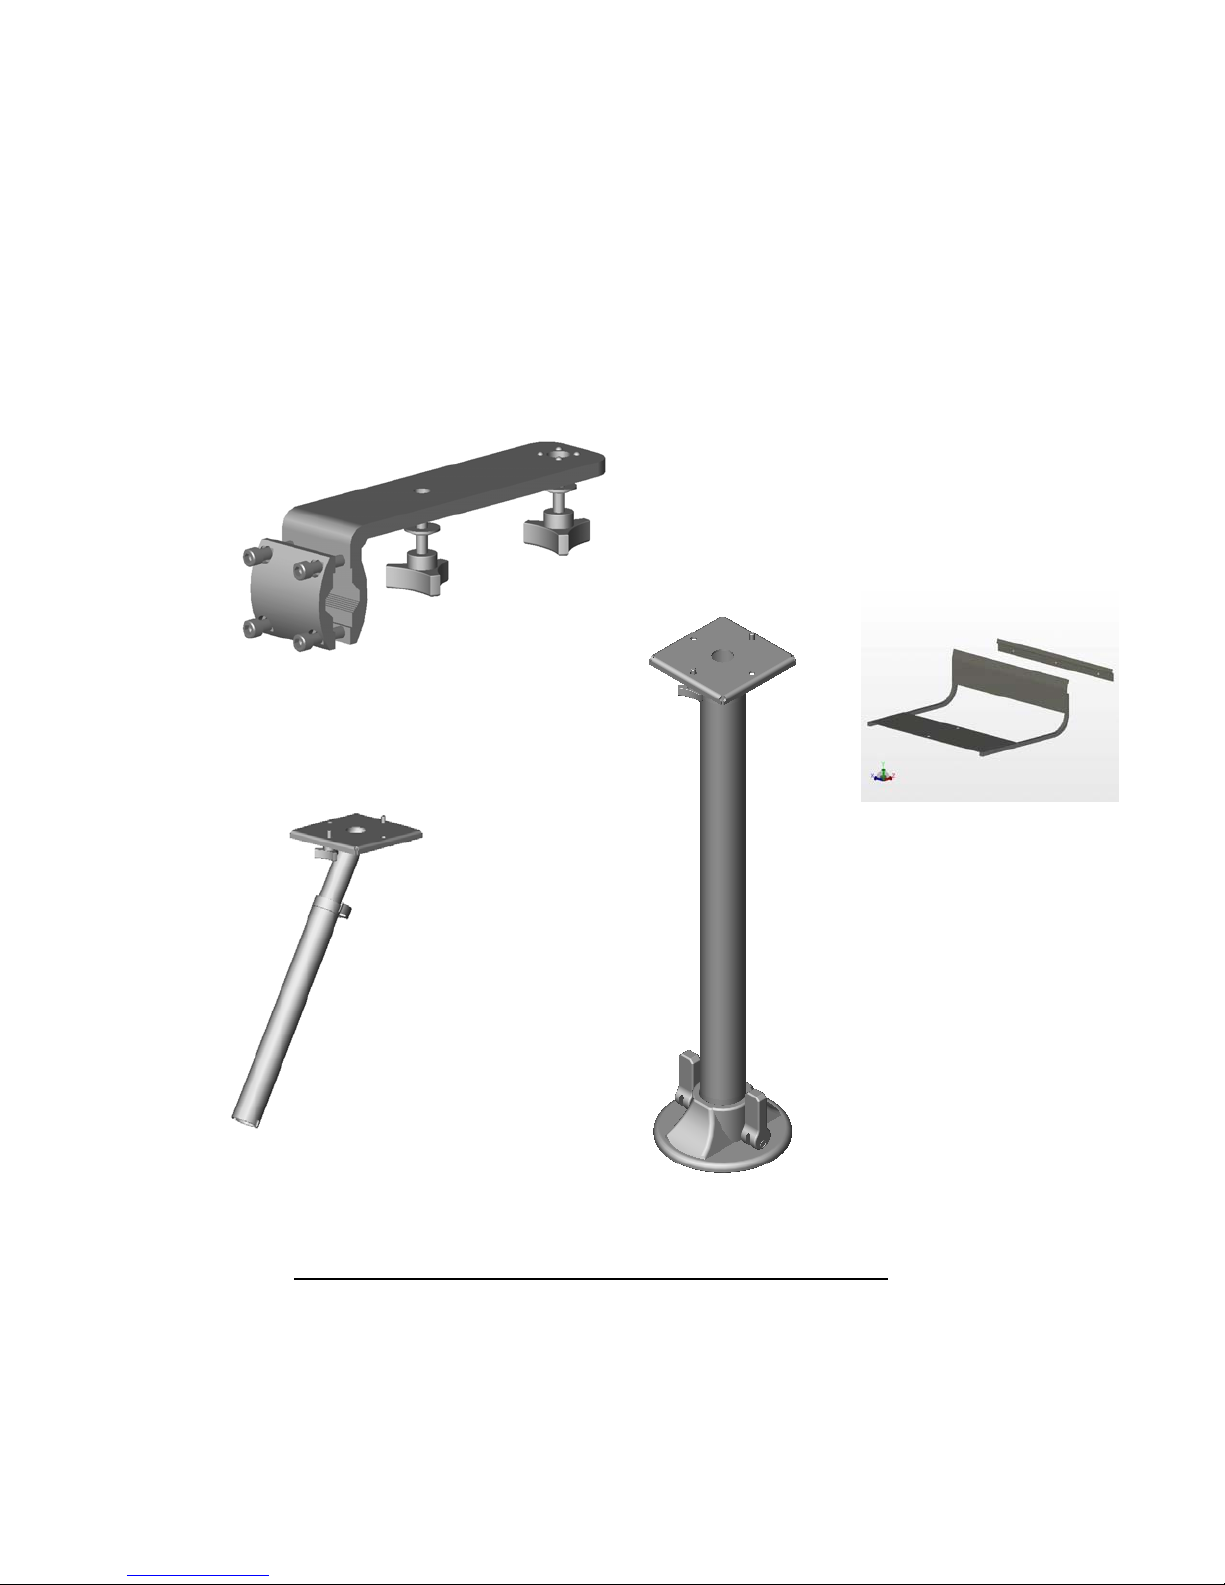
Kuuma Stow N' Go 83705 User manual

Stow N’ Go
PROPANE BARBECUES
OWNER’S MANUAL
Covering Models;
83705 (Charcoal)
83715 (1)
83722 (1)
83735 (1)
83706 (Hybrid)
83790 (Inland Grill)
Read all instructions and warnings before operating.


INTRODUCTION
Thank you for selecting the Stow N’ Go Barbecue, produced by Kuuma Products.
Your unit was carefully inspected and tested at our factory. Please take the time to
read this manual carefully; many of its instructions are essential to the safe operation
of your new propane barbecue.
Because of the continuing refinement of our product designs, your barbecue may
possess features not discussed in the manual. We have tried to supply all the
information you might need, so please take time to read this manual before installing
and using your barbecue. Kuuma Products advises strongly against unauthorized
modification of this product, but we do encourage you to correct problems which may
arise by under-taking the simple repairs and maintenance described in this manual.
Barbecue mounting options are not included.To satisfy your specific mounting application
for your Stow N’ Go barbecue, the mount is sold separately. Please read the “Installation
Instructions” section entitled “Mounting” for more details.
SAFETY
Read all Instructions before operating.
•For outdoor use only.
•Use high pressure propane only.
•Always light BBQ with lid open.
•Do not leave hot BBQ unattended.
•Always turn off Propane after use.
•Any modification of the barbecue may be dangerous.
Caution: The BBQ lid is hot – Do not touch when in use. Open lid with handle only.
If you are missing any parts or have questions regarding assembly,
performance or operation, please contact Kuuma Products

INSTALLATION
Unpacking & Installation
1. Remove all interior packing before use.
2. Verify the burner is positioned with the burner slots vertical.
3. Position the Flavor Plate over top of the burner with the round holes facing the
front. (see item 3 in Diagram (1))
4. Ensure the back tabs on the Cooking Grill are in the holes on the back of the upper
rail. The front of the grill should sit on the front top ledge.
Table top use - This BBQ comes with attached fold down legs.
To use on a table top, unfold the (4) legs located on each corner of the BBQ.
Legs in the up position Legs in the down position
Note: For transport, lock the hinges on each side of the BBQ, fold the legs up (the
legs on the left side of the BBQ secure the grease tray in place) and carry by the
handle.

Mounting Options
In addition to the fold away legs, there are (4) mounting options available for the
Stow N’ Go. (Mounts are sold separately) When using a mounting option, the legs
should be folded up to lock the grease tray in place. Note model 83735(1) requires
two mounts # 83635.
We recommend that you remove the BBQ from the mount and store it while not
in use. Long Periods of Vibration may loosen the BBQ on the mount.
To attach the BBQ to the mount, please follow the instructions included with the
mount. DO NOT LEAVE A HYBRID MODEL MOUNTED WHERE IT CAN
BE EXPOSED TO WATER / MOISTURE / RAIN.
Rail Mount
Part # 83635
For use on 7/8” – 11/4” round horizontal
rails, and 11/4” square rails
30” Pedestal Mount
Part # 83769
60 Degree Rod Holder Mount
Part # 83754
Fits most Cross Pin Rod Holders
RV Mount
Part # 83746

OPERATION
Propane Gas Hook-up
1. This BBQ is set-up for High Pressure Propane. Models with (5) digit model #s
can only be operated in high pressure. Models with (6) digit model #s can be
operated on either. This is called our “Flexfuel” system. To use low pressure
propane with the Flexfuel system, the high pressure regulator must be unthreaded
from the low pressure valve and the supplied 3/8” male flare fitting must be
attached to the valve in the regulators place.
2. When using standard 1 Lb disposable propane canisters, ensure the regulator is in
the off position prior to fastening the canister. Take caution not to cross thread.
3. When using a propane supply already on board, the BBQ can be hooked up prior
to the regulator, as the barbecue has its own regulator valve assembly, direct from
the box. If you wish to hook up on the low pressure side of your system’s
regulator, and your bbq is equipped with the Flexfuel system, then the high
pressure regulator must be unthreaded from the low pressure valve and the
supplied 3/8” male flare fitting must be attached to the valve in the regulators
place. DO NOT DOUBLE REGULATE.
4. Check for leaks prior to use.
5. The disposable propane canister must not be more than 45 degrees off vertical
6. Store and use the barbecue in a well ventilated area. Do not store with Propane
bottle attached.
7. Do not store fuel tanks in direct sunlight, indoors, or in temperatures over 120 °F.
8. Shut off connections at tank supply when barbecue is not in use.
Lighting
Now that your barbecue has been connected to a propane supply you are ready to light
it.
1. Never operate your Barbecue indoors. Use only in a well ventilated area.
2. Make sure the regulator is in the off position.
3. Open lid.
4. Push and turn the regulator counter-clockwise to the high setting.
5. Light the BBQ with a Butane lighter using the lighting holes located either on the
right hand side of the heat plate or on the left side of the BBQ.
6. Visually confirm burner is lit by looking through the front of the BBQ.
7. Adjust heat setting.
8. To shut off, turn knob clockwise to the Lock-Off position.
Note: If burner does not light after (10) seconds, turn valve to off position and wait
(5) minutes before repeating.

Cooking
1. Do not overheat BBQ. This BBQ does not require pre-heating when operating on
gas.
2. Do not cook on the high setting with the lid closed.
Tip: You can add extra flavor to your meals by putting some hickory or cherry wood
chips on your heat plate. Place pre-soaked wood chips directly into the cavity in the
middle of the Flavor Plate. Use Caution when using as a smoker.
Hybrid Model 83706 – Running on Electricity
This model can be run on 120V electricity as well. Do not operate on electricity
and propane at the same time. To operate with electricity, simply hook the power
cord to the receptacle on the bbq and then into a 120V outlet. For the most part, you
will operate on high only. Preheat in this mode (electric) takes up to 15 minutes.
DO NOT LEAVE A HYBRID MODEL MOUNTED WHERE IT CAN BE
EXPOSED TO WATER / MOISTURE / RAIN. THIS WILL DAMAGE THE
UNIT. DO NOT OPERATE IN RAIN OR DAMPNESS. DO NOT STAND IN
WATER WHILE ATTEMPTING TO OPERATE.
Lock the lid securely with the latches when the BBQ is not in use.
Adjustments
There is an air adjustment that can be made on the BBQ to optimize performance
There are two air adjustment locations on the Stow N’ Go BBQ.
The external air baffle is located on the regulator housing on the right side of the
BBQ. When cooking in windy conditions, slide the baffle forward to reduce the cross
wind effect on the orifice.
There is a primary air shutter located on the far end of the burner in the regulator
housing. (Shown below) This air shutter adjusts the flame quality of the burner.
3mm to
4.5mm
The burner flame should be mostly blue with yellow tips. If the flame is completely
blue with a wild flame, the opening at air shutter needs to be reduced. (Do not
completely close this opening) If the flame is yellow, the opening needs to be made
larger.
Ad
j
ustment Screw

Regulator (models with 5 digit model #s only)
The regulator pressure may be set too low and you may have to reset it. Remove the
silver label in the center of the regulator (where it says “Push to Turn”). By turning
the Phillips head or 3/32 hex screw found below this label, you can increase or
decrease the gas flow. Clockwise increases the gas flow, and counterclockwise
decreases the gas flow.
CAUTION: You can increase the gas flow too much and the gas will not shut off.
Check this carefully after each adjustment.
CLEANING & MAINTENANCE
Cleaning
Stainless Steel exposed to high heat will change color over time. Discoloration of
components does not affect the operation or performance of the BBQ. The exterior of
the BBQ can be cleaned with soapy water. We recommend covering the grill between
uses. Clean the grease from the Grease Tray on a regular basis. Lining this tray with
tin foil is a great idea! Clean the heat plate on a regular basis. Build up of grease and
food particles can cause flare-ups or poor heat disbursement.
NOTE – The model 83790 is an INLAND GRILL and the stainless is not
manufactured for existence in a salt air environment.
DO NOT LEAVE A HYBRID MODEL MOUNTED WHERE IT CAN BE
EXPOSED TO WATER / MOISTURE / RAIN. THIS WILL DAMAGE THE
UNIT.
Maintenance
The following procedure will allow for the removal of the Burner Tube and Regulator
for cleaning or replacement.
Burner
The burner can be removed from the Barbecue by removing the machine screw
connecting the burner to the left side of the barbecue and sliding it out.
Regulator
1. Remove the barbecue’s burner, described above.
2. The orifice is located at the entrance to the burner. It is a brass fitting with a fine
hole that controls the maximum amount of gas to enter the burner.
3. Remove the orifice from the barbecue using an 11/16” (17mm) wrench.
4. Do not lose the spring washer that goes between the orifice and the regulator
housing. Observe the orientation of this washer for proper re-installation.
Ad
j
ustment screw

ASSEMBLY DIAGRAM
1. Lid assembly
2. Cooking Grill
3. Heat plate
4. Burner
5. Bottom Assembly
6. Regulator
Shown as standard
High pressure set up
Not the Flexfuel
system
7. Grease tray
Note – some models
The grease tray
slides out the front
Diagram 1
1
2
3
4
5
6
7

TROUBLE SHOOTING GUIDE
PROBLEM CAUSE Solution______________
BBQ will not light No Gas Flow Check Propane Bottle
Obstruction Remove and clean orifice and
burner tube
Bad Regulator Replace Regulator
BBQ Blows out Low Flame Increase flame
Strong wind Close down Air Adjustments
Regulator out of specification Adjust Regulator
Flare-up Grease build-up on Flavor Plate Clean Flavor plate
Un-even heat disbursement Flavor Plate is not installed Install Flavor Plate
BBQ is not level Mount BBQ on a level surface
ACCESSORIES
(Sold separately)
GENERAL
ACCESSORIES
83751
cast iron
griddle
Stow & Go - Model 83722 & 83790
83176 Tote Bag - Black....................................................................................…
83245 Food Tray……………………………………………………………..
83111 Cover…………………………………………………………………..
83908 Heat Plate……………………………………………………………..
83907 Burner………………………………………………………………….
83905 Cook Rack…………………………………………………………….
83906 Grease Tray……………………………………………………………
83912 Regulator……standard_…………………………………………………………

Stow & Go 125 - Model 83715
83176 Tote Bag - Black....................................................................................…
83245 Food Tray……………………………………………………………..
83110 Cover…………………………………………………………………..
16211 Heat Plate……………………………………………………………..
83957 Burner………………………………………………………………….
16213 Cook Rack…………………………………………………………….
16221 Grease Tray……………………………………………………………
83912 Regulator……standard…………………………………………………………
Stow & Go 225 - Model 83735
83246 Food Tray……………………………………………………………..
83310 Cover bbq only………………………………………………………………..
83112 Cover bbq with side burner………………………………………….
16428 Heat Plate……………………………………………………………..
171561 Burner………………………………………………………………….
171504 Cook Rack…………………………………………………………….
16410 Grease Tray……………………………………………………………
83912 Regulator……standard…………………………………………………………
83115 Side burner……………………………………………………………
83116 accessory drink holder……………………………………………….
Hybrid Model - Model 83706
83176 Tote Bag - Black....................................................................................…
83245 Food Tray……………………………………………………………..
83111 Cover…………………………………………………………………..
83119 Cook Rack - gas version…………………………………………………….
Stow & Go Charcoal - Model 83705
83176 Tote Bag - Black................................................................................…
83245 Food Tray……………………………………………………………..
83111 Cover…………………………………………………………………..
83905 Cook Rack…………………………………………………………….

SPECIFICATIONS
Model # 83715 83722 & 83790 83735 83705 83706
BTU Rating 8500 13,000 14000 charcoal 13000 / elec
Cooking 125 sq in. 160sq. in. 225 sq. in. 145 sq. in 160 sq. in.
Surface
Warranty (1) Year (1) Year (1) Year (1) Year (1) Year
Limited Warranty
Kuuma Products warranties this propane barbeque to the original consumer to be free
from defective material(s) and workmanship while under normal use and service for a
period of (1) year.
During the warranty period, Kuuma Products will, at its option and without charge,
repair and/or replace but not remove or re-install the faulty product.
The purchaser will return defective products to the address stated below. No product
will be accepted by Kuuma Products without a Return Authorization Number. Return
of defective products must be accompanied by written details of the problems and
proof of purchase.
The buyer shall be responsible for shipping and insurance charges, if any, on the
products returned for repair under the terms of this warranty. Kuuma Products will
pay shipping of products returned to the buyer.
This limited warranty applies only to products that have been installed and used in
accordance to printed instructions of Kuuma Products and does not cover improper
use, vandalism, negligence or accidents.
This manual suits for next models
5
Table of contents
Other Kuuma Grill manuals
Popular Grill manuals by other brands

Gasmate
Gasmate GM142-157 Installation, operation and maintenance instructions

Napoleon
Napoleon PRESTIGE P500-3 Quick assembly guide

Fiesta
Fiesta Express Classic EA34540 manual

Matador
Matador MAVERICK user manual

Avantco Equipment
Avantco Equipment 177RG1830RC user manual

Coleman
Coleman RoadTrip 9941-765 instructions