Kvaser BlackBird SemiPro HS/HS User manual

Kvaser BlackBird Getting Started Guide
Copyright 2007-2014 Kvaser AB, Mölndal, Sweden
http://www.kvaser.com
Printed Thursday 20th March, 2014
We believe that the information contained herein was accurate in all respects at the time of printing.
Kvaser AB cannot, however, assume any responsibility for errors or omissions in this text. Also note
that the information in this document is subject to change without notice and should not be construed
as a commitment by Kvaser AB.

Kvaser BlackBird Getting Started Guide 2 (47)
Contents
1 About this manual 4
2 Installation summary 5
3 Driver installation 6
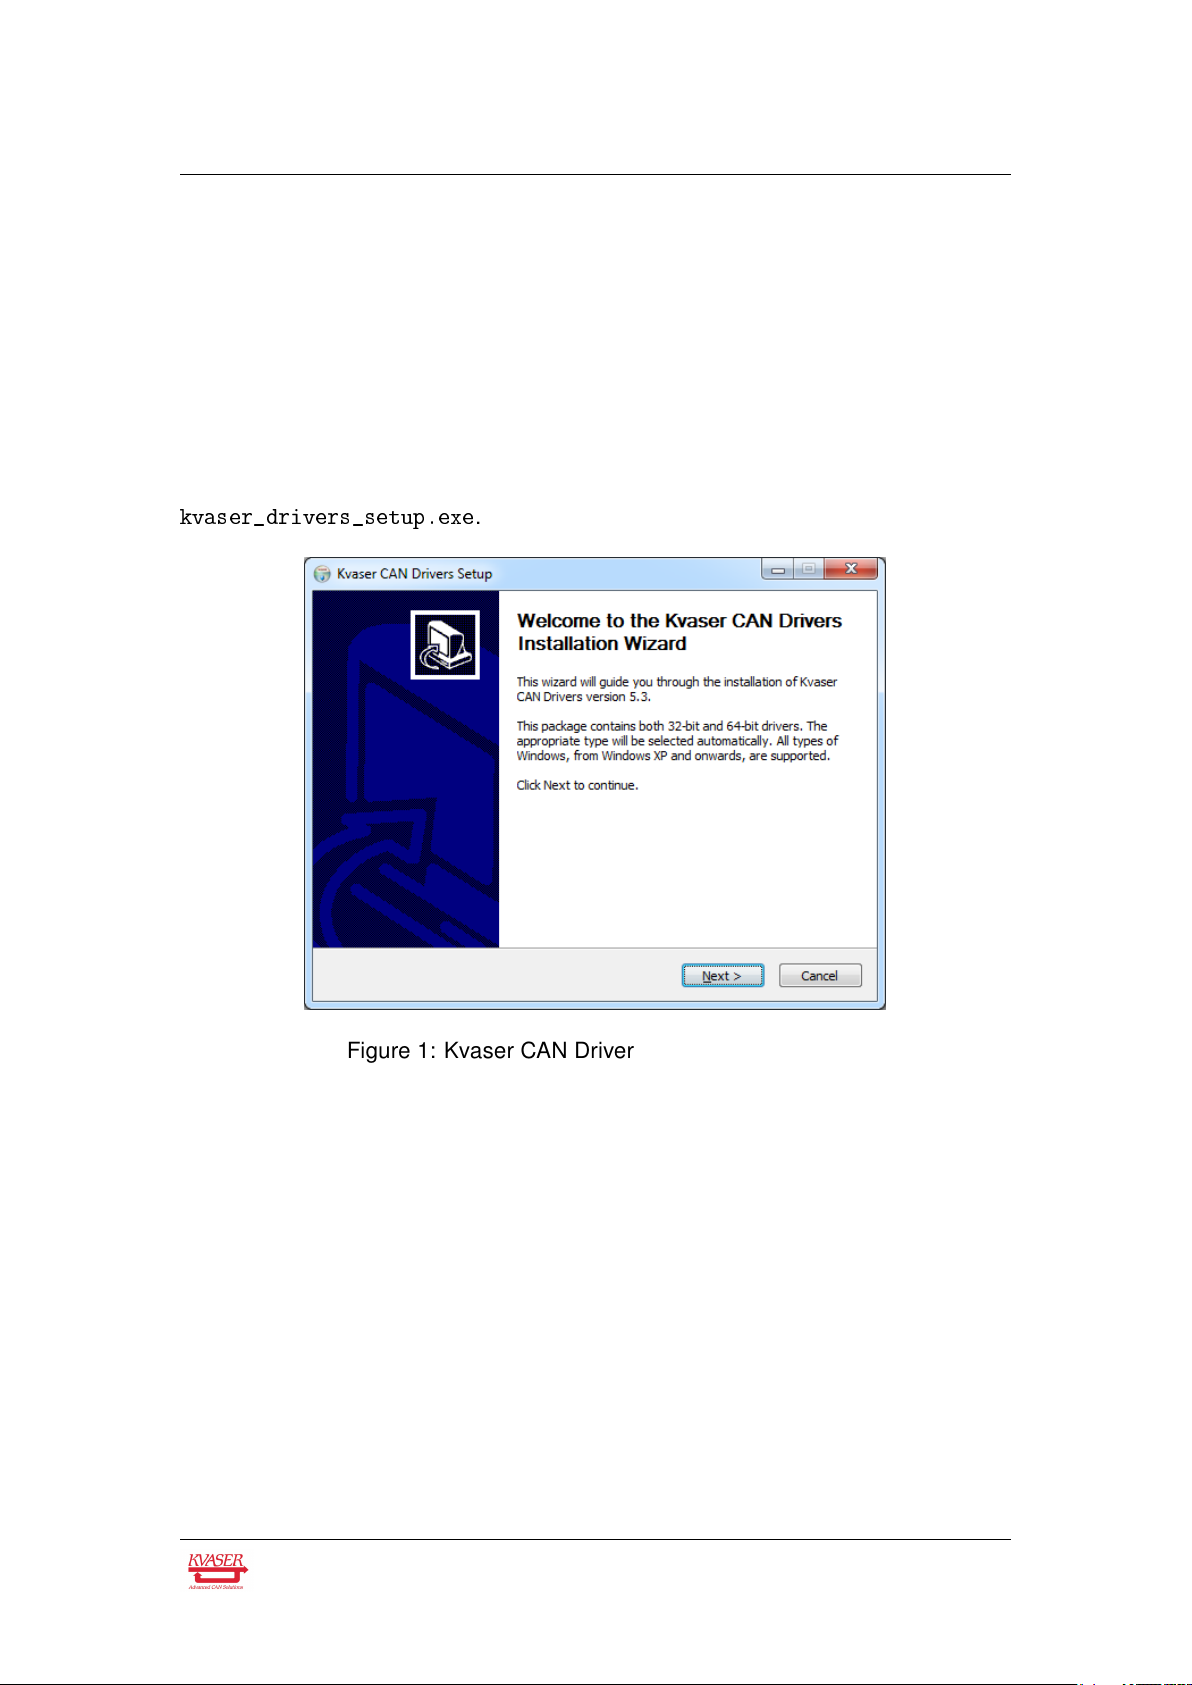
3.1 Installing the drivers . . . . . . . . . . . . . . . . . . . . . . . . . . . 6
3.2 Verifying driver installation . . . . . . . . . . . . . . . . . . . . . . . 6
4 Network operational modes 8
4.1 Ad-hoc mode . . . . . . . . . . . . . . . . . . . . . . . . . . . . . . 8
4.2 Infrasctructure mode . . . . . . . . . . . . . . . . . . . . . . . . . . 9
4.3 Wireless hosted network . . . . . . . . . . . . . . . . . . . . . . . . 10
5 Configuring the Kvaser BlackBird 11
5.1 Starting the configuration program . . . . . . . . . . . . . . . . . . . 11
5.2 Identifying your Kvaser BlackBird . . . . . . . . . . . . . . . . . . . . 11
5.3 Selecting WLAN network . . . . . . . . . . . . . . . . . . . . . . . . 13
5.4 Setting WLAN keys and security . . . . . . . . . . . . . . . . . . . . 16
5.5 Network setup and device name . . . . . . . . . . . . . . . . . . . . 19
5.6 Setting device accessibility . . . . . . . . . . . . . . . . . . . . . . . 21
5.7 Save the configuration . . . . . . . . . . . . . . . . . . . . . . . . . 22
5.8 Verifying the WLAN connection . . . . . . . . . . . . . . . . . . . . . 22
5.9 Supplying external power to the device . . . . . . . . . . . . . . . . . 25
6 Selecting the device from the network 26
6.1 Starting the Kvaser Network Device Selector . . . . . . . . . . . . . 26
6.2 Selecting the device you want to use . . . . . . . . . . . . . . . . . . 26
6.3 Finding new hardware . . . . . . . . . . . . . . . . . . . . . . . . . . 28
6.4 Verifying connection status . . . . . . . . . . . . . . . . . . . . . . . 28
7 Using Kvaser BlackBird from your software 30
8 Configuring host computer 31
8.1 Setting static IP on your computer . . . . . . . . . . . . . . . . . . . 31
8.2 Setting up Wireless Hosted Network on your computer . . . . . . . . 32
8.3 Setting up an ad-hoc network on your computer . . . . . . . . . . . . 36
8.4 Connecting your computer to the ad-hoc network . . . . . . . . . . . 38
9 Troubleshooting 39
9.1 Check the LEDs . . . . . . . . . . . . . . . . . . . . . . . . . . . . . 39
9.2 Check connected status . . . . . . . . . . . . . . . . . . . . . . . . . 39
9.3 Check signal strength . . . . . . . . . . . . . . . . . . . . . . . . . . 39
9.4 Check WLAN security settings . . . . . . . . . . . . . . . . . . . . . 40
Kvaser AB, Mölndal, Sweden — www.kvaser.com

Kvaser BlackBird Getting Started Guide 3 (47)
9.5 Scan for networks . . . . . . . . . . . . . . . . . . . . . . . . . . . . 40
9.6 Check IP number and network mask . . . . . . . . . . . . . . . . . . 40
9.7 Check that your computer and Kvaser BlackBird recognize each other
(ad-hoc mode) . . . . . . . . . . . . . . . . . . . . . . . . . . . . . . 40
9.8 Check channel number when using ad-hoc mode . . . . . . . . . . . 41
9.9 Check the WLAN link with the ping command . . . . . . . . . . . . . 41
9.10 Connect to the built-in web server . . . . . . . . . . . . . . . . . . . 43
9.11 Scan for Kvaser BlackBirds . . . . . . . . . . . . . . . . . . . . . . . 44
9.12 Add the device manually . . . . . . . . . . . . . . . . . . . . . . . . 44
9.13 Service status indications . . . . . . . . . . . . . . . . . . . . . . . . 45
9.14 Disconnect USB cable . . . . . . . . . . . . . . . . . . . . . . . . . 45
9.15 Scanning will not detect devices on other IP networks . . . . . . . . . 45
9.16 Restart the service . . . . . . . . . . . . . . . . . . . . . . . . . . . 45
9.17 Check your firewall . . . . . . . . . . . . . . . . . . . . . . . . . . . 45
9.18 Check for other programs running . . . . . . . . . . . . . . . . . . . 46
10 Version history 47
Kvaser AB, Mölndal, Sweden — www.kvaser.com

Kvaser BlackBird Getting Started Guide 4 (47)
1 About this manual
This manual is intended for Kvaser BlackBird users. It contains a description of the
setup programs and detailed instructions of how to connect the device to a wireless
network. Basic knowledge about TCP/IP networks is assumed.
This manual applies to Kvaser BlackBird devices listed in Table 1.
Device Product Number
Kvaser BlackBird SemiPro HS 73-30130-00441-2
Kvaser BlackBird SemiPro HS OBDII 73-30130-00629-4
Kvaser BlackBird SemiPro HS/HS 73-30130-00453-5
Kvaser BlackBird SemiPro 3xHS 73-30130-00446-7
Kvaser BlackBird v2 73-30130-00671-3
Kvaser BlackBird v2 OBDII 73-30130-00675-1
Table 1: Kvaser BlackBird devices and their EAN numbers
Throughout this document, we use the name Kvaser BlackBird to mean any one of
the different Kvaser BlackBird products listed in Table 1, unless otherwise noted.
Kvaser AB, Mölndal, Sweden — www.kvaser.com

Kvaser BlackBird Getting Started Guide 5 (47)
2 Installation summary
This chapter summarizes the installation and setup steps, connecting to the device
in infrastructure mode. You will find detailed information about the different steps in
the following chapters.
1. Install the driver package (Chapter 3.1, Installing the drivers, on Page 6)
2. Connect your Kvaser BlackBird to the computer via the USB cable.
3. Start the parameter setting program (Chapter 5.1, Starting the configuration
program, on Page 11) and configure at a minimum:
(a) The network name(Chapter 5.3, Selecting WLAN network, on Page 13)
(b) The network passphrase (Chapter 5.4, Setting WLAN keys and
security, on Page 16)
(c) Decide whether to use DHCP or a static IP number (Chapter 5.5,
Network setup and device name, on Page 19)
4. Save the configuration (Chapter 5.7, Save the configuration, on Page 22).
5. Verify that the WLAN connection works (Chapter 5.8, Verifying the WLAN
connection, on Page 22).
6. Disconnect the USB cable and supply external power to the Kvaser
BlackBird (Chapter 5.9, Supplying external power to the device, on Page 25).
7. Check the LED indicators (Chapter 9.1, Check the LEDs, on Page 39).
8. Start the Kvaser Network Device Selector program (Chapter 6.1, Starting the
Kvaser Network Device Selector, on Page 26).
9. Connect to the device (Chapter 6.2, Selecting the device you want to use, on
Page 26).
10. The new remote CAN device should now be visible in Kvaser Hardware
(Chapter 7, Using Kvaser BlackBird from your software, on Page 30).
Kvaser AB, Mölndal, Sweden — www.kvaser.com

Kvaser BlackBird Getting Started Guide 6 (47)
3 Driver installation
Please visit http://www.kvaser.com/download/ to download the latest versions of
drivers, software and documentation.
3.1 Installing the drivers
Install version 5.2 or later of the Kvaser CAN drivers by running
kvaser_drivers_setup.exe
.
Figure 1: Kvaser CAN Drivers Installation Wizard.
After installing the drivers, plug in your Kvaser BlackBird into a free USB port on
your computer.
The “Found New Hardware” wizard in Windows will now start. Complete it as usual.
3.2 Verifying driver installation
Check that the Kvaser BlackBird is connected via the USB cable to the computer.
Go to the Control Panel and start Kvaser Hardware, it is located under “Hardware
and Sound”, see Figure 2 on Page 7.
Your Kvaser BlackBird should be visible in the list of devices, see Figure 3 on
Page 7.
Kvaser AB, Mölndal, Sweden — www.kvaser.com

Kvaser BlackBird Getting Started Guide 8 (47)
4 Network operational modes
The Kvaser BlackBird is normally connected to a computer via an access point
(AP), this is referred to as infrastructure mode. The Kvaser BlackBird may also be
connected directly to a computer using either ad-hoc mode or the “Wireless Hosted
Network” feature of the computer.
Windows 8 no longer support ad-hoc mode, instead use the
replacement (introduced in Windows 7) called “Wireless Hosted
Network”. In this mode, you configure the Kvaser BlackBird in the
same way as for infrastructure mode.
4.1 Ad-hoc mode
Ad-hoc mode is not supported in Windows 8 and later. It’s successor, called
“Wireless hosted network” or “virualization”, is supported from windows 7. See
Chapter 4.3, Wireless hosted network, on Page 10 for more information.
In ad-hoc mode, you are connecting the Kvaser BlackBird directly to a computer.
Therefore, you must assign static IP addresses to the Kvaser BlackBird and to the
computer.
Figure 4: Ad-hoc mode.
Kvaser AB, Mölndal, Sweden — www.kvaser.com

Kvaser BlackBird Getting Started Guide 9 (47)
If you are going to use ad-hoc mode, you should read Chapter 8, Configuring host
computer, on Page 31 and configure your computer before continuing.
Ad-hoc mode is limited to a maximum speed of 11 Mbit/s (maximum speed
required by the IEEE 802.11 standard for ad-hoc mode). Still, 11 Mbit/s is likely
enough for most real-world one-way CAN traffic, as long as you are reasonably
alone on the channel and there is not too much radio interference.
Note that most network cards only support WEP-64 and
WEP-128 encryption in ad-hoc mode.
4.2 Infrasctructure mode
If you are using an AP (Access Point), you should connect the Kvaser BlackBird in
infrastructure mode.
Figure 5: Infrastructure mode.
In this case, your network probably has a DHCP server running. If your network
does not have a DHCP server, you will need to assign a static IP address to your
Kvaser AB, Mölndal, Sweden — www.kvaser.com

Kvaser BlackBird Getting Started Guide 10 (47)
Kvaser BlackBird. You should consult with your network manager to determine
what IP address and Subnet mask should be used.
4.3 Wireless hosted network
When using Wireless hosted networks, your computer is simulating an Access
Point so others can connect to it using Infrastructure mode even though you are
connecting directly to the computer.
Figure 6: Direct connection using Wireless hosted network.
If you are using the “Wireless Hosted Network”, you should connect the Kvaser
BlackBird in infrastructure mode.
In this case, your computer probably does not have a DHCP server running and
you will need to assign your Kvaser BlackBird a static IP address.
See Chapter 8.2, Setting up Wireless Hosted Network on your computer, on
Page 32 for more information.
Kvaser AB, Mölndal, Sweden — www.kvaser.com

Kvaser BlackBird Getting Started Guide 11 (47)
5 Configuring the Kvaser BlackBird
Check that your Kvaser BlackBird is connected via the USB cable to your computer
and start the configuration program.
5.1 Starting the configuration program
Start the Kvaser Hardware program and go to the Tools tab, see Figure 7.
Figure 7: The Tools tab in Kvaser Hardware.
Press the “Setup button...” in the “Setup a Kvaser BlackBird” box. This will start the
Kvaser Wireless Configuration program used to configure the Kvaser BlackBird. All
configuration changes will be saved in the device’s flash memory.
5.2 Identifying your Kvaser BlackBird
When you start Kvaser Wireless Configuration, you will be presented with a list of
found devices, see Figure 8 on Page 12.
Select your device in the list and click Next.
If you have more than one Kvaser BlackBird in the list, you can identify a specific
unit by the serial number that is printed on the back of the unit. You can also
Kvaser AB, Mölndal, Sweden — www.kvaser.com

Kvaser BlackBird Getting Started Guide 12 (47)
Figure 8: Kvaser Wireless Configuration starting up.
identify a Kvaser BlackBird by right- clicking on it in the list and selecting “Locate
Hardware (Flash LEDs)”. The LEDs on the selected device will now flash
momentarily.
If your device does not show up in the list of devices, make sure you have
connected the unit properly to your USB port. Check that you have installed the
drivers and that the Kvaser BlackBird is recognised by the Kvaser Hardware
program as described in Chapter 3.2, Verifying driver installation, on Page 6.
The first time you connect to the device, the message shown in Figure 9.
Figure 9: The device parameters are initially blank.
Your Kvaser BlackBird ships without any passwords set. (If you decide to set a
password, you will be asked for it next time you connect to the device. In that case,
enter the password and click Finish.) For more information about setting a device
password, see Chapter 5.6, Setting device accessibility, on Page 21
Kvaser AB, Mölndal, Sweden — www.kvaser.com

Kvaser BlackBird Getting Started Guide 13 (47)
Once you have connected the Kvaser BlackBird to the computer and started
Kvaser Wireless Configuration, you will be shown the Status tab, see Figure 10 on
Page 13. If you have not configured a connection, the display will show Connection
Status as Not Connected.
Figure 10: Status tab in Kvaser Wireless Configuration.
5.3 Selecting WLAN network
You will now enter the name of the WLAN network you are connecting the Kvaser
BlackBird to. Go to the Configuration tab, see Figure 11 on Page 14.
Make sure that Geographical Region is set to the correct value. This field ensures
that the antenna power and available channels are set according to the specified
regulatory domain.
The built in Network Browser provides the easiest way to connect to a network.
When using ad-hoc mode, make sure you have performed the setup steps
described in Chapter 8, Configuring host computer, on Page 31. Press the Browse
Networks button.
Kvaser AB, Mölndal, Sweden — www.kvaser.com

Kvaser BlackBird Getting Started Guide 15 (47)
5.3.1 Currently available networks
This window accumulates all visible networks, see Figure 12 on Page 15. To clear
the list of obsolete networks, you must close this window and then re-open it.
Whenever a network is detected its signal strength is shown next to the network’s
name. In order to get a stable connection, the signal strength should be better than
−70 dBm (as a rule of thumb, −70 dBm is weak, −60 dBm is fair, −50 dBm is good,
and −40 dBm is strong).
Figure 12: Availible networks in Kvaser Wireless Configuration.
Wait for your network to show up among the Currently Available Networks. The
scanning process can take a little while, so please be patient. When you select the
network you would like to connect to, more detailed information about the network
is shown in the right pane.
When using ad-hoc mode, make sure the computer is still connected (i.e. a
time-out has not disconnected the computer from the network).
Once the desired network is selected, click “Select” and you will be informed that
some network specific settings will be copied to your configuration setting. The
copied settings include the SSID value, the Operational Mode, and the Encryption
Mode. The “Search All Channels” will also be enabled. Click OK to allow the
copying of these values.
Kvaser AB, Mölndal, Sweden — www.kvaser.com

Kvaser BlackBird Getting Started Guide 16 (47)
5.3.2 Multiple APs in a network
You will notice that the same network is listed more than once if you have multiple
APs within range. You can identify a specific AP on a network by selecting the
network and noting the MAC Address shown in the right pane. Multiple APs within
a single network may also use different channels. The current channel is also
shown in the right pane.
Normally you will be connected to the AP with the strongest signal strength within a
given network. You may override this by manually selecting which channel to use
on the Configuration Tab.
5.4 Setting WLAN keys and security
On the Configuration tab you now have a valid SSID, a correct Operational Mode
and Channel setting. In order to connect, you also need to specify the Encryption
key used by the network. This is done on the Security tab.
Figure 13: Security tab in Kvaser Wireless Configuration.
Kvaser AB, Mölndal, Sweden — www.kvaser.com

Kvaser BlackBird Getting Started Guide 17 (47)
The Encryption mode is already copied when you selected the network, but you
can here specify one of the following Encryption modes:
•Open, or "plain text"
•WEP (64-bit)
•WEP (128-bit)
•WPA with PSK (Pre-shared key) and TKIP encryption
•WPA2 with PSK (Pre-shared key) and AES encryption
If you choose an encryption mode other than Open, you should also use the
“Passphrase...” button to generate the encryption keys used. When using WEP,
you should also specify the Authentication algorithm used. If you don’t know what
encryption mode to select, please read the following sections or ask your network
manager.
You may also override the Group and Pairwise Encryptions used (TKIP or AES).
Encryption keys will, for security reasons, never be read from the
device, so these fields will be empty whenever you connect to a
device, regardless of if they are set or not.
5.4.1 Open, or "plain text"
This Encryption mode means that all data is transferred unencrypted. This is only
recommended for initial setup or debugging connection issues.
5.4.2 WEP-64 or WEP-128
When using WEP-64, you must provide a 40-bit-key in hexadecimal format (i.e. 10
hexadecimal digits). For WEP-128 you need a 104-bit-key. There is room for up to
4 keys to be entered. You may also use a passphrase to generate the WEP keys,
see Chapter 5.4.6, Using passphrase to generate keys, on Page 18. Use the radio
buttons to the left of the keys to select the key that will be used.
5.4.3 About static WEP keys
Some rules for setting up WEP:
•The Kvaser BlackBird must have one of the WEP keys specified on the AP in
order to decode data sent from the AP to the Kvaser BlackBird.
Kvaser AB, Mölndal, Sweden — www.kvaser.com

Kvaser BlackBird Getting Started Guide 18 (47)
•The AP must have all of the Kvaser BlackBird’s keys so the AP can decode
transmissions from the Kvaser BlackBird to the AP.
•The key must occupy the same slot on all nodes (AP and Kvaser
BlackBirds). For example, if the AP defines abc123 as WEP key number 3,
then the Kvaser BlackBirds must define that same string as WEP key 3.
5.4.4 Authentication algorithm
When using WEP encryption, you can choose the Authentication algorithm:
•Open system means any station may connect to the AP whether that client
station has the correct WEP key or not. This algorithm is also used in WPA
and WPA2 encryption modes.
•Shared key authentication requires the client station to have the correct WEP
key in order to associate with the access point.
Even though a client station is allowed to associate with an access point, this does
not ensure the client can exchange traffic with that access point. A station must
have the correct WEP key in order to successfully access and decrypt data from an
access point, and to transmit readable data to the access point.
5.4.5 WPA-PSK or WPA2-PSK
Both WPA and WPA2 use Pre-Shared Keys (PSK). WPA-PSK uses the Temporal
Key Integrity Protocol (TKIP). WPA2-PSK uses Counter mode/CBC-MAC Protocol
which uses the Advanced Encryption Algorithm (AES).
5.4.6 Using passphrase to generate keys
Instead of entering the security keys in hexadecimal format, you may use a
Passphrase. Click on the Passphrase button and a Generate keys window will
open, see Figure 14 on Page 19. This window will allow you to enter a pass phrase
and select which types of keys you would like to generate.
For WPA-PSK and WPA2-PSK encryption modes, the key generation is based
upon the network SSID, so make sure that the correct network name is entered in
the SSID field.
Kvaser AB, Mölndal, Sweden — www.kvaser.com

Kvaser BlackBird Getting Started Guide 19 (47)
Figure 14: Generating network keys.
5.5 Network setup and device name
We should now configure an appropriate Device name and choose an address
assignment method. This is done under the Network tab, see Figure 15 on
Page 20.
If you are not sure about your network’s configuration, check with your network
manager. In infrastructure mode, the default selection of DHCP (automatic IP
address assignment) will be the desired selection. If your network requires a static
IP address, you will need to manually enter the IP address, network mask, and
gateway IP address. When using static IP, see Chapter 8.1, Setting static IP on
your computer, on Page 31 for details on how to set a static IP on your computer.
In the Device Name box, you can enter a descriptive name of the device. This
name will be visible when you browse the network using the tool described in
Chapter 6, Selecting the device from the network, on Page 26.
Clicking on the Apply or Ok button will save the configuration to your Kvaser
BlackBird and restart it. You may edit more than one tab before clicking Apply/Ok.
Kvaser AB, Mölndal, Sweden — www.kvaser.com
This manual suits for next models
5
Table of contents
Other Kvaser Adapter manuals
Popular Adapter manuals by other brands

QNAP
QNAP QDA-A2AR user guide

SMC Networks
SMC Networks SMCWPCIT-G Specifications

ZyXEL Communications
ZyXEL Communications ZyXEL ZyAIR G-260 quick start guide

Allen-Bradley
Allen-Bradley 140G Series quick start guide

ZyXEL Communications
ZyXEL Communications N220 - V1.0 manual

Digitus
Digitus DN-7045 Quick installation guide