KYMCO VISA R 110 User manual

1
TABLE OF CONTENTS
SECTION 1 –FORWARD & SAFETY INTRODUCTION ...............2 - 6
IMPORTANT SAFETY INFORMATION........................................................ 3
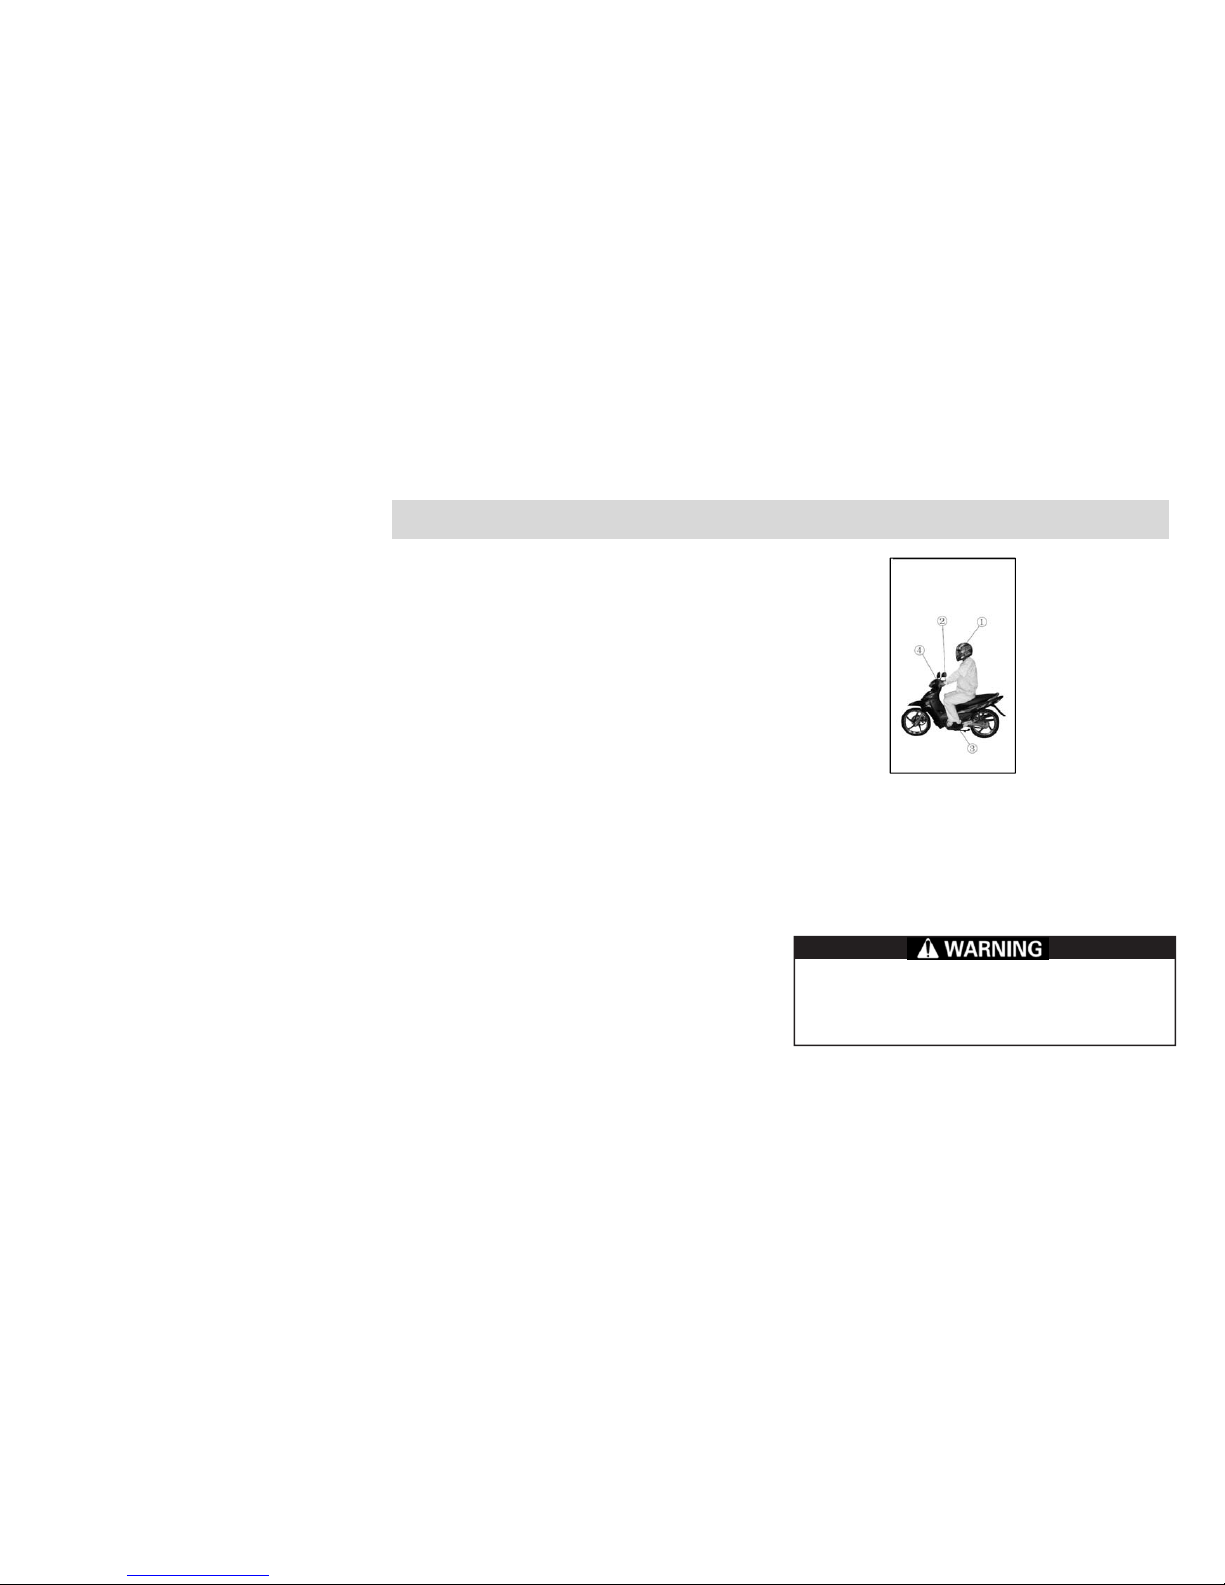
PROTECTIVE APPAREL.........................................................................4 - 6
SECTION 2 - CONTROLS & FEATURES............................. 7 - 15
LOCATION OF PARTS & CONTROLS....................................................7 - 8
IGNITION SWITCH/STEERING&HANDLEBAR LOCK................................. 9
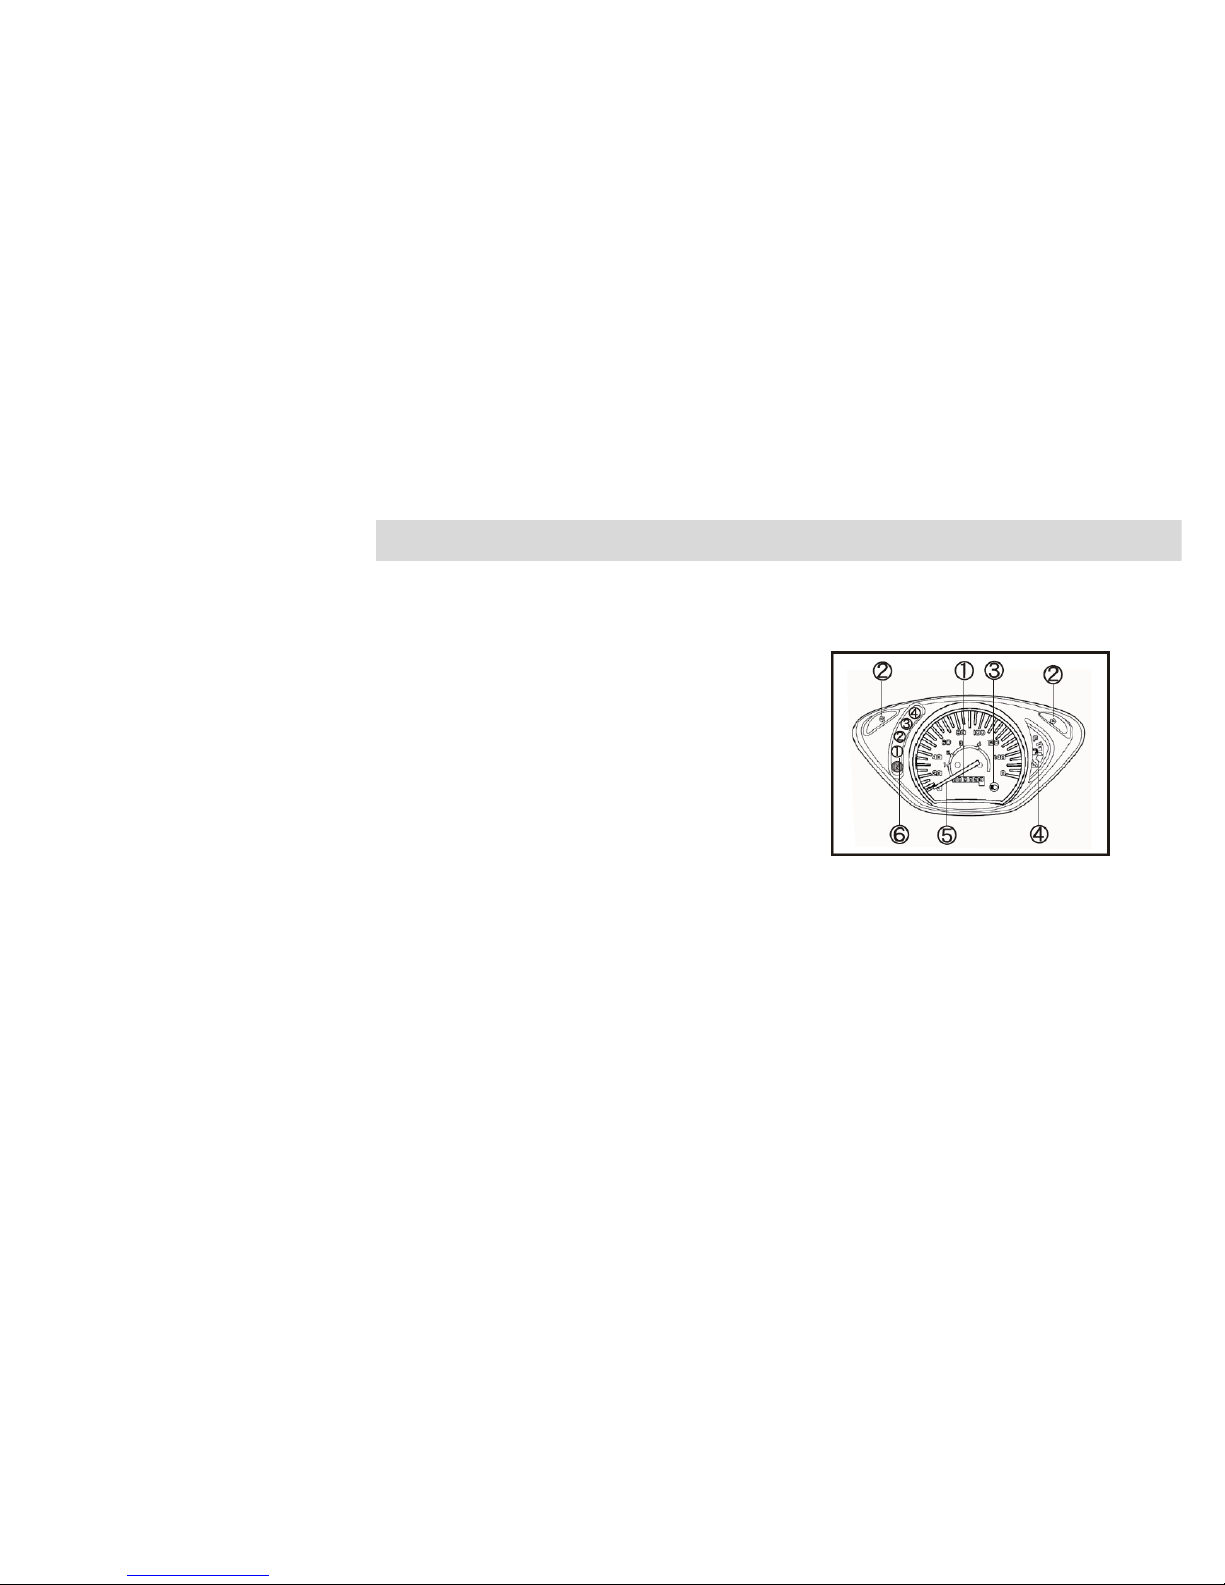
INSTRUMENTS...........................................................................................10
RIGHT HANDLEBAR SWITCH...................................................................11
LEFT HANDLEBAR SWITCH......................................................................12
SEATLOCK/MET-IN BOX ...........................................................................13
HELMET POSTS......................................................................................... 14
FUEL LEVEL INSPECTION/REFILLING .................................................... 15
SECTION 3 – OPERATION................................................16 - 28
BREAK-IN RECOMMENDATIONS.....................................................16 – 17
TROUBLESHOOTING................................................................................17
PRE-RIDE INSPECTION............................................................................18
STARTING THE ENGINE WITH STARTER BUTTON .......................19 – 21
STARTING THE ENGINE WITH KICK STARTER...................................... 22
RIDING YOUR MOTORCYCLE..........................................................23 – 26
STOPPING &PARKING YOUR MOTORCYCLE ................................27 – 28
SECTION 4 – MAINTENANCE.......................................... 29 – 50
THE IMPORTANCE OF MAINTENANCE...................................................29
MAINTENANCE SCHEDULE..............................................................30 – 31
ENGINE OIL........................................................................................32 – 35
CLUTCH PANEL INSPECTION & ADJUSTMENT .....................................35
AIR CLEANER FILTER ELEMENT............................................................. 36
THROTTLE OPERATION & ADJUSTMENT............................................... 37
DRIVE CHAIN INSPECTION /ADJUSTMENT............................................37
SPARK PLUG.............................................................................................. 38
BRAKE FLUID LEVEL INSPECTION..........................................................39
BRAKE INSPECTION ..........................................................................40 - 41
BRAKE LEVER FREE PLAY INSPECTION & ADJUSTMENT...................41
BATTERY....................................................................................................42
FUSES.........................................................................................................42
TIRES..................................................................................................43 – 45
CHASSIS INSPECTION..............................................................................46
CLEANING.................................................................................................. 47
WASHING YOUR MOTORCYCLE......................................................47 – 48
REMOVING ROAD SALT............................................................................ 48
PAINTED ALUMINUM WHEEL MAINTENANCE........................................ 48
EXHAUST PIPE MAINTENANCE...............................................................48
STORAGE GUIDE................................................................................49 - 50
SECTION 5 - SPECIFICATION...........................................................51
SECTION 6 – EXHAUST EMISSION CONTROL SYSTEM.......52 - 53

2
SECTION 1 - FORWARD & SAFETY INTRODUCTION
Thank you for purchasing this KYMCO VISA R 110 motorcycle, and welcome to the KYMCO
riding family.
Please read this Owner's Manual carefully before riding so that you will be thoroughly familiar with
the proper operation of your motorcycle’s controls, itsfeatures, itscapabilities, anditslimitations.
To ensure a long, trouble-free life for your motorcycle, provide it with the proper care and
maintenance as described in this manual.
For replacement parts and accessories, you should always use genuine KYMCO products as they
have been specially designed for your vehicle and manufactured to meet KYMCO's demanding
standards.
Keep this Owner's Manual aboard your motorcycle at all times so that you can refer to it whenever
you need information. This manual should be considered a permanent part of the motorcycle and
should remain with the motorcycle when it is sold.
All information, illustrations, photographs and specifications contained in this manual are based on
the latest product information available at the time of publication. Due to improvements or other
changes, there may be information in this manual that differs slightly from your vehicle. KYMCO
reserves the right to make product and publication changes at any time, without notice, and without
incurring any obligation.

3
SECTION 1 - FORWARD & SAFETY INTRODUCTION
IMPORTANT SAFETY INFORMATION
Your motorcycle can provide you many years of service and
plea- sure if you take responsibility for your own safety and
under- stand the challenges that you can meet on the road.
There is much that you can do to protect yourself when you
ride. You will find many helpful recommendations
throughout this manual. Here are some very important
safety tips:
Wear a helmet
Motorcycle safety equipment starts with a quality helmet.
One ofthe most serious injuries you can suffer in a crash is
a head injury. Always wear a properly approved helmet.
You should also wear suitable eye protection.
Make yourself easy to see
To make yourself more visible, wear bright, reflective
clothing, position yourself so other drivers can see you,
signal before turning or changing lanes, and use your horn
when it will help others notice you.
Know your limits
Ride within the boundaries of your own skill at all times.
Knowing these limits and staying within them will help you
to avoid accidents. Always ride with both hands on the
handlebars.
Keep your motorcycle in safe condition
For safe riding, it is important to inspect your motorcycle
before every ride and perform all recommended
maintenance. Never exceed load limits, and only use
accessories that have been approved by KYMCO for this
motorcycle.
Inspect your motorcycle before riding
Remember to perform an entire safety inspection to
ensure your and your passenger's safety before each ride.
Be extra cautious on bad weather days
Riding on bad weather days, especially wet ones, requires
extra caution. Braking distances can double on a rainy day.
Stay off of painted surfaces, manhole covers and greasy
appearing areas on the pavement, as they can be
especially slippery. Use extreme caution at railway
crossings and on metal gratings and bridges. Whenever
you are in doubt about the road conditions, slow down.
Modification
Modification of your motorcycle or removal of original
equipment may render the vehicle unsafe or illegal. Obey
all applicable equipment regulations in your area.

4
SECTION 1 - FORWARD & SAFETY INTRODUCTION
PROTECTIVE APPAREL
For your safety, always wear an approved motorcycle or
motorcycle helmet, eye protection, boots, gloves, long pants,
and a long- sleeved shirt or jacket whenever you ride your
motorcycle.
Helmets and protection
Your helmet is your most important piece of riding gear be
cause it offers the best protection against head injuries.
Your helmet should fit your head comfortably and securely.
Always wear a face shield or goggles to protect your eyes
and to aid your vision.
Additional riding gear
In addition to a helmet and eye protection, you should
also use:
Sturdy boots with nonslip soles to help protect your
feet and ankles
Leather gloves to keep your hands warm and help pre-
vent blisters, cuts, burns and bruises
A motorcycle or motorcycle riding suit or jacket that has
been designed for comfort as well as protection.
Brightly colored and reflective clothing can help make
you more noticeable in traffic. Be sure to avoid loose
clothing that can get caught on any part of your
motorcycle.
Footwear should be the proper size, have low heels,
and offer ankle protection
Wear gloves
Always wear a helmet. You should also wear eye
protection
Wear bright or reflective clothing.
Clothes should fit properly (not too tight or loose)
Be sure both you and your passenger always wear
properly fitting, approved motorcycle helmets. You
should also wear eye protection and other protec-
tive
a
pp
arel
when
y
ou
ride.

5
SECTION 1 - FORWARD & SAFETY INTRODUCTION
These general guidelines may help you decide how to
add accessories to your motorcycle and how to load it
properly.
Load limits
These specifications are the load limits for your VISA
R 110 motorcycle.
Overloading the motorcycle will affect its stability and
handling.
Be sure to stay within the limits listed below:
Maximum weight capacity
(includes the weight of the rider, passenger, cargo
and accessories): 248 kg
Maximum cargo weight:............................................10 kg
Under-seat compartment weight limit: ........................ 5 kg
Helmet hook weight limit:.............................................3 kg
Loading guidelines
Improperly loading your motorcycle will affect its stability and
handling. You should ride at reduced speeds when you are
carrying a passenger or cargo. Follow these guidelines
whenever you carry a passenger or cargo:
Check that both tires are properly inflated
To prevent loose items from creating a hazard, make
sure all cargo is securely tied down before you ride
Place cargo weight as close to the center of the
motorcycle as possible
Balance cargo weight evenly on both sides of the
motorcycle
Overloadin
g
or
improper
loadin
g
will
affe
c
t vehicle
handling, stability and braking, and can lead to an
accident.
Never exceed the stated load capacity of your scooter.
Cargo should be properly distributed and securely
attached. Reduce speed when carrying cargo and allow
more room for braking.

6
SECTION 1 - FORWARD & SAFETY INTRODUCTION
There is a large variety of accessories available to KYMCO motorcycle owners. KYMCO cannot have direct control over
the quality or suitability of any accessories you may wish to purchase. The addition of unsuitable accessories to your
motorcycle can lead to unsafe operating conditions. It is not possible for KYMCO to test each available accessory on the
market, or combinations of all such available accessories; however, your KYMCO dealer can assist you in the selection and
installation of quality accessories.
Use extreme caution when selecting and installing accessories for your motorcycle.
No modifications
KYMCO strongly advises you against removing any original equipment from your motorcycle or modifying it in any way that
would change its design or operation.
Improper accessories or modifications can make your
scooter unsafe and can lead to an accident.
Never modify your scooter through the improper install
lation or use of accessories. All parts and accessories
added to this vehicle should be genuine KYMCO (or
equivalent) components designed for use on this
scooter and should be installed and used according to
the accessory manufacturer’s instructions. If you have
an
y
q
uestions
,
consult
an
authorized
KYMCO dealer.

7
SECTION 2 - CONTROLS&FEATURES
Location of parts & controls
NOTE: Your motorcycle may differ slightly in appearance from the images in this manual.
ToolBox
Headlight Comp
Left Front Turn Signal Light
Instruments
Main Stand
Side Stand
Drive Chain
Gear Shifter
Air Cleaner

8
SECTION 2 - CONTROLS&FEATURES
Location of parts & controls
NOTE: Your motorcycle may differ slightly in appearance from the images in this manual.
Starter Motor Button
Fuel Filler (under seat)
Tail Light & Stop Light
Rear Brake Pedal
Kick Starter
Front Brake Lever
Exhaust Muffler
Right Rear Turn Signal Light
Ignition Switch
Choke

SECTION 2 - CONTROLS&FEATURES
9
(1) IGNITION SWITCH/STEERING&HANDLEBAR LOCK
ON : At th is position, power is connected to start the
engine. The key cannot be taken out.
OFF :At this position, power is cut off and the engine
stops. The key can be taken out.
LOCK :At this position, the steering handlebar is locked.
The key can be taken out
Locking Method
Turn the steering handlebar left to the full and then push
and tum the ignition switch key left to the ''LOCK"
position ,the handlebar can be locked.
Unlocking Method
Tum the ignition switch key right to the "OFF" and the
"LOCK" is released automatically.
After locking, turn the handlebar gently to make sure that
it is locked.
Do not tum the ignition switch to the "LOCK" Position
during riding, otherwise the handlebar will be out of
control and cause accidents.
Don't park your motorcycle at a place to hinder the traffic.

SECTION 2 - CONTROLS&FEATURES
10
(2) INSTRUMENTS
MILEAGE COUNTER: The total riding mileage is
indicated by kilometer. The figure in black and white
is an unit of 1OOm.
TURN SIGNAL INDICATOR: When the tum signal
switch is operated, this indicator will wink.
HIGH BEAM INDICATOR: This indicator comes on
when the long distance light is turned on.
FUEL GAUGE: The fuel gauge is to show the
volume of gasoline in the fuel tank. If the fuel gauge
pointer is at the red area, the fuel is insufficient.
Refill nonleaded gasoline as soon as possible.
SPEEDOMETER: The riding speed is indicated by
km/hour or mph.
GEAR POSITION INDICATOR: When the engine is
at the neutral or the others gear position, this
indicator will come on when the ignition switch is on.

SECTION 2 - CONTROLS&FEATURES
11
(3) RIGHT HANDLEBAR SWITCH
ELECTRIC STARTER BUTTON
Turn the ignition switch “ON” and press the electric starter
button to activate the starter motor.
During engine running, do not push the electric
starter button to avoid engine damage.
Tum the headlight switch off and turn signal switch
off before using the electric starter button.
Release the electric starter button immediately after
the engine is started.

12
SECTION 2 - CONTROLS&FEATURES
(4) LEFT HANDLEBAR SWITCH
Dimmer switch:
" " Dimmer switch position turns the headlight low
beam on, and the high beam indicator light on the dash is
activated.
" " Dimmer switch position turns the headlight high
beam on. The high beam indicator light on the dash is
activated as well.
Passing light switch:
Use this button to rapidly flick the headlamp high beam
on and off to signal other vehicles that you wish to pass.
Turn signal switch:
Use the turn signal indicator to signal to other traffic that
you intend to turn or change lanes. The turn signal light on
the dash will flash to alert the rider that the switch is
engaged.
" " for turning to the "left" .
" " for turning to the "right" .
To cancel the turn signal, press the switch in when it is in
the center position .
Horn button " " :
Press the horn button to sound the horn.

SECTION 2 - CONTROLS&FEATURES
13
(5) SEATLOCK/MET-IN BOX
To open the seat (passenger section)
1. Insert the ignition switch key into the seat lock and rotate
it clockwise to open the seat latch.
2. Lift up on the back edge of the passenger seat and
remove it from the motorcycle.
3. To replace the seat, engage the hooks on the bottom of
the seat with the loops on the frame. Press down on the
seat until you hear the seat latch “clicks” indicating it is
engaged.
NOTE: The weight capacity of the tool tray is 1.5 kg.
Never put the key inside the seat cushion to lock the seat.

SECTION 2 - CONTROLS&FEATURES
14
(6) HELMET POSTS
Your VISA R 110 motorcycle has two helmet posts so you
can secure your helmet(s) outside of the under seat storage
compartment.Tousetheposts,unlocktheseat.
With the seat up, put the helmet’s retaining ring onto the
post. Lower and press down on the seat to lock it and
secure the helmet in place. To remove the helmet, open
the seat.
Do not ride your scooter with a helmet hanging from a
helmet post. The helmet can interfere with your ability to
contro
l
you
r
scoote
r
,
causin
g
a
n
accident.

SECTION 2 - CONTROLS&FEATURES
15
(7) FUEL LEVEL INSPECTION/REFILLING
When the fuel level gauge needle approaches “E” (indicating
the tank is nearly empty), refill the tank with unleaded gasoline.
1. Stop the engine and turn the ignition switch to “OFF”.
2. Unlock and raise the seat.
3. Turn the fuel cap counterclockwise to access the fuel
tank filler.
4. Add fuel through the filler opening.
5. After filling, replace the cap and turn it clockwise to
secure it to the tank.
Gasoline is highly flammable and explosive.
You can be burned or seriously injured while
handling fuel.
* Stop the engine and keep heat, sparks, and
flame away.
* Refuel only outdoors.
* Clean up fuel spills immediately.

16
SECTION 3 - OPERATION
Break-in recommendations
The first 1,600 km of riding are the most important in the life
of your motorcycle. Proper break-in operation during this time
will help ensure you receive the maximum life and
performance from your new motorcycle. Proper break-in
operation allows the machined surfaces to polish each other
and mate smoothly.
Your motorcycle’s reliability and performance depend on
special care and restraint exercised during the break-in period.
It is especially important that you avoid operating the engine
in a manner which could expose the engine parts to excessive
heat.
The following guidelines should be followed during the break-
in period:
Maximum throttle operation:
Initial 800 km: Less than 1/2 throttle
Up to 1,600 km: Less than 3/4 throttle
Vary the engine speed:
The engine speed should be varied and not held at a constant
ratefor longperiodsoftime.Thisallowsthepartstobe"loaded"
with pressure, and then unloaded, allowing the parts to cool.
This aids in the mating process of the engine and transmis-
sion components.
It is essential that some stress be placed on these
components during break-in to allow for this mating process.
Do not, however, apply excessive load on the motorcycle's
drive line.
Avoid constant low speed:
Operating the engine at constant low speed (light load) can
cause parts to glaze and not seat in properly. Allow the
engine to accelerate freely through the gears, without
exceeding the recommended throttle openings.
Avoid using full throttle for the first 1,600 km. The initial
service:
Observeyourfirstandmostcriticalservice. The1,000 km initial
service is the most important service in the life of your
motorcycle. During the break-in period all of the engine
components will have worn in and all of the other parts will
have seated in, so adjustments will be required. All fasteners
will be tightened, and the contaminated engine oil will be
replaced.
NOTE: Completion of the 1,000 km initial service will
help you obtain the optimum service life and
performance from your motorcycle. Do not delay in
having this service performed once your motorcycle
reaches this mileage.

17
SECTION 3 - OPERATION
Breaking in the new tires
New tires need proper break-in to assure maximum
performance, just as your motorcycle's engine does. Wear
in the tread surface by gradually increasing your
cornering lean angles over the first 160 km before
attempting maximum lean angles. Avoid hard acceleration,
hard cornering, and hard braking for the first 160 km.
Troubleshooting
It can be frustrating if your motorcycle fails to start or
stops running while you are riding. In the rare instance this
hap- pens, take a few moments to check some items and
you may be back to riding your motorcycle soon.
Do you have enough gasoline in the fuel tank?
Did you follow the correct procedure for starting the
engine?
Is the side stand in the “UP” position?
Is the battery voltage low?
Is the main fuse in good condition?
NOTE: Use this Owner’s Manual to check components
and adjustments that are within your technical ability. If
you cannot resolve the problem, do not hesitate to
contactyour KYMCO dealer for assistance.
The 1,000 km service should be performed as outlined
in the Maintenance Schedule section of this owner's
manual. Pay particular attention to the cautions and
warnings in the Maintenance Schedule section.
Unless you have formal training as a service
technician and have access to KYMCO technical
reference materials, it is strongly suggested that you
have the initial
service
p
erformed
b
y
a
KYMCO dealer.
Failure to break in your tires could cause the tires to slip
andcould result in youlosing control of themotorcycle.
Use extra care when riding on new tires. Perform proper
break-in of the tires as described in this Owner’s Manual, and
avoid hard acceleration, hard cornering, and hard braking
for the first 160 km.

18
SECTION 3 - OPERATION
Pre-ride inspection
For your safety, it is very important to take a few moments
before each ride to walk around your motorcycle and check
its condition. If you detect any problem, be sure to address it
immediately, or have it corrected by your KYMCO dealer.
1. Engineoillevel:Addengineoilifrequired(page32).Check
for leaks.
2. Fuel level: Fill fuel tank when necessary (page 15). Check
for leaks.
3. Front brakes: Check operation and make sure there is
no brake fluid leakage (pages 39 and 40).
4. Throttle: Check for smooth operation and that it closes
fully in all steering positions (page 37).
5. Tires: Check condition and inflation (pages 43 - 45).
6. Lights and horn: Check that headlight, tail/brake light, turn
signals, indicators and horn function properly.
7. Chassis: Check for overall proper function (page 46).
Improperl
y
maintainin
g
y
our motorc
y
cle
or failin
g
to
correct a problem before riding can cause a crash in
which you can be seriously hurt or killed.
Always perform a pre-ride inspection before every
ride and correct any problems.
Performin
g
pre-ride
inspections
does
not take the
place of regular maintenance. Follow the maintenance
schedule recommendations on pages 30-31 of this
manual.
After one month of use or 1,000 km of riding,
whichever occurs first, contact your KYMCO dealer to
have an initial service of your motorcycle performed.
This initial service is the most important service in the
life of your motorcycle and includes checks and
adjustments that will help ensure that your motorcycle
operates efficiently and safely.

19
SECTION 3 - OPERATION
Starting the engine with starter button
To start your VISA R 110 motorcycle, follow the procedure
listed onthe following pages.
NOTE: Always check the engine oil level and the fuel
level BEFORE attempting to start your motorcycle’s
engine
1. Use the ignition key to unlock the steering lock on the
steering
2. Turn the ignition switch to “ON”.
To prevent damage to the starter motor, do not operate the
starter motor for more than five seconds at a time. If the
motorcycle fails to start immediately, check the fuel level and
the battery condition, and allow the starter motor to cool
before attempting to start the engine again. Do not press the
starter button once the engine is running or the starter
motor and engine can be damaged. To prevent damage to
the catalytic converter in the motorcycle’s exhaust
system, avoid idling for extended periods of time, and do
not use leaded gasoline.
Your motorcycle's exhaust emits poisonous carbon
monoxide gas. High levels of carbon monoxide can collect
rapidly in enclosed areas such as a garage.
Do not run the motorcycle's engine with the garage door
closed. Even with the door open, run the engine only long
enough tomove your motorcycle out of the garage.

20
SECTION 3 - OPERATION
3. The engine must be started with the transmission in the
neutral position. When the transmission is in “NEUTRAL”
the neutral indicator on the dash will illuminate.
4. Press the starter button without rotating the throttle grip.
Release the starter button as soon as the engine starts.
5. For cold starting, pull down the choke knob. After the
engine warms up, restore the choke knob to its original
position
Do not use the choke knob for a long time; otherwise
the mixture will become too rich and cause engine
stop.
Table of contents
Other KYMCO Motorcycle manuals

KYMCO
KYMCO 125 PULSAR User manual

KYMCO
KYMCO DINK50 User manual

KYMCO
KYMCO Quannon 125 Release note

KYMCO
KYMCO AHG5 User manual

KYMCO
KYMCO K-XCT 125i User manual

KYMCO
KYMCO People S 250 User manual

KYMCO
KYMCO 125 QUANON NAKED User manual

KYMCO
KYMCO Venox 250 User manual

KYMCO
KYMCO XCITING 500 User manual

KYMCO
KYMCO Quannon 150 User manual

KYMCO
KYMCO Stryker 125 User manual

KYMCO
KYMCO XCITING S 400 User manual

KYMCO
KYMCO K-PIPE 125 User manual

KYMCO
KYMCO PEOPLE S 125 User manual

KYMCO
KYMCO 125 ZING II QE - User manual

KYMCO
KYMCO MXU 300 - User manual

KYMCO
KYMCO X-Town 250 ABS User manual

KYMCO
KYMCO Venox 250 Release note

KYMCO
KYMCO XCITING 500 User manual

KYMCO
KYMCO 125 MOVIE S INJECTION User manual