KYMCO Quannon 150 User manual

Do not remove this Owner’s Manual from the vehicle. Read this manual carefully
before operating the vehicle as it contains important safety information.

Read this manual carefully.
This Owner’s Manual contains important information on safety, operation and maintenance of your KYMCO motorcycle.
Anyonewhooperatesyourmotorcycleshouldcarefullyreadandunderstandthecontentsofthismanualbeforeridingthemotorcycle.
Foryoursafety,understandand followallofthewarningscontainedinthisOwner’sManualandthelabelsappliedtoyourmotorcycle.
This Owner’s Manual should be considered a permanent part of the vehicle. Keep it with your motorcycle at all times.
ON-ROAD USE ONLY. This motorcycle has been designed to be used on the road.
Particularly important information is called out in this manual by the following icons and notations:
WARNING
CAUTION
NONO
NONO
NOTETE
TETE
TE
The SAFETY ALERT symbol with the exclamation point in the triangle means ATTENTION!
BE ALERT! YOUR SAFETY CAN BE AFFECTED.
Failure to follow instructions associated with a WARNING symbol could result in severe injury or
death to the rider, a passenger, a bystander, or a person inspecting or repairing the motorcycle.
A CAUTION symbol indicates that special precautions must be taken to avoid damaging
the motorcycle.
The NOTE symbol indicates key information about a procedure or to clarify an operation.
California Proposition 65
WARNING
This product contains or emits chemicals known to the State of California to cause
cancer and birth defects or other reproductive harm.
WARNING
To avoid damage to the motorcycle’s electrical system, do not remove or install a
battery wire when the ignition switch is in the “ON” position.
Battery & Electrical System Damage Alert

1
Manual Icon Legend ................................................... (inside of front-cover)
CA Prop 65 & Battery Warning .................................. (inside of front-cover)
Table of Contents.......................................................................................... 1
SECTION 1 - SAFETY................................................................ 2 - 8
Forward ......................................................................................................... 2
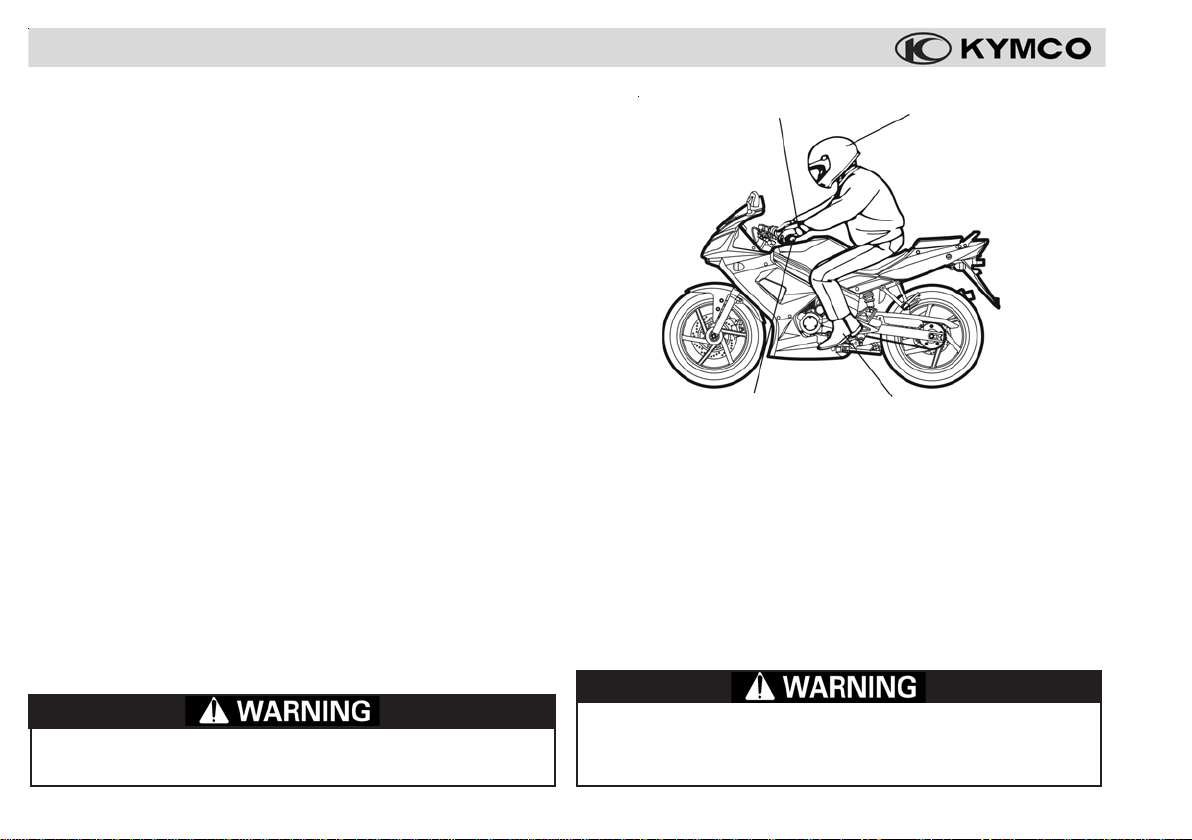
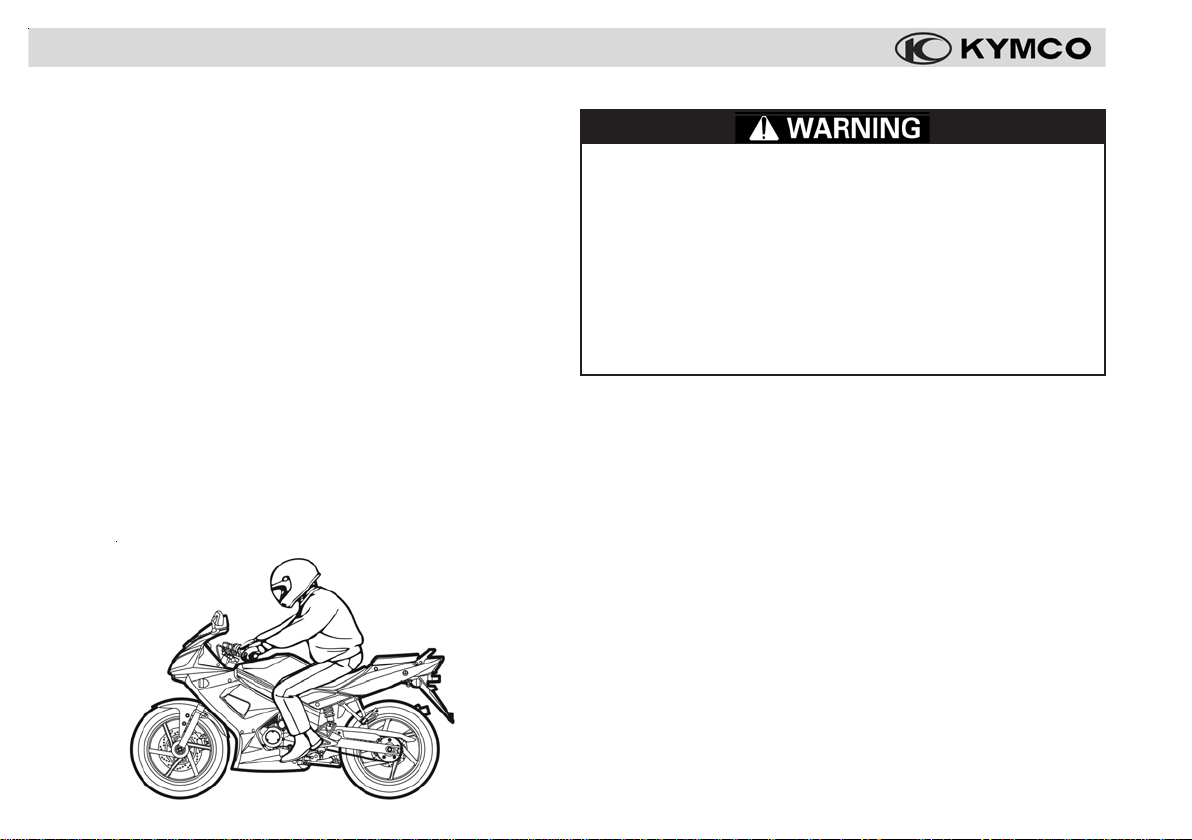
Motorcycle Safety ................................................................................... 3 - 4
Load Limits & Guidelines ............................................................................. 5
Accessories & Modifications ........................................................................ 6
Caution & Warning Labels............................................................................ 6
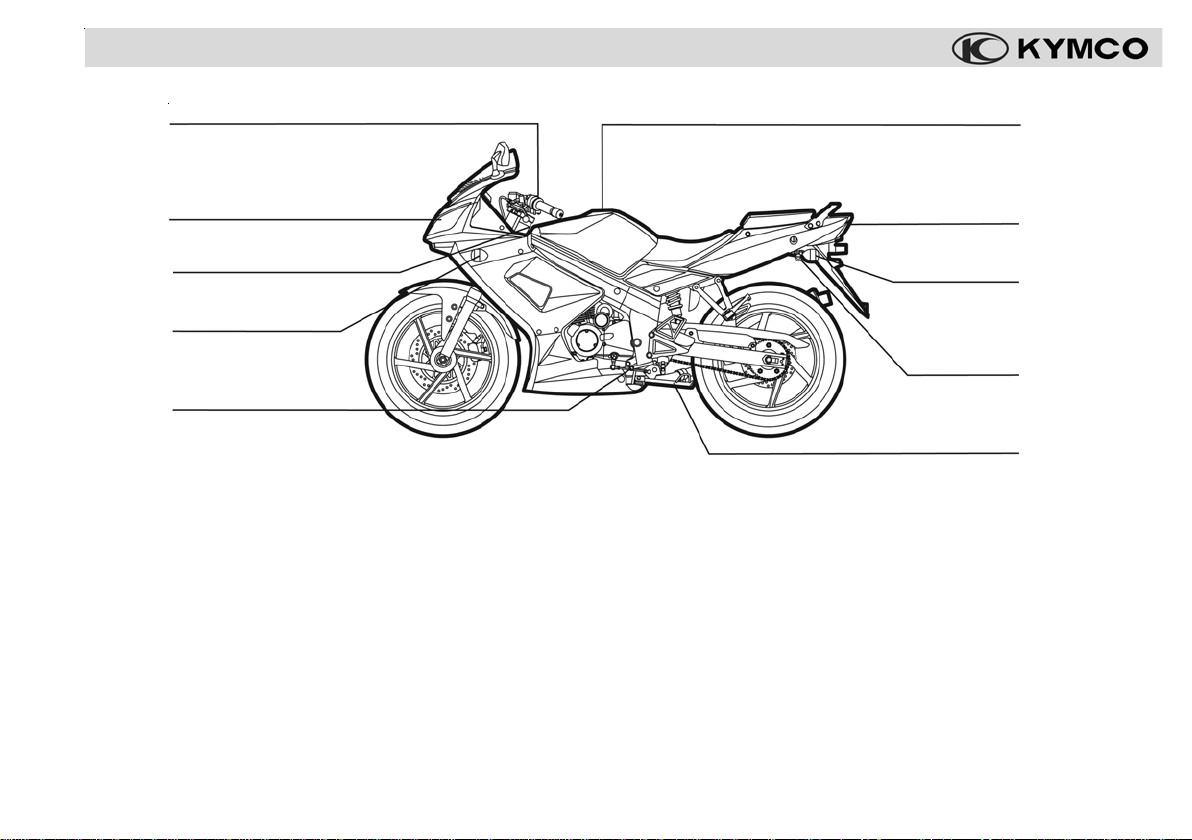
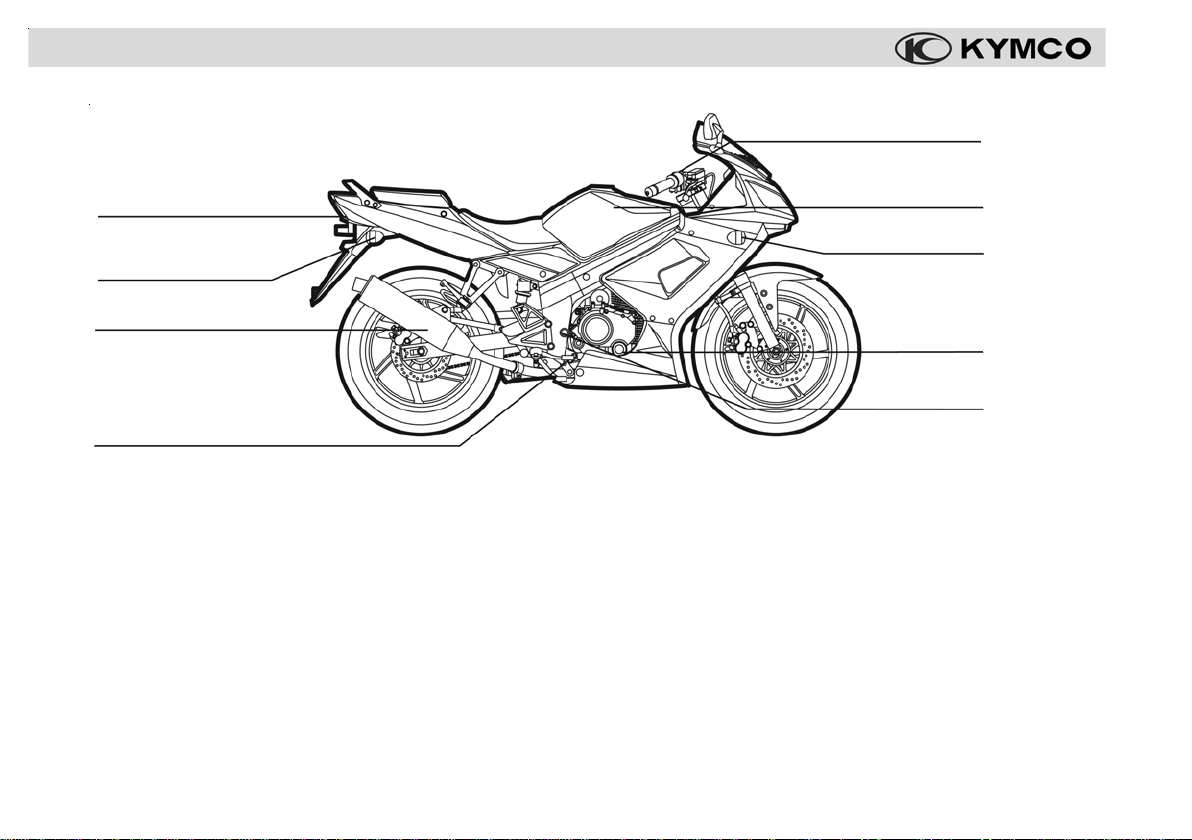
Locations of Parts & Controls ................................................................ 7 - 8
SECTION 2 - CONTROLS & FEATURES............................... 9 - 21
Serial Numbers ............................................................................................. 9
Keys.............................................................................................................10
Ignition Switch............................................................................................. 10
Steering Lock .......................................................................................10 - 11
Right-hand Handlebar Switch .................................................................... 12
Left-hand Handlebar Switch....................................................................... 13
Helmet Lock ................................................................................................14
Seat Lock .................................................................................................... 14
Tool Kit.........................................................................................................14
Multifunction Meter ............................................................................ 15 – 21
Speedometer...............................................................................................17
Odometer/Trip meter/Service meter ................................................. 18 – 19
Fuel Level Gauge .......................................................................................20
Clock.................................................................................................... 20 - 21
SECTION 3 - OPERATION..................................................... 22 - 40
Pre-ride Inspection ............................................................................ 22 – 31
Engine Oil Inspection ................................................................................. 23
Brake Inspection .........................................................................................24
Tire Inspection ............................................................................................25
Fuel Level Inspection & Refilling ...............................................................26
Steering Inspection..................................................................................... 27
Lights Inspection......................................................................................... 27
TABLE OF CONTENTS
Horn Inspection...........................................................................................28
Drive Chain Inspection ............................................................................... 28
Clutch Lever & Cable Inspection ...............................................................29
Throttle Inspection ......................................................................................30
Chassis Inspection ..................................................................................... 31
Starting the Engine ............................................................................. 31 - 33
Riding Your Motorcycle....................................................................... 37 - 40
Stopping & Parking Your Motorcycle ................................................. 37 - 38
Break-in Recommendations............................................................... 39 - 40
Tire Break-in................................................................................................40
SECTION 4 - MAINTENANCE............................................... 41 - 58
Importance of Maintenance .......................................................................41
Maintenance Schedule....................................................................... 42 - 43
Engine Oil Recommendation .....................................................................44
Engine Oil Change.............................................................................. 44 - 45
Spark Plug........................................................................................... 46 - 47
Air Filter Element ................................................................................ 47 - 48
Throttle Free-play Adjustment....................................................................49
Brake Fluid .......................................................................................... 49 - 50
Battery ................................................................................................. 50 - 51
Battery Removal & Service ........................................................................51
Wire Connectors .........................................................................................52
Fuses...........................................................................................................52
Cleaning Your Motorcycle .................................................................. 53 - 54
Storage................................................................................................ 55 - 56
Maintenance Record ......................................................................... 57 – 58
Specifications.............................................................................................. 59
Exhaust Emissions System................................................................. 60 -61
Clean-air System ........................................................................................61
Emission Information & EPA Warranty ......................................................62
KYMCO Limited Motorcycle Warranty....................................................... 63
Index............................................................................................................ 64
Identification Numbers Record .................................. (inside of back-cover)

2
Thank you for purchasing this KYMCO Quannon motorcycle, and welcome to the KYMCO riding family.
Please read this Owner's Manual carefully before riding so that you will be thoroughly familiar with the
proper operation of your motorcycle’s controls, its features, capabilities, and limitations.
To ensure a long, trouble-free life for your motorcycle, provide it with the proper care and maintenance as
described in this manual.
For replacement parts and accessories, you should always use genuine KYMCO products, as they have
been specially designed for your vehicle and manufactured to meet KYMCO's demanding standards.
Keep this Owner's Manual aboard your motorcycle at all times so that you can refer to it whenever you
need information. This manual should be considered a permanent part of the motorcycle and should re-
main with the motorcycle when it is sold.
All information, illustrations, photographs and specifications contained in this manual are based on the
latest product information available at the time of publication. Due to improvements or other changes, there
may be information in this manual that differs slightly from your vehicle. KYMCO reserves the right to make
product and publication changes at any time without notice and without incurring any obligation.
SECTION 1 -
FORWARD & SAFETY INTRODUCTION

3
IMPORTANT SAFETY INFORMATION
Your motorcycle can provide you many years of service and
pleasure if you take responsibility for your own safety and un-
derstand the challenges that you can meet on the road. There
ismuchthat you candoto protect yourself whenyouride. You
will find many helpful recommendations throughout this
manual. Here are some very important safety tips:
Wear a helmet
Motorcycle safety equipment starts with a quality helmet. One
of the most serious injuries you can suffer in a crash is a head
injury. Always wear a properly approved helmet. You should
also wear suitable eye protection.
Make yourself easy to see
To make yourself more visible, wear bright reflective clothing,
position yourself so other drivers can see you, signal before
turning or changing lanes, and use your horn when it will help
others notice you.
Know your limits
Ridewithintheboundariesofyourownskillatalltimes.Know-
ing these limits and staying within them will help you to avoid
accidents.
MOTORCYCLE SAFETY
Keep your motorcycle in safe condition
For safe riding, it's important to inspect your motorcycle before
every ride and perform all recommended maintenance. Never
exceed load limits, and only use accessories that have been
approved by KYMCO for this motorcycle.
Inspect your motorcycle before riding
Do not forget to perform an entire safety inspection to ensure
the safety of you and your passenger before each ride.
Be extra safety conscious on bad weather days
Riding on bad weather days, especially wet ones, requires ex-
tra caution. Braking distance can double on a rainy day. Stay
off of the painted surfaces, manhole covers and greasy ap-
pearing areas on the pavement, as they can be especially slip-
pery. Use extreme caution at railway crossings and on metal
gratings and bridges. Whenever your are in doubt about the
road conditions, slow down.
Modification
Modification of your motorcycle, or removal of original equip-
ment may render the vehicle unsafe or illegal. Obey all appli-
cable equipment regulations in your area.

4
MOTORCYCLE SAFETY
PROTECTIVE APPAREL
For your safety, always wear an approved motorcycle helmet,
eye protection, boots, gloves, long pants, and a long-sleeved
shirt or jacket whenever you ride your motorcycle.
Helmets and protection
Your helmet is your most important piece of riding gear be-
cause it offers the best protection against head injuries. Your
helmet should fit your head comfortably and securely. Always
wear a face shield or goggles to protect your eyes and to aid
your vision.
Additional riding gear
In addition to a helmet and eye protection, you should also use:
•Sturdy boots with nonslip soles to help protect your
feet and ankles
•Leatherglovestokeepyourhandswarmandhelppre-
vent blisters, cuts, burns and bruises
•A motorcycle riding suit or jacket that has been de-
signed for comfort as well as protection. Bright colored
and reflective clothing can help make you more notice-
able in traffic. Be sure to avoid any loose clothing that
might get caught on any part of your motorcycle.
1Wear bright or reflective clothing. Your clothes should fit
properly (not too tight or loose)
2Always wear a helmet and wear eye protection
3Your footwear should be the proper size, have low heels,
and offer ankle protection
4Wear gloves and always ride with both hands grasping
the handlebars
Not wearing a helmet increases your chance of serious
injury or death in a crash.
Be sure you and your passenger always wear approved
motorcycle helmets that fit properly. You should also wear
eyeprotection and other protective apparelwhen youride.
11
11
122
22
2
33
33
3
44
44
4

5
RIDING & LOADING GUIDELINES
Load limits
These specifications are the load limits for your Quannon motor-
cycle. These general guidelines may help you decide how to add
accessories to your motorcycle and how to load it properly.
Loading guidelines
Improperly loading your motorcycle will affect its stability and han-
dling.You should ride at reduced speeds when you are carrying a
passenger or cargo. Follow these guidelines whenever you carry
a passenger or cargo:
•Check that both tires are properly inflated
•To prevent loose items from creating a hazard, make
sure all cargo is securely tied down before you ride
•Balance cargo weight evenly on the motorcycle
Your riding position
The riding stability of your motorcycle is influenced by your
riding position. When riding, you should sit on the center of the
seat. If you sit on the rear of the seat you could reduce the
amount of weight on the front wheel. This could affect the han-
dling and steering characteristics of the motorcycle.
Your motorcycle will turn more smoothly if you lean your body
into the turn. Use caution with extreme leaning or handlebar
inputs that could upset the chassis.
When riding your motorcycle on a rough or slippery road, re-
duce your speed and hold the handlebars firmly. Be prepared
to brake or turn to avoid a road hazard.
Overloading will affect the motorcycle’s stability and handling,
be sure to stay within the limits given below:
Maximum weight capacity (Includes the weight of the rider,
passenger, cargo and accessories): ...... 810 lbs (368 kg)
Maximum cargo weight:........................... 308 Ibs (140 kg)
Overloading or improper loading will affect vehicle han-
dling, stability and braking, and can lead to an accident.
Never exceed the stated load capacity of your motorcycle.
Cargo should be properly distributed and securely at-
tached. Reduce speed when carrying cargo. Allow greater
distance for braking.

6
ACCESSORIES, MODIFICATION & CAUTION LABELS
Accessories
There is a large variety of accessories available to KYMCO
motorcycle owners. KYMCO cannot have direct control over
the quality or suitability of accessories you may wish to pur-
chase. The addition of unsuitable accessories to your motor-
cycle can lead to unsafe operating conditions. It is not pos-
sibleforKYMCO totesteach accessory onthemarket orcom-
binations of all the available accessories; however, your
KYMCO dealer can assist you in selecting and installing qual-
ity accessories.
Use extreme caution when selecting and installing the ac-
cessories for your motorcycle.
No modifications
KYMCO strongly advises you against removing any original
equipment or modifying your motorcycle in any way that would
change its design or operation.
Caution labels
Your KYMCO Quannon motorcycle comes equipped with sev-
eral labels and hangtags containing important safety informa-
tion. Anyone who rides your motorcycle should read and un-
derstandthisinformation beforeoperatingit. Thelabelsshould
be considered permanent parts of the vehicle. If a label comes
off or becomes hard to read, contact your KYMCO dealer im-
mediately for a replacement.
Improperaccessoriesormodificationscanmakeyour
motorcycle unsafe and can lead to an accident.
Never modify your motorcycle through the improper
installation or use of accessories. All parts and ac-
cessories added to this vehicle should be genuine
KYMCO or equivalent components designed for use
on this motorcycle, and should be installed and used
according to instruction. If you have any questions,
consult an authorized KYMCO dealer.

7
LOCATION OF PARTS & CONTROLS
1 Headlightdimmerswitch,pass-
ing button, turn signal switch,
and horn button
2 Headlight
3Ignition switch
4left front turn signal
5 Transmission shift lever
6 Fuel tank cap
NOTE: Your motorcycle may differ slightly in appearance from the images in this manual.
11
11
1
22
22
2
33
33
3
44
44
4
55
55
5
66
66
6
77
77
7
88
88
8
99
99
9
ATAT
ATAT
AT
7 Taillight/Stoplight
8Left rear turn signal
9 Helmet lock
AT Side stand

8
LOCATION OF PARTS AND CONTROLS
NOTE: Your motorcycle may differ slightly in appearance from the images in this manual.
1 Taillight/Stoplight
2 Right rear turn signal
3Exhaust muffler
4Rear brake pedal
5 Engine stop switch and starter
motor button
6 Fuel tank
11
11
1
22
22
2
33
33
3
44
44
4
55
55
5
66
66
6
77
77
7
88
88
8
99
99
9
7 Right front turn signal
8Oil level window
9 VIN (frame number)

9
Vehicle identification number
The vehicle identification number (also known as the VIN or
frame number) is a 17-digit number stamped on the right side
of the frame.At this same location is the VIN compliance label.
When you take delivery of your motorcycle, check that the VIN
stamped on your motorcycle and imprinted on the label is the
sameastheVINlistedinthebill-of-saleandthewarrantydocu-
ments you receive from your dealer.
Engine serial number
Theengineserial number (alsoknownasthe ESN) isstamped
on left side of the engine case.
SECTION 2 -
CONTROLS & FEATURES
NOTE: Write your motorcycle’s VIN and ESN in the boxes
provided in the inside, rear cover of this Owner's Manual.

10
CONTROLS & FEATURES
KEYS
Your Quannon motorcycle is supplied with two identical igni-
tion switch keys that operate the ignition switch, the steering
lock, the fuel filler cap, and the helmet lock.
Both keys have a unique code stamped on the tab supplied
with the keys. For security reasons this code is not stamped
on the motorcycle or recorded in the vehicle's basic docu-
mentation. Since the code is required if you need replace-
ment keys, record these important codes in the boxes pro-
vided on the inside, rear cover of this Owner's Manual.
NOTE: Apply a lock lubricant with antifreeze properties
to key openings if the outside air temperature drops be-
low freezing (32oF, 0oC).
IGNITION SWITCH & STEERING LOCK
To operate the ignition switch and the steering lock:
11
11
1 “OFF”: In this position, the motorcycle’s electrical system is
off, and the engine cannot be started. The key can
be removed from the ignition switch in this position.
22
22
2 “ON”: In this position ,the motorcycle’s electrical system is
on, and the engine can be started. The key cannot
be removed from the ignition switch in this position.
33
33
3 “LOCK”: Inthisposition,theignitionswitchlocksthesteer-
ing of the motorcycle. The key can be removed
from the ignition switch in this position.
11
11
1
22
22
2
Key code

11
CONTROLS & FEATURES
33
33
3
Using the steering lock:
LOCKING: Turn the handlebars fully to the left, then push in
and turn the ignition switch ley to the “LOCK” 3
position.Remove thekey.The steeringshould now
be locked.
UNLOCK: Turn the ignition switch key to the “OFF” 1 or
the “ON” 2 position to unlock the steering.
After locking the steering, gently turn the handle-
bars to make sure the lock is engaged.
Do not turn the ignition switch to the “OFF” or
“LOCK” positions while riding, as this may cause an
accident.
When parking (and locking) your motorcycle, do not
leave it in a place where it can hinder pedestrian or
vehicular traffic.

12
CONTROLS & FEATURES
Headlight switch 11
11
1" " position:
The headlight and taillight will be lit.
"" position:
The position light and taillight (running lamps) will be lit.
"" position:
The headlight and taillight will be off.
NOTE: Not all Quannon motorcycles have switches that
control the headlight circuit. Depending upon country and
state regulations, your motorcycle's controls may differ
from the switches described here.
NOTE: The starter motor will not engage unless the front
brakeleverissqueezedortherearbrakeleverisdepressed
at the same time the starter button is pressed.
Release the starter button immediately after the engine
has started.
To prevent damage to the starter motor, do not operate
the starter motor for more than five seconds at a time.
If the motorcycle fails to start immediately, check the fuel
level and the battery condition. Allow the starter motor to
cool before attempting to start the engine again.
Engine stop switch 33
33
3" " position:
The ignition circuit is off. The engine will not start or run.
Electric starter button 22
22
2" ":
Turn the ignition switch “ON” and press the electric starter but-
ton to activate the starter motor.
Right handlebar switch
11
11
1
22
22
2
33
33
3
44
44
4
Engine stop switch 44
44
4"" position
The ignition circuit is on, and the engine can start and run.

13
CONTROLS & FEATURES
Left handlebar switch
Turn signal switch:
Use the turn signal indicator to signal to other traffic that you
intend to turn or change lanes. The turn signal light on the
dash will flash to alert the rider that the switch is engaged.
"" for turning to the "left" 5.
"" for turning to the "right" 6.
To cancel the turn signal, press the switch in when it is in the
center position 7.
NOTE: The turn signals do not automatically cancel. Be
sure to cancel your signals each time you complete a turn
or lane change.
55
55
5
66
66
6
77
77
7
Dimmer switch:
"" switch position 9 turns the headlight low beam on.
""switch position AT turns the headlight high beam on. The
high beam indicator light on the dash is activated as well.
Passing light button:
Use this button AK to rapidly flick the headlamp high beam on
and off to signal other vehicles that you wish to pass.
99
99
9
ATAT
ATAT
AT
88
88
8
Horn button 88
88
8" ":
Press the horn button to sound the horn.
AKAK
AKAK
AK

14
CONTROLS & FEATURES
Helmet lock
To use the helmet lock:
1. Insert the ignition switch key and rotate it clockwise to open
the lock
2. Put the helmet’s strap ring into the lock’s pin 1 and push
the outside of the pin 2 in to secure the lock.
3. To remove the helmet, use the key to open the lock.
11
11
1
22
22
2
Do not ride your motorcycle with a helmet attached
to the helmet lock. The lock is not intended to be a
helmet holder. A helmet hanging from the lock could
interfere with the motorcycle’s operation and may
cause a loss of control and an accident.
Seat Lock & tool kit
To open the seat (passenger section):
1. Insert the ignition switch key into the seat lock 3 and ro-
tate it clockwise to open the seat latch
2. Lift up on the back edge of the passenger seat 4 and
remove it from the motorcycle
3. To replace the seat, engage the hooks on the bottom of the
seat with the loops on the frame. Press down on the seat
untilyou heartheseat latch“clicks”indicatingitis engaged.
NOTE: Lift gently up on the back of the seat to make sure
the seat is secured in the latch.
The tool kit 5 is located under the seat in the tray on the top
of the fender.
NOTE: The weight capacity of the tool tray is 3.3 lb (1.5 kg).
33
33
3
44
44
4
55
55
5

15
CONTROLS & FEATURES
11
11
1
11
11
1 Tachometer: Indicates engine revolutions per minute (RPM).
22
22
2 Odometer / Tripmeter / Oil Service Meter Display: The odometer displays the vehicle’s total operating mileage. The
tripmeter displays the amount of mileage since the rider last reset the display to “zero”. The oil service meter can be set to
alert the rider that oil service is required.
33
33
3Clock: Displays the time in 12-hour format (AM/PM).
44
44
4Speedometer: Indicates the vehicle speed in kilometers per hour (Km/h) or in miles per hour (MPH), depending upon the
setting chosen by the rider.
55
55
5 Adjustment buttons: Used to set the time display on the clock, and to access or clear the tripmeter display.
66
66
6 Fuel level gauge: indicates the approximate amount of fuel in the fuel tank. If the gauge indicates “E”, the fuel level is low
and gasoline must be added.
22
22
2
33
33
3
44
44
4
44
44
4
55
55
5
66
66
6
Multifunction meter display
NOTE: The indicator needle of the tachometer’s analog dial will sweep from zero to the maximum reading then back
to zero when the ignition switch is turned "ON" (or when the battery is reconnected following service). This is a
normal function of this type of meter and is required to calibrate the dial before the engine is operated.

16
CONTROLS & FEATURES
Multifunction meter display
11
11
122
22
233
33
344
44
455
55
5
11
11
1 SideStandIndicatorLight: Indicatesthatthemotorcycle’s
side stand is in the “down” position.
22
22
2 Neutral Position Indicator Light: Indicates that the
motorcycle’s transmission is in the “neutral” position. The
lightwillonlyilluminateiftheignition switch is “ON” and the
transmission is in “neutral”.
33
33
3Left Turn Signal Indicator Light: When the turn signal
switchonthelefthandlebarswitchispushedtotheleft,the
left turn signal and this indicator light will flash.
44
44
4Right Turn Signal Indicator Light: When the turn signal
switch on the left handlebar switch is pushed to the right,
the right turn signal and this indicator light will flash.
55
55
5 High Beam Indicator Light: When the headlight switch
on the left handlebar switch is pressed to the “HI” position,
the headlight high beam and this indicator will light. The
indicatorwillalso light ifthepassinglamp switch ispressed
on the left handlebar switch.

17
CONTROLS & FEATURES
Multifunction meter display
The liquid crystal display (LCD) portion of the multifunction
meter has the following functions:
11
11
1 Speedometer
22
22
2 Fuel Level Gauge
33
33
3Odometer / Tripmeter / Oil Service Meter
44
44
4Digital Clock
44
44
4
11
11
1
22
22
2
33
33
3
Initial display
When the ignition switch is turned “ON”, the multifunction dis-
play will temporarily display all of the elements for each func-
tionsoyoucanbesurethatthedisplayisfunctioningproperly.
Speedometer
The speedometer displays the road speed of the motorcycle
in MPH or Km/h.
TotogglethespeedometerdisplaybetweenMPHorKm/h,press
and hold the MODE button for more than two seconds.
See item “5” on page 15.
MPH
Km/h

18
CONTROLS & FEATURES
Odometer / Tripmeter / Oil Service meter
To selectMPH,Km/hortheoilservicereminderdisplayonthe
LCD panel, press and hold the MODE button for more than
two seconds.
See item “5” on page 15.
Odometer:
The odometer displays the vehicle’s total operating mileage.
Tripmeter:
The tripmeter displays the amount of mileage since the rider
last reset the display to “zero”.
Oil Service meter:
The oil service meter shows the mileage for oil service fre-
quency. The oil service meter can be set to alert the rider that
oil service is required.
To select the Odometer/Tripmeter/Oil Service meter:
1. Press and hold the ADJ. (Adjust) button for more than two
seconds to select the odometer, tripmeter or oil service
meter display on the LCD.
MPH
Km/h
Table of contents
Other KYMCO Motorcycle manuals

KYMCO
KYMCO Dink-R 150 User manual

KYMCO
KYMCO K-PIPE 125 User manual

KYMCO
KYMCO X-Town CT125 User manual

KYMCO
KYMCO FILLY 50 User manual

KYMCO
KYMCO downtown 300i User manual

KYMCO
KYMCO CV3 Series User manual

KYMCO
KYMCO XCITING 500 User manual

KYMCO
KYMCO Active 50 User manual

KYMCO
KYMCO Venox 250 User manual

KYMCO
KYMCO PEOPLE S 50 User manual

KYMCO
KYMCO 125 ZING II QE - User manual

KYMCO
KYMCO AGILITY300 User manual

KYMCO
KYMCO XCITING S 400 User manual

KYMCO
KYMCO Stryker 125 User manual

KYMCO
KYMCO AHG5 User manual

KYMCO
KYMCO Dink-R125 User manual

KYMCO
KYMCO Downtown 300i ABS User manual

KYMCO
KYMCO Dink 50 Release note

KYMCO
KYMCO X-Town 250 ABS User manual

KYMCO
KYMCO DINK50 User manual