Kyocera FS-600 Installation and maintenance instructions

Network Connectivity for Kyocera Printers
KyoceraEcoLAN 2000E
Quick Configuration Guide

FCC Notice:
This equipment complies with Part 15 of FCC Rules. Operation is subject to the following two
conditions: (1) this device may not cause harmful interference, and (2) this device must accept any
interference received, including interference that may cause undesired operation.
Trademarks
Kyocera®isaregisteredtrademarkofKyoceraCorporation. NetWare®isaregisteredtrademarkof
Novell,Incorporated. Windows®isaregisteredtrademarkofMicrosoftCorporation. Macintosh®isa
registeredtrademarkofAppleComputer,Incorporated. PostScript®andAcrobat®areregistered
trademarksofAdobeSystems,Incorporated. Allotherproductsreferencedaretrademarksorregistered
trademarksoftheirrespectivecompanies.
Thank You
ThankyouforchoosingtheawardwinningKyoceranetworkprintingproducts. Weare
sureyouwillappreciatethehighperformanceandlowcostofownershipthatare the
hallmarksofKyoceraproducts.

Contents
Introduction ........................................................................ 4
Using the CD ROM ............................................................. 4
Supported Kyocera Printer Models ..................................5
EcoLAN 2000E Hardware Installation............................... 5
NetWare 2.x & 3.x Configuration ....................................... 6
NetWare 4.x Directory Services Configuration ................ 8
Macintosh Configuration ................................................. 11
Windows Peer to Peer Printing Configuration...............12
Windows NT Configuration .............................................14
UNIX Configuration .......................................................... 17
Dynamic Host Configuration Protocol (DHCP).............. 18
IP Address Setup with the Printer Front Panel .............. 19

Introduction
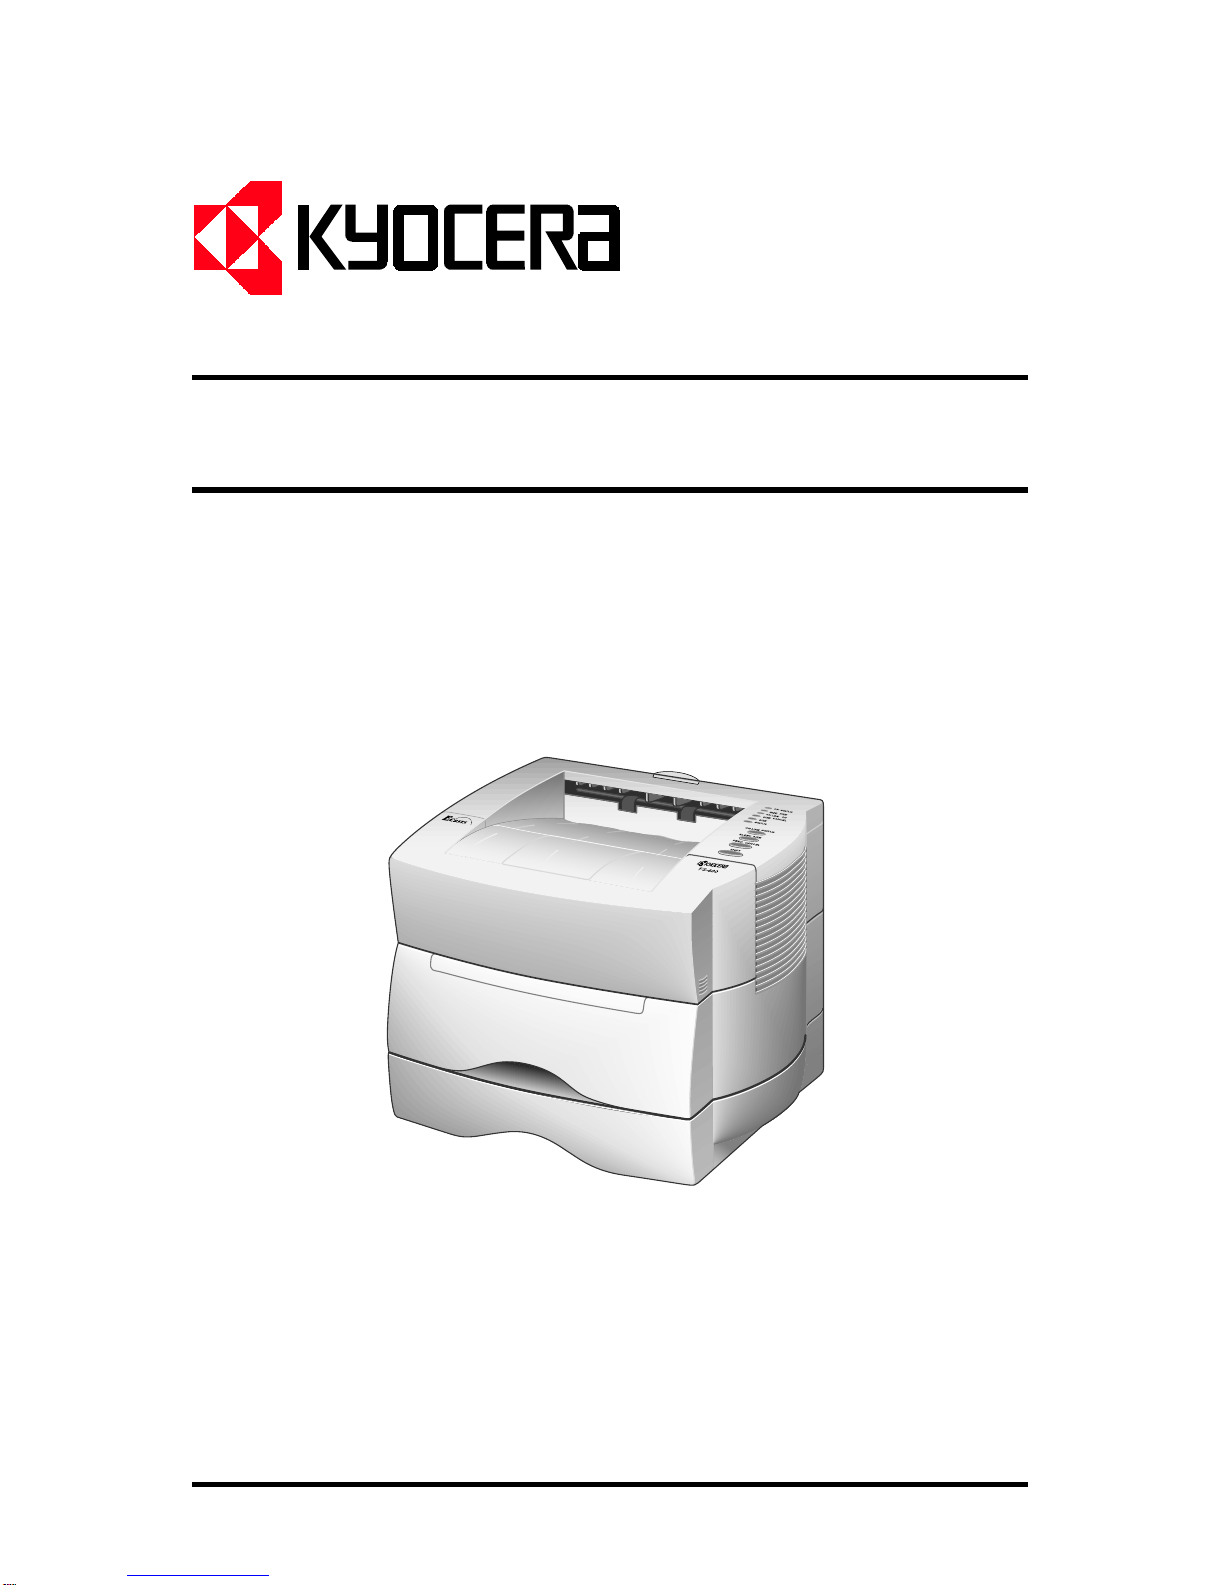
TheEcoLAN2000EisthenextgenerationKyocerainternalnetworkinterfacecard
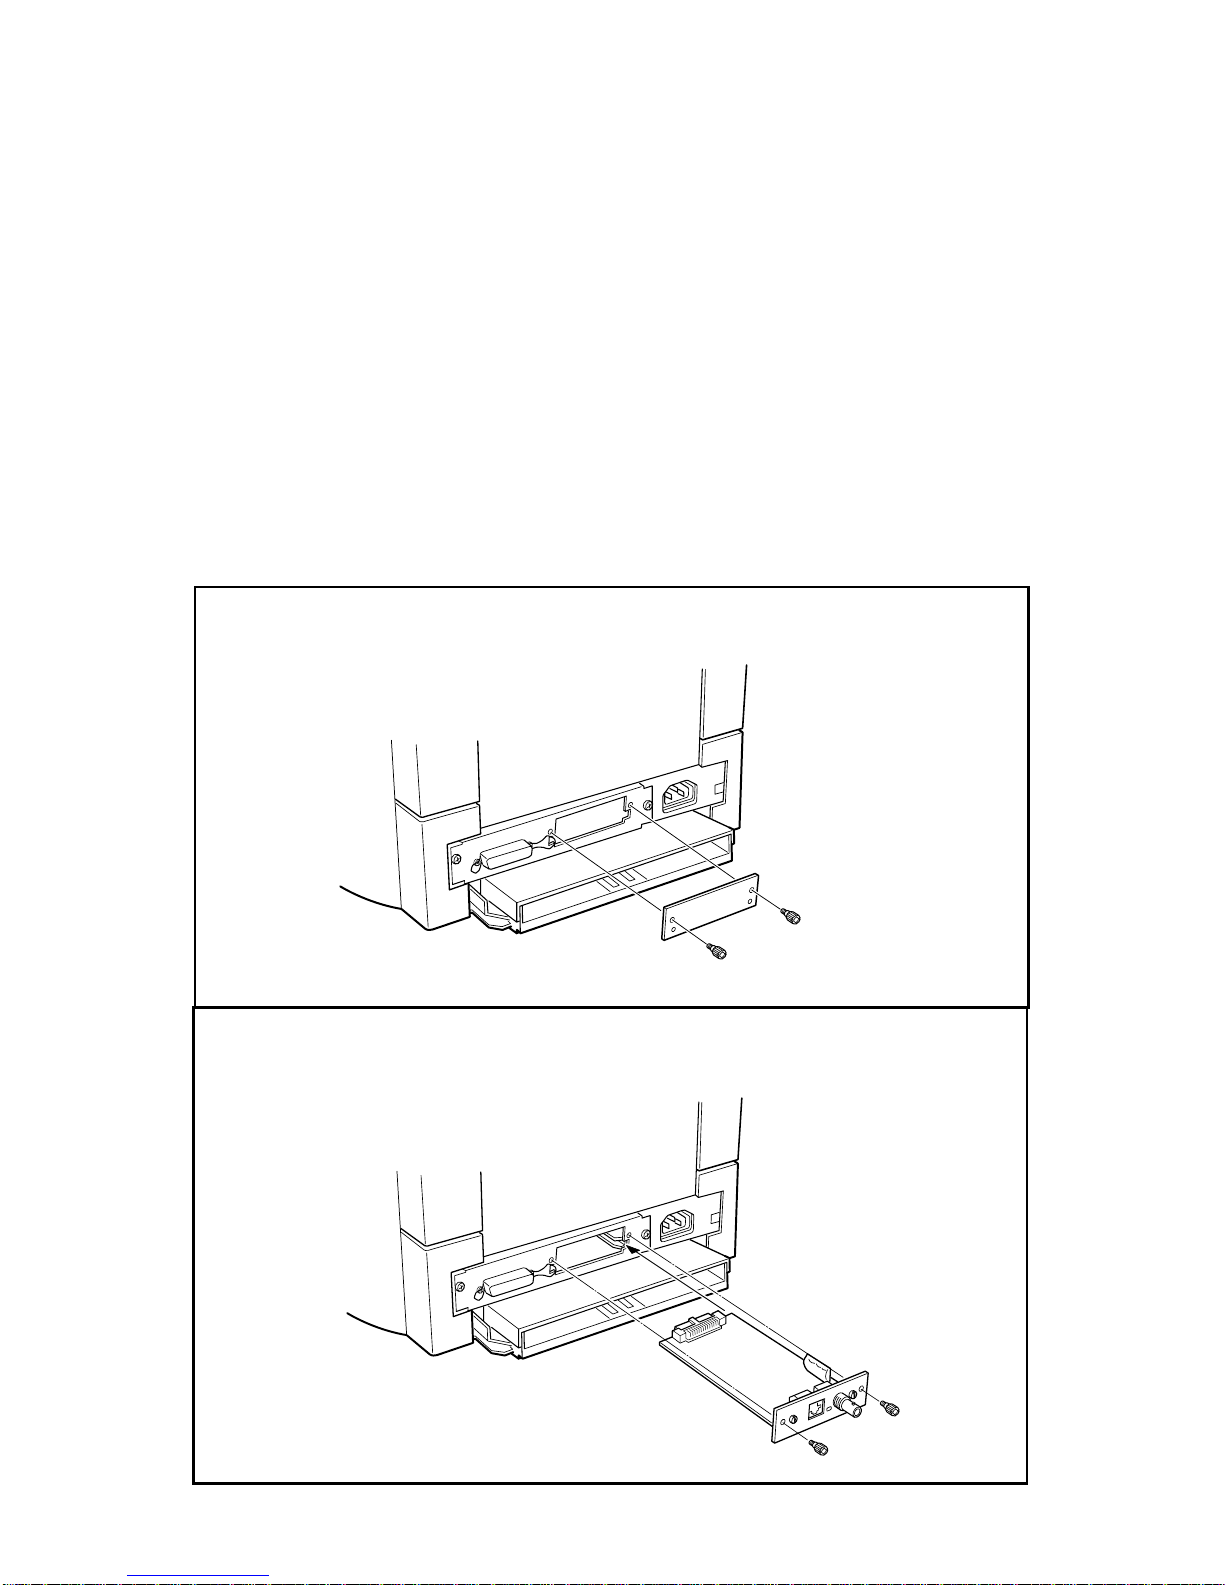
allowingeasyinstallationwithoutremovingtheprintermainboard. Its featuresinclude:
❒EasySlide-inInstallation ❒MultipleProtocolSupport
❒10MbpsEthernetInterface ❒SNMPSupport
❒10BaseT/10Base2AutoDetection ❒FlashUpgradeCapability
❒SetupwiththePrinterFrontPanel ❒HTTPServerforManagement
❒DHCPSupportforAutomatic withaBrowser
IPAddressAssignment
TheEcoLAN2000EenablesKyoceraFS-SeriesandLS-Seriesprinterstocommunicate
overanEthernetnetworkwithmanydifferentnetworkoperatingsystems,including
NetWare,Macintosh,UNIX,andWindows.
This Guide’s Role
ThisQuickConfigurationGuideprovidesconcisesoftwareconfigurationinstructions
allowinganexperiencedsystemadministratortogetthe2000Eupandrunningquickly.
Formorecompleteinstructionsorforprintingorconfigurationoptionsnotcoveredinthis
guide,pleaserefertothe2000EUser’sManualontheCDROM.
Using the CD ROM
TheCDROMpackagedwiththe2000Eincludesallinstallationandconfigurationutilities,
aswellasthe2000EUser’sManualandthisguidein.PDFformat.Quickaccesstothe
utilitiesanddocumentationisprovidedbytheCONTENTS.PDFfile.Thisfileandallother
documentationontheCDROMareinAdobeAcrobat.PDFformatandcannotberead
withouttheAdobeAcrobatReader3.0orlater.(Note:Theutilitiesmayalsobeinstalled
withoutusingCONTENTS.PDFbynavigatingtheCDROMtotheappropriatesetupfile.)
OnWindows95,98andNT4.0systems,insertingtheCDROMwillauto-loadascreen
withoptionstoinstalltheAcrobatReaderortodisplayCONTENTS.PDF.Theuserwillbe
promptedtoinstalltheAcrobatReaderifitisnotdetectedonthesystem.
Onothersystems,theAcrobatReadermaybeinstalledmanuallyfromtheCDROM.
WindowsNT3.51:FromtheProgramManagerFilemenu,selectRunandtype:
D:\acroread\win\rdr_srch\32bit\setup.exe
Windows3.1,3.11:SameasNT3.51,buttype:D:\acroread\win\rdr_srch\16bit\setup.exe
Macintosh:RuntheReader3.01InstallerintheAcroread,Mac,Reader+Search,
Readerfolder.ItisalsoveryusefultoinstallthesearchcapabilityfromtheSearchfolder.
UNIX:Seeinstguid.txtintheacroread/unix/rdr_searchdirectoryontheCDROM.
OncetheAcrobatReaderisinstalled,launchtheContents.PDFfileontheCDROM.
No CD ROM Drive?
Downloadmanualsandutilitiesfromhttp://www.kyocera.com/printers/techsupp.html
4

Supported Kyocera Printer Models
TheEcoLAN2000EiscompatiblewiththeFS/LS-600,800,1700+,3700+,andanyother
Kyoceraprinterwiththenewslide-ininterface. The2000Eiscompatiblewiththeupper
(harddisk)interfaceslotofanFS/LS-7000withaSoftwareversionof25.05orlater.The
Softwareversionisdisplayedontheprinterstatuspage.
TheEcoLAN2000EisNOTcompatiblewithpreviousFS/LS-Seriesmodels,including,
FS/LS-400,850,1500/A,1550/A/+,1600/A/+,1700,3400/A/+,3500/A,3600/A/+,3700,
5500,6500/+.
EcoLAN 2000E Hardware Installation
The2000Eisanewslide-ininterfaceboardwhichdoesnotrequiretheremovalofthe
printer’smainboardforinstallation. Theseinstructionsdescribetheinstallationintothe
FS-600butwouldbesimilarlyapplicabletoanyKyoceraprinterwiththeslide-ininterface.
1.Removethetwoscrewssecuringtheinterfaceslotcoverontherearpanelofthe
printeranddiscardtheinterfaceslotcover.
2.Aligntheedgesofthe2000Eboardwiththerailsintheinterfaceslotandslidethe
2000Eintotheprinter. SecurewiththetwoscrewsremovedinStep1.
5

6
NetWare 2.x & 3.x Configuration
1. LoginasSupervisorandstartPCONSOLE.
2. DefinethePrintQueue.
➪IfaPrintQueuealreadyexistswhichwillbeassignedtothe2000E,skiptostep3.
➪SelectPrintQueueInformationfromtheAvailableOptionsmenu.
➪PressINSERT,typeanameforthenewqueuetobeservicedbythe2000Eand
pressENTER. PressESCAPEtoreturntotheAvailableOptionsmenu.
3. DefinethePrintServer.
➪SelectPrintServerInformationfromtheAvailableOptionsmenu.
➪PressINSERT,typethe2000EPrintServernameandpressENTER. Thedefault
PrintServernameisKYOfollowedbyanunderscoreandthe2000Esixdigit
serialnumber,e.g.KYO_163709. Theserialnumberislistedonthebottomofthe
2000Eandisdisplayedonthe2000Ebox. Ifthe2000Ehasalreadybeen
installed,theNovellPrintServerNamecanbefoundonthepowerupnetwork
statuspageunderNovellNetworkInformation.
4. DefinethePrinter.
➪PressENTERwiththenewPrintServerhighlighted,selectPrintServerConfigu-
ration,thenselectPrinterConfiguration.
➪SelectPrinter0anddefineamoremeaningfulnamefortheprinterifdesired. The
printernameisdisplayedinvariousNetWareprintingmessages,suchaswhen
notifyingusersthattheirjobiscompleted.
➪SettheTYPEfieldtoRemote/OtherUnknown.
➪PressESCAPE toexitandselectYestosavethechanges. PressESCAPE again
toreturntothePrintServerConfigurationmenu.
5. AssignthePrintQueue.
➪SelectQueuesServicedByPrinter,highlightthe2000EprinterontheDefined
PrinterslistandpressENTER.
➪PressINSERTtodisplaytheAvailableQueueslist. Selectthedesiredqueueand
assignaPrioritylevel(recommendedchoiceis1).
➪PressESCAPE whenfinishedandcontinuepressingESCAPE toexit
PCONSOLE.

6. ConfirmSuccessfulConfiguration.
➪Turntheprinteroffandonandwaitforapowerupnetworkstatuspagetoprint. If
thenetworkislarge,thepowerupstatuspagemaytakeseveralminutestoprint.
(Note:ThistimemaybereducedbysettingaPreferredFileServerforthe2000E
withtheManagementAccessProgram. RefertotheNetWaresectionofthe
2000EUser’sManualformoreinformation.)
➪TheNovellConnectionInformationinthebottomhalfofthestatuspagedisplaysthe
printername,fileserver,queue,etc. IfitdisplaysAttached:Yes,thisconfirmsthat
the2000EPrintServerisreadytoacceptprintjobs.
➪IfthestatuspagedoesnotdisplayAttached:Yes,pleaseverifythattheNovell
PrintServerNameonthestatuspageunderNovellNetworkInformationmatches
exactlywiththePrintServernamethatwasenteredinPCONSOLEorrefertothe
troubleshootingsectionintheUser’sManual.
7

8
NetWare 4.x
Directory Services Configuration
Bindery vs. NDS Setup
InadditiontoitsnativeNDS(NetWareDirectoryServices),NetWare4.xcanalsobeused
inBinderyemulation. Binderyemulationisprovidedonthe2000Eforusersmorefamiliar
withtheNetWareBinderythanwithNDS. IfBinderyemulationispreferred,pleasereferto
theNetWaresectionofthe2000EUser’sManual.
PCONSOLE vs. NWADMIN Setup
NetWare4.xsetupcanbedonewitheitherPCONSOLEorNWADMIN. ThisQuick
ConfigurationGuideincludestheproceduresinPCONSOLEbecausefewerstepsare
requiredthanwithNWADMIN.(NotallversionsofNWADMINincludethePrintServices
QuickSetupoption). IfsetupwithNWADMINispreferred,pleaserefertotheNetWare
sectionofthe2000EUser’sManual.
Configuration Utilities
Thisconfigurationisaccomplishedusingtwoutilities,NetWare’sPCONSOLE,andthe
Windows-basedManagementAccessProgram(MAP)includedwiththe2000E.
PCONSOLE Configuration
1. EnterPCONSOLE.
2. SettheCurrent“Context”.
ContextistheNetWaretermforaspecificlocationintheDirectoryServicestree. The
currentcontextisdisplayedintheupperlefthandcornerofthescreen. Thisiswhere
thePrintServer,Printer,andQueuewillbelocated. Ifthisisnotthedesiredcontextfor
theseobjects,usethefollowingproceduretochangethecurrentcontext.
➪SelectChangeContextfromthePCONSOLEmainmenu.
➪PressINSERTtobrowsetothedesiredcontext.
➪HighlightthedesiredcontextandpressF10.
Onceinthedesiredcontext,makeanoteofitasdisplayedintheupperlefthand
cornerofthescreen. Thiscontextwillneedtobeenteredduringtheconfigurationwith
theManagementAccessProgram.
PrintServerContext:_______________________________

3. DefinethePrintServer,Printer,andQueue.
➪SelectQuickSetuptodisplaythePrintServicesQuickSetupscreen.
Note:Ifyoudonothavesufficientrightstocreateobjectsinthiscontext,Quick
Setupwillnotappearonthemenu. YoumusthavetheObjectCreaterightinorder
toaddPrintServices.
➪NetWareinsertsadefaultnameorexistingPrintServernameinthePrintServer
field. PressENTERandthenINSERTtodefinethenewPrintServer. Donotuse
anyspacesinthePrintServername. MakeanoteofthenewPrintServername
asitmustbeduplicatedexactlyduring setupwiththeManagementAccess
Program.
PrintServerName:________________________________
➪PressENTERattheNewPrinterandNewPrintQueuefieldstodefinedesired
namesfortheseobjects.
➪MovetothePrintQueueVolumefieldandpressENTER. Press INSERT and
browsetothedesiredvolumetouseforthisprintqueue.
➪MovetothePrinterTypefieldandpressENTER. SelectOther/Unknownfrom
thelist.
➪PressF10tosavethisconfigurationandreturntothePCONSOLEmainmenu.
4. Optional:Assignqueueusers,selectprinternotificationoptions,and/ordefineaPrint
Serverpassword. IfaPrintServerpasswordisdefined,makeanoteofitasitmust
beduplicatedexactlyduring setupwiththeManagementAccessProgram.
PrintServerPassword:________________________________
5. ExitPCONSOLE.
MAP Configuration
TheManagementAccessProgram(MAP)isaWindowsprogramwithabrowser-like
interfaceallowingconfigurationandmanagementof EcoLANNetworkInterfaceCardson
IPXnetworks.
1. InstallandRunMAP.
➪InserttheCDincludedwiththeEcoLAN2000E.
➪InWindows95orNT4.0,clickonStartandselectRun,or
intheWindows3.1orNT3.51ProgramManager,selectFileandchooseRun.
➪Type:D:\MAP\SETUP.EXEandclickOK.
➪Onceinstalled,doubleclickontheMAPicontostarttheprogram.
2. SelecttheEcoLAN2000EtoConfigure.
➪ClickonthearrownexttotheServerdialogforthelistofavailableEcoLANcards
displayedbyunitserialnumber. TodisplaythenameandotherdetailsoftheEcoLAN
cards,selectShowAllfromtheOptionsmenu.
➪Clickonthe2000Etobeconfigured.
9

10
3. PasswordProtection.
ManyoftheconfigurationoptionsintheMAPutilityarepasswordprotected. The
defaultpasswordis:sysadm Thepasswordiscasesensitive. Tochangethe
password,selectChangePasswordintheSystemcolumn.
4. NetWareConfiguration.
➪SelectSetupNetWareintheProtocolscolumn.
➪EnterthePrintServerName,PreferredNDSContext,andPrintServer
Password(ifapasswordwasdefined)exactlyastheywereenteredin
PCONSOLE. Note:EntriesinMAParenotcasesensitive(exceptthesysadm
password). PreferredFileServerandPreferredNDSTreeshouldnormally
remainblankunlessBinderymodeisusedorifthenetworkincludesmultiple
NDStrees.
➪IfnotusingBinderyemulation,clicktheDisableBinderybox.
➪TypethesysadmpasswordintheappropriateboxandclickAcceptSettings.
Afterafewsecondsthescreenshouldreportthattheupdatewassuccessful.
ClicktheBackArrowicontwicetoreturntothe2000EConfigurationpage.
➪Optional:ClickonConfigureStatusPageinthePrintercolumntodefine
powerupstatuspagesettings,(e.g.disablingthepowerupstatuspage).
➪Thechangesmadetothe2000Edonottakeeffectuntiltheunitisreset. Clickon
ResetintheSystemcolumnandclickontheResetUnitbutton. Afterafew
secondsthescreenshouldreportthattheunitwasreset.
5. ConfirmSuccessfulConfiguration.
➪AftertheReset,theprogramadviseswaiting2minutesbeforereconnecting,but
the2000Emaybeavailablesooner. FromtheOptionsmenu,selectUpdate
ServerListandclicktheDownArrowtodisplaythelistofServers. Repeatif
necessaryuntilthe2000Ereappearsandselectitfromthelist.
➪Atthe2000EConfigurationpage,selectUnitStatusintheSystemcolumn.
➪ScrolldowntodisplaytheNetWarestatus. TheQueueStatusshouldbe
Attached.
➪IftheQueueStatusisnotAttached,pleaseverifythattheentriesforPrintServer
Name,PreferredNDSContext,andPrintServerPasswordmatchthosedefined
inPCONSOLEorrefertothetroubleshootingsectionintheUser’sManual.

Macintosh Configuration
KPDLII,Kyocera’sPostScriptcompatiblemodeisrequiredforMacintoshprinting.KPDL
IIisstandardonsomeprinters,suchastheFS/LS-800,1700+and3700+,whileitisan
optiononothermodels,suchastheFS/LS-600and7000.IfKPDLIIisinstalleditwill
appearintheEmulationlistontheStatuspage. FortheFS/LS-7000,thedefaultemulation
fortheOption2InterfacemustalsobesettoKPDLorKPDL(Auto).
Installing the Driver and Selecting the Printer
1. ToinstalltheMacintoshPrinterDriverandUtilitiesfromtheCDwhichisprovidedwith
theprinter,opentheDriversfolder,thentheappropriatelanguagefolder,anddouble
clickontheFS-SeriesInstallerprogram.
2. Onceinstallationiscompleteandyoursystemhasbeenrestarted,selectChooser
fromtheApplemenutoopentheChooser.
3. SelecttheFS-SeriesDriver,thezone(ifany)andthe2000Eprinter. Thedefault
namefortheprinterisKYO_followedbythe2000Esixdigitserialnumber.
4. ClickonSetup. SelecttheappropriatePPDfilefromthepop-upmenunearthe
bottomofthescreen. TurnonBackgroundPrintingifdesiredandclosetheChooser.
5. FromtheFilemenuwithinanyapplication,selecteitherPageSetuporPrint.
6. ClickontheOptionsbutton,clickonOptionsInstalled,andselectthepaper
handlingaccessoriesthatareinstalledontheprinter.
7. Optional:Clickontheappropriateselectiontosetthedesireddefaultsforoptionssuch
asOutputTray,ImageRefinement,Duplexing,etc.
Naming the Printer and Changing Other Settings
Therearetwomethodsforchangingadditional2000Esettings;1)withtheFS-SeriesUtility,
and2)withastandardbrowser. Connectingtotheprinter’sIPaddresswithabrowser
allowschangingMacintosh,NetWare,andTCP/IPsettingsonthe2000E,whereasthe
FS-SeriesUtilitycanonlybeusedtochangeMacintoshsettingsonthe2000E. Forthose
usersthatdonothaveabrowserand/ordonotwanttoassignanIPaddresstothe
2000E,instructionsforusingtheFS-SeriesUtilityareprovidedbelow.Instructionsfor
configuringwithabrowsercanbefoundintheUser’sManual.
1. DoubleclickontheFS-SeriesUtilityiconontheMacintoshdesktop.
2. HighlightKYO_<serial#>,e.g.KYO_163479intheprinterlistandclickonGeneral.
3. ClickonRenamePrinterandtypethedesiredprinternameinthePrinterNamefield.
ClickonOKtoreturntotheGeneralPrinterOptionsdialog.
4. ClickonNetworkOptions,selectthedesiredzonefortheprinterfromtheAvailable
ZoneslistandclickonSetZone.
5. EnableordisablethepoweronstatuspageasdesiredandclickonDone. This
completesMacintoshprintingconfiguration.
11

12
Windows Peer to Peer Printing Configuration
PeertoPeerprintingisavailableforWindows95,Windows98andWindowsNT4.0.
What is Windows Peer to Peer Printing
ThepeertopeerprintingsoftwarewhichisincludedwiththeEcoLAN2000Eallows
WindowsPCstocommunicatedirectlywithnetworkattachedprinters. Anetworkserver,
suchasNetWareorWindowsNT,isnotrequiredforpeertopeerprinting. Thepeerto
peerprintingsoftwaremustbeinstalledoneachPCthatwillusepeertopeerprinting.
Oncethepeertopeerprintingsoftwareisinstalled,allEcoLAN2000Eboardsonthe
networkautomaticallyappearinthelistofavailableprinterports.
Thepeertopeerprintingsoftwarecanalsobeusedinnetworkswhereserversare
present,however,oftentheserverprintservicesareutilizedinstead. Server-basedprint
servicesoffercentralizedprintingmanagementandspoolinganddonotrequiresoftware
(otherthantheprinterdriver)tobeinstalledoneachPC.
Peer to Peer Printing over IP or IPX
PeertopeerprintingisavailableoverboththeIPandtheIPXprotocols.Atleastoneof
theseprotocolsmustbeinstalledbeforepeertopeerprintingmaybeused. Itisassumed
thattheIPprotocolwillbeusedforpeertopeerprintingonlyiftheWindowsPCsare
alreadyconfiguredwithIPaddresses;otherwise,thesimplertoconfigureIPXprotocol
wouldmostlikelybeused.
IfUsingPeertoPeeroverIP
Configurethe2000EIPaddresswithDHCP(page18),withtheprinterfrontpanel(page
19),orwiththeNTBOOTPutility(page15),thenreturntothissectiontocompletepeerto
peerprintinginstallation.
IfUsingPeertoPeeroverIPX
TheIPXprotocolmustbeinstalledoneachPCthatwillusepeertopeerprintingoverIPX.
ThefollowinginstructionsdescribeinstallationoftheIPXprotocolforWindows95or98.
InstallationforWindowsNT4.0isverysimilar(checktheProtocoltabforNWLinkIPX/
SPXCompatibleTransport).
1. ClickontheWindowsStartbuttonandselectSettings,ControlPanel, Network.
2. ChecktoseeifIPX/SPX-compatibleProtocolisdisplayedonthelistofnetwork
components. Ifitisonthelist,IPXisalreadyinstalled. Pleasecontinuewiththenext
section. IfitisNOTonthelist,clickonAdd.
3. DoubleclickonProtocol,clickonMicrosoft,anddoubleclickonIPX/SPX-
compatibleProtocol.WindowswillpromptfortherequiredWindowsdiskstoinstall
theIPXprotocol.
4. Oncethefilesarecopied,clickonOKtoclosethenetworkcontrolpanel. Windows
willprompttorestartthesystem. TheIPXprotocolwillnotbeactiveuntilthesystemis
restarted.

13
Optional: Changing the Printer Name
IPPrinterName:ChangingtheprinternameonlyappliestotheIPXprotocol. WithIP
peertopeerprintingtheprinterisidentifiedbyitsIPaddress.
IPXPrinterName: TheIPXpeertopeerprintingsoftwareusestheNetWarePrint
ServerNametoidentifythe2000E. Thedefaultnameistheserialnumberprecededby
KYO,e.g.,KYO-163495. Ifdesired,thisnamecanbechangedtoamoreeasily
identifiablenamewiththeManagementAccessProgram(MAP).
TochangethenamewithMAP,followtheMAPConfigurationinstructionsintheNetWare
4.xDirectoryServicesConfigurationsectioninthisguide(thesettingsotherthanNetWare
PrintServerNamedonotneedtobeentered). MAPrequirestheIPXprotocol.
Peer to Peer Printing Software Installation
ThepeertopeerprintingsoftwareshouldbeinstalledoneachWindowsPCthatwilluse
peertopeerprintingservices.
1. InstallandRunthePeertoPeerSoftware.
➪InserttheCDincludedwiththeEcoLAN2000E.
➪ClickontheWindowsStartbuttonandselectRun.
➪ForIPXpeertopeerprinting,type:D:\IPX-P2P\SETUP.EXEandclick
OK.Followtheinstructionsonthescreentocompleteinstallation.
➪ForIPpeertopeerprinting,type:D:\IP-P2P\SETUP.EXEandclickOK.
Followtheinstructionsonthescreentocompleteinstallation.
2. SelectthePrinterPort.
Iftheprinterdriverhasnotalreadybeeninstalled,pleaseinstallitfromtheCDwhichis
shippedwiththeprinterbeforecontinuingwiththefollowinginstructions.
➪ClickontheWindowsStartbuttonandselectSettings,thenPrinters.
➪RightclickontheappropriateprinterdriverandselectPropertiesfromthemenu.
➪SelecttheDetailstabandclickonthedownarrowbesidethePrinttothe
followingport:fieldtodisplaythelistofavailableports.(OnNT4.0selectthe
Portstabandscrolldownthelistofports).
➪Selectthe2000EfromthelistofportsandclickonOK. WithIPpeertopeer
printing,the2000EisdisplayedbyitsIPaddress. WithIPXpeertopeerprinting,
the2000EisdisplayedbyitsNetWarePrintServerName,e.g.,thedefaultname
isintheformatKYO-163495.
➪Peertopeerprintingconfigurationiscomplete. Printjobswillnowbedirectedto
theselected2000Ewhenthecurrentprinterdriverisused.

Windows NT Configuration
ThereareseveraloptionsforsettingupprintinginaWindowsNTenvironment.
◆IfaNetWareserverispresent,NetWareprintservicesmaybeusedbyfollowingthe
NetWareconfigurationinstructionsinthisguide.
◆PeertopeerprintservicesmaybeusedbyfollowingtheWindowsPeertoPeer
Printinginstructionsinthisguide,butareonlyavailableforWindowsNT4.0,notfor
WindowsNT3.51. PeertopeerprintservicesusingtheIPXprotocolmaybe
preferablewhenTCP/IPsetupisnotdesired.
◆LPRprintservicesmaybeusedviaTCP/IPbyfollowingtheinstructionsinthis
section.
WindowsNTprintingisveryflexible. ItispossibletoconfiguretheindividualWindowsNT
orWindows95/98workstationstoprintusingadifferentprotocolthantheWindowsNT
server. Forexample,aWindowsNTservercouldbeconfiguredtoprinttoa2000Evia
TCP/IPusingtheinstructionsinthissection. The2000Ecouldthenbedesignatedas
sharedontheNTserver,allowingworkstationstoprintviatheNTserverusingadifferent
protocol(suchasthedefaultNetBEUI).
TheoptimumWindowsNTprintingconfigurationdependsupontheparticularenvironment
anduserandadministratorexperienceandpreferences. Generally,theLPRprinting
overTCP/IPcoveredinthefollowinginstructionsisthebestchoiceforenvironments
whereTCP/IPisalreadyinuse.
TCP/IP Required Components
TheWindowsNTsystemperformingthe2000EconfigurationmusthavetheTCP/IP
protocolinstalled. Thefollowingstepsdescribehowtocheckforand,ifnecessary,add
therequiredTCP/IPcomponents.
WindowsNT3.51
1. IntheProgramManagergroupMain,doubleclickonControlPanel.
2. DoubleclickonNetworkandcheckthelistofInstalledNetworkSoftwareforthe
followingthreecomponents:
MicrosoftTCP/IPPrinting,SimpleTCP/IPServices,&TCP/IPProtocol
3. Ifanyofthesecomponentsaremissing,clickonAddSoftware,selectTCP/IP
ProtocolandrelatedcomponentsandclickonContinue.
4. SelectTCP/IPNetworkPrintingSupportandSimpleTCP/IPServicesandclick
Continue.
5. Afterallnecessaryfilesarecopied,clickonOKtoclosetheNetworkSettingsdialog
andrestartthesystemwhenprompted. Thenewprotocoland/orservices willnot
beavailableuntilthesystemisrestarted.
14

15
WindowsNT4.0
1. ClickontheWindowsStartbutton,selectSettings,andControlPanel.
2. DoubleclickonNetworkandselecttheProtocolstab. IfTCP/IPProtocolisnotin
thelistofNetworkProtocols,clickonAddtoinstallit.
3. SelecttheServicestab. IfeitherMicrosoftTCP/IPPrintingorSimpleTCP/IP
ServicesisnotinthelistofNetworkServices,clickonAddtoinstallthem.
4. ClickonClosewhenallprotocolsandserviceshavebeenadded. IftheTCP/IP
protocolhasjustbeenadded,WindowswillpromptfortheIPaddressandotherTCP/
IPparameters. Thenewprotocolsandserviceswillnotbeavailableuntilthesystem
isrestarted.
2000E TCP/IP Configuration
ForTCP/IPconfigurationwithDHCP,seepage18. Fornon-DHCPenvironments,the
TCP/IPparametersmaybesetusingtheprinterfrontpanelinstructionsonpage19.For
remotesetuporforprintersnotsupportingfrontpanelsetup,thefollowingNTBOOTPutility
instructionsmaybeused.
Note:NTBOOTPdoesnotworkwhenrunonasystemconfiguredasaDHCPserver.
1. InserttheCDincludedwiththeEcoLAN2000E.
2. IntheWindowsNT3.51ProgramManager,selectFileandchooseRun.
InWindowsNT4.0,clickontheWindowsStartbuttonandselectRun.
2. Type:D:\MAP\NTBOOTP.EXE andclickOKtolaunchtheutility.
3. SelectConfigurefromtheAdminmenu.
4. EntertheIPparameters.
➪EntertheIPaddresstoassigntothe2000E.
➪EntertheSubnetmask.IfunsureofthecorrectSubnetmaskandthefirstnumber
inthe2000EIPaddressisfrom192to254,thenuse255.255.255.0asthe
Subnetmask.
➪EntertheDefaultGatewayaddress(therouter’sIPaddress)orleaveblank.
➪EntertheHardwareAddressofthe2000E. Thisaddressislistedonthenetwork
statuspageunderNetworkAddress,forexample,00:40:af:13:c9:f0. Pleaseenter
itasitappearsonthestatuspage. Thestatuspagemaybeprintedbypressing
theStatuskeyonthefrontpaneloftheprinter.
5. ClickonGotosendthenewsettingstothe2000E. Wait1or2minutesandthen
presstheStatuskeytoprintanEcoLAN2000ENetworkStatuspage.ThenewIP
parameterswillbelistedintheTCP/IPNetworkInformationsectiononthestatuspage.
Ifthestatuspagedoesn’tshowtheassignedIPaddress,rechecktheHardware
AddressentryinNTBOOTP. ThenewIPaddressmayalsobeverifiedbyselecting
VerifyfromtheNTBOOTPAdminmenu.

16
Setting Up Windows NT LPR Printing
Iftheprinterdriverhasnotalreadybeeninstalled,pleaseinstallitfromtheCDwhichis
shippedwiththeprinterbeforecontinuing. Inthefollowinginstructions,somefieldordialog
namesmayvarydependingupontheNTreleasepackinuse.
WindowsNT3.51
1. IntheProgramManagergroupMain,opentheControlPanelanddoubleclickon
Printers.
2. HighlighttheappropriateprinterandselectPropertiesfromthePrintermenu.
3. SelectOtherfromthelistofportsdisplayedinthePrintto:dialog,thenselectLPR
portfromthelistofPrintDestinations.
4. IntheNameoraddressofhostprovidinglpd:field,enterthe2000EIPaddress.
5. IntheNameofprinterorprintqueueonthatserver:field,enteranydesiredport
name,e.g.LPR1andclickonOKtoreturntothePrinterPropertiesdialog.
6. Iftheprinteristobeshared,clickonthecheckboxnexttoSharethisprinteronthe
network. ClickonOKwhenfinished.
WindowsNT4.0
1. ClickontheWindowsStartbuttonandselectSettings,andthenPrinters.
2. RightclickontheappropriateprinterandselectProperties.
3. OnthePortstab,clickonAddPort.
4. DoubleclickonLPRPortinthelistofavailableprinterports.
5. IntheNameoraddressofserverprovidinglpd:field,enterthe2000EIPaddress.
6. IntheNameofprinterorprintqueueonthatserver:field,enteranydesiredport
name,e.g.LPR1,andclickonOK.
7. ClickonClosetoclosethePrinterPortsdialog. The2000EIPaddressisnow
displayedandcurrentlyselectedonthelistofports.
8. Iftheprinteristobeshared,clickontheSharingtab,selectSharedandenterthe
Sharename. ClickonOKwhenfinished.
Selecting a Shared Printer
Thissectionbrieflydescribesthestepsforsettingupclientaccesstoasharedprinter.
Windows95/98:InPrinterPropertiesontheDetailstab,clicktheAddPortbuttonand
browsethenetworkforthesharedprinter.
WindowsNT3.51:SelectConnecttoPrinterfromthePrintermenuinPrintManagerand
choosethesharedprinterfromthesharedprinterslist.
WindowsNT4.0:Addanewprinter(withAddPrinter),selectNetworkPrinterServer
ratherthanMyComputerandchoosethesharedprinterfromthesharedprinterslist.

17
UNIX Configuration
UNIXprintingutilizesalineprinterdaemon(lpd)todirectprintjobstotheprinter. The
2000Esupportstwomodesoflpdprinting,host-basedlpdandprinter-basedlpd. With
host-basedlpd,thelineprinterdaemonisrunononeormoreworkstations(hosts)where
printjobsareacceptedandsenttothe2000E. Withprinter-basedlpd,the2000Eactsas
thelineprinterdaemonhostandacceptsprintjobsdirectly. ManyUNIXsystemsallow
eitherlpdmodetobeused,althoughconfigurationmaybeeasierforoneofthemodes
dependingupontheUNIXsystem. Followingaresomeadvantagesanddisadvantagesof
eachmode:
BannerPageComparison
Thehost-basedlpdcanincludetheusernameandfilenameonthebannerpage,while
theprinter-basedlpdcanonlyincludethehostname.
ConfigurationComparison
Thehost-basedlpdrequiresconfigurationoneachhostthatwillbesendingjobstothe
printer,whiletheprinter-basedlpdrequiresonlythe2000Etobeconfigured.
2000E Configuration
TCP/IPconfigurationofthe2000EisneededforallversionsofUNIX.Usetheinstructions
onpage19tosetTCP/IPparameterswiththeprinterfrontpanelorrefertotheUser’s
manualforotherTCP/IPsetupmethods.Lpdconfigurationdependsuponthemode
selectedandtheUNIXsysteminuse. PleaserefertotheUser’smanualforlpdconfigu-
rationinstructionsforyourparticularUNIXsystem.

18
Dynamic Host Configuration Protocol (DHCP)
TheDynamicHostConfigurationProtocol(DHCP)providesamechanismfordelivering
IPconfigurationparameters,includingIPaddress,subnetmaskanddefaultgateway,to
devices(hosts)onanIPnetwork. ADHCPservermanagesthepoolofavailableIP
addressesandgrantsdevicerequestsforanIPaddress.
Atpower-up, theEcoLAN2000EbroadcastsaDHCPrequestforanIPaddress. Ifa
DHCPserverispresent,therequestwillbeprocessed,andanIPaddresswillbe
returnedtothe2000E. UponreceiptoftheIPaddress,the2000Eresets,andprintsa
NetworkStatusPage. TheNetworkStatusPagewilllistthenewIPaddress(andsubnet
maskanddefaultgateway). OnceanIPaddresshasbeenassignedtothe2000E,itwill
nolongerbroadcastDHCPrequests.
IMPORTANT:EcoLAN2000EIPaddressassignmentwithDHCPwillonlywork
whenthe2000EdoesnothaveanexistingIPaddress.
TheDHCPservermaygrantatemporaryIPaddress,calledatemporaryleasewhich
expiresafteraperiodoftime,ormaygrantanunlimitedleasewhichdoesnotexpire. If
theEcoLAN2000Eisassignedatemporarylease,theIPaddressmaybeassignedto
anotherdeviceoncethe2000Eleaseexpires,resultingintwodeviceswiththesameIP
address.
IMPORTANT: ItishighlyrecommendedtospecifytheEcoLAN2000Eleaseas
unlimitedortodefineanAddressReservationforthe2000EinyourDHCPserver
configurationtoavoidthepossibilityofduplicateIPaddresses.
InWindowsNT,leasedurationissetforaparticularscope,orgroupofaddresses,rather
thanforanindividualaddress. Thus,theleasedurationshouldbesettoUnlimitedforthe
scopetowhichthe2000Ebelongs. Ifthisisnotdesirable,thenthe2000Eshouldbe
definedasaReservedClient.
AReservedClientmaybeaddedwiththeWindowsNTDHCPManagerbyselecting
ScopeandthenAddReservations. TheIPaddressandthehardwareaddressofthe
2000Ewillthenneedtobeentered. Thehardwareaddressmaybefoundonthe
EcoLAN2000ENetworkStatusPage.
IfyouprefernottouseDHCPforIPaddressassignment,itmaybedisabledwiththe
printerfrontpanel,withtheMAPutility,orbyconnectingtothe2000EIPaddresswitha
browser. Theenable/disableDHCPsettingmaybefoundintheSetupTCP/IPsection
undertheProtocolsheading.

19
IP Address Setup with the Printer Front Panel
SettheIPaddressandother2000Eparametersusingthefollowingprocedure:
1. PresstheMODEkey.IfthefirstlineoftheLEDpaneldoesnotalreadydisplay
INTERFACE,pressthe
+
or
-
keyuntilINTERFACE isdisplayed.
2. IfthelinebelowINTERFACE doesnotalreadydisplayOPTION (OPTION 2on
theFS-7000),presstheENTERkey,then
+
or
-
untilOPTION isdisplayed.
3. Pressthe
>
keytoentertheOptionsubmenu.(Note:Notallfirmwareversions
supportfrontpanelsetup.IfthereisnoOptionsubmenuornotallchoicesare
availableonthesubmenu,pleasecheckthefirmwarerequirementslistedbelow.)
4. Press
+
or
-
untilTCP/IP isdisplayed.Pressthe
>
keytoentertheTCP/IP
submenu(onlyaccessiblewhentheTCP/IPprotocolisOn).
5. Press
+
or
-
untilIP Address isdisplayed.PresstheENTERkeyandacursor
willappearunderthelastdigitoftheIPaddress.
6. Pressthe
<
or
>
keytomovethecursortothedesireddigittochange.Press
+
or
-
tochangethevalueofadigit.
7. Oncealldigitsaresetasdesired,presstheENTERkeytoacceptthenewaddress.
8. Repeatsteps5-7forSubnetMaskandDefaultGateway(therouter’sIPaddress).If
unsureofthecorrectSubnetmaskandthefirstnumberinthe2000EIPaddressis
from192to254,thenuse255.255.255.0astheSubnetmask.
9. WhenallsettingsforIPAddress,SubnetMask,andDefaultGatewayarecompleted,
pressthe
<
keytoreturntotheOptionsubmenu(TCP/IP isdisplayed).
Note:Itisrecommendedtoturnoffprotocolsthatarenotinuse,however,beawarethatthe
managementandprintcapabilitieswhichdependuponthatprotocolwillnolongerfunction.
Forexample,iftheNovellprotocol(IPX)isturnedoff,thenNetWareprinting,management
withtheMAPutility,andIPXPeertoPeerprintingwillallbedisabled.
10. Optional:Press
+
or
-
todisplaytheprotocoltoturnoff,e.g.EtherTalk.Press
theENTERkeyanda?willappearnexttoOn.Press
+
or
-
totogglethevalueto
OffandpressENTERtoacceptthenewvalue.Repeatforeachprotocoltoturnoff.
11. Whencompleted,presstheMODEkeytoexitthemenusystem.
12. PresstheSTATUSkeytoprintastatuspageandverifythenewsettings.
Front Panel Setup Firmware Requirements
Followingarethefirmwarelevelsrequiredforfrontpanelsetupcapability.Thefirmware
leveloftheprinterislistedasSoftwareversionontheprinterstatuspage.The2000E
firmwareversionislistedontheEcoLAN2000Estatuspage.
FS/LS-800version38.01orlater FS/LS-1700+version40.00orlater
FS/LS-7000version25.07orlater FS/LS-3700+version32.02orlater
EcoLAN2000Eversion5.04orlater

EcoLAN2000E
QuickConfigurationGuide
Rev.1.1,September1998
PartNumber8836015
Kyocera Corporation
2-14-9 Tamagawadai, Setagaya Ward, Tokyo 158
Japan
Kyocera Communications Systems Co., Ltd.
2-14-9 Tamagawadai, Setagaya Ward, Tokyo 158
www.kccs.co.jp/
U.S.A.
Kyocera Electronics, Inc.
2301-300 Cottontail Lane, Somerset, NJ 08873
www.kyocera.com/printers
Germany
Kyocera Electronics Europe GmbH
Mollsfeld 12, 40670 Meerbusch
www.kyocera.de/drucker.htm
France
Kyocera Electronics France S.A.
Parc les Algorithmes, Saint Aubin 91194 GIF SUR YVETTE
U.K.
Kyocera Electronics (UK) Ltd.
8 Beacontree Plaza, Gillette Way, Reading, RG2 0BP
www.kyocera.co.uk
Australia
Kyocera Electronics Australia Pty., Ltd.
Unit 8, 43, Herbert Street, ARTARMON, NSW 2064
www.kyocera.com.au
Other manuals for FS-600
4
This manual suits for next models
1
Table of contents