Labcold IntelliCold RLDF 19 Series User manual

www.labcold.com
IntelliCold® Pharmacy Refrigerator Operating Instructions - RLDF/G 19

WEEE: Disposal at end of life.
This equipment, when being disposed of in an EU Member State,is subject to the Waste Electrical and Electronic
Equipment Regulations (WEEE)and must be recycled and disposed of in accordance with EU directive 2002/96/EC
asapplied in local laws of that State at the time of disposal. This refrigerator contains ammable insulation gases
and must be disposed of in the appropriate way by competent persons. Ensure that none of the refrigerant circuit
pipes are damaged prior to disposal.
The symbol below on the appliance or accompanying documents indicates that this refrigerator should not be
treated as ordinary waste but must be taken to a special collection centre for the recycling of electrical equipment.
For more information regarding the treatment, recovery or recycling of this product, contact your competent local
oce, electrical waste disposal or vendor from whom you purchased the refrigerator.
As this item is designed for medical or scientic use, before presenting for collection and disposal it will be
necessary for the user to provide documentary evidence of decontamination and/or that it is entirely safe to handle
and dismantle outside of a controlled environment. Goods that cannot be so certied fall outside the scope of the
Directive and remain the user’s responsibility to dispose of.
This refrigerator contains a ammable gas.
This refrigerator contains gas under pressure which may explode if heated.
The refrigerator MUST NOT be located in a room or area with a volume
less than 10m3.
Original instructions - Version 1 12.2018
WARNINGS
Servicing and repairs must be carried out by a suitably qualied engineer.
Only engineers who have been trained in the safe handling and use of hydrocarbon
refrigerants can work on the refrigeration system.
If you suspect a leak contact the manufacturer or its service agents immediately.
Do not touch the refrigerant, it can cause severe eye irritation, redness, tearing, blurred
vision, and possible freeze burns. Contact with evaporating liquid may cause frostbite or
freezing of the skin.
If the power supply cord is damaged, it MUST be replaced by the manufacturer, its
service agent or similarly qualied persons in order to avoid a hazard.
Do not use mechanical or other means to accelerate the defrosting process.
Keep clear of obstruction all ventilation openings in the appliance enclosure.
This refrigerator is climate class 4 and is designed to operate at +16°C to +32°C
ambient room temperature.
Do not damage the refrigerant circuit.
Maximum shelf loading 40 Kg/m 2
The noise level in normal operation is lower than 70 dB.
Do not use electrical appliances inside the refrigerator.
Do not store explosive substances such as aerosol cans with ammable
propellant in this appliance.
Labcold RLDF/G refrigerators are designed for the storing of pharmaceuticals,
medicines and laboratory products and are for professional use only by suitably
trained, competent persons.

Operating instructions for your
IntelliCold® Pharmacy Refrigerator
from Labcold
Contents
Before Use ..............................................................................................................1
A Closer Look .......................................................................................................2
Alarm battery back up.....................................................2
Remote connections........................................................2
IntelliCold® Controller.......................................................................................3
Plug In and Switch On........................................................................................4
Muting the alarm..............................................................6
Accessing the Menu............................................................................................6
Viewing the set point.......................................................7
Viewing software version...............................................7
Centigrade /Fahrenheit...................................................8
Alarm Time Out..................................................................8
Internal light.......................................................................9
Battery alarm......................................................................9
Second temperature probe t2.................................10
Viewing alarm limits......................................................11
Reviewing the date........................................................11
Viewing Min/Max Temperatures................................................................12
Resetting Min/Max Temperatures.............................................................12
Alarm Guide.........................................................................................................13
Light Icon/Button..............................................................................................14
Door Lock..............................................................................................................14
Digital Door Lock...............................................................................................15
Micro SD Card......................................................................................................18
Caring for your Fridge.....................................................................................20
Troubleshooting................................................................................................21
Useful Information...........................................................................................22
IMPORTANT: These operating instructions contain information essential to the
safe and reliable operation of your refrigerator. Failure to use your refrigerator in
accordance with these instructions may invalidate your warranty.
PLEASE RETAIN AND KEEP IN A SAFE PLACE FOR FUTURE REFERENCE
Need calibration?
Labcold are a UKAS calibration laboratory #8898
We can calibrate your refrigerator AND your independent
thermometer
We don’t just use UKAS traceable equipment, we use UKAS
methodology and training for assured technical competence
8898

1
Before Use
Thank you for purchasing a Labcold IntelliCold® Pharmacy Refrigerator. Your fridge has been
purposely designed and precision built for the safe storage of vaccines and other temperature
sensitive pharmaceuticals.
Although great care has been taken in the manufacture of your refrigerator, damage can occur
in transit. Before using for the rst time please remove all packaging and give your fridge a
thorough visual inspection. If any damage is suspected, please contact your retailer immediately
upon receipt of the product. Failure to do so may invalidate your warranty.
Installation
Place your fridge in the location in which it is to be used.
Do not place your fridge near a direct heat source or direct sunlight and leave at least 6cm all
round the unit for adequate ventilation. Failure to do so may aect the performance of your
refrigerator.
Clean your fridge with mild soapy water to remove any dust that may have accumulated during
manufacture and dry thoroughly.
Ensure your fridge is level by adjusting the feet at the bottom of your fridge.
For models RLDF/G0519, 1019 and 1519, insert shelves by placing clips in the racking and resting
the shelf on top. When positioning the shelves, please remember to keep adequate room for air
circulation. Failure to do so may cause hot spots in the fridge.
YOUR REFRIGERATOR SHOULD NOW BE LEFT FOR AT LEAST SIX HOURS BEFORE
CONNECTING TO POWER FOR THE FIRST TIME
2
A Closer Look
Alarm Battery Back Up
Remote Alarm
Connections
Insert 4AA long life alkaline batteries (not supplied) in the holder
located on the right side of the unit.
The batteries will power the controller, facilitate the collection
of data and alarm immediately in the event of a power failure.
Batteries will only power the controller not the fridge.
The remote alarm connection is located at the back of the fridge.
If you have a Labcold repeat alarm kit this can be connected to
the 2 pin connector.
The maximum rating for the connection is 1A 30Vdc.
DO NOT CONNECT TO MAINS VOLTAGE
Door Lock
Fan
Adjustable Feet
Adjustable Shelves
Maximum Load
10kg
LED Light
Controller
Battery Holder
(side of the fridge)
Serial Plate
SD Card Slot
Remote Alarm
Connections
(back of fridge)
Temperature
Display
Second Temperature
Probe (t2)
Second Temperature
Serial Plate

3
IntelliCold® Controller
Before plugging in your Labcold refrigerator for the rst time make sure the power cable is free
from damage and check that your voltage corresponds to that on the serial plate.
It is recommended that you do not use extension cords or multiple socket adapters. Make sure
the power cable is not bent, pinched or compressed and that it can be easily accessed.
When you rst plug your refrigerator in it will sound and all the icons/buttons will be illuminated.
°
°
tt
°
1
2
C
H/L
P
4
Plug In and Switch On
Setting the Date and Time
This needs to be done as soon as the refrigerator is plugged in. Your fridge does not have a
GPRS/wireless connection, so this will need to be repeated if the refrigerator experiences a
power loss and no batteries are tted. We recommend tting batteries to the fridge so it will
alarm and record internal temperatures should it become disconnected from a mains power
source.
The time should NOT be changed when the clocks change to GMT or BST as this may
cause stored data loss.
To set the date you need to do the following:
The IntelliCold® controller tted to the front of your refrigerator has been designed by Labcold
for the safe storage of vaccines, medicines and laboratory products.
It is tted with an exclusive touch controller that displays the temperature detected by two
temperature probes, one located in the back of the fridge and one you can position yourself
within the fridge.
Unlike other refrigerator controllers which have buttons you can press with your nger, this
one responds to the electrical current in your skin like a mobile phone or tablet. When you
place your hand over the controller it will reveal the various icons/buttons allowing you to
access dierent functions.
Like a mobile phone screen it may not work if you’re wearing gloves.
Where the instructions say ‘touch’ this means tap the icon/button like you would an app
on your phone. ‘Hold’ means leave your nger on the icon/button. The controller sounds to
conrm it has registered your touch, again similar to a mobile.
High /Low
Touch to view
minimum/maximum
temperatures
Tick
Touch to select
menu option and
hold to conrm
adjustments
Mute
Touch to mute
alarms, cancel
adjustment or go
back in the menu
Light
Touch to turn the
light on
Slot for
Micro SD Card
Visual Alarm
This red light displays
when the refrigerator is in
an alarm state. It remains
on as long as the alarm
conditions continue
regardless of whether the
alarm is muted
Battery Alarm
Up/Down Arrows
Use to scroll through menu
and hold simultaneously to
access menu
t1 and t2
Indicates which probe
the temperature
displayed relates to
Temperature
Scale
H/L
P
H/L
P
The controller will ash Yfollowed by 2 digits, for example Y98. Use the up and down arrows
on the right hand side to adjust to the current year, so if it is 2019 adjust the digits to 19. If
you hold the arrow it will scroll through the numbers, if you touch the arrow(s) the value will
increase/decrease by one unit at a time. When the controller is showing the correct year, touch
the tick icon/button and it will store that setting and then ask you to set the month.
The controller will now ash followed by 2 digits, for example 98. Adjust the digits using
the arrow icons/buttons as above, so if it is June adjust the digits to 06. When adjusted, touch
the tick icon/button as before.
H/L
P
H/L
P

5 6
Muting the Alarm
To mute the alarm, wait until the controller is showing the t1H high alarm screen and touch
the mute icon/button. The t1H high alarm screen will then ash to conrm you have muted
it and the alarm will stop sounding. Repeat for the t2H alarm.
Muting the alarm does not mean the alarm is cancelled and it will sound again after 15 minutes.
This is the default setting which you can change using the refrigerators menu. However, the
alarm will only cancel completely when the controller detects that the refrigerator is no longer
in an alarm state.
To change the interval between muting and the alarm sounding again please see section
Alarm Time Out page 8.
After 30 seconds the icons/buttons will disappear from the front of the controller and it will
display the temperature alternately with any active alarms.To activate the icons/buttons again,
put your hand across the controller and they will become active after 2 seconds of appearing.
When adjusted, hold the tick icon/button until the display changes to show the temperature
inside the refrigerator. The red alarm light will display because the inside of the refrigerator
hasn’t had time to cool down yet and after a few seconds the controller will alternate the
temperature screen with a t1H and t2H high alarm screen. The alarm will sound when this
screen is displayed.
After setting the month you next need to set the day. The controller will now ash dfollowed
by 2 digits, for example d98. Adjust the digits using the arrow icons/buttons as above, so if it is
21st June adjust the digits to 21. When adjusted, touch the tick icon/button as before.
H/L
P
H/L
P
After setting the day you next need to set the hour. The controller has a 24 hour clock and will
now ash H followed by 2 digits, for example d98. Adjust the digits using the arrow icons as
above, so if it is 2 O’clock, adjust the digits to 14. When adjusted, touch the tick icon/button
as before.
H/L
P
H/L
P
After setting the hour you next need to set the minutes. The controller now ash n followed
by 2 digits, for example n98. Adjust the digits using the arrow icons/buttons as above, so if it
is half past two, adjust the digits to 30.
H/L
P
H/L
P
°
°
t
1
C
H/L
P
H/L
P
ALTHOUGH THE REFRIGERATOR WILL REACH 5oC WITHIN ABOUT AN HOUR, YOU
SHOULD LEAVE THE FRIDGE RUNNING FOR 24 HOURS BEFORE FILLING WITH
TEMPERATURE SENSITIVE VACCINES AND PHARMACEUTICALS.
While your refrigerator is cooling down without contents, it is a good time to set up all the
functions you want to use on your fridge. Some functions you can only view, not change.
To enable/view functions, rst you need to wake the controller menu. This is done by placing
your hand for at least 2 seconds across the controller. This contact will make the icons/buttons
visible.
To access the menu, hold the two arrow icons/buttons on the right hand side of the controller
simultaneously for at least 2 seconds.
Accessing the Menu
°
°
t
1
C
H/L
P
°
°
t
1
C
H/L
P
Make the icons/buttons
visible by placing your hand across
the controller for at least 2 seconds
Access the menu by
holding the two arrow
icons/buttons for at least 2 seconds

7 8
Should you wish to change the temperature scale from centigrade to Fahrenheit enter the
menu as before and use the arrow icons/buttons until you get to a screen displaying C F.
Touch the tick icon/button to enter this function as before.
Centigrade/Fahrenheit
H/L
P
When you access the menu the rst menu option is to view the set point, see above.
The set point is one of the parameters that you can not change but you can view it. Your
Labcold IntelliCold® pharmacy refrigerator leaves the factory with a set point of 5C as advised
by the Green Book chapter 3 page 27 and to prevent this being altered accidently, the set
point can only be changed by a Labcold engineer. If you need the set point changed please
To view the set point, touch the tick icon/button when the SEt screen is displayed and the
controller will display the set point temperature.
Viewing the Set Point
H/L
P
°
C
H/L
P
To return to the normal display, touch the mute
icon/button or wait 30 seconds.
Viewing Software Version
This is another function that you cannot change, but you may be asked about the software
version if you need to contact us about an issue.
If the controller has reverted to the normal display, hold the arrow icons/buttons as above,
if you are already in the menu, touch the up and down arrows as required until you get to a
screen with
SFt on it. Touch the tick icon/button as before and it will display a number. Again touch the
mute icon/button or wait 30 seconds for the display to revert to normal.
H/L
P
H/L
P
H/L
P
The Cwill ash, touch one of the arrows until the display shows F. Hold the tick icon/button
to conrm your selection and the screen will change from F to the the normal temperature
screen. The temperature will now display in Fahrenheit.
The temperature data for the Micro SD card will always be saved using the centigrade scale.
°
°
t
1
F
H/L
P
Alarm Time Out
The alarm time out function allows you to change the time interval between the alarm being
muted and the alarm sounding again.
Access the menu by holding the arrow icons/buttons simultaneously and use either one of
them to scroll through options until you get to a screen that shows Ato.
Touch the tick icon/button to enter the function. The display will now ash with the current
number of minutes there are between the alarm being muted and sounding again. The fac-
tory setting is 15 minutes as shown below.
H/L
P
Use the arrow icons/button to adjust the interval in 5 minute units up to a maximum of a 30
minute time out. When you have set it to the length of time you require, hold the tick icon/
button and the screen will revert to Ato. You can then either leave it alone or hold the mute
icon/button and the controller will then revert to the normal temperature display.
H/L
P

9
The internal light comes on when the door opens and go off when it is shut. It can be changed
so the light is either on or off all the time. To change the setting, access the menu in the usual
way by holding both the arrow icons/buttons and scroll through the menu until you get to the
Lt screen or hold the light icon/button which will take you straight to the Aut screen.
Touch the tick icon/button as before to access this function and the screen will show Aut. This is the
default setting described above. To change the setting to the light being on all the time touch an
arrow icon/button until the screen displays on. Once selected, hold the tick icon/button until the
display reverts to Lt. To change the light operation to not coming on at all, select OFF instead and
again hold the tick icon/button until the screen reverts to Lt. You can either touch the mute icon/
button or just leave the controller alone and the screen will return to the normal temperature display.
10
If you do not t batteries you will need to turn this alarm to OFF. To do so, hold the arrow
icons/buttons to enter the menu. Scroll through until you get to the screen that shows bAt
and touch the tick icon/button. Touch the arrow icon/button to change the screen from on
to OFF and hold the tick icon/button until the display reverts to bAt to conrm the change.
The battery symbol should then disappear from the temperature display screen and the alarm
won't sound.
There is a secondary temperature probe at the back of your refrigerator. It is a ‘wandering
probe’ you can move anywhere in the fridge, for example placing it in a simulated load. Like
probe t1 the controller will alarm if probe t2 detects that the temperature is lower than 2oC
or higher than 8C where it is placed. The temperature detected by this probe will display in
normal operation after the t1 screen.You can tell which one is which because a small t1 or t2
will appear above the temperature displayed.
Likewise you will be able to tell which probe is alarming as the high or low alarm will be
prexed by t1 or t2.
Internal Light
H/L
P
H/L
P
H/L
P
H/L
P
Battery Alarm
The battery alarm is enabled by default. This means if you put 4AA batteries (not supplied)
in your refrigerator the alarm will not sound unless the batteries are faulty or removed. For
extra security, the controller will alarm if the batteries are low or removed. Labcold strongly
recommends that you t batteries to your IntelliCold® pharmacy refrigerator for maximum
cold chain safety, however, should you decide not to you will need to disable the alarm, please
see Turning the Battery Alarm O opposite
The alarm will show on the normal display as a battery symbol which will alternate with a
screen showing n-b. The alarm will sound when n-b is displayed. This alarm can be muted by
touching the mute icon/button while the n-b screen is displayed. The visual alarm will remain
and the screen n-b will still alternate with the temperature display. Unless you install batteries
the alarm will sound again after the time out interval is exceeded. (see page 8).
°
°
t
1
C
H/L
P
H/L
P
Battery Alarm
Turning the Battery Alarm O
H/L
P
H/L
P
H/L
P
Temperature Probe t2
H/L
P
°
°
t
1
C
°
°
t
C
2
Should you wish to disable it, enter the menu by holding the two arrow icons/buttons
simultaneously and scroll until you get to a screen that shows t2.
Touch the tick icon/button to enter the t2 menu and the screen will display on.Touch the
arrow icon/button to reveal the OFF screen and hold the tick icon/button to conrm. The
display will then return to t2 and then the normal temperature display.
Temperature detected
by probe t1
Temperature detected
by probe t2

11
Your IntelliCold® pharmacy refrigerator is now set up and ready to use once it has had 24 hours
of cooling.
Before loading and using for the rst time, make sure that you reset your
minimum/maximum (Hi/Lo) temperature readings
Touch the tick icon/button to access the function and the controller will show the high/low
temperature parameters for each probe.
12
Min/MaxTemperatures
Viewing Alarm Limits
You can view the factory set alarm parameters or limits.These limits ensure that you are alerted
should your pharmaceuticals experience temperatures outside those recommended by the
Green Book, Chapter 3 page 27 and you cannot change them. Should you need them to be
To view the parameter, access the menu by holding the arrow icons/buttons and scroll through
the options until you come to screen Lt.
H/L
P
Reviewing the Date
To review or change the date/time enter the menu by holding the two arrow icons/buttons
simultaneously and scroll through the menu until you get to the d-t screen.
H/L
P
Touch the tick icon/button to access the function and use the tick icon/button to view the
year, month, day etc .If you want to change any of the settings, use the arrow icons/buttons
to change the number and hold the tick icon/button to conrm the change as described on
pages 4 and 5.
Changing the date/time may lead to data stored by the controller being overwritten.
We recommend that once the date/time is set it should not be altered unless absolutely
necessary, for example if the controller experiences a power issue and batteries aren’t tted.
If you are going to use the Micro SD card function, make sure you have downloaded the
latest data before adjusting the date or time.
To view your high/low temperature make the icons/buttons are visible by putting your hand
on the controller as described in page 6. Touch the high/low icon and the controller
will display the minimum and maximum temperatures recorded by probe t1 and repeat
this process for probe t2. You can tell which probe the high and low temperatures relate to
because the t1 or t2 will display above the temperature displayed for the respective probe
readings.
H/L
H/L
P
°
C
t
°
1
H/L
P
°
°
t
1
C
H/L
P
°
°
t
1
C
H/L
P
H/L
P
H/L
P
°
°
tt
°
1
2
C
H/L
P
H/L
P
°
°
tt
°
1
2
C
H/L
P
After showing the temperatures, the controller will revert to the normal display and the icons/
buttons cease to be active.
The temperatures recorded by the two probes may dier because they are taking readings
from dierent parts of the fridge, especially if probe t2 is placed in a simulated load .
Min/Max Reset
To reset the minimum/maximum temperatures to conform with DH Green Book Guidance
page 29-30, hold the high/low icon/button until CF flashes on the display. Hold the tick
icon/button until the display reverts to the normal temperature screen and the minimum/
maximum temperatures will be reset. Repeat this for probe t2.However, if you don’t want to
reset the temperatures, touch the mute icon/button and you will be returned to the normal
temperature display.
H/L
H/L
P

13 14
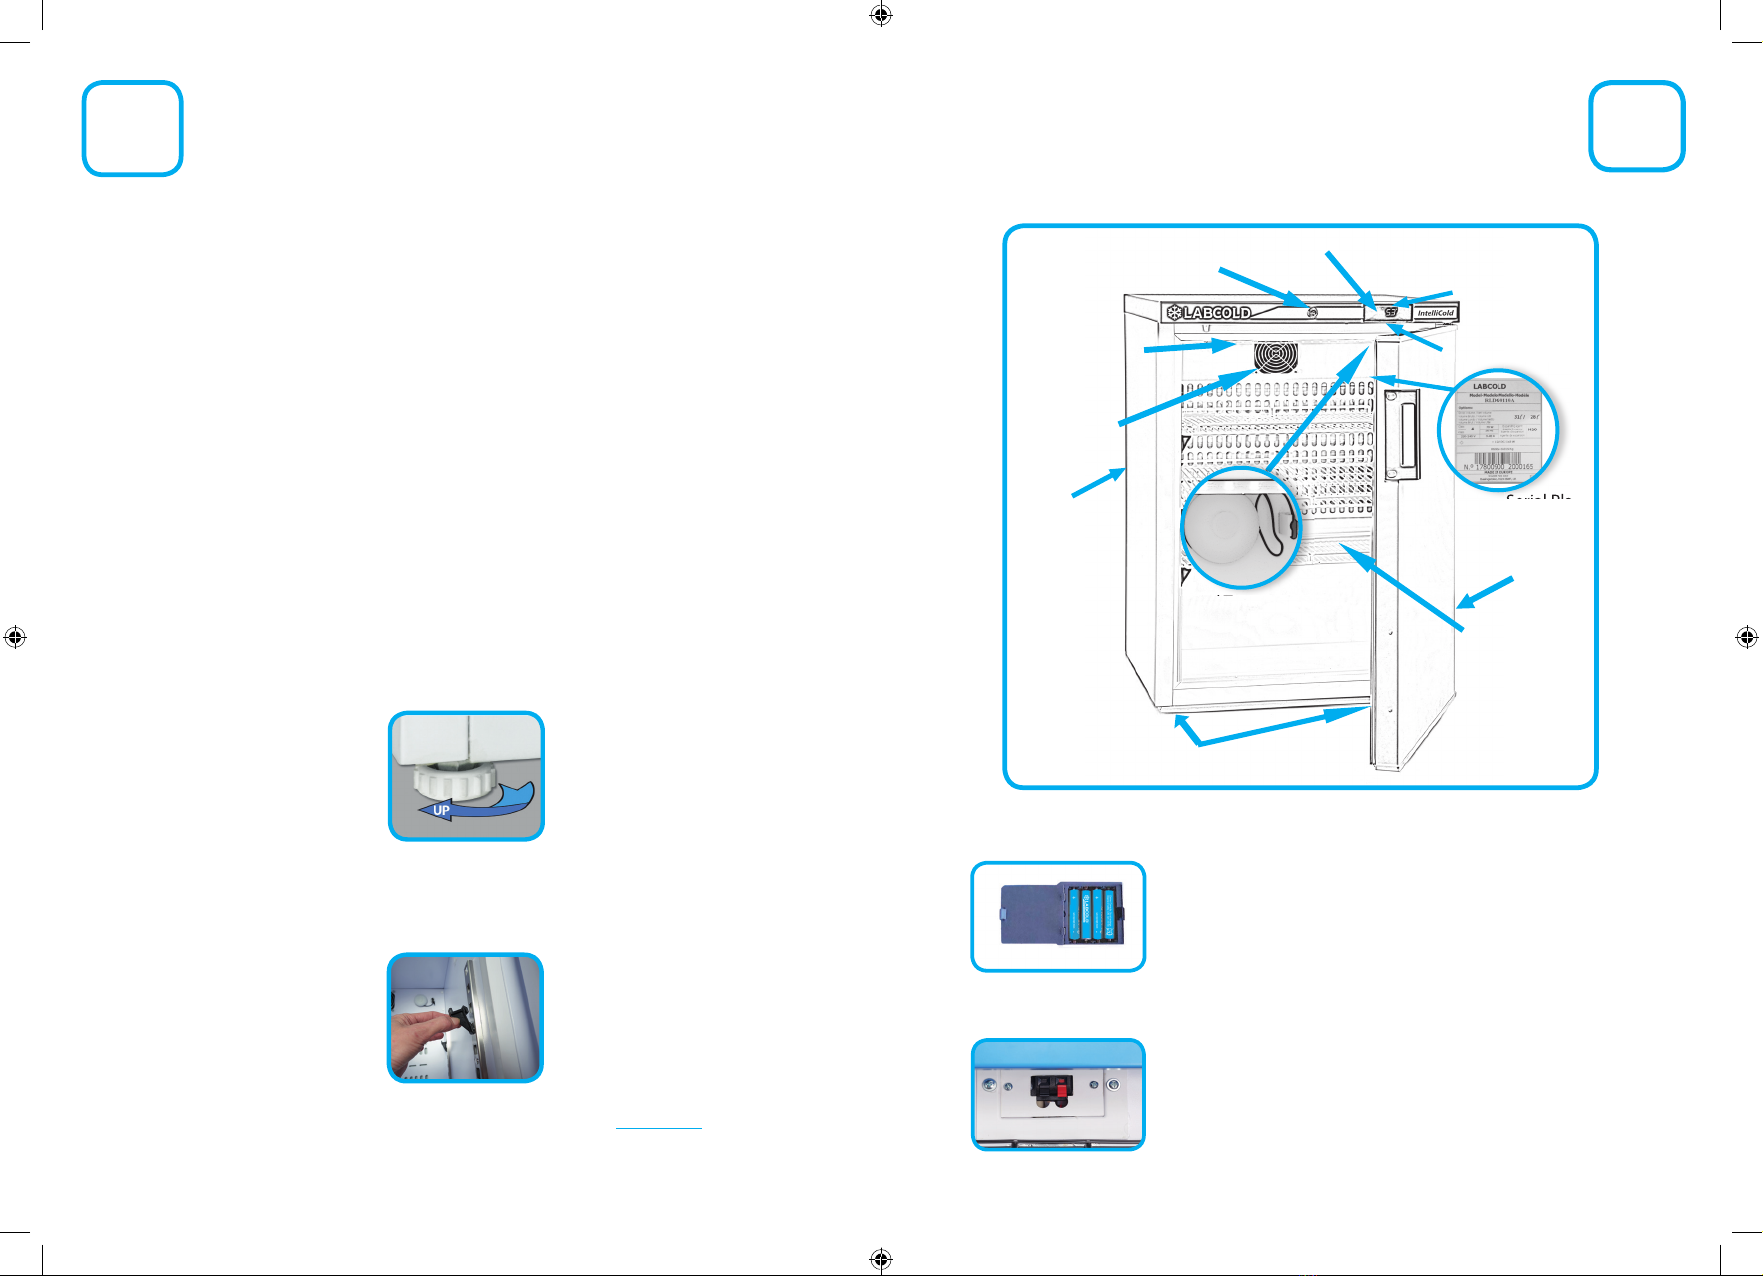
Your Labcold pharmacy and vaccine fridge is tted as standard with a door lock with 2 keys
unless the digital lock has been specied. To lock, push the key in gently and twist 90 to the
left, to unlock twist 90 to the right. The key can be safely removed from both the locked and
unlocked positions.
Keys should not be left in the lock as they protrude from the fridge. They could cause a
health and safety hazard or could be knocked, which may damage the lock.
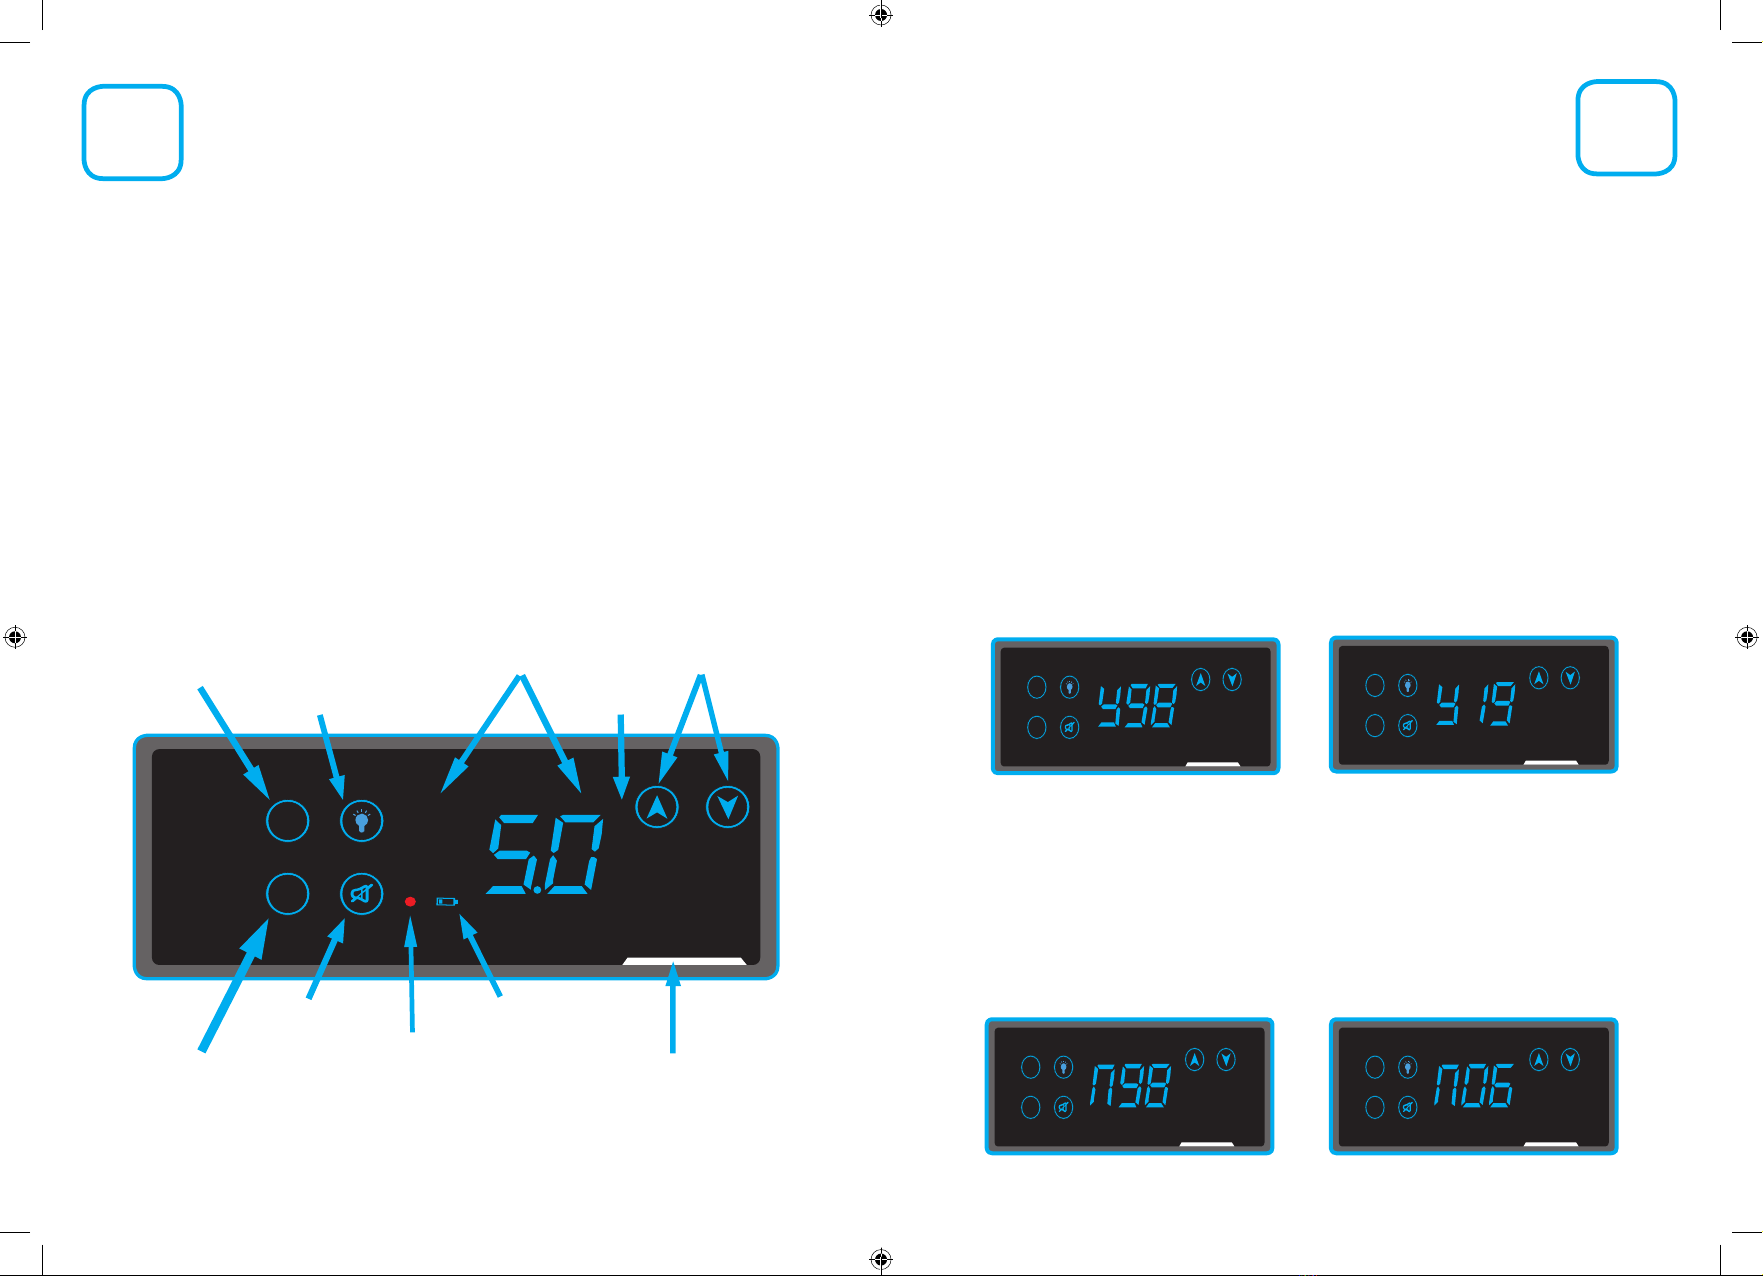
The light icon/button allows you to turn the light of the refrigerator on when the light setting
(Lt) is in Auto mode.
To do so you will need to illuminate the icons/buttons by putting your hand over the controller
as described on page 6 and then touch the light icon/button. The light will turn on even if
the door is shut. Please note it will not override any settings programmed by entering the Lt
function on the settings menu so, if the light is set to on you can’t turn it o using the light
icon/button alone, you have to enter the Lt menu. For information about how to change the
light (Lt function) see page 9.
Alarm Guide
Door Lock
Your IntelliCold® Pharmacy refrigerator is tted with audio and visual alarms to help keep
the contents safe. All can be muted but unless the alarm condition is resolved, the alarm will
return after the time out interval.
The controller will show a code to explain why the fridge is alarming. An alarm code screen
alternates with the usual temperature screen. For all temperature, door and mains failure
related alarms, a red dot will illuminate, regardless of which screen is currently displaying. For
battery related alarms a battery icon will display.
t1H - This will display when probe t1 detects that
the air temperature has exceeded 8oC. Because high
temperatures can adversely aect the contents of your
fridge, it should always be investigated.The alarm will also
sound when this screen is displayed.
1 l
2h
2l
l
o
b
t1L - This will display when probe t1 detects that the air
temperature is below 2oC. Because low temperatures can
adversely aect the contents of your pharmacy fridge, it
should always be investigated. The alarm will also sound
when this screen is displayed.
t2H - This will display when probe t2 detects that
the temperature has exceeded 8oC. Because high
temperatures can adversely aect the contents of your
fridge, it should always be investigated.The alarm will also
sound when this screen is displayed.
t2L - This will display when probe t2 detects that the
temperature is below 2oC. Because low temperatures can
adversely aect the contents of your pharmacy fridge, it
should always be investigated. The alarm will also sound
when this screen is displayed.
L-b - This warns you that the controller has detected that
the batteries are getting low. This alarm will only activate
if batteries are installed and the battery alarm is enabled.
See page 9 for instructions on how to do that. The alarm
will also sound when this screen is displayed.
d-o - Door open alarm which displays if the door is left
open for more than 90 seconds.The alarm will also sound.
It does not cancel when the door is shut so you need to
touch the mute icon/button when the screen shows d-o.
The red light will go o to show it has been cancelled.
n-P - You will see this if batteries are installed. It means
that there has been a loss of mains power. The alarm will
also sound.
Light Icon/Button
p
If batteries are installed and running low the red dot
will display after the n-P alarm as the fridge goes in
to hibernating mode. This is to conserve power so
the controller can continue to record refrigerator and
temperature data for the duration of the power outage.
n-b - You will see this if batteries are not installed and
the battery alarm is enabled, such as when you rst plug
the refrigerator in and haven’t installed batteries (not
supplied).
H/L
P
°
C
t
°
1

15 16
Digital Door Lock
If you have opted to have your IntelliCold® Pharmacy Refrigerator tted with a digital
combination lock, the key lock will be removed and the digital lock tted in it’s place.
The digital combination lock has been designed to provide extra security for the contents of
your pharmacy refrigerator. There is also a master override key (optional extra) that enables
you to open the refrigerator in the normal way should you wish to or in an emergency.
The Labcold digital combination lock is backed by a UK one year parts and labour warranty.
A Closer Look
Logo button
Lock handle in closed
position
Slide up to unlock
Lock handle in open
position
Slide down to lock
Getting Started
Follow the instructions on page 4 -11 to set up your refrigerator.
We especially recommend that you install 4 AA batteries (not provided) in to the battery
compartment located on the right hand side of the fridge near the base ( see page 2) because
this will allow you to be able to open the digital lock if there is a failure of mains power.
IF BATTERIES ARE NOT FITTED, DURING A POWER FAILURE YOU WILL NOT BE ABLE
TO UNLOCK THE REFRIGERATOR UNLESS YOU HAVE PURCHASED A MASTER KEY
Opening the Door
Once the refrigerator has power, you can now open the door using the factory set user code
of 2244.
Put in the code and after every correct digit a green light will illuminate. Always wait for the
LED to light before pressing the next button. After the fourth digit is entered the lock will
make a noise signifying it has unlocked. You can then rotate the lock handle 90oin a clockwise
direction to open the fridge.
If the red LED ashes it indicates you have either entered a wrong digit or the lock hasn’t
registered the code you have entered and an error has occurred. Obviously, the refrigerator
will not unlock. Wait 4 seconds before you try entering the code again.
If you DO NOT unlock the refrigerator within 4 seconds the door will re-lock automatically if
the lock remains in the closed position.
Locking the Door
Shut the fridge door as usual and slide the lock handle 90oin an anti clockwise direction
The digital combination lock does NOT self lock but once the lock handle is in the closed
position the lock will automatically engage.
LED lights
Light up green when the
correct digit is entered
Red LED light
Lights up red if an
incorrect digit is entered
Key lock
Green LEDs illuminate when
you input the correct code
Red LED illuminates when you
input the incorrect digit or code

17
If you do NOT press a button within 4 seconds the red LED will ash and you need to
start the process again.
Press the logo button and key in:
Existing user code i.e. 2244
02
New 4 digit user code
Write the new user code for reference here
The fridge will now only open using the new user
code or a master key
Using the key
We advise that you purchase a master key with your lock, to be held by a responsible person,
because it will enable the refrigerator to be unlocked in the event of a mains power failure or
if the user code is forgotten. The master key is unique to Labcold digital combination locks.
Micro SD Card
18
You can purchase a Micro SD card to transfer fridge and temperature data from the controller
to your computer. The card is supplied with an adapter for convenience so you can use a
regular SD card reader slot found on some older computers.
You cannot use any Micro SD card with your Labcold IntelliCold® pharmacy refrigerator.
Only the Micro SD cards from Labcold are encoded to work with the controllers. They are
fridge specic, so one Micro SD card cannot be used for a number of IntelliCold® fridges, you
need one for every refrigerator that you want to use this function on.
The controller automatically records data every minute about alarms and fridge function and
allows you to download this information as a CSV le. The controller will store this information
for 18 months but we recommend that you download the data once a week especially as the
more data there is to download, the longer it takes.
Downloading Data to the Micro SD card
To download the data, you rst have to fully insert the Micro SD card, printed side up in
the Micro SD slot on the bottom of the controller.
When you insert the card the Sd screen will be displayed. Touch the tick icon/button to
select options for which data you want to download.
H/L
P
You will have the option to download a number of days of data, all the data since the last
download or all the data currently stored on the controller. Use the arrow icons/buttons to
select the option you want.
The option to download data from where the last download ended is only available if
there has previously been at least one download.
Should you wish to use the lock as a digital lock again but have no record of the user code
Changing the User Code
It is advised that you change the factory set user code so that you can control who has access
to your refrigerator.
The user code 2244 is required to change the user code for the refrigerator when the code is
rst changed. After the initial change, whatever is the existing user code will be required to
change the user code. All new user codes must be four digits long.

19 20
To defrost you should:
• Leave unplugged with the door open for at least 6 hours at room temperature or until
any ice is melted. Do not use a sharp implement to remove ice as this will damage
the coating of the fridge
• Dry thoroughly and remove any surplus water before returning to use
• Leave cooling for at least 6 hours or until the temperature display show the correct
temperature for at least 30 minutes before reloading with temperature sensitive
contents such as vaccines or other pharmaceuticals.
It is essential that you unplug the refrigerator from the mains to prevent electric
shock and transfer the contents where they can be stored and monitored at the correct
temperatures before defrosting
Although your Labcold fridge features automatic o-cycle defrosting, it is recommended that
it is defrosted manually if there is a build up of ice. This can happen for a number of reasons, for
example in times of high humidity, if the door has been opened for a long time, the refrigerator
is overstocked or the ambient temperature is high.
Defrosting
Cleaning
When cleaning you should:
• Remove the shelves and clean with weak soapy water. Do not use strong detergents
or bleach
• Wipe the inside of the fridge in the same solution and dry with a soft cloth. Take care
to avoid the light tting and ensure that the drain hole at the back of the fridge is
clear of debris
• Wipe the door seal with a damp cloth. Do not use strong detergents or bleach
• Gently remove the dust on the back of the fridge. Take care not to damage the pipes
It is essential that you unplug the refrigerator from the mains to prevent electric
shock and transfer the contents where they can be stored and monitored at the correct
temperatures before cleaning
Caring for your Fridge
Loading
In order to ensure even temperature distribution throughout your refrigerator it is important
that :
• The shelves are evenly spaced and do not restrict air ow round the product.
• The contents are not packed too closely together.
• The contents do no touch the door, wall or the bottom of the fridge and are stored away
from the fan.
As with all refrigerators, your Labcold pharmacy and vaccine fridge, although designed to
provide you with many years of fault free service, will perform better if it is regularly maintained
and calibrated as per the Green Book, chapter 3 page 28. In addition to the above, attention
needs to be paid to the loading of the fridge to ensure maximum temperature and energy
eciency. The refrigerator also requires regular cleaning and defrosting.
H/L
P
H/L
P
H/L
P
dAY
Select to download a number
of days ie 5. Touch the tick
icon/button and use the
arrows to select the number
of days required, then touch
the tick icon/button for the
download to commence.
LSt
Select to download all the
data since the last download.
Touch the tick icon/button to
select and for the download
to commence.
All
Select to download all the
data held by the controller.
Touch the tick icon/button to
select and for the download
to commence.
H/L
P
H/L
P
H/L
P
H/L
P
The controller will rst check the card then begin to download the data. You will see the
screens below showing the progress of the download and End when it is completed.
If you see a screen with Err, an error has occurred so try again. If you see Er1, it means
initialization has failed, please contact our service team on 01256 705 580 or service@
labcold.com, and if you see ER2 it means the wrong Micro SD card for that refrigerator
is being used. Try again with the correct Micro SD card.
Viewing the data
When you insert you insert the SD card in to your computer you will see csv folders
named in yymm format. They contain CSV les named in yymmdd format. Click on the
le to select the one(s) you want to download or view.
The csv le will be a mixture of temperature readings against time and fridge operation
data such as whether the door was open etc and the time it happened. A zero in a
column means no incidence and a one in a column means there was an incidence so in
the example below, the compressor was on at 00:11 but o at 00:12.

Labcold IntelliCold® refrigerators constantly take readings of the air temperature inside the
refrigerator and averages and analyses the results. This means that if you have a separate
monitor it may alarm before the fridge controller, but the refrigerator will still alarm very
shortly afterwards and, if working correctly, will do so long before the temperature poses a
threat to the contents.
Why doesn’t the alarm react instantly?
There is water at the back of the fridge
Your Labcold refrigerator automatically defrosts and ice and water may be observed at the
back. Any ice is melted and runs through the drain hole to the condensate removal tray at
the back of the fridge. Due to the heat produced by the fridge motor this should evaporate
but may occasionally cause water to be observed in the tray. This is perfectly normal and is
nothing to worry about.
21
My independent thermometer shows a dierent temperature to the front of the fridge
Your Labcold IntelliCold® refrigerator has a probe placed at the rear of the fridge and the
temperature displayed is calculated by analysing and averaging the temperature data
collected by the probe. A thermometer placed in a dierent part of the refrigerator may read a
slightly dierent temperature especially if it is placed close to the door or at the top or bottom
of the fridge as these are the areas where the greatest temperature uctuations occur.
Useful Information
Your Labcold refrigerator comes complete with a one years parts and labour warranty.
However, if you register your refrigerator you will be entitled to a 5 year warranty.*
To register your warranty, please complete the enclosed warranty form or visit our web site
at www.labcold.com, click on the‘Warranty Registration’tab and follow the instructions. Full
warranty terms and conditions can also be viewed and downloaded from the Labcold website.
In the unlikely event that there is a problem with your refrigerator, you should contact your
retailer in the rst instance. If you bought your fridge directly from Labcold you should contact
When you register your warranty or want to report a performance issue you will need to have
the following information to hand. Please ll this in as soon as you get your fridge so we can
help you as quickly as possible in the event of a problem.
Model Number
Serial Number
Retailer
Date Purchased
the professional choice for medical
and scientic refrigeration...
Labcold Ltd, Cherrywood, Chineham Park, Basingstoke, RG24 8WF, UK 01256 705 555
* 5 year warranty available to UK customers only. Outside the UK, warranty is limited to one year parts only.
Micro SD cards are available only as a chargeable extra.
22
Small accumulations of ice on the cold plate are quite normal and should melt away after a
few minutes. Larger accumulations can occur for a variety of reasons:
• The room is too warm or even damp
• Please contact the Labcold service team if the set point is too low (i.e below 3C).
• The door has been left open too long
There is ice in my fridge
Trouble Shooting
If the fridge door is left open too long, or the fridge is over full, or is working in a high ambient
temperature or humid conditions, condensation may form. This is a normal part of the
refrigeration process and as long as the temperatures remain in range, is nothing to worry
about. Labcold IntelliCold® Pharmacy Refrigerators are designed for temperate climates, 16
to 32C, with a humidity of 60% RH.
There is condensation on the glass door of my fridge
All Labcold refrigerators work by evaporating a gas with low GWP properties. This is what
causes the back of the refrigerator to get cold,. As part of this process the gas has to turn back
in to liquid. This is why sometimes you will hear liquid sounds coming from the fridge.
My fridge is making a gurgling noise
• Check that the fridge is plugged in and the plug socket is turned on
• Try another appliance in the power socket. If this appliance works but your fridge
doesn’t, please contact your retailer
My refrigerator is not working

www.labcold.com
This manual suits for next models
7
Table of contents
Other Labcold Refrigerator manuals
Popular Refrigerator manuals by other brands

Zanussi
Zanussi ZC202R Instruction book

Victory
Victory Reach-In Installation, operation and troubleshooting manual

Electrolux
Electrolux U20012 ER 6632 Instruction booklet

Dometic
Dometic DMA4061 operating manual

Electrolux
Electrolux Icon E42BS75EPS Specification sheet

KitchenAid
KitchenAid KSBP25INSS01 parts list