SAFETY & OPERATIONAL PRECAUTIONS
Manufacturer assumes no liability for the use or misuse of this unit.
Wear proper respiratory protection, protective clothing, gloves and eye-wear when working with chemicals.
Always direct the discharge away from electrical devices.
Follow the chemical manufacturer’s safe handling instructions.
Carefully follow chemical manufacturer's safe handling instructions and recommended precautions/practices
when using flammable chemicals.
SPECIAL CAUTION: This fogger atomizes chemical into the air. Ensure that the area to be fogged has
been evacuated of all people without proper respiratory protection!
TO INSTALL (REFER TO DIAGRAM ON NEXT PAGE)
1. Unpack and connect the 4-way fogger head to the nipples and through the slide brackets as shown in the
drawing
2. Push the pick up tubes over the 4 blue metering tip holders. Make sure to place the same tube on the 2 foggers
with the ball valves. This allows the unit to be used as a 2 way.
3. Use a container with enough water for doing some test runs to familiarize yourself with the fogger before running
chemicals through it.This will help you determine the best placement for the best coverage.
4. Place the fogger in the center of the test area to be fogged.
5. Place the 2 pick up tubes/strainers in the water.
6. Connect a 1/2" minimum air line to the fogger that has a shut off valve on the opposite end where the fogger can
be turned on and off at a distance. Wear ear protection.
7. Loosen the anchor bolts on the slide brackets and raise the 4-way fogger assembly to preferred height, and
tighten the bolts to secure.
8. Move away from the fogger and turn on your air supply, observe the foggers performance. The fog should be
consistent and uniform. If it is sputtering and inconsistent you may need to partially close your airline ball valve to
fine tune the air volume/pressure.
9. For certain applications the foggers may produce more volume than needed. If fog is too dense, optional metering
tips are available for restricting the solution volume to produce a lighter fog
10. Observe the coverage, you may have to move the fogger a time or two for best coverage. Once you are familiar
with coverage and operation and air flow adjustments you are ready to fog.
TO OPERATE
SPECIAL CAUTION:This fogger atomizes chemical into the air. Ensure that the chemical is safe to be around or
the area to be fogged has been evacuated of all people and/or animals before starting fogging. Upon completion
of fogging, ensure that sufficient time has elapsed for all the fog to have dissipated before returning to the area
without proper respiratory protection.
1. Fill a 5 gallon pail with the desired amount of ready to use solution you want to "fog" and place the tubes in the
chemical solution.
2. Place the fogger in the center of the area to be fogged.
3. Loosen the anchor bolts on the slide brackets and raise the 4-way fogger assembly to preferred height, and
tighten the bolts to secure.
4. Connect your 1/2" minimum air line to the fogger do not turn on!!
5. Make sure you are out of the area to be fogged and turn on your air supply. Adjust airline ball valve if needed
based on your testing with water.
6. For certain applications the foggers may produce more volume than needed. If fog is too dense, optional metering
tips are available for restricting the solution volume to produce a lighter fog
7. Fogger will continue to run until the air supply is manually turned off.
8. Depending on the application, you will have to experiment with the amount of time and solution required to
achieve the desired results.
9. Turn air supply off when finished. Do NOT re enter room without proper respiratory protection until fog dissipates.
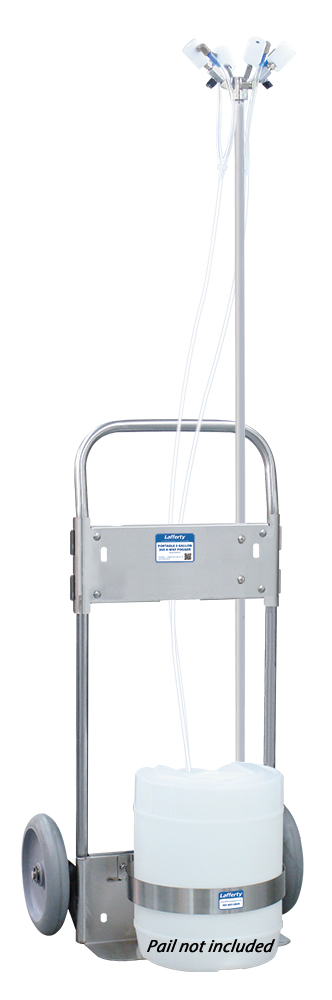
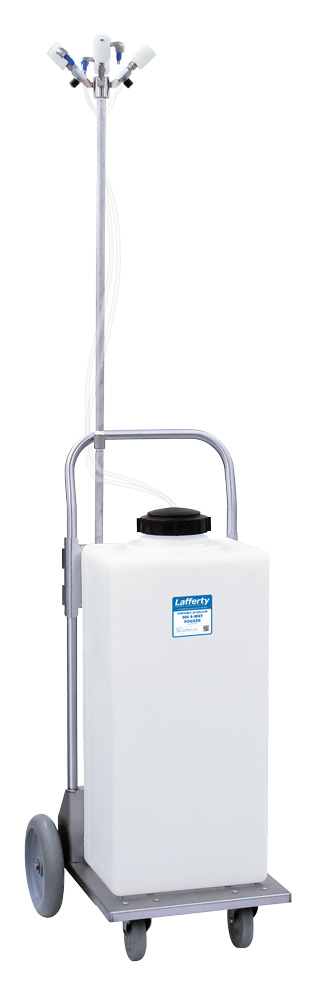
PORTABLE 305 4-WAY FOGGER
PRODUCE MEDIUM FOG PARTICLES AND
PROJECT A LIGHTER, "DAMP" MIST UP TO 25
FEET.
COMPRESSED AIR FLOW (CFM)
PLUMES 60 PSI 80 PSI
4-Way 22.5 29.5
CHEMICAL SOLUTION DRAW RATE (FL-OZ/MIN)
DISTANCE 60 PSI 80 PSI
80" Above Chemical 31.6 39.5
60" Above Chemical 37.4 44.2
950701 • Portable 5 Gallon 305 4-Way Fogger
- Page 2 -


