Lagostina Artiste User manual

- Artiste - 12-cup programmable
lter coffee maker /
Artiste - Cafetière à ltre de 12 tasses
programmable -
INSTRUCTIONS FOR USE - NOTICE D’UTILISATION -
www.lagostina.ca

u*
s*
t*
q
n
w
k
p
o
l
m
r

u*
s*
t*
q
n
w
k
p
o
l
m
r
12 3
4 5
12
6
7 8a 8b
9 1110
or

12 13 14
15 16
20*
17b
17a
19*
22
17 fl.
OZ
(0.5 L)
21
12
23
18b18a

27*
24 25 26*
28*
* depending on the model * selon le modèle

6
IMPORTANT SAFEGUARDS
When using electrical appliances, basic safety precautions
should always be followed to reduce the risk of fire, electric
shock, and/or injury to persons including the following:
1. Read all instructions.
2. Do not touch hot surfaces. Use handles or knobs.
3. To protect against fire, electric shock and injury to persons, do
not immerse cord, plugs or machine in water or other liquid.
Close supervision is necessary when any appliance is used by
or near children.
4. Unplug from outlet when not in use and before cleaning.
Allow to cool before putting on or taking off parts, and before
cleaning the appliance.
5. Do not operate any appliance with a damaged cord or plug
or after the appliance malfunctions, or has been damaged
in any manner. Return appliance to the nearest authorized
service facility for examination, repair or adjustment.
6. The use of accessory attachments not recommended by the
appliance manufacturer may result in fire, electric shock or
injury to persons.
7. Do not use outdoors.
8. Do not let cord hang over edge of table or counter, or touch
hot surfaces.
9. Do not place on or near a hot gas or electric burner, or in a
heated oven.
10. Always attach plug to appliance first, then plug cord into
the wall outlet. To disconnect, turn any control to the “off”
position, then remove plug from wall outlet.
11. Do not use appliance for other than intended use.
12. The carafe is designed for use with this appliance. It must
never be used on a range top.
13. Do not place a hot carafe on a wet or cold surface.

7
EN
14. Do not use a cracked carafe or a carafe having a loose or
weakened handle.
15. Do not clean carafe with cleansers, steel wool pads, or other
abrasive material.
16. Scalding may occur if the lid is removed during the brewing cycles.
17. The coffee-maker shall not be placed in a cabinet when in use.
SAVE THESE INSTRUCTIONS
CAUTION
This machine is intended for household use only. Any servicing other than cleaning and
user maintenance should be performed by the nearest authorized Lagostina Service
Center. Visit our website at www.lagostina.ca in Canada or contact your respective
country’s Consumer Service department for the service center nearest you, or contact
your respective country’s Consumer Service department. To reduce the risk of fire or
electric shock, do not attempt to disassemble the machine.
Repair should be done by an authorized Lagostina Service Center only.
SHORT CORD INSTRUCTIONS
A. A short power cord or a detachable power cord is provided to reduce the risks of
becoming entangled in or tripping over a longer cord accidentally.
B. Longer detachable power cords or extension cords are available and may be used if
care is exercised in their use.
C. If a long detachable power cord or an extension cord is used:
1) the marked electrical rating of the detachable power cord or extension cord
should be at least as great as the electrical rating of the appliance.
2) If the appliance is of the grounded type, the extension cord should be a grounding
type 3-wire cord.
3) the longer cord should be arranged so that it will not drape over the counter where
it can be pulled on by children or tripped over accidentally. The appliance may
have a polarized plug (one blade is wider than the other). To reduce the risk of
electric shock, this plug is intended to fit into a polarized outlet only one way.
If the plug does not fit fully into the outlet, reverse the plug. If it still does not
fit, contact a qualified electrician. Do not attempt to modify the plug in anyway.
ADDITIONAL SAFETY INSTRUCTIONS
• This appliance is not designed to be used by children or people without knowledge
or experience with the product, unless they are supervised or given prior instructions
concerning the use of the appliance by someone responsible for their safety.
• Burns can occur from touching hot plate, hot water or steam. Exercise caution.
• All machines are subject to stringent quality control. Practical tests using machines
taken at random are conducted and this may explain any slight marks or coffee residue
showing prior to use.
• Do not pour liquids other than water and descaling solutions specified in this manual
into the water tank.

8
IMPORTANT: Your machine has been designed to work with cold or
water at room temperature only.
• Protect the machine against humidity and freezing.
• Do not pour water into the appliance if it is still hot.
• Always place your coffee maker on a flat, stable, heat resistant work surface away from
water splashes and any external sources of heat.
• Never place your carafe or your insulated pot in a microwave oven, in a dishwasher or
on a stove top.
• Never put your hand inside the insulated pot.
• Do not use the carafe or the insulated pot without the lid.
• Do not use the thermal carafe if the glass inner part inside is broken. If the glass inner
part of the carafe is broken, pieces of glass can transfer to your cup.
• In the interest of improving products, Lagostina reserves the right to change
specifications without prior notice.
• A short power supply cord is provided to reduce the hazards resulting from becoming
entangled in or tripping over a long cord.
• This appliance is not intended for use by persons (including children) with reduced
physical, sensory or mental capabilities, or lack of experience and knowledge, unless
they have been given supervision or instruction concerning use of the appliance by a
person responsible for their safety. Children should be supervised to ensure that they do
not play with the appliance.
a) Machine body
b) Lid
c) Water tank
d) Water level indicator
e) Carafe lid
f) Carafe handle
g) Carafe
h) Warming plate
i) Filter holder
j) Permanent filter (avoids paper filters)
k) BREW button
l) AUTO button
m) HR button
n) MIN button
o) BOLD button
p) 1 - 4 cups button
q) CLEAN button
r) ON OFF button
s) Filter cartridge holder*
t) Filter cartridge*
u) Cartridge replacement indicator*
v) Spoon
w) CLOCK button
Description
Before first use
1) Remove stickers from your coffee maker.
2) Before using your coffee maker for the first time, run a cycle without coffee to rinse
the circuit. Fill the water tank to the maximum level and start a cycle by pressing the
brew button (k).
* depending on the model

9
EN
Setting the clock
• Place the coffee maker on a hard flat surface.
• Connect the power cord to a 120V wall socket.
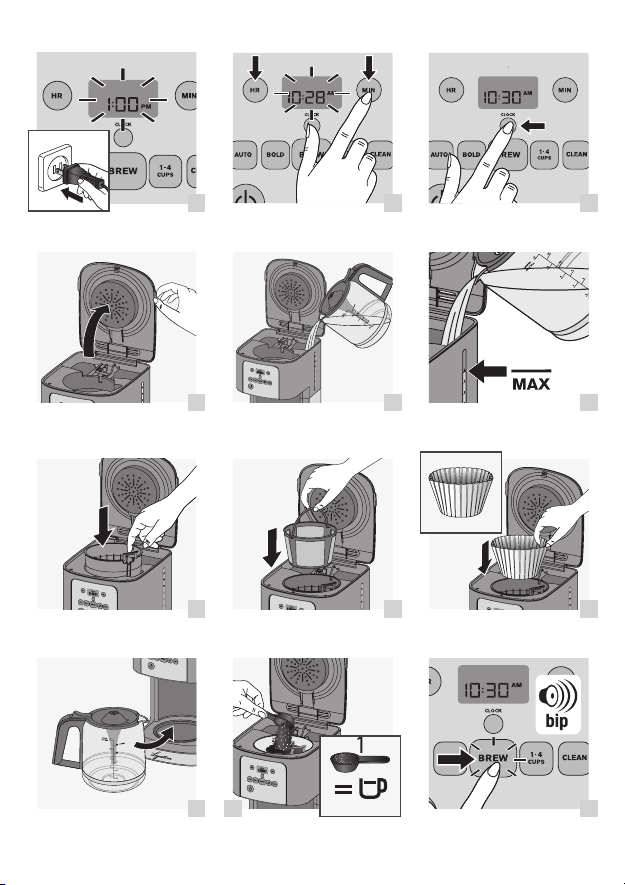
1) When you plug in the coffee maker for the first time, “1:00 pm” will start flashing
on the display. Fig. 1. Set the time by pressing the HR button (m) to set the hour
and the MIN button (n) to set the minutes. The time will appear on the display.
It will be automatically set after 5 seconds or by pressing the BREW button (k).
2) You can also change or reset the time whenever you wish by pressing the CLOCK
button (w) then adjusting the time by pressing HR (m) for the hours and MIN
(n) for the minutes. The time will appear on the display. Figs. 2 and 3. It will be
automatically set after 5 seconds or by pressing the CLOCK button.
NB: Your clock is now set and will continue to show the time, even when your machine
is in standby mode. If the machine is unplugged or there is a power failure, the clock will
default to 1:00 pm. Repeat the steps above to reset the clock.
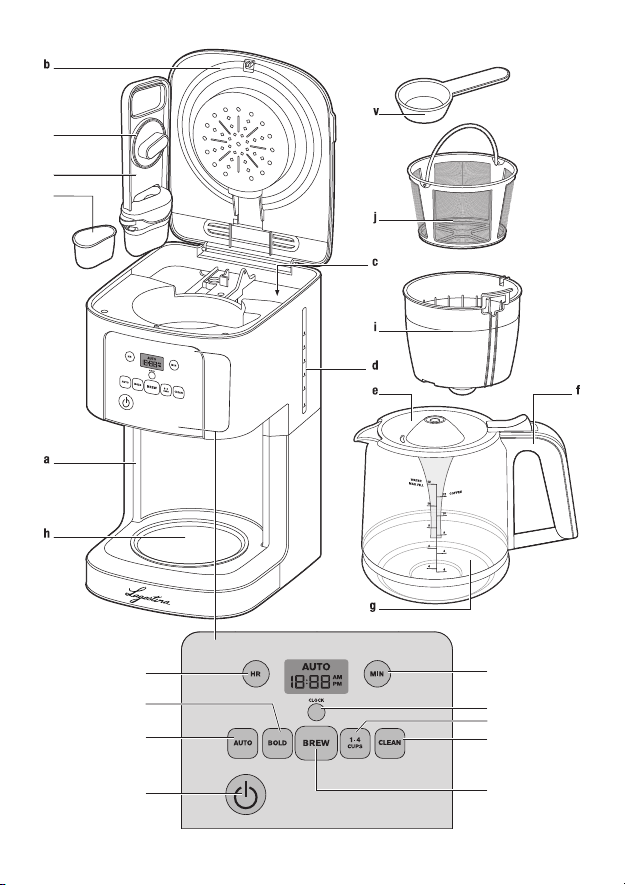
• Open the coffee maker lid (b). Fig. 4.
• Fill the carafe (g) with cold or water at room temperature, then pour it into the water
tank (c) Fig. 5.
The number of cups is shown by the water level indicator. Do not exceed 12 cups. Fig. 6.
• Place the carafe (g) with its lid (e) onto the warming plate (h) making sure that it is
properly positioned so as to activate the coffee pouring mechanism. Fig. 9.
• Make sure that the filter holder (i) is inserted. Fig. 7. Insert the permanent filter (j) Fig. 8a
or a paper filter into the filter holder (i). If using a paper filter, make sure it is fully
opened and properly positioned in the filter holder. Fig. 8b.
• Add 1 spoon (v) of ground coffee per cup. Do not exceed 12 spoons (2 ounces). Fig. 10.
• If you accidentally pour ground coffee into the water tank, do not start the cycle. Clean
the tank, otherwise the coffee may block the water circuit.
• Close the lid (b).
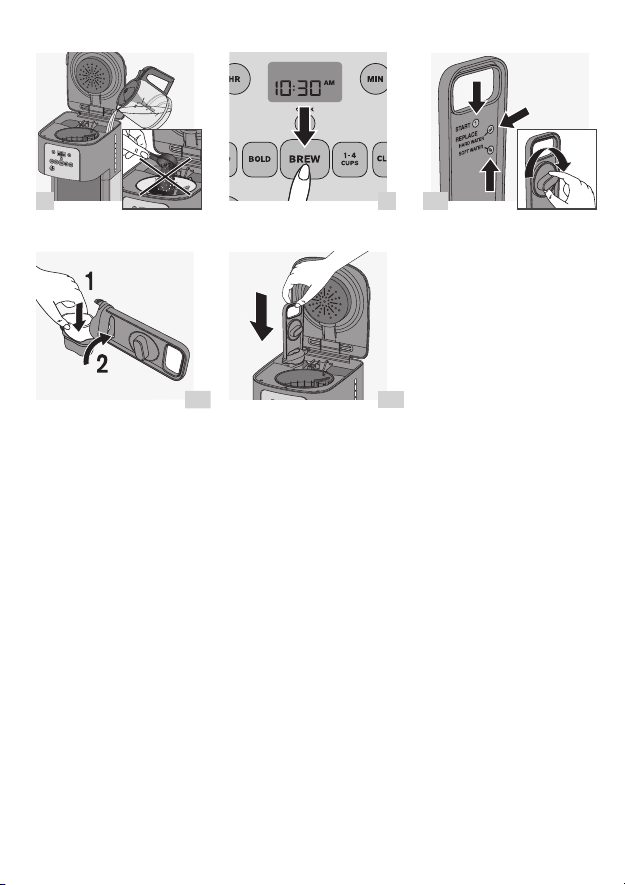
• Press the ON OFF button (r) to turn on the coffee maker and then press BREW (k) to
start the cycle. The BREW button light will come on to show that the coffee maker has
started the brew cycle. The machine will beep once. Fig. 11.
• Once the cycle has finished, the machine beeps 3 times and the keep warm function
switches on automatically for a duration of 4 hours. At the end of the keep warm time,
your machine beeps 3 times and the BREW button (k) turns off.
Note:
− The amount of coffee in the carafe at the end of the cycle is less than the amount of
water poured into the tank because about 10% is absorbed by the ground coffee and
the filter.
− There is an overflow hole on the back of the water tank. If you add too much water, it
will leak out of this hole.
− Clean the permanent filter between each use or use a new paper filter.
Making coffee

10
CAUTION:
− To avoid any overflow, the carafe must be properly positioned on the warming plate
of the coffee maker, otherwise it could cause hot water or hot coffee to overflow.
− The coffee maker becomes very hot during the brew cycle. Please handle with care.
6a – AUTO START FUNCTION (AUTO)
Programming the auto-start settings.
• Your appliance is equipped with auto-start program.
• Check whether the clock is set to the right time. If not, follow the instructions in the
SETTING THE CLOCK section.
• Press the ON OFF button to turn the coffee maker on and press the AUTO button to set
the time. The AUTO icon will appear on the display. Figs. 12-13-14.
• Set the time by pressing the HR button (m) to set the hour and the MIN button (n) to
set the minutes. The time set is automatically set after about five seconds.
• Starting a auto-on function when time has already been set.
− See the section MAKING COFFEE.
− Press AUTO.
• To cancel the delayed start, press AUTO once.
6b – REGULAR OR BOLD
• The BOLD function allows you to adjust the coffee intensity.
• Press the BOLD (o) button to select the strength of your coffee. Fig. 15.
• The BOLD button lights up (o).
• The function is stored in the memory for subsequent cycles.
• To cancel the BOLD function, press the BOLD button again.
6c – 1 - 4 CUPS
• This function is specially designed for making small amounts of coffee, with optimal
aroma and flavor.
• To activate this function, press the 1 - 4 CUPS button (p) before starting the cycle.
Fig. 16.
• The 1 - 4 CUPS button lights up.
• To cancel the 1 - 4 cups function, press the 1 - 4 CUPS button again.
Other features
Cleaning
• To remove the used coffee grounds, remove the filter and the filter holder from the
coffee maker. Fig. 17a. and Fig 18a.
• Throw the coffee grounds and filter paper in the garbage. Fig. 17b. and Fig. 18b.
• Do not clean the machine if it is still hot.
• Wash the removable filter holder and the permanent filter in warm soapy water. The
carafe may be cleaned in the dishwasher.
CAUTION: Do not place the carafe in the microwave.

11
EN
Do not put other parts of the coffee maker into the dishwasher.
• Clean the coffee maker with a damp cloth or sponge. Never use abrasive or strong
products on any part of the coffee maker.
• To clean the stainless steel parts of your coffee maker, dampen a soft cloth or sponge
with warm water. Wipe carefully with a dry cloth.
• For difficult stains, use a cloth with white vinegar.
• Do not immerse the appliance in water or under the tap.
Descaling
• Why descale?
− Limestone forms naturally in your coffee maker. Descaling preserves the coffee maker
and ensures it will last longer and provide quality coffee over time. Limestone can
permanently affect the machine’s performance. Malfunctions associated with scaling
will not be covered by the warranty if the product is returned.
• When to descale?
− When your machine needs descaling, the CLEAN button light will come on.
− The descaling frequency depends on the hardness of the water and the number of
brew cycles. If you notice the following signs: longer cycle time, excessive steaming,
more noise at the end of the cycle, stopping mid-cycle, this means your machine has
limestone build up and needs to be descaled.
− Your coffee maker should be descaled around once a month depending on the hardness
of the water.
− If your machine needs descaling, the CLEAN button (q) light will flash 3 times at the
end of the cycle.
Note: If you press the BREW button (k) while the CLEAN button (q) light is on, the
descaling cycle will start instead of the brew cycle.
How to descale your Lagostina coffee maker
• Remove the filter cartridge (t). Figs 19* and 20*.
• Use 17 fl. oz of white vinegar diluted in 17 fl.oz of cold or water at room temperature
or 1.5 oz of citric acid diluted in 17 fl. oz until complete dissolution of crystals. Fig. 21.
• Pour the solution into the water tank (without coffee). Fig. 22.
• Press the CLEAN button (q) followed by the BREW button (k) to start the descaling
cycle. Fig. 23.
• The cycle lasts for 30 min.
• Wait until the end of the cycle.
• If the water tank is not empty, please launch another descaling cycle by pressing CLEAN
button.
• To rinse the machine, run 2 full 12 cups cycles with water but without coffee. Fig. 24.
• Repeat if necessary.
• Put the filter cartridge back. Figs. 27* and 28*.
• The warranty does not cover coffee makers that do not work, or do so poorly, due
to lack of descaling.
* depending on the model

12
Filter cartridge*
• Your machine filters water using a DuoFilter: a double action filter (reduces chlorine and
scaling) formulated with active plant ingredients. This DuoFilter allows you to enjoy the
subtle aromas of your coffee and reduces the descaling frequency.
Note: There is a rotary indicator on the top of the water filter holder that shows
when you should replace your DuoFilter.
• Select the number of the month when you replace the filter. The month when you
should change your filter depending on the hardness of the water will then be indicated.
Fig. 26*.
• To change the filter, remove the filter cartridge from the tank. Fig. 19*.
• Open it by pulling the bottom part and change the filter. Figs 27* and 28*.
IMPORTANT:
The DuoFilter must only be used with water.
Your coffee machine will still work if the water filter is not installed.
If you have not used your coffee machine for over a month, rinse the DuoFilter
under running water.
We do not recommend leaving the same DuoFilter in your machine for over 5 months.
The DuoFilter may need to be replaced if water flow is slow, machine releases
excessive steam, or machine makes loud noises when brewing.
Troubleshooting
PROBLEM SOLUTION
The coffee does
not brew or the
appliance does not
turn on.
• Make sure the appliance is well connected to a working outlet and
that it is in the «ON» position.
• The water tank is empty.
• There is a power outage.
• Unplug the machine, then plug it back in.
• The clock should be reprogrammed after a power outage.
• The automatic stop feature has turned off the appliance. Turn off
the appliance and then turn it back on to make more coffee. For more
information, please consult the «Making Coffee» section.
The appliance
seems to leak.
• Make sure the water tank has not been filled beyond the maximum
limit.
Brewing takes a
long time.
• It may be time to descale the appliance.
• Several minerals can accumulate in the coffee maker’s circuitry.
Regular descaling of the machine is recommended. This may need
to be done more often depending on the hardness of your water. For
more information, please consult the «Descaling» section.
CAUTION: do not take the appliance apart.
* depending on the model

13
EN
PROBLEM SOLUTION
The filter holder
overflows or the
coffee flows too
slowly.
• The coffee maker needs cleaning.
• There is too much coffee. We recommend using one measuring
spoon or one soup spoon of ground coffee per cup.
• The ground coffee is too fine (e.g., ground coffee for espresso won’t
work in a drip coffee maker).
• There is ground coffee lodged between the paper filter and the
filter holder.
• The paper filter is not opened properly or is not well placed.
• Rinse the filter holder before inserting the paper filter so it will
adhere to the damp walls of the filter basket.
• Be sure you have not inserted a paper filter at the same time as the
permanent filter.
• There is more than one paper filter in the filter holder.
• Make sure the filter holder is pushed down all the way.
The coffee tastes
bad.
• Clean the coffee maker.
• The ground coffee is not right for your coffee maker.
• The proportion of coffee and water is not sufficient. Adjust to suit
your taste.
• The quality and freshness of the coffee is not the best.
• The water is of poor quality.
The coffee does
not flow.
• See if there is water in the water tank.
• The coffee flow system may be obstructed. You may clean it simply
by rinsing with water.
The time is not
correct (there is a
time difference).
• The timer is synchronized and depends on your electrical network. If
there is a time difference, we recommend that you program the time
once a week to be sure it is correct.
If your appliance does not always work properly, call customer service in your country.

14
LAGOSTINA HOUSEHOLD APPLIANCES
MANUFACTURER’s LIMITED WARRANTY
: www.lagostinausa.com / www.lagostina.ca
With a strong commitment to the environment, Lagostina electrical products are repairable during and after the warranty
period. Before returning any defective products to the point of purchase, please call Lagostina consumer service directly at the
phone number below for repair options.
Your help to sustain the environment is appreciated!
The Warranty
This electrical product or product with batteries is guaranteed by Lagostina for a period of 2 years against any
manufacturing defect in materials or workmanship, starting from the initial date of purchase.
The manufacturer’s warranty by Lagostina is an extra benefit which does not affect consumer’s Statutory Rights.
The Lagostina warranty covers all costs related to restoring the proven defective product so that it conforms
to its original specifications, through the repair or replacement of any defective part and the necessary labor.
At Lagostina’s choice, a replacement product may be provided instead of repairing a defective product.
Lagostina’s sole obligation and your exclusive resolution under this warranty are limited to such repair or replacement.
Conditions & Exclusions
The Lagostina warranty only applies within the United States and Canada, and is valid only on presentation
of a proof of purchase.
For warranty service please contact Lagostina Consumer Service using the appropriate toll free number or
website listed below. A consumer service representative will personally assist you with the evaluation, repair or
replacement of your product at the closest Lagostina service center.
Lagostina shall not be obliged to repair or replace any product which is not accompanied by a valid proof of purchase.
This warranty will not cover any damage which occurs as a result of misuse, negligence, failure to follow
Lagostina instructions, use on current or voltage other than as stamped on the product, or a modification or
unauthorized repair of the product. It also does not cover normal tear and wear, maintenance or replacement
of consumable parts, and the following:
-using the wrong type of water or consumable
-scaling (any de-scaling must be carried out according to the instructions for use);
-ingress of water, dust or insects into the product (excluding appliances with features
specifically designed for insects);
-mechanical damages, overloading
-damages or bad results due to wrong voltage or frequency
-accidents including fire, flood, lightning, etc
-professional or commercial use
-damage to any glass or porcelain ware in the product
This warranty does not apply to any product that has been tampered with, or to damages incurred through
improper use and care, faulty packaging by the owner or mishandling by any carrier.
The Lagostina manufacturer’s warranty applies only for products purchased and used in USA & Canada.
Where a product is purchased in one country and then used in another one:
a) The Lagostina guarantee does not apply in case of non conformity of the purchased product
with the local standards, such as voltage, frequency, power plugs, or other local technical
specifications
b) The repair process for products purchased outside the country of use may require a longer
time if the product is not locally sold by Lagostina
c) In cases where the product is not repairable in the new country, the Lagostina guarantee is limited
to a replacement by a similar product or an alternative product at similar cost, where possible.

15
EN
U.S.A.
GROUPE SEB USA
2121 Eden Road
Millville, NJ 08332
800-255-2523
CANADA
GROUPE SEB CANADA INC.
36 Newmill Gate, Unit 2
Scarborough, ON M1V 0E2
1-800-418-3325
: www.lagostinausa.com / www.lagostina.ca
Consumer Statutory Rights
This Lagostina manufacturer’s warranty does not affect the statutory rights a consumer may have or those
rights that cannot be excluded or limited, nor rights against the retailer from which the consumer purchased
the product. This warranty gives a consumer specific legal rights, and the consumer may also have other legal
rights which vary from State to State or Country to Country or Province to Province. The consumer may assert
any such rights at his sole discretion.

16
CONSIGNES IMPORTANTES
DESÉCURITÉ
Lorsque vous utilisez un appareil électrique, des consignes
de sécurité élémentaires doivent toujours être observées
pour réduire les risques de feu, de décharge électrique et de
blessures, y compris les suivantes :
1. Lire le mode d’emploi entier.
2. Ne pas toucher aux surfaces chaudes; utiliser les poignées ou
les boutons.
3. Pour se protéger des incendies, des décharges électriques et
des blessures, ne pas immerger la machine dans l’eau ni dans
tout autre liquide.
4. Il convient de surveiller les enfants étroitement lorsque
l’appareil est utilisé par des enfants ou en leur présence.
5. Débrancher l’appareil de la prise murale lorsqu’il n’est pas
utilisé ou pour le nettoyer. Laisser l’appareil refroidir avant
d’ajouter ou d’enlever des pièces.
6. Ne pas utiliser un appareil électrique ayant une prise ou un
cordon d’alimentation endommagé, si l’appareil fonctionne
mal ou qu’il a été endommagé de quelque manière que ce soit.
Retourner tout appareil défectueux au centre de service agréé le
plus près afin qu’il soit examiné, réglé ou réparé.
7. L’utilisation d’accessoires non recommandés ni vendus par le
fabricant peut causer des feux, des décharges électriques ou
des blessures.
8. Ne pas utiliser l’appareil à l’extérieur.
9. Le cordon ne doit pas pendre de la table ou du comptoir, ni
toucher à des surfaces chaudes.
10. Ne pas placer l’appareil sur ou près d’un brûleur au gaz ou
électrique, ni dans un four chaud.
11. Toujours brancher le cordon à l’appareil en premier, puis à la
prise murale. Pour débrancher l’appareil, tourner le bouton de
commande à la position « OFF » puis retirer la fiche de la prise
murale.

17
FR
12. Ne pas utiliser l’appareil pour une autre fonction que celle pour
laquelle il a été conçu.
13. La carafe est conçue pour être utilisée avec cet appareil; ne
jamais l’utiliser sur une cuisinière.
14. Ne pas déposer une carafe chaude sur une surface froide ou
humide.
15. Ne pas utiliser un récipient fêlé ou dont la poignée est
endommagée.
16. Ne pas nettoyer la carafe avec des nettoyants, des éponges
métalliques ni avec tout autre produit abrasif.
17. Le retrait du couvercle pendant les cycles d’infusion peut
causer des blessures.
18. L’appareil ne doit pas être placé à l’intérieur d’un meuble
lorsqu’il est en cours d’utilisation.
CONSERVEZ CES INSTRUCTIONS
ATTENTION
Cet appareil est conçu pour une utilisation domestique seulement. Tout entretien autre
que le nettoyage et l’entretien normal de l’appareil par son propriétaire doit être effectué
par un centre de service agréé de Lagostina uniquement. Visitez notre site web canadien
(www.lagostina.ca) ou communiquez avec le service à la clientèle pour connaître le centre
de service le plus près de chez vous. Afin de réduire les risques de feu et de décharge
électrique, ne démontez pas la base de l’appareil. Toute réparation doit être effectuée par
un centre de service agréé de Lagostina uniquement.
INSTRUCTIONS POUR LE CORDON COURT
A. Un cordon d’alimentation court ou amovible est fourni avec l’appareil pour éviter
qu’il ne s’emmêle ou ne fasse trébucher quelqu’un.
B. Des rallonges et des cordons plus longs peuvent être utilisés, mais l’utilisateur doit
prendre les précautions nécessaires.
C. Lorsqu’on utilise une rallonge ou un cordon d’alimentation plus long :
1) Le calibre spécifié sur le cordon ou la rallonge doit être égal ou supérieur à celui
indiqué sur l’appareil.
2) Si l’appareil est mis à la terre, le cordon ou la rallonge doit être du type mis à la
terre (à 3 fils).
3) Le cordon d’alimentation doit être placé de façon à ce qu’il ne pende pas du plan
de travail ou du haut de la table, car un enfant pourrait tirer dessus ou trébucher
accidentellement. L’appareil peut être équipé d’une prise polarisée (une lame est
plus large que l’autre). Pour réduire les risques de décharges électriques, cette
fiche ne peut se brancher que dans un sens. Si la fiche ne rentre pas correctement

18
dans la prise murale, il faut la mettre dans l’autre sens. Si elle ne rentre toujours
pas, il faut contacter un électricien. Ne pas essayer en aucune façon de modifier
la prise.
CONSIGNES DE SÉCURITÉ SUPPLÉMENTAIRES
• Cet appareil n’est pas conçu pour être utilisé par des enfants ni par des personnes ne
possédant pas de connaissances ou d’expérience quant à l’appareil, à moins qu’une
personne responsable de leur sécurité ne les supervise ou ne leur donne des instructions
préalables.
• Tout contact avec la plaque chauffante, l’eau chaude ou la vapeur peut provoquer des
brûlures. Faire preuve de prudence.
• Tout appareil est soumis à un contrôle de qualité très strict qui comprend des tests
d’utilisation réelle sur des appareils sélectionnés au hasard, ce qui peut expliquer toute
trace légère d’usage ou tout résidu de café avant l’utilisation.
• Ne pas verser de liquides dans le réservoir d’eau autres que de l’eau ou les solutions de
détartrage spécifiées dans ce guide.
• Protéger l’appareil contre l’humidité et la congélation.
• Ne pas verser d’eau dans l’appareil s’il est encore chaud.
• Toujours installer la cafetière sur un plan de travail plat, stable et résistant à la chaleur,
loin des éclaboussements d’eau et de toute source externe de chaleur.
• Ne jamais mettre la carafe ou la cafetière isolée dans un four à micro-ondes, au lave-
vaisselle ou sur une cuisinière.
• Ne jamais mettre la main à l’intérieur de la cafetière isolée.
• Ne pas utiliser la carafe ou la cafetière isolée sans le couvercle.
• Ne pas utiliser la carafe isotherme si la partie intérieure en verre est cassée, car des
morceaux de verre pourraient se retrouver dans votre tasse.
• Dans l’intérêt d’améliorer ses produits, Lagostina se réserve le droit d’en modifier les
caractéristiques sans avis préalable.
• Un cordon électrique court est fourni afin d’empêcher qu’il ne s’emmêle ou que
quelqu’un ne trébuche accidentellement.
• Cet appareil n’est pas prévu pour être utilisé par des personnes (y compris les enfants)
dont les capacités physiques, sensorielles ou mentales sont réduites ou par des
personnes dénuées d’expérience ou de connaissance, sauf si elles ont pu bénéficier,
par l’intermédiaire d’une personne responsable de leur sécurité, d’une surveillance ou
d’instructions préalables concernant l’utilisation de l’appareil. Il convient de surveiller
les enfants pour s’assurer qu’ils ne jouent pas avec l’appareil.

19
FR
a) Corps de l’appareil
b) Couvercle
c) Réservoir d’eau
d) Indicateur de niveau d’eau
e) Couvercle de la carafe
f) Poignée de la carafe
g) Carafe
h) Plaque chauffante
i) Porte-filtre
j) Filtre permanent
(éviter de prendre des filtres en papier)
k) Bouton BREW (Infuser)
l) Touche AUTO
m) Touche HR
n) Touche MIN
o) Touche BOLD (Corsé)
p) Touche 1 - 4 tasses
q) Touche CLEAN (Nettoyer)
r) Touche ON OFF (Marche / Arrêt)
s) Support de la cartouche filtrante*
t) Cartouche filtrante*
u) Indicateur de remplacement de la
cartouche*
v) Cuillère
w) Touche CLOCK (Horloge)
Description
Avant la première utilisation
• Retirez les autocollants de la machine.
• Avant la première utilisation, faites fonctionner votre cafetière sans café pour rincer
le circuit. Remplissez le réservoir d’eau jusqu’au niveau max et lancez un cycle en
appuyant sur le bouton BREW (Infuser) (k).
IMPORTANT: votre appareil a été conçu pour fonctionner seulement
avec de l’eau froide ou tiède.
Préparation du café
• Soulevez le couvercle de la cafetière (b). Fig. 4.
• Remplissez la carafe (g) d’eau froide ou tiède. Versez l’eau dans le réservoir d’eau (c)
Fig. 5. L’indicateur de niveau d’eau affiche le nombre de tasses. Ne dépassez pas 12
tasses. Fig. 6.
• Mettez la carafe (g) avec son couvercle (e) sur la plaque chauffante (h) en vous assurant
qu’elle est bien placée pour activer le mécanisme permettant au café de s’écouler. Fig. 9.
• Assurez-vous que le porte-filtre (i) est inséré. Fig. 7. Mettez le filtre permanent (j) dans
le porte-filtre (i) ou un filtre en papier. Si vous utilisez un filtre en papier, assurez vous
qu’il est bien ouvert et bien en place dans le porte-filtre. Fig. 8a et 8b.
• Il est préférable de retirer le porte-filtre avec le filtre avant d’y ajouter la mouture. Si
de la mouture devait être versée par mégarde dans le réservoir, veuillez ne pas lancer
le cycle avant d’avoir nettoyé le réservoir. La mouture risque en effet de boucher le
circuit d’eau.
• Ajoutez 1 cuillerée (v) de mouture par tasse. Ne pas dépasser 12 cuillerées (2 onces).
Fig. 10.
* selon le modèle

20
• Fermez le couvercle (b).
• Appuyez sur la touche ON OFF (Marche / Arrêt) (r) pour mettre la cafetière en marche
puis sur la touche BREW (Infuser) (k) pour lancer le cycle. La touche BREW (Infuser)
s’illumine pour indiquer que la cafetière a commencé le cycle d’infusion. Elle émet un
signal sonore. Fig. 11.
• Lorsque le cycle est terminé, la machine émet 3 signaux sonores, et la fonction
maintien au chaud se met en marche automatiquement pour une durée de 4 heures.
A la fin du maintien au chaud, votre appareil émet 3 signaux sonores et le bouton
BREW (Infuser) (k) s’éteint.
Note :
− La quantité de café dans la carafe à la fin du cycle est inférieure à la quantité d’eau
versée dans le réservoir puisque la mouture et le filtre en absorbent environ 10 %.
− Le réservoir est muni d’un orifice de trop-plein à l’arrière de l’appareil. Si vous ajoutez
trop d’eau, elle s’écoulera par cet orifice.
− Nettoyez le filtre permanent entre chaque utilisation ou utilisez un nouveau filtre en papier.
À tout moment pendant le cycle d’infusion, vous pouvez éteindre la cafetière en appuyant
simplement sur la touche BREW (Infuser) (k). La lumière de la touche BREW (Infuser)
s’éteindra également et la cafetière émettra 3 signaux sonores.
Même si le cycle d’infusion est terminé, il reste du liquide chaud dans le filtre. Attendez
quelques minutes pour que le reste du liquide s’écoule dans la carafe avant de retirer le filtre.
ATTENTION :
− Pour éviter tout débordement, la carafe doit être bien placée sur la plaque
chauffante de la cafetière, sinon il pourrait y avoir un débordement d’eau
chaude ou de café chaud.
− La cafetière devient très chaude pendant le cycle d’infusion. Veuillez la
manipuler avec précaution.
Autres fonctions
6a – DÉPART DIFFÉRÉ (AUTO)
Réglage de l’heure du départ différé
• Votre appareil compte un programme de départ différé.
• Assurez-vous que l’horloge est à la bonne heure. Si ce n’est pas le cas, suivez les
instructions à la section PROGRAMMATION DE L’HORLOGE.
• Appuyez sur la touche ON OFF (Marche / Arrêt) pour mettre en marche la cafetière et
sur la touche AUTO pour régler l’heure. Une icône AUTO paraît à l’écran. Fig. 12-13-14.
• Programmez l’heure en appuyant sur la touche HR (m) pour les heures et MIN (n) pour
les minutes. Le réglage de l’heure est validé automatiquement au bout de 5 secondes
environ.
• Mettez en marche un départ différé dont l’heure est déjà réglée.
− Voir paragraphe PRÉPARATION DU CAFÉ.
− Appuyez sur AUTO.
• Pour annuler le départ différé, appuyez UNE fois sur la touche AUTO.
Other manuals for Artiste
1
Table of contents
Languages:
Other Lagostina Coffee Maker manuals