Lagostina Grind and Brew User manual

- Grind and Brew -
INSTRUCTIONS FOR USE - NOTICE D’UTILISATION -
www.lagostina.ca

3
4
9
5
6
8
7
19
2
17 20 1011
18
1
13
12
14
14
15
16

3
4
9
5
6
8
7
19
2
17 20 1011
18
1
13
12
14
14
15
16
3
1 8
8C
2
E B
45 6 7
D
A

Fig.1 Fig.
2b
Fig.
2a
Fig.
4
10 cups
Fig.
5
Fig.
3
OR
Fig.
7a Fig.
7b
Fig.
6
Fig.
10
9
13
Fig.
8Fig.
9

Fig.
11
Fig.16Fig.15
Fig.13Fig.12
Fig.14

6
IMPORTANT SAFEGUARDS
When using electrical appliances, basic safety precautions
should always be followed to reduce the risk of fire, electric
shock, and/or injury to persons including the following :
1. Read all instructions before using.
2. Do not touch hot surfaces. Use handles or knobs.
3. To protect against electric shock do not immerse cord, plugs
or coffee maker in water or other liquid. Close supervision is
necessary when the any appliance is used by or near children.
4. Unplug from outlet when either the appliance or display clock
is not in use, and before cleaning. Allow to cool before putting
on or taking off parts, and before cleaning the appliance.
5. Do not operate any appliance with a damaged cord or plug
or after the appliance malfunctions, or has been damaged in
any manner. Return the appliance to the nearest authorized
service facility for examination, repair or adjustment.
6. The use of attachments not recommended or sold by the
manufacturer may cause fire, electric shock or injury.
7. Do not use outdoors.
8. Do not let cord hang over edge of table or counter, or touch
hot surfaces.
9. Do not place on or near a hot gas or electric burner, or in a
heated oven.
10. Always attach plug to the appliance first, then plug cord in
the wall outlet. To disconnect, turn any control to “off”, then
remove plug from wall outlet.
11. Do not use the appliance for other than intended use.
12. The coffee carafe is designed for use with this appliance.
It must never be used on a range top.
13. Do not place a hot carafe on a wet or cold surface.
14. Do not use a cracked carafe or a carafe having a loose or
weakened handle.
15. Do not clean carafe with cleansers, steel wool pads, or other

7
EN
abrasive material.
16. Scalding may occur if the lid is removed during the brewing cycles.
17. Avoid contacting moving parts.
18. Check hopper for presence of foreign objects before using.
19. This appliance has a polarized plug (one blade is wider than
the other). To reduce the risk of electric shock, this plug is
intended to fit into a polarized outlet only one way. If the
plug does not fit fully into the outlet, reverse the plug. If it still
does not fit, contact a qualified electrician. Do not attempt to
modify the plug in any way.
SAVE THESE INSTRUCTIONS
CAUTION
This machine is intended for household use only. Any servicing other than cleaning and
user maintenance should be performed by the nearest authorized LAGOSTINA Service
Center. Visit our website at www.lagostina.ca in Canada or contact your respective
country’s Consumer Service department for the service center nearest to you. To reduce
the risk of fire or electric shock, do not attempt to disassemble the machine. Repair should
be done by an authorized Lagostina Service Center only.
SHORT CORD INSTRUCTIONS
A. A short power cord or a detachable power cord is provided to reduce the risks of
becoming entangled in or tripping over a longer cord accidentally.
B. Longer detachable power cords or extension cords are available and may be used if
care is exercised in their use.
C. If a long detachable power cord or an extension cord is used:
1) the marked electrical rating of the detachable power cord or extension cord
should be at least as great as the electrical rating of the appliance.
2) If the appliance is of the grounded type, the extension cord should be a grounding
type 3-wire cord.
3) the longer cord should be arranged so that it will not drape over the counter where
it can be pulled on by children or tripped over accidentally. The appliance may have
a polarized plug (one blade is wider than the other). To reduce the risk of electric
shock, this plug is intended to fit into a polarized outlet only one way. If the plug
does not fit fully into the outlet, reverse the plug. If it still does not fit, contact a
qualified electrician. Do not attempt to modify the plug in anyway.
ADDITIONAL SAFETY INSTRUCTIONS
• Your appliance is designed for domestic use only.
• It is not intended to be used in the following applications, and the guarantee will not apply for:
staff kitchen areas in shops, offices and other working environments; farm houses; by clients in
hotels, motels and other residential type environments; bed and breakfast type environments.

8
• This appliance is not designed to be used by children or people without knowledge
or experience with the product, unless they are supervised or given prior instructions
concerning the use of the appliance by someone responsible for their safety.
• Burns can occur from touching hot plate, hot water or steam. Exercise caution.
• All machines are subject to stringent quality control. Practical tests using machines
taken at random are conducted and this may explain any slight marks or coffee residue
showing prior to use.
• Do not pour liquids other than water and descaling solutions specified in this manual
into the water tank.
• Protect the machine against humidity and freezing.
• Do not pour water into the appliance if it is still hot.
• Always place your coffee maker on a flat, stable, heat resistant work surface away from
water splashes and any external sources of heat.
• Never place your carafe or your insulated pot in a microwave oven, in a dishwasher or
on a stove top.
• Never put your hand inside the insulated pot.
• Do not use the carafe or the insulated pot without the lid.
• Do not use the thermal carafe if the glass inner part inside is broken. If the glass inner
part of the carafe is broken, pieces of glass can transfer to your cup.
• In the interest of improving products, LAGOSTINA reserves the right to change
specifications without prior notice.
• A short power supply cord is provided to reduce the hazards resulting from becoming
entangled in or tripping over a long cord.
• This appliance is not intended for use by persons (including children) with reduced
physical, sensory or mental capabilities, or lack of experience and knowledge, unless
they have been given supervision or instruction concerning use of the appliance by a
person responsible for their safety.
Children should be supervised to ensure that they do not play with the appliance.
1) Grind and brew button
2) Grind off button
3) Coffee quantity selector
4) Hour button
5) Auto start function
6) Minutes button
7) Coffee strength selector
8) Display
a. Coffee quantity indicator
b. Coffee strength indicator
c. Timer indicator
d. Descaling indicator
e. Keep-warm indicator
9) Ground coffee fineness selector
10) Coffee filter holder
11) Permanent filter
12) Release button (filter holder assembly)
13) Coffee bean compartment
14) Lid
15) Water reservoir
16) Water level indicator
17) Glass carafe
18) Heating plate
19) Cleaning compartment
20) Brush
Description

9
EN
IMPORTANT: Your machine has been designed to work with cold or
water at room temperature only.
Setting the clock
Plug your appliance. The display (8) will light up to indicate that the clock can be set.
The clock can be adjusted at any time later on. Fig. 1 and 2.
1) Repeatedly press the hour button (4) to set the hours. Fig. 2a.
2) Repeatedly press the minute button (6) to set the minutes. The display will
light up within a few seconds and the time will appear on the screen. Fig. 2b.
3) NOTE: You can adjust or change the time. You can adjust the time setting by
using the Hour and Minutes buttons.
Before first use
1) Rinse all the removable parts.
2) Before using your coffee maker for the first time, run a cycle without coffee to rinse
the circuit. Fill the water tank to the maximum level and start a cycle by pressing the
Grind off button (1).
Setting the clock
Plug your appliance. The display (8) will light up to indicate that the clock can be set. The
clock can be adjusted at any time later on. Fig. 1 and 2.
1) Repeatedly press the hour button (4) to set the hours. Fig. 2a.
2) Repeatedly press the minute button (6) to set the minutes. The display will light up
within a few seconds and the time will appear on the screen. Fig. 2b.
3) NOTE: You can adjust or change the time. You can adjust the time setting by
using the Hour and Minutes buttons.
The appliance can be used for making coffee with coffee beans or ground coffee. Before
first use, the appliance is set to make coffee with coffee beans. After each use, the
appliance will memorize the last setting used for the next use: making coffee with coffee
beans or making coffee with ground coffee.
The appliance can only be used when the display is activated. If the display is not
activated, press any button to activate the display. The appliance is ready for use.
Before you proceed, we need you to pay attention to the following notes:
• Keep your hands, face and other body parts away from the steam hole. The steam from
the appliance becomes very hot during use.
• Do not cover the steam hole.
Use

10
Making coffee
Making coffee with coffee beans
Before you proceed, we would like you to focus your attention on the following notes:
• Only use coffee beans.
• Only use paper coffee filters or permanent filter.
• Open the lid (14) and fill the water reservoir (15) with the required amount of water.
Fig. 3 and 4.
• Do not fill the water reservoir with more water than required for making the coffee.
• Fill the coffee bean compartment (13) completely with coffee beans Fig. 9.
• Close the lid (14).
• Set the ground coffee fineness. Refer to the section “Setting the ground coffee fineness”
Fig. 8.
• Press the Release button (12) to open the filter holder compartment Fig. 6.
• Place a suitable paper filter holder or permanent filter in the coffee filter holder (10)
Fig. 7a or 7b.
• Close the filter holder compartment until the Release button (12) clicks into place.
Note: The appliance can only be used when the display is activated. If the display is not
activated, press any button to activate the display. The appliance is ready for use.
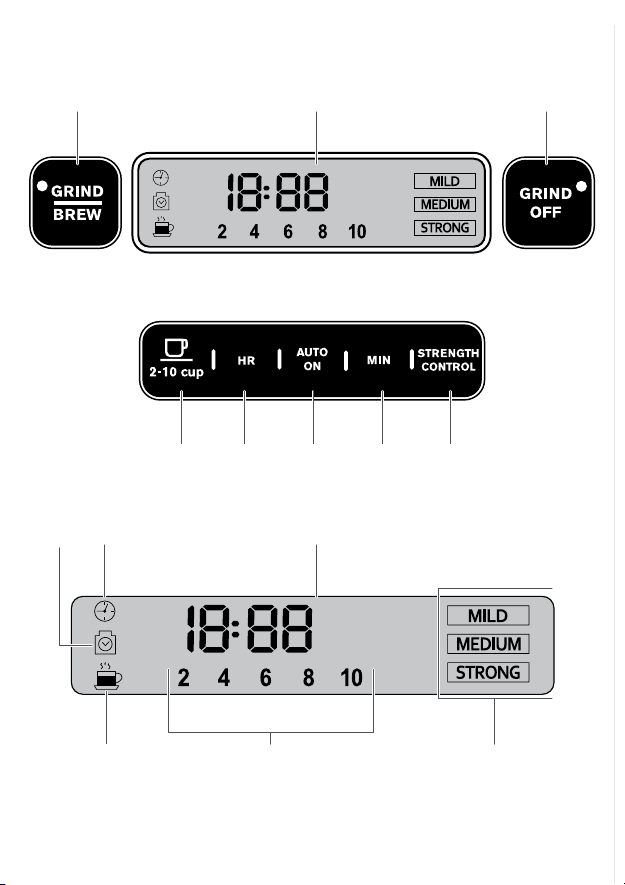
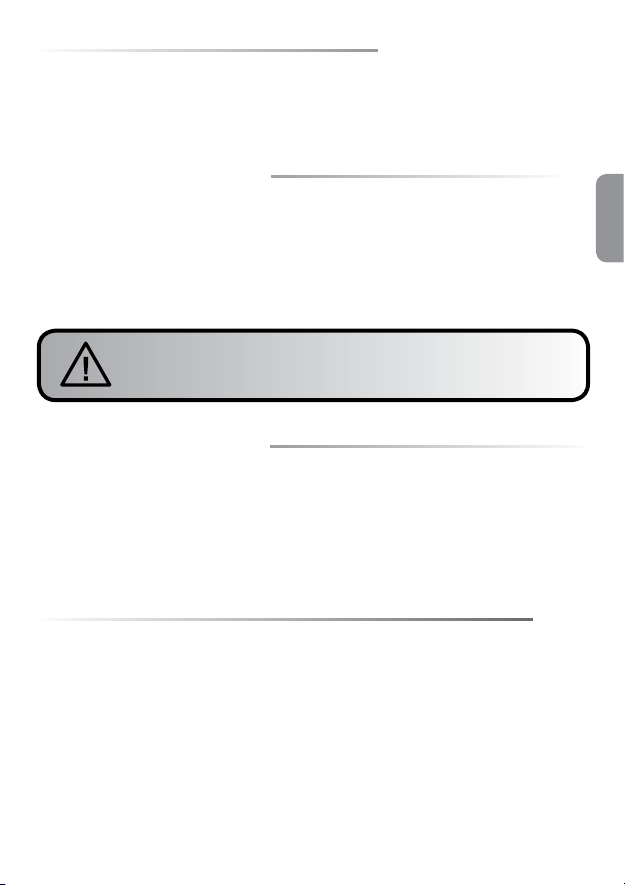
• Set the coffee quantity. The coffee quantity selector (3) is used for setting the required
coffee quantity. The coffee quantity selector (3) can be set to 2, 4, 6, 8 or 10 cups Fig. 13.
• Set the coffee strength. The coffee strength selector (7) is used for setting the required
coffee strength. The coffee strength selector (7) can be set to mild coffee (MILD),
medium coffee (MEDIUM) and strong coffee (STRONG) Fig. 14.
• Place the glass carafe (17) on the heating plate (18) Fig. 16.
• Press Grind and Brew button (1). The cup-of-coffee symbol (E) appears (Keep warm
function) Fig. 15.
• After a few seconds, the appliance starts grinding the coffee beans and making the coffee.
• To interrupt the process, press the Grind and Brew button (1).
• If the process is completed, the appliance will beep and switch to keep-warm mode.
The cup-of-coffee symbol (E) starts flashing. The appliance can be switched off by
pressing the Grind and Brew button (1) or the appliance switches off automatically
after 2 hours.
Making coffee with ground coffee
Before you proceed, we would like you to focus your attention on the following notes:
• Only use ground coffee.
• Only use paper coffee filters or the permanent filter.
• Fill the water reservoir (15) with the required amount of water.
• Do not fill the water reservoir with more water than required for making the coffee.
• Press the Release button (12) to open the filter holder Fig. 6.
• Place a suitable paper filter or permanent filter in the coffee filter holder (10) Fig.7a or 7b.
• Note: The appliance can only be used when the display is activated. If the display is not
activated, press any button to activate the display. The appliance is ready for use.

11
EN
• Put the required amount of coffee in the coffee filter Fig. 12.
• Close the filter holder compartment until the Release button (12) clicks into place.
• Place the glass carafe (17) on the heating plate (18) Fig. 16.
• Press the Grind off button (2). Press the Grind and brew button after pressing Grind off
button for the coffee symbol to appear (E).
• After a few seconds, the appliance starts making the coffee.
• To interrupt the process, press the Grind and brew button (1).
• If the process is completed, the appliance will beep and switch to keep-warm mode. The
cup-of-coffee symbol (E) starts flashing. The appliance can be switched off by pressing the
Grind off button (2) or the appliance switches off automatically after 2 hours.
Setting the coffee quantity
ONLY for «Grind / Brew», NOT applicable for «Grind Off».
The coffee strength selector (7) is used for setting the required coffee strength. The
coffee strength selector (7) can be set to mild coffee (MILD), medium coffee (MEDIUM)
and strong coffee (STRONG).
Setting the coffee strength (B)
ONLY for «Grind / Brew», NOT applicable for «Grind Off».
The coffee strength selector (7) is used for setting the required coffee strength. The
coffee strength selector (7) can be set to mild coffee (MILD), medium coffee (MEDIUM)
and strong coffee (STRONG) Fig. 14.
Note: The appliance can only be used when the display is activated. If the display is not
activated, press any button to activate the display. The appliance is ready for use.
• Repeatedly press the coffee strength selector (7) to set the coffee strength. The coffee
strength (B) is shown on the display (8).
Setting the ground coffee fineness (Fig. 8)
The ground coffee fineness selector (9) is used for setting the required fineness of the
ground coffee when using coffee beans. The ground coffee fineness selector (9) can be
set to different positions from fine ground coffee to coarse ground coffee.
• Turn the ground coffee fineness selector (9) to the required position to set the fineness
of the ground coffee.
Auto start function
The appliance has an auto start function which makes it possible to program the time for
starting the coffee-making process.
Note: The appliance can only be used when the display is activated. If the display is not
activated, press any button to activate the display. The appliance is ready for use.
• Set the clock. Check whether the clock has already been set. If the clock has not been
set, refer to the section “Setting the clock”.
• Keep the Auto start button (5) pressed until the clock on the display flashes.
• Repeatedly press the Hour button (6) to set the hours.
• Repeatedly press the Minutes button (7) to set the minutes.
• Set the coffee quantity. Refer to the section “Setting the coffee quantity”.
• Set the coffee strength. Refer to the section “Setting the coffee strength”.
• If you want to make coffee with ground coffee, switch off the grinding function before

12
using the auto start function.
• Press the Auto start button (5) to save the settings. The timer indicator (C) light will
continuously appear.
• To interrupt the process, press the Auto start button (5) again. The timer indicator (C)
will turn off.
Cleaning and maintenance
• To dispose of used ground coffee, remove the filter and the filter holder (10) of the
coffee maker.
• Throw the coffee grounds and filter paper in the garbage.
• Do not clean the appliance if it is still hot.
• Wash the carafe (17), the removable filter holder (10) and the permanent filter (11)
with warm, soapy water.
• CAUTION: Do not place the carafe (17) in the microwave.
• Do not put any parts of the coffee maker into the dishwasher.
• Clean the coffee maker with a damp cloth or sponge. Never use abrasive or strong
products on any part of the coffee maker.
• To clean the stainless steel parts of your coffee maker, dampen a soft cloth or sponge
with warm water. Wipe carefully with a dry cloth.
• For difficult stains, use a cloth with white vinegar.
• Do not immerse the appliance in water or under the faucet.
Cleaning the grinding compartment (Fig. 10 and 11)
When grinding coffee beans, coffee powder can clog the grinding mechanism. The
grinding compartment (19) should be cleaned at least every 2 weeks to prevent the
grinding mechanism from being clogged.
• Before you proceed, we would like you to focus your attention on the following notes:
− Before cleaning the grinding compartment, take the following actions:
− Switch off the appliance.
− Remove the plug from the wall socket.
− Remove the coffee carafe (17) from the heating plate (18).
− Empty the coffee filter holder (10). Place a suitable coffee filter. Close the filter holder
compartment.
• Remove the cover by pressing with a tooth pick or similar non metallic object and
pulling the cover simultaneously Fig. 10.
• Clean the grinding compartment (19) using the brush (21).
• Replace the cover.
• Do not clean the machine if it is still hot.

13
EN
Descaling
• Why descale
− Limestone forms naturally in your coffee maker. Descaling preserves the coffee maker
and ensures it will last longer and provide quality coffee over time. Limestone can
permanently affect the machine’s performance. Malfunctions associated with scaling
will not be covered by the warranty if the product is returned.
• When to descale
− The appliance must be descaled after 70 brewing cycles. If you leave the appliance
plugged into the wall, the appliance will keep track of the number of brewing cycles.
Theindicator (D) will flash on the display to indicate that the appliance must be
descaled. If the appliance must be descaled, use 5fl.oz of white vinegar diluted in
17fl.oz of cold or water at room temperature or 1.5oz of citric acid diluted in 17fl.oz
until the crystals have completely dissolved.
− However, the descaling frequency depends on the hardness of the water and the
number of BREW cycles. It may be necessary to descale your coffee machine more
frequently if you notice the following signs, even if the indicator (D) does not flash on
the display: longer cycle time or excessive steaming, more noise at the end of the cycle
or stopping mid-cycle this means that your machine needs to be descaled.
− Descaling should be done every other month, depending on the hardness of the water.
How to descale your LAGOSTINA coffee maker
• Use 5 fl. oz of white vinegar diluted in 17 fl.oz of cold or water at room temperature
or 1.5 oz of citric acid diluted in 17 fl. oz until the crystals have completely dissolved.
• Pour the solution into the water reservoir (15) (without coffee).
• Press Grind off button (3).
• Please wait until the end of the cycle.
• To rinse the machine, run 2 full 10 cups cycles with water but without coffee.
• Repeat the operation if needed.
• When the descaling cycle is finished, press 2-10 cups button (3) as well as the coffee
strength selector (7) to reset the descaling function. The descaling indicator (D) will not
light up anymore.
• The warranty does not cover coffee makers that do not work, or do so poorly, due
to lack of descaling.
NEVER PUT GROUND COFFEE IN THE WHOLE BEAN COFFEE
CONTAINER
Use of coffee beans that are oily, caramelized or flavored is not recommended for this
machine. This type of bean may damage the machine.
Make sure that no foreign objects such as small stones among the coffee beans enter the
coffee container. Any damage due to foreign objects having entered the coffee container is
not covered by the warranty. Do not put water in the coffee bean container.

14
Troubleshooting
PROBLEM SOLUTION
The coffee does
not brew or the
appliance does not
turn on.
• Make sure the appliance is plugged into a working outlet and the
screen flashes.
• The water tank is empty.
• There is a power outage.
• Unplug the machine, then plug it back in.
• The clock should be reprogrammed after a power outage.
The appliance
seems to leak.
• Make sure the water reservoir has not been filled beyond the
maximum limit.
Brewing takes a
long time.
• It may be time to descale the appliance.
• Several minerals can accumulate in the coffee maker’s circuitry.
Regular descaling of the machine is recommended. This may need
to be done more often depending on the hardness of your water.
Formore information, please consult the “Descaling” section.
CAUTION: do not take the appliance apart.
The filter basket
overflows or the
coffee flows too
slowly.
• Coffee maker needs cleaning.
• There is too much coffee. We recommend using one measuring
spoon or one tablespoon of ground coffee per cup.
• The ground coffee is too fine (Please note that: ground coffee for
espresso won’t work in a drip coffee maker).
• There is ground coffee lodged between the paper filter and the
filter holder.
• The paper filter is not opened properly or is not well placed.
• Rinse the filter holder before inserting the paper filter so it will
adhere to the damp walls of the filter basket.
• Be sure you have not inserted a paper filter at the same time as the
permanent filter.
• Make sure the filter basket is pushed down all the way.
The coffee tastes
bad.
• Clean the coffee maker.
• The ground coffee is not right for your coffee maker.
• The proportion of coffee and water is not sufficient. Adjust to suit
your taste.
• The quality and freshness of the coffee is not the best.
• The water is of poor quality.
The coffee does
not flow.
• See if there is water in the water tank.
• The coffee flow system may be obstructed. You may clean it simply
by rinsing with water.
The time is not
correct (there is a
time difference).
• The timer is synchronized and depends on your electrical network. If
there is a time difference, we recommend that you program the time
once a week to be sure it is correct.

15
EN
PROBLEM SOLUTION
You have used
ground coffee
instead of coffee
beans.
• Use your vacuum cleaner to remove the pre-ground coffee from the
coffee bean container.
You put water in
the coffee bean
compartment.
• Bring your coffee machine to the customer service.
If your appliance still does not work properly, please call your respective country’s
Consumer Service.

16
LAGOSTINA HOUSEHOLD APPLIANCES
MANUFACTURER’s LIMITED WARRANTY
: www.lagostinausa.com / www.lagostina.ca
With a strong commitment to the environment, Lagostina electrical products are repairable during and after the warranty
period. Before returning any defective products to the point of purchase, please call Lagostina consumer service directly at the
phone number below for repair options.
Your help to sustain the environment is appreciated!
The Warranty
This electrical product or product with batteries is guaranteed by Lagostina for a period of 2 years against any
manufacturing defect in materials or workmanship, starting from the initial date of purchase.
The manufacturer’s warranty by Lagostina is an extra benefit which does not affect consumer’s Statutory Rights.
The Lagostina warranty covers all costs related to restoring the proven defective product so that it conforms
to its original specifications, through the repair or replacement of any defective part and the necessary labor.
At Lagostina’s choice, a replacement product may be provided instead of repairing a defective product.
Lagostina’s sole obligation and your exclusive resolution under this warranty are limited to such repair or replacement.
Conditions & Exclusions
The Lagostina warranty only applies within the United States and Canada, and is valid only on presentation
of a proof of purchase.
For warranty service please contact Lagostina Consumer Service using the appropriate toll free number or
website listed below. A consumer service representative will personally assist you with the evaluation, repair or
replacement of your product at the closest Lagostina service center.
Lagostina shall not be obliged to repair or replace any product which is not accompanied by a valid proof of purchase.
This warranty will not cover any damage which occurs as a result of misuse, negligence, failure to follow
Lagostina instructions, use on current or voltage other than as stamped on the product, or a modification or
unauthorized repair of the product. It also does not cover normal tear and wear, maintenance or replacement
of consumable parts, and the following:
-using the wrong type of water or consumable
-scaling (any de-scaling must be carried out according to the instructions for use);
-ingress of water, dust or insects into the product (excluding appliances with features
specifically designed for insects);
-mechanical damages, overloading
-damages or bad results due to wrong voltage or frequency
-accidents including fire, flood, lightning, etc
-professional or commercial use
-damage to any glass or porcelain ware in the product
This warranty does not apply to any product that has been tampered with, or to damages incurred through
improper use and care, faulty packaging by the owner or mishandling by any carrier.
The Lagostina manufacturer’s warranty applies only for products purchased and used in USA & Canada.
Where a product is purchased in one country and then used in another one:
a) The Lagostina guarantee does not apply in case of non conformity of the purchased product
with the local standards, such as voltage, frequency, power plugs, or other local technical
specifications
b) The repair process for products purchased outside the country of use may require a longer
time if the product is not locally sold by Lagostina
c) In cases where the product is not repairable in the new country, the Lagostina guarantee is limited
to a replacement by a similar product or an alternative product at similar cost, where possible.

17
EN
Consumer Statutory Rights
This Lagostina manufacturer’s warranty does not affect the statutory rights a consumer may have or those
rights that cannot be excluded or limited, nor rights against the retailer from which the consumer purchased
the product. This warranty gives a consumer specific legal rights, and the consumer may also have other legal
rights which vary from State to State or Country to Country or Province to Province. The consumer may assert
any such rights at his sole discretion.
U.S.A.
GROUPE SEB USA
2121 Eden Road
Millville, NJ 08332
800-255-2523
CANADA
GROUPE SEB CANADA INC.
36 Newmill Gate, Unit 2
Scarborough, ON M1V 0E2
1-800-418-3325
: www.lagostinausa.com / www.lagostina.ca

18
CONSIGNES IMPORTANTES
DESÉCURITÉ
Lorsque vous utilisez un appareil électrique, des consignes
de sécurité élémentaires doivent toujours être observées
pour réduire les risques de feu, de décharge électrique et de
blessures, y compris les suivantes :
1. Lire le mode d’emploi entier.
2. Ne pas toucher les surfaces chaudes; utiliser les poignées
ou les boutons.
3. Pour se protéger des incendies, des décharges électriques
et des blessures, ne pas immerger la machine dans l’eau ni
dans tout autre liquide.
4. Avant de procéder au nettoyage, débranchez l’appareil
ou l’horloge d’afchage s’ils ne sont pas utilisés. Laissez
refroidir l’appareil avant d’ajouter ou de retirer des pièces,
et avant de le nettoyer.
5. Débrancher l’appareil de la prise murale lorsqu’il n’est pas
utilisé ou pour le nettoyer. Laisser l’appareil refroidir avant
d’ajouter ou d’enlever des pièces.
6. L’utilisation d’accessoires qui ne sont par recommandés
ou vendus par le fabricant peut provoquer un incendie, une
décharge électrique ou des blessures.
7. L’utilisation d’accessoires non recommandés ni vendus
par le fabricant peut causer des feux, des décharges
électriques ou des blessures.
8. Ne pas utiliser à l’extérieur.
9. Le cordon ne doit pas pendre de la table ou du comptoir,
ni toucher à des surfaces chaudes.
10. Ne pas placer l’appareil sur ou près d’un brûleur au gaz ou
électrique, ni dans un four chaud.
11. Toujours brancher le cordon à l’appareil en premier, puis
sur la prise murale. Pour débrancher, tourner le bouton de
commande à la position «OFF» puis retirer la che de la
prise murale.

19
FR
12. Ne pas utiliser l’appareil pour une autre fonction que celle
pour laquelle il a été conçu.
13. La verseuse est conçue pour être utilisée avec cet appareil;
ne jamais l’utiliser sur une cuisinière.
14. Ne pas déposer une verseuse chaude sur une surface
froide ou humide.
15. Ne pas utiliser un récipient fêlé ou qui présente une
faiblesse à la poignée.
16. Ne pas nettoyer la verseuse avec des nettoyants, des
éponges métalliques ni avec tout autre produit abrasif.
17. Le retrait du couvercle pendant les cycles d’infusion peut
causer des blessures.
18. Evitez tout contact avec les parties mobiles.
19. Avant utilisation, assurez-vous que la trémie ne contient
pas de corps étrangers.
20. Cet appareil dispose d’une che polarisée (une broche plus
large que l’autre). Pour réduire le risque d’une décharge
électrique, cette che est prévue pour rentrer dans une
prise polarisée d’une seule façon. Si la che ne rentre pas
complètement dans la prise, inversez le sens. Si le problème
persiste, contactez un technicien qualié. N’essayez pas de
modier la che de quelque manière que ce soit.
CONSERVEZ CES INSTRUCTIONS
ATTENTION
Cet appareil est conçu pour une utilisation domestique seulement. Tout entretien autre que
le nettoyage et l’entretien normal de l’appareil par son propriétaire doit être effectué par un
centre de service agréé de Lagostina uniquement. Visitez notre site Web www.lagostina.ca
au Canada ou communiquez avec le service à la clientèle pour connaître le centre de service
le plus près de chez vous. Afin de réduire les risques de feu et de décharge électrique, ne
pas démonter la base de l’appareil. Toute réparation doit être effectuée par un centre de
service agréé de Lagostina uniquement.
INSTRUCTIONS POUR LE CORDON COURT
A. Un cordon d’alimentation court ou amovible est fourni avec l’appareil pour éviter
qu’il ne s’emmêle ou ne fasse trébucher quelqu’un.
B. Des rallonges et des cordons plus longs peuvent être utilisés, mais l’utilisateur doit
prendre les précautions nécessaires.

20
C. Si vous utilisez une rallonge ou un cordon d’alimentation plus long :
1) Le calibre spécifié sur le cordon ou la rallonge doit être égal ou supérieur à celui
indiqué sur l’appareil.
2) Si l’appareil est mis à la terre, le cordon ou la rallonge doit être du type mis à la
terre (à 3 fils).
3) Le cordon d’alimentation doit être placé de façon qu’il ne pende pas du plan de
travail ou du haut de la table, car un enfant pourrait tirer dessus ou trébucher
accidentellement. L’appareil peut être équipé d’une prise polarisée (une lame
est plus large que l’autre). Pour réduire les risques de décharges électriques, cette
fiche ne peut se brancher que dans un sens. Si la fiche ne rentre pas correctement
dans la prise murale, mettez-la dans l’autre sens. Si elle ne rentre toujours pas,
contactez un électricien. N’essayez en aucune façon de modifier la prise.
CONSIGNES DE SÉCURITÉ SUPPLÉMENTAIRES
• Votre machine a été conçue pour un usage domestique seulement.
• Il n’a pas été conçu pour être utilisé dans les cas suivants qui ne sont pas couverts par la
garantie: dans des coins de cuisines réservés au personnel dans des magasins, bureaux
et autres environnements professionnels; dans des fermes; Par les clients des hôtels,
motels et autres environnements à caractère résidentiel; dans des environnements de
type chambres d’hôtes.
• Cet appareil n’est pas conçu pour être utilisé par des enfants et des personnes ne
possédant pas de connaissances ou d’expérience quant au produit, à moins qu’une
personne responsable de leur sécurité ne les supervise ou ne leur donne des instructions
préalables.
• Tout contact avec la base, de l’eau chaude ou de la vapeur peut provoquer des brûlures.
Faites preuve de prudence.
• Tout appareil est soumis à un contrôle de qualité très strict qui comprend des tests
d’utilisation réelle sur des appareils sélectionnés au hasard, ce qui expliquerait toute
trace légère d’usage ou résidus de café avant l’utilisation.
• Ne pas verser de liquides dans le réservoir d’eau autres que de l’eau ou les solutions de
détartrage spécifiées dans ce guide.
• Protéger l’appareil contre l’humidité et la congélation.
• Ne pas verser de l’eau dans l’appareil s’il est encore chaud.
• Toujours installer votre cafetière sur un plan de travail plat, stable et résistant à la
chaleur, loin des éclaboussements d’eau et de toute source externe de chaleur.
• Ne jamais mettre votre verseuse ou votre cafetière isolée dans un four à microondes, au
lave-vaisselle ou sur une cuisinière.
• Ne jamais mettre votre main à l’intérieur de la cafetière isolée.
• Ne pas utiliser la verseuse ou la cafetière isolée sans le couvercle.
• Ne pas utiliser la verseuse isotherme si la partie intérieure en verre est cassée, car des
morceaux de verre pourraient être transférés dans votre tasse.
• Dans l’intérêt d’améliorer ses produits, Lagostina se réserve le droit de modifier les
caractéristiques sans avis préalable.
• Un cordon électrique court est fourni afin de réduire les risques d’emmêlement et de
trébuchement accidentel liés à l’utilisation d’un plus long cordon.
• Cet appareil n’est pas prévu pour être utilisé par des personnes (y compris les
Table of contents
Languages:
Other Lagostina Coffee Maker manuals