Laguna Yachts Windrose User manual

LAGUNA YACHTS, INC.
_ 1630 S. SINCLAIR, ANAHEIM, CA 92806
All nqhh. rf~' ;I(;rvod noprodtJctlon In whOIQ or par1 without writtflttl p••mli~;~imn in t)Ir/Gtly protubit«1Jd
W NDROSE
OWNER'S MANUAL
TRAILERABLE SAILBOATS UP TO 25 FEET
A
~ ~
,
LAGUNA YACHTS, INC.

WINDROSE OWNER'S MANUAL
(Models under 26' in length)
TABLE OF CONTENTS
Section 1.
Section 2.
Section 3.
Section 4.
Section 5.
Section 6.
Section 7.
Section 8.
Section 9.
Section 10.
Section 11.
Section 12.
Section 13.
Section 14.
Section 15.
Section 16.
Section 17.
Section 18.
Section 19.
Section 20.
Section 21.
Section 22.
Section 23.
Section 24.
Section 25.
Section 26.
PAGE
Foreword 2
Before You Leave the Dealer 2
Safety Tips 2-3
Safety Equipment 3
Parts to Your Boat 4
Trailering 5-6
Launching 6
Retrieving Your WINDROSE 6-7
Standing Rigging 7
Rigging and Stepping the Mast 8
Rigging the Boom 8
Rigging the Mainsheet 8
Mast Tuning 9
Bending on and Hoisting the Sails 9-10
Sailing Tips 10-17
Retractable Keel Operation 18-19
Kick-Up Rudders 19
Outboard Engines 19
Electrical Systems 19-20
Pop-Top Models 20
Galley Operations 20
Galley Stove 20
General Maintenance Tips 20-23
Storing and Winterizing Your Boat 23
Dealer and Warranty Service 23
North American Sailing Association 24
MAIICI
t
19h1

Section 1. FOREWORD sailing. Children should wear them at
Sailboats are made for fun. WINDROSE all times, no matter how much they
sailboats will deliver years of pleasure may object. Ask each person going
and fun if properly maintained and if used with you if they can swim, those that
in a knowledgeable, safe manner. cannot should be required by you to
Before you start your first trip to favorite wear a life vest.
waterways, we recommend you read and F. When sailing at night, use safety har-
observe all following suggestions and nesses and tie a line to yourself and
procedures. They are all intended for another to your crew and then tie
your safety and enjoyment. these lines to the boat. Also follow
this procedure if you get into very
Section 2. BEFORE YOU LEAVE rough weather.
THE DEALER
G.
Purchase all Coast Guard required
A.
Be sure you have all warranty and
safety equipment
and
learn how
to
use it before that day arrives that it
trailer booklets. becomes necessary to use it.
B.
Read the section of this manual on H. Enroll in a C.G. class or other cer-
trailering; it could save you time and tified boating/sailing class. You will
money. learn alot and enjoy sailing even
C.
Now is the time to ask questions, more.
while you are still at the dealership. I. Do not overload your boat with too
Section 3. SAFETY TIPS many people when sailing. Use
common sense and do not take more
Following safety procedures and using than required.
common sense can make sailing fun and
J.
Marine insurance is worth every cent
safe. Here are our recommendations. you pay for it. Take out insurance
A. Don't go out when the weather condi- right from the start. See your dealer
tions are unfavorable or are predicted or insurance broker.
to become so. Listento weatherfore-
K.
Fasten all heavy objects such as gas
casts, check with your Harbor Patrol cans, anchor, tool boxes, etc. down.
Office, and look out for small craft If a knock-down should occur, loose
storm warnings. objects can fall inside the boat and
B. Be especially careful in areas where change the center of gravity, offset-
there may be commercial shipping ting the effect of the keel. If enough
traffic. Keep well away from shipping weight change is involved, this could
channels. be dangerous.
C.
Learn The Rules of the Road. All L. Keep all seat hatches,the main hatch
other sailors will expect you to know and the pop-top (if your boat has a
them and abide by them. The U.S. pop-top) closed and secured during
Coast Guard, 400 S. Eleventh Street, rough weather or gusty winds that
SW., Washington, D.C. 20590, will could unexpectedly strike the boat
supply free literature on this and and cause a knock-down. A shock
other sUbjects such as first aid and cord system can be rigged inside the
weather. Your local branch or Harbor hatches such that a hatch door that
Patrol Office may have it available, has been opened briefly will automat-
also. ically close when released.
D. Have a dependable person in the
M.
Reducing sail area by reefing during
crew keep a sharp lookout under the strong winds is a safe move and can
jib sail for oncoming traffic, or install a actually make the boat more efficient
window in your jib sail. and faster. Reef points can be added
E. Keep a C.G. approved life vest on- to your mainsail and jiffy reefing
board for each crew member. Wear equipment can be added for a very
them during rough weather and night modest price, checkwith your dealer.
2

N. Mother Nature can be very strong
and even the largest of ships can
encounter overpowering winds and
seas. Observe safety regulationsand
practices, you cannot "play it" too
safe.
Section 4. SAFETYEQUIPMENT
A. P.F.D.
Personal Flotation Devices (P.F.D.'s)
are requiredfor each person onboard
and at least one throwable flotation
device. All must be Coast Guard ap-
proved.
B. Fire Extinguishers:
At least one U.S. Coast Guard ap-
proved B-1 type must be onboard.
Mount it where it can be easily and
quickly located by any person on
board, preferably within reach of the
cockpit. When you need it, you need
it now, not after the time it takes to
dig through several storage hatches.
DO NOT mount it immediately nextto
your stove.
C. Horn:
One hand, mouth or power operated
whistle or horn audible for at least
one half mile must be onboard.
Again, mount it where you can reach
it immediately. Situations requiring
it's use usually will not wait while you
or your crew rummage about.
D. Flashlight:
A good item to have when the sun
sets is a flashlight that will throw a
long beam. Spare batteries are a
good idea. The flashlight should be
mounted where it can be reached in
the dark without having to have light
to find it.
E. Electrical Running Lights:
Keep the battery chargedand in good
condition even if you don't plan on
being out after dark. A properly
operating system is good insurance.
F. Anchors:
Every boat should have an anchor
onboard. An eight to thirteen pound
"Danforth" type anchor should be
adequate for any condition you are
likely to encounter. Attached to the
anchor should be 114 or heavier
guage chain. The length of the chain
should be equal to the length of your
boat. Then, attached to the chain
should be one-hundred fifty to three
hundred feet of
=ta"
or heavier Nylon
line, depending upon the depth of the
water, the size of swells, wind veloc-
ity, and changes in tidal levels. You
should ask knowledgeable people in
your area about anchoring proce-
dures relativeto the place you plan to
visit. Be sure to inquire of more than
one experienced person and always
use extra caution in assembling the
anchor, chain and line. Don't forget to
wire all shackle pins so they cannot
come loose underwater.
G. Distress Signals:
Small boat distress signal kits are
available. They generally have a flag,
flares and dye. They work and are
advisable for attracting attention if
you ever need assistance.
H. Bilge Pumps:
Under normal conditions you should
never need a bilge pump. If it is ever
needed, there is no good substitute.
A hand operated pump is inexpen-
sive and recommended. Ifyou will be
leaving your boat in the water unat-
tended, an automatic bilge pump is
recommended. It's low-cost insur-
ance againstvandals leaving hatches
open, being holed from a boat out of
control or storm damage.
We suggest you review your safety
equipment needs carefully with an ex-
perienced person. Week-end sailing on
familiar waters may not require as much
as sailing in open seas or large water
areas such as the Great Lakes. There
are many different types of equipment
available from a compass to electronics.
Your dealer should be able to assist you.
3

I
-::.
,.,
f
-
J
(.
75
.
'1
.,
'?
~~
I
~
\
i:
)"
"7::t
<..'
1L
4
Section 5. PARTS TO YOUR BOAT
BACKSTAY .....•.
,
.
;p.
S /

Section 6. TRAILERING
By following a few rules, you can enjoy
many carefree trips with your boat. All
trailers shipped from the factory have
been specially designed for each model,
and provide the proper support for your
boat.
A. Hooking
Up:
A 2" ball
is
used for all retractable
keel WINDROSE trailers. You should
check with your trailer hitch supplier
for the proper strength hitch.
Check state regulations for GVWR
and brake requirements.
Attach the trailer to your hitch. Make
sure the coupler
is
tight on the ball. If
it is not, confirm you have a 2" ball
and then tighten the nut under the
coupler until it is tight when locked to
the ball.
Attach your safety chains to a solid
part of the towing vehicle. Leave just
enough slack so you can make a
sharp turn. It's best to cross the
chains.
If your trailer
is
equipped with surge
brakes, attach the brake chain to the
towing vehicle. It will automatically
set the trailer brakes if the boat trailer
and the towing vehicle separate.
Also, check the brake fluid level, it
may have been drained for shipment
to your dealer or may have leaked out
over a period of time.
A load-equalizing hitch may cause
burning up the brakes on a trailer.
You should be aware of this and that
repairs due to the use of a load-
equalizing hitch are not covered by
the trailer manufacturer's warranty.
What can happen is this: As the tor-
sion bars lift the hitch and ball up-
ward, they create a tension in the
sliding part of the brake actuator.
When the towing vehicle's brakes are
applied. the trailer surges forward,
activating the trailer brakes. Because
of the tension, however, the front part
of the brake actuator does not slide
forward as the towing vehicle re-
sumes pulling the trailer. Con-
sequently, the trailer brakes are still
applied and may burn up.
The solution to this potential problem
is to make sure that the brake
acutator is free to slide in and out
when the load-equilizing hitch is in
operation.
Make sure all lights are working
properly. If the clearance lights come
on dimly when the turning signals are
used, the problem is probably that the
car and trailer are not grounded to-
gether well enough. If your lights
flash too fast, a heavy duty flasher in
your car will correct the problem.
The boat should be snug in the rub-
ber bow stop. Also, the keel should
be resting in the rubber keel "V." You
should attach a "back-up" safety line
from the bow eye to the winch stand
on the trailer.
Be sure to tie the aft end of the boat
down to the trailer. Do not use Nylon
rope as it will stretch. Dacron line or
straps will suffice. Your dealer should
be able to help you in either case.
Tie the mast down to the bow pulpit
and optional mast carrier. Place a
pad inbetween the mast and bow
pulpit to prevent scratching of either
surface. Tie the mast in a manner to
prevent it from moving sideways on
the bow pulpit.
On longer trips, tie a line from the aft
starboard mooring cleat to the port
mooring cleat. wrapping the mast
several times at the top of the mast
carrier. This will add a great amount
of stability to the mast, particularly in
strong side winds.
Is the overhang in the back legal for
your state? Is a red flag needed?
Load the gear you are carrying in the
boat so you have enough trailer ton-
gue weight to prevent fishtailing when
underway. Make sure that nothing
will chafe inside the boat and cause
damage to any surface. Check trailer
tire lug nuts to be sure they are tight.
Loose lug nuts can cause the loss of
a wheel while underway. Check the
tire pressure. Make sure the boat is
tied or strapped down to the trailer in
the rear. This will prevent the boat
from shifting on the trailer if you hit a
5

••• . •• ;;1>
6
bump while underway, and is re-
quired in many states. Makesure you
don't exceed the load weight recom-
mended by the trailer manufacturer.
Tandum axle trailers are available.
Ask your dealer.
Section 7. LAUNCHING
Your WINDROSE sailboat is easily
launched, even by one person. It is best
to step your mast and attach mooring
lines before proceeding. Attach bumpers
if needed. Check turnbuckles. Always
check for overhead obstructions before
raising the mast or moving the boat with
the mast up. REFER TO SECTION 10
FOR RIGGING INSTRUCTIONS.
WARNING
If electrical wires contact
the rigging or the mast,
electrocution of anyone
touching the mast or rig-
ging may result.
A. Stop and set your parking brake.
B. Disconnect and remove the trailer
lights.
C. Be sure the rudder is off, or if you
have the optional kick-up rudder be
sure it is in the full up position. Be
sure the keel is fully raised so it will
not fall and catch in the trailer.
D. Back the boat and trailer down the
ramp into the water until the boat
begins to float lightly on the trailer.
E. Unhook the winch line and allow the
boat to slip back.
F. Secure her with the mooring line to a
nearby dock.
Be sure the bow is into the wind before
raising any sails. If necessary, use the
engine to motor away from docks and
other obstructions prior to raising sails.
Prior to leaving the launch area the first
time you launch the boat, check the hull
for any possible leaks, including all thru-
hull fittings, hoses, and valves. If there
are any small leaks, a good marinecaulk-
ing compound should take care of them.
-
Section 8. RETREIVINGYOUR
WINDROSE
A. Crank the keel into the full up posi-
tion. Remove rudder or place in
kick-up position (if it has that modifi-
cation).
B. Submerge the trailer until the boat
can be easily floated onto it. The
water should be covering the trailer
fenders.
C. Guide your WINDROSE overthe trail-
er and attach the winch line hook to
the bow eye.
D. Tighten the winch while guiding the
boatfully forward on the trailer so that
the bow rests into the rubber "V" on
the trailer, and the keel rests in the
rubber "V" keel support. Never try to
"winch" the boat on the trailer without
enough water to float it. This could
cause a broken winch.
WARNING
Never stand with your
head or body near the
trailer winch just in case
the winch line should
break due to some unde-
tected chaffing. It could hit
you in the face and be
serious.
E. After you are sure the stern of the
boat is properly seated, that is with
the keel in it's rubber "V" keel sup-
port, pull out. Optional boat guides
assure the boat will center automati-
cally when the guides are positioned
properly.
F. If the bow slips back when pulling
from the water, tighten the bow line
then while moving forward in a
straight line, tap the brakes. The boat
will move forward. Tighten cable and
secure the stern.
G. Once on land, you can put away sails
byfolding andthen un-stepthe mast.
H. LoweringThe Mast:
Prior to lowering the mast, remove
ALL gearfrom below that doesn't be-
long there and properly stow the
BOAT GEAR. Down rig the main-
sheet, remove the boom from the

mast, and stow it below. LOWER
THE KEEL UNTIL THE CABLE IS
SLACK. Lower the pop-top hatch and
close the sliding hatch. Set the aft
mast carrier in place. Bow tight in
chock and stern properly tied down?
OK, disconnect the jibstay and walk
the mast down. (For models equip-
ped with optional double lower
shrouds, you will need to release
the forward lowers).
The Finishing Touch:
Before walking the mast forward and
tying it down, be sure to remove any
7
TOP
lighting connections from the mast.
With the mast tied down and all rig-
ging tied off, one final item that
should be attended to is a GOOD
HOSING. Nothing keeps your
WIND-
ROSE
sparkling better than fresh
water and a chamois. Use plenty of
water pressure especially in the
cockpit, non-skid areas, and metal
surfaces. You will then be trailering
home with a sharp, clean yacht,
ready for its next sail and reflecting
your pride in the ownership of a
WINDROSE.
TOP
.\1
FORE
:-:
"
---....
AFT
-
Section 9.
STANDING RIGGING
....
1
a
I.

8
Section 10. RIGGING AND
ST~PPING THE MAST
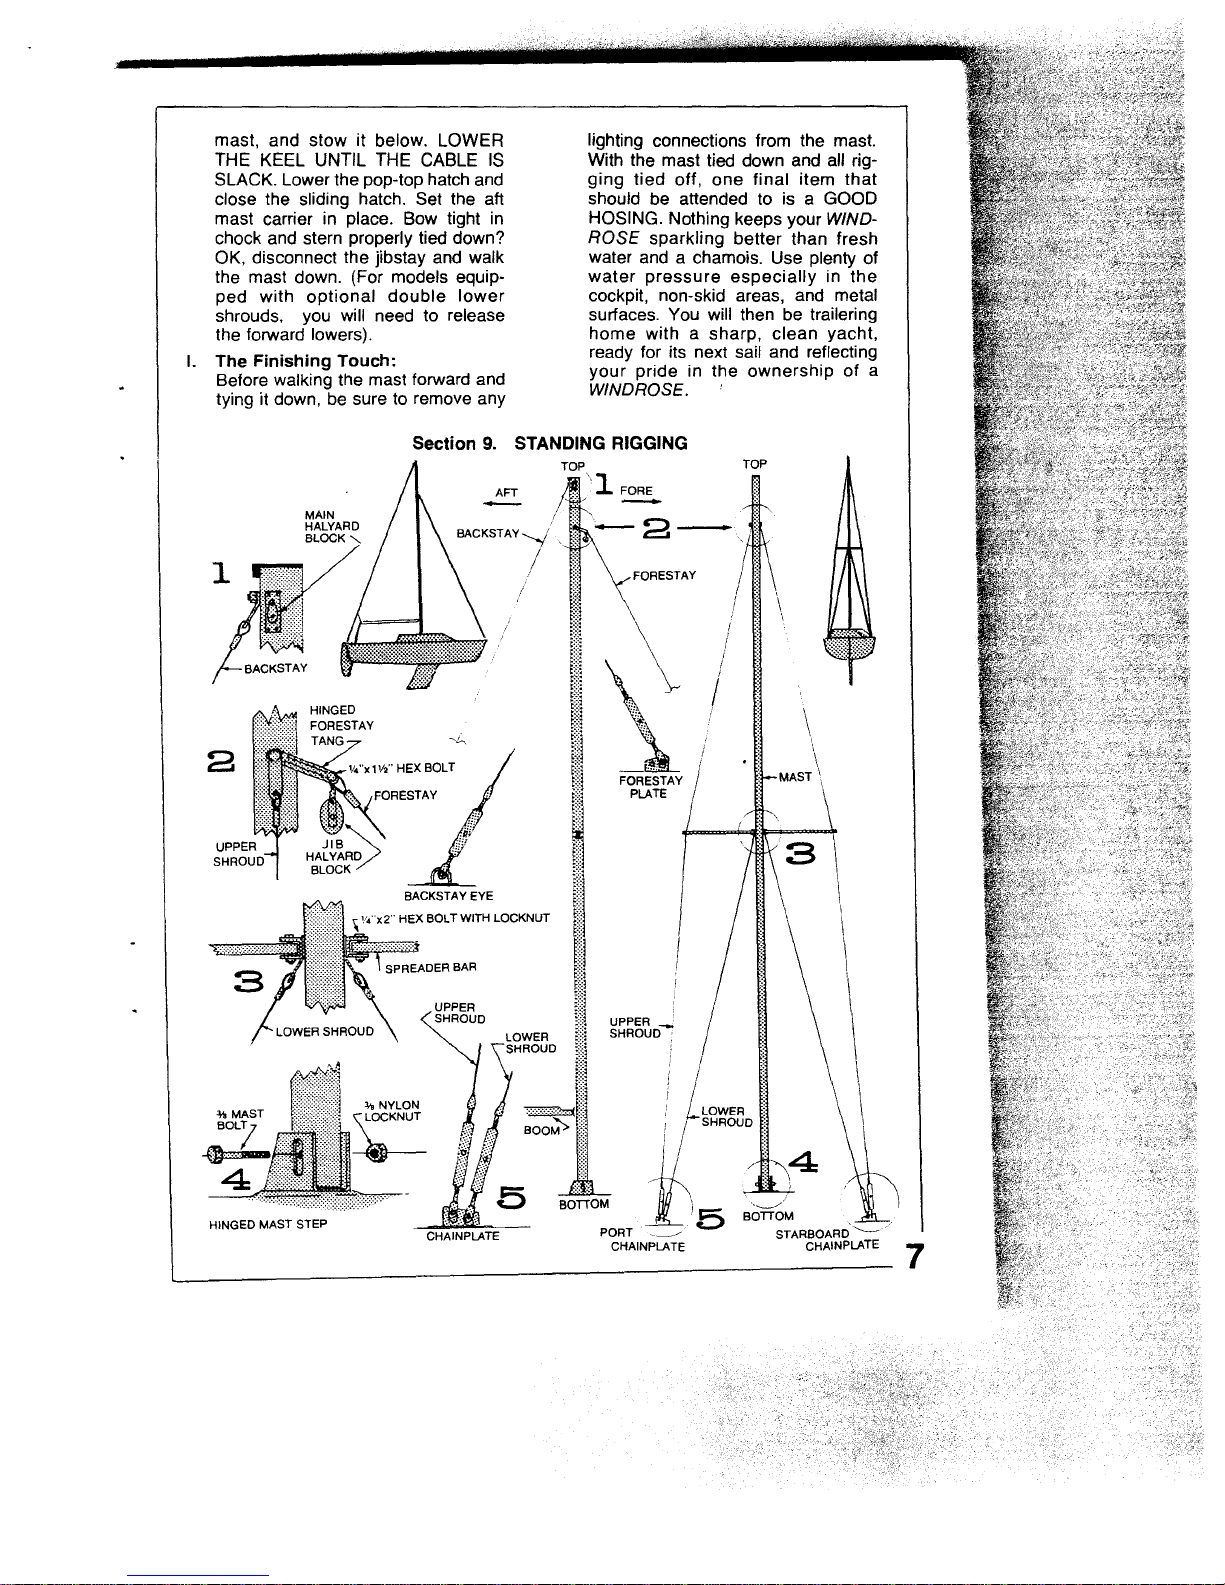
Attach all shrouds and the backstay as
illustrated in the rigging diagram.
NOTE: Attachment to the chainplates
with quick disconnect pull pins or other
devices are not recommended.Theycan
and do come out when hit inadvertently.
This can bring the mast down.
Your mast has been stepped at the fac-
tory and the turnbuckles are probably
very close to the right adjustment for
raisingthe mast. Before raisingthe mast,
make sure you have installedthejib block
and both halyards on the mast. A helpful
hint is to use marine tape and tape the
base of each turnbuckle to the chainplate
in the position they will be when the mast
is up.This will preventthemfrom catching
and bending when the mast is raised.
Also tape the top retaining clip and pin
on each turnbuckle as a double safety
precaution to prevent the retaining clips
and pins from possibly coming out of the
turnbuckles, which would bring the mast
down.
WARNING
Before raising the mast, be
sure the area is clear of
any overhead obstruc-
tions, ESPECIALLY
POWER LINES. The
aluminum mast and stain-
less steel rigging are ex-
cellent conductors and
can result in serious injury
or death to anyone touch-
ing a mast or rigging if the
mast or rigging touch the
power lines.
When everything is attached per the
above instructions, follow the procedure
below. This is how one person can
handle the entire procedure.
Slide the companion way hatch shut.
Place the base of the mast in the mast
step and insert the
3/8
bolt through the
mast step and mast. Secure with the 3/8
Nylon locknut provided and tighten sev-
eral turns with a wrench. Wing nuts and
other quick disconnect devices are not
recommended. Be sure
%"
washers are
between the bolt head and mast step and
nut and mast step.
Stand aft of the mast on the cabin top.
(Starting in the cockpit is awkward and
not a safe procedure). Pick the mast up
and stand it upright. It's recommended
you do this when the boat is still on the
trailer when possible for more steady
footing.
Hold forward pressure on the mast while
taking hold of the forestay. Hold the
forestay tight while walking forward to the
headstay plate.
Attach the forestay in the forward hole.
Now tighten and adjust all shrouds and
stays. After tightening all by hand, tighten
each locknut and then, with a pair of
pliers, take a slight snugging turn to lock
the nut firmly against the barrel. A small
piece of tape on the locknuts will assure
that vibration will not loosen the
turnbuckle and cause the rigging to sepa-
rate, which could cause the mast to come
down. Ifyouhaveopen barrelturnbuckles
make sure retaining cotter key pins are
in place.
If you have someone assisting you, have
them check the turnbuckles as you raise
the mastto be sure they do not catch and
bend. Turnbuckles can be taped with
marine tape to the chainplates to keep
them from getting caught and bending.
Bentturnbuckles cause metalfatigue and
may be dangerous. If you bend one, we
recommend you replace it with a
turnbuckle of equal strength. Also, be
caeful not to kink the shrouds and stays,
as they will be weaker at that point. We
recommend replacement if bent.
All rigging wire used on yachts has a
tendency to stretch. Therefore, you
should periodically check the tension on
the shrouds and stays, tightening them
as needed.
Section 11. RIGGING THE BOOM
The boom may now be removed from
below, brought on deck, and the
gooseneck fitting slipped into the mast
groove, with the track fitting jaw UP, and
downhaul hole DOWN. Go aft and attach
the topping lift to the aft "ear" on the end
of the boom.
Section 12. RIGGING THE
MAINSHEET
Start at the main swivel cam on the star-
board quarter, run the sheet through the
fairlead and the attached block, up
through the FORWARD sheave on the

double boom end block, down through
the port quarter block, back up through
the AFT sheave on the double boom end
block and back to the starboard quarter
deck pad eye. Tie off here with a bowline
and then tie a figure eight knot in the
other, or bitter end.
Section 13. MAST TUNING
Most of the following will require just a
few moments of your time, but it is
EX-
TREMEL Y IMPORTANT. The results will
be a more pleasant sail and prolonged
future enjoyment of your WINDROSE.
While the rig of your WINDROSE is quite
simple, special attention should be given
to the initialtuning of the mast, alongwith
the following suggestions, especially
after your WINDROSE has been in a few
hard weather sails.
The mast should usually be absolutely
verticle or "plumb," bothfore andaft, and
athwartships. On some boats the mast
should have a rake aft. The WINDROSE
20 sails best with an aft rake. For normal
conditions, we recommend a "firm" rig
and UNDER NO CIRCUMSTANCES
SHOULD ANY RIGGING BE SET UP
"BAR- TIGHT' OR LEFT SLACK. Once
the mast has been stepped and the slack
taken out of the jibstay with its
turnbuckle, tighten the upper and lower
shrouds to about the same tension. Now
face the mast, reach out and pull inward
on the shroud and see the mast move in
that direction. Try to get tension on both
shrouds equal with about 2" of play on
both the uppers and the lowers.
The final tuning of the mast should be
done while sailing to windward in a 5 to
10 mph breeze. Since the part of the
mast above the jibstay and upper shroud
intersection (hounds), is unsupported, it
will properly "fall off" slightly to leeward.
This tuning should give the mast a
smooth even curve from head to deck. It
will be necessary to sight along the back
of the maston each tack,from deck level,
to see this curve and make the proper
turnbuckle adjustments.ALWA YS MAKE
ANY TURNBUCKLE ADJUSTMENTS
ON THE LEE SIDE WHEN THE SHROUD
IS NOT UNDER STRAIN. Lower shrouds
act to keep the mast section in "col-
umn,"and they also prevent excessive
forward bending between the hounds
and the mast step.
NOTE:

bolt or pin. Trace the forward side
(luff) of the sail up to the top (head) of
the sail. Insert the luff rope into the
mast slot and hoist about two feet
then secure the Dacron halyard to its
cleat on the side of the mast.
The battens are now inserted into
their pockets on the trailing edge or
LEECH of the mainsail. Note that the
battens are of different lengths, as
are the pockets, so they must be
matched. No. the battens aren't too
long' The pocket is tight to keep them
in, so you must push a bit.
Finally, tie the OUTHAUL LINE to the
FORWARD hold of the aft boom end
fitting, run it through the clew. Pull
just hard enough to remove any
wrinkles in the foot of the sail. and
then tie off. The outhaul line will pre-
vent the foot rope from pulling out of
the SLOT in strong winds.
C. Hoisting The Sails:
The JIB is hoisted first with the
halyard tight enough to eliminate any
sag between the snaps BUT NOT SO
TIGHT that a hard crease appears
radiating upward from the tack. Now
slack off the mainsheet and hoist the
main. Keep the head of the main low
enough so it will not hit the backstay.
Wrinkles in the MAIN LUFF are re-
moved in the same manner as the jib,
only the DOWN HAUL LINE, at-
tached to the bottom of the
gooseneck, does the job.
If you have a topping lift, disengage it
from the boom and secure it to the
mast or backstay. Keep the sheets
slack as you cast off, give the bow a
hard shove in the direction you want
to go, pull in the jib, so that the wind
pushes the bow in the direction you
are turning, then pull in the main
sheet, and ... YOU'RE SAILING
Section 15. SAILINGTIPS
Now that we have you in the water under
sail, it is undoubtedly a good time to tell
you how your new sailboat works This
section was contributed by Peter Barrett,
a designer of sailboats, and Coastal Rec-
reation, Inc., and will give you enough
knowledge to start you on your way.
In sailing, the single most important thing
to remember is what direction the wind is
10
blowing. The key to knowing how to set
the sails is the angle between the wind
direction and the direction the boat is
pointing. YOU HAVE TO KNOW THE
WIND DIRECTION. As soon as you get
near the water, determine what direction
the wind is blowing. Look at the waves,
look at the flags, or at smoke. Look at the
direction the boats are pointing while an-
chored or tied by their bow lines. Feel the
breeze on your face and neck and
ears-consciously decide which way the
wind is blowing.
This wind direction will constantly change
by small amounts as the air is deflected
by houses, hills, trees, etc. Major
changes usually occur gradually, as a
weather system moves through, or the
land and sea change temperature. Keep
track of the wind direction. Use tell-tales
(yarns) tied to the side stays.
There are three basic ways a sailboat
can move, related to the wind direction:
One: It can sail in the same direction
the wind is blowing, being blown along
like a leaf on a pond. This point of sail is
called RUNNING with the wind. The sails
can be on either side of the boat, and the
keel can be pulled all the way up, as
there is no side force to resist.
RUNNING

I
11
FROM
HERE
II \
~
=' )
Keel down to resist
side force.
When sailing to windward, the keel must
be lowered all the way and the sails
pulled in fairly tight. The boom should be
over the rear corner of the cockpit, and
the jib should be pulled in to the same
angle.
Pointing too close
boat slows or
stops, sails
luff.
At first, you will find sailing to windward
the hardest. If you "point" or head into
the wind too much, the forward part of the
sails will flutter (luff) and the boat will slow
down or stop. If you point away from the
wind too much, the boat will tip or heel
too much.
Two: It can sail at an angle (45 de-
grees for most boats) against the wind.
This point of sail is also called beating,
close hauled, hard-on-the-wind, or other
synonymous terms. By sailing a zig-zag
course (tacking), a sailboat can proceed
up wind.
w (
~¥I
w~
~/'f
gt '::~
00
~>,
p(I:':: ~
.... '
~
.' ./
•..
'.•
.•..
.
.
......•....••.•....••
cZ'
\-u.- _.
_\,-:i~/,:: , y'
"'.'\.\
/
'.. '.'\ '1
;f
' 'XX)'
o

One of the biggest differences between a
really fine helmsman and a mediocre
tiller-tugger is the helmsman's ability to
keep the boat and sails at exactly the
right angle to the wind, Concentration is
the key (no really good helmsman can
talk or think about anything else while he
is steering).The sails should be just on
the verge of luffing all the time. The
course of the boat is adjusted with the
tiller to keep this angle constant.
In fresh and heavy winds, you can often
keep this angle constant by keeping the
boat tipped (heeled) at a constant angle.
Turn toward the wind to heelless, away
from the wind to heel more. Slight
changes in angle will cause large differ-
ences in angle of heel. Make small
smooth adjustments.
The keel is all the way down while sailing
closehauled, because the sails are pulled
in, causing a large side force which the
water resists by pushing on the keel. Pull
it up and the boat slips sideways. The
added stability due to the lower weight of
the keel is a helpful factor.
Pointing too far
from wind. Boat
heels, sails stall.
front of sail.
12 --'

REACHING REACHING
A. Reaching:
We have discussed sailing downwind
(running) and we have talked about
sailing upwind (beating). The third
means of moving through the water is
any course between these two
methods, and is called reaching.
While reaching, let your sails out as
far as you can without having the
leading edge luff. Steer the boat
straight for a landmark or on a com-
pass cOurse. Keep adjusting the sails
so they are on the verge of luffing. If
you are nearly sailing upwind, this
point of sail is called a CLOSE reach.
If you are nearly sailing downwind, it
is a BROAD reach. Sailing across the
wind is called a BEAM reach.
13

B. You'll have to turn
sometime ...
You are now able to sail any direction
(except within 45 degrees of into the
wind, where the sails flutter) ... but
what about turning from one course
WIND
to another? As long as the wind
comes from the same side of the
boat, you can turn to your new course
and adjust your sails.
WIND
If you are going to turn so that the
wind comes from the other side of the
boat, you will have to point into the
wind (tacking) or straight downwind
Gibing) as you turn.
While you are tacking, the forward
edge of your sails is attached to the
mast or forestay and the sails just
14
WIND
flutter. When you jibe, the back edge
is presented to the wind, and it is free
to swing rapidly from one side of the
boat to the other.
AVOID JIBING in strong winds (when
there are small whitecaps on the
waves). PRACTICE JIBING in light
winds.

.-_------------------------------ .,
C. You'll also have to stop
sometime ...
The only way to stop a sailboat is to
turn it into the wind so the sails flutter
and let it coast to a stop. The distance
it will coast depends on how fast you
are going and how strong the wind
and waves are against you as you
coast. A good sailor can land any
boat by coasting to a stop with the
bow a foot away from the dock or the
buoy.
WIND
WIND
~
NEVER try to land or stop with the
sails full of wind.
The best way to become proficient is
to PRACTICE. Throw a life jacket
overboard and practice coming to a
stop at it. When landing at a pier,
approach the end if possible so you
have an easy avenue of escape if you
are coming too fast. Hold the boom
out so the sail fills and acts as a brake
if you are coming too fast.
WIND
~
15

D.
Some hints on staying
out of trouble ...
When the wind is blowing offshore,
check its strength carefully. What
looks like a calm day on the water
may in fact be a real howler and you
will have to sail upwind to get back.
Always start out by sailing upwind or
close reaching, especially while you
are learning. Don't let yourself get
downwind of your home base. It is a
lot easier to return by sailing
downwind or broad reaching than by
beating into the wind.
Remember-your rudder won't work
unless the boat is MOVING. If you
are in a close spot, sailing towards a
beach or pier, you will have to turn
awayfrom thewind enough to get the
sails full and pick up speed before
you can turn away from the shore.
WRONG
Skipper keeps trying
to turn into wind, no
speed, can't tack,
drifts into shore.
WIND
+-~
3. Trim sails
and start sailing
/lIv~~\
V
RIGHT .\
Turns toward
1\-
shore to pick;:: ... )
up speed then \ : :
is able to tack .~
and sail away.
~~~
'..•• I '"
E2r
Skipper puts
tiller to port
WIND
t,.
DESIRED ~
COURSE
110:
WIND
If you are stalled out, with no speed,
pointing into the wind, you will start to
drift backwards. Now the tiller and
rudder will work in reverse. Think of
the tiller as a skate on ice, or a wheel,
and move it the way you want the
stern to move. Have a crew member
hold the jib out ("back the jib") to
push the bow in the direction you
want to go.
2. Crew backs
jib to push
bow to port
16

When anchoring, use a short length
of chain next to the anchor, and
plenty of anchor line (seven (7) times
the water depth to be really secure).
When tying up next to
a dock or boat use fenders
(bumpers) so you keep your
hull looking like new.
CHAIN
/ ANCHOR
When sailing in heavy air, or if you
can't swim, wear a comfortable life
vest. These vests are soft, flexible,
and comfortable enough to wear all
the time with no inconvenience at all.
Don't leave your sails up when you
are not sailing-ten minutes of luffing
in heavy air will age them more than
ten hours of sailing
Finally-ENJOY YOUR WINDROSE
Use it. Let it introduce you to sailing,
the greatest sport in the world.
17

Section 16. RETRACTABLE KEEL
OPERATION
All WINDROSE keel winches have cap a-
~ity ratin~s greater than the weight being
lifted. This makes the operation easy for
most anyone since the gear ratio is grea-
ter than needed.
Each winch has a "pressure brake"
which means the winch can be turned in
either direction without you having to flip
levers (there are no manual levers). As
long as the weight of the keel is on the
winch, the winch handle will stop at any
point in either direction. The handle can
be removed when the keel is resting on
the trailer or when the keel is in the full
down position. To remove, continue wind-
ing counter-clockwise and the handle will
unscrew. This operation will be aided if
the handle threads are kept lubricated.
The keel cable is
%"
stainless steel and
has a capacity far greater than needed
for your keel. The
%"
size is used as an
extra margin of safety and if cared for
properly, and periodically checked, it will
last many years of normal use.
CAUTION
Always crank the keel up
and down slowly. Never
force the crank handle
when operating the re-
tractable keel. If the keel is
locked down and an at-
tempt is made to raise it,
the large capacity winch
can be made to create ex-
cess pressure which may
cause damage to the
mounting assembly of the
winch, or the fiberglass to
which the winch is
mounted. It is unlikely the
keel trunk housing could
be damaged due to the
thickness of all Windrose
keel trunks.
When locking the keel down lower the
keel until it stops then raise it one turn of
the winch handle and remove the keel
lockdown bolt. It is located in the forward
end of the keel trunk and is
Y2"
size with
two black
%"
thick washers. (A wrench
should not be used on this bolt, "finger
tight" is usually adaquate and this allows
18
anyone to quickly remove the bolt
whenever the keel is to be raised). Lower
the keel one turn of the winch handle
then hold the lockdown bolt in one side ot
the keel trunk while lowering the keel
slowly and the bolt will slip through when
the hole in the keel lines up with the keel
trunk housing holes. Turn the handle
once or twice counter-clockwise, and that
should eliminate humming in the keel
cable while underway by making the
cable slack so no harmonic sounds can
be made. It is like a violin string; if tight, a
sound can be made, if loose, it is quiet.
WARNING
Do not put your finger in
the keel lockdown bolt
hole as a loss of your
finger may result.
After a day's sailing, remove the
Jockdown bolt then crank the keel up
slowly. At the first feel or sound of resis-
tance to the cranking action, stop crank-
ing immediately. Never force the handle
beyond normal pressure.
You'll face speciaJ problems if you decide
to keep your boat in the water, especially
salt water. Bottom paint is a must, plus
periodic cleaning and removal of marine
growth from the keel trunk slot. The pos-
sibility of corrosion to the keel and keel
fittings is greatly increased. Bottom paint
will also protect the gel coat surface from
blistering, which occasionally occurs
when gel coat is submerged for an ex-
tended period of time.
Note: Blisters resulting from leaving
the boat in the water for an ex-
tended time are not covered by
warranty. Professionally applied
vinyl based anti fouling bottom
paint
is
recommended.
Should you decide to keep your boat in
the water at a slip or mooring, the follow-
ing suggestions may help to extend the
life of the keel assembly. First of all, the
keel pivot pin is made of stainless steel,
and the keel itself is made of cast iron. To
retard electrolytic action, which will "eat"
away the metals, drill and tap the side of
the keel (near the forward edge) as close
to the keel pivot assembly as possible.
Then attach a zinc fitting. Keeping the

keel in the raised position will help pro-
long the life of the stainless steel cable by
keeping as much of it out of the water as
possible. Replacement cables are avail-
able through your local dealer.
Paint the keel itself with rust retardant
paint, like the commercially available
"Rust-Oleum" or zinc chromate paints. If
you use a zinc chromate paint, you must
strip the keel down to bare metal before
painting.
Paint the keel and fiberglass bottom (in-
cluding portion of rudder that is under-
water) with a good quality "hard finish
vinyl-based" bottom paint to protect the
fiberglass gel coat and reduce fouling
growth. The through-hull fittings are in-
stalled so that there is very little, if any,
metal exposedto water to be acted upon.
If you are sailing in shallow water, the
keel should not be lockeddown. Sail area
should be reduced if in strong winds.
Your local dealer may have additional
suggestions relative to the particulararea
where you plan to keep the boat.
Section 17. KICK-UPRUDDERS
Kick-up rudders give the ability to beach
a retractable keel WINDROSE on a
sandy beach or place the rudder on the
boat (in the kick-up position) while still on
the trailer prior to launching. This pro-
vides a greater degree of flexibility in
using your boat.
WARNING
DO NOT use the kick-up
rudder in the up position:
1. While under sail, far
greater stresses than
the rudder was de-
signed for can occur,
causing a failure if
sailed with the rudder
kicked up.
2. While using an out-
board engine. The
rudder (if in the up
position) can hit the
engine propeller with
possible damage to
the engine and/or
kick-up rudder.
Section 18. OUTBOARDENGINES
The appropriate size engine will depend
on the size of your WINDROSE. For
modelstwenty-two feet and less, three to
six h.p. is best. For models twenty-three
feet and over, a six h.p. is good and up to
a ten h.p. can be used. Remember, the
less weight in the aft end of the boat, the
better performance will be when sailing.
The outboard bracket on your boat re-
quires a "long shaft engine."
Coast Guard regulations require venting
of the hull if you install an outboard en-
gine on your boat. In the interest of
safety, be sure and comply with these
regulations. Gasoline fumes are heavy
and will accumulate in the low areas of
the boat's hull if venting is not properly
installed.
Section 19. ELECTRICALSYSTEM
The optional electrical system in a
WINDROSE has a 12volt battery that will
provide you with power for many hours,
but like any lead-acid battery, it will need
recharging occasionally. Be sure the
area is well ventilated while charging, or
better yet, removethe battery and charge
ashore.
WARNING
DO NOT CHARGE BAT-
TERY IN AN ENCLOSED
AREA, FUMES CAN
CAUSEAN EXPLOSION.
The battery is provided with a tie-down to
prevent its tipping over at an extremely
high angle of heel. Be sure this tie-down
is fastened.
The switch panel on boats ordered with
electrical systems is fused; each circuit
has a 15 AMP fuse.
The "MASTHEAD" switch is for the light
on the forward side of the mast. THIS
LIGHT IS TO BE USED ONLY WHEN
UNDER POWER, WITH THE SAILS
DOWN. It can be used to offer quick
illumination to check the jib trim while
sailing at night.
The "RUNNING" switch activates the
stern lightand redand green lightson the
bow.
19
Table of contents
Popular Boat manuals by other brands

CORRECT CRAFT
CORRECT CRAFT Ski Nautique 1996 owner's manual

LDC Racing Sailboats
LDC Racing Sailboats RS400 Rigging guide

Boston Whaler
Boston Whaler 320 Outrage owner's manual

BearCreeks
BearCreeks Scavenger user guide

Aqua Design
Aqua Design Koloa user manual

Advanced Elements
Advanced Elements STRAITEDGE AE1006 Owner's owner's manual