Laice IPV-222S User manual

Package Contents
Megapixel IP Vandalproof Dome Camera
Warning
Installation, servicing, alterations and repairs should be performed by qualied service personnel
authorized by your equipment distributor alterations and repairs.
Caution
THIS SYMBOL INDICATES
THAT DANGEROUS
VOLTAGE CONSTITUTING A
RISK OF ELECTRIC SHOCK IS
PRESENT WITHIN THE UNIT.
TO REDUCE THE RISK OF ELECTRIC SHOCK, DO NOT DISASSEMBLE OR ALTER. NO USER SERVICEABLE
PARTS INSIDE REFER SERVICING TO QUALIFIED SERVICE PERSONEL
THIS SYMBOL INDICATES
THAT IMPORTANT
OPERATING AND
MAINTENANCE
INSTRUCTIONS
ACCOMPANTY THIS UNIT.
Easy Quick Setup Guide
For Megapixel HD HYBRID Camera
Thank you for purchasing Megapixel HD HYBRID Camera. Before installing camera, Please ensure that
you read and understand this Quick Setup Guide thoroughly.
MS12059V0100A
WEEE (Waste Electrical and Electronic Equipment)
Correct disposal of this product (applicable in the European Union and other
European countries with separate collection systems.) This product should be
disposed of, at the end of its useful life, as per applicable local laws, regulations,
and procedures.
Certicates
FCC Compliance
Information to the User: This equipment has been tested and found to comply with the limits for a
Class A digital device. Pursuant to Part 15 of the FCC Rules, these limits are designed to provide
reasonable protection against harmful interference in a residential installation. This equipment
generates, uses, and can radiate radio frequency energy and, if not installed and used in accordance
with the instruction manual, may cause harmful interference to radio communications. However, there
is no guarantee that interference will not occur in a particular installation.
If this equipment does cause harmful interference to radio or television reception, which can be
determined by turning the equipment o and on, the user is encouraged to try to correct the
interference. For example, try reorienting or relocating the receiving antenna, increasing the
separation between the equipment and receiver, or connecting the equipment to an outlet on a
dierent circuit.
CE Compliance
Connector
Cables
1. Dome Base
2. Lens
3. Gimbal
4. Mounting Screws (ST4x38)
5. Safty Wire
6. Dome Cover
7. Dome Bubble
8. Assembly Screws (M3x12)
9. Cable
1 2 3 45
7
6
5
3
4
1
2
8
9
ST4x38 (4pcs)
Dowel (4pcs)
Torx Wrench
Quick Setup Guide Mounting Template
CD with user’s manual
and software (EMS)
1
Megapixel HD HYBRID Camera
1. Power Cable
Cable for Power Source. (DC 12V)
2. P.O.E. / Ethernet connector
Power Over Ethernet to supply the power source to this camera by using POE hub.
Or Ethernet can be connected by Lan cable.
3. Alarm In/Out
This connector is provided with1 input and 1 alarm output.
4. Audio Jack
Connect the Audio jack to this Audio connecter. (Audio IN (Yellow), OUT(Red))
5. HD VIDEO
BNC CABLE Outputs connect HD Hybrid Camera to Hybrid NVR.
Mounting Template
VD-50s
109mm
70mm
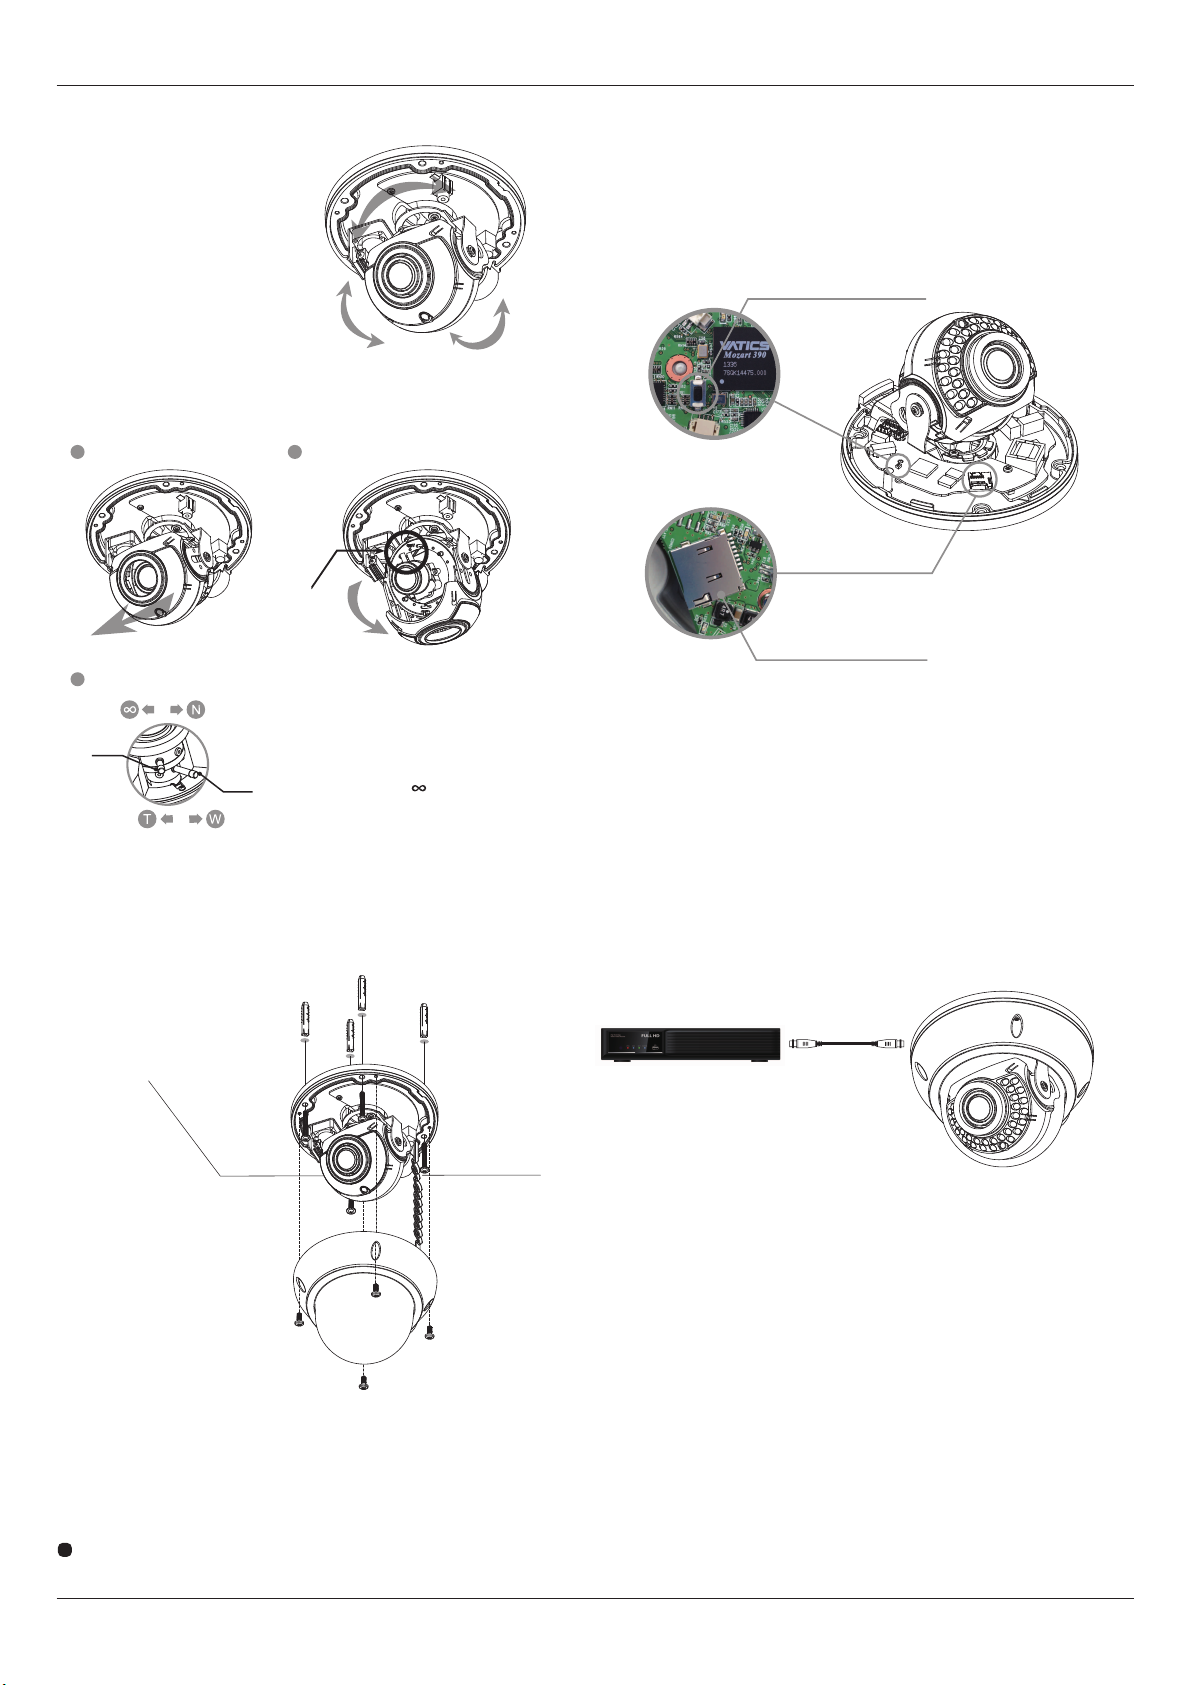
3-Axis Gimbal Adjustment
- Rotation
Adjusting the rotation to desired angle by hand.
- Tilt
Adjusting the tilt to move up and down by hand.
- Pan
Adjusting the pan to turn right and left by hand.
Zoom & Focus Adjustment
Installation
Connect the cables to the connectors on the camera unit before installation.
- Connect the Power Input Cables to a DC12V
- Alarm In/Out cable
- BNC cable to HD connector
- Audio cable to audio In/Out connector.
MS12059V0100A
2
Megapixel HD HYBRID Camera
Reset Button
Micro SD Card Slot
Tilt (85°)
Rotation (355°)
Pan (355°)
1. Remove a dome cover by loosening 4 screws.
2. There are four mounting holes on a dome base so that you can install a dome unit in any place
such as ceiling, wall and etc.
3. Use the mounting screws to ax a dome base to a sturdy surface. If necessary, use the
supplied dowels.
4. Adjust the 3-axis gimbal and point the camera to the desired area.
5. Assemble a dome cover with a installed dome base.
!
CAUTION To avoid smear, do not expose the camera directly to a strong light source
such as the sun or spot light.
HD Hybrid NVR allocate IP address for each camera Automatically by using Auto IP Scan function.
The default HTTP port number is 80.
Connecting to the RJ-45
Connect a standard RJ-45 cable to the network port of the network camera. Generally a cross-over cable is
used for directly connection to PC, while a direct cable is used for connection to a hub.
Connecting the Power
There’re 2 ways to supply the power source to this camera, as follows.
1) DC12V
2) P.O.E.
- Input Voltage : PoE (IEEE802.3af),
- Input Voltage Range : PoE (36~57V)
- Input Current : PoE (0.35Arms)
Connecting to the BNC
Enable HD Hybrid Camera to connect with Hybrid NVR.
Our IP-Over-Coax technology allows you connect HD Hybrid camera with Coaxial cable directly.
BNC cable connects HD Hybrid Camera to Hybrid NVR.
Reset
HD Hybrid Camera has a Reset button inside of the camera (See Location). Use this button to restart.
1) Press the Reset button for 1 second.
2) Reset to defults starts and it take approximately 40 seconds to complete it.
Micro SD Card Slot
Remove the bottom cap of camera to insert the SD memory card.
- Zoom (Field of View): Telephoto(T) to Wide(W)
- Focus: Near(N) to Innity( )
1Pull the upper gimbal
3Adjust zoom/focus by the zoom or focus levers as shown
2Take down the upper gimbal to open
Zoom
Lever
Focus
Lever
Zoom/Focus
Lever
This manual suits for next models
1
Table of contents
Other Laice Security Camera manuals


