Lakeland 63558 User manual

INSTRUCTION BOOKLET
Model: 63558
DIGITAL GRILL

2
CONTENTS
Product features.............................................................................................................. 3
Safety cautions............................................................................................................. 4-6
Using your Digital Grill for the first time........................................................................... 7
Grilling positions ............................................................................................................. 8
Instructions for use .................................................................................................... 9-10
A guide to ingredients and cooking times...................................................................... 11
Hints and tips................................................................................................................ 12
Recipes .................................................................................................................... 13-16
Frequently asked questions............................................................................................ 17
Care and cleaning ......................................................................................................... 18
Technical information .................................................................................................... 19
Electrical connections.................................................................................................... 19
Recycling your electricals ............................................................................................... 19
LAKELAND DIGITAL GRILL
Thank you for choosing the Lakeland Digital Grill.
Please take a little time to read this booklet before getting started and keep it in a safe
place for future reference.
This Digital Grill has variable temperature control to cook meat and fish from rare to well
done; and panini’s and chargrilled vegetables to perfection, along with an integrated
timer.
Here at Lakeland, our award-winning family-owned business still offers the same excellent
quality, value for money and exceptional customer service as when we founded the
company back in the 1960s.
Our products are hand-picked and thoroughly tested so you can be sure that everything
you purchase will be a pleasure to use for many years to come.

3
PRODUCT FEATURES
1. Handle
2. Removable grill plates
3. Removable drip tray
4. Digital control panel
5. Start/pause button
6. Release buttons
7. On/off power button
2
345
6
6
1
7

4
SAFETY CAUTIONS
Carefully read all the instructions before using the appliance and keep in a safe place
for future reference. Always follow these safety cautions when using the appliance to
avoid personal injury or damage to the appliance. This appliance should be used only as
described in this instruction book.
• This appliance can be used by children aged from 8 years and
above and persons with reduced physical, sensory or mental
capabilities or lack of experience and knowledge if they have
been given supervision or instruction concerning use of the
appliance in a safe way and understand the hazards involved.
Children shall not play with the appliance. Cleaning and user
maintenance shall not be done by children unless they are older
than 8 and supervised.
• Make sure your electricity supply matches the voltage shown on the appliance.
• Ensure all packaging materials and any promotional labels or stickers are removed from
the appliance before the first use.
• Always inspect the appliance before use for noticeable signs of damage. Do not use if
damaged or has been dropped. In the event of damage, or if the appliance develops a
fault contact the Lakeland customer care team on 015394 88100.
• Do not use this appliance if the lead is damaged. Contact the Lakeland customer care
team on 015394 88100.
• Always use the appliance on a flat, dry, level, heat resistant surface. If the surface is
sensitive, place a heat-resistant board under the grill.
• Unplug from the mains when not in use and before cleaning. To disconnect, turn the
socket to “off” and remove the plug from the mains socket.
• Do not use any accessories or attachments with this appliance other than those
recommended by Lakeland.
• To protect against fire, electric shock or personal injury, do not immerse cord, plug or
lid in water or other liquids.
• Do not leave the lead hanging over the edge of a kitchen table or worktop.
Avoid contact between the lead and hot surfaces.
• For indoor use only.
• For domestic use only.
• This appliance should be used for preparation of food as described within the
instructions for use that accompany it.

5
• Always ensure that your hands are dry before removing the plug from the mains
socket. Never pull the plug out of the mains socket by its lead.
• To avoid injury or possible fire, do not cover the appliance when in use.
• Do not connect this appliance to an external timer or remote control system.
• An extension cable may be used with care. The electrical rating of the cable should be
at least as great as the appliance. Do not allow the cable to hang over the edge of the
worktop or touch any hot surfaces.
• This appliance complies with the basic requirements of Directives 2014/30/EU
(Electromagnetic Compatibility) and 2014/35/EU (Low Voltage Directive).
• WARNING: A cut off plug inserted into a 13amp socket is a serious safety (shock)
hazard. Ensure the cut off plug is disposed of safely.
• CAUTION: The plastic bags used to wrap this appliance or the packaging may be
dangerous. To avoid risk of suffocation, keep these bags out of reach of babies
and children. These bags are not toys.
• Keep the grill, plug and lead away from hot ovens, electric and gas burners, flames and
hot surfaces.
• The grill should only be used in a well ventilated area, at least 30cm away from walls
and other surfaces to allow sufficient airflow.
• Only use the grill with the top and bottom grill plates properly installed.
• Do not use metal utensils with the grill, this will damage the non-stick coating on the
grill plates. Use heat resistant plastic or wooden utensils.
• Do not use aluminium foil or any other material between the grill plates and the food
being cooked.
• Do not place cooking utensils on the cooking surfaces of the appliance.
• Do not remove the drip tray while cooking, if the drip tray becomes full when cooking,
let the appliance cool down before emptying.
• Do not line the drip tray with aluminium foil or any other material.
• Do not leave the grill unattended during use.
• Switch off and unplug the grill and let it cool completely before moving, cleaning or
storing.

6
WARNING – HOT SURFACES
All surfaces marked with this symbol will get very hot during use.
To prevent injury, DO NOT TOUCH.
Switch off and unplug the grill and let it cool completely before touching these surfaces.
When adding food to the grill, always use the handle to lift the top grill plate. Be careful
when opening the grill as burning hot steam can escape, and fat can spit which can burn.
Use oven gloves when cooking with grill, only touch the handle.

7
• To remove the drip tray – press the drip tray
inwards in the middle of it at the front. It will auto
release.
• To remove the grill plates – open the grill using
the handle, so that it is in the open position.
• Press the ‘Release’ buttons on the right-hand side of
the appliance to release each grill plate and lift them
out.
• Wash the drip tray and grill plates in warm soapy
water, rinse and dry thoroughly.
• The drip tray and grill plates are dishwasher safe.
• Make sure that all parts are clean and dry before
assembling the product.
• Slot the drip tray back into the base unit and gently
push inwards to secure on the catch.
• Click the bottom grill plate with the curved edge on
the left, back onto the base unit by lining up the
two notches at the back of the grill plate with two
locators at the back of the base unit on the grill, then
push down to click into place.
• The bottom grill plate is angled towards the drip tray.
• Repeat the same with the top plate.
• The Digital Grill is now ready to use.
USING YOUR DIGITAL GRILL FOR THE FIRST TIME
• Unpack the Digital Grill, remove all the packaging materials.
• Before first use, wipe the base unit with a clean damp cloth and dry thoroughly.
Notch
Locator

8
GRILLING POSITIONS
WARNING: The grill plates and metal surfaces of the appliance and handle will become
very hot during use. To avoid a burn hazard, wear protective oven or heat-resistant gloves
when using and touch only the black portion of the handle.
The Digital Grill has two cooking positions for you to use, depending on your recipe.
DOUBLE-SIDED GRILLING IN THE CLOSED POSITION
• For searing both sides of food without having to turn it, the top and bottom grill plates
are in contact with your food. The grill should always be in this position when it is
preheating.
• Use this position when you need your food cooked on both sides.
• When you close the lid press gently on it and it will self-adjust to the thickness of the
food, to make sure your food is cooked evenly.
• When adding or removing food, open the grill using the handle until the top grill plate
in is an upright and open position.
• NOTE: If cooking more than one piece of food at a time, food items should be similar
in thickness to ensure the upper grill plate rests evenly on the food for even cooking.
SINGLE-SIDED GRILLING IN THE OPEN POSITION
• Grill in the open position when you want to cook open side of your food.
• The grill should also be in this position when you are adding or removing the grill
plates.

9
INSTRUCTIONS FOR USE
Make sure both grill plates are fixed securely on the grill before switching on, otherwise
the grill will not preheat properly. Never plug in and switch on the grill without the grill
plates.
Place the Digital Grill near a socket on a flat heat resistant surface or heatproof board
to catch any juices that may escape during cooking. The grill should only be used in a
well-ventilated area, at least 30cm away from walls and other surfaces to allow sufficient
airflow.
Plug into the socket and switch on.
ON/OFF POWER BUTTON
• There is an On/Off Power button located at the back of the appliance. When switched
on the appliance will beep and the control panel will illuminate.
MENU DISPLAY
• Time and temperature display will illuminate red. These can be adjusted using the
and buttons by each one, the initial setting will show – time: 5:00 (5 minutes);
temperature: 200°C. This is a preheat program.
• The time range of the Digital Grill is from 0:10 to 9:50 and will increase and decrease
in 10 second increments.
• The temperature range of the Digital Grill is from 60 to 220°C and will increase and
decrease in 10°C increments.
Time increase
button
Temperature
increase button
Temperature
decrease button
Start/pause
button
Cooking time
display
Temperature
display
Time decrease
button
PREHEATING
• In the preheating process the time and buttons are in a locked status and do
not function.
• Adjust the temperature and buttons to the temperature you require.
• When the temperature is set, press the Start/Pause button on the right to start
heating up. Whilst the appliance is preheating, both sets of and buttons do
not function, the temperature display will flash red, until the required temperature is
reached.
• The time display will illuminate red but does not flash.

10
• When the appliance is up to temperature, the appliance will beep and remain at a keep
warm temperature. You can then set the temperature and time depending on the food
your cooking.
• When you switch on the Digital Grill for the first time there may be a slight burning
smell. This is normal for a new product and will disappear after a few uses. So, we
advise heating up the grill empty on first use.
FOOD COOKING
NOTE: When using the grill plates for the first time, spray or apply a thin layer of cooking
oil onto the non-stick surfaces of the grill plates using kitchen towel coated with a little
oil, in order to season the non-stick surface. As necessary, reapply a thin layer of cooking
oil throughout the life of the grill plates to maintain best non-stick performance. Add oil
sparingly or the grill plates will smoke.
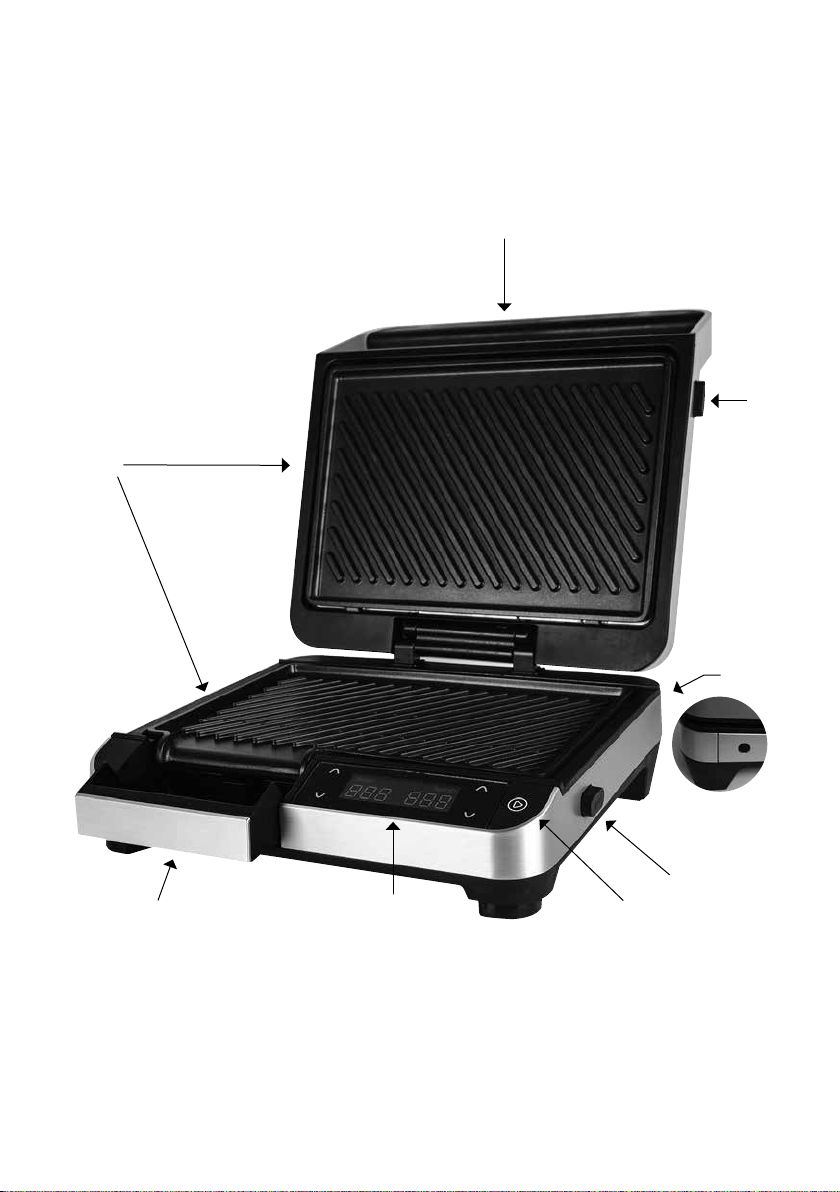
• After preheating, both the timer and temperature control are adjustable using the
and buttons.
• When the correct time and temperature has been selected, press the Start/Pause button
to start.
• The appliance will start counting down the time and the temperature display will flash.
When the cooking time has finished, appliance will beep 6 times (5 short sound, 1 long
sound).
• Then the appliance will resume the last time setting and stop working.
• If you need to continue cooking, press the Start/Pause button, appliance will restart.
• If you press the Start/Pause button during cooking, the appliance will pause, press
again to continue cooking.
• During cooking, the button and buttons on both the time and temperature are
not illuminated.
• When you have finished cooking, press the On/Off Power button on the back of the
appliance to turn off.
CAUTION: The appliance will still be hot! Wear oven gloves and avoid contact with the
outer of the grill itself. Switch off and unplug from the socket and remove your food
and serve.
• Open the Digital Grill using the handle and an oven or heat-resistant glove, be carefully
as it will be hot and steam will escape and could burn and scald.
• If not operated within 30 minutes, unit will shut off automatically.
• Allow the appliance to cool down completely before removing the grill plates, moving
or cleaning, usually about 30 minutes.
• Empty the drip tray and clean it after every use.
CAUTION: Always unplug the product from the electrical outlet when cooking is complete
and when the product is not in use.

11
A GUIDE TO INGREDIENTS AND COOKING TIMES
Here is a guide on different types of food and cooking times. Times will vary depending
upon the thickness of your food. For steak, cooking times will vary depending on your
taste.
Whilst you are getting to grips with cooking times, monitor your food.
Ensure food is thoroughly cooked before serving.
Food Temperature
90/140/180/220°C
Time
Vegetables 180°C 5-7 minutes
Prawns 180°C 5-8 minutes
Fish 180°C 8-9 minutes
Panini, toasted sandwiches 220°C 2-4 minutes
Sausages thin 220°C 8 minutes
Burgers (quarter pounder size) 220°C 6-8 minutes
Pork fillet or chop 220°C 6-8 minutes
Kebab 220°C 6-8 minutes
Bacon 220°C 3-4 minutes
Poultry, chicken 220°C 8-9 minutes
Sirloin steak approx. 2cm
thickness
Rare 220°C 3-4 minutes
Medium 220°C 5-6 minutes
Well-done 220°C 7-8 minutes
Slice vegetables to around 1cm in thickness and toss in olive oil before grilling.
Never grill to cook or defrost frozen food. All food must be fresh and completely defrosted
before cooking.
Make sure foods are an even thickness for even cooking. Flatten chicken breasts, pork and
steaks using a meat mallet or rolling pin to an even thickness before cooking.
Tougher cuts of meat taste and cook better if they are marinated first. Make sure excess
marinade is removed from food before grilling, to prevent burnt marinade building up on
the grill plates.

12
HINTS AND TIPS
Once you’ve tried some of the recipes in this booklet, you may wish to adapt them, using
our suggestions as a guide.
• Use a pastry brush with heat resistant bristles or a sheet of kitchen towel to clean food
residue from the grill plates if you are cooking different types of food in the same
session.
• When cooking marinated and fatty meats, keep an eye on the drip tray to make sure it
does not overflow. Empty frequently.
• When cooking in the open position you will need to turn your food during cooking.
You will not need to do this when cooking in the closed position.
• When cooking small amounts, place food in the centre of the grill plates.

13
RECIPES
Please note that all spoon measurements are standard metric, so 1 tsp is 5ml and 1 tbsp is
15ml. We recommend using a set of measuring spoons for accurate results.
CHARGRILLED CHICKEN AND BACON CLUB SANDWICH
Makes 4
Ingredients Quantity
Chicken breasts, boneless and skinless 2
Olive oil 2 tsp
Lemon juice 2 tsp
Salt and freshly ground black pepper
Rindless rashers smoked back bacon 8
White bread, crusts removed 12 slices
Tomatoes 2 sliced
Little gem lettuce 8 leaves, roughly torn
Mayonnaise 8 tbsp
Cocktail sticks to serve
WHAT TO DO:
Flatten each chicken breast slightly by using a meat tenderiser or rolling pin to ensure it
is an even thickness. Arrange chicken in a shallow dish, whisk the oil, lemon juice and
seasoning together then brush over the chicken breasts.
Preheat the grill to 200°C. Open up the grill, add the chicken and cook in the closed position
for 8-10 minutes or until cooked through. Carefully remove the chicken from the grill and
when cool enough to handle, cut into slices. Wipe over the grill plates with some kitchen
towel.
Add the bacon rashers to the grill and cook in the closed position for 3-4 minutes or until
crisp. Carefully remove from the grill and keep warm. Wipe over the grill plates with some
kitchen towel.
Place 4 of the bread slices on the grill and toast in the closed position for 3-4 minutes or
until lightly browned. Carefully remove the toast slices and keep warm wrapped in a clean
tea towel, whilst repeating with other bread slices.
Place 4 slices of toast on a chopping board and lightly spread each with a little mayonnaise then
top with some tomato slices, a little torn lettuce and the grilled chicken slices. Top each with
another slice of toast spread with a little more mayonnaise, a little more lettuce, tomato
and crispy bacon and a final layer of toast which has been spread with remaining
mayonnaise and place the mayonnaise side down.
Then cut the sandwiches diagonally in half and then in half again to form triangles,
inserting a cocktail stick in the centre of each sandwich quarter to keep in place and serve
immediately.

14
TANDOORI CHICKEN KEBABS WITH MANGO CHILLI AND LIME SALSA
Makes 4
TIP: For an even quicker marinade, why not stir 2 tbsp ready-made tandoori paste into the
natural yoghurt.
Ingredients Quantity
Natural yoghurt 200g
Lemon juice 1 tbsp
Fresh root ginger 1tbsp, peeled and finely grated
Clove garlic 1, peeled and crushed
Garam masala 1 tsp
Sweet paprika 2 tsp
Generous pinch sea salt
Skinless and boneless chicken breasts 450g, diced into 2cm pieces
Wooden skewers 8
FOR THE MANGO CHILLI AND LIME SALSA
Ingredients Quantity
Medium ripe mangoes 2, stones removed and finely diced
Spring onions 4, trimmed and finely sliced
Finely chopped red chilli 1, optional
Freshly chopped coriander 3 tbsp
Juice of a lime 1
Salt and freshly ground black pepper To taste
Pitta breads or wraps To serve
WHAT TO DO:
In a bowl mix together the yoghurt, lemon juice, ginger, garlic, garam masala, paprika and
salt. Add the diced chicken to the bowl and stir until well coated. Cover and leave to
marinate for at least 2 hours, or ideally overnight for best results, in a fridge.
In a bowl combine all of the salsa ingredients until well mixed, then season to taste and
set aside.
Preheat the grill to 200°C. Thread the marinated chicken onto 8 wooden skewers. When
the grill is preheated, open up the grill, add the chicken skewers to the grill plates and
cook in the closed position for 8-10 or until cooked through.
Serve the tandoori chicken kebabs in pitta breads or wraps with the mango chilli and lime
salsa to accompany them.

15
FAMILY FUN FAJITAS
Makes 4
TIP: Instead of chicken why not try using turkey or beef strips.
Ingredients Quantity
Chicken breasts, boneless and skinless 450g, cut into strips
Olive oil 2 tbsp
Small clove garlic 1, peeled and crushed
Freshly squeezed juice of a lime 1
Smoked paprika 2 tsp
Generous pinch of ground cumin
Pinch of mild chilli powder
Onion, medium size 1, peeled, halved and sliced
Red pepper 1, cored, deseeded and cut into slices
Yellow pepper 1, cored, deseeded and cut into slices
Flour tortillas 8
To serve
Guacamole, soured cream and salsa.
WHAT TO DO:
Place the strips of chicken in a freezer bag, add the oil, garlic, lime juice, paprika, cumin and
chilli and mix together until well coated. Leave to marinate for at least 1 hour, or ideally
overnight for best results, in a fridge.
Preheat the grill to 200°C. Open the grill up to the open position.
Add the onion to the grill for approximately 6-8 minutes and then pepper slices for
approximately 10-12 minutes, turning both over halfway through cooking until softened and
chargrilled.
Carefully remove the cooked onions and then the pepper slices and keep warm whilst cooking
the chicken.
Divide the chicken and cook in two batches on the grill, ensuring you spread it out to an even
layer, close the lid. Cook the chicken for 8-10 minutes, until cooked through.
Toss together the cooked chicken and onion and pepper mix with the remaining lime juice
and serve wrapped in warmed tortillas with guacamole, soured cream and salsa to accompany.

16
ASIAN STYLE SALMON FILLETS WITH CHARGRILLED VEGETABLES
Makes 4
Ingredients Quantity
Sesame oil 2 tsp
Olive oil 1 tbsp
Soy sauce 2 tbsp
Lime ½, juice of
Runny honey 1 tbsp
Finely grated fresh ginger 1 tsp
Clove garlic 1, peeled and crushed
Fresh red chilli 1 tsp, finely chopped (optional)
Salmon fillets, skin on 4
Large carrot 1, peeled and cut into thin strips
Yellow pepper 1, cored, deseeded and cut into slices
Fine asparagus spears 125g , trimmed
WHAT TO DO:
Combine the sesame and olive oil, soy sauce, lime juice, honey, ginger, garlic and chilli, if using,
and pour into a shallow dish large enough to hold the salmon fillets in one layer. Add the salmon
fillets, skin side uppermost, cover and leave to marinate for at least 1 hour, or ideally overnight
for best results, in a fridge.
Preheat the grill to 200°C. Open up the grill, arrange the carrot strips in one even layer on
the grill and cook in the closed position for 4-5 minutes until tender and chargrilled.
Carefully remove to a serving dish to keep warm.
Add the pepper slices to the grill in one even layer and cook in the closed position for 4-5
minutes or until softened and chargrilled. Carefully remove the pepper strips to the serving dish
and keep warm with the carrot.
Add the asparagus to the grill in one even layer and cook in the closed position for 4-5 minutes
or until softened and chargrilled. Carefully remove the asparagus from the grill and add to the
carrots and peppers and keep warm whilst cooking the salmon.
Shake off any excess marinade and add the marinated salmon to the grill. Cook in the closed
position for 8-10 minutes, or until cooked through. Serve the salmon on a bed of the chargrilled
vegetables immediately.

17
FREQUENTLY ASKED QUESTIONS
Question: Why are fat and cooking juices escaping out onto the work surface?
Answer: The drip tray needs emptying or has not been inserted correctly back into the
grill. Empty the drip tray and makes sure it is correctly in place. Remember to
empty and wash the drip tray after every use.
Question: Why is there smoke coming from the grill?
Answer: There is too much oil on the grill plates, or the grill plates have not been
cleaned properly. Switch off the grill, allow it to cool and remove excess oil
from the grill plates, or try cooking your food without it. Ensure you wash or
wipe the grill plates after every use, see ‘Care and cleaning’.
Question: Why is food sticking to the grill plates?
Answer: The grill may not have fully preheated to the correct temperature before
adding your food to the grill plates.
The grill plates may need cleaning. Ensure you wash or wipe the grill plates
after every use.
Question: Why is food taking so long to grill?
Answer: The temperature you have selected may not be hot enough. Increase the
temperature.
Question: Why is food being burnt on the outside and not cooked through
in the centre?
Answer: The temperature you have selected may be too hot. Decrease the
temperature.
Question: Why is the grill making a buzzing noise?
Answer: The grill has developed an electrical fault. Immediately switch it off and
unplug at the socket. Contact Lakeland Customer Services.

18
CARE AND CLEANING
• Unplug the grill and let it cool completely before removing the grill plates and cleaning,
usually about 30 minutes.
• Clean thoroughly before using for the first time and after every use.
• Check the parts for wear or damage after every few uses.
• Do not use abrasive cleaners, or steel wool.
• Always use plastic, wooden or silicone spatulas, as metal utensils will damage non-stick
coatings.
• Never immerse the base unit in water or any other liquid.
• To clean the base unit and control panel, wipe with a clean, damp cloth and dry
thoroughly before storing.
• Scrape off any food residue from the grill plates. For stubborn food, pour on a little
cooking oil and leave for 5 to 10 minutes, then clean the grill plates with a sponge or
soft bristled brush to dislodge.
• If burnt on food remains, soak the grill plates for a while before washing.
• To clean the grill plates and drip tray, wash with hot soapy water. Rinse and dry
thoroughly before storing.
• The drip tray and grill plates are dishwasher safe.
• Ensure the grill plates and drip tray are completely dry before re-attaching to the grill.
• Store the Digital Grill with the power cable loosely coiled. Never wrap it tightly around
the grill.

19
TECHNICAL INFORMATION
• Power: 2000W.
• Voltage: 220-240V.
• Frequency: ~50-60Hz.
ELECTRICAL CONNECTIONS
THIS APPLIANCE MUST BE EARTHED
The appliance is fitted with a fused three-pin plug to BS1363 which is suitable for use in
all homes fitted with sockets to current specifications.
CHANGING THE 13 AMP FUSE
Use a 13 amp BS1362 fuse. Only BSI or ASTA approved fuses should be used. If you are
unsure which plug or fuse to use, always refer to a qualified electrician.
Note: after replacing or changing a fuse on a moulded plug which has a fuse cover, the
cover must be refitted to the plug; the appliance must not be used without a fuse cover.
If lost, replacement fuse covers can be obtained from an electrical shop. This appliance
complies with the following EU Directives: 2014/35/EU (Low Voltage Directive) and
2014/30/EU (EMC Directive).
RECYCLING YOUR ELECTRICALS
Along with many other high street retailers, Lakeland has joined a
scheme whereby customers can take their unwanted electrical products
to recycling points set up around the country.
Visit www.recycle-more.co.uk to find your nearest recycling point.

20
Lakeland
Alexandra Buildings, Windermere, Cumbria, UK LA23 1BQ
Tel: +44(0)15394 88100 lakeland.co.uk
Table of contents
Other Lakeland Grill manuals
Popular Grill manuals by other brands

George Foreman
George Foreman GR36BW owner's manual

Klarstein
Klarstein 10022267 manual

TEFAL
TEFAL OptiGrill GC730D12 Instructions for use

Bartscher
Bartscher E-6p Instructions for installation, use and maintenance

Arteflame
Arteflame EURO 20 GRILL Assembly instructions

Brinkmann
Brinkmann 810-6550-S owner's manual