Lambrecht SYNMET-IND Series User manual

X:\PmDoku\Geräte\Synmet NAV\englisch\SYNMET MANUALE 1.doc Release 31.99.31
LAMBRECHT
Interface System "SYNMET-IND"
STW-Manual (Setting to work)

X:\PmDoku\Geräte\Synmet NAV\englisch\SYNMET MANUALE 1.doc
STW Manual Page 2 of 25
Content
1.0 THE INDIVIDUAL SPECIFICATION DATA SHEET................................................................................ 3
1.1. TYPE NUMBER CODE................................................................................................................................4
1.2. INDIVIDUAL CONFIGURATION DATA-SHEET OF THE SYNMET SYSTEM ......................................................... 5
2.0 GENERAL................................................................................................................................................. 6
3.0 UNPACKING ............................................................................................................................................ 6
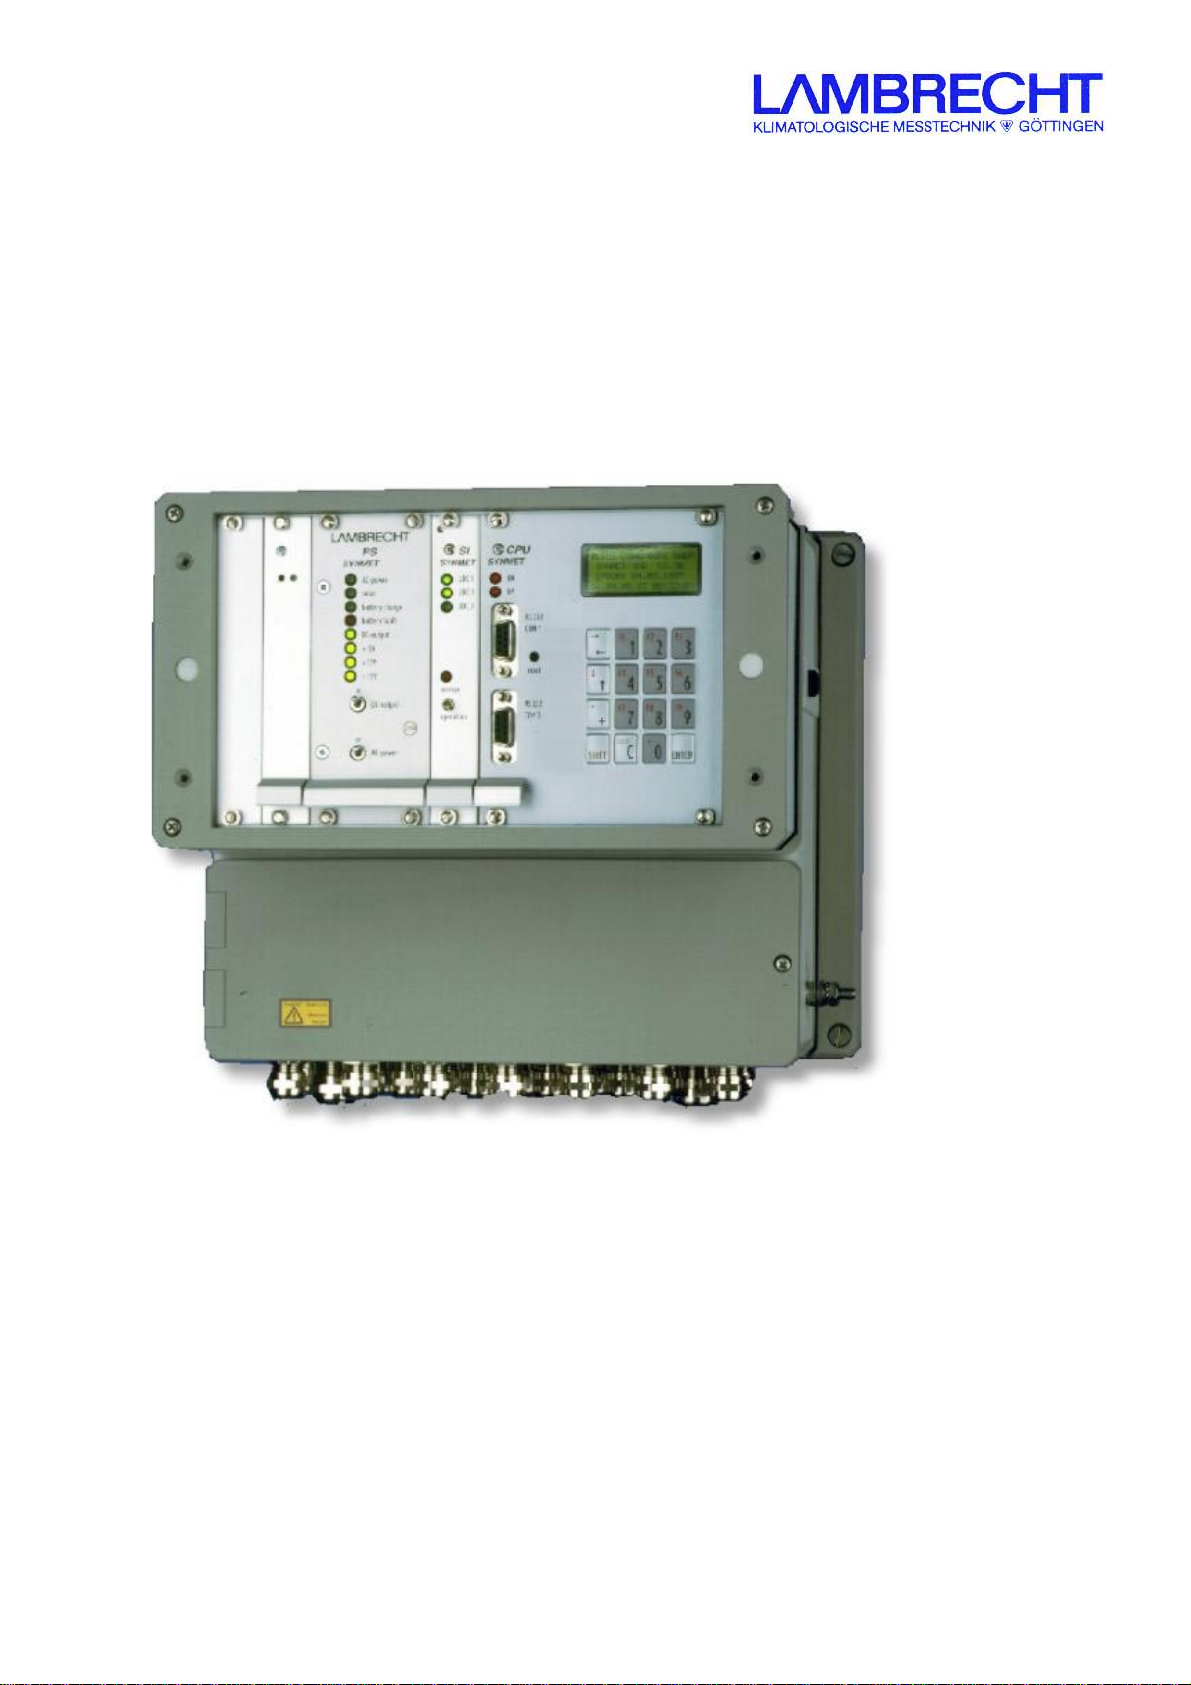
4.0 BASIC CONFIGURATION OF A SYNMET-SYSTEM ............................................................................. 6
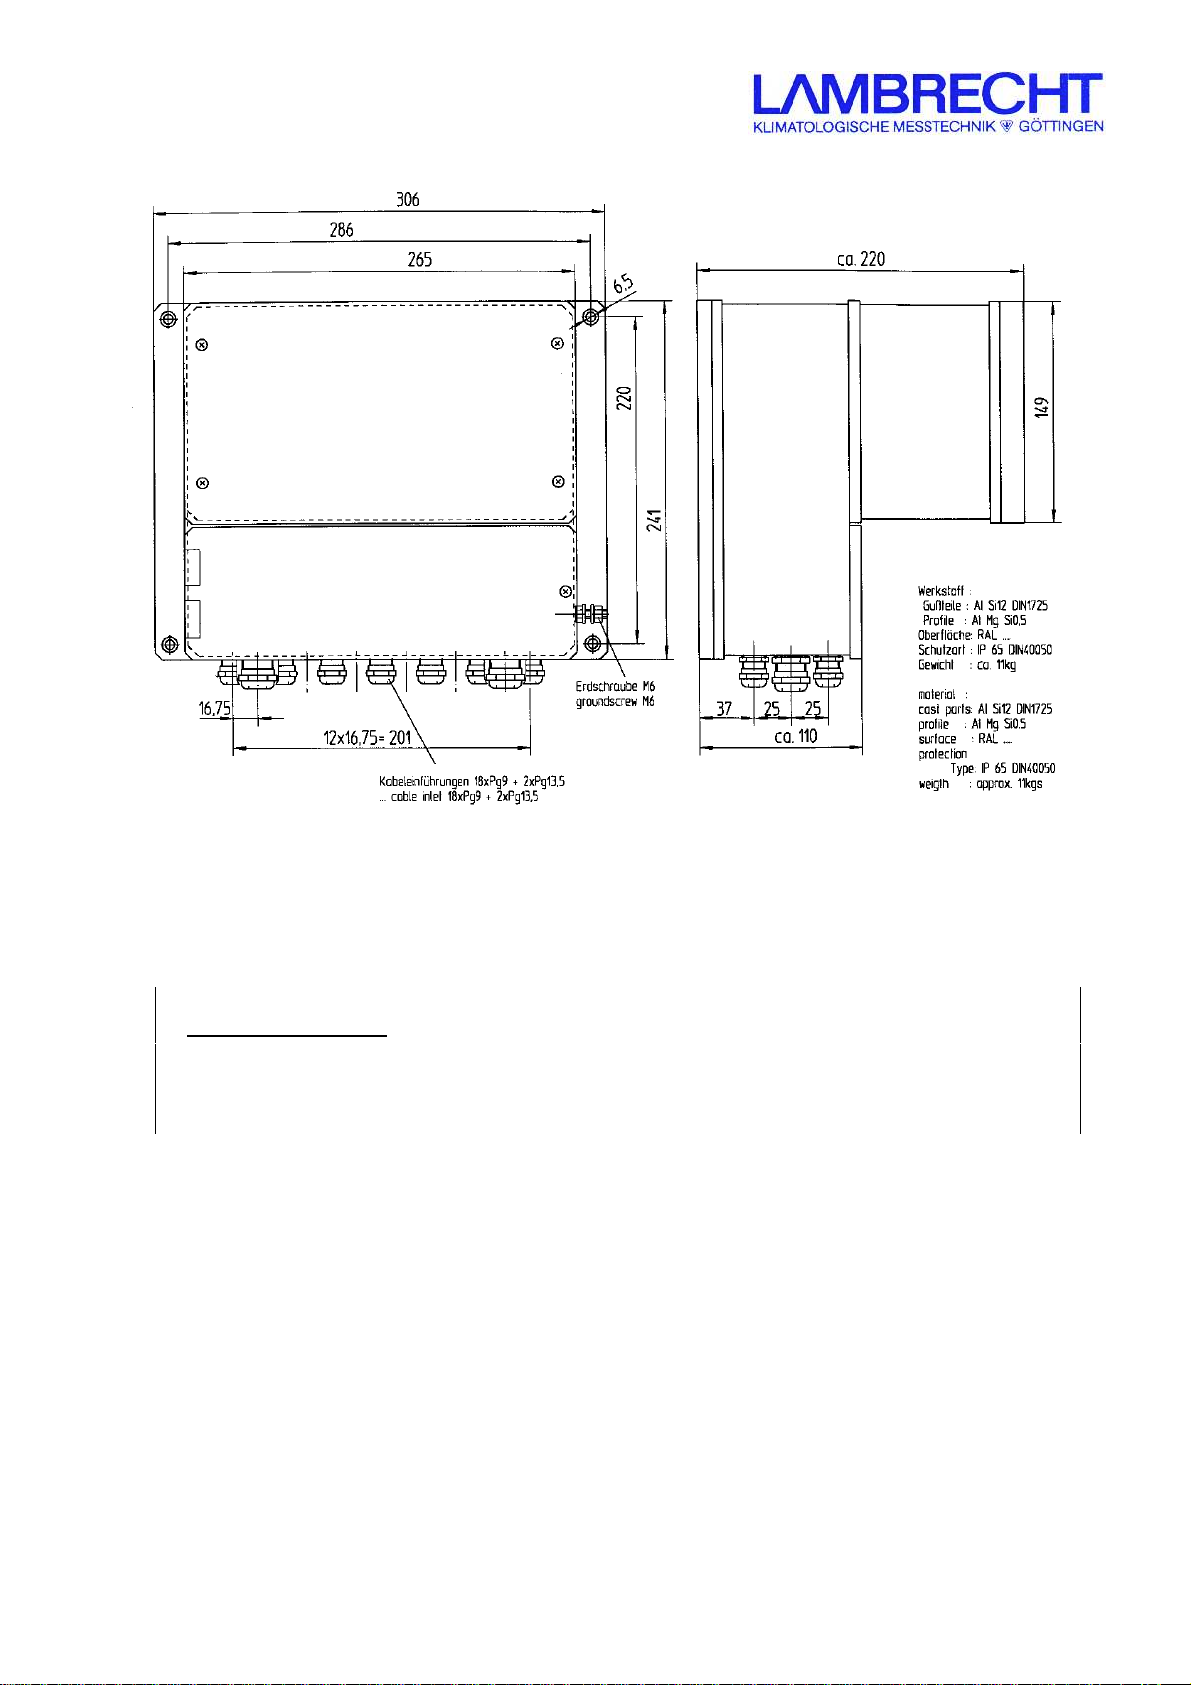
5.0 MECHANICAL INSTALLATION .............................................................................................................. 7
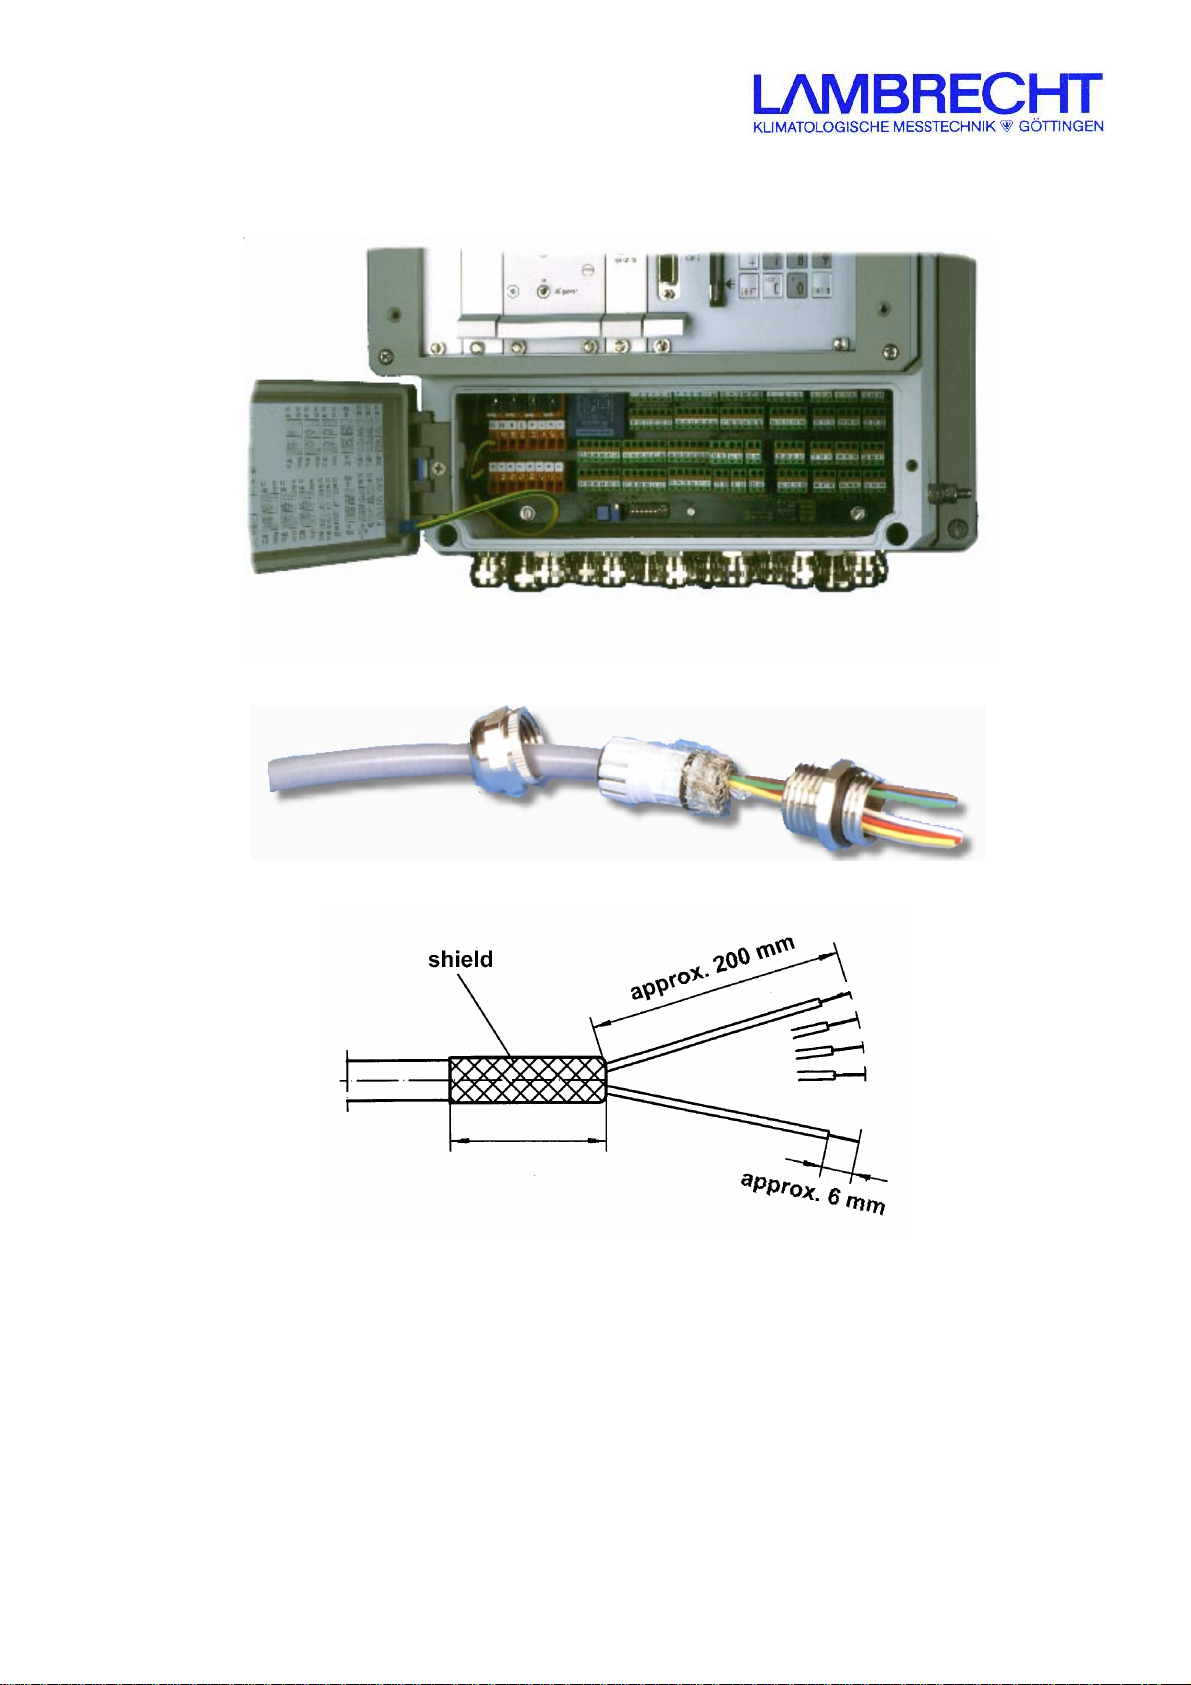
6.0 ELECTRICAL CONNECTIONS................................................................................................................ 8
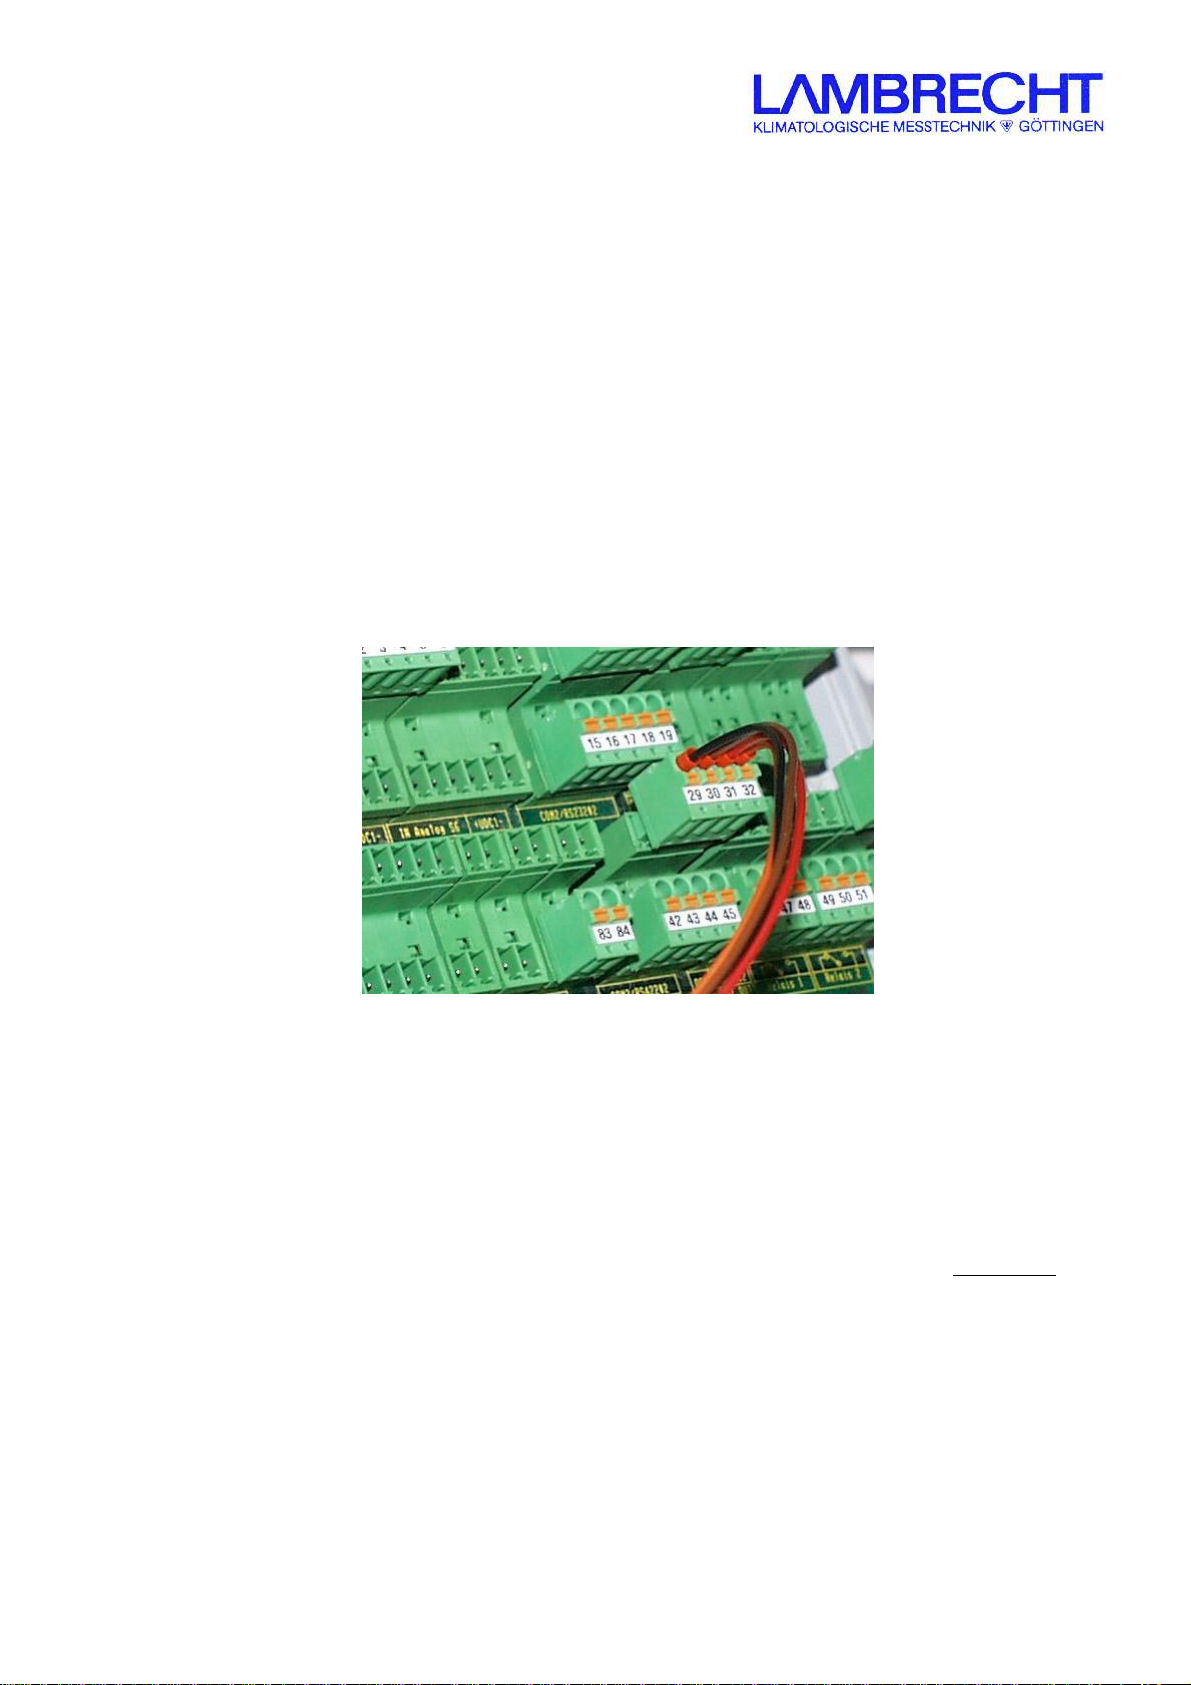
6.1. GENERAL INFORMATION........................................................................................................................... 8
6.2. SENSORS.............................................................................................................................................. 10
6.3. DATA CABLES........................................................................................................................................ 10
7.0 SETTING TO WORK.............................................................................................................................. 11
7.1. FIELD-TEST OF THE SYSTEM................................................................................................................... 11
7.2. DATA-TRANSMISSION TEST..................................................................................................................... 13
8.0 FT 50 LITE.............................................................................................................................................. 13
9.0 EVALUATION SOFTWARE "METEOWARE-PRO".............................................................................. 13
10.0 OPTIONS AND ACCESSORIES FOR SYNMET-IND ........................................................................... 13
10.1. MODEMS ........................................................................................................................................... 13
10.2. NETWORK SOLUTIONS........................................................................................................................ 15
10.3. KEYBOARD AND DISPLAY UNIT............................................................................................................. 16
10.3.1. General......................................................................................................................................... 16
10.3.2. The LC display... .......................................................................................................................... 16
10.3.3. The keyboard... ............................................................................................................................ 16
10.4. PRESSURE-SENSOR AND UNINTERRUPTABLE POWER-SUPPLY UNIT....................................................... 18
10.4.1. General remarks .......................................................................................................................... 18
10.4.2. Technical Data ............................................................................................................................. 18
10.5. POWER DISTRIBUTION BOX ................................................................................................................. 18
11.0 INTERFACE DESIGN SPECIFICATIONS .............................................................................................19
11.1. THE LAMBRECHT STANDARD MESSAGE FORMAT .............................................................................. 19
12.0 METEOROLOGICAL MESSAGE-FORMATS ....................................................................................... 20
12.1. NMEA 0183 MESSAGE-FORMAT......................................................................................................... 20
13.0 TROUBLE-SHOOTING .......................................................................................................................... 21
14.0 COMPONENTS AND TECHNICAL DATA OF THE SYNMET-SYSTEM............................................. 22
15.0 MAINTENANCE...................................................................................................................................... 25
16.0 STORAGE AND SHIPPING ................................................................................................................... 25
17.0 FURTHER TECHNICAL MANUALS...................................................................................................... 25

X:\PmDoku\Geräte\Synmet NAV\englisch\SYNMET MANUALE 1.doc
STW Manual Page 3 of 25
Important advice:
To prevent accidents and injuries of the installation personnel, make sure
to know and obey all local safety regulations when working in dangerous
heights and/or with high voltages!
1.0 The individual specification data sheet
The SYNMET-system is equipped with the below specified components and modules.
In case of any questions, always refer to these specific customer-data for a proper identification!
System-abbreviation: SYNMET–IND / SCH 660
Type No.: 00.95661. __ __ __ __ __ __
Identification-digits: 1 2 3 4 5 6
Serial Number: .......................................................
LAMBRECHT wiring diagram: SKF/SWF ...................... Rev. .......
LAMBRECHT Quality Assurance Department
Göttingen, ...........................................
(Date)
Name: ......................................................... Signature: ..............................
Remark: These specific data will be added by LAMBRECHT’s quality assurance department.

X:\PmDoku\Geräte\Synmet NAV\englisch\SYNMET MANUALE 1.doc
STW Manual Page 4 of 25
1.1. Type number code
The meaning of the last six digits of the LAMBRECHT type-number is described below. More details and
information can be obtained from the technical data of the items mentioned later in this manual.
1st digit: Power supply PS
1 = 90 – 260 V AC (standard)
2 = 90 – 260 V AC and 17 – 32 V DC
3 = 17 – 32 V DC
4 = 90 – 260 V AC and separate module with output 24 V DC / 30 W (e.g. sensor-heating)
5 = 90 – 260 V AC, 17 – 32 V DC and separate module with output 24 V DC / 30 W (external power supply)
2nd digit: Controller board CPU
1 = basic configuration 1*RS 232c / 1* RS 232c/RS 422
2 = basic configuration 1*RS 232c / 1* RS 232c/RS 422 + DAC module
3 = basic configuration 1*RS 232c / 1* RS 232c/RS 422 + display and keypad
4 = - not in use -
5 = basic configuration 1*RS 232c / 1* RS 232c/RS 422 + display and keypad + DAC module
6 = basic configuration 1*RS 232c / 1* RS 232c/RS 422 + display and keypad + 4-channel serial interface
7 = - not in use -
Remark: A combination of "DAC" and "4-channel interface" is not possible
3rd digit: Sensor interface board SI
1 = basic configuration
2 = basic configuration + 2 DC/DC module 12/24 V DC
3 = basic configuration + 1 DC/DC module 12 V DC + relay
4 = basic configuration + 2 DC/DC module 12/24 V DC + 1 DC/DC module 12 V DC + relay
5 = RS 422/485 port
6 = basic configuration + 2 DC/DC module 12/24 V DC + RS 422/485 port
7 = basic configuration + 1 DC/DC module 12 V DC + RS 422/485 port
8 = basic configuration + 2 DC/DC module 12/24 V DC + 1 DC/DC module 12 V DC + relay + RS 422/485 port
4th digit: Accumulator and barometer module
0 = no module installed
1 = buffer accumulator installed (12 V / 0,8 Ah)
2 = barometer installed (800 – 1060 hPa)
3 = buffer accumulator and barometer installed
5th digit: Not in use
6th digit: Not in use

X:\PmDoku\Geräte\Synmet NAV\englisch\SYNMET MANUALE 1.doc
STW Manual Page 5 of 25
1.2. Individual configuration data-sheet of the SYNMET system
--------------------------------------------------------------------------------------------------------------------------------------------------
Print-out of configuration hardcopy (to be inserted by WL-QS).
--------------------------------------------------------------------------------------------------------------------------------------------------

X:\PmDoku\Geräte\Synmet NAV\englisch\SYNMET MANUALE 1.doc
STW Manual Page 6 of 25
2.0 General
This instruction manual will guide the user through the different steps to a safe initial operation of the
meteorological measuring system SYNMET. Since such a system consists of different components, detailed
descriptions and instructions of all items are written in the furthermore provided manuals. To ensure a safe
operation, we remind you to study all literature carefully before starting.
All installation-work should be done by skilled staff that is familiar with all relevant safety-regulations as well.
This manual describes the most common configuration, consisting of one field station (SYNMET-system and
sensors) as well as a modem for the data transmission and a computer for data-filing and -evaluation.
In case of network solutions with more than one SYNMET system and/or computers, all therefore specific
settings and instructions are part of separate documentation material.
Last not least, the software MeteoWare-PRO has to be installed on the computer. For an easy installation and
operation, please refer to the software handbooks, where you’ll also find the necessary hardware-
requirements for the computer.
3.0 Unpacking
When unpacking the boxes, please check the completeness of all items according to the packing-list. Some of
the items may be of small size: Make sure that no items remain in the boxes!
In general, no special instructions or tools are required for the unpacking-procedure. Carefully remove all
items from the boxes. Coloured labels give helpful advice for some products (e.g. Attention – Glass – Handle
with care).
4.0 Basic configuration of a SYNMET-system
Since all delivered hardware-parts are manufactured ready-to-work, the customer only has to mechanically
install and connect these parts at their desired locations and hook up the data-interfaces and mains.
All jumpers / DIP-switches / potentiometers / etc. are configurated at LAMBRECHT ready-to-work, according
to the customer's specific requirements. Never attempt to change any of these settings!

X:\PmDoku\Geräte\Synmet NAV\englisch\SYNMET MANUALE 1.doc
STW Manual Page 7 of 25
5.0 Mechanical installation
Important advice:
To prevent accidents and injuries of the installation personnel, make sure
to know and obey all local safety regulations when working in dangerous
heights.
Normally, the SYNMET-system and the sensors are mast-mounted. According to recommendations of
scientists and meteorlogical authorities, wind sensors have to be installed on top of a 10m-mast (minimum
height: 6 m). All other sensors besides the precipitation gauge – e.g. temperature, relative humidity, pressure,
radiation – have to be installed on a cross-arm 2 m above ground-level. The precipitation gauge has to be
installed on a separate, small pole so that its upper edge is 1,2 m above ground-level. Fix all cables to the
mast, so that there's no looseness which could lead to malfunctions. Fasten the plugs tightly to the sensors.
If the mast is purchased from LAMBRECHT, fitting mechanical supports for all items will be provided.
Read the accompanying sensor- / accessories- and mast-manuals for additional information.
Figure: application photo of a field station (specimen)

X:\PmDoku\Geräte\Synmet NAV\englisch\SYNMET MANUALE 1.doc
STW Manual Page 8 of 25
Figure: dimensional drawing of SYNMET housing
6.0 Electrical connections
Important advice:
To prevent electric shocks when working at the high-voltage circuit, make
sure to switch off the mains with a contact-breaker.
6.1. General information
All fuses (located on the left-hand side in the terminal box) have to be replaced by identical spare fuses.
Check the equality ofall technical specifications before mounting any spare fuse.
If any cable of the system is longer than 25 meters, an overvoltage-protection has to be used. Please contact
the factory for detailed information about overvoltage-protection parts.
Open the terminal box by loosening the philips-screw on the right-hand side of it. Unscrew all necessary cable
glands from the cable entries at the bottom part of the SYNMET-system. Insert the sensor-cables in the same
sequence. Special care should be taken when preparing the shields of the cables: A proper mounting assures
good conductivity and therefore best electromagnetic shielding properties of the entire equipment. The

X:\PmDoku\Geräte\Synmet NAV\englisch\SYNMET MANUALE 1.doc
STW Manual Page 9 of 25
SYNMET-IND has to be grounded according to technical standards. See wiring diagrams SWF/SKF for more
details.
Figure: SYNMET with opened terminal room cover
Figure: Sequence of an EMV cable gland with plastic corpus and the cable shield .
Figure: Termination of the cable
The electrical wiring has to be done according to the individually provided LAMBRECHT wiring plan (marked
"SKF ???" or "SWF ????" in its lower right-hand edge). This wiring plan also indicates the used AWG-color-
code. Find this plan as an annex to the manuals.
All wiring can be done without tools. To ease the wiring process, all terminal blocks can be removed from their
sockets by simply pulling them upwards. Push the end-slices of each cable into the appropriate green terminal
blocks until they are in a secure contact-position (to be tested by gently pulling on the cable). To dismount
cables, simply press the orange buttons with a small screw driver, to release the wires from the springs. The
connecting to ground has to be fastened to the screw at the outer right-hand side of the SYNMET-system.

X:\PmDoku\Geräte\Synmet NAV\englisch\SYNMET MANUALE 1.doc
STW Manual Page 10 of 25
For outdoor-use, shielded ultraviolet-resistant cable is required (type "?? AWG 20 CUL sw", recommended
manufacturer: hela GmbH, Berlin/Germany, Phone: ++49-30-792 50 53 or other equivalent companies).
Cable-material or ready-to-work cable-sets from LAMBRECHT fulfill all required specifications.
Ader
core AWG-Farbcode colour code
1 schwarz sw black blk
2 braun br brown brn
3 rot rt red red
4 orange or orange ora
5 gelb ge yellow yel
6grün gn green grn
7 blau bl blue blu
8 violett vi violet vio
9 grau gr gray gry
10 weiß ws white wht
Figure: AWG Cable Code
Figure: terminal bloc with cables
6.2. Sensors
Most sensors have a screw-connection, some require a fixing by terminal blocks (in this case, a small screw-
driver is necessary). Refer to the LAMBRECHT wiring diagram for specific information.
6.3. Data cables
Data cables (4 wires, shielded) have to be connected in the same way as described in chapter 6.1. The
RS 232-interface transmits data via shielded cables up to 25 meters only. For distances up to 1000 meters, a
standard converter-modem RS 232 / RS 422 has to be added to the end of the data cable (near the evaluation
computer). At the SYNMET-system, a corresponding serial port has to be used to hook up the data cable.
See chapter 10.1 for details on the modems.

X:\PmDoku\Geräte\Synmet NAV\englisch\SYNMET MANUALE 1.doc
STW Manual Page 11 of 25
7.0 Setting to work
7.1. Field-test of the system
Check all electrical connections thorougly (according to the LAMBRECHT wiring diagram) before connecting
the mains. The two switches on the Power Supply Module PS ("AC-power" and "DC-power") both have to be
in the "on"-position. The switch on the sensor interface board SI has to be in the "operation"-position. The two
red LEDs on the CPU board ("DA" and "DP") should flash about once per second.
The following table shows the function/meaning of the various LEDs (depending on the customer-specified
configuration of the delivered SYNMET-system, some LEDs eventually are disabled):
--------------------------------------------------------------------------------------------------------------------------------------------------
LED-marking colour located on function remark
AC-power green power supply board PS AC voltage on standard (*)
solar green power supply board PS solar power on option (*)
battery charge green power supply board PS battery charge option
battery fault red power supply board PS battery error option
DC-output green power supply board PS DC power on standard
+ 5 V green power supply board PS + 5 V DC on standard
+ 12 V green power supply board PS + 12 V DC on standard
- 12 V green power supply board PS + 12 V DC on standard
UDC 1 green sensor interface board SI 12/24 V DC out option
UDC 2 green sensor interface board SI 12/24 V DC out option
UDC 3 green sensor interface board SI 12 V DC out option
Remark:
(*) = Combinations of AC and DC inputs to the power supply PS are possible.

X:\PmDoku\Geräte\Synmet NAV\englisch\SYNMET MANUALE 1.doc
STW Manual Page 12 of 25
Figure: Front panel SYNMET
Figure: circuit diagram of data cable (connection of Sub-D-connectors)

X:\PmDoku\Geräte\Synmet NAV\englisch\SYNMET MANUALE 1.doc
STW Manual Page 13 of 25
7.2. Data-transmission test
After having done all previously described tests successfully, the fix installed data cable, converters and
modems should now be checked with the software "FT 50 LITE" in the same way as written above.
8.0 FT 50 LITE
To test a SYNMET-system by its serial interface, install the LAMBRECHT test- and configuration-software "FT
50 LITE" according to the instructions of the manual "FT 50 LITE" on a computer. The software guides the
user through self-explaining menus.
Connect the SYNMET-system and the computer via the provided SUB-D-cable. This cable is a regular and
fully connected "Zero-Modem"-cable (male & female Sub-D-connectors, 9-pole).
Start the software "FT 50 LITE" and save the configuration (including the clock: time and date) of the delivered
SYNMET-system to a floppy-disk. The battery-buffered RAM of the SYNMET-system is able to guard the
configuration for about 6 months without any external power-supply. Should the configuration be lost because
of a discharge of the internal battery, use "FT 50 LITE" to reload the saved configuration to the RAM.
Refer to the separate manual "FT 50 LITE" for more information.
The stored configuration file also has to be used after exchanging memory-components (e.g. the CPU-Board).
9.0 Evaluation software "MeteoWare-PRO"
Install the LAMBRECHT evaluation software MeteoWare-PRO according to the separate software manual.
When choosing the menu "Instantaneous Values" for the first time, the configuration of the station will be
transfered automatically to the software "MeteoWare-PRO". Other customer-specific settings have to be made
later on, according to the software manual.
10.0 Options and accessories for SYNMET-IND
10.1. Modems
Standard type
This manual describes the most common measuring system, consisting of one field station e.g. sensors and
interface system as well as a simple RS422/232-converter for the data transmission and a personal computer
for data evaluation. For the data transmission at a shielded cable with at least two twisted pairs is required.
The connection of this converter and the accessories and their operation are mentioned in the wiring diagram
and the separate manual.
In general this RS 232 / RS 422 modem consists of the following components:
RS 232/422 converter 00.90249.000 000
AC Adapter 00.90515.000 240
data cable: modem/PC 32.09000.024 010

X:\PmDoku\Geräte\Synmet NAV\englisch\SYNMET MANUALE 1.doc
STW Manual Page 14 of 25
Figure: RS 422/232 converter with accessories
Dialing modem
Also for remote data transmission, dialing modems can be used. Therefore, national/international networks
have to be used as well as internal phone systems of companies or authorities without external access. These
modems are linked to a RS 232 port of the SYNMET-system and the local telephone network with access to
the corresponding telephone lines.
For operation, two modes are possible in a way that the request for measuring values a manual operation at
the computer has to be carried out or the system is dialing itself automatically under certain conditions (alarm
etc).
Details regarding the installation and the setting to work (initial operation) of these phone-modems are
described in separate manuals.
In most countries, LAMBRECHT delivers tested and approved modems together with the system. Due to
different local telecommunication regulations in some countries, modems could require an approval of the
local authorities (in these cases they have to be purchased locally).
GSM-Modems
Countries operating a cellular network according to the GSM 900 standard (e.g. the German D1 and D2
network) the customer can use a wireless data transmission instead of a cable network.
For the operation, two modes are possible in that way that the request for measuring values a manual
operation at the computer has to be carried out or the system is dialling itself automatically under certain
conditions (alarm etc).

X:\PmDoku\Geräte\Synmet NAV\englisch\SYNMET MANUALE 1.doc
STW Manual Page 15 of 25
To enable a safe transmission, a sufficient field strength at the site is required. The user shall contact his local
provider for more information. The field strength problems should be discussed before purchase. They can be
solved by means of directed antennas (Yagi-principle) and booster amplifiers.
The SIM card for the GSM modem and the operation of the whole equipment all has to be organised by the
customer.
Details of their installation and the setting into operation procedures of these telephone modems are
described in separate manuals.
Radio-Modems
Radio modems working on the half-duplex mode will be used at sites with a low level of infra-structure where
no data-cables are available. For a safe transmission, a visible connection between both locations is
necessary.
The equipment is approved by most of the European authorities. According to the restrictions of the local
telecommunication authorities, various types of modems with different power-data and frequencies can be
chosen. Details have to be negotiated before ordering the equipment.
Details of their installation and the setting into operation procedures of the radio modems are described in
separate manuals.
10.2. Network solutions
In case of network solutions with more than one SYNMET-system and/or computer, the specific settings and
instructions are part of separate documentation material.
In some of these cases LAMBRECHT may have got an order for the assistance during the setting into
operation procedure of complex network systems. When carrying these works by our company the following
requirements have to be secured by the buyer:
•presence of the customer’s network administrator
•access to all necessary locations and sites
•staff from the customer eventually available for assistance works

X:\PmDoku\Geräte\Synmet NAV\englisch\SYNMET MANUALE 1.doc
STW Manual Page 16 of 25
10.3. Keyboard and display unit
10.3.1. General
With the keyboard and display unit it is possible to check the function of SYNMET without further devices.
The following functions are available:
•Manuel or automatic display of the instantaneous measuring values
•Setting of the SYNMET-clock
•Choice of the display language
•Displaying of the SYNMET eprom version
10.3.2. The LC display...
... shows on 4 rows maximum 20 characters, enough to display instantaneous measuring values and menus
for the function control. The contrast regulation is automatically dependent upon the operating temperature
(operating temperature range of –20 to +70 °C).
10.3.3. The keyboard...
... has 16 membrane keys. Most of the membrane keys have two functions. The second function of the key
will be activated by pressing
Shift
and the key simultaneously.
The
Exit
key will be activated by pressing key Shift and Exit C simultaneously.
In general:
Key1+Key2 Key1 and Key2 are pressed simultaneously
Basic display
Beginning from this basic display it is possible to choice the function menus.
Function key Function Remarks
Exit Shift +
Exit
C Basic display shows the hard- and software releases,
time and date of SYNMET
With any key it is possible to choice the function menu.

X:\PmDoku\Geräte\Synmet NAV\englisch\SYNMET MANUALE 1.doc
STW Manual Page 17 of 25
Function menu
In the function menu the desired function will be select by the displayed function key.
Function key Function
1 Go to the submenu
Displaying values
2 Set the SYNMET clock
3 Select the display
Choice the language
Exit Exit this menu
Submenu
Displaying values
Function key Function Remarks
1 Manual change To view the instantaneous values of more parameters you
must press any key.
2 Automatic change If more than 4 parameters are defined the display change
automatically after 15 seconds to show the instantaneous
values.
Additionally it is possible to change the displayed
parameters with any key.
3 Set the SYNMET clock The date and the time of SYNMET are setting according
the following scheme:
Choice of the day of week – Enter
Input of the day – Enter
Input of the month – Enter
Input of the year – Enter
Submenu
Choice the language
1 German The actual selected language is marked with a star.
2 English Accept the choice with Enter.
3 Spanish
4 Portug.

X:\PmDoku\Geräte\Synmet NAV\englisch\SYNMET MANUALE 1.doc
STW Manual Page 18 of 25
10.4. Pressure-sensor and Uninterruptable power-supply unit
10.4.1. General remarks
The barometer and accumulator module is designed as a printed circuit board with a 4 units front panel
carrying the options barometer and buffer accumulator which can be integrated into a slot of the SYNMET
housing as a compact solution.
Figure: Integrated barometer
10.4.2. Technical Data
Accumulator: maintenance-free dryfit accumulator 12 V / 0.8 Ah
Barometer: measuring range: 800 to 1060 hPa
Accuracy at 20 °C: ±0.3 hPa
Operating temperature: -40 to +60 °C
More details: refer to data sheet
10.5. Power distribution box
This distribution box is available according to the customer's specifications (e.g. with contact-breaker, fuses).

X:\PmDoku\Geräte\Synmet NAV\englisch\SYNMET MANUALE 1.doc
STW Manual Page 19 of 25
11.0 Interface design specifications
11.1. The LAMBRECHT standard message format
With this description you shall be provided to develop your own device driver for the communication with the
FMA 186 / SYNMET up the firmware 3.0.
With a sequence of commands (ASCII - characters) different processes will carried out at SYNMET.
You can work with real-time measured values or you can scan stored mean values later. It is not required to
develop difficult multitasking procedures. You can write simple, linear structured programs for the data
aquisition without to fear a lost of data.
The detailed description you will find as an appendix to this paper.

X:\PmDoku\Geräte\Synmet NAV\englisch\SYNMET MANUALE 1.doc
STW Manual Page 20 of 25
12.0 Meteorological message-formats
Generating meteorological messages according to the WMO-regulations with the Lambrecht Data
Acquisition System "SYNMET"
During the last years professional users of meteorological measuring systems on air fields as well as
operators of official weather stations more and more require fully automated modes and faster evaluations of
the measuring systems in order to work more cost-effective (minimize manual inputs and to save observation
capacities and costly man power).
Therefore, apart from the standard firmware of our data acquisition system SYNMET, for those customers
working in the professional meteorological field, a special firmware was developed. It is generating coded
messages according to the international standards of the World Meteorological Organization (WMO), the
International Civil Aviation Organization (ICAO), and domestic weather services like:
•METAR (half-hourly report)
•SYNOP (synoptic observations)
•SPECI (special weather messages)
12.1. NMEA 0183 message-format
Especially for maritime applications (apart from the LAMBRECHT-standard message format) the system can
generate standardized messages from the following meteorological parameters:
wind speed
wind direction
air temperature
water temperature
relative humidity
dew point temperature (calculated by firmware)
air pressure
This message format corresponds to the regulations of the "National Marine Electronics Association" (NMEA
0183 standard 2.00 or higher).
Table of contents
Popular Recording Equipment manuals by other brands

Lexicon
Lexicon PCM 90 - GUIDE REV 1 Quick reference guide

Spectra Logic
Spectra Logic Spectra BlueScale Vision user guide

Panasonic
Panasonic WJHD220 - DIGITAL DISK RECORDER operating instructions

RODE Microphones
RODE Microphones Caster Pro II quick start guide

AlphaVision
AlphaVision 004318 installation manual

turck
turck TBEN-S2-2RFID-4DXP Instructions for use

Turbo
Turbo E4T Use and maintenance instructions

Kawai
Kawai CS11 Setting manual

Cooper Crouse-Hinds
Cooper Crouse-Hinds FLEX-STATION Series Installation & maintenance information

National Instruments
National Instruments MXI-Express x1 Series user manual

Vermona
Vermona action filter 4 user manual

ArtNet-DMX
ArtNet-DMX STAGE-PROFI 1.1 user manual