LaMotte WaterLink Spin Touch User manual

For Code/ Para el código / Pour les codes 3580/3581/3582
The Future of Water Testing
El futuro del análisis del agua
L’avenir de l’analyse de l’eau
Touch
WaterLink nSp ®
Compatible with Android®and iOS®devices
Compatible con dispositivos Android®y iOS®
Compatible avec les appareils Android®et iOS®

2

3
SETUP
BEFORE FIRST USE
¬Fully charge battery using the Spin Touch USB cable and adapter plug in AC
outlet.
¬Ensure your Spin Touch has the latest firmware:
1. Download and install the WaterLink®Connect application for Windows®at
http://softwarecenter.lamotte.com/.
2. Plug meter into the computer with the provided USB cable and launch
WaterLink®Connect application from the Start Menu.
3. Any firmware updates will automatically be applied to the meter.
METER
1. The meter can be powered from an AC outlet, a computer or the internal battery.
2. Use the USB cable and the adapter to plug the meter into an AC outlet.
3. Use the USB cable to connect the meter to the USB port of a computer.
CHARGE THE BATTERY
1. Use the USB cable and the adapter to plug the meter into an AC outlet or use the
USB cable (included) with a car charger (not included) to charge the battery. (Anker
PowerDrive 2, DC 12/24V, 5V = 4.8A, Part Number A2310 recommended.)
2. The battery icon on the screen will show the battery status. Charge the battery until
the battery indicator is full.
FIRMWARE UPDATES
Occasionally, the firmware in the Spin Touch will require updates. To do so:
1. Visit
http://softwarecenter.lamotte.com/ and download the WaterLink®Connect
application for Windows.
2. Plug the Spin Touch into the computer using the included USB cable.
3. Open the WaterLink®Connect desktop application and wait for the update to
complete.
Once the update is complete, it is safe to close WaterLink® Connect and unplug the lab.
After updating firmware it is recommended that the Alignment Procedure on page 15 be
performed.
PC CONNECTION
When the WaterLink®Spin Touch®is connected to a computer via USB, the onboard
touchscreen becomes disabled and operation of the lab is performed using the WaterLink®
Connect application for Windows®. This application is available for free at http://
softwarecenter.lamotte.com/. Via the WaterLink®Connect desktop application, results
from the Spin Touch can be transferred to a water analysis program such as WaterLink®
Solutions™.
DEVICE CONNECTION
The WaterLink®Spin Touch®supports connections to a Windows® based PC (over USB) and
to Android and iOS mobile devices (via Bluetooth).
SETUP PC CONNECTION DEVICE CONNECTION

4
CONNECTING VIA USB
Using the provided USB cable, the WaterLink®Spin Touch®can be connected to a Windows®
based PC. Before connecting a meter via USB, download and install the free WaterLink®
Connect Windows®application from http://softwarecenter.lamotte.com. When the
WaterLink®Spin Touch®is connected to the PC via USB, the onboard touch screen controls
will be disabled and operation of the meter is performed using the WaterLink®Connect
application. LaMotte offers robust water analysis programs as well, such as WaterLink®
Solutions™, to collect test results and offer detailed treatment recommendations. Learn
more about LaMotte software products at http://softwarecenter.lamotte.com.
CONNECTING VIA BLUETOOTH
The WaterLink®Spin Touch®is capable of connecting to a Bluetooth enabled device, such
as a phone or tablet. The Spin Touch is also compatible with a LaMotte Bluetooth Printer
[Code 5-0066]. Other Bluetooth printers are not supported.
Transferring results over Bluetooth to a mobile device requires that a mobile app is
installed on the device and an active account for the associated software program. For
example, with an active WaterLink®Solutions™account and the WaterLink®Solutions™
mobile app on a phone or tablet, results can be transferred from the meter into the
application. Mobile apps for LaMotte software products are available from iTunes (for
iOS devices) and Google Play (for Android devices). Learn more about LaMotte software
products at http://softwarecenter.lamotte.com.
To transfer results from the WaterLink®Spin Touch®to a LaMotte software product mobile
app:
1. Log into the LaMotte software product mobile app.
2. Search for a customer or Site record. You may need to create one before you can
begin testing.
3. Start a Water Test in the mobile app.
4. Perform a water test from the Spin Touch onboard touchscreen normally. The Spin
Touch and the Bluetooth enabled mobile device will connect automatically.
5. When the connection is available the will light on the touch screen. When the is
dim, the meter and device are not connected. Tap the to transfer results to the
mobile app.
Whenever the appears on the touch screen the Spin Touch is capable of connecting
to the Mobile Bluetooth Printer (Code 5-0066). The button will be highlighted when
connected and dim when not connected.
The Spin Touch cannot connect to both mobile device and the printer at one time. (See the
Save, Print and Send, page 9)
USING BLUETOOTH LOW ENERGY
The WaterLink®Spin Touch®will automatically connect to the nearest Bluetooth enabled
phone or tablet or printer. It is not necessary to pair the Spin Touch to the Bluetooth
enabled device. Barriers to wireless signals can reduce the range of wireless devices.
The WaterLink Spin Touch will work best if there are no walls between it and the receiving
devices.
DEVICE CONNECTION

5
FILLING: Single-Use Disks
When the syringe is placed in the water sample, and the plunger is
pulled all the way up, the syringe will hold more than enough water
sample to adequately fill the disk. Hold the syringe vertically and
insert the tip into the fill hole in the disk. Press the plunger slowly and
smoothly to fill the disk.
1. Fill the disk using slow, even pressure. The
sample water will fill the spaces between
the baffles in a counterclockwise order.
Each space will fill from the bottom to the
top. Sample water should be added until the
sample water in the fourth chamber fills to the
top of the chamber slightly past the embossed
fill line. It is OK to fill slightly past the fill line. Correct Fill
(Fill line)
2. Do not overfill the disk. If the disk is overfilled,
sample water will flow out of the overflow
hole in the center of the disk. The disk is not
leaking. Dry the disk and run the test.
Over
Filled
(Dry disk before placing in meter)
3. Do not under fill the disk. If the disk is under
filled, the reagent chambers will not fill entirely
and results will be inaccurate.
Under
Filled
4. Do not introduce air bubbles into the disk.
The reagent chambers will not fill entirely
and results will be inaccurate. As soon as a
bubble starts to form, pull back on the plunger
to draw the bubble out of the disk. Begin the
filling process again.
Air
Bubble
5. Wet disks should be dried thoroughly with a
lint free wipe. The disk should be handled by
the edges.
6. Disks should be filled and used within 10 minutes. They cannot be filled ahead of
time.
For filling and troubleshooting tips go to: www.lamotte.com/spin
FILLING

6
FILLING: Multiple-Use Disks
When the syringe is placed in the water sample, and the plunger is
pulled all the way up, the syringe will hold more than enough water
sample to adequately fill the disk. Hold the syringe vertically and
insert the tip into the fill hole in the disk. Press the plunger slowly and
smoothly to fill the disk..
1. Fill any unused section of the disk using slow, even
pressure. Add the sample water until the Blank
Chamber is full and the Over Flow Chamber is partially
filled.
Correct Fill
Blank
Chamber
Over Flow
Chamber
2. Do not overfill the disk. If the disk is overfilled, sample
water will flow out of the vent hole in the center of the
disk. The disk is not leaking. Dry the disk and run the
test.
Over
Filled
(Dry disk before placing in meter)
Blank
Chamber
Over Flow
Chamber
3. Do not under fill the disk. If the disk is under filled, the
blank chamber will not be full. The reagent chambers
will not fill entirely and results will be inaccurate.
Under Filled
Blank
Chamber
4. Do not introduce air bubbles into the disk. The reagent
chambers will not fill entirely and results will be
inaccurate. As soon as a bubble starts to form, pull
back on the plunger to draw the bubble out of the disk.
Begin the filling process again.
Air Bubble
5. Wet disks should be dried thoroughly with a lint free
wipe. Handle the disk by the edges. Between tests
store the disk on a flat surface. Do not agitate a
partially filled disk to avoid leaking and contamination.
Partially used disks should be discarded at the end of
the day.
6. Disks should be filled and used within 10 minutes. They cannot be filled ahead of
time.
For filling and troubleshooting tips go to: www.lamotte.com/spin
FILLING

7
GENERAL OPERATING PROCEDURES
METER
When a filled disk is placed in the chamber and the lid is closed, the meter spins at high
speed to distribute the sample to the test wells. Next the meter slows to maximize the
pumping action of the stainless steel mixing beads as the reagents mix with the sample
water. Each reaction is then read at the proper time and wavelength for that reagent
system.
The button located in the lower center of the top of the meter turns the
instrument on and off.
The Blue indicator light of the on/off button indicates the status of the instrument.
Steady blue light – the blue LED will remain steady to indicate that the meter is on and
ready to run a test.
Blinking blue light (three blinks/second) – a test is in progress and the disk is spinning. Do
not open the lid when the disk is spinning.
Care should be taken when closing the lid. Do not slam the lid. Wiring between the lid and
the body of the photometer passes through the hinge. The meter will not run with the lid
open.
TOUCHSCREEN DISPLAY
When the button is pressed to turn the meter on, the Test Screen will be displayed.
12:14 PM
30-Oct-18
SaniƟzer
Disk Series
Salt
203
Tap to
Start Test
Sanitizer
Selection Start
Test
Disk
Type
Power/
Battery
Status
Date &
Time Test
History
Settings
The display screen is touch-activated. To make a selection, tap the icon or word on the
screen with a fingertip, fingernail, pencil eraser, or stylus.
GENERAL OPERATING PROCEDURES

8
¬Gently wipe smudges from the screen with the Cloth Wipe (3580-WIPE).
¬Do not touch the screen with a sharp object.
¬Do not place objects on the screen that will scratch or damage it.
¬Avoid touching the screen with wet fingers.
TESTING
12:14 AM
30-Oct-18
SaniƟzer
Disk Series
Salt
203
Tap to
Start Test
1. Press and hold until the meter turns on.
2. Tap . Select a sanitizer type. Tap to confirm.
3. Tap . Select a disk series (found on disk packaging). Tap to confirm.
NOTE: Disk Series are limited by Sanitizer Type selection.
4. Remove a disk from the packaging.
5. Use the syringe (1189) to fill the disk with the pool or spa water sample.
6. Insert the disk. Cover the disk with the Universal Disk Cover. Close the lid.
7. Tap to start test. Tap to cancel the test.
8. The results will be displayed.
9. Choose an option.
¬Tap to add a tag.
¬Tap the highlighted to save the test results to the test log if Auto Save is
not enabled.
¬Tap the hightlighted to send the results to the enabled Mobile Bluetooth
Printer.
¬Tap the highlighted to send the results to a Bluetooth enabled device.
¬Tap to return to the Test Screen.
10. Press and hold for 2 seconds to turn the meter off.
NOTE: For water samples over 100 °F (38 °C) subtract 0.3 from pH result or, for the most accurate
result, wait until water sample is below 90 °F (32 °C) to test.
GENERAL OPERATING PROCEDURES

9
SAVE, PRINT, AND SEND TEST RESULTS
Test results can be saved, transferred to the WaterLink Connect mobile app via Bluetooth,
and sent to the Mobile Bluetooth Printer (Code 5-0066).
Test Time 05:30:06 30-Oct-2018
Test Results
Transfer
Results
via
Bluetooth
Return
to Test
Screen
FCL - 1.31
TCL - 1.31
CCL - 0.00
PH - 7.8
ALK - 100
HARD - 230
CYA - 2
COPPER - 0.1
IRON - 0.1
PHOS - 0
SALT - 489
Save
Results Print
Results
via
Bluetooth
Tagging
Test History Settings
The WaterLink Spin Touch can log test results for 250 water samples in the Test History.
The results for the most recent sample will be located at the top of the list. All results can
be logged automatically or results for an individual sample can be logged after the sample
has been tested.
To turn on automatic logging, tap on the Test Screen. Tap . Select Auto-Save Tests.
Tap and
ut
t
t
o
to return to the test screen. When Auto Save is selected will not be
highlighted on the Test Results screen.
To manually log results for one sample at a time, Auto-Save Tests must be disabled. If
Auto-Save Tests is disabled will be highlighted on the Test Results screen. After the test
has been run, tap to save the results for that water sample to the Test History.
A user defined identification tag can be assigned to an individual sample result. The tag
can be up to 4 hexadecimal characters. It cannot begin with a zero. To tag a test result,
tap on the bottom of the Test Results screen and use the buttons to enter up to four
characters. Tap to erase a character. Tap to save the tag and return to the Test
Results screen. Tap to return to the Test Results screen without saving the tag. The
tagged result will appear on the Test Results screen and the Test History screen. The tag
will be preceded by “T-“.
Select All/
De-Select All
12:02A 30-Oct-2018 Salt 401
12:01A 30-Oct-2018 Salt 301
12:00A 30-Oct-2018 T-4650 Chlorine 100
12:00A 30-Oct-2018 Chlorine 300
11:57A 30-Oct-2018 T-ABC7 Chlorine 300
11:49A 30-Oct-2018 Biguanide 400
Test History
View
Selected
Results
Delete
Selected
Results
History
Settings
Select
Auto Save
Go to Top
Go to Bottom
Scroll up
or down
the test
list by 5
entries
Home
GENERAL OPERATING PROCEDURES

10
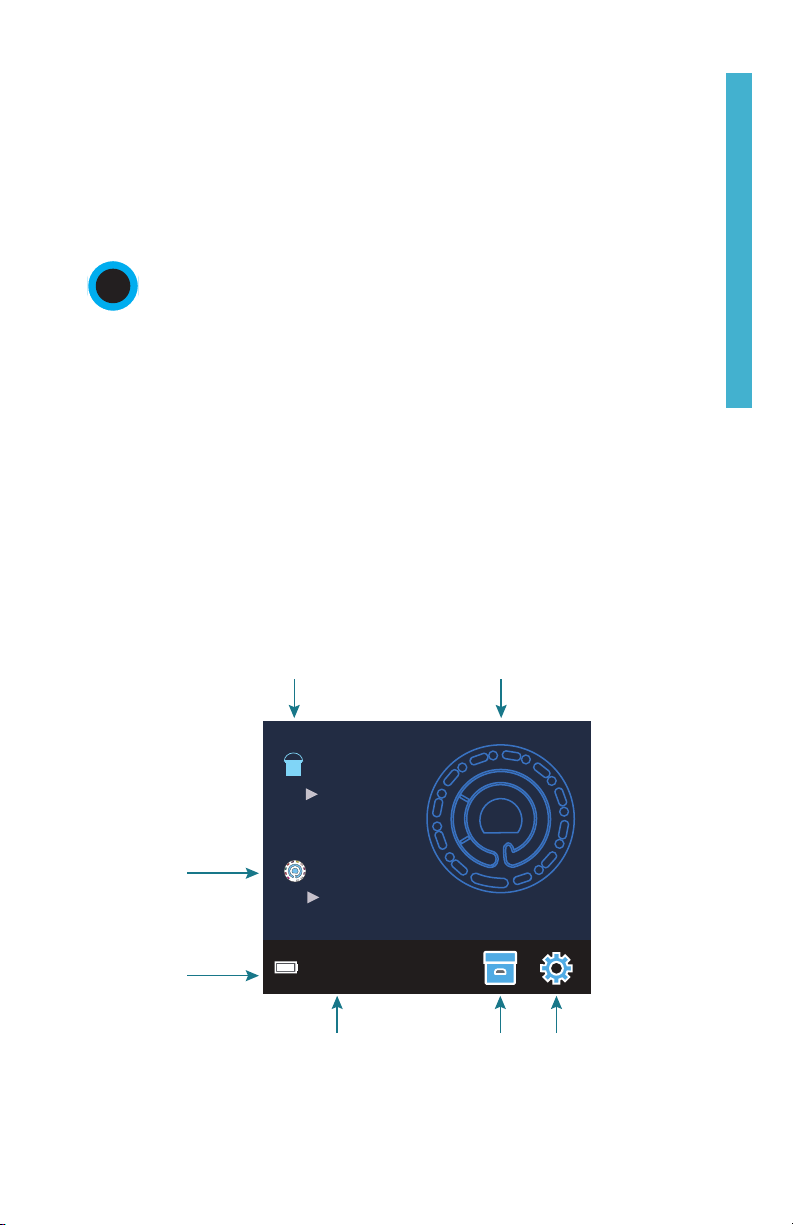
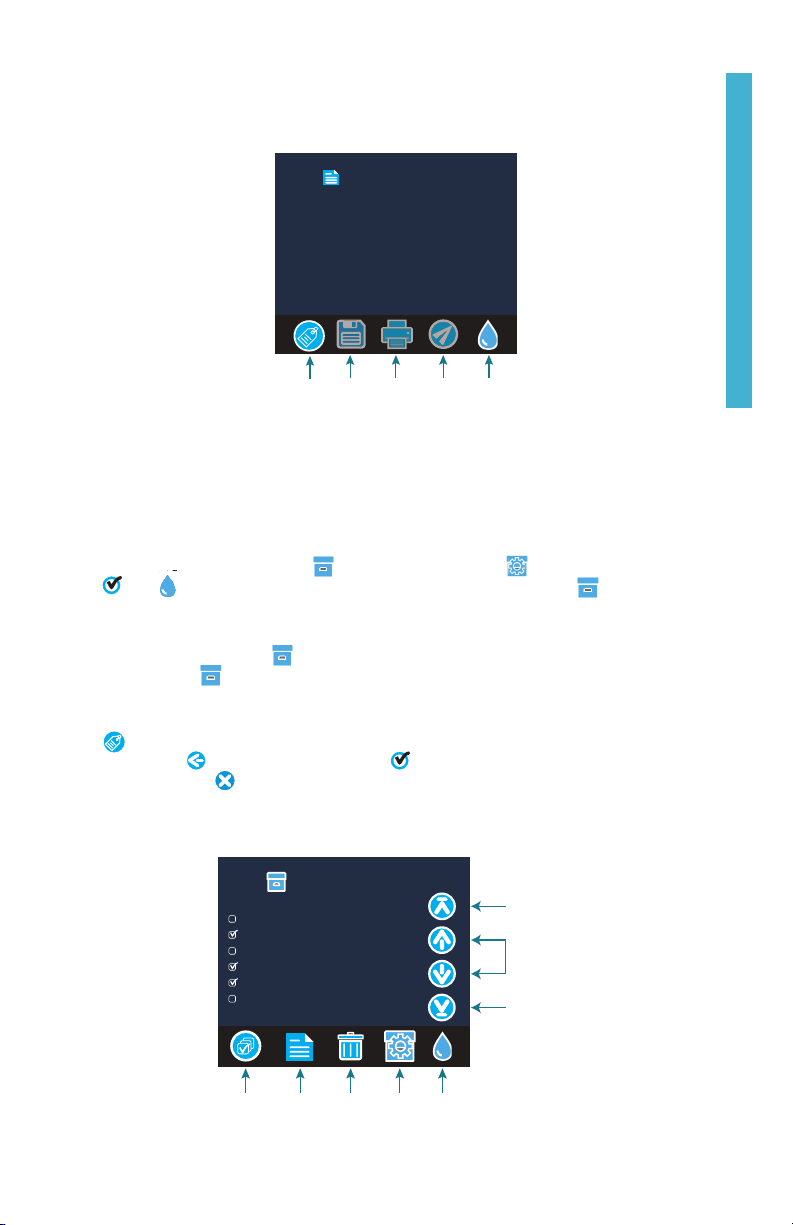
Logged results are viewed in Test History. Controls for viewing and managing single or
multiple test records are located on the Test History screen. Tap the checkbox next to a
test record to select it, then tap one of the buttons along the bottom to perform an action
with the selected records.
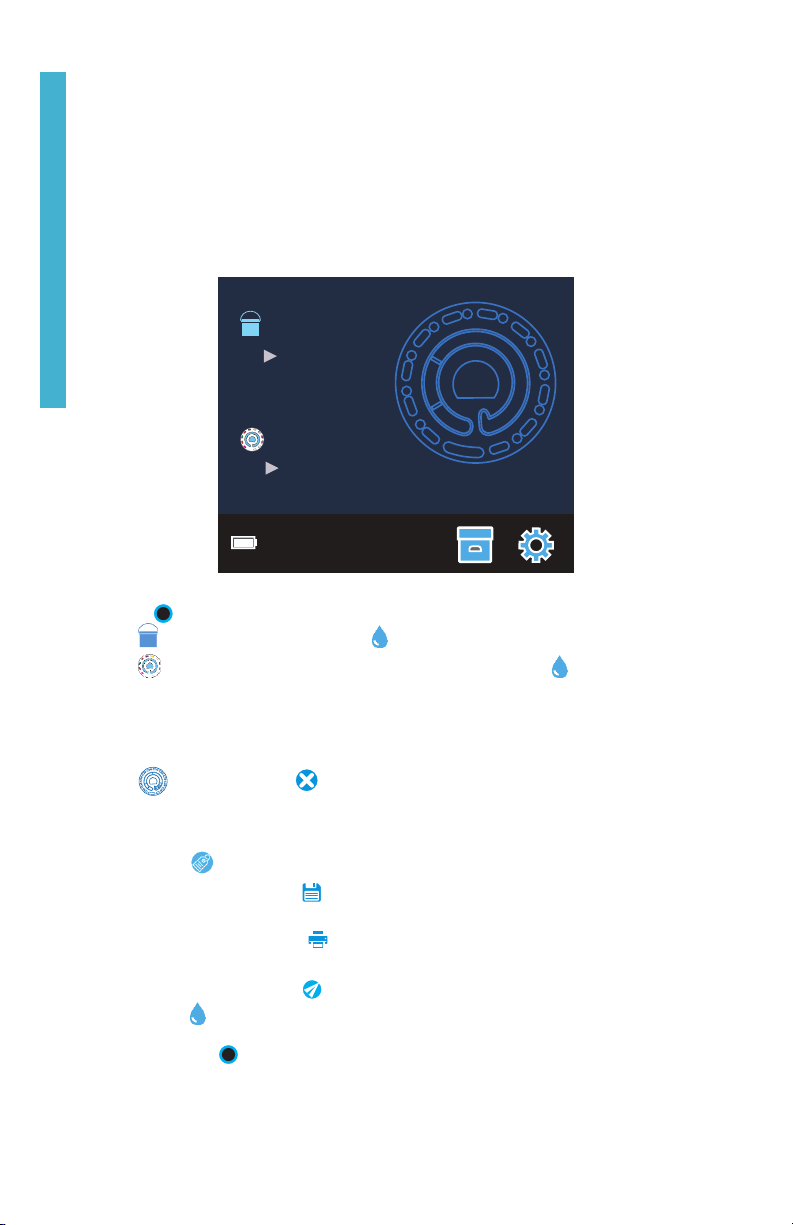
Print or Send Results to a Bluetooth Phone or Tablet
The WaterLink Spin Touch can print to the Mobile Bluetooth Printer or send test results to a
Bluetooth-enabled device such as a phone or a tablet. The highlighted or will show
which function is active. The Spin Touch cannot connect to the printer and connect to a
phone or tablet at the same time.
There are two modes of operation for connecting to the printer and a phone or tablet – Fast
Printer Connect ON and Fast Printer Connect OFF. The default mode is Fast Printer Connect
ON. Fast Printer Connect can be turned on or off from the Bluetooth Menu that is located in
the Settings Menu.
If Fast Printer Connect is ON, the meter will connect immediately to the printer upon
recognizing it. It will also connect to a phone or tablet but priority is given to the printer
connection. The printer will start printing immediately when is tapped. The will dim
in intensity while the printer is printing. Fast Printer Connect should be ON if results will
be printed more frequently than results will be sent to a phone or tablet. It can remain
selected if results will only be sent to a phone or tablet. If Fast Print Connect is ON, and the
printer is on, the printer will have to be turned off before results can be sent to a phone or
tablet.
If Fast Printer Connect is OFF, the meter has the opportunity to connect to a phone or
tablet at all times other than when the printer is actually printing a test. The meter will
connect to the printer only after has been tapped so printing will be delayed a few
seconds while the connection to the printer is being established. The will dim in
intensity while the printer is printing. After printing, the meter will automatically reconnect
to the phone or tablet. Fast Printer Connect should be OFF if results will be sent to a phone
or tablet most frequently and printed less often.
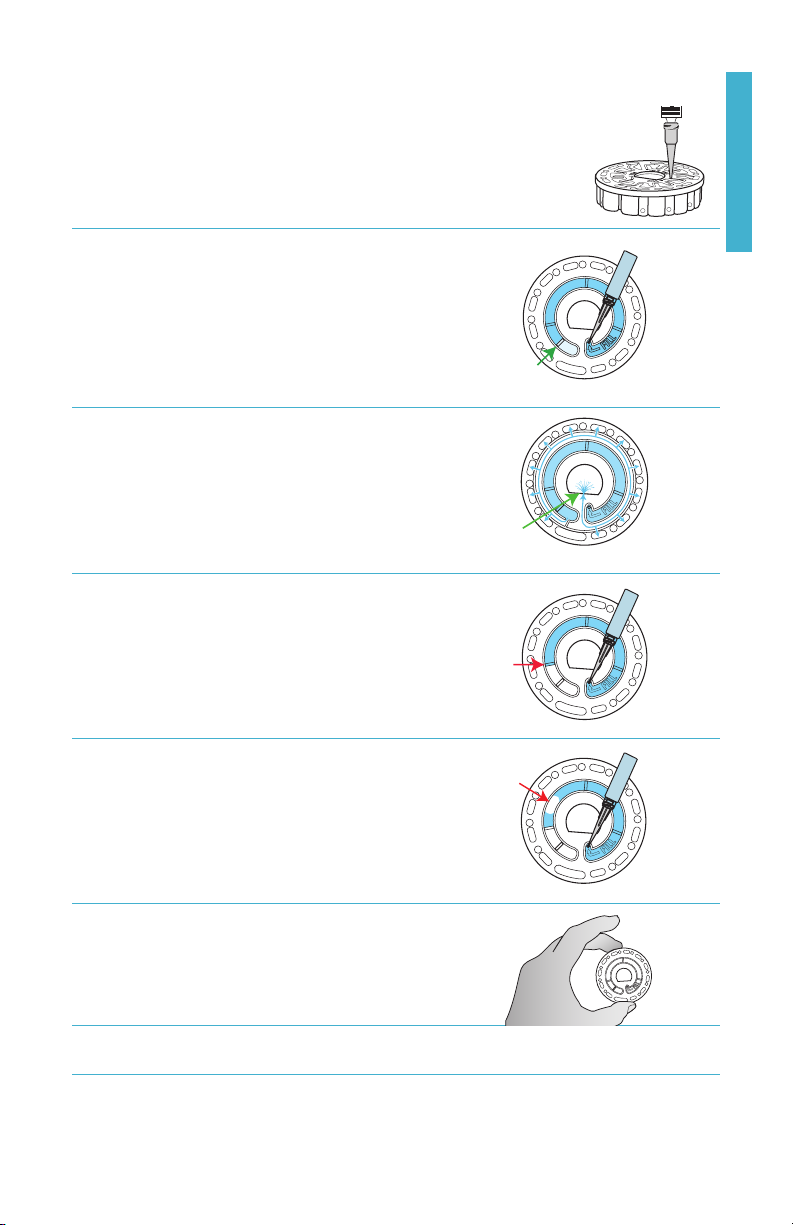
SYRINGE
A plastic 3 mL syringe (Code 1189) is used to fill the disks. A precision
tip on the syringe fits into the fill hole on the disk. The syringe tip should
not be removed from the syringe. Syringes should be cleaned between
water samples. Pump air in and out of the syringe a few times to clear
the previous sample or rinse the syringe with a small amount of the
next water sample before filling it with the next sample.
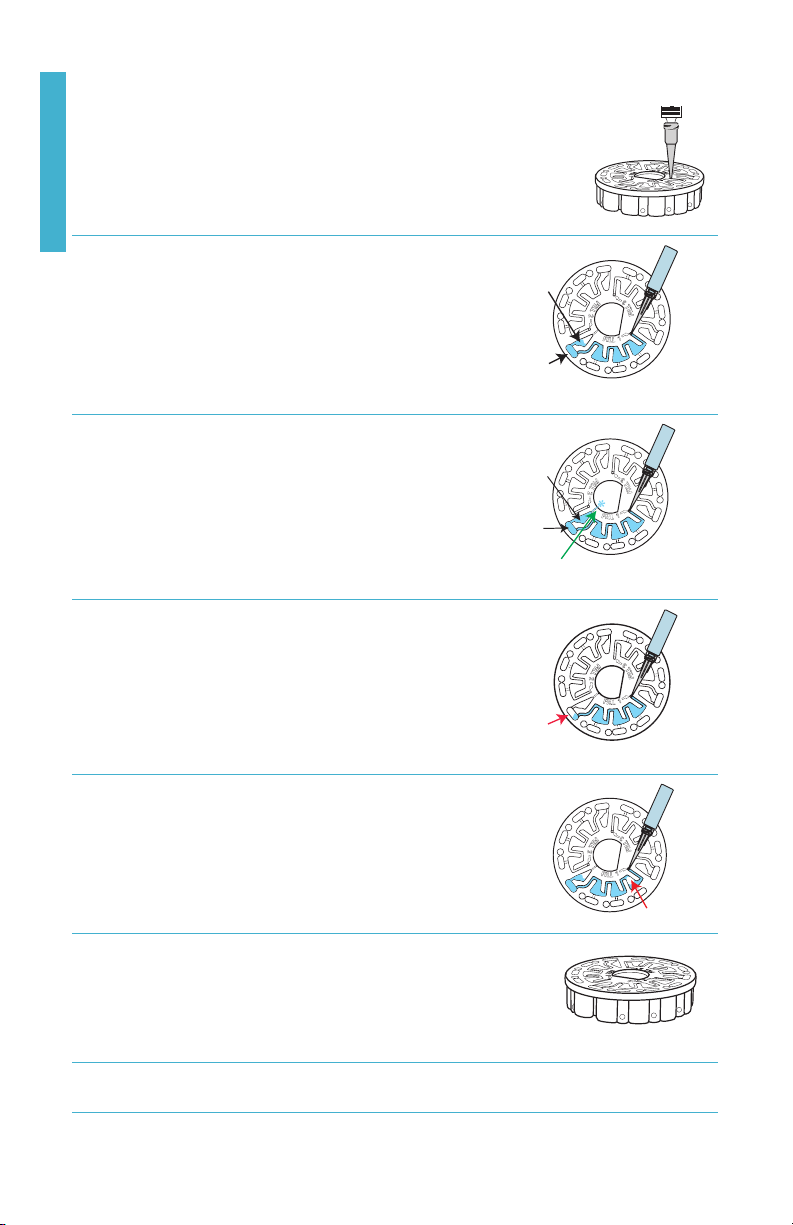
REAGENT DISK
The WaterLink®Spin Touch®uses a disk reagent system. The dried
reagents are packaged in single test amounts in a sealed, polystyrene
disk. Stainless steel mixing beads in the reaction chambers mix the
sample water and the dried reagents. Tests for all factors in the series
are performed at one time. It is not possible to isolate the well for a
single factor and perform a test for one test factor only. Single-use
disks contain reagents for a single series. Multiple-use disks contain
reagents for repetitions of a series. Disks should not be filled in the
meter chamber.
GENERAL OPERATING PROCEDURES

11
DISK HANDLING
The disk should be handled only by the edges. Avoid touching the
top or bottom of the disk. The light passes through the non-frosted
areas of the disk so these areas must be kept free of smudges and
fingerprints. Wet disks should never be placed in the meter. Wet
disks should be dried with a lint free cloth before placing them into
the chamber.
The disk is positioned in the chamber by aligning the D-shaped hole in the center of the
disk over the D-shaped hub in the photometer chamber. The disk should be placed gently
on the hub. There is no need to firmly press the disk down onto the hub.
DISK STORAGE
Disks are sensitive to moisture. Avoid opening more packs than are needed. Disks
have a limited shelf life and should not be exposed to the humidity in the air more than
necessary.
Between tests store multiple-use disks flat. Do not agitate a
partially filled disk. It could leak or contaminate unused sections
of the disk. Multiple-use disks that are partially used should be
discarded at the end of the day. Do not transport the meter with a
disk in the chamber.
Store disks at 70-80 °F/21-27 °C. Disks with Salt reagent should be
stored and used at room temperature (68-74 °F/20-23 °C).
DISK COVER
The black disk cover is placed over the disk in the photometer
chamber to reduce interference from stray light. The disk cover is
positioned over the disk by aligning the D-shaped hole in the center
of the disk over the D-shaped hub in the photometer chamber. The
disk cover should be placed gently on the hub. There is no need
to firmly press the disk cover down onto the hub. The test will be
aborted if the disk cover is not used.
Only the Universal Disk Cover (Code 1719) that is included with the
WaterLink®Spin Touch®can be used with the multi-use disks.
METER CHECK DISK
The Meter Check Disk serves two purposes:
¬When the Meter Check Disk (MCD) is run as an option from the Disk Series menu, the
values on the display are compared to the values on the chart on the Meter Check
Disk package to determine whether the meter is reporting results in the expected
ranges.
¬If the Meter Check Disk is inserted in the meter and Rotary Calibration is chosen from
the Settings Menu, the alignment of the hub and disk is evaluated. The results are
analyzed and reported as Pass or Fail.
For use of the Meter Check Disk see page 14.
GENERAL OPERATING PROCEDURES

12
USB CABLE
A USB cable connects the Waterlink®Spin Touch®to a Windows®-based PC. When used with
the AC Power Adapter, it connects the meter to an AC outlet.
WARNING: only use the USB cable and wall adapter that are supplied with the kit. Make no
substitutions.
BATTERY
A fully charged battery will last for approximately 150 tests under average conditions. The
battery life will vary based on usage patterns. The meter should be turned off after testing
to prolong the battery life. The standard life cycle of a lithium ion battery is 500 cycles.
The battery will fully charge in approximately 10-12 hours. The battery is designed to be
charged overnight and should be charged indoors only. The battery is rated at 12 V and 8.1
AH capacity. Power the meter from the battery pack or from AC power. The USB cable and
AC adapter are used to plug the meter into an AC outlet. WARNING: only use the AC adapter
supplied with this equipment. Do not substitute.
The battery charge status is indicated by the battery icon on the display. The
battery icon will indicate when the battery charge is full, partial, low, empty or
charging. The empty battery icon will flash to indicate that meter should be
connected to AC power source. If the meter continues to be used at low battery
power without connecting it an AC power source, the meter will go into an auto-
shutdown mode. In this mode the meter will be locked until meter is connected
to an AC source and the battery is charged to a sufficient voltage.
While charging, the charging battery icon will be displayed. The meter should
remain plugged in until the battery is fully charged. When the battery is
completely charged, the charging icon will change to the full battery icon.
SETTINGS
Tap to enter the SETTINGS menu. Tap to return to the test screen at any time.
Brightness The brightness level of the display can be adjusted from 00 to 10. Tap and
to adjust the brightness. Tap to exit to the Settings menu.
Date/Time The Year, Month, Day, Format, Hour, Minute, AM/PM can be set. Tap or
to adjust the displayed value. Tap to move to the next value. After the
last value has been chosen (minutes for 24 hour format, AM/PM for 12 hour
format) tap to return to the Settings menu. Tap to exit to the Settings
menu at any time.
Set Language There are ten language options – English, French, Italian, Portuguese,
Spanish, Chinese, German, Dutch, Swedish, Turkish. Tap selection. Tap to
exit to the Settings menu.
Calibration Tap to run an angle calibration to evaluate the alignment of the hub and disk.
Tap to exit to the Settings menu.
Power
Options
There are three power options: Auto Dim Time, Auto Off Time, and Power. Tap
the options then tap a selection. Tap selection. Tap to exit to the Settings
menu.
Bluetooth There are two Bluetooth options: Bluetooth Enabled and Fast Printer Connect
that are used to transfer and print test results. Tap to exit to the Settings
menu.
GENERAL OPERATING PROCEDURES

13
Market Type Tap to select the market type. Select Pool/Spa. Tap to exit to the Settings
menu.
Other Settings About…lists the Serial Number, Firmware Version, Bluetooth MAC address,
Bluetooth Version and Test Count. The Test Count shows the number of
complete tests that have been performed over the lifetime of the meter. Tap
to return to the Settings menu.
Ranges Enabled allows the option of having test results that are out of range
of the reagent system displayed in red. The default setting is off.
When Show Market Type is selected, the market type will be displayed on the
Testing Screen. The default setting is OFF. Tap to return to the Settings
menu.
Select Disk Detection to display an error message and abort the test when
improper testing conditions, such as No Disk, No Disk Cover, Used Disk or
Meter Check Disk, are present that would result in inaccurate or no test
results. The default setting is OFF. Tap to return to the Settings menu.
TROUBLESHOOTING
TROUBLESHOOTING GUIDE
Problem Reason Solution
“No Disk, Test Aborted” No disk in chamber
Empty chamber
Place filled disk in chamber. Cover
with disk cover. Select OK. Start test.
Insert filled disk. Cover with disk
cover. Select OK. Start test.
“No Disk Cover, Test
Aborted”
Disk cover was not used Use disk cover. Select OK. Start test.
“Lid Open, Test Aborted” Lid opened Close lid. Select OK. Start test.
“Used Disk” Reacted disk in chamber Select “Continue” to go to Test
Results screen. Select “Abort” to go
to Testing screen and run test with
new disk.
Meter Check Disk Meter Check Disk in chamber
instead of reagent disk
Select “Continue” to go to Test
Results screen. Select “Abort” to go
to Testing screen and run test with
reagent disk.
“Source” appears on
test screen instead of
“Sanitizer”
Wrong Market Type was chosen Go to Settings. Change Market Type
to Pool/Spa
!on Test History
screen
Meter is using the default blank
due to under filled disk or air
bubble.
Solution: Fill disk correctly (see
FILLING)
Range Error Raw data out of range Contact Support
Output Error Decreased light intensity.
Possibly dirty lens
Clean lens (see CLEANING). Follow
Range Check Procedure. If error
message persists, contact Support.
GENERAL OPERATING PROCEDURES

14
High pH results Water sample temperature
above 100 °F (38 °C) interferes
with pH reagent
For water samples over 100 °F
(38 °C) subtract 0.3 from pH result
or, for the most accurate result, wait
until water sample is below 90 °F
(32 °C) to test
Salt results not as
expected
Water sample not between
68-74 °F (20-23 °C). Sample
disk temperatures above or
below this will also cause
artificially low or high readings
respectively.
Run salt test with sample water and
disk between 68-74 °F (20-23 °C).
Disk not spinning Lid open, meter not powered
on, low battery, disk or disk
cover pressed down too tightly
on hub
Close lid, power on meter, charge the
battery or plug meter into a stable
power source, remove the disk/disk
cover and place back in the chamber
more gently
Fast electrical transients may
disrupt operation of the Spin
Touch meter
Restart the test to resume normal
operation
Trouble connecting to
Bluetooth device
Bluetooth not enabled
Too many Bluetooth devices
near the meter
Printer power is ON and Fast
Printer Connection is ON
Enable Bluetooth
Have only one device near the meter
Turn printer power OFF. Or turn Past
Printer Connection OFF.
Trouble connecting to
computer by USB
Broken connection Press and hold power button for 1
second.
Results not printing Printer not on
The Spin Touch will only print
to the Mobile Bluetooth Printer
(Code 5-0066)
Turn printer on
Connect to Mobile Bluetooth Printer
(Code 5-0066)
TROUBLESHOOTING WITH THE METER CHECK DISK
Do not attempt to separate the components of the Meter Check Disk (Code 1705). The
Meter Check Disk consists of a disk with a permanently attached cover.
Do not fill the Meter Check Disk with water. Water is not used during the meter check
procedure.
Range Check Procedure
The Meter Check Disk is used to verify the performance of a meter. It is not used to
recalibrate the meter. Meters are calibrated at the time of manufacture. The meter is
performing satisfactorily if readings using the Meter Check Disk are within the ranges
provided on the Meter Check Disk pouch. Range specifications are specific to the disk
identified by the serial number on the pouch. The range specifications will vary from disk to
disk. The exact readings from a specific disk may vary from meter to meter.
1. Follow the Cleaning procedure on page 20 to clean the light chamber and optic lenses.
2. Tap select Disk Series.
3. Tap MCD to select Meter Check Disk.
4. Tap
MC
M
to return to the test screen.
GENERAL OPERATING PROCEDURES

15
5. Remove the Meter Check Disk from the foil pouch. DO NOT remove the black cover
from the disk.
6. Insert the Meter Check Disk. Close the lid.
7. Tap to start test.
8. Results will be displayed.
9. Compare the results on the display to the values on the chart shown on the pouch. If
the results are not within the range shown on the pouch, contact Support.
10. Replace the Meter Check Disk in the foil pouch for storage.
Alignment Procedure
The Meter Check Disk is inserted in the meter and Calibration is chosen from the Settings
Menu to perform an angle calibration which checks the alignment of the hub and disk. The
results are analyzed and reported as Pass or Fail. If the measurements pass, the settings
will be saved. If the analysis fails, contact Support.
1. Follow the Cleaning procedure on page 20 to clean the light chamber and optic lenses.
2. Tap to go to Settings.
3. Tap Calibration.
4. Remove the Meter Check Disk from the foil pouch. DO NOT remove the black cover
from the disk.
5. Insert the Meter Check Disk. Close the lid.
6. Tap
Start to begin the meter check procedure.
7. If the meter is performing satisfactorily, “Angle Calibration Successful” will be
displayed and the settings will be saved. If the meter is not performing satisfactorily,
“Angle Calibration Unsuccessful. Contact Support.” will be displayed.
8. Tap
g
to return to the Testing Menu and resume testing.
email: [email protected]
phone: 800-344-3100 option 3 | Mon-Fri 9am-5pm EST
HELPFUL HINTS
¬Do not touch top or bottom of disk. Handle disk by the edge.
¬Do not fill disk while in the meter. Fill disk on clean, dry surface.
¬Fill the disk on a dark surface to more easily see the sample water.
¬The disk should not contain any large air bubbles. Air bubbles will result in erroneous
results.
¬Always use the disk cover.
¬Only the Universal Disk Cover (Code 1719) can be used with the WaterLink®Spin
Touch®.
¬Empty syringe of old sample before filling with next sample.
¬Remove filled disk from meter after testing. Do not travel with filled disks in meter.
They may leak.

16
RANGES AND SPECIFICATIONS
Test Factor Range Test Factor Range
Alkalinity, Total 0–250 ppm Copper 0.0–3.0 ppm
Biguanide 0–70 ppm Cyanuric Acid 5–150 ppm
Biguanide Shock 0–250 ppm Hardness, Calcium 0–800 ppm
Borate 0–80 ppm Iron 0.0–3.0 ppm
Bromine (DPD) 0.00–33.00 ppm pH 6.4–8.6
Chlorine, Free (DPD) 0.00–15.00 ppm Phosphate 0–2000 ppb
Chlorine, Combined 0,00–15.00 ppm Salt 0–5000 ppm
Chlorine, Total (DPD) 0.00–15.00 ppm
Test results that are out of range of the reagent system wil be RED. RED test results may
not be accurate. Go SETTINGS>Other Settings to turn the Ranges Enabled feature OFF.
Copper concentrations over 4 ppm will result in low total hardness results.
Instrument Type Centrifugal Fluidics Photometer
Wavelengths
(interference filters)
390 nm, 428 nm, 470 nm, 525 nm, 568 nm, 635 nm
Display Color Capacitive Touchscreen,
3.5 in, 320 x 240 pixel resolution
Wavelength Accuracy ±2 nm
Wavelength Bandwidth 10 typical
Photometric Range -2 to 2 AU
Photometric Precision ±0.01 AU at 1.0 AU
Photometric Accuracy ±0.01 AU at 1.0 AU
Sample Chamber Accepts prefilled disk
Light Source 6 LEDS
Detectors 6 silicon photodiodes
Pre-Programmed Tests Yes, with automatic wavelength selection
Languages English, French, Spanish, German, Dutch, Swedish, Portuguese,
Italian, Chinese, Turkish
Temperature Operation: 0-50 °C; storage – 40-60 °C
Operation Humidity Range 0- 90 % RH, non-condensing
Communication USB-C, Bluetooth low energy technology (BLE)
Calibration Factory set, field calibration via internet connection
Firmware Internet updateable (New Test, New Test Calibrations, etc.)
Software Android & iOS Apps, DataMate®Web, DataMate®10
Power Requirements USB wall adapter, USB computer connection or internal lithium ion
rechargeable battery
Battery Type Lithium ion

17
Minimum Capacity 12 V/2.6 AH
Charge Life Approximately 150 tests
Battery Life Approximately 500 charges
Full Charge 10-12 hours
Water Resistance Rubber over-molded base, rubber USB Port Plug, gasketed display
and hinge.
Electrical Rating Rated voltage (5V), Rated power of input current (1.6 A) at USB C
Auto Off Yes, default 15 (only with battery power)
Power Save Yes, default OFF
Data Logger 250 test results stored for download to PC or transfer by Bluetooth
Certifications EZ-BLE™PRoC™
Module,
CYBLE-022001-00
RF Radio:
FCC (USA):
Industry
Canada (IC)
Certification:
FCC ID:
WAP2001
License IC:
7922A-2001
CE (Europe): Complies with
Directive
1999/5/EC
MIC (Japan): 005-101007
KC (Korea): MSIP-CRM-
Cyp-2001
EMC: EU: ETSI EN 301489-1
US: FCC PART 15 B
CAN ICES-3 (B)/NMB-3(B)
AS/NZS: CSPR 22
Safety: EU: EN61010-1:2010
AS/NZS: national differences
Dimensions 21.6 X 12.4 X 10.4 cm (L X W X H)
8.5 X 4.9 X 4.2 in
Weight 0.79 Kg, 1.74 lb

18
ACCESSORIES AND REPLACEMENT PARTS
Description Code
WaterLink®Spin Touch® Meter 1715-METER
Water Sample Bottle (60 mL) 0688
Water Sample Bottle (30 mL) 0689
Syringe with tips (3) 1189-3
Syringe tips (3) 1189-TIP
Cleaning Tissues 0669
Meter Check Disk (North America) 1705
Meter Check Disk (Europe) 1705-EU
Universal Disk Cover 1719
USB Cable 1712
AC Adapter (North America) 1713
AC Adapter (UK) 27252-PAD-UK
Cloth Wipe 3580-WIPE
Mobile Bluetooth Printer 5-0066
WaterLink®Spin Touch®Counter Mat 3580-MAT
WaterLink®Spin Touch®Manual 3580-MN
WaterLink®Spin Touch®Quick Guide 3580-QG
WaterLink®Spin Touch®Quick Guide 3581-QG
WaterLink®Spin Touch®Banner 3580-BAN
WaterLink®Spin Touch®Window Decal 3580-DECAL
For available WaterLink®Spin Touch®reagent disks, see page 19.

19
DISK DESCRIPTIONS
SINGLE USE DISKS
Chlorine/Bromine Disk
(Code 4328)
Free Chlorine
Bromine
Total Chlorine
Total Alkalinity
pH
Salt
Calcium Hardness
Copper
Iron
Cyanuric Acid
pH
Total
Chlorine
Calcium
Hardness
Free Chlorine/
Bromine
Blank
Iron
Alkalinity
Salt
Copper
Cyanuric
Acid
Chlorine/Bromine Plus Phosphate
10 Tests Series Disk
(Code 4329)
Free Chlorine
Bromine
Total Chlorine
Total Alkalinity
pH
Salt
Calcium Hardness
Copper
Iron
Cyanuric Acid
Phosphate
pH
Total
Chlorine
Calcium
Hardness
Free Chlorine/
Bromine
Blank
Iron
Alkalinity
Salt
Copper
Cyanuric
Acid
Phosphate
Chlorine/Bromine Plus Borate
10 Tests Series Disk
(Code 4330)
Free Chlorine
Bromine
Total Chlorine
Total Alkalinity
pH
Salt
Calcium Hardness
Copper
Iron
Cyanuric Acid
Borate
pH
Total
Chlorine
Calcium
Hardness
Free Chlorine/
Bromine
Blank
Iron
Total
Alkalinity
Salt
Copper
Cyanuric
Acid
Borate
NOTE: Colored reagents may be visible in the disk before adding sample water.
NOTE: Disks with Salt reagent should be stored and used at room temperature (68-74 °F/20-23 °C).

20
Biguanide Plus Borate Disk
(Code 4331)
Biguanide
Biguanide Shock
Total Alkalinity
pH
Calcium Hardness
Copper
Iron
Borate
pH
Biguanide
Shock
Biguanide
Blank
Iron
Copper
Calcium
Hardness Total
Alkalinity
Borate
MULTIPLE-USE DISKS
Chlorine/Bromine/pH
(Code 4334)
pH
Free Chlorine
Bromine
Total Chlorine
pH
Free
Chlorine/
Bromine
Total
Chlorine
Blank
pH
pH
Blank
Blank
Free
Chlorine/
Bromine
Free
Chlorine/
Bromine
Total
Chlorine
Total
Chlorine
Chlorine/Bromine/pH/Alkalinity
(Code 4335)
pH
Free Chlorine
Bromine
Alkalinity
pH
Free
Chlorine/
Bromine
Alkalinity
Blank
pH
pH
Blank
Blank
Free
Chlorine/
Bromine
Free
Chlorine/
Bromine
Alkalinity
Alkalinity
MAINTENANCE
CLEANING
The optical system of the WaterLink®Spin Touch®must be kept clean and dry for optimal
performance. Dry the disk with a lint-free wipe before placing it into the chamber to avoid
introducing moisture. For best results, store the instrument in an area that is dry and free
from aggressive chemical vapors. Clean the exterior housing with a damp, lint-free cloth.
Do not allow water to enter the light chamber or any other parts of the meter. To clean the
light chamber and optic lenses, point a can of compressed air into the light chamber and
the lid and blow the pressurized air into the light chamber and lid. Focus the pressurized
air around the LEDs which are the small round lenses positioned at 2:00, 4:00, 6:00, 8:00,
10:00 and 12:00 in the lid. The photodiodes are located on the bottom of the chamber
around the hub. This area must be kept clean and dry. Use a cotton swab dampened with
Windex®window cleaner to gently swab the LED and photodiode lenses. Do not use alcohol;
Other manuals for WaterLink Spin Touch
4
Table of contents
Languages:
Popular Accessories manuals by other brands

tech21
tech21 Midi Moose owner's manual

Silvercrest
Silvercrest SAD 12 B2 operating instructions

Masterpro
Masterpro Carlo Gracco BGMP-9134 instruction manual

Tex Energy
Tex Energy Tex-Flex 10 quick start guide

Chef's Choice
Chef's Choice Pronto Diamond Hone 463 user manual

Sferalabs
Sferalabs Exo Sense Pi quick reference