I
IM SERIE 5000 MIRA
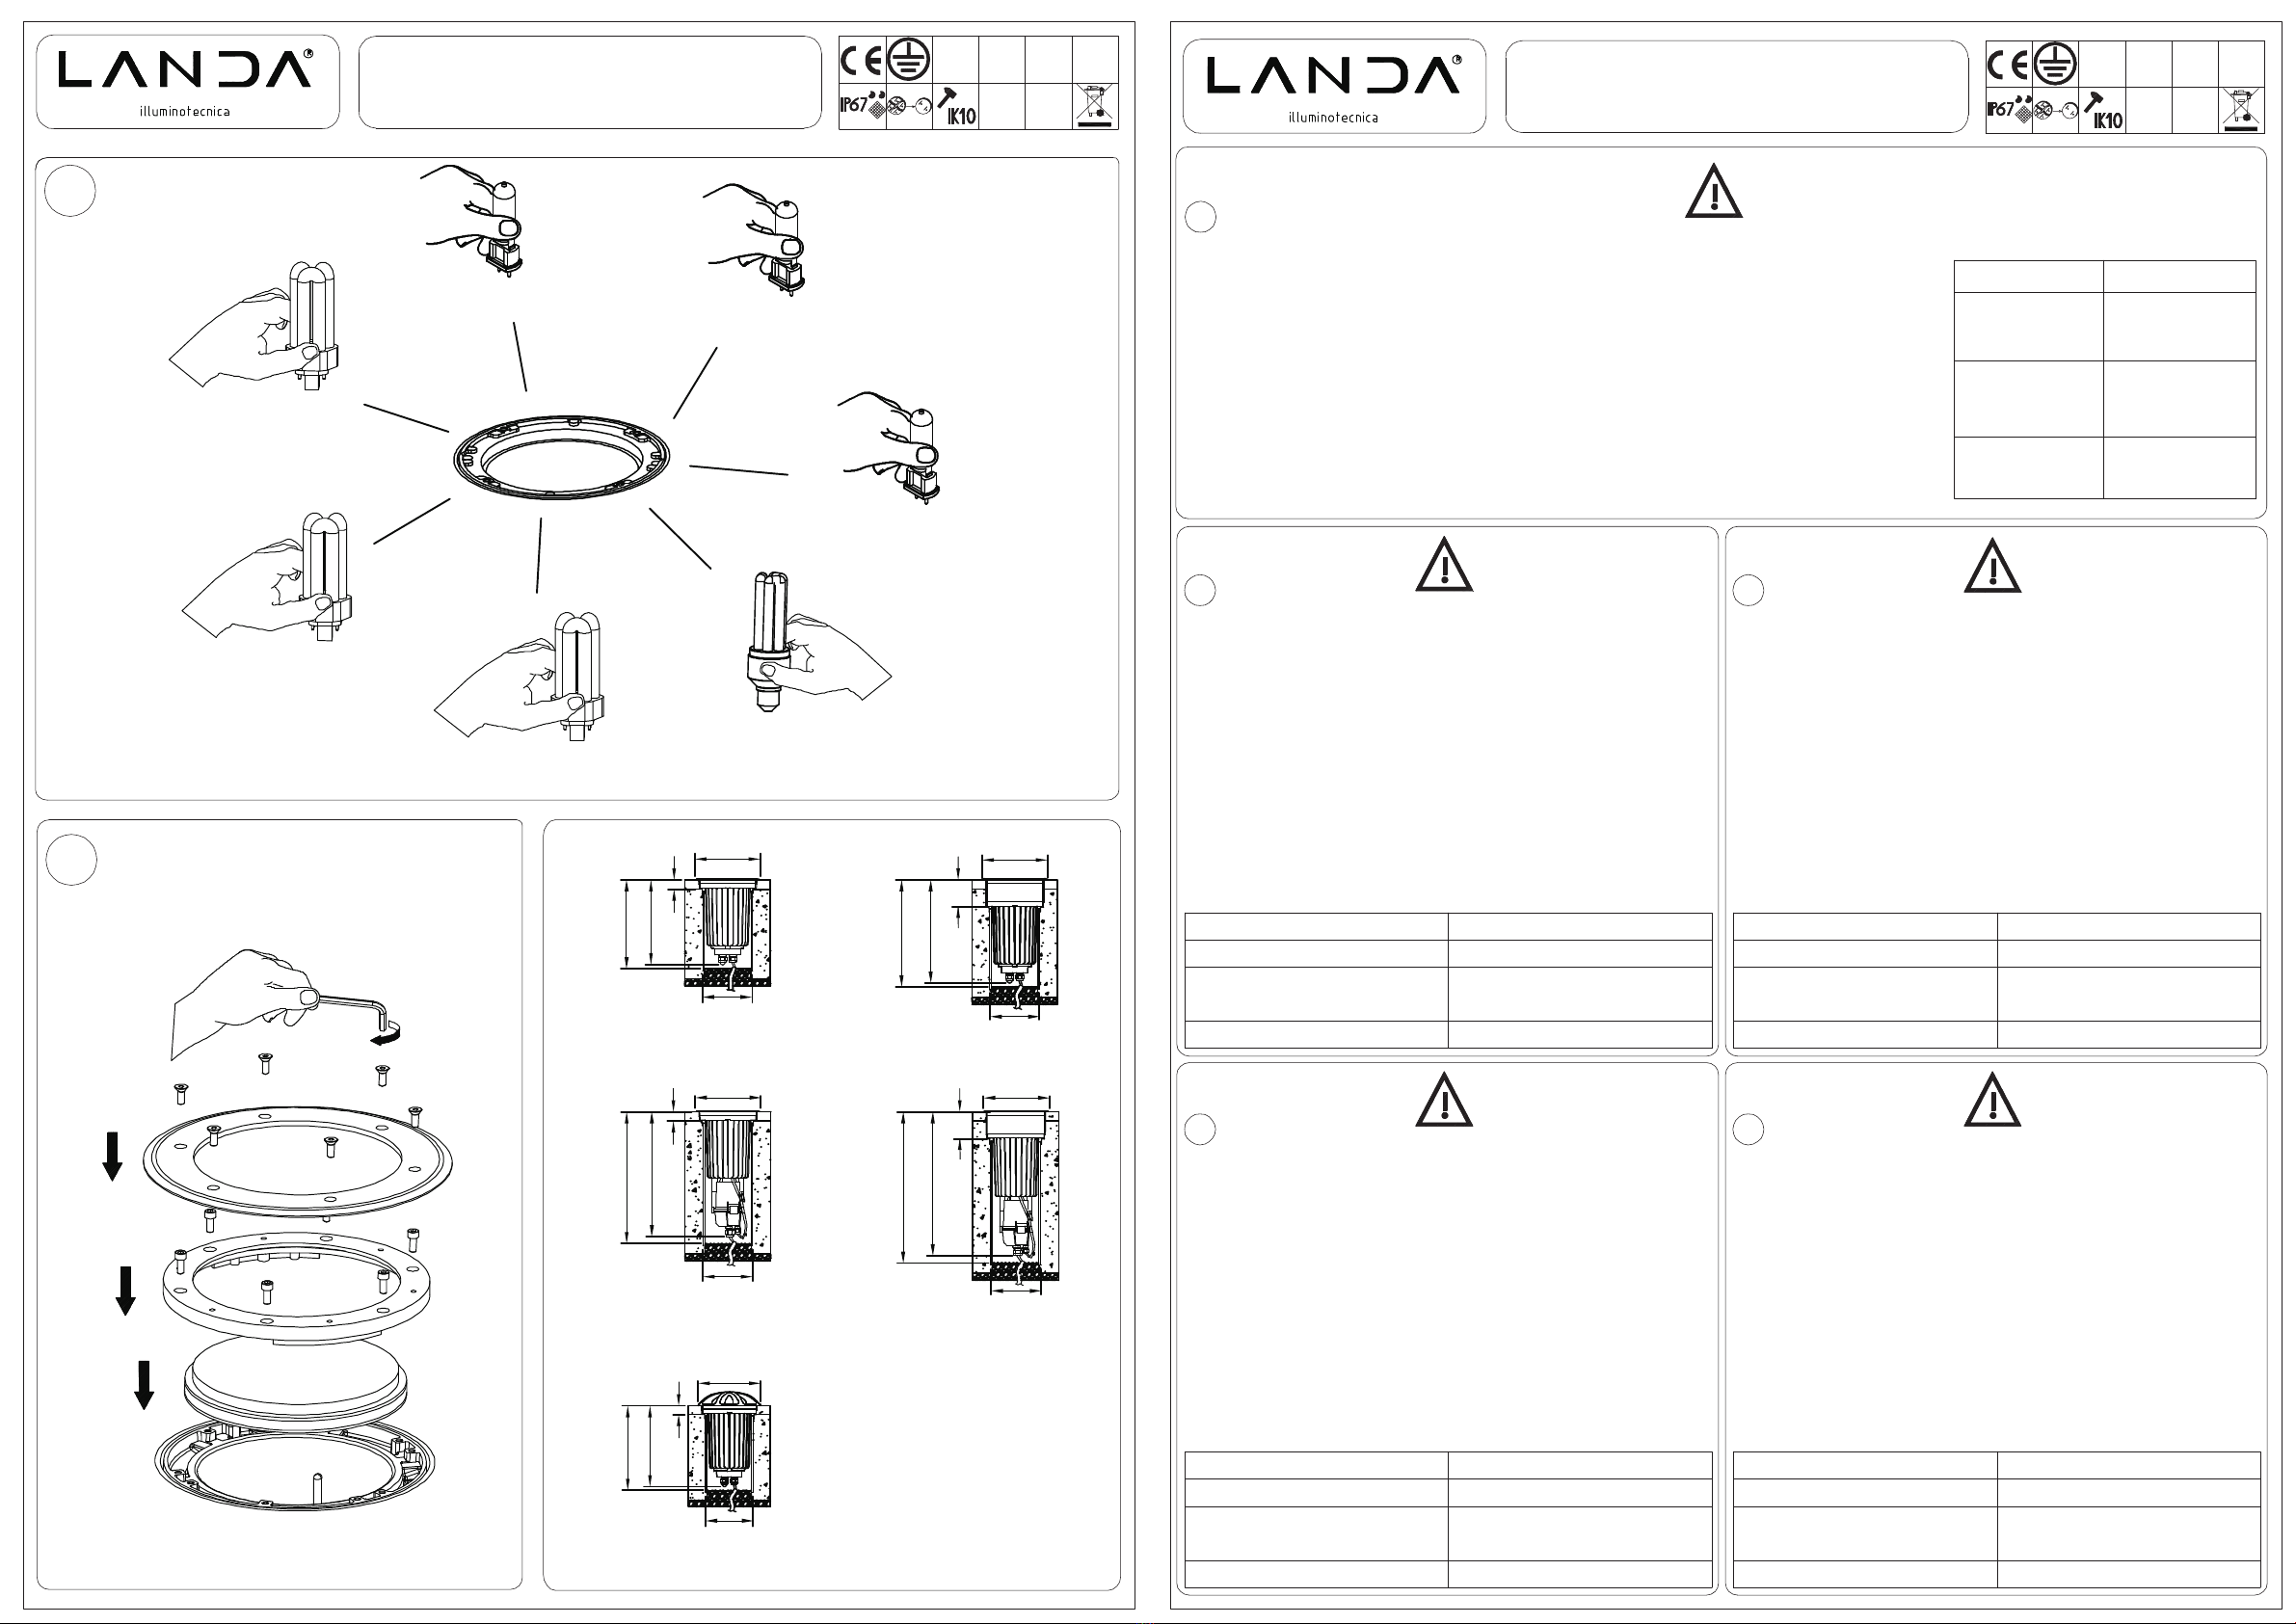
5051E27-F18-F26-H35-H70
33mm
300mm
330mm
Ø180mm
Ø234mm
La instalaciòn de los aparatos enterrados Mira debe realizarla personal cualificado, con la màxima
precauciòn y de acuerdo con las instrucciones de montaje y las normas de instalaciòn elèctrica
conformes con la normativa vegente.
B) Es indispensable crear un drenaje eficaz para todos los aparatos (arena de gravilla de 2 a 30 cm) con
el objeto de evitar el estancamiento de agua en el fondo del surco donde se instalan los aparatos .
C) La conexiòn entre los aparatos debe efectuarse mediante cable flexible del tipo H07RN-F .
INSTALACIÒN
- No trabaje nunca con iluvia o niebla.
- Para la extracciòn del vidrio utilice exclusivamente un destornillador piano o una ventosa .
- Conecte el proyector cuando estè abierto y dèjelo en funcionamiento durante aproximadamente dos
horas al objeto de secar la atmòsfera interna y evitar la formaciòn de condensaciòn en el vidrio (pantalla
de protecciòn).
- Limpie a fondo las guardicciones, el vidrio, la pantalla de protecciòn, los orificios roscados y los tornillos.
Es imprescindible que la base de apoyo de la guarniciòn estè completamente limpia . .
- Es imprescindible que en vidrio ( pantella de protecciòn) no haya el menor resto de hojas, gravilla,arena.
ATENCIÓN : es necesario sustituir el vidrio de la pantella de protecciòn cuando estè roto o presente
grietas , y tambièn las guarniciones cuando estèn dañadas o desgastadas .
RESOLUCIÒN DE EVENTUALES PROBLEMAS
E
PROBLEMAS SOLUCION
Presencia de agua de condensación dentro
de la lámpara
Presencia de agua dentro de la lámpara
- Secar a los miembros mojados, limpiar las
guarniciones y reensamblar el proyector
- Averiguar que el cable de alimentación utilizado sea
del tipo correcto, como indicado sobre,
- Averiguar que los prensa-cables sean cerrados
correctamente
Die Einbauleuchten Mira müssen von fachkundigen Personal in Übereinstimmung mit den gültigen
Vorshriften und den Montageanleitungen installiert werden.
B) Für alle Leuchten ist es notwending eine gute Dränage zu erstellen (25 bis 30 cm Kiesschicht), um
die Bildung von stehendem Wasser auf dem Boden des Schachtes zu vermeiden.
C) Die Verbindung der Leuchten muß durch flexible Kabel, wie H07RN-F .
INSTALLATION
- Bei Regen oder Nebel nicht arbeiten.
- Um das Glas auszutauschen, soll man einen flachen Schraubenzeher verwenden .
- Das Licht einschalten, wenn die Leuchte noch geöffnet ist und für ca. zwei Stunden eingeschaltet
lassen, um die Leuchte innen zu trocken und die Bildung von Kondenswasser auf dem Glas zu
vermeiden.
- Die Dichtungen, das Glas, die Ausschnitte und die Schrauben perfekt säubern (die Schrauben
solten auch geölt werden).
- Das glas muß immer sauber sein, ohne Blätter, Sand, Verkrustungen ...
ACHTUNG : Falls das Glas gebrochen oder rissig ist, muß man das Glas und die beschädigte oder
abgenutzte Dichtung ersetzen.
LÖSUNG VON EVENTUELLEN PROBLEMEN
D
PROBLEMEN LÖSUNG
Anwesenheit von Kondenswasser im Inneren
der Lampe
Anwesenheit Wasser im Inneren der Lampe
-Die nassen Mitglieder trocknen, die Verzierungen
putzen und wieder den Projektor zusammensetzen
- Prüfen, daß das benutzt Kabel von Ernährung
sowohl dem korrekten, wie geeigneten Typ auf
-Prüfen, daß die Presse-Höhlen korrekt
verschlossen werden
Pour les appareils encastrès dans le sol MIRA l'installation doit être faite par un personnel compètent
avec un maximum de soin en respectant les instructions de montage et les règles de l'art de
l'installation èlectrique suivant les normes en vigueur .
B) Pour tous les appareils il est indispensable de crèere un drenage efficace ( sable gravier de 25 à 30
cm ), pour èviter la formation d'eau stagnante au fond du puits contenant ces mêmes appareils.
C) Le raccomandament des appareils doit être rèalisè avec câble souple type H07RN-F .
INSTALLATION
- Ne jamais intervenir sous la pluie ou par temps de brouillard.
- Pour extraine le verre, (l'ècran) utiliser exclusivement un tournevisplat ou une ventouse .
- Allumer le projecteur quant il est encore ouvert et le laisser fonctionner pour deux heures env. afin
d'assècher l'atmosphère interne èvitant la formation de condensation sur le verre (ècran).
- Nettoyer parfaitement les joints, le verre , l'ècran , les trous filetès et les vis (huilant lègérement ces
dernières). Il est indispensable que la base sur laquelle s'appuie le joint, soit parfatement prope.
- Veiller impèrativement à ce que le verre (ècran) soit toujoursvide de feulles, sable boue, ècorces.
ATTENTION: Replacement obligatoire du verre, (ècran) s'il est casse ou ébréche, et aussi des joints
endommagès et/ou usès. .
RÈSOLUTION DE PROBLÈMES ÈVENTUELS
F
PROBLEMES SOLUTION
Présence de buée à l'intérieur de la lampe
Présence d'eau à l'intérieur de la lampe
- Essuyer les composants trempés, nettoyer les
garnitures et remonter le projecteur
- Vérifier que le câble d'alimentation utilisé soit du
type correct, comme indiqué sur,
- Vérifier que les presse-câbles soient serrés
correctement
The Mira buried ground light must be installed by qualified personnel following carefully the instructions
given and in strict compliance to the standards and regulations in force regarding electrical installation .
B) Good drainage must be created for the luminaire (between 25 and 30 cm of gravel) to avoid the
accumulation of water at the bottom of the well.
C) The connection of the luminaire should be done with flexible cable H07RN-F.
INSTALLATION
- Never carry out of the above in the rain or fog.
- To remove glass use a flat screwdriver or sucker only.
- Turn the luminaire on before closing and leave for about two hours in order to dry to prevent
condensation from depositing on the inside of the glass.
- Clean the gaskets, glass, threaded holes and screws well ( the screws should be lightly oiled ).It is
also essential that the base on which the gasket lies is perfectly clean .
- Ensure that the glass is clean and free from debris.
ATTENTION : The glass must be replaced immediately if broken, cracked or worn. This also applies to
the gasket .
RESOLUTIONS OF POSSIBLE PROBLEMS
UK
PROBLEMS SOLUTIONS
Presence of condence in the projector
Presence of water in the projector
- to dry the wet component, to clean the gasket
and reassemble the projector
- To verify that the cable of feeding used both of the
correct type
- To verify that the cable gland is correctly locked
Per gli apparecchi interrati Mira 200 , l'installazione deve essere effettuata da personale competente con la massima cura rispettando le indicazioni
di montaggio e le regole d'installazione elettrica secondo le norme vigenti.
1) Creare un efficace drenaggio ( Sabbia o Ghiaia ) 25 - 30 CM per evitare la formazione di acqua stagnante sul fondo del pozzetto .
2) La connessione degli apparecchi deve essere realizzata con cavi flessibili tipo H07RN-F .
INSTALLAZIONE
- Mai intervenire sotto la pioggia o con nebbia
- Per estrarre il vetro utilizzare utilizzare esclusivamente un cacciavite piatto o una ventosa .
- Accendere il proiettore quando ancora è aperto e lasciarlo funzionare per circa 2 ore al fine di essicare l'atmosfera interna evitando la formazione
di condensa sul vetro.
- Pulire perfettamente le guarnizioni , il vetro , lo schermo , i fori filettati e le viti. E' indispensabile che la base sulla quale si appoggia la guarnizione
sia perfettamente pulita .
- Installare o cambiare la lampadina rispettando la compatibilità ( apparecchiatura , lampada , illuminazione) , la potenza e le prescrizioni del
fabbricante .
- Rispettare l'orientamento del vetro e dell'anello ; posizionare il vetro o lo schermo correttamente .
- Badare imperativamente che la superfice del vetro sia sempre pulita da foglie , sabbia , croste etc.
ATTENZIONE : Rimpiazzo obbligatorio del vetro dello schermo se si verifica una rottura o crepatura sostituendo anche le guarnizioni troppo usate o
danneggiate .
I
PROBLEMA SOLUZIONE
Presenza di condensa
all'interno della lampada
Presenza di acqua
all'interno della lampada
- Asciugare i componenti
bagnati , pulire le
guarnizioni e rimontare il
proiettore
- Verificare che il cavo di
alimentazioe utilizzato sia del tipo
corretto ( come indicato sopra )
- Verificare che i pressa-cavi
siano serrati correttamente
RISOLUZIONE DI EVENTUALI PROBLEMI
IM SERIE 5000 MIRA
H
3 Nm
5061E27-F18-F26-H35-H70
5011H150 - 5021H150
5031H150 - 5041H150
5013H150 - 5023H150
5033H150 - 5033H150
37mm
459mm
594mm
Ø180mm
Ø234mm Ø234mm
Ø180mm
679mm
544mm
122mm
5012H150 - 5022H150
5032H150 - 5042H150
37mm
304mm
334mm
Ø180mm
Ø234mm
122mm
389mm
419mm
Ø180mm
Ø234mm
5011F18-F26-F42-PLE-H35-H70
5021F18-F26-F42-PLE-H35-H70
5031F18-F26-F42-PLE-H35-H70
5041F18-F26-F42-PLE-H35-H70
5012H35-H70 5022H35-H70
5032H35-H70 5042H35-H70
H70 - G12 - 70W H35 - G12 - 35W
F26 - Gx24-q3 - 26W 9
H150 - G12 - 150W
F18 - Gx24-q2 - 18W
F42 - Gx24-q4 - 42W
PLE - E27 - Max 21W
10
11
12


