L&T Electrical & Automation 1 Phase DIN Rail Meter User manual

USER MANUAL FOR 1 PHASE DIN RAIL METER
Doc.No.4D060283 Rev.0
1 Phase DIN Rail Meter
L&T Electrical & Automation

LCD display
Push-to-Push consumption, Daily, Weekly, Monthly consumption.
Terminal covers to avoid direct contact of the supply terminals along with sealing provision.
Data transfer through optical communication*.
Easy mounting on DIN rail with locking.
Energy recording at current as low as 0.02A.
*Note:
1) Additional “Wi-Fi Module”is available to get data over Wi-Fi (to be purchased separately).
2) Mobile Application is also available for Energy Monitoring for iOS, Android, Windows & Symbian
Operating systems.
3) RS485 Module is available.
Meter Type
1P2W Direct Whole current Operated, Direct
Connected, Unidirectional
Voltage Rating
240 V (Phase to Neutral)
Current Rating
5A (Ibasic), 40A (Imax)
Starting Current
0.4% Ibasic
Accuracy Class
1.0 (5% to 800% Ibasic)
Operating Voltage
168V to 288V
Current Display Range
0.05A onwards
Operating Frequency
50Hz ±5%
Meter Constant
3200 Imp/kWh
Measurement Category
Category III
Standard Compliance
IEC 62052-11, IEC 62053-21, IP20
Enclosure
Polycarbonate
Dimension
36mm x 83mm x 66.5mm (Tolerances Apply)
Weight
132 grams(Approximate)
Communication
Compatible with Wi-Fi & RS485 communication
Page 2 of 8
FEATURES
TECHNICAL SPECIFICATIONS
Terminal sealing provision
Terminal cover
Display
Pulse LED
Push button
Optical
communication
Terminal sealing provision
FEATURES & TECHNICAL SPECIFICATIONS

1 Phase Load
3
Phase
Neutral
M0
M1
L1
Parameter scrolling: The default display mode is Auto Scroll Mode in which the parameters scroll
automatically. On pressing key, the meter display goes to manual mode. If key press doesn’t happen
for approximately 30 seconds, meter display returns to default mode i.e. Auto Scroll mode.
Push-to-push consumption: The push button is also used for measuring Push-to-Push kWh
consumption. Follow the below steps to measure the Push-to-Push kWh consumption:
a) Scroll through the parameters until Display No.11 (Refer Display Parameters Table 2) is displayed.
b) When Display No.11 is displayed; press and hold the push button, it resets to zero.
c) Energy recording starts in Display No.11.
d) Check Display No.12 to get the energy consumed value between the previous start-&-stop
operations.
Page 3 of 8
2
1
WIRING DIAGRAM
DISPLAY
WIRING DIAGRAM, OPERATING INSTRUCTIONS & DISPLAY
OPERATING INSTRUCTIONS

DISPLAY PARAMETERS
Table 1.
DISPLAY EXPLANATION
Sl. No.
Parameter
Display Legend
1
Quantities measured
2
Energy, Voltage, Amps, Power
kWh, V, A, kW
3
Different consumptions
Present day
D (Flashing)
Present week
W (Flashing)
Present month
M (Flashing)
Previous day
D
Previous week
W
Previous month
M
Push-to-Push kWh consumption(present)
T (Flashing)
Push-to-Push kWh consumption(previous)
T
Table 2.
No
.
Parameter
LCD Pattern
No.
Parameter
LCD Pattern
1
Cumulative Forward
kWh
2
Present kW
3
Current
4
Voltage
5
Current Month
consumption
'M' will be flashing
at the rate of 0.5sec
6
Last month
consumption
7
Current Week
consumption
'W' will be flashing
at the rate of 0.5sec
8
Last Week
consumption
9
Current DAY
consumption
'D' will be flashing at
the rate of 0.5sec
10
Last DAY consumption
11
Current Push-to-
Push consumption
'T' will be flashing at
the rate of 0.5sec
12
Last Push-to-Push
consumption
Page 4 of 8
DISPLAY PARAMETERS

DISPLAY PARAMETERS & METER SETTING
No.
Parameter
LCD Pattern
No.
Parameter
LCD Pattern
13
Meter Mode of
communication
Configuration
display
14
1st Byte of IP Address of
Wi-Fi Module *
15
2nd Byte of IP
Address of Wi-Fi
Module *
16
3rd Byte of IP Address of
Wi-Fi Module *
17
4th Byte of IP
Address of Wi-Fi
Module *
18
Meter Modbus
Communication Slave ID **
19
Meter Modbus
Communication
Baud rate **
20
Meter Modbus
Communication Parity **
Note:
* Parameters available only in WiFi mode of Communication.
** Parameters available only in MODBUS mode of Communication.
Following settings need to be done to configure the DIN meter to WiFi or MODBUS mode:
• Connect the meter to the power supply and manually scroll till parameter "Config" is displayed.
• Press and hold the push button for approximately 5 sec, meter will display “Yi-Fi”, “ndbus”,”IEC”and
“ESC”on each scroll.
• Press and hold the push button for approximately 5 sec after the required mode of communication. Select
“Yi-Fi” for Wi-Fi mode to use with Wi-Fi module and “ndbus” for MODBUS mode to use with RS-485 module.
• Meter will restart in selected mode of communication.
• Escape is to exit from the configuration mode.
•30 Second timeout is given from configuration mode to the Auto scroll mode.
Page 5 of 8
CONFIGURING COMMUNICATION:

METER SETTING & MEMORY MAP
Table 3.
Address
Parameters
Words
MF
Read only Parameters ( Function Code 4)
Instantaneous Parameters
30001
R Phase Voltage
2
0.01
30007
R Phase Current
2
0.001
30013
Average Voltage
2
0.01
30015
Average Current
2
0.001
30017
Total Active Power
2
0.0001
30023
Total Power Factor
2
0.001
NOTE: Format for above addresses 7 to 11, 15 to 23
1st word –(MSW) 0x0000 if value positive 0xFFFF if value negative
2nd word –value itself, if positive as indicated by 1st word
2’s complement of value, if negative as indicated by 1st word
30025
Line Frequency
2
0.01
30027
Cumulative energy –forward kWh
2
0.01
30029
Previous Day Consumption-kWh
2
0.01
30031
PresentDay Consumption-kWh
2
0.01
30033
Previous Week Consumption-kWh
2
0.01
30035
Present Week Consumption-kWh
2
0.01
30037
Previous Month Consumption-kWh
2
0.01
30039
Present Month Consumption-kWh
2
0.01
30041
Current Push-to-Push Consumption-kWh
2
0.01
30043
Backup Push-to-Push Consumption-kWh
2
0.01
LS DATA -Last 4 IP kWh
30049
IMPKWH Previous Integration
2
0.01
30051
IMPKWH Previous to Previous Integration
2
0.01
30053
IMPKWH Previous to Previous to Previous Integration
2
0.01
30055
IMPKWH Previous to Previous to Previous to Previous
Integration
2
0.01
30057
Meter Serial Number
Format For Above :ASCII Value
6
1
Read Write Parameters(Read supported by function
code 3)(Supported by function code 6 and 16)
Communication Parameters
42385
Meter Address
1
1
42386
Baud Rate
Format : 3 -> 1200 4 -> 2400 5 -> 4800 6 -> 9600
baud rate
1
1
42387
Parity
Format of Address 2387:
0 -> None Parity 1 -> Odd Parity 2 -> Even Parity
1
1
42388
Push-to-Push Consumption Reset Command
1
1
Page 6 of 8
Memory Map
g

All dimensions are in mm
* For terminal cover sealing, wire used should be of maximum 0.8mm diameter.
Page 7 of 8
DIMENSIONS
INSTALLATION PROCEDURE
PULL**
PRESS
STEP 1
STEP 2
STEP 3
STEP 4
UN-INSTALLATION PROCEDURE
PULL **
Note:
1) Before installing & uninstalling the meter make sure that the
Power supply to meter is switched off.
2) Remove all the connections to the meter before uninstalling.
3) ** PULL the locking clips with the help of a screwdriver by
inserting it in slot provided in the clip.

WARRANTY & DISCLAIMER
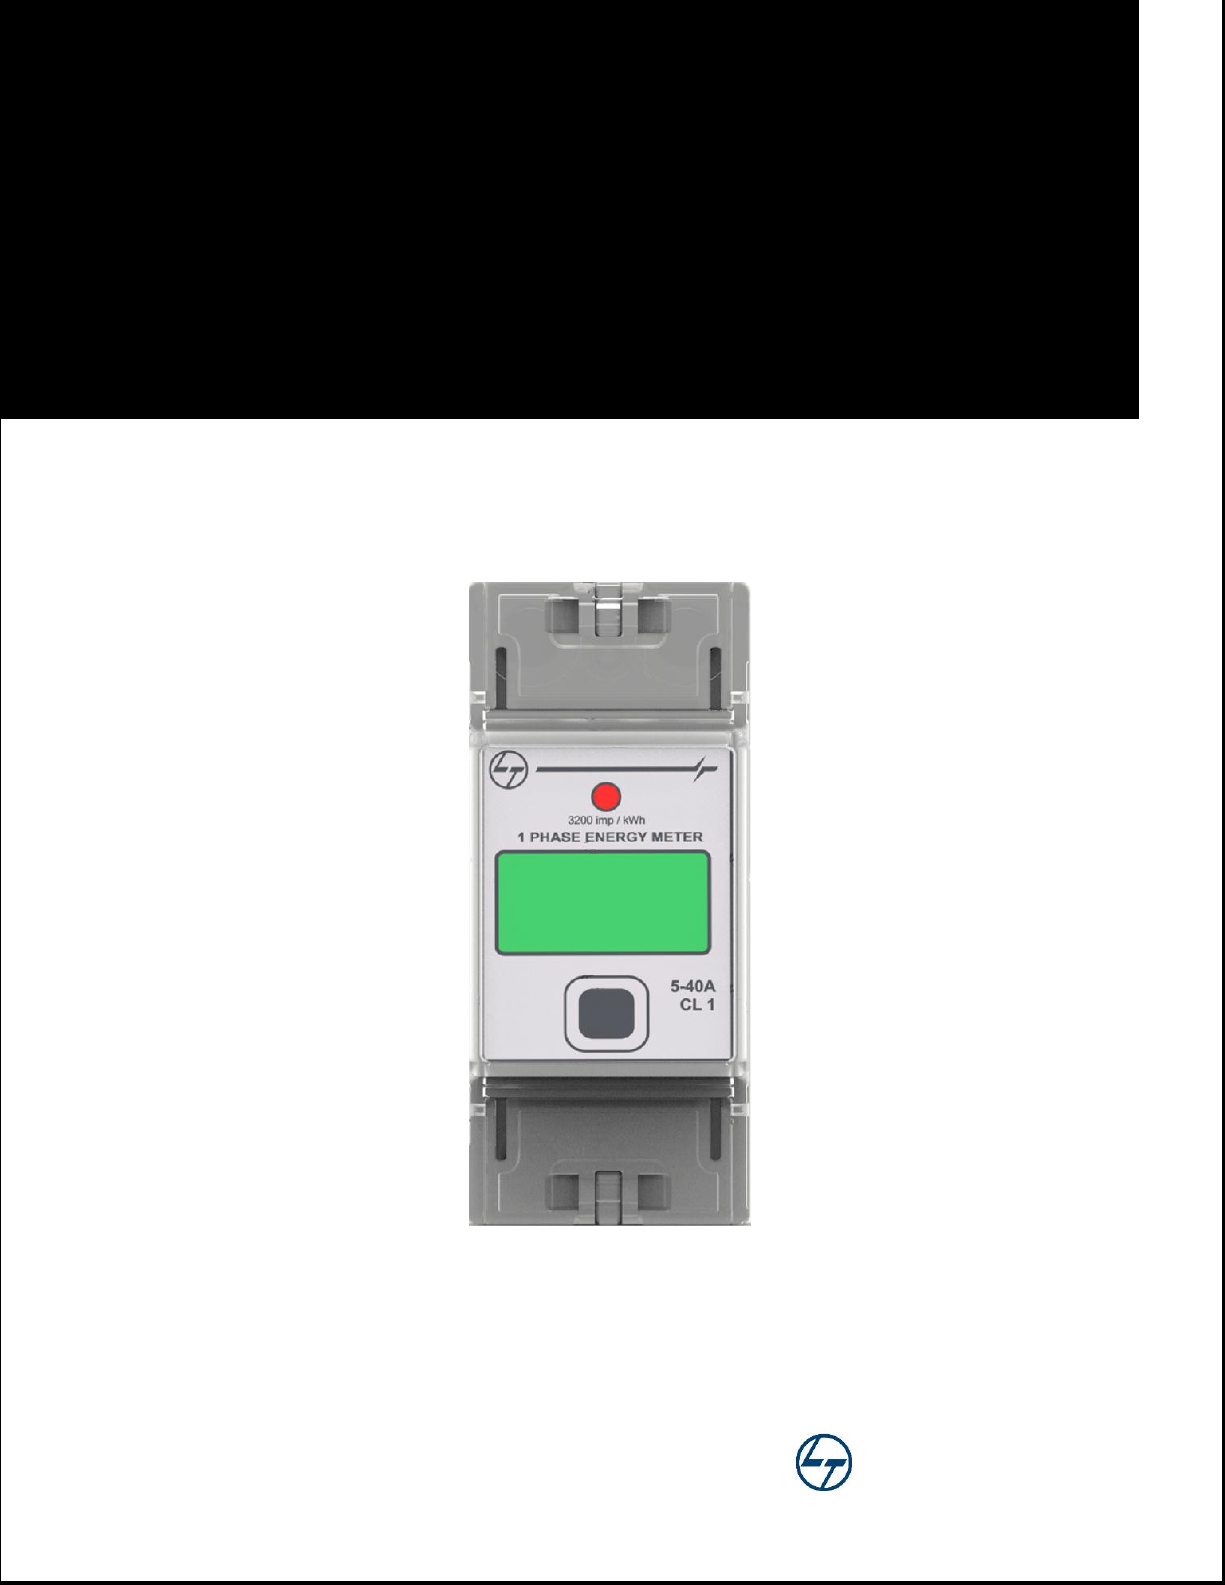
Larsen & Toubro warrants that 1 PHASE DIN RAIL ENERGY METER is free from defects in workmanship and
material. Larsen & Toubro’s obligation under this warranty shall be for a period of 18 months from the date of
sale subject to the following terms and conditions provided the notice of defects and satisfactory proof thereof
is given to Larsen & Toubro by its Customer within the warranty period.
1. Larsen & Toubro shall provide only repairs for the sold item.
2. Defective parts shall be serviced or replaced by Larsen & Toubro.
This warranty does not cover any defect in the product caused by accident, misuse, mishandling (includes
improper electrical, mechanical installation), tamper, neglect, alteration/modification or substitution of any of
the components or parts, or any attempt of internal adjustment by unauthorized service personnel. For
applicability of warranty Larsen & Toubro shall be the sole judge.
Under no circumstance shall Larsen & Toubro be liable for any consequential or resulting injury or for loss,
damage or expense directly or indirectly from the use of this product.
The foregoing warranty is in lieu of all other warranties, expressed or implied, and is the sole and exclusive
remedy for any claim arising from any defect in the product.
Sufficient care is taken to provide all information regarding the product but Larsen & Toubro Electrical and
Automation does not claim any responsibility for the damage caused by using the product directly or indirectly.
In case of customer complaint please contact
Customer Interaction Centre (CIC)
Toll Free: 1800 233 5858, 1800 200 5858
Telephone: 022 6774 5858
Email: cic@LNTEBG.com
Electrical Standard Products
L&T Business Park, Tower ‘B’ / 3rd Floor
Saki Vihar Road, Powai, Mumbai 400 072
Website: www.Lntebg.com
WD4000DR06A –1P
Page 8 of 8
DISCLAIMER
WARRANTY
L&T Electrical & Automation

USER MANUAL 3 PHASE DIN RAIL ENERGY METER
L&T Electrical & Automation
Doc.No.4D060284 Rev.0
3 Phase DIN Rail Meter

Page 2of 8
Bright LCD display
Push to Push consumption
Terminal covers to avoid direct contact of the supply terminals along with sealing provision.
* Data transfer through “Wi-Fi” and “MODBUS”.
Easy mounting on DIN rail with locking.
Energy recording at current as low as 0.04A.
Reverse current indication.
* Wi-Fi and RS485 modules are available as an add–on and should be purchased separately to
Communicate with meter.
Meter Type
3 Phase 4 Wire Whole current Operated, unidirectional
Accuracy Class
1.0
Voltage Rating
3 x 240V (Phase to Neutral)
Current Rating
10A (Ibasic), 60A (Imax)
Operating Voltage
168V to 288V
Starting Current
0.4% Ibasic
Operating Frequency
50Hz± 5%
Meter Constant
450 impulses/kWh
Measurement Category
Category III
Standards Applicable
IEC 62052-11, IEC 62053-21, IP50
Enclosure
Polycarbonate
Dimension
125mm x 83mm x 66mm
Weight
460g
Communication
Compatible with Wi-Fi and RS485 communication
Sealing
provision
Terminal
cover
Display
Pulse rate
LED
Push button
Optical
communication
FEATURES
TECHNICAL SPECIFICATIONS

Page 3of 8
L1 L2 L3
Y-Phase
3 Phase
supply
Parameter scrolling:
Manual Scroll: Press and release the push button to view the next parameter. Meter will continue to be
in Manual scroll mode once push button is pressed and will change over to Auto scroll
mode if the Push button is left inactive for 5 minutes.
Auto Scroll : In Auto scroll mode, each parameter will be displayed for 6 seconds.
Push to push consumption: The push button is also used for measuring Push to Push kWh consumption.
Follow the below steps to measure the Push to Push consumption:
a) Scroll through the parameters until the push to push consumption (P0) is displayed.
b) When P0 is displayed press and hold the push button, it resets to zero.
c) Energy recording starts in P0 display.
d) To stop the Push to Push consumption press and hold the push button in P0 display.
e) Check the display parameter P1 to get the energy consumed value between the start and stop
operations.
CONNECTION DIAGRAM
OPERATING INSTRUCTIONS
DISPLAY
B-Phase
Neutral
M1 M2 M3 M0
LOAD
R-Phase

Page 4of 8
DISPLAY EXPLANATION
Sl #
Parameter
Display Legend
1
Value of quantity measure
2
Units of Energy, Voltage, Current and
Power
kWh, V, A, kW
3
Maximum demand
4
Presence of R, Y and B phase voltages
and blinks when current flows to the
load.
5
Different consumptions
Present day energy
Pd
Present week energy
P7
Present month energy
Pb
Previous day energy
Ld
Previous week energy
L7
Previous month energy
Lb
Cumulative energy
C
Instantaneous power
Pr
6
Reverse current indication (Rev.)
Rev. is displayed when connections to M1 and
L1 or M2 and L2 or M3 and L3 are interchanged
No.
Parameter
LCD Pattern
1
Voltage reading R phase
2
Voltage reading Y phase
3
Voltage reading B phase
DISPLAY PARAMETERS
6
3
2
1
4
5
DISPLAY

Page 5of 8
4
Current reading R phase
5
Current reading Y phase
6
Current reading B phase
7
Frequency
8
Power factor
9
Instantaneous Active Power
10
Instantaneous Reactive Power
11
Instantaneous Apparent Power
12
Present month Demand
13
Previous month Demand
14
Cumulative energy (kWh)
15
Present Push to push
consumption
16
Push to Push consumption
17
Present day consumption (kWh)
18
Previous day consumption (kWh)
19
Present week consumption (kWh)
20
Previous week consumption
(kWh)
21
Present month consumption
(kWh)

Page 6of 8
22
Previous month consumption
(kWh)
23
First byte of IP address *
24
Second byte of IP address *
25
Third byte of IP address *
26
Fourth byte of IP address *
27
Slave ID **
28
Baud rate **
29
Parity **
30
Config
31
Indicates change over from
manual scroll mode to auto
scroll mode
32
Indicates data collection
* Parameters available only in WiFi mode of Communication.
** Parameters available only in MODBUS mode of Communication
Following settings need to be done to configure the DIN meter to WiFi or MODBUS mode:
Connect the meter to the power supply and manually scroll till parameter "Config" is displayed.
Press and hold the push button for 6 sec, meter will display “Yi-Fi”, “ndbus”,”IEC”and “ESC”on
each scroll.
Press and hold the push button for 6 sec after the required mode of communication. Select “Yi-Fi”
for Wi-Fi mode to use with Wi-Fi module and “ndbus” for MODBUS mode to use with RS-485
module.
Meter will restart in selected mode of communication.
After entering into Config menu, if the key is not pressed for 1 min then meter will resume to
Config display mode.
After entering into Config Menu, if key is not pressed for 5 min then meter will resume to auto
scroll mode.
CONFIGURING COMMUNICATION

Page 7of 8
PULL
PULL
PULL***
PULL***
All dimensions are in mm
* For terminal cover sealing, wire used should be of maximum 0.8mm diameter
Warning:Terminal cover has to be used for operator protection. As soon as the connections are
made the terminals has to be covered by terminal cover.
*** Note:
1) Before installing and uninstalling the meter make sure that the Power supply to the meter is switched
off.
2) Remove all the connections to the meter.
3) PULL the locking clips with the help of a screwdriver by inserting it in slot provided in the clip.
DIMENSION
S
INSTALLATION PROCEDURE
PRESS
PRESS
STEP 1.
STEP 2.
STEP 3.
STEP 4.
UN-INSTALLATION PROCEDURE

Page 8of 8
Larsen & Toubro warrants that 3 PHASE DIN RAIL ENERGY METER is free from defects in workmanship and
material. Larsen & Toubro obligation under this warranty shall be for a period of 18 months from the
date of sale subject to the following terms and conditions provided the notice of defects and satisfactory
proof thereof is given to Larsen & Toubro Limited by its Customer within the warranty period.
1. Larsen & Toubro shall provide only repairs for the sold item.
2. Defective parts shall be serviced or replaced by Larsen & Toubro.
This warranty does not cover any defect in the product caused by accident, misuse, mishandling (Includes
improper electrical, mechanical installation), tamper, neglect, alteration/modification or substitution of
any of the components or parts, or any attempt of internal adjustment by unauthorized service
personnel. For applicability of warranty Larsen & Toubro shall be the sole judge.
Under no circumstance shall Larsen & Toubro be liable for any consequential or resulting injury or for
loss, damage or expense directly or indirectly from the use of this product.
The foregoing warranty is in lieu of all other warranties, expressed or implied, and is the sole and
exclusive remedy for any claim arising from any defect in the product.
Sufficient care is taken to provide all information regarding the product but Larsen & Toubro does not
claim any responsibility for the damage caused by using the product directly or indirectly.
In case of customer complaint please contact
Customer Interaction Centre (CIC)
Toll Free: 1800 233 5858, 1800 200 5858
Telephone: 022 6774 5858
Email: cic@LNTEBG.com
Electrical Standard Products
L&T Business Park, Tower ‘B’ / 3rd Floor
Saki Vihar Road, Powai, Mumbai 400 072
Website: www.Lntebg.com
WD4005DB00A –3P
WARRANTY
DISCLAIMER
L&T Electrical & Automation

Doc.No.4D060285 Rev.0
USER MANUAL DIN RS485 MODULE
L&T Electrical & Automation
RS485 Module DIN Energy Meter
Module DIN Energy Meter
WiFi Module DIN Energy Meter
MO

Page 2of 8
DIN RS485 module is used to collect data from L&T make DIN meters through optical interface and
to make it available for the user through RS485 port and modbus protocol. This RS485 module is
compatible with 1 Phase as well as 3 Phase meters.
RS485 port enables a master to communicate with many DIN meters connected in daisy
chain.
Data transfer through modbus protocol.
Terminal cover to avoid direct contact of the supply terminals along with sealing
provision.
Easy mounting on DIN rail with locking.
Voltage rating : 240 V (-30% to +20% AC)
Operating Temperature : -20°C to 70°C
Storage Temperature : -40°C to 85°C
Enclosure : Poly carbonate
Dimension : 36mm x 83mm x 66.5mm
Weight :115 g
Terminal
cover
Power on
LED
Optical
communication
FEATURES
SPECIFICATIONS
Terminal sealing
provision
RS485 connector

Page 3of 8
Neutral
Phase
Radiated RF field immunity : IEC 61000-4-3
Conducted RF immunity : IEC 61000-4-6
Conducted RF emissions : CISPR 22
Radiated RF Emission : CISPR-22-A
Fast transient burst (2kV) : IEC 61000-4-4
Electrostatic Discharge (±15kV) : IEC 61000-4-2
Surge Immunity Test ( ±4kV) : IEC 61000-4-5
The configuration details to communicate with the module are given below.
Standard
RS485 (half duplex)
Baud Rate
Selectable
(19200, 9600,4800, 2400, 1200)
Parity
Selectable ( None,Odd,Even)
Protocol
RS485 interface uses MODBUS Protocol in RTU mode. Communicating
with the meter involves sending commands to the meter for reading
and writing the particular register. The meter can be addressed with
specific user defined meter address (Slave ID) from 1 to 247
CONNECTION DIAGRAM
STANDARDS APPLICABLE
INTERFACE DETAILS
Modbus interface

Page 4of 8
Address
Parameters
Words
MF
(if no specific format is mentioned, format is HEX)
Read only Parameters ( Supported by Function Code 4)
Instantaneous Parameters
30001
R Phase Voltage
2
0.01
30003
Y Phase Voltage
2
0.01
30005
B Phase Voltage
2
0.01
30007
R Phase Current
2
0.001
30009
Y Phase Current
2
0.001
30011
B Phase Current
2
0.001
30013
Average Voltage
2
0.01
30015
Average Current
2
0.001
30017
Total Active Power
2
0.0001
30019
Total Reactive Power
2
0.0001
30021
Total Apparent Power
2
0.0001
30023
Total Power Factor
2
0.001
Format: for above addresses 7 to 11, 15 to 23
1st word –(MSW) 0x0000 if value positive
0xFFFF if value negative
2nd word –value itself, if positive as indicated by 1st word
2’s complement of value, if negative as indicated by 1st word
30025
Line Frequency
2
0.01
30027
Cumulative energy –kWh
2
0.01
30029
Previous Day Consumption-kWh
2
0.01
30031
Present Day Consumption-kWh
2
0.01
30033
Previous Week Consumption-kWh
2
0.01
30035
Present Week Consumption-kWh
2
0.01
30037
Previous Month Consumption-kWh
2
0.01
30039
Present Month Consumption-kWh
2
0.01
30041
Current Push to Push Consumption-kWh
2
0.01
30043
Backup Push to Push Consumption-kWh
2
0.01
30045
Present Month MD-kW
2
0.0001
30047
Previous Month MD-kW
2
0.0001
MEMORY MAP
This manual suits for next models
3
Table of contents
Popular Measuring Instrument manuals by other brands

Extech Instruments
Extech Instruments EC150 user guide

TOA-DKK
TOA-DKK ALF-1600 instruction manual

HACH LANGE
HACH LANGE POCKET COLORIMETER II Series Application Instruction

Campbell
Campbell CNR4 product manual

Geokon
Geokon 4820 instruction manual

Hanna Instruments
Hanna Instruments HI 96739 instruction manual