Laney Audiohub AH-Freestyle User manual


1). Read & Retain these Instructions carefully before installing or operating this product.
2). Comply with Warnings: All warnings and instructions for these products should be adhered to.
3). Unpacking: On unpacking your product please check carefully for any signs of damage that may have occurred whilst in transit from the Laney factory to your
dealer. In the unlikely event that there has been damage, please repack your unit in its original carton and consult your dealer. We strongly advise you to keep your
original transit carton, since in the unlikely event that your unit should develop a fault, you will be able to return it to you dealer for rectification securely packed.
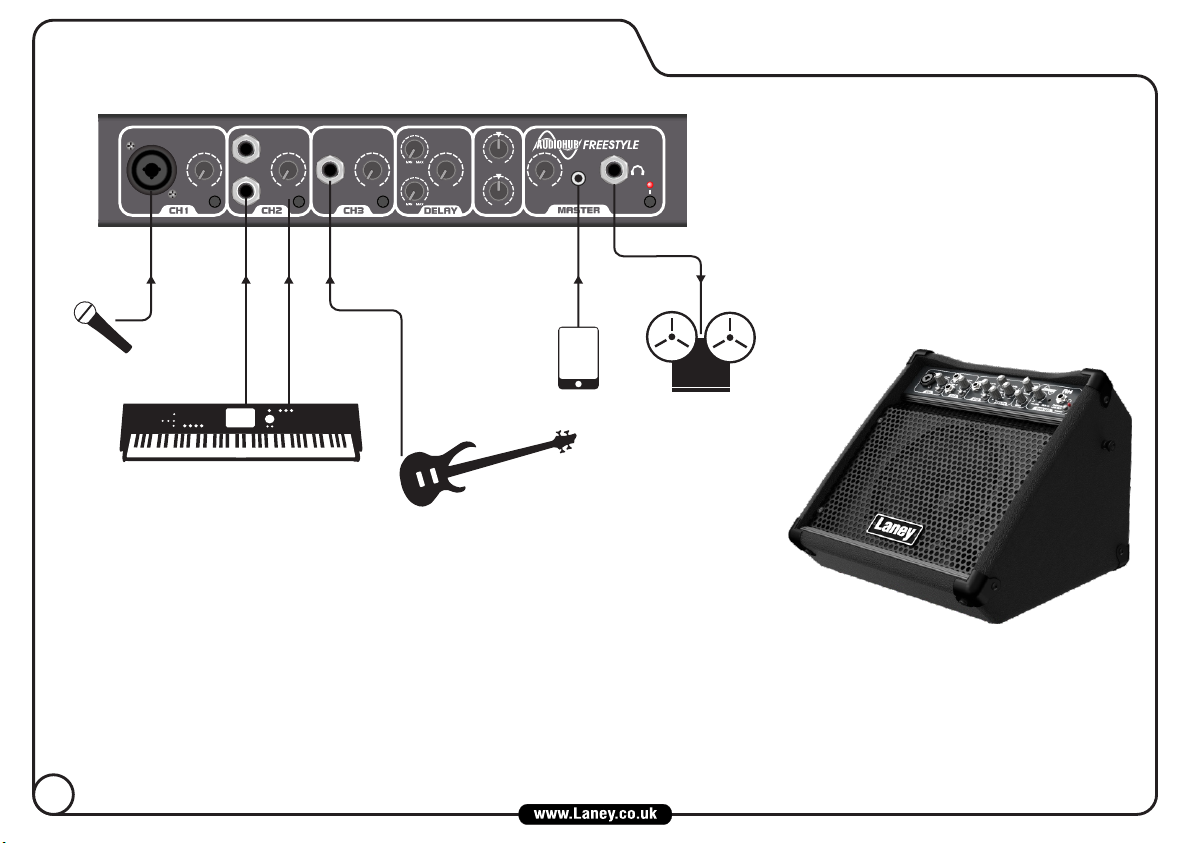
4). Amplifier Connection: In order to avoid damage , it is advisable to establish and follow a pattern for turning on and off your system. With all system parts
connected, turn on source equipment, CD/MP3 players, mixers/recorders, etc, BEFORE turning on your guitar amplifier. Many products have large transient surges
at turn on and off which can cause damage to your speakers. By turning on your guitar amplifier LAST and making sure its level control is set to a minimum, any
transients from other equipment should not reach your loud speakers. Wait till all system parts have stabilised, usually a couple of seconds. Similarly when turning
off your system always turn down the level controls on your guitar amplifier and then turn off its power before turning off other equipment
5). Servicing: Refer all servicing to qualified service personnel. Servicing is required when the apparatus has been damaged in any way, such as when the DC Power
Supply is damaged, liquid has been spilled or objects have fallen into the apparatus, the apparatus has been exposed to rain or moisture, does not operate normally,
or has been dropped.
6).Placement: This electrical apparatus should not be exposed to dripping or splashing and care should be taken not to place objects containing liquids,
such as vases, upon the apparatus.
Do not install near any heat sources such as radiators, heat registers, stoves or other apparatus (including amplifiers) that produce heat. Do not block any
of the ventilation openings.
Use only with a cart, stand, tripod, bracket, or table specified by the manufacturer, or sold with the apparatus. When a cart is used, use caution when moving
the cart/apparatus combination to avoid injury from tip-over.
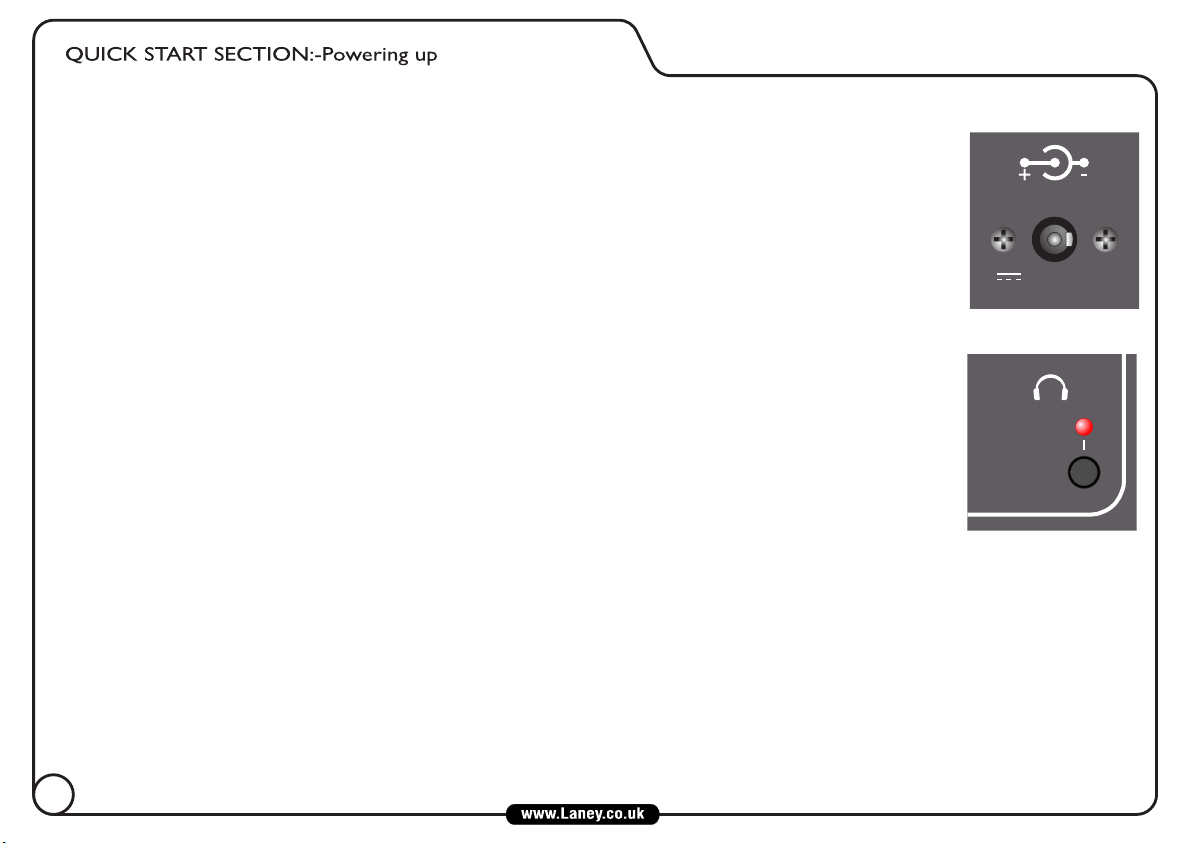
7). When using the DC power Supply: Only use the approved DC power supply provided by the manufacturer. Rating 12Vdc 500mA. Protected
by a 125°C thermal fuse.
Make sure that the line voltage at the installation matches the input voltage on the DC power Supply.
Protect the power cord on the DC power Supply from being walked on or pinched, particularly at plugs, convenience receptacles, and the point they exit
from the apparatus.(See notes on using the DC Power Supply page 6).
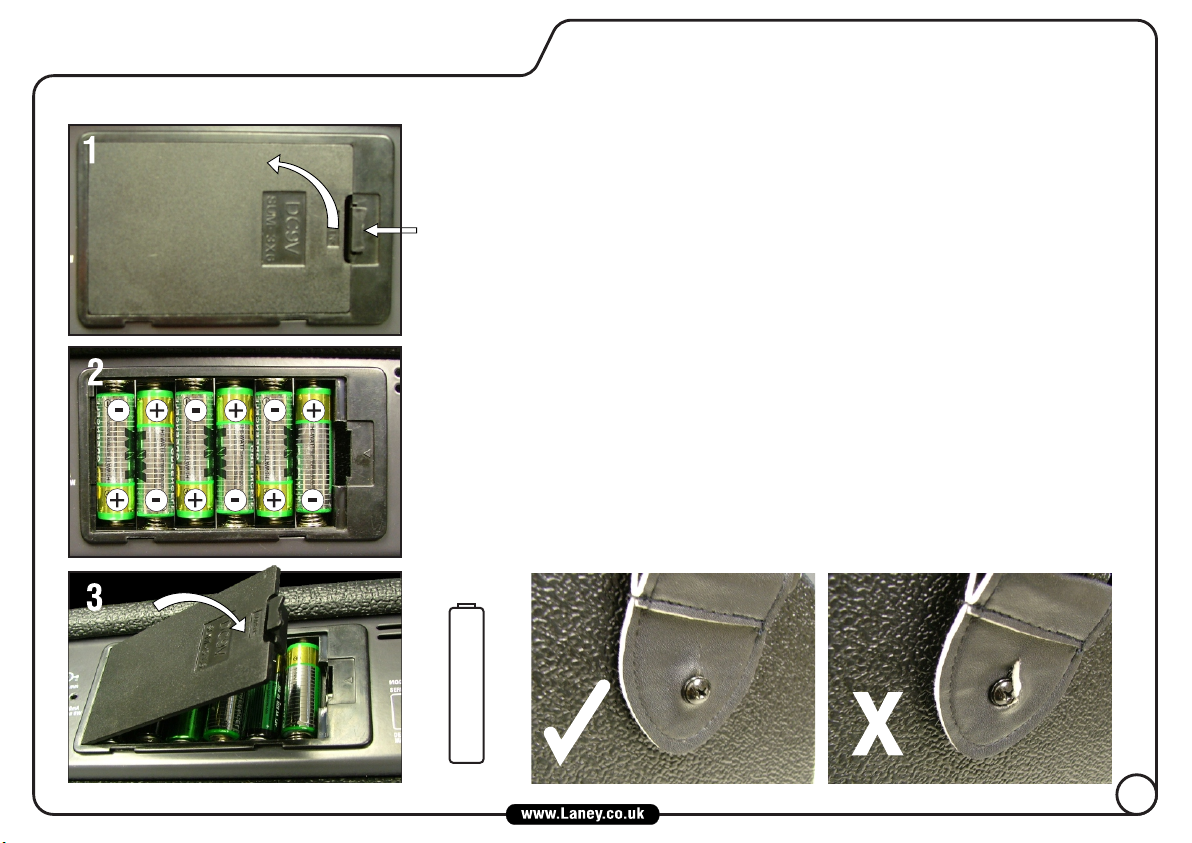
8). Batteries: Use only alkaline batteries (LR6) in the product. (See notes on fitting and replacing batteries page 6-7).
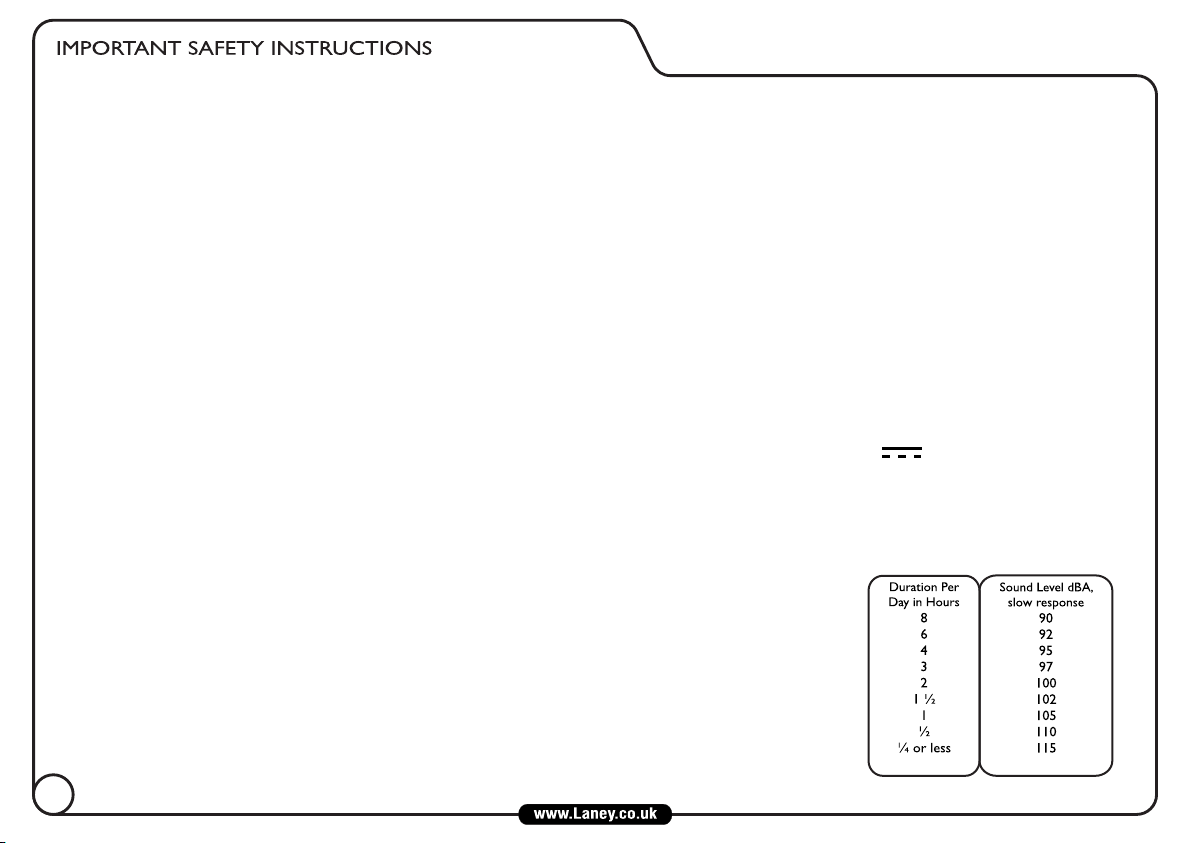
9).Sound Levels: Exposure to extremely high noise levels may cause a permanent hearing loss. Individuals vary
considerably in susceptibility to noise-induced hearing loss, but nearly everyone will lose some hearing if exposed to
sufficiently intense noise for a sufficient time.
The U.S. Government’s Occupational Safety and Health Administration (OSHA) has specified the following permissible
noise level exposures: According to OSHA, any exposure in excess of the above permissible limits could result in
some hearing loss. Earplugs or protectors to the ear canals or over the ears must be worn when operating this
amplification system in order to prevent a permanent hearing loss, if exposure is in excess of the limits as set forth
above. To ensure against potentially dangerous exposure to high sound pressure levels, it is recommended that all
persons exposed to equipment capable of producing high sound pressure levels such as this amplification system be
protected by hearing protectors while this unit is in operation.
10). Maintenance: Clean only with a dry cloth.
Care of your Laney amplifier will prolong it's life.....and yours!
2


The Audiohub range of multi instrument amplifiers is designed to
be the centre of your audio world.
The portable AH-FREESTYLE, great for bedroom, practice or
busking, features 3 independent channels allowing connection
of balanced XLR, line and Hi-Impedance/Instruments, as well
as a dedicated Aux In.
The AH-FREESTYLE can be run from a wall mounted
mains adaptor, or from batteries in the rear
compartment. It is equipped with a delay unit with
Time and Feedback controls, and an FX send switch
on each channel.
Ideal for keyboards, vocals, electronic drums and
playing recorded audio, the Audiohub series
features custom drivers to ensure that
whatever sound source you use is produced
and projected correctly and clearly. Add to
this ‘Road Ruggedness,’ solid construction,
hard waring vinyl and a metal front Grille.
The AH-FREESTYLE is the ideal solution
for all of your audio performance and
rehearsal needs...wherever you are!
5

DC Power Supply: Your AH-Freestyle comes supplied with a 12V DC Power Supply, this is easily fitted
between the mains outlet and the amp. When using the amp with the power supply a few precautions should
be followed:
1). Only use the DC Power supply that is supplied by the manufacturer. The use of other DC Power Supplies
may cause damage or other problems.
2). Turn the power switch to OFF and disconnect any other attached devices, before plugging in and turning
ON the DC Power Supply.
3). When the DC Plug is connected to the socket, the battery compartment is isolated from the unit. Both
the DC Power Supply and the battery tray are independent of each other.
4). Although no harm will come to the batteries if left in place whilst the DC Power supply is being used, it
is recommended that they be removed. Use either one power source or the other.
Batteries: The use of a DC Power Supply is recommended as the units main power source, however,
should you prefer to use batteries, use only Alkaline type (LR6).
Used continuously the batteries will last for approximately 40 hours. (This will vary greatly with the actual
conditions of use).
As the batteries run down, the power indicator on the fascia panel will become dim when the battery power
is too low. Replace the batteries or revert to the DC Power Supply.
Fitting Batteries: When installing or replacing batteries, always turn the power switch to the OFF position and disconnect
any other devices you have may have connected. This prevents damage to your speaker and/or other devices. Follow the photo
sequence to fit a set of batteries.
1). Turn the amplifier around to access the battery tray that is located on the back the chassis, place the amp on a piece of felt
or cloth to avoid damage.
2). Push the catch to release, then lift out the lid of the battery tray and insert 6 AA batteries, ensure that the orientation is
correct to the legend on the tray.
3). When closing the lid of the battery tray, insert the tabs opposite the catch first, then push the lid down until a click is heard.
PHONES/
LINE OUT
POWER
5.5 x 2.1 mm
Power Consumption 6W
12V DC 500mA
FRONT
REAR
6

If used incorrectly batteries may leak or explode and cause damage or injury, please
take the following precautions.
1). Carefully follow the installation instructions for fitting new batteries, especially the
polarity.
2). Avoid mixing new batteries with old or part used batteries.
3). Avoid mixing battery types.
4). Do not try to recharge or take apart alkaline batteries.
5). Remove the batteries from the unit if it is not going to be used for a long time.
6). If batteries have leaked in the battery tray, remove the batteries and all traces of
the discharge from the tray. Use caution so that none of the discharge gets near the
skin or the eyes. Any affected areas should be immediately rinsed with cold running
water, seek medical advice,
7). Do not dispose of used batteries in fire or water systems. Batteries must not be
exposed to excessive heat such as sunlight, fire or the like.
8). Used batteries should always be disposed of in compliance with the current
regulations applicable to the country/region where you live.
Attaching the Strap: Attach the supplied strap to the buttons on each side of the
cabinet securely, so that it does not become detached causing damage or injury.
+
-
7

FX
1
2
FEEDBACK
TIME
LEVEL
PHONES/
LINE OUT
AUX IN
LINE/INST
MIC/LINE
LEVEL LEVEL LEVEL
BASS
TREBLE
VOLUME
LINE
()
R
()
L
MIN MAX MIN MAX (HI-Z) MIN MAX
FX
FX
MIN MAX MIN MAX
POWER
FRONT & REAR PANEL CONTROLS
1. CH1 MIC/LINE INPUT: Combi Socket providing either a Balanced XLR input for low impedance microphone signals
(200-600 Ohms), or an Unbalanced Jack input socket for connection of all line level signals (keyboard, signal processor, sample,
drum machine, etc.).
2. CH1 LEVEL: Adjusts the channel level, enabling the user to balance levels across channels.
3. FX SEND: When pushed in, this switch routes the channel signal to the built in digital delay.
4. CH2 STEREO LINE INPUT: 2 x Unbalanced Jack sockets for connection of a stereo line signal. Sockets may also be
used to connect a single mono source, or two individual sources. When connecting independent sources, use the output
controls on your device to adjust the balance between the two signals. Active instruments may also be connected here.
5. & 6. CH2 LEVEL & FX: See CH 1 LEVEL & FX.
7. CH3 LINE/INSTRUMENT INPUT: Unbalanced high impedance input for connection of high impedance devices such
as electric guitars/basses, or regular line devices. This channel features +6dB gain compared to the other line inputs, so take
care if connecting a line level device here.
8. & 9. CH3 LEVEL & FX: See CH1 LEVEL & FX. As this channel has more gain than the other line inputs, don’t be
surprised if you find that you need to set this control lower than the others when using line level devices.
10. DELAY TIME Controls the amount of time between repeats of the inbuilt delay. Turning this control clockwise will
increase the delay time.
11. DELAY FEEDBACK This controls the amount of repeats in the inbuilt delay. Turning the control clockwise increases the
amount of repeats.
9
10
8

FX
FEEDBACK
TIME
LEVEL
PHONES/
LINE OUT
AUX IN
LINE IN/
INST
MIC/LINE
LEVEL LEVEL LEVEL
BASS
TREBLE
VOLUME
LINE IN
(R)
(L)
MIN MAX MIN MAX MIN MAX
FX
FX
MIN MAX MIN MAX
POWER
SAMPLE SETUP
RECORD OUT
MP3
KEYBOARD
BASS
MIC
Power Supply 12V DC Power Supply or 6 “AA” size Batteries
Output Power Rating 5W
Loudspeaker Custom Designed 8” 8 Ohm Driver
Features 1 x Combi Skt (Balanced Mic XLR, Unbalanced Line jack)
1 x Stereo Unbalanced Line (2 x Jacks)
1 x Line/Hi-Z Instrument (Jack)
Headphones/Line out, Delay with timer, Feedback & Level controls.
Master Volume Level. AUX IN
Size (H*W*D) 314*360*278 Unit Weight 7Kg
Included Items DC Power Supply, Guitar Style Carry Strap
SPECIFICATIONS
10

1.CH1 MIC/LINE INPUT: El conector combinado proporciona una entrada balanceada XLR de baja impedancia para señal de micrófono (200-600 Ohms), o una de Jack
sin balancear para conectar cualquier señal de línea (teclado, procesador de señal, sampler, caja de ritmos, etc.).
2. CH1 LEVEL: Ajusta el nivel del canal, equilibrando los niveles independientemente para cada canal.
3. FX SEND: Cuando está pulsado éste conmutador envía la señal del canal a un delay digital.
4. CH2 STEREO LINE INPUT: 2 x conectores Jack sin balancear para señal estéreo. Los conectores pueden usarse para una fuente mono, o dos fuentes individuales.
Cuando la señal provenga de dos fuentes, utilice los controles de salida para ajustar el balance entre las dos señales. Esta entrada también admite instrumentos
activos.
5/6. CH2 LEVEL & FX: Mirar CH 1 LEVEL & FX.
7. CH3 LINE/INSTRUMENT INPUT: Entrada de alta ganancia para conectar dispositivos de alta ganancia tales como guitarras eléctricas/bajos o dispositivos de línea
normal. Este canal cuenta con un aumento de +6dB, con lo cual debe tener cuidado si conecta un dispositivo de línea aquí.
8/9. CH3 LEVEL & FX: Mirar CH1 LEVEL & FX. Como este canal tiene más ganancia que las otras entradas de línea, no se sorprenda si necesita poner este control más
bajo que otros si conecta aquí un dispositivo de señal.
10. DELAY TIME: Controla el espacio de tiempo entre las repeticiones del delay integrado. Gírelo en el sentido de las agujas del reloj para incrementar el tiempo del
delay.
11. DELAY FEEDBACK: Controla la cantidad de repeticiones del delay integrado. Gírelo en el sentido de las agujas del reloj para incrementar la cantidad de repeticiones.
12. DELAY LEVEL: Controla el nivel de mezcla del delay integrado. Use el delay para añadir atmósfera a su sonido, o crear interesantes efectos.
13. TREBLE & BASS: La ecualización es mejor usarla sutilmente. Cortando o añadiendo demasiado, o usando configuraciones extremas puede reducir la claridad y la
dinámica. El punto medio es un buen inicio.
14. MASTER VOLUME: Ajusta el nivel de salida general del amplificador o de los auriculares.
15. AUX INPUT: Entrada de Jack de 3.5mm para una fuente auxiliar como un reproductor Mp3.Esta entrada está controlada por elVolumen Master. La ecualización
afecta a la entrada auxiliar, pero el delay no.
16. PHONES/LINE OUT: Conector de auriculares estéreo. Desconecta el altavoz interno para que pueda practicar sin molestar.Asegúrese de que el volume está bajado
antes de conectar los auriculares.También es una salida balanceada para grabación o conexión a otro amplificador.
17. POWER SWITCH & LED: Interruptor principal de encendido ON/OFF del amplificador, el led iluminado significa encendido.
18. CONECTOR DE CORRIENTE 12V DC: Úselo para conectar la fuente de alimentación incluida.
19. COMPARTIMENTO BATERÍAS: Úselo cuando quiera alimentar la unidad con baterías, introduzca 6 baterías alcalinas AA como se indica en las páginas 6 y 7.
20. NÚMERO DE SERIE: Modelo y número de serie del amplificador.
CONTROLES DEL PANEL FRONTAL
CONTROLES DEL PANEL TRASERO
1
FX
1
2
FEEDBACK
TIME
LEVEL
PHONES/
LINE OUT
AUX IN
LINE/INST
MIC/LINE
LEVEL LEVEL LEVEL
BASS
TREBLE
VOLUME
LINE
()
R
()
L
MIN MAX MIN MAX (HI-Z) MIN MAX
FX
FX
MIN MAX MIN MAX
POWER
9
10
DESIGNED AND ENGINEERED IN THE UK
MADE IN CHINA. FABRIQUE EN CHINE.
SERIAL NO:
N150 39
MODEL:
5.5 x 2.1 mm
Power Consumption 6W
12V DC 500mA
www.laney.co.uk
L Z B 1 2 3 4

1. CH1 MIC/LINE : Entrée combinée, XLR symétrique pour micro basse impédance (200-600 ohms) ou Jack asymétrique pour
signaux de niveau ligne (clavier, processeur de signal, échantillonneur, boîte à rythmes, etc.)
2. CH1 LEVEL :Ajuste le niveau du canal 1 pour pouvoir équilibrer les niveaux entre les canaux.
3. FX SEND : Lorsque ce bouton est enfoncé le signal est envoyé vers l'effet de retard numérique interne.
4. H2 STEREO LINE INPUT : Entrées Jack asymétriques doubles pour brancher un signal stéréo de niveau ligne. Il est aussi possible
d'envoyer un signal mono ou deux sources mono individuelles. Lorsque deux sources indépendantes sont envoyées, utilisez le
contrôle de chaque source pour équilibrer le niveau entre les deux signaux. Les instruments actifs peuvent également être branchés
dans ces prises.
5 & 6. CH2 LEVEL & FX :Voir CH1 LEVEL & FX
7. CH3 LINE/INSTRUMENT : Entrée asymétrique haute impédance pour brancher une guitare électrique/basse ou un instrument de
niveau ligne. Ce canal a un gain supérieur de 6dB par rapport aux autres entrées, il faut donc veiller au volume des instruments de
niveau ligne.
8 & 9. CH3 LEVEL & FX :Voir CH1 LEVEL & FX. Comme ce canal possède un gain plus important, ne soyez pas surpris s'il faut
réduire le contrôle de niveau par rapport aux autres canaux.
10. DELAY TIME : Ce contrôle ajuste le temps entre les répétitions de l'effet intégré. Le temps du retard augmente lorsque vous
tournez le bouton dans le sens des aiguilles d'une montre.
11. DELAY FEEDBACK : Ce contrôle ajuste le niveau des répétitions de l'effet intégré. Le niveau des répétitions augmente lorsque
vous tournez le bouton dans le sens des aiguilles d'une montre.
12. DELAY LEVEL : Ce contrôle ajuste le mélange de l'effet avec le signal. Utilisez le retard pour donner une ambiance à votre son ou
pour créer des effets intéressants.
13.TREBLE & BASS : Contrôles de tonalité à utiliser avec subtilité.Trop couper, trop augmenter ou utiliser des réglages extrêmes
peut réduire la clarté et la dynamique. Un réglage moyen est un bon point de départ.
14. MASTER VOLUME : Ce contrôle ajuste le niveau général de l'ampli ou de la sortie casque.
15.AUX INPUT : Entrée Jack stéréo 3,5mm pour brancher une source auxiliaire telle qu'un lecteur MP3. Cette entrée est contrôlée
par le réglage Master Volume. Le signal AUX est modifié par les réglages de tonalité mais pas par l'effet retard intégré.
16. PHONES/LINE OUT : Prise pour casque stéréo. Le HP interne est déconnecté lorsque le casque est branché.Assurez-vous que
le volume général est baissé avant de brancher le casque. La sortie ligne permet l'enregistrement ou le branchement d'une table de
mixage ou d'un autre ampli.
17. INTERRUPTEUR M/A ET VOYANT : Interrupteur général de l'ampli, le voyant s'allume lorsque l'ampli est en marche.
18. PRISE D'ALIMENTATION 12VDC : Permet de brancher l'alimentation basse tension fournie.
19. COMPARTIMENT PILES : Si vous voulez être autonome, installez 6 piles alcalines de format AA en suivant les instructions des
pages 6 & 7.
20. NUMERO DE SERIE : Modèle et numéro de série de l'ampli.
AH FREESTYLE
FX
1
2
FEEDBACK
TIME
LEVEL
PHONES/
LINE OUT
AUX IN
LINE/INST
MIC/LINE
LEVEL LEVEL LEVEL
BASS
TREBLE
VOLUME
LINE
()
R
()
L
MIN MAX MIN MAX (HI-Z) MIN MAX
FX
FX
MIN MAX MIN MAX
POWER
9
10
DESIGNED AND ENGINEERED IN THE UK
MADE IN CHINA. FABRIQUE EN CHINE.
SERIAL NO:
N150 39
MODEL:
5.5 x 2.1 mm
Power Consumption 6W
12V DC 500mA
www.laney.co.uk
L Z B 1 2 3 4
FR

9
10
L Z B 1 2 3 4
AH FREESTYLE
CH

1、 コンボジャック
・ローインピーダンス・マイク信号(200-600Ω)用 バランスXLR入力
・ライン信号用アンバランス・フォン入力(キーボード、シグナルプロセッサー、ド ラムマシンなど
2、CH1 レベル:チャンネル1の入力レベル調整を行います。
3、X センド:ボタンがONの時は、搭載されたデジタル・ディレイにチャンネルの信号を ルーティングします。
4、CH2 ステレオ・ライン入力:ステレオ・ライン信号用アンバランス・フォン入力端子(2個)モノラル音源、ま
たは2つの個別の音源も接続可能。個別の音源を接続する場合は、出力側の機材のボリュームコントロールを使い、
2つの信号のバランスを調整してください。
5、6、CH2 レベル&FX:CH1 レベル & FXをご覧ください。
7、CH3 ライン/楽器入力:エレキギター、ベース、その他ハイ・インピーダンス接続用アンバランス入力。他のラ
イン入力に比較し+6dBのゲインが得られます。ここにラインレベルの機材を接続する際にはレベルを上げすぎない
よう気を付けてください。
8、9、CH3 レベル & FX:CH1レベル&FXをご覧ください。他のライン入力よりゲインが高いため、ラインレベルの
機材を使用する場合はボリュームをより低く設定する必要があります。
10、DELAY TIME:搭載されたディレイのリピート間の時間を調整します。このコントロールを右に回すことでディ
レイタイムを延ばします。
11、DELAY FEEDBACK:搭載されたディレイのリピートの量を調整します。このコントロールを右に回すことでリ
ピートの量を増やします。
12、DELAY LEVEL:搭載されたディレイのミックスレベルを調整します。サウンドに雰囲気を出したい時や、面白
いエフェクト効果を生み出したい時にディレイを使用すると効果的です。
13、TREBLE & BASS:わずかに加えるのがコツです。カッティングやブーストのしすぎ、極端な設定をすると、明
瞭さを失い、ダイナミクスを低下させる原因となります。
14、マスターボリューム:アンプ、またはヘッドホンの出力レベルを設定します。
15、AUX INPUT:3.5mmミニステレオジャックには、MP3プレイヤーなどの音源を接続します。マスターボリューム
コントロールを用いて音量を調整できます。EQコントロール は、Aux入力にも掛りますが、ディレイは掛りません。
16、ヘッドホン/ライン出力:ステレオ・ヘッドホン端子。ヘッドホンをさすことにより、内臓スピーカーをオフ
に切り替え、一人での練習に使用できます。ヘッドホンに繋ぐ前に必ず、マスターボリュームが0になっているこ
とを確認してください。もう一つのアンプへの接続、レコーディング用に使用するためのバランスライン出力とし
ても使用できます。
17、パワースイッチ&LED:アンプ本体の電源ON/OFFスイッチです。ONの時に、LEDライトが点灯します。
CH1 マイク/ライン入力:
18、DCパワーサプライを接続する際に使用します。
19、バッテリーカバー:電池駆動する際は、単三アルカリ電池を6個セットします。
20、シリアルナンバー:モデル名、シリアルナンバーがここに記載されています。
12V DC INLET SOCKET:
フロントパネル・コントロール
リアパネル
L Z B1 2 3 4
AH FREESTYLE
JP

1. CH1 MIC/LINE INPUT: Conector Combinado que proporciona entrada XLR balanceada para sinais de microfones de baixa
impedância (200 - 600 Ohms), ou soquete de entrada não balanceada para conexão de todos os sinais de nível de linha
(teclados, processadores de sinal, samplers, baterias eletrônicas, etc.).
2. CH1 LEVEL:Ajusta o nível do canal, permitindo balancear o nível entre os canais.
3. FX SEND: Quando pressionada, esta chave muda a rota do sinal do canal para o digital delay interno.
4. CH2 STEREO LINE INPUT: 2 conectores não balanceados para conexão de sinais de linha estéreo. Os conectores podem ser
usados também para conectar uma fonte mono, ou duas fontes em estéreo.Ao conectar fontes independentes, use os
controles de saída do seu dispositivo para ajustar o balanço entre os dois sinais. Instrumentos ativos também podem ser
conectados aqui.
5 e 6. CH2 LEVEL & FX:Veja CH1 LEVEL & FX.
7. CH3 LINE/INSTRUMENT INPUT: Entrada não balanceada de alta impedância para conexão de dispositivos de alta impedância
como baixos/guitarras,ou dispositivos de nível de linha. Este canal apresenta +6dB de ganho comparado às outras entradas de
linha, tenha cuidado ao conectar um dispositivo de sinal de linha aqui.
8 e 9. CH3 LEVEL & FX: See CH1 LEVEL & FX: Como este canal possui mais ganho que as outras entradas de linha, não se
surpreenda ao descobrir que você precisa ajustar este controle mais baixo que os outros ao usar dispositivos de nível de linha.
10. DELAY TIME: Controla a quantidade de tempo entre as repetições do delay interno. Girar o controle em sentido horário
aumenta o tempo de delay.
11. DELAY FEEDBACK: Controla a quantidade de repetições do delay interno. Girar o controle em sentido horário aumenta a
quantidade de repetições.
12. DELAY LEVEL: Controla o nível de mixagem do som do delay interno. Use o delay para adicionar atmosfera ao seu som, ou
para criar efeitos interessantes.
13.TREBLE e BASS: O EQ deve ser usado sutilmente. Cortar ou aumentar muito, ou usar ajustes extremos, pode reduzir a
clareza e a dinâmica. O centro é um bom ponto de partida.
14. MASTERVOLUME:Ajusta o nível de saída geral do amplificador ou fones de ouvido.
15.AUX INPUT: Conector estéreo de 3.5 mm para conexão de uma fonte auxiliar como um MP3 Player. Esta entrada é
controlada através do controle master volume. Os controles de EQ tem efeito sobre a entrada Aux, mas o delay não.
16. PHONES/LINE OUT: Conector estéreo para fones de ouvido. Isto desconecta o falante interno, para que você possa praticar
sozinho.Assegure-se de que MasterVolume está baixo antes de conectar seus fones de ouvido. Saída de linha balanceada para
gravação ou conexão com outro amplificador.
17. CHAVE E LED POWER: Chave LIGA/DESLIGA geral para o amplificador. O LED acende para indicar ON.
CONTROLES DO PAINEL FRONTAL
CONTROLES DO PAINEL TRASEIRO
18. SOQUETE DE ENTRADA 12V DC: Use para conectar a fonte de energia DC fornecida.
19. COMPARTIMENTO DE PILHAS: Para quando o amplificador é alimentado através de pilhas, insira 6 pilhas alcalinas AA como
indicado nas instruções das páginas 6 e 7.
20. NÚMERO DE SÉRIE: Modelo e número de série para o amplificador
FX
1
2
FEEDBACK
TIME
LEVEL
PHONES/
LINE OUT
AUX IN
LINE/INST
MIC/LINE
LEVEL LEVEL LEVEL
BASS
TREBLE
VOLUME
LINE
()
R
()
L
MIN MAX MIN MAX (HI-Z) MIN MAX
FX
FX
MIN MAX MIN MAX
POWER
9
10
DESIGNED AND ENGINEERED IN THE UK
MADE IN CHINA. FABRIQUE EN CHINE.
SERIAL NO:
N150 39
MODEL:
5.5 x 2.1 mm
Power Consumption 6W
12V DC 500mA
www.laney.co.uk
L Z B 1 2 3 4
AH FREESTYLE
PT

AH FREESTYLE FRONTBLENDE
1 . CH1 MIC / LINE INPUT: Combi Buchse für einen symmetrischen XLR -Eingang für Mikrofon-Signale mit niedriger Impedanz (
200-600 Ohm) oder eine assymmetrische Klinkeneingangsbuchse für den Anschluss aller Line-Signale (Keyboard, Signalprozessor ,
Sampler , Drum -Maschine, usw.).
2 . CH1 LEVEL: Regelt die Kanal-Lautstärke,um die Lautsärke über alle Kanäle anzupassen
3 . FX SEND:Wird der Knopf gedrückt , wird das Signal auf das eingebaute Digital-Delay weiter geleitet.
4 . CH2 -Stereoeingang : 2 x unsymmetrische Klinken-Buchsen für den Anschluss eines Stereo-Line -Signal. Die Buchsen können
auch verwendet werden , um eine einzelne Mono-Quelle , oder zwei Einzelquellen zu verbinden. Beim Anschluss von unabhängigen
Quellen , verwenden Sie die Ausgangsregler auf dem Gerät , um die Balance zwischen den beiden Signalen anpassen.Aktive
Instrumente können auch hier angeschlossen werden .
5 . & 6 . CH2 LEVEL & FX: Siehe CH LEVEL 1 & FX .
7 . CH3 LINE / INSTRUMENT INPUT: assymetrischer hochohmiger Eingang für den Anschluss von Geräten mit hoher Impedanz wie
elektrische Gitarren / Bässe, oder Geräte mit Line-Pegel . Dieser Kanal hat eine 6 dB Verstärkung im Vergleich zu den anderen Line-
Eingängen , beachten Sie deshalb nachfolgende Punkte 8 und 9,wenn Sie ein Gerät mit Line-Pegel anschliessen.
8 . Und 9 . CH3 LEVEL & FX: Siehe CH1 LEVEL & FX . Da dieser Kanal mehrVerstärkung hat als die anderen Line-Eingänge ,drehen
Sie zunächst den Level- nach links, wenn sie ein Line-Gerät anschließen.
10 . DELAY TIME Steuert die Zeitspanne zwischen den Wiederholungen der eingebauten Echos. Drehen Sie diesen Regler im
Uhrzeigersinn, um dieVerzögerungszeit zu erhöhen.
11 . Delay Feedback Steuert die Anzahl der Wiederholungen des Echos . Drehen im Uhrzeigersinn erhöht die Anzahl der
Wiederholungen.
12 . DELAY LEVEL : Regelt die Stärke des Echo-Anteils. .Verwenden Sie das Echo, um Atmosphäre Ihrem Sound hinzuzufügen oder
um interessante Effekte zu erzielen.
13 .TREBLE & BASS : Zur optimalen Nutzung diese Regler nur feinfühlig verwenden.. Zu viele Senkungen oder Anhebungen,können
Klarheit und Dynamik zu reduzieren. Mittel-Stellung ist ein guter Ausgangspunkt.
14 . MASTERVOLUME : Regelt die Gesamt-Lautstärke des Verstärkers oder Kopfhörers..
15 .AUX- Eingang: 3,5 mm Stereo-Klinke für den Anschluss einer Hilfsquelle , wie zB einen MP3-Player . Dieser Eingang wird von dem
Master- Lautstärkeregler gesteuert. Die EQ-Regler haben eine Wirkung auf den Aux-Eingang , aber das Delay nicht.
16: Phones/Line-Out: Stereo-Kopfhörer-Buchse, bei Anschluß wird der interne Speaker zum lautlosen Üben abgeschaltet, drehen Sie
vorher den Master-Volumen-Regler zurück.
Symmetrischer-Line-Ausgang für Recording oder Anschluss eines weiterenVerstärkers.
17.Netzschalter & LED: Ein/Aus-Schalter , LED leuchtet,wenn derVerstärker eingeschaltet ist.
18: 12V-DC-Buchse: zum Anschluß des mitgelieferten 12V –DC- Netzteils.
19. Batterie-Fach: zur Aufnahme von 6x AA-Alkaline-Batterien ,wie auf Seite 6&7 beschrieben.
20. Serial-No: Modell-Bezeichnung und Serien-Nummer
AH FREEESTYLE HINTEN PANEL
FX
1
2
FEEDBACK
TIME
LEVEL
PHONES/
LINE OUT
AUX IN
LINE/INST
MIC/LINE
LEVEL LEVEL LEVEL
BASS
TREBLE
VOLUME
LINE
()
R
()
L
MIN MAX MIN MAX (HI-Z) MIN MAX
FX
FX
MIN MAX MIN MAX
POWER
9
10
DESIGNED AND ENGINEERED IN THE UK
MADE IN CHINA. FABRIQUE EN CHINE.
SERIAL NO:
N150 39
MODEL:
5.5 x 2.1 mm
Power Consumption 6W
12V DC 500mA
www.laney.co.uk
L Z B 1 2 3 4

전면 패널 조작부- AHFREESTYLE
FX
1
2
FEEDBACK
TIME
LEVEL
PHONES/
LINE OUT
AUX IN
LINE/INST
MIC/LINE
LEVEL LEVEL LEVEL
BASS
TREBLE
VOLUME
LINE
()
R
()
L
MIN MAX MIN MAX (HI-Z) MIN MAX
FX
FX
MIN MAX MIN MAX
POWER
9
10
DESIGNED AND ENGINEERED IN THE UK
MADE IN CHINA. FABRIQUE EN CHINE.
SERIAL NO:
N150 39
MODEL:
5.5 x 2.1 mm
Power Consumption 6W
12V DC 500mA
www.laney.co.uk
L Z B 1 2 3 4
AH FREESTYLE
KR

SAFETY INFORMATION


Table of contents
Languages:
Other Laney Amplifier manuals

Laney
Laney HCM160B User manual

Laney
Laney AH100 User manual

Laney
Laney A 301 2 User manual

Laney
Laney Richter R5 Operating and installation instructions

Laney
Laney Nexus NX810 User manual

Laney
Laney VC30-112 User manual

Laney
Laney Lionheart L5-Studio User manual

Laney
Laney LX120H User manual

Laney
Laney Richter Bass RB2 User manual

Laney
Laney Hardcore Combo HC25 User manual

Laney
Laney VC30 User manual

Laney
Laney LION HEART L20H User manual

Laney
Laney LX20 User manual

Laney
Laney Alliance VC50 User manual

Laney
Laney LA 10 User manual

Laney
Laney TH6150 Operation manual

Laney
Laney LION HEART L5T-112 User manual

Laney
Laney CUB 12 User manual

Laney
Laney Richter Bass RB6 User manual

Laney
Laney LV200 User manual