manuals.online logo
Brands
  1. Home
  2. •
  3. Brands
  4. •
  5. WHD
  6. •
  7. Amplifier
  8. •
  9. WHD AMP 4200 User manual

WHD AMP 4200 User manual

Manual AMP 4200
Valid for
111-425-04-001-00
Version (modifications reseverd)
21.02.2022
Seite 1 of 17
1. Welcome
Thank you for buying this quality WHD roduct. Please read this manual carefully, es ecially the safety
and security information.
Please check that you have the correct manual for your roduct. To do this, lease com are the roduct
code number shown above with the roduct code number dis layed on your roduct.
AMP 4200
Matrix Am lifier with 4 s eaker zones (4-8 ohms/70V/100V)
2. Inventory C ecklist
- AMP 4200
- 19 "bracket
- Device feet ( remounted)
- Power cable
- O eration manual
3. Safety & Security
General Information
In addition to this guidance lease adhere to your own country-s ecific safety & security regulations.
3.1.
How to use t is guide:
Read these instructions carefully before use and use this roduct only in accordance with the instructions
listed here.
3.2. Signs & symbols used
This sign warns of danger of injury and ro erty damage.
This sign warns of injury from electricity.
This sign warns of injury and/or ex losion.
This symbol refers to additional information.
3.3. Signal words and t eir meaning
Danger: Potential severe hysical damage and acute danger.
Warning: Potential electrical shock hysical damage and severe ro erty damage.
Caution: Potential fire hazard hysical damage or ro erty damage as a result of.
Attention:
Advisory notes only.
Manual AMP 4200
Valid for
111-425-04-001-00
Version (modifications reseverd)
21.02.2022
Seite 2 of 17
Warning
The 230V line must be connected only by a rofessional electrician.
The Electrical su ly must be disconnected before working on the device.
Improper andling may void warranty.
4. Product Scope
Matrix Am lifier for 4 s eaker zones (4-8 ohms/70V/100V).
5. Intended use
Indoors
6. Improper use
The device is not suitable for outdoor o eration. The ambient tem erature should not exceed 30 ° C.
7.
Specifications
AMP 4200
Power Su ly
100
-
2
4
0 V AC, 50
/60
Hz
Out ut Power
4 x 200
Watt
rms
Protection Thermal, over-current, over-voltage, short
circuit rotection
Dimensions
(H/
W
/
D
)
44 x 430 x 320 mm
Weight
5
.
5 kg
O erating Tem erature
5 … 30 °C
Input
:
Sensitivity
*)
0
/
+6
dBV (variab
le
)
Im edan
ce
22 kOhm
Ty e 4 x Phoenix, 3Pin
Bzw. 4 x RCA
Trigger: 12VdC (3,5mm mono jack)
Output
:
S eaker
4 x Phoenix, 2Pin
Audio Performance:
Ty e
Class D
Frequency Res onse
20

20kHz ± 1dB
THD+N
> 1% @ 1 kHz, Rated Power
S/N Ratio
≥ 90 dB (A
-
weighted)
Manual AMP 4200
Valid for
111-425-04-001-00
Version (modifications reseverd)
21.02.2022
Seite 3 of 17
Netw
o
rk:
IP User Interface Web-GUI, 10/100 mb s Ethernet
DSP Spe
c
ifi
c
ation
s
:
DSPs
28
-
/56
-
Bit, 50 MIPS
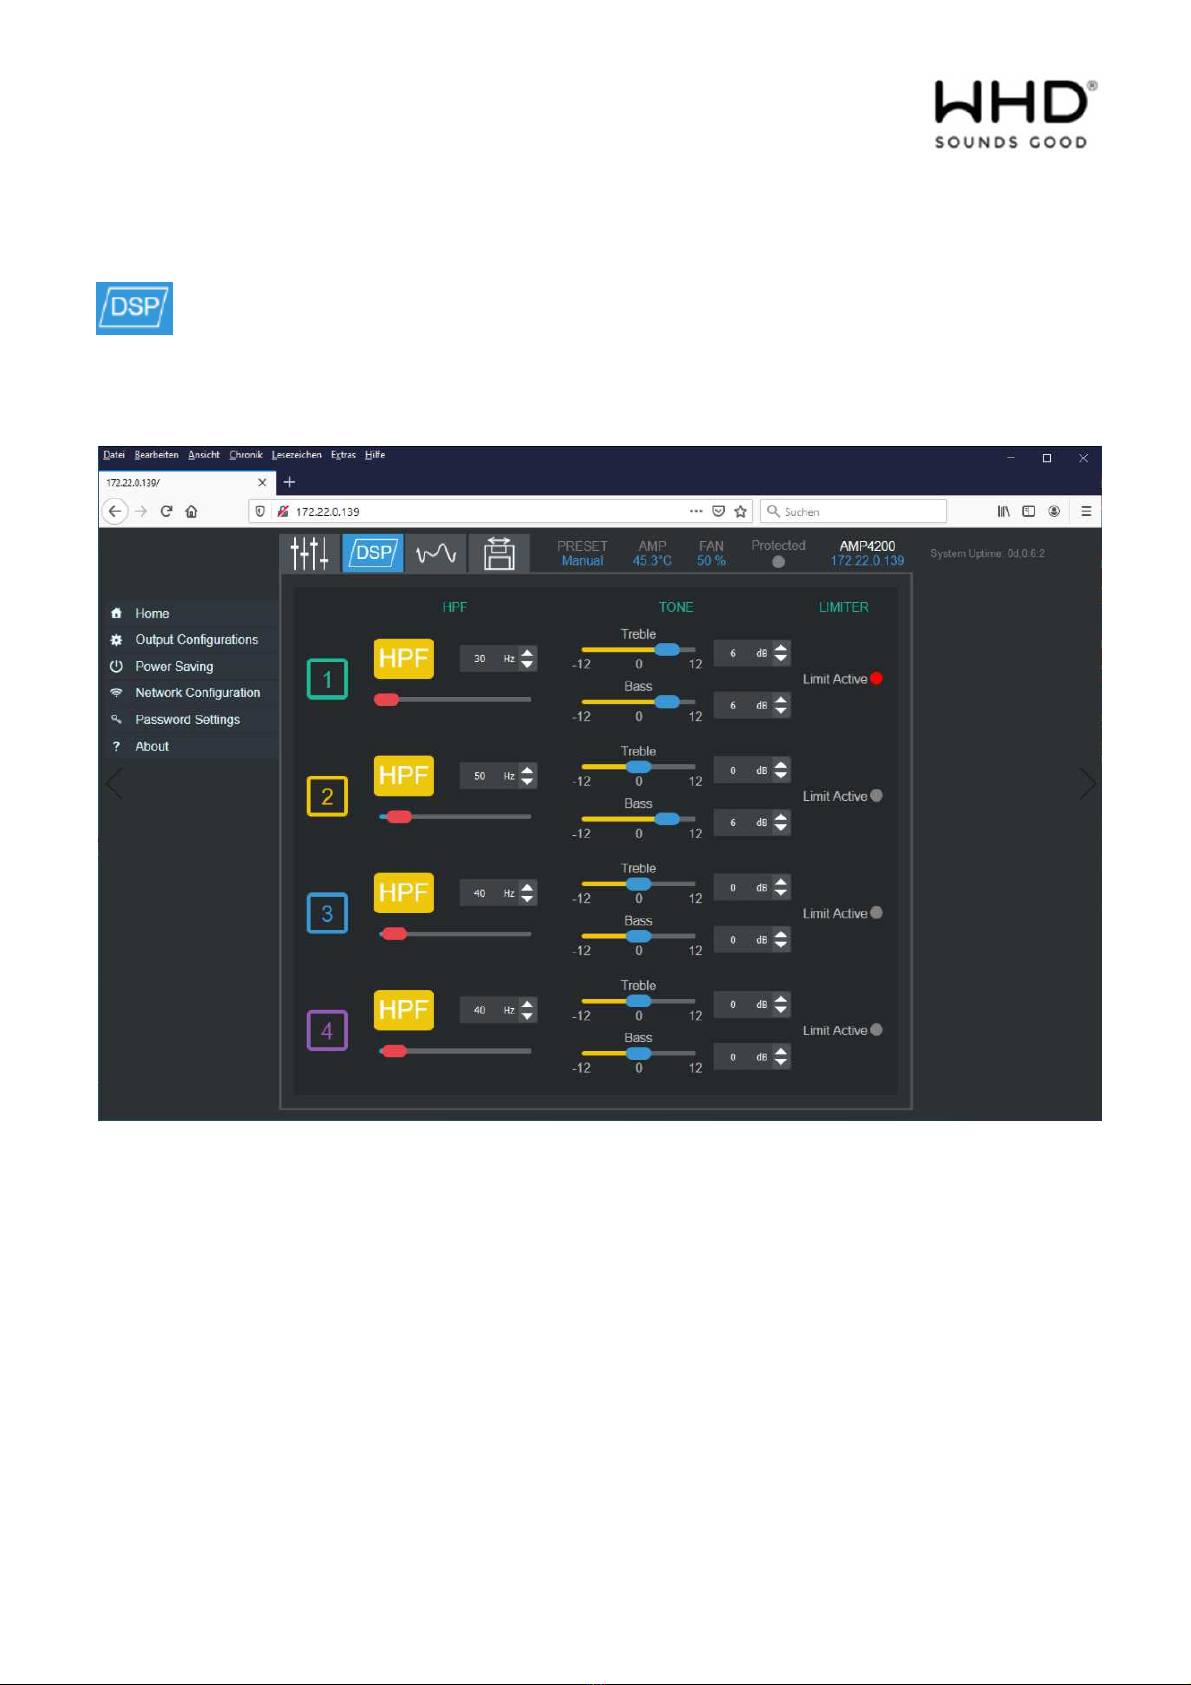
Crossovers 6 dB/oct …24 dB/oct
Equalizer 3-Band IIR er channel
Peaking,
b
ass,
treble
, LFP, HFP, Notch
Limiters
Peak Limiter
Matrix
4 x 4 Matrix/Mixer
Presets
20
reset
bank
s
8.
Prepa
ratory work before installation
Check if all cables (e.g. 230 V AC, antenna and the RCA cable for AUX) are installed in accordance with
installation guidelines, and your desired ort scenario.
Note:
For the installation / configuration via the web interface (web GUI) you need a corres onding end device
(PC / la to / ... etc.) and an Ethernet crossover cable.
9.
Installation and assembly
The device is suitable for 19 “installation (1 U). To do this, mount the enclosed bracket.
Note on 19 "installation:
Leave at least 2 U free above the device to revent overheating.
With the remounted device feet, you can use the AMP 4200 as a standing device.
Notes on temperature development:
Like any am lifier, the device can reach high o erating tem eratures, es ecially under load. Make sure
there is sufficient heat dissi ation. Therefore, mount the device mainly in the technical room or a suitable
distribution cabinet (ventilation / air conditioning) and not directly in furniture.
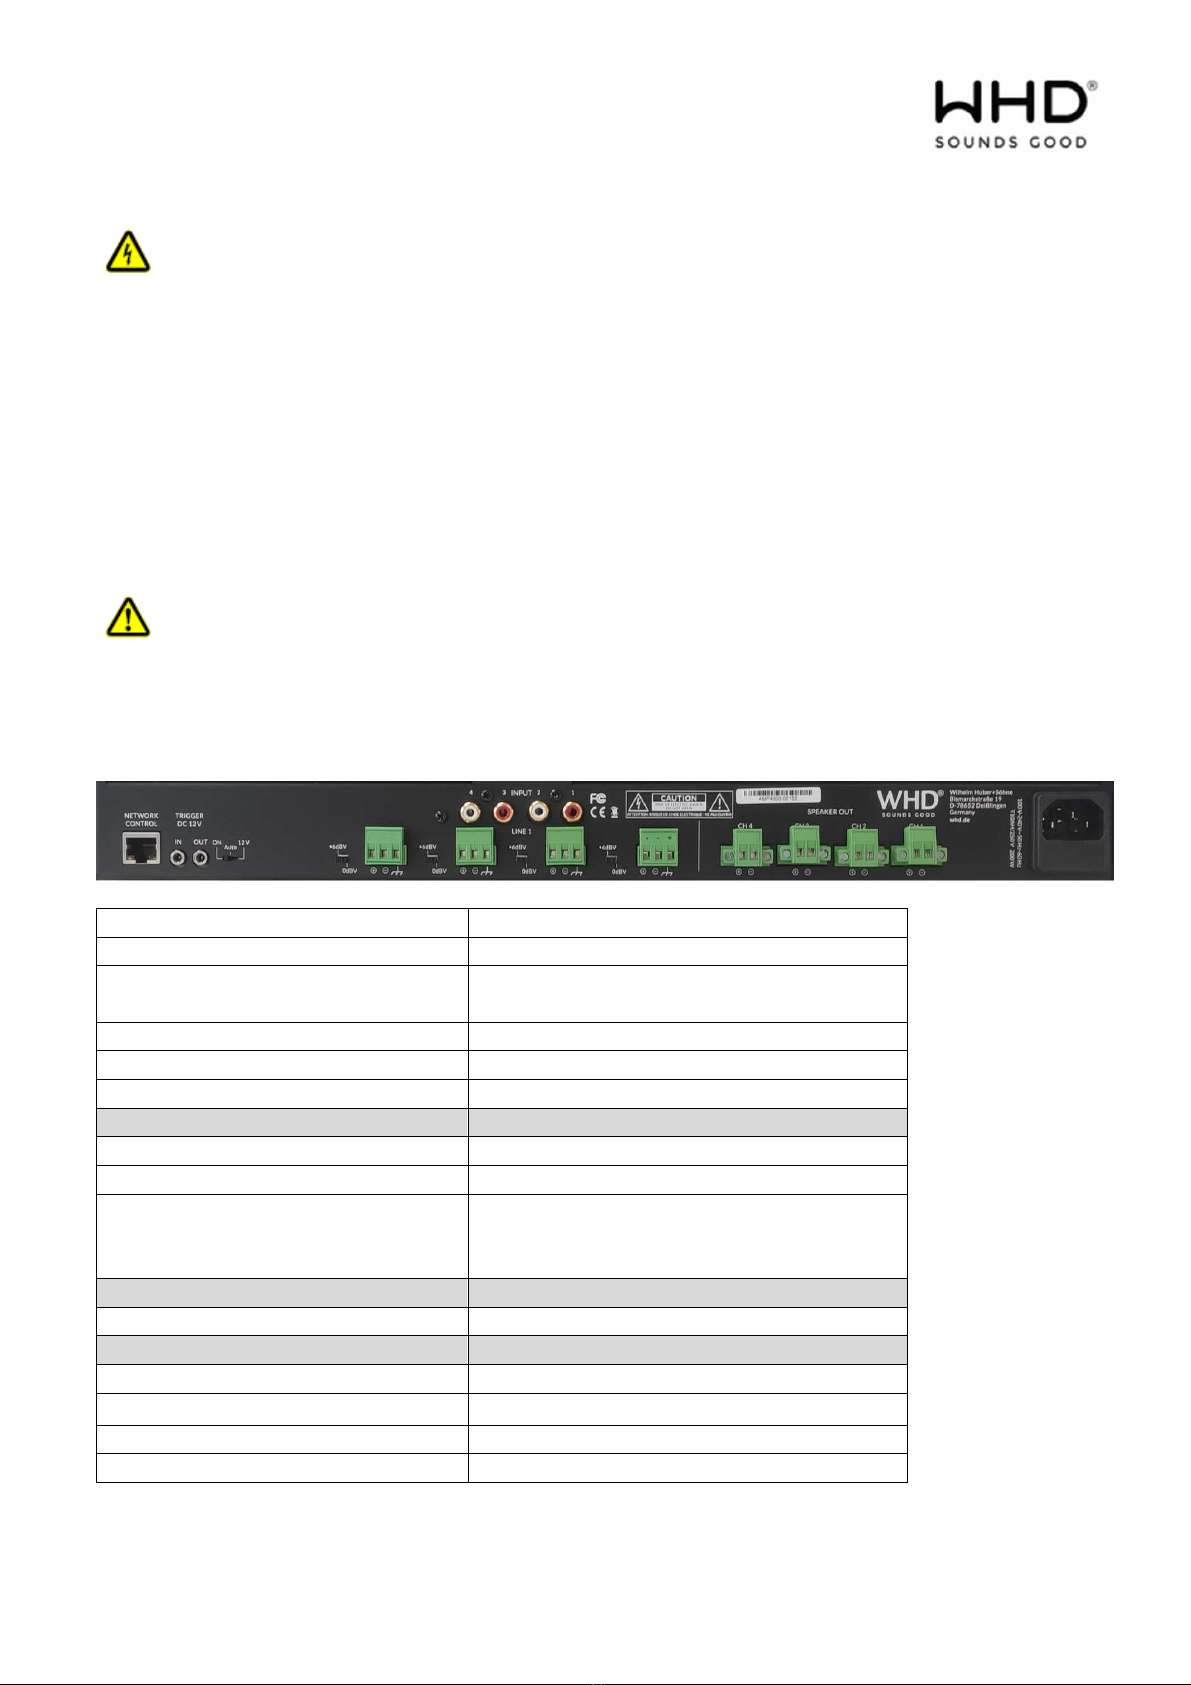
9.1. Connection of external audio sources
You can connect either 4 mono sources or 2 stereo sources to the device. Use either the Phoenix terminals
(ensure correct olarity!) Or the RCA connectors on the back of the device.
Note on setting t e sensitivity of t e input sources:
For the in ut sensitivity you can choose between +6 dBV and 0 dBV (switch).
For devices with a low out ut level (e.g. smart hones), lease set the switch to 0 dBV. This am lifies the
in ut signal.
Manual AMP 4200
Valid for
111-425-04-001-00
Version (modifications reseverd)
21.02.2022
Seite 4 of 17
9.2. Connection of t e speakers
When connecting the s eakers, you can choose for each zone whether you want to o erate it as a low-
resistance version (4 ohms) or in 100V ELA technology (s eakers with transformer / longer transmission
aths).
Note:
NEVER mix the two technologies in one zone!
Pay attention to the correct olarity when connecting the s eakers!
W en connecting t e speakers, make sure t at t e dimensions are correct.
With 100V technology, the total ower of the s eakers must not exceed 200 W er zone!
With low-resistance connections, the total im edance of the louds eakers must not be less than 4 ohms!
10.
Operation
10.1.
Connections
Connect the 230V cable (2) to the device and switch on the am lifier (3).
Select TRIGGER (T) if needed.
(1) (T) (2)
(3)
10.1.1. Configuration wit out a network (direct access)
For configuration, lug an Ethernet crossover cable into your PC / la to , ... (1) and o en your web
browser.
Enter the following default IP address in the start bar of the browser: 192.168.14.1
Default password:
Username: admin
Password: admin
This o ens the configuration interface.
Manual AMP 4200
Valid for
111-425-04-001-00
Version (modifications reseverd)
21.02.2022
Seite 5 of 17
10.1.
2
. Configuration in t e network
The AMP 4200 is delivered with DHCP. I.e. an IP address is automatically assigned to the device as soon
as it is recognized in the network.
Check the current IP address on the device. (Press on "ADJUST / SET" and turn to the left Device Info)
and enter this in the start bar of the browser:
Example: My IP address: 172.22.0.139
____________
Default password:
Username: admin
Password: admin
This o ens the configuration interface.
Note:
If you access the am lifier via a network, you can also enter http://AMP4200/ in the start bar.
If you have changed the user name / assword in a revious configuration setting, lease enter this
My login details:
User name: _______________________
Password: _______________________
IP address: _______________________
10.1.2. RESET to factory settings
Simultaneously ress the "BACK" button and the "ADJUST / SET" rotary button for more t an 5
seconds. This returns the device to the factory settings.
Note:
A RESET (reset to factory settings) deletes all settings and all saved presets and sets all outputs to 4-8
o ms in the "Qut ut Configurations" menu.
Manual AMP 4200
Valid for
111-425-04-001-00
Version (modifications reseverd)
21.02.2022
Seite 6 of 17
10.2.
C
onfiguration
10.2.1. Home Menu
On the left side you will find the selection of the menu items.
The tabs above the configuration area show the sub-items in ut matrix, DSP, equalizer and storage.
Further to the right you will find the other basic settings of the device, the current heat load as well as the
device name, the IP address of the device and the current software version.
Input Matrix:
In ut signals can be mixed and assigned to s ecific out uts via the in ut matrix.
Four zones with different volume can be created using the gra hic controls.
The bars on the right show the current level while music is laying.
Manual AMP 4200
Valid for
111-425-04-001-00
Version (modifications reseverd)
21.02.2022
Seite 7 of 17
DSP
Configuration
:
A high- ass filter and a sim le bass / tweeter control can be carried out for each out ut.
HPF: Hig -Pass-filter:
Frequencies above the s ecified value are let through, lower frequencies are filtered out.
Tone:
Sound settings for treble and bass.
Limiter, setting and activation:
Power setting of the am lifier out ut.
0 dB: maximum ower / -3 dB: half ower
Manual AMP 4200
Valid for
111-425-04-001-00
Version (modifications reseverd)
21.02.2022
Seite 8 of 17
Equalizer
Configuration
:
Three arametric equalizer bands are available er out ut.
Select the out ut and configure the desired settings.
Freq:
Set the center frequency for a filter for channel 3 for frequency bands.
Gain:
Then set the gain / attenuation factor (-3 dB is half the out ut signal).
Q factor (quality, between 0.4 to 14):
If you select a Q factor of "0.4", a wider frequency range will be rocessed than with a factor of "4". If
only a certain frequency range is to be rocessed as s ecifically as ossible, i.e. narrow-band, lease select
a high Q value.
Peak filter:
Select the filter ty e you want. The choices are: Peak, Bass, Treble, Notch, LPF, HPF. Activate / deactivate
the desired filter via the checkbox.
Manual AMP 4200
Valid for
111-425-04-001-00
Version (modifications reseverd)
21.02.2022
Seite 9 of 17
Preset
Management
:
You can save u to 20 resets on the device and reactivate them.
The resets can also be saved and read back on the PC / la to , ... of the service technician.
Note:
A RESET (reset to factory settings) deletes all settings and all saved presets and sets all outputs to 4-8
o ms in the "Qut ut Configurations" menu.
Manual AMP 4200
Valid for
111-425-04-001-00
Version (modifications reseverd)
21.02.2022
Seite 10 of 17
10.2.2. Output Configuration
Here the out ut im edance can be selected se arately for each channel.
Note:
NEVER mix the two technologies in one zone!
Pay attention to the correct olarity when connecting the s eakers!
W en connecting t e speakers, make sure t at t e dimensions are correct.
With 100V technology, the total ower of the s eakers must not exceed 200 W er zone!
With low-resistance connections, the total im edance of the louds eakers must not be less than 4 ohms!
Manual AMP 4200
Valid for
111-425-04-001-00
Version (modifications reseverd)
21.02.2022
Seite 11 of 17
10.2.3. Power Saving
If “Auto” is selected as “Power Saving”, the am lifier goes into stand-by mode after an extended eriod
(a rox. 20 min.) without an in ut signal.
You can use the trigger function e.g. if you use a control signal via a beamer (home cinema).
Note:
As soon as an in ut signal is resent again, the am lifier is reactivated.
Manual AMP 4200
Valid for
111-425-04-001-00
Version (modifications reseverd)
21.02.2022
Seite 12 of 17
10.2.4. Network Configuration
Here you will find the network settings of your device.
Host Name: Name oft he device
IP address: Address with which you can call u the device in the browser (IPv4).
Gateway: For connections to the ublic network.
Subnet Mask: Filter for subnet or host address.
Primary / Secondary DNS: Server for the resolution of domain and com uter names.
DHCP (enabled): assignment of the network configuration of the device by a server.
DHCP (disabled): Manual configuration.
Manual AMP 4200
Valid for
111-425-04-001-00
Version (modifications reseverd)
21.02.2022
Seite 13 of 17
10.2.5.
Password Settings
The web interface can be rotected with a assword.
Instructions for assigning passwords:
The am lifier is visible in the network. You can only ex ect secure o eration if you assign individual
asswords.
! When commissioning each device for the first time, change the default assword first.
Make a note of the assword in the enclosed o erating instructions, in your customer documentation or
on a sticker on the device.
! Handle the assword carefully (GDPR)
The assword may be max. 17 ASCII characters long.
Manual AMP 4200
Valid for
111-425-04-001-00
Version (modifications reseverd)
21.02.2022
Seite 14 of 17
How to assign a secure password (according to GDPR)
1. When choosing the assword, it is im ortant that a assword that is as long as ossible is selected.
Passwords with 8 characters or more are considered sufficient. But of course the security of the assword
increases with its length. A length of 20 or more digits is articularly a ro riate for articularly sensitive
data.
2. Combinations with ersonal details such as the birthday or the name of children should not be used,
as these can easily be unmasked by others.
Example: Leon1998 or Schatz75
3. Coherent words, meaningful sentences or re etitions of numbers should be avoided.
Exam le: secure assword or dreamcar911
4. Instead, use an arbitrary combination of u er and lower case letters and numbers.
Exam le: Koch + lam shade + sun + corres onding numbers = K0chL4m 3nsch1rmS0nn3
If necessary, note the conce ts and assword guidelines develo ed for your com any in coo eration with
your data rotection officer.
10.2.6. About
Here you will find the device name and the current software version.
Manual AMP 4200
Valid for
111-425-04-001-00
Version (modifications reseverd)
21.02.2022
Seite 15 of 17
10.3.
Manual configuration
The device can also be configured using the buttons and controls on the front.
We deliver each device with a ersonalized configuration so that you can do without the configuration
using the device buttons.
We have mentioned the necessary manual ste s for o eration below.
(1) (2 … 5) (6) (7) (8)
1 … ON/OFF button
2...5 Out ut channel (CH1/A, CH2/B, CH3/C, CH4/D)
6 … Dis lay
7 … „BACK“ botton
8 … „ADJUST/SET“ (selection key, right / left rotation, ush)
Note:
If no button is ressed, the device jum s back after a rox. 60 seconds and takes over the current
settings.
10.3.1. Retrieve t e current IP address
Press the ADJUST / SET button (8) and turn it one ste to the left.
"Device Info" a ears in the dis lay.
Press the ADJUST / SET button (8) again.
The current IP address of the device a ears.
If you do not ress / turn a button for a rox. 60 seconds, the device jum s back to the original
indication on the dis lay. You can return at any time by ressing the "BACK" button.
10.3.2. Manual volume adjustment via t e device buttons / buttons
Press the button of the desired out ut channel (2… 5).
The reset volume value (attenuation, -XY, Z dB) now a ears on the dis lay.
Turn the ADJUST / SET knob (8) to the left (quieter) or to the right (louder).
If you do not ress / turn a button for a rox. 60 seconds, the device jum s back to the original
indication on the dis lay. You can return at any time by ressing the "BACK" button.
Manual AMP 4200
Valid for
111-425-04-001-00
Version (modifications reseverd)
21.02.2022
Seite 16 of 17
10.3.3.
RESET
Press the ADJUST / SET button (8) for about 5 seconds.
Note:
A RESET (reset to factory settings) deletes all settings and all saved presets and sets all outputs to 4-8
o ms in the "Qut ut Configurations" menu.
11.
Trouble
-
S ooting
No sound:
- check the s eaker connections (cables may be loose) and the settings (100V / 4Ohm)
- check the s eaker wiring (cables may have been kinked)
- check the su ly voltage
- check whether there is an audio signal
- check the configuration / settings (if necessary, email us your configuration file)
Humming:
Make sure that the in uts on the am lifier are connected.
Otherwise there is a ground roblem due to grounding / shielding the sound source / am lifier. Make
sure that your 230V cabling com lies with the EMC guidelines.
Different ground otentials (source & am lifier) can result in humming noises.
Remedy: Common mass or a mass se aration filter.
Noise (cracking):
Make sure that only shielded cables are used.
Check the cable routing for cable crossings or arallel laying to 230V cables and eliminate them
(induction roblems). If ossible, cinch cables should be laid at a distance of 30 cm.
Power amplifier switc es c annel off
Check the cli limiter settings of the channels.
Manual AMP 4200
Valid for
111-425-04-001-00
Version (modifications reseverd)
21.02.2022
Seite 17 of 17
1
2
.
Disposal
WHD are members of t e INTERSEROH association.
We participate in t e dual system as well as some industry-
specific solutions t erefore t e plastic, metal and electronic
parts can all be recycled.
15
.
Declaration of
Conformity
This roduct su orts all CE criteria.
The certificate can be requested at WHD.
16
.
Name and address of t e manufacturer
CONTACT
WHD - Wilhelm Huber+Söhne GmbH+Co.KG
Bismarckstr. 19
78652 Deißlingen
Tel. Zentrale 0 74 20 / 8 89-0
Fax Zentrale 0 74 20 / 8 89-51
E-Mail: [email protected]
Home age: www.whd.de
Technical Su ort
Tel. 0 74 20 / 8 89-800
Fax 0 74 20 / 8 89-700
E
-
Mail:
su [email protected]

Other WHD Amplifier manuals

WHD AMP 550/100V User manual

WHD

WHD AMP 550/100V User manual

WHD WR 250 DSP User manual

WHD

WHD WR 250 DSP User manual

WHD AMP 120/100V User manual

WHD

WHD AMP 120/100V User manual

WHD AMP 1200 User manual

WHD

WHD AMP 1200 User manual

WHD WR 250 HS User manual

WHD

WHD WR 250 HS User manual

Popular Amplifier manuals by other brands

TAD TAD TAD-M600 owner's manual

TAD

TAD TAD TAD-M600 owner's manual

Peavey PV 1200 operating guide

Peavey

Peavey PV 1200 operating guide

Velex VX508 instructions

Velex

Velex VX508 instructions

CAAS Audio EPre user manual

CAAS Audio

CAAS Audio EPre user manual

Aiyima A08 User manuals

Aiyima

Aiyima A08 User manuals

Outlaw Marantz AV7005 user guide

Outlaw

Outlaw Marantz AV7005 user guide

Marantz SR7015 owner's manual

Marantz

Marantz SR7015 owner's manual

Warwick Blue Cab 15.1 owner's manual

Warwick

Warwick Blue Cab 15.1 owner's manual

Extron electronics DP DA2 user guide

Extron electronics

Extron electronics DP DA2 user guide

Universal Audio M610 manual

Universal Audio

Universal Audio M610 manual

Williams Sound Pocketalker Pro Manual and user guide

Williams Sound

Williams Sound Pocketalker Pro Manual and user guide

Laboga Alligator AD 5202 Twin user manual

Laboga

Laboga Alligator AD 5202 Twin user manual

Oriel LIDA-SRS-KIT user manual

Oriel

Oriel LIDA-SRS-KIT user manual

SPL Auditor 2910 manual 

SPL

SPL Auditor 2910 manual 

Monacor PA-1414MX instruction manual

Monacor

Monacor PA-1414MX instruction manual

JBL 5306 Technical manual

JBL

JBL 5306 Technical manual

Krell Industries Evolution Owner's reference

Krell Industries

Krell Industries Evolution Owner's reference

NJS NJS401 manual

NJS

NJS NJS401 manual

manuals.online logo
manuals.online logoBrands
  • About & Mission
  • Contact us
  • Privacy Policy
  • Terms and Conditions

Copyright 2025 Manuals.Online. All Rights Reserved.