Lanix Ilium X110 User manual

1
1
USER MANUAL
Model:Ilium X110
Brand:LANIX
FCC ID: ZC4X110

2
2
目录
Safety Information ................................................................................................................................................................ 4
Introduction .......................................................................................................................................................................... 7
SIM/SD card and battery Installation Guide........................................................................................................................... 7
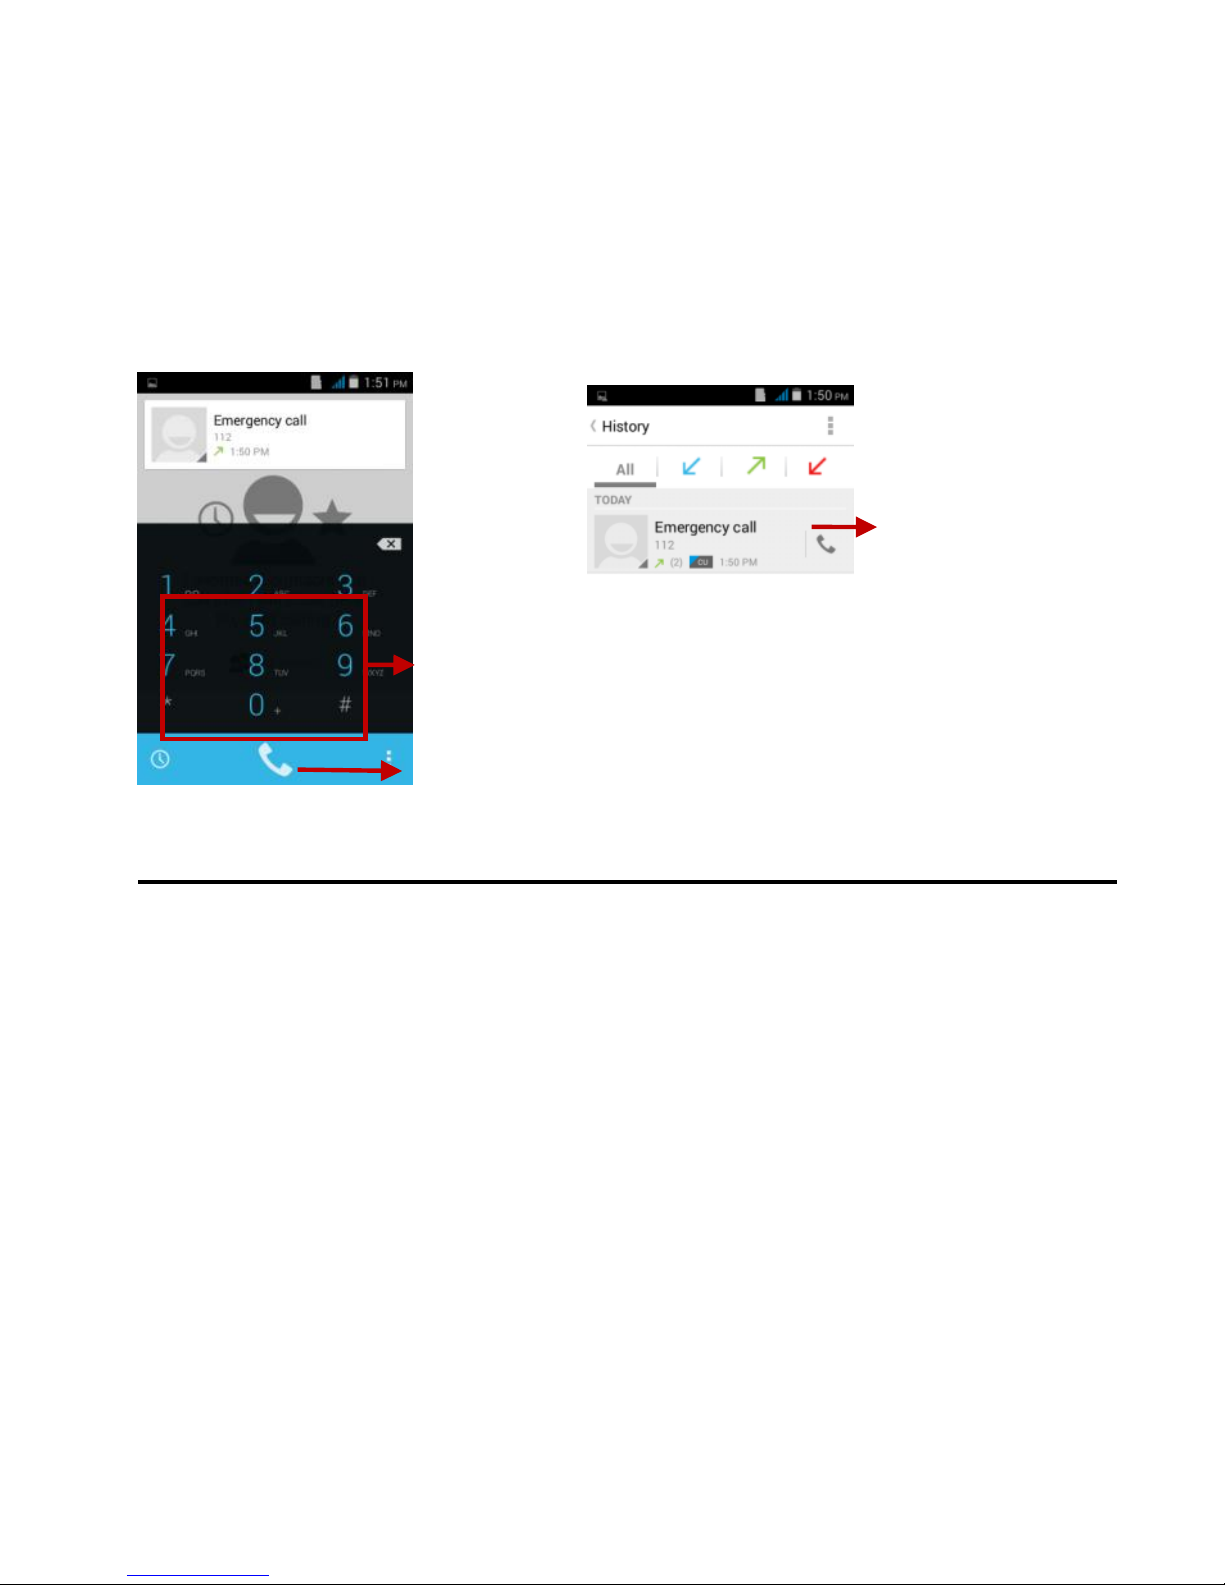
Call Functions....................................................................................................................................................................... 9
Internet Browser..................................................................................................................................................................11
Messaging.......................................................................................................................................................................... 13
Notifications Bar................................................................................................................................................................. 15
Contacts............................................................................................................................................................................. 16
Bluetooth & Wi-Fi................................................................................................................................................................ 19
Downloads ......................................................................................................................................................................... 21
Gmail ................................................................................................................................................................................. 21
Clean Master...................................................................................................................................................................... 23
Clean the phone memory garbage...................................................................................................................................... 23
WPS office kinqsoft............................................................................................................................................................. 24
Play Store........................................................................................................................................................................... 24
Camera.............................................................................................................................................................................. 25
Gallery................................................................................................................................................................................ 28
Music ................................................................................................................................................................................. 29
FM Radio ........................................................................................................................................................................... 30
Sound Recorder ................................................................................................................................................................. 32
File Manager ...................................................................................................................................................................... 33
Calendar ............................................................................................................................................................................ 33
Alarm Clock........................................................................................................................................................................ 34
Calculator........................................................................................................................................................................... 35
Flashlight............................................................................................................................................................................ 35

3
3
Notebook............................................................................................................................................................................ 36
Hangouts............................................................................................................................................................................ 36
Facebook ........................................................................................................................................................................... 36
Google............................................................................................................................................................................... 37
Storage............................................................................................................................................................................... 42

4
4
All rights reserved
No part of this publication may be quoted, reproduced,
translated or used in any form or by any means, electronic
or mechanical, including photocopying and microfilm,
without the prior written permission of LANIX Corporation.
LANIX Corporation reserves the right to make modifications on
print errors or update specifications in this guide without prior
notice.
Safety Information
Please carefully read the terms below:
Use Safely
Do not use the phone in situations where it might cause
danger.
Transportation Safety
Please observe all transportation laws and regulations.

5
5
Please drive with both hands on the wheel.
Hospital Safety
Please follow hospital rules and limitations.
Please turn off your mobile phone when near medical
instruments.
Airport Safety
Remember to follow all airport and flight safety regulations.
Please do not use your phone during flight.
Chemical Warning
Do not use your mobile phone around fuels or chemicals.
Temperature Warning
Do not subject your phone to extreme temperature conditions.
Water Hazard
Your phone is not waterproof. Keep it away from water and
liquids.
Emergency Calls

6
6
Make sure your mobile phone is switched on and in a service
area. In home screen, tap the phone key and dial the
emergency number.
Accessories and Batteries
Use only Blu authorized batteries and accessories.
Information Backup
Remember to keep a written record of all important
information.

7
7
Introduction
SIM/SD card and battery Installation Guide
Installation of the SIM Cards
Advisory: Please keep the SIM card out of the reach of
children. The SIM card and its contact are easily damaged due
to scratching or bending. Please be cautious when carrying,
installing or taking out the SIM card. BN: Contact your cellular
phone service provider directly to obtain the SIM card.
To insert SIM card:
1. Remove the rear cover. Insert the SIM card.
2. Insert the SD card. (For additional storage capacity)
3. Insert the battery, replace the rear cover, and power on.
Charging The Battery
When you first get your new phone you‟ll need to charge the
battery.
1. Connect the adapter to the charger jack. Ensure that the
adapter is inserted with the correct orientation. Do not force
the connector into the charger jack.
2. Connect the charger to a standard AC wall outlet.

8
8
3. Disconnect the charger when the battery is fully charged.
Power On and Off
On - Please ensure the SIM card has been properly inserted
into the phone. Long press the Power key to switch on the
phone.
Off - In standby mode, long press on Power key until an
options menu appears. Select Power Off in the pop-up prompt
to switch off the phone.
Waking Up Your Phone
1. You may Press Power Key to activate your screen display.
2. Drag up the icon.
NOTE: If you have set an unlock pattern, PIN or password for your
phone, you‟ll need to draw the pattern or enter the PIN/password to
unlock your screen. For further information regarding password
locks, password revision and other functions please enter the
security settings of the phone.
Switching to Sleep Mode
To save battery power, Sleep Mode suspends your device to a
low-power-consumptionstate while the display is off. Your

9
9
device also goes into Sleep Mode by itself when the display is
automatically turned off after a certain period of time. You can
start sleep mode by the following method.
Press Power Key to switch to Sleep Mode.
Home Screen
In the Home screen, besides the shortcut icon is displayed,
you can also set your own wallpaper, add the widgets or
application shortcuts you need, or remove them as you like.
Call Functions
At the dial keyboard, enter the phone number and then click
the dial key. If dialing an extension, you may click the dial pad
icon in the bottom of the screen to open the interface and enter
the number of the extension. You may also press and hold the
0 key to add a (+) sign when adding an international dialing
prefix.

10
10
Call Logs
Every telephone number called and received will be saved in
the phones call history. All numbers in the call log can be
dialed directly by clicking the number and select REDIAL on
the screen. When the number appears on the list, click it and
select DETAILS to view details. To clear all the call history,
press the menu key and select Clear call history. You may
remove one or multiple calls.
Dial pad
Dial key
Tap number and
select Redial to dial

11
11
Call Options
There are different options that can be used in the call history
and dialing interface. You may tap the option icon( ) while in
the dial interface and adjust speed dial and call settings.
Telcel
Internet Browser
Menu Functions
Backward
• Click the backward icon in the browser will return the user to
the previous page.
Options
Search for
Content Area

12
12
Forward
• Click the forward icon in the browser will move to a web page
after the current page.
Windows
• View all windows open by clicking the windows icon in the
browser.
Bookmarks
• Click the save to Bookmarks option to save to Bookmarks.
More
Find on page: Search current page.
Share page: Select to share the current page.
Bookmarks/History: Show your browsing history and view the
most visited pages.
Settings: Contains a variety of browser settings.

13
13
Messaging
You may use this function to exchange text messages and
multimedia messages with your family and friends. The
messages to and from the same contact or phone number will
be saved into a single conversation so you may see the entire
message history conveniently.
Click menu to access
the internet browser
options

14
14
Send an SMS
Application Menu »Messaging »New message icon( )
Click the contact icon to add text message recipient
Compose Text Message and click Send
Send an MMS
When creating message, the default message style is SMS.
The message will automatically convert to MMS when adding
an attachment.
Click the attachment icon ( )in the messaging interface.
Click to add attachments and create an MMS message.
Attachment buttons
Add Recipient
Text message entry field

15
15
Notifications Bar
The notification bar is located on the top of the screen which
contains useful and important information regarding your
phone and the applications that are installed. On the
notification bar, several icons will appear such as signal bar,
battery indicator, data indicator and Bluetooth. You may flick
the status bar downwards from across the top of the screen to
open the Notification Panel to display any pending
notifications or actions.
Pending Notifications
and Applications
Quick Notification
Settings
Quick Settings menu
buttons

16
16
Notification Settings
The notification settings window provides shortcuts to different
phone settings for quick access. Click on any of the shortcut
notification icons to power on or off.
Note: To remove pending notifications, drag down the
notification bar and click the clear notification icon on the under
right hand part of the screen (3 horizontal lines). The
notification settings menu is located by dragging down the
notification bar and is located on the upper right hand part of
the screen next to the battery icon.
Contacts
You can add contacts on your phone, you can enter the
name or number to find the contact. The default display
is the phone contacts and SIM card contacts.
The contacts are organized alphabetically by default.

17
17
Click the option icon and select Search to enter the
contact search interface. Any numbers or letters
associated with any of the contacts saved in the list will
be shown in the search results.
Add New Contact
Click the add contact icon ( ) to add contact.
Select to save your contacts to your Google account, the
phone or the SIM card.
Add Contact
Find Contact
Menu

18
18
You may enter different contact details which include
adding a picture, name, telephone number, group,
address, and email among other options.
Click to finish and save contact.
Delete Contact
Click on the Contacts icon to enter the phonebook.
Click the menu key to access the Contacts menu.
Click on Delete contact and scroll to select which
contact(s) you wish to delete.
Note: You may also search for an individual contact in the
phonebook. Once the contact is found click the contact name
Contact information
entry field
Option menu button

19
19
to enter the contact profile, press the menu key to bring up the
contact menu and select delete to eliminate from the
phonebook.
Import / Export Contacts
The phone allows you to import and export contacts to
synchronize information between different storage types that
include the SIM card, Gmail account and your phone.
To import or export contacts:
1. Press the Contacts icon to enter the phonebook.
2. Press the menu key and select Import / Export.
3. Select the source you want to copy the contacts from. Once
selected click next and select the destination where you want
the contact to be copied to then select the desired contacts to
be copied.
Bluetooth & Wi-Fi
Bluetooth is a short-range wireless communications
technology that devices can use to exchange information and
connect to different types of devices which include headsets

20
20
and other devices.
Power on Bluetooth
Settings »Bluetooth and select to power on Bluetooth.
The icon will appear in the notification bar. The
Bluetooth will then start to scan for all visible Bluetooth
devices within its range and will display in a list.
In Bluetooth settings, all the devices found will
displayed in a list.
Power on WI-Fi
Settings » WI-Fi and select ON to power on WI-Fi
Click on the desired WI-Fi network to be connected.
Note: Unsecured networks can be connected to directly - secured networks require a password or credentials prior to
connection.
List of available Bluetooth devices
Note: The maximum detecting time of the
phone is 2 minutes.
Table of contents