Lanzar 15 User manual

www.lanzar.com
user’s manual
OptiE-15
OptiE-15
15-Band
Half/Full Octave
Stereo Equalizer

Congratulations on your purchase of a new Lanzar Opti signal processor. Opti mobile electronics are some of the most advanced
car audio products available. These quality audio products are designed and engineered to afford you years of uncompromising
musical service. Lanzar has utilized the latest electronic technologies in order to deliver a superb listening experience.
The E-15 Equalizer offers the listener the ability to intensify the listening experience, add realism to their mobile system, overcome
his or her vehicle’s unique acoustic properties, and tailoring the sound to their preference. The E-15 was designed with the
goal of achieving the finest music reproduction.
Although the way it sounds to you is the ultimate decision maker in how you set up your car audio system, we suggest the use
of a sound analyzer to give you exact audio measurements of your car’s interior so that you can achieve precise equalizer settings.
Of course, the E-15 can and should also be adjusted to your preference.
Finally, a tip – once you achieve the optimum settings for your system, don’t keep changing them to suit particular program
material! Also, we suggest you write the settings down and keep this record in case they ever accidently get changed. This
could save hours in having to experiment all over again.
INTRODUCTION...

general features
precautions
features and specifications
system wiring
mounting and installation
noise check and system adjustment
troubleshooting
2
3
4-5
6-9
10-11
12
13
table o contents

15 Band Equalizer Controls per Channel in 1/2 and Full Octave Steps
Blue Light Illu ination
±
12 dB Boost/Cut at Each Frequency Setting
Front, Rear and Line Outputs
Separate Front, Rear and Line Output Level Controls
Front/Rear Fader Control
Power LED Indicator
EQ Bypass Switch
Gold-Plated Connectors and Ter inals
2
general eatures

3
Precautions
To prevent short circuits, be sure to disconnect the negative battery ground lead before wiring the system up.
When you finish the installation, be sure to make one more check to be sure everything is done correctly.
Reinstate all car parts that were removed.
Reconnect the negative battery ground lead.
4
eatures and speci ications

5
eatures and speci ications
Control Frequencies
Half Octave
Full Octave
Control Range
Frequency Response
Signal-to-Noise Ratio (A-Wtd)
Input Sensitivity
Maximum Output Voltage
Channel Separation
Power Requirement
Dimensions, WxDxH, inches
(millimeters)
20Hz • 30Hz • 45Hz • 67Hz
100Hz • 150Hz • 200Hz
350Hz • 500Hz • 800Hz
1.1KHz • 2.2KHz
4.4KHz • 8.8KHz • 17.2KHz
12dB Boost/Cut
10Hz - 30KHz
100dB
80mv-2.0Volts
for 400mv Output
7.0 Volts
65 dB
11-16 Volts DC
negative ground
11-5/8 x 8-9/32 x 1-1/2
(295 x 210 x 38
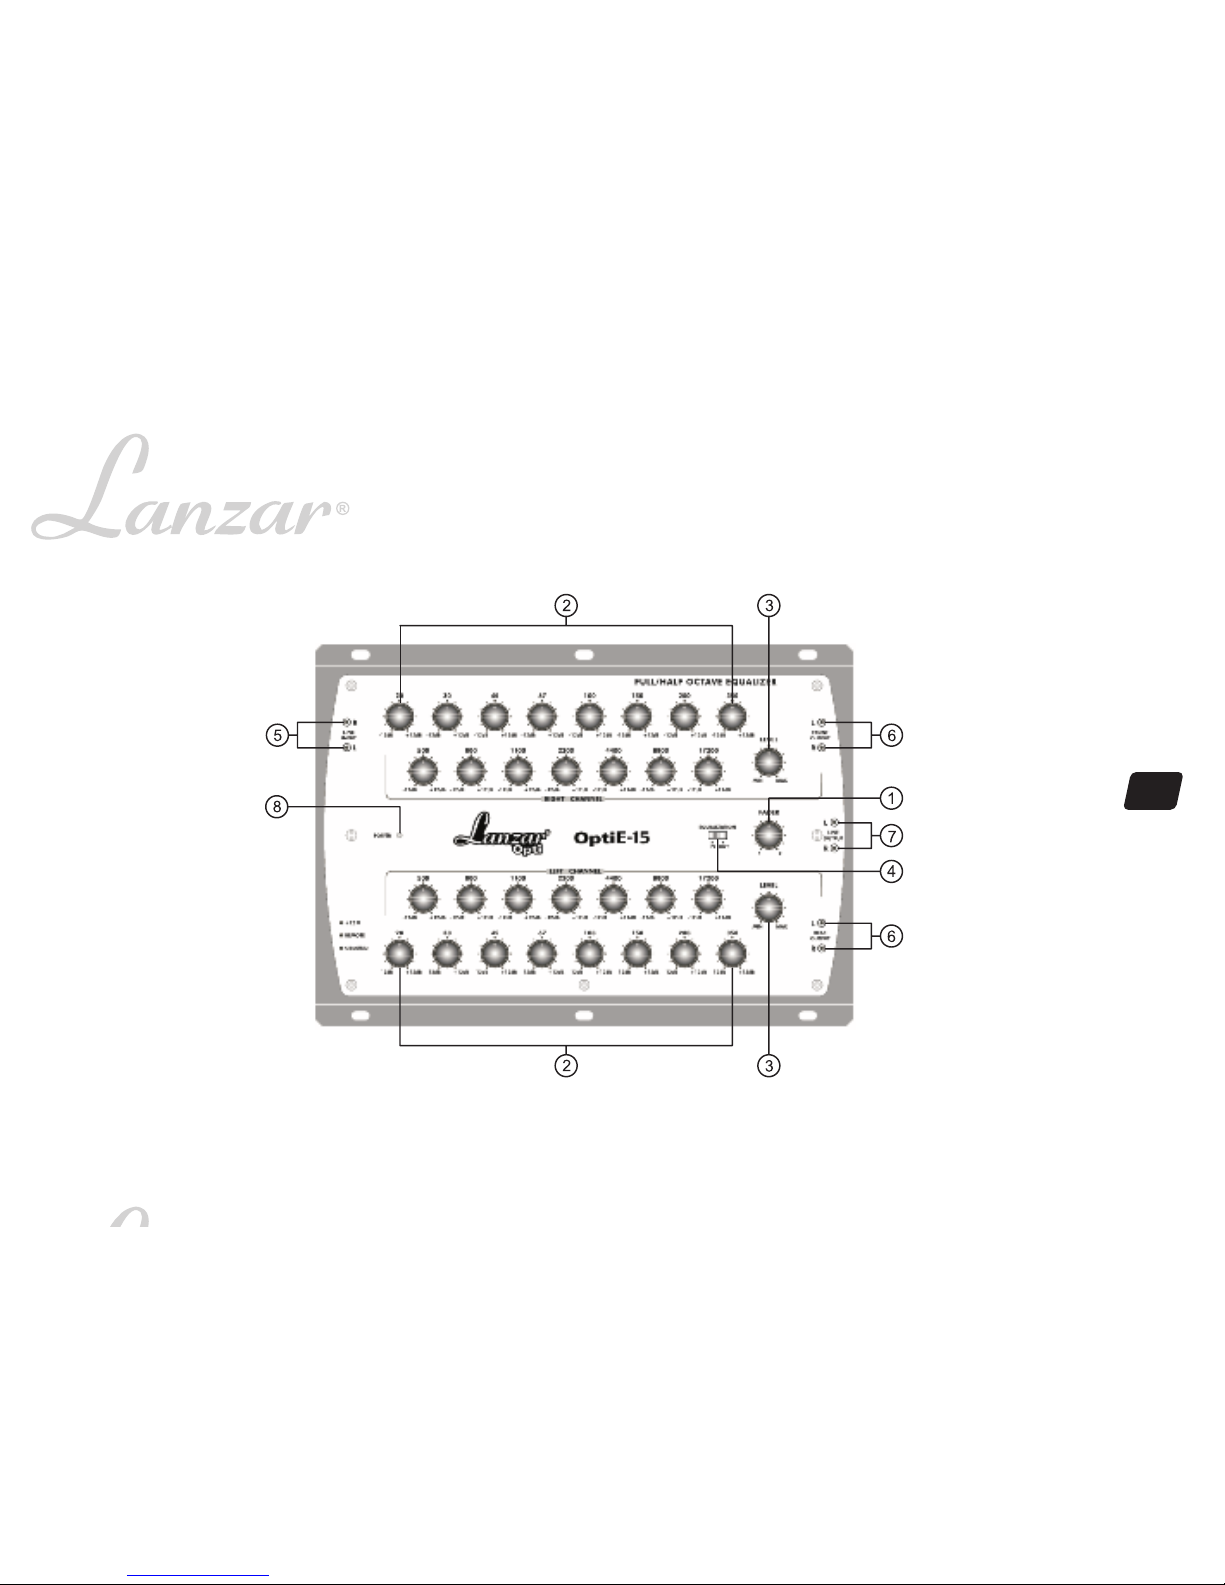
. Fader Control
2. Right and Left Channel Equalizer
Controls
3. Right and Left Output Level Controls
4. EQ In/Out Switch
5. Line Inputs
6. Front & Rear Outputs
7. Line Outputs
8. Power Indicator
This rotary controls the balance between the front and rear outputs. This fader takes priority
over the fader in your car stereo head unit.
The 15 band equalizer controls divide the frequency control range into 1/2 octave steps at
20Hz, 30Hz, 45Hz, 67Hz, 100Hz, 150Hz, 200Hz, 350Hz, 500Hz,800Hz,and at full octave
steps, 1100Hz, 2200Hz, 4400Hz, 8800Hz, 17200Hz. Each rotary control permits the signal
at that control’s frequency to be either increased (by turning clockwise or decreased (by
turning counter-clockwise by up to 12 dB. When set to the center detent position, the
control provides no increase or decrease at that frequency.
There are separate level controls on the E-15 for both the left and right channel outputs.
When installing and first setting up the system, set the output level controls to the center
detent position for a starting point.
Typically, when the head unit volume is set to approximately the 2 o’clock position your
system is at its ideal volume. Set the head unit volume this way, and then adjust the outputs
on the E-15 accordingly to achieve the ideal volume without over-driving the inputs of your
amplifier, which will create distortion.
The goal in the adjustment is to obtain the best signal-to-noise ratio while obtaining your
desired listening volume.
This switch controls whether or not the E-15 is providing equalization (”IN” or simply
passing signals through in an unaffected way.
The line inputs are connected to your head units RCA outputs. If your head unit has a fader
that fades between two sets of RCA outputs make sure that the head unit fader is turned
toward the set of RCA connectors that you are using. If your radio has only speaker level
outputs you can connect the E-15 to your head unit via a high/low level adapter (for example,
a Pyramid NS-60 or equivalent . This separate component allows you to connect your
speaker wires from your head unit and the RCA cables from the E-15 while balancing the
head unit’s output and the equalizer’s input.
Connect these outputs to the appropriate inputs of your power amplifier(s . The front outputs
connect to the amplifier driving your front speakers, the rear outputs for the rear amplifier.
Connect this output to another signal processor type device in your system, such as a
crossover. Th1s line output level is unaffected by the fader control.
This indicator lights up when the internal power supply is activated and the unit is operational.
Lanzar strives to continually improve and refine its products, as well as to design
new models. Therefore, the product specifications and illustrations in this manual
are subject to change without notice.
6
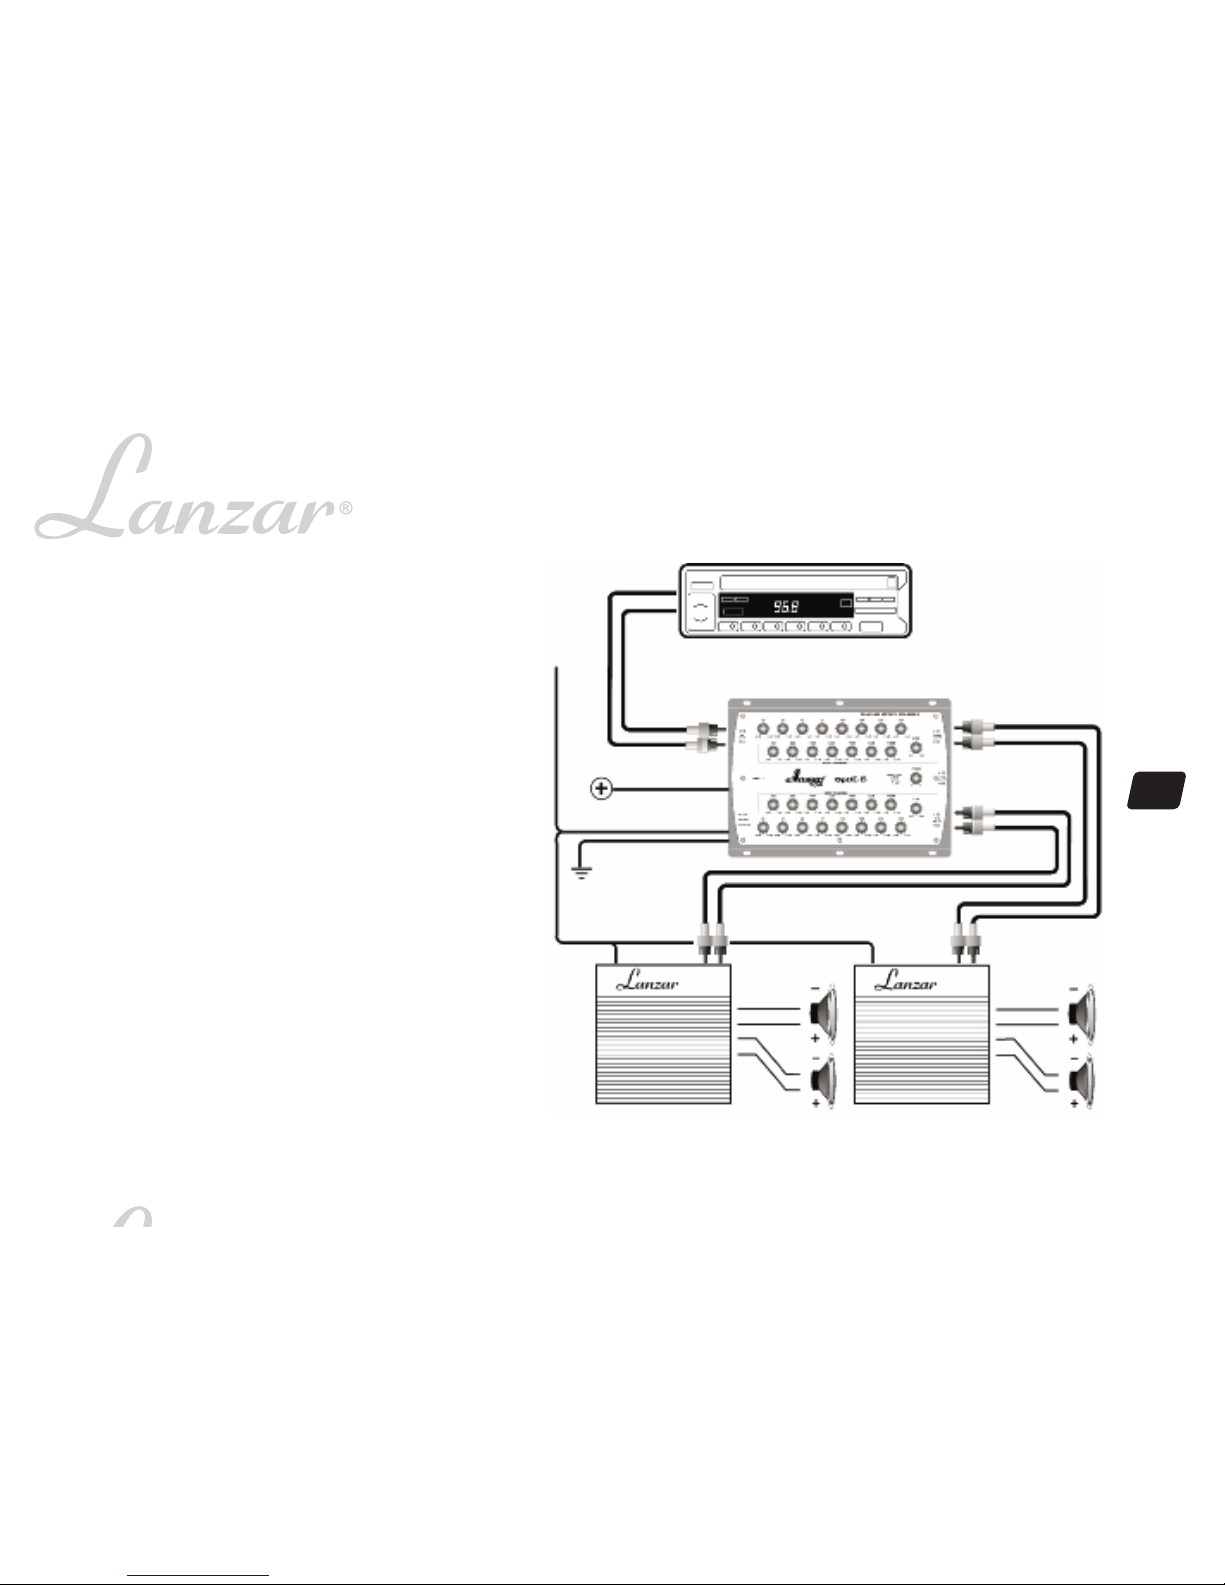
System wiring
Standard 4-Channel Output
For standard 4-channel operation, plug both the left and right RCA
outputs from your head unit into the E-15 inputs. The output power
can be distributed to either the front or rear speakers by using the
fader control. With the fader is in the center detent position, you
will have balanced output between your front and rear channels.
Turning the fader to either the front or rear position results in
increased signal strength to that particular side while decreasing
signal strength to the other side.
FRONT CHANNEL
Speakers
REAR CHANNEL
Speakers
TO OUTPUT
OF HEAD UNIT
Head unit (Stereo, DVD P ayer, Tape Deck, etc.)
TO REAR
AMPLIFIER TO FRONT
AMPLIFIER
to
REMOTE
OUTPUT
from
HEAD
UNIT
to BATTERY
to GROUND
to AMP
REMOTE ON

7
System wiring
Dual E- 5 2 + 2 Channel Output Using 4 RCA Inputs
Two Model E-15s are required for this configuration. For
more exact control, the E-15s can be configured into separate mono
units with the outputs summing the signal into stereo.
If your head unit has two pairs of RCA outputs, plug both of the left
outputs into the E-15’s left inputs and both of the right outputs
into the E-15’s right inputs. Place both of the fader controls of the
E-15’s into the center detent position.
SpeakersSpeakers
TO FRONT OUTPUT
OF HEAD UNIT
Head unit (Stereo, DVD P ayer, Tape Deck, etc.)
TO REAR
AMPLIFIER
TO FRONT
AMPLIFIER
FRONT CHANNEL
Speakers
REAR CHANNEL
Speakers
to
REMOTE
OUTPUT
from
HEAD
UNIT
to AMP REMOTE ON
TO REAR
OUTPUT
OF HEAD UNIT
to BATTERY
to GROUND
to AMP
REMOTE ON
to BATTERY
to GROUND
to AMP
REMOTE ON

8
System wiring
Dual E- 5 2 + 2 Channel Output Using 2 RCA INPUTS
Two Model E-15s are required for this configuration. If
your head unit has only one pair of RCA output jacks, you can
achieve the same result by using a pair of Y-adapter cables.
Utilizing two E-15s permits the users to tailor 4 separate 15 band
channels in full stereo. When setting up your system we suggest
the use of a sound analyzer to aid in obtaining exact measurements
of your car’s interior. This permits precise equalizer settings.
to AMP REMOTE ON
TO OUTPUT
OF HEAD UNIT
Head unit (Stereo,DVD P ayer, Tape Deck, etc.)
TO REAR
AMPLIFIER
TO FRONT
AMPLIFIER
FRONT CHANNEL
Speakers
REAR CHANNEL
Speakers
to
REMOTE
OUTPUT
from
HEAD
UNIT
to AMP
REMOTE ON
to GROUND
Y-ADAPTER
CABLES
to
GROUND
to BATTERY
to BATTERY
to AMP REMOTE ON
This manual suits for next models
2
Other Lanzar Stereo Equalizer manuals

Lanzar
Lanzar VIBE E540P User manual

Lanzar
Lanzar HTG50EBT User manual

Lanzar
Lanzar VIBE E740V User manual

Lanzar
Lanzar HTGEPBT9 User manual

Lanzar
Lanzar HTG50EBTH User manual

Lanzar
Lanzar HTGEPBT9H User manual

Lanzar
Lanzar VBE420P User manual

Lanzar
Lanzar VIBE530P User manual

Lanzar
Lanzar VBXEQ4P User manual

Lanzar
Lanzar VIBE XE3 User manual


