LASER COMPONENTS Viavi HP3-60-P4 User manual

1
01/19 / V02 / IF / lc/application-reports/viavi/quick-start-guide_fib-inspect
A Quick Start Guide to
Fiber Inspection, Cleaning, and Test
INSPECT BEFORE YOU CONNECTSM
Measu-
rement
Devices
Germany & Other Countries
Laser Components GmbH
Tel: +49 8142 2864 – 0
Fax: +49 8142 2864 – 11
www.lasercomponents.com

2
01/19 / V02 / IF / lc/application-reports/viavi/quick-start-guide_fib-inspect
Notice Every effort was made to ensure that the information in this document was accurate at
the time of printing. However, information is subject to change without notice, and JDSU
reserves the right to provide an addendum to this document with information not available
at the time that this document was created.
Copyright © Copyright 2009 JDSU, LLC. All rights reserved. JDSU, Enabling Broadband and Optical
Innovation, and its logo are trademarks of JDSU, LLC. All other trademarks and registered
trademarks are the property of their respective owners. No part of this guide may be
reproduced or transmitted electronically or otherwise without written permission of the
publisher.
Trademarks JDSU is a trademark of JDSU in the United States and other countries.
CleanBlast is a registered trademark of JDSU.
RibbonDrive is a trademark of JDSU.
Hirose is a trademark of Hirose Electric Group.
MTP is a registered trademark of US Conec, Ltd.
IBC is a trademark of US Conec, Ltd.
Optipop is a trademark of NTT Advanced Technology Corporation.
Molex is a registered trademark of Molex Incorporated.
OptiTip and OptiTap are trademarks of Corning Incorporated.
Sony is a registered trademark of Sony Corporation.
Specifications, terms, and conditions are subject to change without notice. All trademarks
and registered trademarks are the property of their respective companies.
Patents RibbonDrive Tips: US Patent No. 6,751,017 / 6,879,439
CleanBlast: US Patent No. 7,232.262
Tested Equipment All pre-qualification tests were performed internally at JDSU, while all final tests were
performed externally at an independent, accredited laboratory. This external testing
guarantees the unerring objectivity and authoritative compliance of all test results.
The Commerce and Government Entities (CAGE) code under the North Atlantic Treaty
Organization (NATO) is 0L8C3.
FCC Information Electronic test equipment is exempt from Part 15 compliance (FCC) in the United States.
European Union Electronic test equipment is subject to the EMC Directive in the European Union. The
EN61326 standard prescribes both emission and immunity requirements for laboratory,
measurement, and control equipment. This unit has been tested and found to comply with
the limits for a Class A digital device.
Independent
Laboratory Testing
This unit has undergone extensive testing according to the European Union Directive and
Standards.
Measu-
rement
Devices
Germany & Other Countries
Laser Components GmbH
Tel: +49 8142 2864 – 0
Fax: +49 8142 2864 – 11
www.lasercomponents.com

3
01/19 / V02 / IF / lc/application-reports/viavi/quick-start-guide_fib-inspect
Contents
Introduction to Fiber Inspection Fiber Inspection Overview..............................................................4
Simple Solution.......................................................................................4
Proactive Inspection............................................................................4
Appendix: JDSU Video Probe Microscopes Digital Video Probe............................................................................ 15
Analog Video Probe ..........................................................................15
Bulkhead Inspection............................................................................5
Patch Cord Inspection........................................................................5
Zones & Acceptance Criteria..........................................................6
Grading Process......................................................................................6
Single-mode Connectors.................................................................7
Multimode Connectors .....................................................................7
Bulkhead Cleaning (IBC™ Cleaner).............................................8
Patch Cord Cleaning (IBC™ Cleaner)..........................................9
Good Fiber Connection..................................................................10
Fiber Connections .............................................................................. 10
Inspect
Is It Clean?
Acceptance Criteria
Clean
Connect
Test HP3-60-P4 Fiber Inspect + Test System...............................11
Absolute Power (System Power Measurement)...............12
Relative Power (Attenuation Measurement)......................13
1. Reference Measurement.............................................13
2. Attenuation Measurement........................................14
INSPECT
IS IT CLEAN
CLEAN
CONNECT
TEST
Measu-
rement
Devices
Germany & Other Countries
Laser Components GmbH
Tel: +49 8142 2864 – 0
Fax: +49 8142 2864 – 11
www.lasercomponents.com

4
01/19 / V02 / IF / lc/application-reports/viavi/quick-start-guide_fib-inspect
IntroduCtIon to FIber InspeCtIon
Contamination is the number 1 reason for
troubleshooting optical networks. A single
particle mated into the core of a fiber can cause
significant back reflection, insertion loss, and
equipment damage. Visual inspection is the only way
to determine if fiber connectors are truly clean before
mating them.
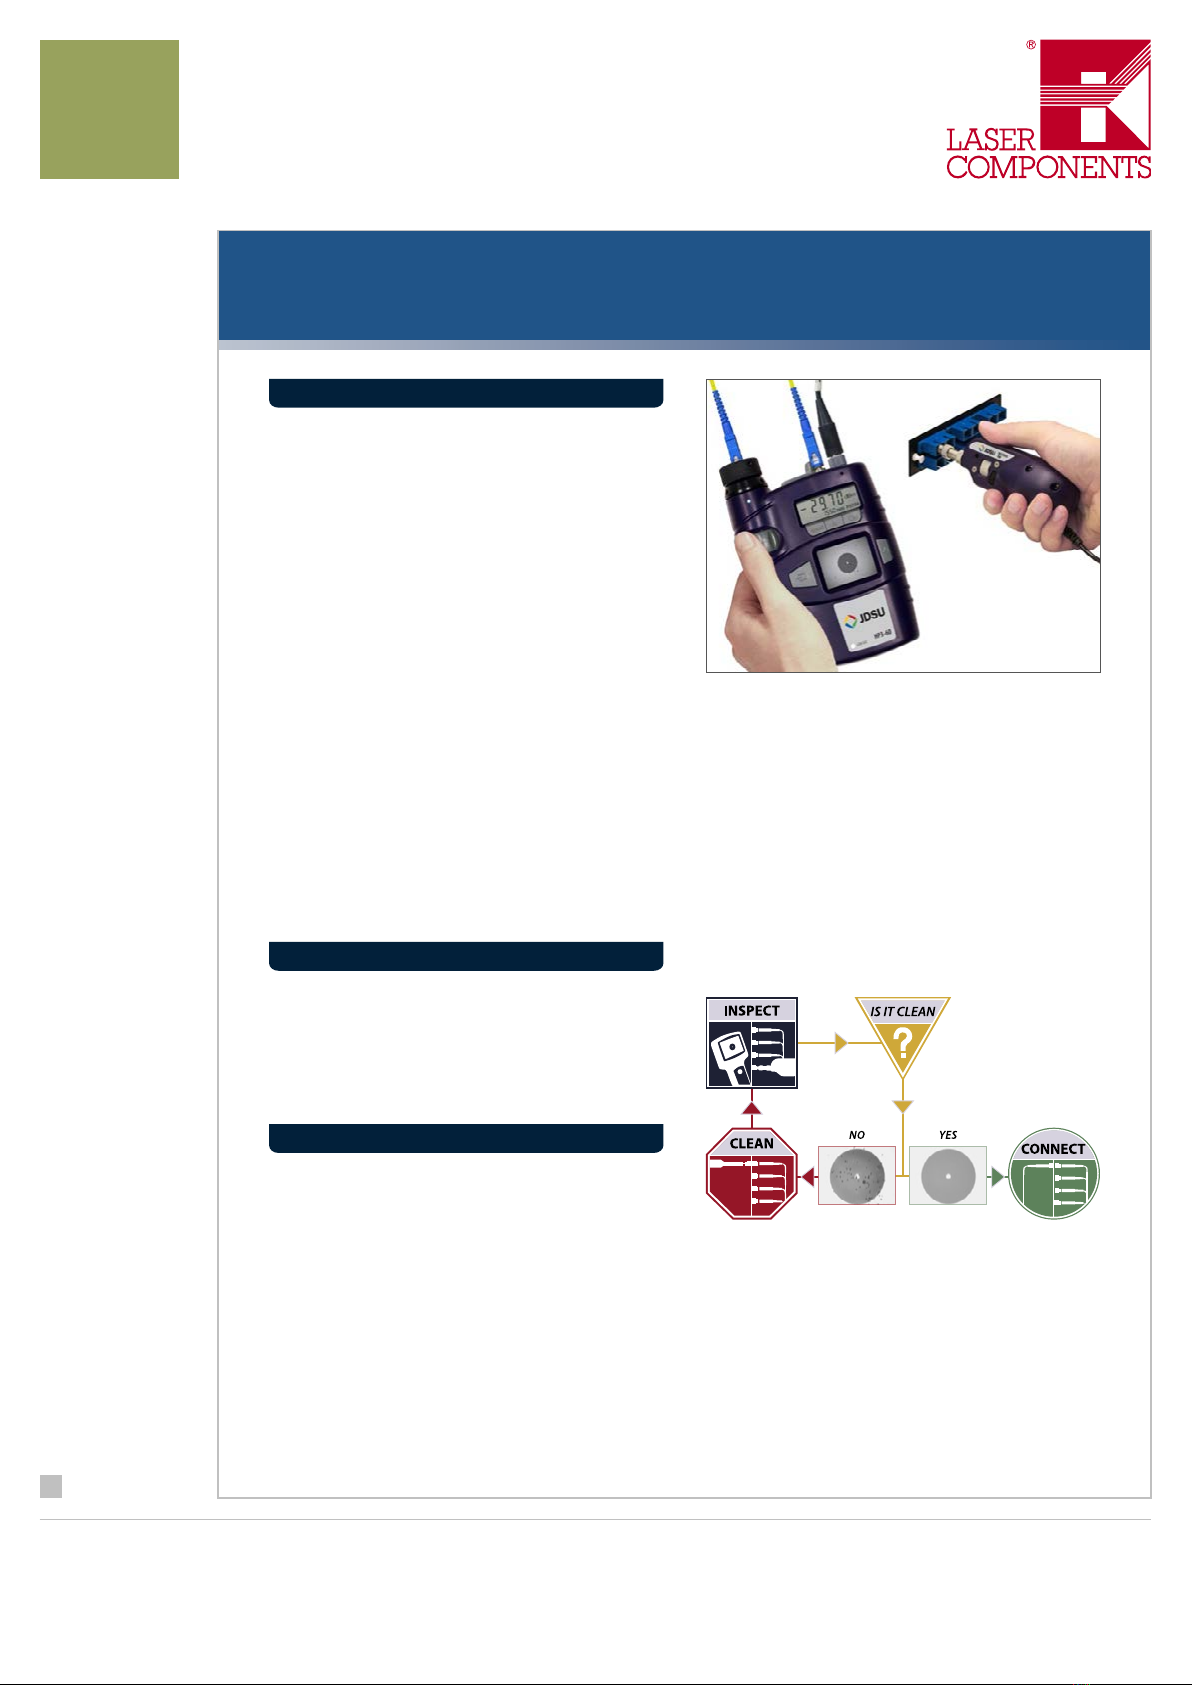
The JDSU video fiber inspection probe and handheld
display system is used to quickly and easily inspect
connector end faces, which ultimately minimizes
signal loss and optimizes test conditions. Westover
FBP-series video probes, available in digital or analog and single- or dual-magnification (200/400X), are high-
performance handheld microscopes designed for inspecting both female (bulkhead) and male (patch cord)
connectors, as well as other optical devices. The probe microscope can also be combined with a USB converter
module to inspect connectors via compatible test platforms and PC/laptop. This versatile system offers a wide
range of configurable solutions that can meet the demands of any application.
Our comprehensive selection of precision, stainless-steel fiber inspection tips and adapters are carefully
engineered to produce consistent and accurate results. They are interchangeable and designed with a unique
optics architecture that enables the probe to interface with every connector and application in your network.
Implementing a simple yet important process of
proactively inspecting and cleaning before mating
can prevent poor signal performance and equipment
damage.
Proactively inspecting fiber optic connectors will...
Reduce Network Downtime
Reduce Troubleshooting
Optimize Signal Performance
Prevent Network Damage
FIBER INSPECTION OVERVIEW
SIMPLE SOLUTION
BENEFITS OF PROACTIVE INSPECTION
INSPECT BEFORE YOU CONNECT
HP3-60-P4 System with
Integrated Power Meter
and Patch Cord
Microscope (PCM)
Measu-
rement
Devices
Germany & Other Countries
Laser Components GmbH
Tel: +49 8142 2864 – 0
Fax: +49 8142 2864 – 11
www.lasercomponents.com

5
01/19 / V02 / IF / lc/application-reports/viavi/quick-start-guide_fib-inspect
InspeCt INSPECT
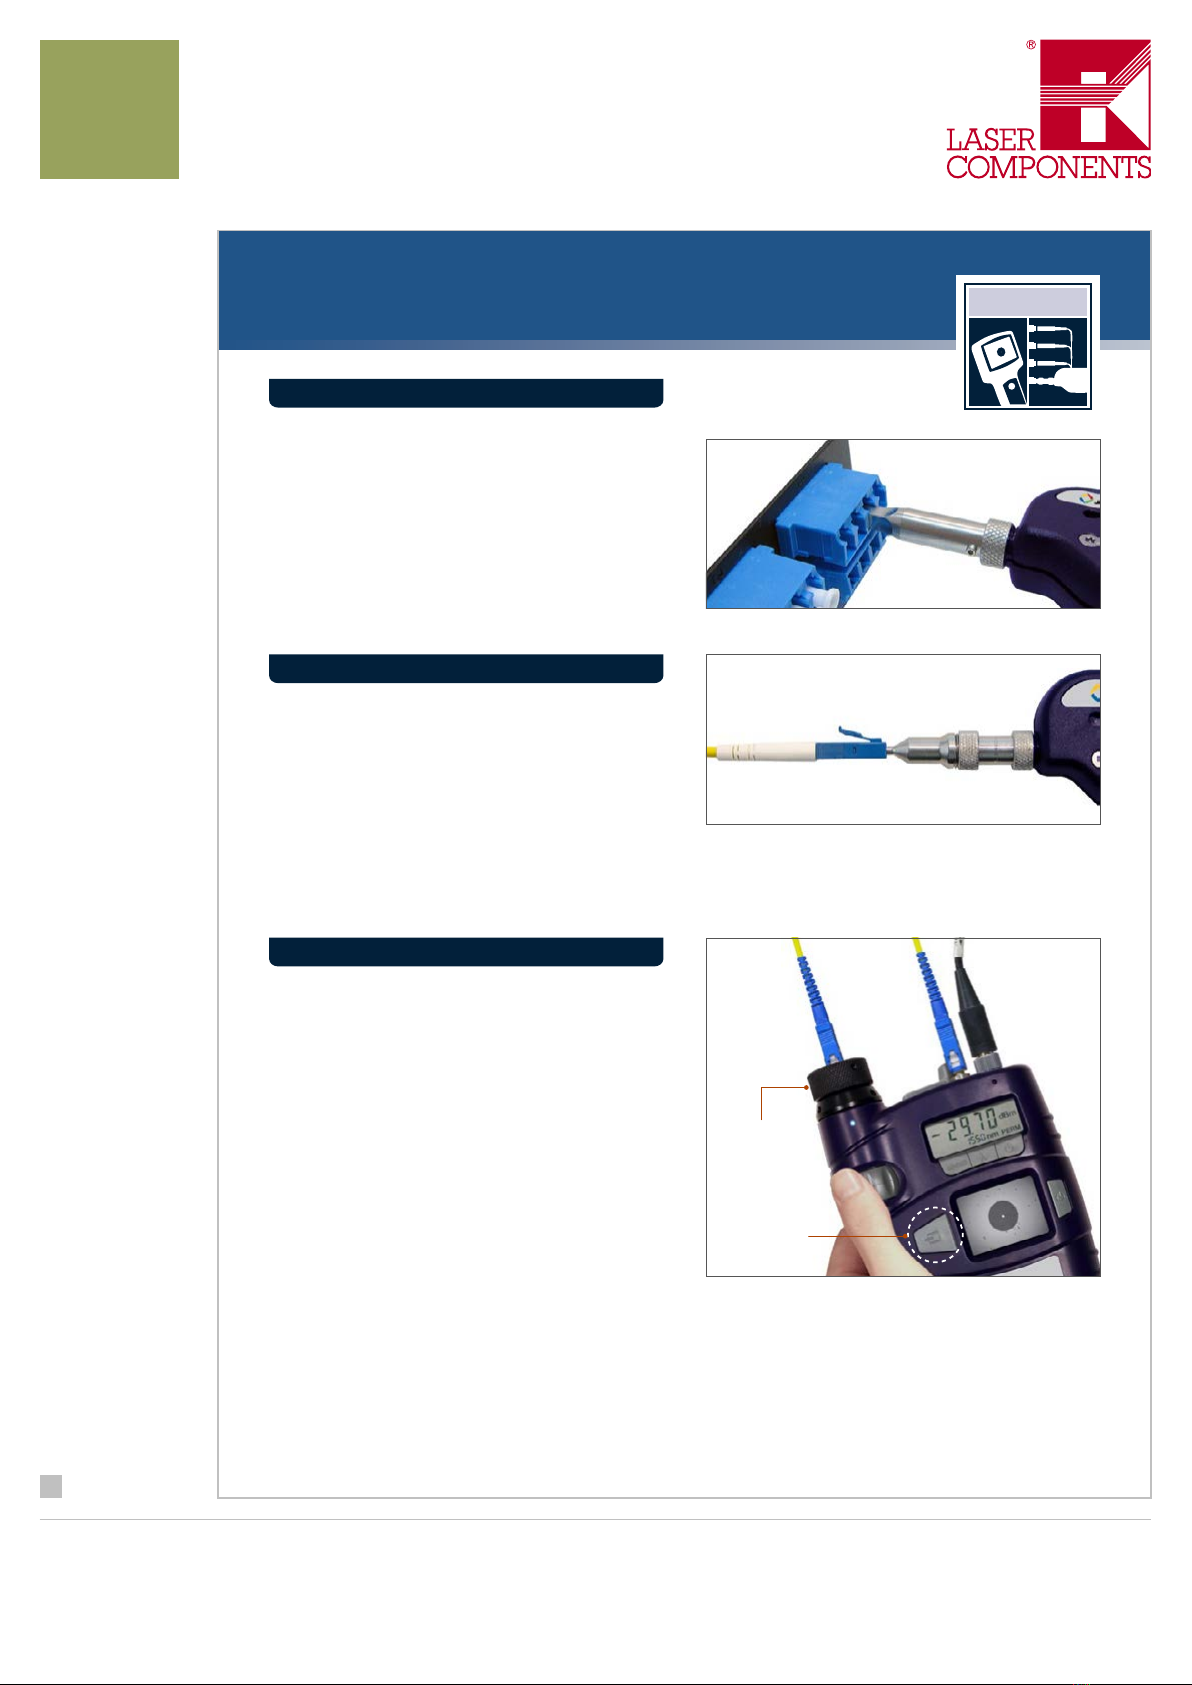
1. Select the appropriate bulkhead inspection
tip that corresponds to the connector type
and install onto probe.
2. Insert the scope into the bulkhead to inspect.
3. Determine whether clean or dirty.
If clean, do not touch it and CONNECT.
If dirty, and cleaning is required, CLEAN.
buLkhEAD
1. Select the appropriate patch cord inspection
tip that corresponds to the connector type
and install onto probe.
2. Attach the patch cord to the probe.
3. Determine whether clean or dirty.
If clean, do not touch it and CONNECT.
If dirty, and cleaning is required, CLEAN.
PATChCORD wITh PRObE
PATChCORD wIThPCm
1. Select the appropriate patch cord adapter
that corresponds to the connector type and
install onto PCM.
2. Attach the patch cord to the PCM.
3. Press A/B switch to activate PCM fiber view.
4. Determine whether clean or dirty.
If clean, do not touch it and CONNECT.
If dirty, and cleaning is required, CLEAN.
The integrated PCM improves workflow by letting
users inspect both the bulkhead and patch cord
quickly and easily. Instantly toggle between probe
and PCM fiber views with the A/B switch.
Patch Cord
Adapter
A/B Switch
Measu-
rement
Devices
Germany & Other Countries
Laser Components GmbH
Tel: +49 8142 2864 – 0
Fax: +49 8142 2864 – 11
www.lasercomponents.com

6
01/19 / V02 / IF / lc/application-reports/viavi/quick-start-guide_fib-inspect
Is It Clean? IS IT CLEAN
1. Count/measure the particles/contamination that are on the fiber surface.
2. Estimate or use a grading overlay to grade the fiber by determining the number and size of each particle
present in each of the 4 fiber zones.
Dirt is everywhere, and a typical dust particle (2–15 μm in diameter) can significantly
affect signal performance and cause permanent damage to the fiber end face. Most
Zones are a series of concentric circles that identify areas of interest on the connector end face. The inner-most
zones are more sensitive to contamination than the outer zones.
Acceptance criteria are a series of failure thresholds that define contamination limits for each zone.
A. Core Zone
B. Cladding Zone
C. Adhesive / Epoxy Zone*
D. Contact / Ferrule Zone
field test failures can be attributed to dirty connectors, and most connectors are not inspected until the problem is
detected, after permanent damage has already occurred.
*Note: In most cases, there are no limits to the number/size of
contamination present on Zone C (Adhesive/Epoxy).
If acceptable, do not touch it and CONNECT.
If not acceptable, CLEAN.
Zones Overlays
A
B
C
D
Multimode FiberSingle-mode Fiber
ZONES AND ACCEPTANCE CRITERIA
GRADING PROCESS
Measu-
rement
Devices
Germany & Other Countries
Laser Components GmbH
Tel: +49 8142 2864 – 0
Fax: +49 8142 2864 – 11
www.lasercomponents.com

7
01/19 / V02 / IF / lc/application-reports/viavi/quick-start-guide_fib-inspect
aCCeptanCe CrIterIa IS IT CLEAN
Zone Name Diameter Defects Scratches
A. CORE Zone 0 – 25 μm none none
B. CLADDING Zone 25 –120 μm
no limit < 2 μm
5 from 2 – 5 μm
none > 5 μm
no limit ≤ 3 μm
none > 3 μm
C. ADHESIVE Zone 120 – 130 μm no limit no limit
D. CONTACT Zone 130 – 250 μm none ≥ 10 μm no limit
Zone Name Diameter Defects Scratches
A. CORE Zone 0 – 65 μm 4 ≤ 5 μm
none > 5 μm
no limit ≤ 5 μm
0 > 5 μm
B. CLADDING Zone 65 –120 μm
no limit < 2 μm
5 from 2 – 5 μm
none > 5 μm
no limit ≤ 5 μm
0 > 5 μm
C. ADHESIVE Zone 120 – 130 μm no limit no limit
D. CONTACT Zone 130 – 250 μm none ≥ 10 μm no limit
The tables below list the acceptance criteria standardized by the International
Electrotechnical Commission (IEC) for single-mode and multimode connectors as
documented in IEC 61300-3-35 Ed. 1.0.
SINGLEMODE CONNECTORS
MULTIMODE CONNECTORS
Measu-
rement
Devices
Germany & Other Countries
Laser Components GmbH
Tel: +49 8142 2864 – 0
Fax: +49 8142 2864 – 11
www.lasercomponents.com

8
01/19 / V02 / IF / lc/application-reports/viavi/quick-start-guide_fib-inspect
CLEAN
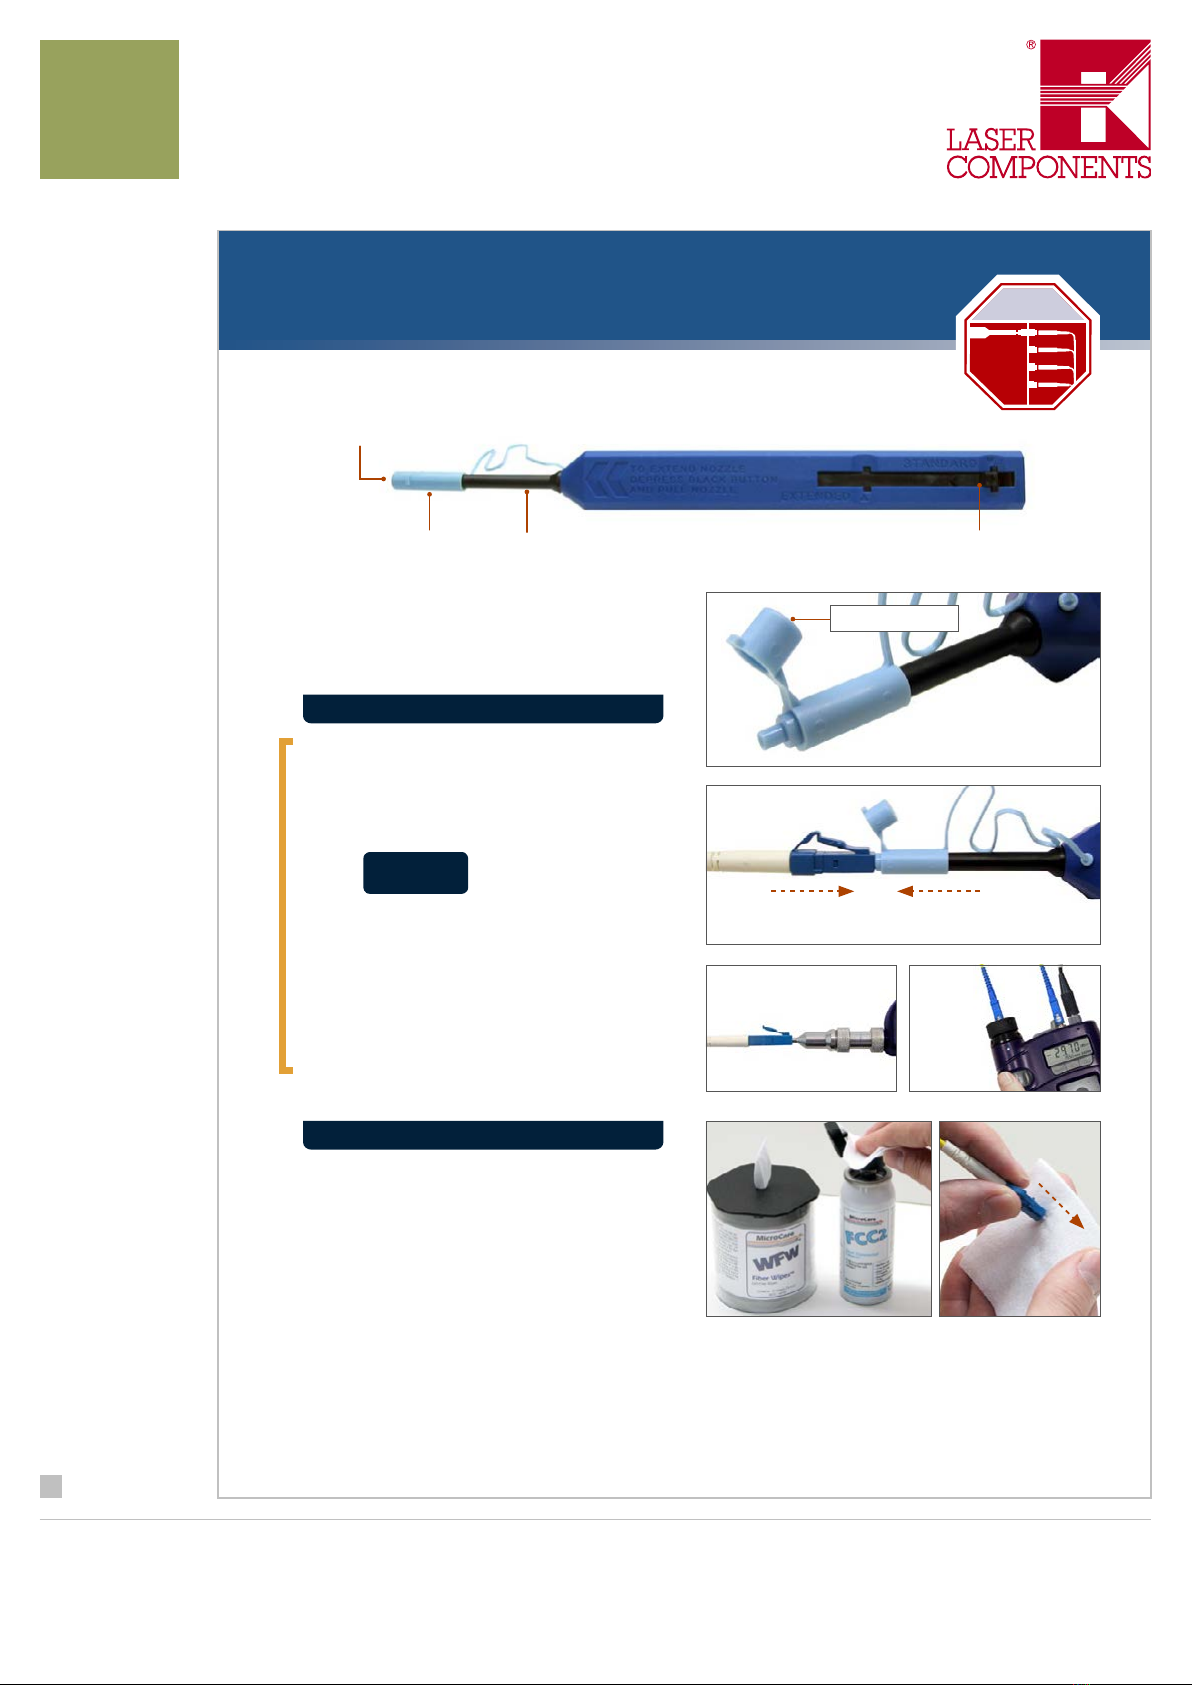
Clean: bulkhead
1. Select the appropriate cleaning tool for
the connector type.
2. Pull off the guide cap.
Guide Cap
Push into bulkhead
2 times (2 clicks)
3. Insert the cleaning tool into the
bulkhead adapter and push the cleaner
into the bulkhead 2 times (2 clicks).
Note: For hard-to-reach places, push the
nozzle extender lock and pull the nozzle
out.
4.
5. Determine whether clean or dirty.
If clean, do not touch it and
CONNECT.
If dirty, either repeat DRY cleaning
or go to wETDRY cleaning.
INSPECT
Repeat steps 3, 4, and 5 if necessary.
DRY CLEAN
6. Apply fiber optic cleaning solution onto
a clean fiber wipe.
7. Dab the cleaning tool onto the wet area
of the wipe to moisten the cleaning tip,
then go to STEP 3.
wET DRY CLEAN
IbC™ Cleaner
Guide Cap Nozzle Extender LockNozzle
Guide Cap Cover
Measu-
rement
Devices
Germany & Other Countries
Laser Components GmbH
Tel: +49 8142 2864 – 0
Fax: +49 8142 2864 – 11
www.lasercomponents.com

9
01/19 / V02 / IF / lc/application-reports/viavi/quick-start-guide_fib-inspect
Clean: patch cord CLEAN
1. Select the appropriate cleaning tool for
the connector type.
2. Pull off the guide cap cover.
Push into patch cord 2 times (2 clicks)
3. Attach the cleaning tool to the
connector and push the cleaner into the
patch cord 2 times (2 clicks).
4.
5. Determine whether clean or dirty.
If clean, do not touch it and
CONNECT.
If dirty, either repeat DRY cleaning
or go to wETDRY cleaning.
INSPECT
Guide Cap Cover
IbC™ Cleaner
Guide Cap Nozzle Extender LockNozzle
Guide Cap Cover
DRY CLEAN
Repeat steps 3, 4, and 5 if necessary.
6. Apply fiber optic cleaning solution onto
a clean fiber wipe.
7. Wipe the end of the fiber connector on
the wet area of the wipe, then
go to STEP 3.
wET DRY CLEAN
Probe
Inspection
PCM
Inspection
Measu-
rement
Devices
Germany & Other Countries
Laser Components GmbH
Tel: +49 8142 2864 – 0
Fax: +49 8142 2864 – 11
www.lasercomponents.com

10
01/19 / V02 / IF / lc/application-reports/viavi/quick-start-guide_fib-inspect
ConneCt CONNECT
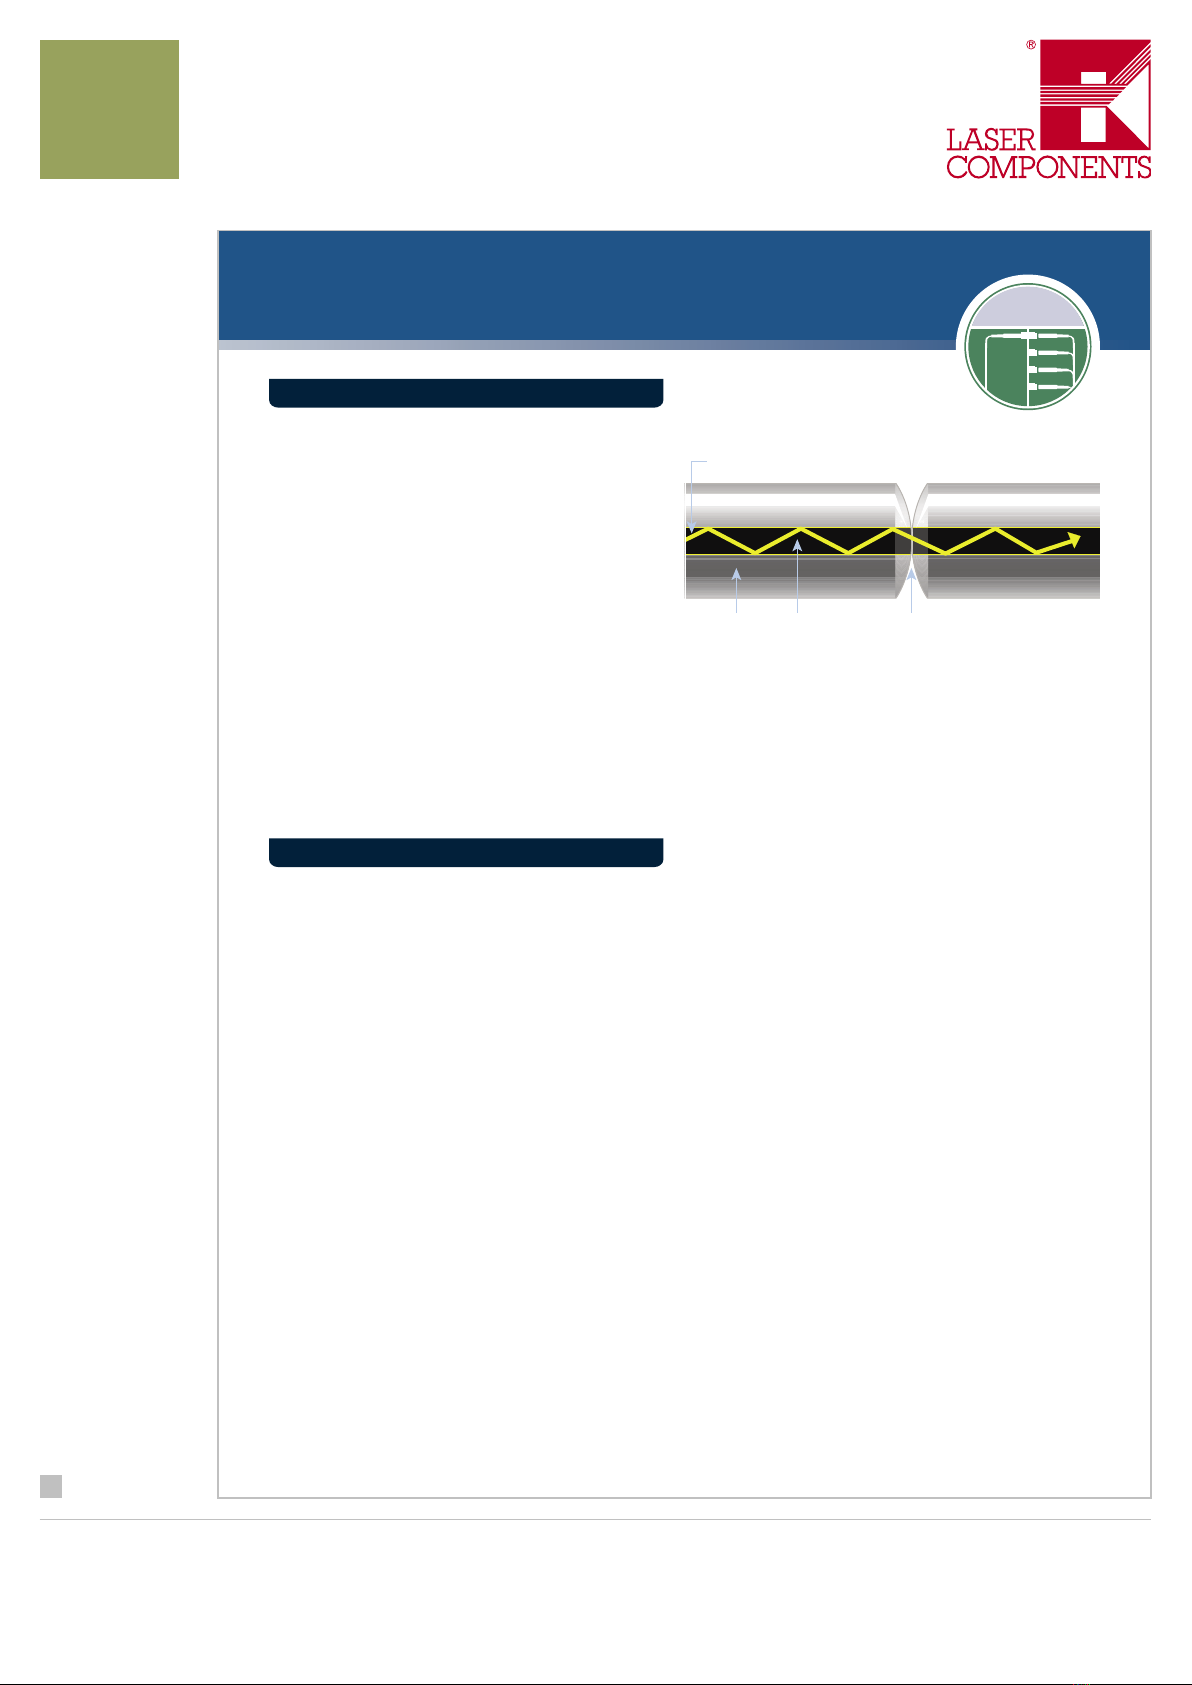
Clean Connection
CoreCladding
Light Transmitted
There are 3 basic principles that are critical to
achieving an efficient fiber optic connection:
1. Perfect Core Alignment
2. Physical Contact
3. Pristine Connector Interface
Today’s connector design and production techniques have eliminated most of the challenges to achieving core
alignment and physical contact.
What remains challenging is maintaining a pristine end face. As a result, CONTAMINATION is the #1 reason for
troubleshooting optical networks.
Optical connections are made for one of two reasons:
1. Completing a System Light Path (TX to RX)
Connectors are used extensively throughout optical networks. They give us the ability to re-configure the
network and provision services. If contamination is present in the light path, system performance will be
degraded.
Note: Always inspect and, if necessary, clean the contamination from the optical port and optical cable
before connecting.
2. Connecting a Test Device to Part of the System
Test devices are frequently connected and disconnected to elements of the network. Often, test leads are
systematically connected to each port in a network element in sequence. This duty cycle makes test leads
especially prone to contamination and damage. If a test lead is contaminated, it can quickly spread that
contamination through a large portion of the network.
Note: Always inspect and, if necessary, clean the contamination from the network port and test lead before
connecting.
GOOD FIBER CONNECTION
FIBER CONNECTIONS
Measu-
rement
Devices
Germany & Other Countries
Laser Components GmbH
Tel: +49 8142 2864 – 0
Fax: +49 8142 2864 – 11
www.lasercomponents.com

11
01/19 / V02 / IF / lc/application-reports/viavi/quick-start-guide_fib-inspect
InspeCt + test system
The HP3-60-P4 fiber inspection and test system (with
integrated patch cord microscope [PCM]) combines
fiber inspection and optical power measurement
into a single seamless handheld device. The result
is a significant increase in workflow efficiency and
decrease in total inspection and test time.
hP3-60-P4 SYSTEm
•Inspect both sides of fiber interconnect, and
accurately test and measure optical power
with one device
•Integrated functions and features eliminate
switching between multiple devices
•Integrated power meter for all single-mode
and multimode applications, such as LAN,
TELECOM, CATV, and DWDM testing
•Modulation frequency detection lets users
identify individual fibers
•Three-year calibration period
•TWINtest and Auto-λ (with JDSU optical light
source)
•Input for FBP-series probe microscope and
a dedicated PCM let users quickly and easily
inspect both sides fiber interconnects
•Integrated PCM eliminates need for
changing inspection tips, prevents
misrouting, and protects patch cords
•1.8-inch TFT LCD to view clear, detailed fiber
end face images
kEY FEATuRES
Power meter:
4-Digit Display for
Wavelengths and
Types of Modulation
1.8-inch TFT LCD
4-Pin FBP Probe
Microscope Input
UPP Input for
2.5 mm and 1.25 mm
Connectors
Low Battery Warning
Indicator
FMAE Adapter/Patch
Cord Inspection Input
A/B Switch
(Toggles between
patch cord [PCM] and
bulkhead [probe] fiber
views)
PCM Focus Control
TEST
Measu-
rement
Devices
Germany & Other Countries
Laser Components GmbH
Tel: +49 8142 2864 – 0
Fax: +49 8142 2864 – 11
www.lasercomponents.com

12
01/19 / V02 / IF / lc/application-reports/viavi/quick-start-guide_fib-inspect
test: power MeasureMent
ABSOLUTE POWER
The absolute power level (system power
measurement) is the amount of optical power present
in the system, measured in dBm. The source of this
power is the transmitter or transceiver sending
information through the system. This test determines
whether the signal has enough power to operate the
receiver or transceiver at the end of the link.
1. Select the connector you are testing and
disconnect from the system.
2. Inspect, and if necessary, clean both the
patch cord and bulkhead ends of the fiber
interconnect.
3. Inspect, and if necessary, clean both ends of
the test lead fiber.
4. Connect the test lead connector to the power
meter and to the system.
5. Press to turn the power meter ON.
6. Press λto select wavelength.
7. Press dBm/dB to select dBm.
8. The optical power measurement is displayed on
the power meter display.
Active Fiber
Optic System
Inspect Inspect
to Probe
B
P
P
Inspect
P
Test Lead
Fiber
Bulkhead
Inspection
B
Patch Cord
Inspection
P
TEST
Measu-
rement
Devices
Germany & Other Countries
Laser Components GmbH
Tel: +49 8142 2864 – 0
Fax: +49 8142 2864 – 11
www.lasercomponents.com

13
01/19 / V02 / IF / lc/application-reports/viavi/quick-start-guide_fib-inspect
test: reFerence MeasureMent
RELATIVE POWER
Attenuation measurements (optical link loss) on optical components or fiber optic links (e.g., fiber connectors,
cable assemblies, installed fiber optic links) are acquired by measuring the relative power level (dB) at the far end
of the link or device under test.
Relative power level (attenuation measurement) is the amount of power lost (attenuated) by the optical link being
tested, measured in dB. The source of this power is typically a handheld optical light source. This test determines
whether the optical link is constructed properly, either as a qualification test or when troubleshooting the network.
To measure attenuation, you must:
1. Get a reference measurement (page 13)
2. Get attenuation measurement (page 14)
REFERENCE MEASUREMENT
OLS
to Probe
Inspect
P
P
P
Reference
Fiber 1
Inspect
1. Inspect, and if necessary, clean both ends of
reference fiber 1.
2. Connect the optical light source (OLS) to the
power meter using reference fiber 1.
3. Press to turn both the power meter
and light source ON.
4. Press λto select wavelength.
5. Press and hold dBm/dB until a reference
level of 0.00 dB is displayed on the power
meter display. For attenuation measurement,
continue to next page.
Note: REF will flash briefly on the power meter to
indicate that the reference level is saved.
Note: DO NOT disconnect the reference fiber
from the light source (OLS).
Note: Loss testing of single-mode fiber links is specified in ANSI/TIA/EIA-526-7 and ISO/IEC-TR-14763-3.
Loss testing of multimode fiber links is specified in ANSI/TIA/EIA-526-14A and ISO/IEC-TR-14763-3.
TEST
Measu-
rement
Devices
Germany & Other Countries
Laser Components GmbH
Tel: +49 8142 2864 – 0
Fax: +49 8142 2864 – 11
www.lasercomponents.com

14
01/19 / V02 / IF / lc/application-reports/viavi/quick-start-guide_fib-inspect
test:attenuation MeasureMent
1. Disconnect the power meter from reference fiber 1.
Note: DO NOT disconnect reference fiber 1 from the light source (OLS).
2. Inspect, and if necessary, clean all ends of the system port.
3. Connect reference fiber 1 to the system port.
4. Inspect, and if necessary, clean both ends of reference fiber 2.
5. Inspect, and if necessary, clean the fiber at the far end of the optical link.
6. Connect reference fiber 2 to the system port and the power meter at the far end of the optical link.
7. Press to turn both the power meter and light source ON.
8. Press λto select wavelength.
9. The attenuation measurement (insertion loss) of the optical link is displayed on the power meter.
ATTENUATION MEASUREMENT
OLS
Reference
Fiber 1
to Probe
Reference
Fiber 2
Network System
Inspect
P
B
P
Inspect
B
P
Inspect
Inspect
P
TEST
Measu-
rement
Devices
Germany & Other Countries
Laser Components GmbH
Tel: +49 8142 2864 – 0
Fax: +49 8142 2864 – 11
www.lasercomponents.com

15
01/19 / V02 / IF / lc/application-reports/viavi/quick-start-guide_fib-inspect
appendIx: Jdsu Video probe Microscopes
USB 2.0 connection to PC/laptop
with HP3-60-series systems
with USB converter
The Westover P5000 digital probe microscope connects directly to PC/laptops via a USB 2.0 connection and
operates with FiberChek2™, an advanced software that determines the acceptability of optical fiber end faces
through advanced automated inspection and analysis.
The Westover FBP and FBE analog probe microscopes connect directly to HD displays (HD1, HD2, HD3, or HP3-60
series), or to a PC/laptop, or JDSU test platform (T-BERD/MTS or FST) via a USB analog-to-digital converter.
DIGITAL PROBE
ANALOG PROBE
Measu-
rement
Devices
Germany & Other Countries
Laser Components GmbH
Tel: +49 8142 2864 – 0
Fax: +49 8142 2864 – 11
www.lasercomponents.com

16
01/19 / V02 / IF / lc/application-reports/viavi/quick-start-guide_fib-inspect
All statements, technical information and recommendations related to the products herein are based
upon information believed to be reliable or accurate. However, the accuracy or completeness thereof
is not guaranteed, and no responsibility is assumed for any inaccuracies. The user assumes all risks and
liability whatsoever in connection with the use of a product or its applications. JDSU reserves the right
to change at any time without notice the design, specifications, function, fit or form of its products
described herein, including withdrawal at any time of a product offered for sale herein. JDSU makes
no representations that the products herein are free from any intellectual property claims of others.
Please contact JDSU for more information. JDSU and the JDSU logo are trademarks of JDS Uniphase
Corporation. Other trademarks are the property of their respective holders. © 2009 JDS Uniphase
Corporation. All rights reserved.
Measu-
rement
Devices
Germany & Other Countries
Laser Components GmbH
Tel: +49 8142 2864 – 0
Fax: +49 8142 2864 – 11
www.lasercomponents.com
Table of contents