Lauten Audio CLARION FC357 User manual
Original, Inspiring, Microphones
™
CLARION FC357
FET CONDENSER MICROPHONE
OPERATING MANUAL
WARNING: Only authorized Lauten Audio technicians should perform disassembly and maintenance
on any part of this microphone. Disassembling and modifying any part of this microphone may void its
warranty. NEVER DISASSEMBLE THE MICROPHONE WHEN POWER IS BEING SUPPLIED.
REGISTER ONLINE TODAY AT LAUTENAUDIO.COM
Warranty
This product has a 3 year limited warranty from the date of sale from an authorized Lauten Audio dealer or
distributor.
Items limited to 90-days coverage include shock mount bands, cases, boxes, cables, and vacuum tubes.
A copy of your original sales receipt may be requested to verify the original purchase date. Please keep your
receipt. To register your microphone, please visit LautenAudio.com for the most up-to-date registration method.
WARNING!
Serial Number:
Date of purchase:
Dealer Name:

A message from the founder
Congratulations and thank you for your purchase of the FC-357 Clarion FET condenser
microphone. Your microphone was designed and built with pride by Lauten Audio. We are
dedicated to providing recordists throughout the world with authentic, high quality, great
sounding microphones.
Please enjoy your new microphone and know it was created with thoughtful engineering and a
great deal of pride.
Sincerely,
Brian Loudenslager
Founder

Table of Contents
Safety/Contents/Introduction
Quick Start Guide/Sequence of Operation
Description
Power Requirements
Connections
Recommended Uses
Placement and Techniques
Care and Cleaning
Technical Specifications
Descriptions and specifications subject to change without notice.

Safety/Contents/Introduction
Safety
Please make sure the equipment your microphone will be connected to meets or exceeds the
safety regulations in force in your country and is utilizing a ground lead.
Never disassemble your microphone while power is being supplied to it.
Contents
•FC-357 microphone
•Shock mount with stand adapter
•Wood box
•Operating manual
Introduction
The FC-357 is a solid-state FET multi-pattern large diaphragm condenser microphone. This
microphone is for recordists looking for a unique and modern FET sound. It offers a full and rich
low and mid-range as well as smooth and unique high mid and high frequencies.
This microphone has class-A electronics and a 28.25mm dual-diaphragm capsule capable of
omnidirectional, cardioid and figure-8 polar patterns. The microphone also features a -10dB pad
and +10 gain switches.
The FC-357 is built with extreme attention to detail. From the individually hand-tuned capsule to
the premium high-resolution electronics, this microphone is a high-quality precision instrument
for professional audio recording.

Quick Start Guide/Sequence of Operation
1. Securely attach the microphone shock mount to a high-quality microphone stand and
tighten the wing nut at the shock mount elbow.
2. Carefully thread the FC-357 into the shock mount.
Tip: Rotating the microphone in the opposite direction of the bottom nut will assist with
threading it into the shock mount.
3. Make sure the phantom power and gain on your recording interface are turned off
before connecting the microphone.
4. Securely connect the female end of a high-quality standard 3-pin XLR microphone cable
to the bottom of the FC-357 microphone and the male end to your recording interface or
microphone preamp.
5. Choose your desired pad and polar pattern selections on each side of the FC-357
microphone.
6. Turn on the +48 volt phantom power on the recording interface channel you have
connected the microphone to and allow the microphone to warm up for several minutes.
7. If you are using the microphone for vocals or voice, please ensure you use a high-quality
pop-filter.
8. Gradually increase the input gain on your recording interface or preamp to test and
achieve your desired microphone input levels.
9. Congratulations, you are ready to begin using your FC-357 microphone.

Description
This large-diaphragm condenser microphone has been thoughtfully designed with the feedback
from sound engineers working in recording studios for many years. The microphone character
was designed to offer a full and rich low and mid-range, as well as smooth and unique high mid
and high frequencies. Using premium quality, reliable components, this microphone will
withstand use in a recording studio for many years.
The electronic circuitry of the microphone exhibits less than 15dB of self-noise and a maximum
SPL level of 130dB (-10dB pad engaged) allowing it to record both quiet and loud sound
sources. The 28.25mm diaphragms are made of an ultra-thin plastic material with a layer of gold
on one side. The body helps prevent RF interference allowing you to successfully use the
microphone near transmitter stations and wireless microphones or other communications
equipment.
The FC-357 features one switch on each side of the microphone just below the microphone grill.
These switches allow you to adjust the microphone polar patterns and output gain (see Figures
1 and 2 below).
Gain/Pad Selector
On the left side of the microphone is the gain and pad selector (refer to
Figure 1). This microphone is unique to other microphones on the market in
that it allows you to increase and decrease the output gain by 10dB. This
feature is extremely useful when using inferior preamplifiers such as those
built into many consumer grade recording interfaces or when recording very
quiet sound sources. This +10dB gain switch allows you to get more of the
microphone character and rely less on the gain from a preamp. There is
also a -10dB pad selection that allows you to reduce the output of the
microphone when recording very loud sound sources, or if you want to have
more of the preamp character in your recording. The 0dB setting is the
default level.
Polar Pattern Selector
The polar pattern selector (refer to Figure 2) is located on the right side of
the microphone. The selectable polar patterns are omnidirectional (top),
cardioid (center) and figure-8 (bottom). The ability to select different polar
patterns allows this microphone to be used in many recording situations.
Fig. 1 Gain/Pad Selector
Fig. 2 Polar Pattern Selector

Power Requirements
The FC-357 microphone requires +48V phantom power. Phantom power can be found as a
built-in feature on most modern recording interfaces and microphone preamplifiers, or you may
use an external +48V phantom power supply.
Connections
Always use a high-quality 3-pin XLR microphone cable with your microphone. Connect the
female end of the XLR cable to the microphone and the male end of the XLR cable to your
recording interface.
Do not connect this microphone to any power source other
than +48v phantom power. Using +48V phantom power is
the only way to ensure safe and reliable operation.
Male
Input
Female
Output
1
2
3
2
1
3
To microphone
To recording interface

Recommended Uses
The FC-357 is designed to offer you sonically smooth and rich recordings. We recommend
using the FC-357 for micing solo voices and instruments and also for distance micing as
overheads or room mics. The FC-357 may also be used to mic various other sources including
but not limited to those listed below.
We recommend the FC-357 for the following recording applications.
Sound Source
Lead/Solo Vocals
Backing Vocals/Choirs
Speech & Voice-over
Piano (Grand & Upright)
Bass Drum
Toms
Snare Drum
Acoustic Guitar
Electric Guitar
Electric Bass
Violin
Cello
Organ
Trumpet
Trombone
French Horn
Tuba
Saxophone
Flute
Clarinet
Harmonica
Cymbals
Bongos

Placement and Techniques
Below are general tips for microphone placement; the recording environment plays a significant role in the success of any
technique. We suggest experimenting extensively.
Lead/Solo Vocals
Distance from source: 6 to 12 inches. Pattern: Cardioid, use pop screen or foam
windscreen.
Choirs
Two mics in stereo and one spot mic for each soprano, alto, tenor and bass
sections, or one set of spaced mics in stereo.
Backing Vocals
Individual micing: distance from source should be 6 to 12 inches. Pattern:
Cardioid, use pop screen or foam windscreen. Group micing: use cardioid or
omni and place vocalists in semi-circle in front of microphone.
Violin & Viola
Position the microphone to the “f” holes from a height of 6 to 10 inches
depending on the musician’s stance. Use cardioid or omni polar pattern. For
increased presence use +10dB gain.
Cello, Upright Bass
Position microphone about 12 to 18 inches from and facing one of the “f” holes.
Use cardioid or omni polar pattern. For increased presence use +10dB gain.
Acoustic Guitar
Single micing: Place mic 6 to 12 inches from the guitar between the sound hole
and where the neck meets the body. Use cardioid polar pattern.
Stereo micing: Place one mic 6 to 12 inches between the end of the body and
sound hole aiming at the sound hole with the second mic 1 to 2 feet from the
bridge. Use cardioid polar pattern.
Flute
Single micing: Place mic to one side of flutist and align mic with flutist’s mouth.
Use cardioid or omni polar pattern.
Stereo micing: Place mic to one side of flutist and align mic with flutist’s mouth.
Place a second mic aiming at the side of the instrument. Use cardioid or omni
polar pattern.
Clarinet
Place one microphone 5 to 10 inches from lowest key and slightly to the side to
reduce key noise. Use cardioid polar pattern.
Saxophones
Place the microphone 12 to 30 inches away aiming at the middle of the
instrument. Use cardioid polar pattern.
Trumpet
Place mic 10 to 15 inches in front of the instrument. Rotate microphone slightly
off axis. Use -10dB pad and foam windscreen to increase SPL handling and
reduce blowing noise. Use cardioid polar pattern.
Grand Piano
Technique 1: Place an XY, MS, or ORTF pair at the middle of the strings from a
height of 4 to 8 feet.
Technique 2: Place two mics 6 to 18 inches above the strings. One mic should
be placed above treble strings and another above the bass strings.
Upright Piano
Open lid and place two mics 6 to 18 inches above the strings. One mic should
be placed above treble strings and another above the bass strings. For
increased or decreased hammer character place mics closer or further away.
Electric Guitar or Bass
Position mic 2 to 8 inches from center of speaker cone. Rotate mic slightly off-
axis. Use -10dB pad and cardioid polar pattern.
Drum Overheads
Place two mics in AB or XY configuration 2 to 6 feet above drummers head.
Use cardioid or omni polar patterns.
Tom Toms
Use one mic for each tom or two toms. Align mic 1 to 3 inches away from the
top rim and angle mic slightly toward drum head. Use -10dB pad.
Floor Tom
Place mic 1 to 3 inches away from the top rim and angle mic slightly toward
drum head. Use -10dB pad.
Bass Drum
Place mic 6 to 24 inches from front of bass drum aiming directly at it or the cut-
out hole if it has one. Remove front head if you feel necessary. Use -10dB pad.
Snare Drum
Place mic 1 to 3 inches away from the top rim and angle mic slightly toward
drum head. Use -10dB pad and cardioid polar pattern.

Care and Cleaning
This microphone is a precise and delicate instrument. Do not drop or allow the microphone to
collide with other objects as this may damage the internal components.
The metal surfaces of the microphone can be cleaned with mild mineral spirits or alcohol on a
lightly dampened very soft cloth. Be very careful not to get any moisture inside the microphone
grill or microphone.
THERE ARE NO SERVICABLE PARTS INSIDE THE MICROPHONE
Only authorized Lauten Audio technicians should perform disassembly and maintenance on
f h h bl d d f f h h

Technical Specifications
Type: 28.25mm dual large diaphragm pressure gradient transducer microphone.
Polar Patterns: Omnidirectional, Cardioid and Figure-8 selectable.
Circuit: Low-noise solid-state FET
Frequency Range: 25Hz-20KHz
Dynamic Range: 120dB minimum
Impedance: < 200 ohms
Max. SPL: 0.5%THD@1000Hz: 130dB
Self-noise Level: < 15dB(A)
Sensitivity: 16mV/Pa OR -36±2dB 0dB=1V/Pa 1000Hz
Special Features: -10 dB attenuation and +10dB gain switch
Connector: 3-Pin standard XLR
Power Requirement: +48V phantom power
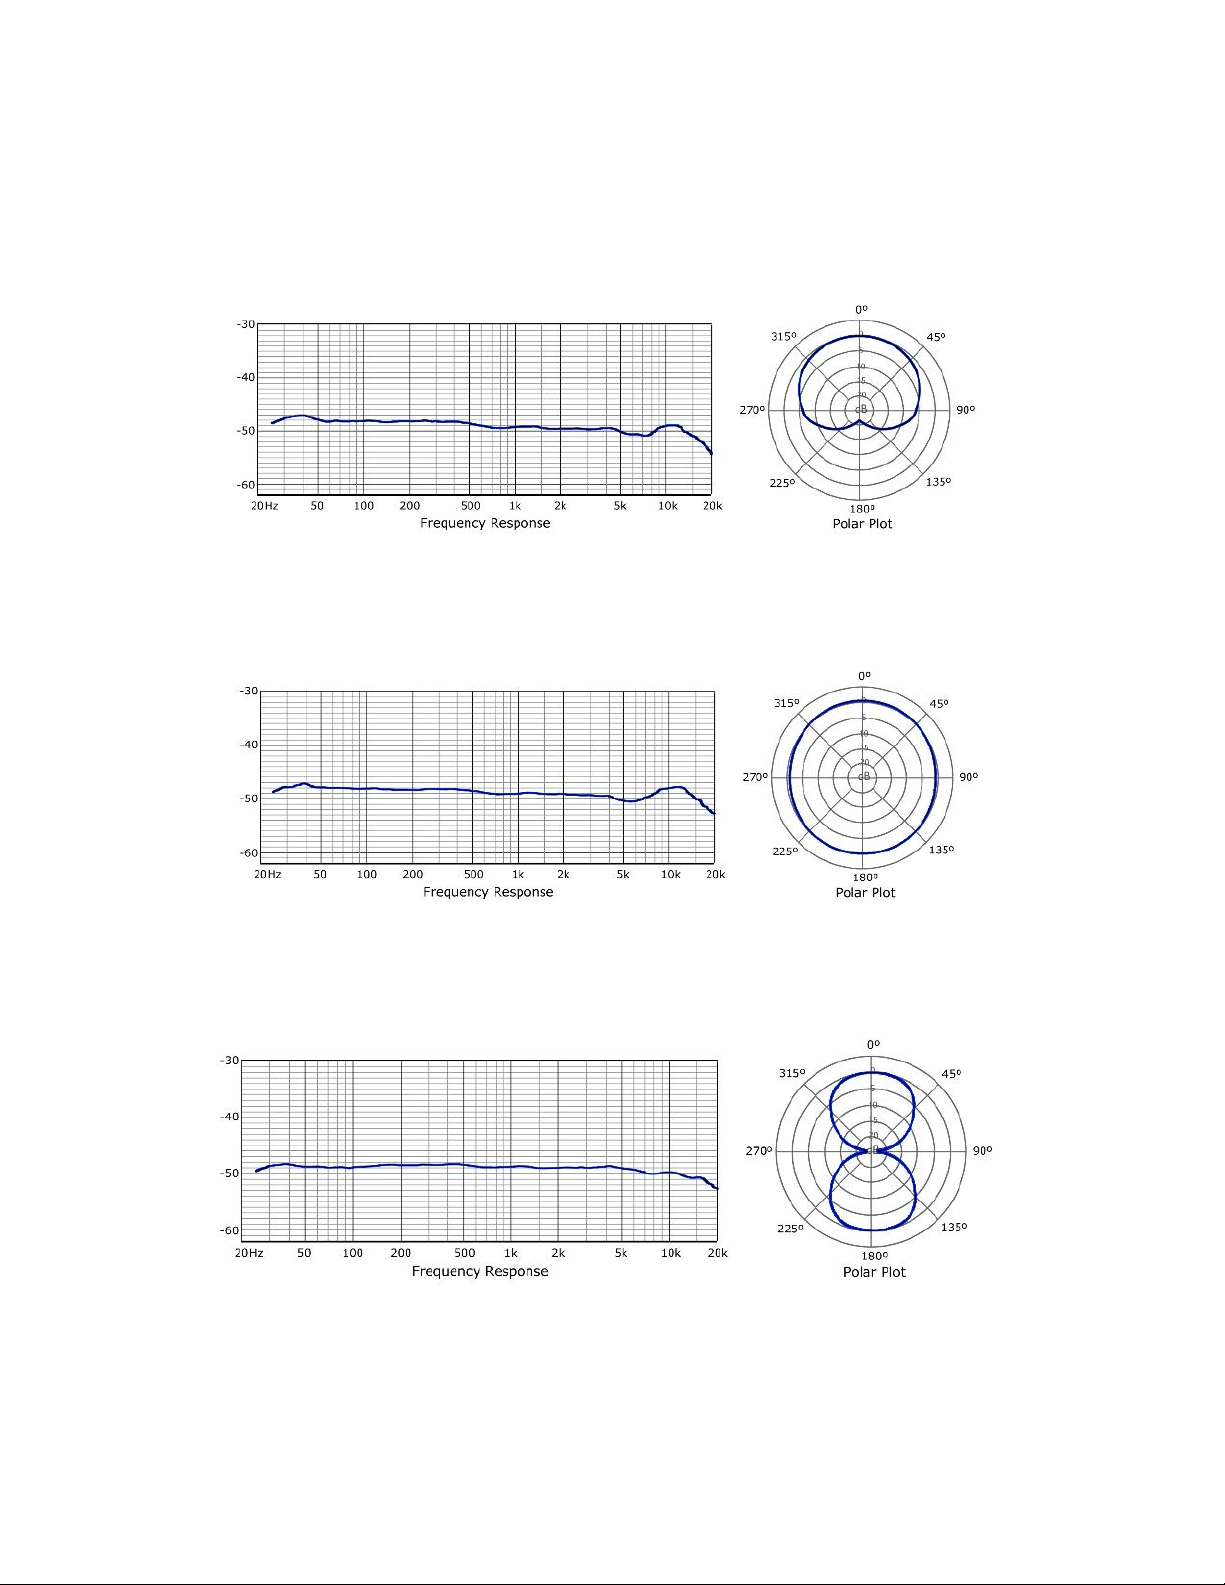
Frequency Response and Polar Pattern Plots
Cardioid
Omnidirectional
Figure-8

Lauten Audio
1817 Houret Ct. Milpitas, CA 95035
Phone: 877-721-7018
Webpage: www.lautenaudio.com
This manual is printed in the USA on recycled paper.
© 2004-2019 LAUTEN AUDIO ALL RIGHTS RESERVED
Table of contents
Other Lauten Audio Microphone manuals


