Lavex 978LAVP20D User manual

INSTRUCTION
MANUAL
20" DUAL SPEED ROTARY FLOOR MACHINE
#978LAVP20D
READ ENTIRE MANUAL BEFORE USE
Lavex Janitorial • 2205 Old Philadelphia Pike • Lancaster, PA 17602
08/2020

INSTRUCTION MANUAL 2
GENERAL SAFETY RULES
WARNING: Read all safety warnings and instructions prior to use.
Failure to follow all warnings and instructions may result in electric shock, fire, and/or
serious injury.
Save all warnings and instructions for future reference.
The term “floor machine” in the warnings refers to your corded floor machine.
1. WORK AREA SAFETY
a. Keep work area clean and well lit during operation.
b. Do not operate floor machine in explosive atmospheres, such as in the presence of
flammable liquids, gases, or dust.
c. Keep children and bystanders away while operating a floor machine to avoid potential
injury.
2. ELECTRICAL SAFETY
a. Floor machine plugs must match the outlet. Never modify the plug in any way. Do not use
any adapter plugs with grounded floor machines. Unmodified plugs and matching outlets
will reduce risk of electric shock.
b. Avoid body contact with grounded surfaces, such as pipes, radiators, ranges, and
refrigerators.
c. Do not expose floor machines to rain or wet conditions. Water entering the floor machine
will increase the risk of electric shock.
d. Do not abuse the cord. Never use the cord for carrying, pulling, or unplugging the floor
machine. Keep cord away from heat, oil, sharp edges, or moving parts. Damaged or
entangled cords increase the risk of electric shock. Never operate this unit with a damaged
cord.
e. When operating a floor machine outdoors, use an extension cord suitable for outdoor use.
Use of a cord suitable for outdoor use reduces the risk of electric shock.
f. If operating a floor machine in a damp location is unavoidable, use a residual current
device (RCD) protected supply. Use of an RCD reduces the risk of electric shock.
3. PERSONAL SAFETY
a. Stay alert, watch what you are doing, and use common sense when operating a floor
machine. Do not use a floor machine while you are tired or under the influence of drugs,
alcohol, or medication. Lack of attention while operating a floor machine may result in
serious personal injury.

INSTRUCTION MANUAL 3
b. Always use appropriate personal protective equipment. Always wear eye protection.
Protective equipment such as a dust mask, non-skid safety shoes, hard hat, or hearing
protection used for appropriate conditions can reduce personal injuries.
c. Ensure the switch is in the o-position before connecting to power source, picking up, or
carrying the tool. Carrying floor machines with your finger on the power switch may cause
accidents.
d. Make sure that you are balanced and stabile before operation. Keep proper footing
and balance at all times. This enables better control of the floor machine in unexpected
situations.
e. Dress properly. Do not wear loose clothing or jewelry. Keep your hair, clothing, and gloves
away from moving parts. Loose clothes, jewelry, or long hair can be caught in moving parts.
f. Always stay alert during machine operation. A lack of awareness while in use can cause
severe injury.
4. FLOOR MACHINE USE AND CARE
a. Use the correct floor machine for your application. The correct floor machine will do the job
better and safer at the rate for which it was designed.
b. Do not use the floor machine if the switch does not turn it on and o. Any floor machine
that cannot be controlled with the switch is dangerous and must be repaired.
c. Disconnect your floor machine from the power source before making any adjustments,
changing accessories, or storing the unit. Such preventive safety measures reduce the risk
of starting the floor machine accidentally.
d. Store idle floor machines out of the reach of children and do not allow persons unfamiliar
with the floor machine or these instructions to operate the floor machine.
e. Maintain floor machines and accessories. Check for misalignment or binding of moving
parts, breakage of parts, and any other condition that may aect the floor machine’s
operation. If damaged, have the floor machine repaired before use. Accidents may be
caused by poorly maintained floor machines.
f. Only use the floor machine and accessories in accordance with these instructions. Always
take into account the working conditions and the work to be performed. Use of the floor
machine for unintended functions could result in hazardous situations.
g. Keep handles and grasping surfaces dry, clean, and free from oil and grease. Slippery
handles and grasping surfaces do not allow for safe handling and control of the tool in
unexpected situations.

INSTRUCTION MANUAL 4
5. SERVICE
a. Have your floor machine serviced by a qualified repair person using only identical
replacement parts. This will ensure that the safety of the floor machine is maintained.
b. If the replacement of the power cord is necessary, this has to be done by the manufacturer
or a designated service organization.
SPECIFIC SAFETY RULES
• For your safety, do not plug in your floor machine or try to use it until it is completely
assembled according to these instructions, and until you have completely read and
understood this user manual.
• Always keep hands out of the path of floor machine. Avoid awkward hand positions where
a sudden slip could cause your hand to move into the floor machine.
• Make sure there are no nails or foreign objects in the area that is being cleaned.
• Protect your eyes. Always wear safety goggles while machine is in use to avoid potential
eye damage.
• Everyday glasses have only impact resistant lenses and ARE NOT safety glasses. For your
own protection, make sure your safety glasses or goggles comply with the ANSI Z87.1
Safety Standard.
• Never use this floor machine without the provided GFCI.
• Always verify that the GFCI is working correctly before starting work.
• Replacement of the plug or the power cord shall always be carried out by the manufacturer
or a designated service organization.
• Keep liquid clear of the parts of the machine and away from persons in the working area.

INSTRUCTION MANUAL 5
TECHNICAL SPECIFICATIONS
NOTE:
V: Volts
A: Amperes
Hz: Hertz
~: Alternating Current
Type P17A,
978LAVP17A
P20A,
978LAVP20A
P20D,
978LAVP20D
Rated Voltage 110–120V~
Rated Current 12A 15A
Frequency 60Hz 50/60Hz
Diameter of Accessories 17" 20" 20"
Protection Class I I
INSTRUCTION MANUAL 6
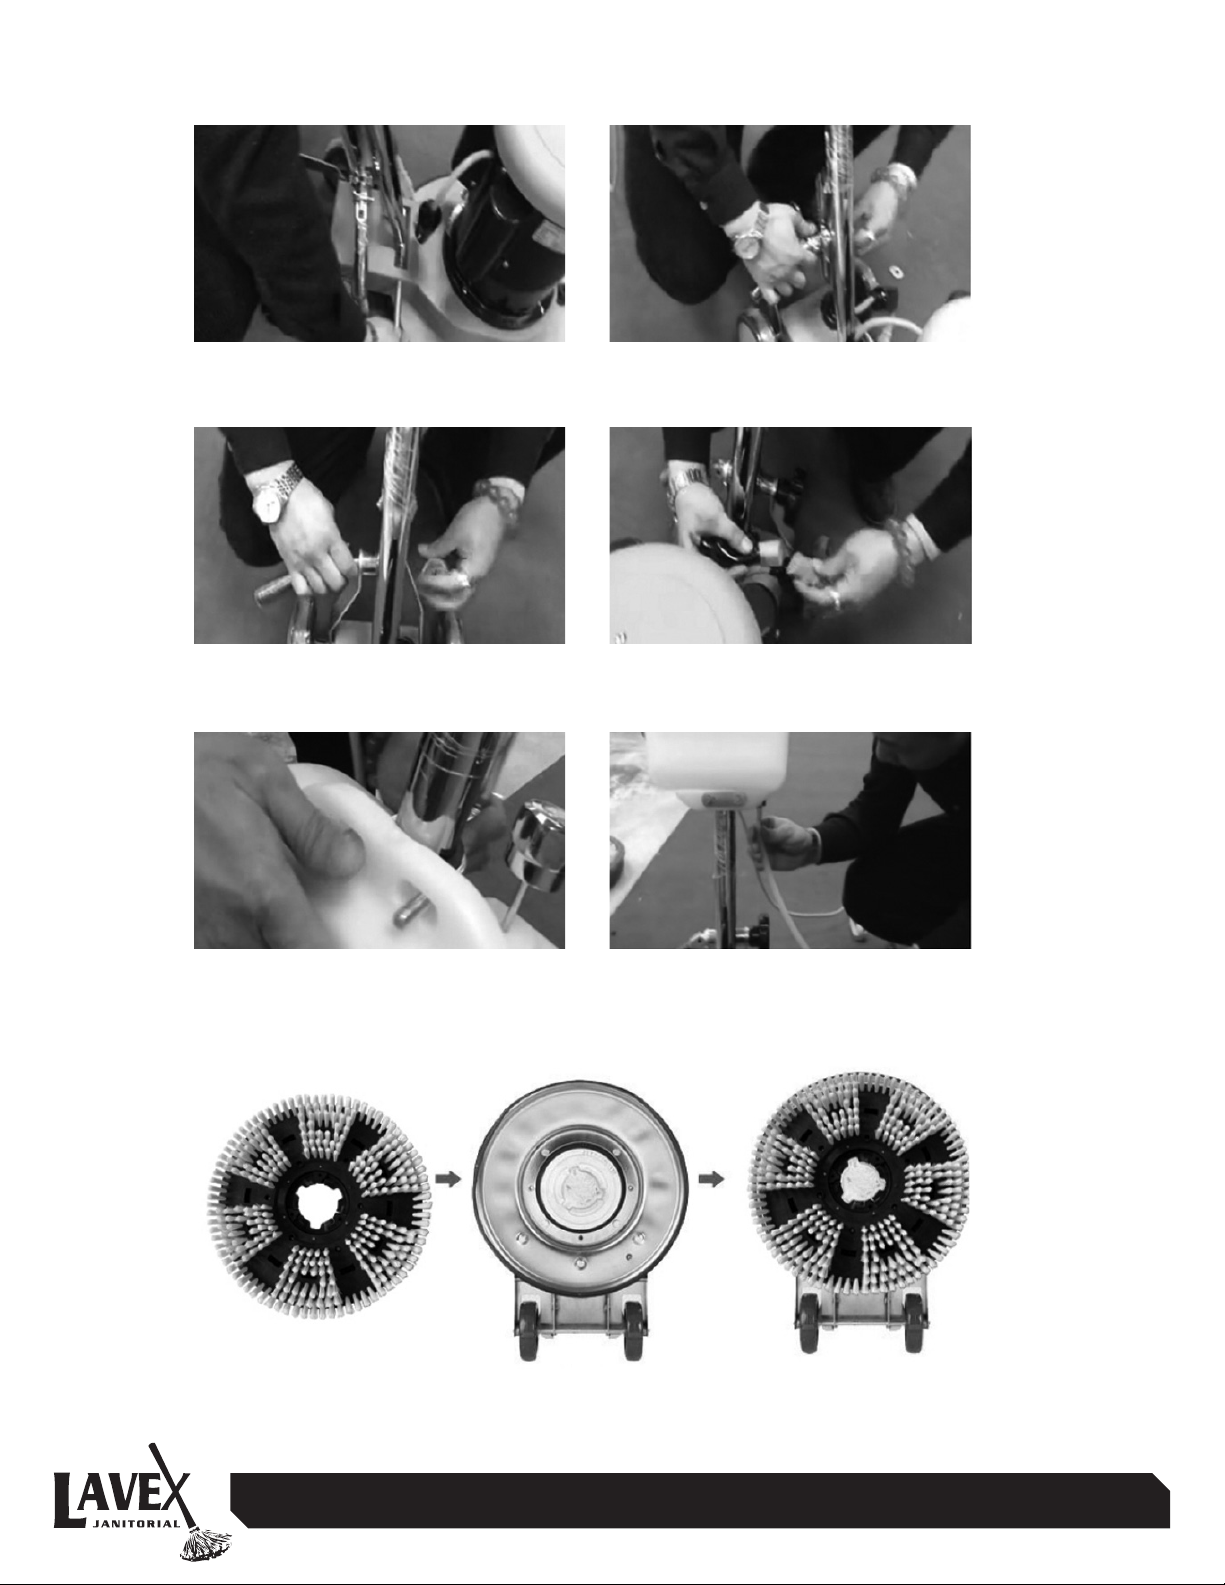
INSTALLATION INSTRUCTIONS
1) Put on the handle
and install the axle
3) Put the wrench through the
support iron and install it again
5) Install the water tank
accessories and install the water
tank on the handle
7) Align the disc brush with the bottom clasp
and rotate it anticlockwise to fix it
2) Remove the wrench
4) Link motor to handle
6) The water pipe connects the
water tank outlet and the base

INSTRUCTION MANUAL 7
OPERATION AND MAINTENANCE
WARNING: Be sure to read and understand this manual in its entirety before operation.
Failure to do so may result in damage or injury.
PROPER SETUP AND PREPARATION
Ensure that all components are assembled tightly and secured, and that power source
matches voltage of your unit.
WARNING: Do not operate this unit near flammable or combustible objects.
FOR SCRUBBING OR POLISHING
• Remove debris and any obstructions from cleaning surface before operation.
• Ensure that the unit is unplugged before attempting to attach floor brush. After unit is
unplugged, place the handle in an upright position, and tilt machine backward until handle
rests on the floor.
• After unit is unplugged and tilted backward, place pad driver on the three lugs on the motor
drive adapter. Once in position, twist brush clockwise to lock into position.
• Ensure unit is unplugged before attempting to remove brush. Tilt unit backward with
the handle in an upright position, identically to the steps to install the brush. After tilted
backward, rotate the brush counterclockwise to remove. Always remove brush and pad
driver when unit is not in use.
• Before operating, adjust handle height to a comfortable position, and lock into place with
adjustment lock near the base of the unit. After handle is locked into place, press the red
safety lock button located on the switch housing, and start unit by holding down the lever on
either handle.
• Both hands should always be on the unit when in use.
• The machine will glide left or right when in operation, depending on the height of the
handle. Raise the handle to move the unit to the right, and lower the handle to move the unit
to the left. Releasing the handle levers will stop the unit immediately.

INSTRUCTION MANUAL 8
SAFETY INFORMATION
Failure to follow the instructions below could lead to damage or personal injury
1. This unit is for commercial janitorial use only, you must be trained before operating unit.
2. Do not operate unit unless it is completely assembled, and you have ensured that every
component is secured tightly.
3. This unit is intended for use with 110-120V power sources only. Always use a 3-wire
grounded power supply.
4. Ensure that the unit is unplugged and dry before performing maintenance or repairs. Never
leave the unit plugged into a power source while unattended.
5. Ensure that the unit is kept dry at all times during operation. Store unit in a dry area, and
only perform cleaning with a dry cloth.
6. Do not use unit near flammable objects, liquids or vapors. Do not use flammable
compounds to clean the unit.
7. Maintenance is to be performed by qualified professionals only.
8. Ensure that the unit's power cord is free of damage before each use. Do not run the
machine over the power cord, and avoid abruptly pulling or tugging on the power cord
while unit is in use.
ELECTRICAL GROUND INSTRUCTIONS
Ensure that this rotary floor machine is grounded while in use to protect the user from electric
shock. The unit is equipped with a three-conductor cord and three-prong plug that is to be
connected to a grounded electrical outlet. The green (or green and yellow) conductor in the
power cord is the grouding wire - Ensure that this wire is only plugged in to the grounding pin
of the plug.

INSTRUCTION MANUAL 9
COMPONENT STRUCTURE
1. Switch Handle
2. Safety Switch
3. Power Cord
4. Aluminum Alloy Handle
5. Water Tank Drain Valve
6. Water Tank (Optional)
7. Cord Wrap
8. Handle Adjumentment Knob
9. Chassis Colloidal Particles
10. Motor Cover
11. Capacitor and Cover
12. Gearbox
13. Wheel Coupling
14. Motor Base
15. Rubber Collision Guard
16. Handle Adjustment Clamp
17. M5*35 Screw
18. Adjustment Button
For Two Speed
(18)
- 4 -

INSTRUCTION MANUAL 10
- 5 -
EXPLOSION DIAGRAM
1. Handle
2. Handle Cover
3. Switch Handle
4. Switch
5. Power Cord
6. Hand Wheel
7. Pad
8. Aluminum Column
9. Wrench
10. Buttress Iron
11. Wheel Axle
12. M6*15 Outer
Hexagon Bolt
13. Back Wheel
14. Wheel Axle
15. Upper Chassis
16. Lower Chassis
17. Anti Collision Rubber
18. Plastic Cover of Motor
19. Motor Cover
20. M4*10 Large Pan
Head Machine Wires
21. Motor
22. Coupling
23. B End Cover
24. Gearbox
25. M6*25 Socket
Head Cap Screw
26. Water Outlet
27. Compression Spring
Table of contents
Popular Floor Machine manuals by other brands

WARRIOR
WARRIOR 200 operating instructions

Nilfisk-Advance
Nilfisk-Advance BHS 5120 Instructions for use

Crescent
Crescent BA611 Service manual

Clarke
Clarke Alto Vision 17E Operator's manual

Onyx
Onyx BLACL DIAMOND SERIES Operator's manual

Minuteman
Minuteman Ambassador C46000-00 Operation, service & parts manual


