manuals.online logo
Brands
  1. Home
  2. •
  3. Brands
  4. •
  5. Lavinia Boho
  6. •
  7. Bathtub
  8. •
  9. Lavinia Boho Bristol Manual

Lavinia Boho Bristol Manual

innovation & design
Instructions for mounting and use
of acrylic bathtub
Iaviniaboho.com
Dear Customers!
Thank you for having chosen Lavinia Boho products.
Acrylic bathtubs are manufactured by vacuum molding method of environmentally friendly acrylic material
(100% PMMA), used by leading manufacturers of sanitary products in Europe and fully complying with
the requirements of STB 1227-2000. Products made of this material meet the highest consumer appeals:
high gloss; sanitary surface; easy to maintain; resistant to: UV radiation, fading, delamination, cracking;
harmless at contact with human body. The bathtub enforcement is made of high quality polyester resin,
with complete allowance for use in residential premises.
The Manufacturer reserves the right to make changes in the product characteristics and supply package
without prior notice to the Seller and the Customer, while maintaining the declared warranty period.
Product designation
The bathtub is to be installed in sanitary facilities of multifunctional buildings and intended for sanitary
and hygienic application.
Prior to mounting
Read carefully and follow these instructions in order to avoid any injuries and property damage.
Prior to installation, the bathtub shall be stored in an undamaged original package in dry and ventilated
location not less than 1 m from heating appliances. After storage and transportation of the bathtub at low
temperatures, it is required to keep the product at room temperature within the range from -20 to +40
degrees Celsius for at least 12 hours. In case of prior unpacking, all the components of the bathtub shall
be reliably packaged again in such a way as to avoid contamination and damage.
Do not put any items on the bathtub (even in case it is still in the package). The product is
subject to physical damage.
Installation of the bathtub shall be carried out by qualified sanitary technicians (unauthorized mounting and
repairs of the bathtub are prohibited). The installation procedure of the bathtub is specified in these
instructions for qualified sanitary technicians, and the operation procedure is described for the Customers.
Some physical efforts are required to fix the holding elements. However, avoid excessive physical efforts
as you may damage the bathtub or elements, suffer an injury or property damage. Please be extremely
careful while fixing the holding elements of the bathtub.
Check the bathtub for completeness before starting the mounting process. Remove all the
components from the package and store them at a designated place to prevent loss.
Preparatory works and complete set
These instructions have been developed for Customers from the Russian Federation, the Republic of
Belarus and the Republic of Kazakhstan. In the event the state adopts technical regulations governing
sanitary and technical works for bathtub installation, as well as preparatory works, then both the given
instructions and relevant provisions of technical regulations shall be followed.
Prior to bathtub installation, it is necessary to ensure complete and qualitative performance of all the
preparatory works (surface leveling, water supply, sewerage system operability, etc.).
Lavinia Boho
In case you find packing elements on the product, remove them before installation and inspect the
product for external defects (in case physical defects are determined, installation of the product is
prohibited). During bathtub installation, please follow the precautions usually taken during sanitary and
mechanical assembly work.
Connection of faucet (mixer for the bathtub or shower system) must be carried out using filters preventing
the ingress of mechanical impurities with water inside the product.
To ensure the pressure reduction in the water supply network (in order to avoid any damage to the
product due to the pressure drop), the pressure reducer (user-supplied) shall be installed.
It is recommended to use sealants for hygienic convenience and in order to prevent ingress of moisture
under the bathtub. Auxiliary materials (silicone, sealants, etc.) and mounting tools are outside the scope
of supply and available separately.
Possible complete set options:
—
acrylic bathtub;
—
set of legs with mounting kit (available for additional cost);
—
metal frame with mounting kit (available for additional cost);
—
front panel (available for additional cost);
—
side panel (available for additional cost);
—
warranty card;
—
instructions for mounting and use of acrylic bathtub.
Mounting instructions
These instructions have been developed for Customers from the Russian Federation, the Republic of
Belarus and the Republic of Kazakhstan. In the event the state adopts technical regulations governing
sanitary and technical works for bathtub installation, as well as preparatory works, then both the given
instructions and relevant provisions of technical regulations shall be followed.
Prior to bathtub installation, it is necessary to ensure complete and qualitative performance of all the
preparatory works (surface leveling, water supply, sewerage system operability, etc.).
4 Lavinia Boho
INSTRUCTIONS FOR INSTALLING THE SET OF LEGS WITH MOUNTING KIT
Specifications
No. Item Qty., pcs.
1 U-shaped profile 2
2 M10x175 Stud 4
3 M10 Nut 12
4 3,5X16 Self-tapping screw 12
5 Legs 4
6 Clamping brackets with fasteners (included in complete set) 4
Mounting
1.
Place the bath upside down on flat surface.
2.
The following fastening elements shall be installed on the U-shaped profiles (1) to assemble the
set of legs: stud (2), nut (3), legs (5).
1
2
5
Lavinia Boho 5
Standard dimensions
of bathtub
A
B
1500x700 195 400
1600x700 195 450
1700x700 195 500
3.
Install the assembled legs on the bathtub depending on its dimensions.
4.
Fix the profiles with the self-tapping screws (4). Turn the bathtub over.
5.
Install the drain and overflow, prior having removed part of protective film of the bathtub (4).
6.
Install the bathtub in the required place. Check the level of the bathtub horizontal position relative to
the floor with the gauge and adjust the position of legs.
7.
Draw line on the wall along the upper edge of the bathtub sides. Move the bathtub aside.
8.
Mark the openings (4 openings) to install the clamping brackets (6) (3 brackets on the long side and 1
on the short side).
9.
Drill Ø 8 mm openings.
10.
Batter in the anchors into the openings and screw in the clamping brackets (4 brackets)
with the self-tapping screws.
11.
Connect the drain and overflow to the sewage system.
12.
Lift the bath, insert the vertical sides to the brackets screwed to the wall.
13.
Adjust the position of legs so that the bathtub turns into strictly horizontal position. Fix the legs with
locking nuts.
14.
Fill the bathtub with water and apply sanitary sealant (silicone) on the bathtub surface
adjacent to wall, prior having removed part of protective film.
15.
The product should not be used 24 hours for the sealant to harden.
16.
After sealant hardens completely, drain the water and remove the protective film from bathtub.
INSTRUCTIONS FOR INSTALLING THE SET OF FRAME WITH MOUNTING KIT
Specifications
No. Item Qty., pcs.
1 Steel frame 1
2 M12x550 mm Stud 4
3 M12x150 mm Stud 2
4 M12 Nut 22
5 Top plastic support 4
6 4.8*12 Tapping screw 8
7 Clamping brackets (included) 4
8 Adjustable supports 6
6 Lavinia Boho
Mounting
1.
Place the bath upside down on flat surface.
2.
Position the frame (1) on the bottom of the bathtub so that the edges of the frame become
symmetrical to the bathtub sides and fasten the frame to the bottom of the bathtub with screws (6).
8
4
2
5
3.
Install the stud (2) in the frame opening, screw the stud onto the plastic supports (5).
4.
Fix the stud (2) on the frame (1) with the nuts (4) so that the support (5) tightly abuts to the plane
of the bathtub side.
5.
Fix all the threaded connections firmly.
6.
The bathtub height can be adjusted with the help of plastic supports (8). Turn the bathtub over.
7.
Install the drain and overflow, prior having removed part of protective film of the bathtub.
8.
Draw line on the wall along the upper edge of the bathtub sides. Move the bathtub aside.
9.
Mark the openings (4 openings) to install the clamping brackets (7) (3 brackets on the long
side and 1 on the short side).
10.
Drill Ø 8 mm openings.
11.
Batter in the anchors into the openings and screw in the clamping brackets (4 brackets)
with the self-tapping screws.
12.
Connect the drain and overflow to the sewage system.
13.
Lift the bath, insert the vertical sides to the brackets screwed to the wall.
14.
Fill the bathtub with water and apply sanitary sealant (silicone) on the bathtub surface
adjacent to wall, prior having removed part of protective film.
15.
The product should not be used 24 hours for the sealant to harden.
16.
After sealant hardens completely, drain the water and remove the protective film from bathtub.
Lavinia Boho 7
Instructions for use and safety measures
Check the holding strength after bathtub installation.
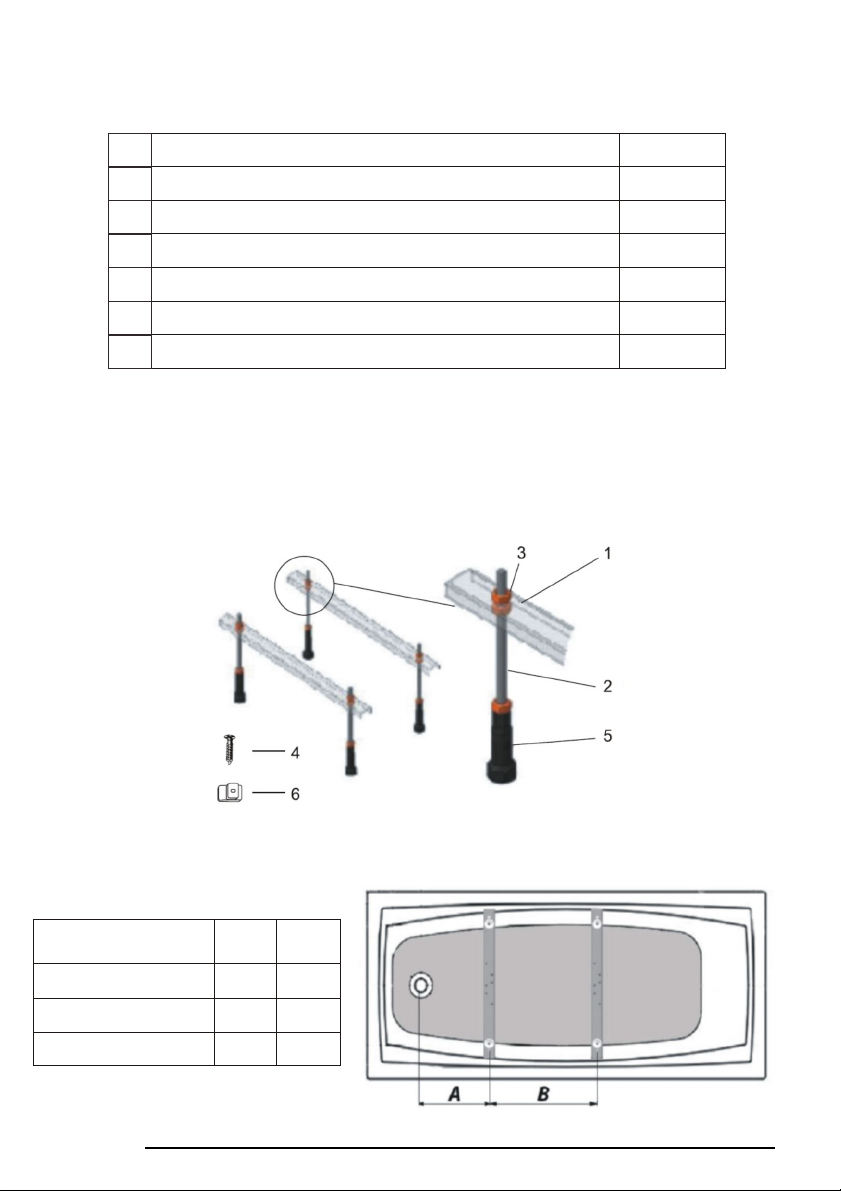
Correct mounting of the product ensures proper flushing of the bathtub and water drain.
Use the bathtub for intended purpose only. It is strictly prohibited to:
—
install drain fittings not designed for acrylic bathtubs (siphons with metal side adjacent to the
acrylic surface and with a thin PVC gasket);
—
use sets and installation kits of third-party manufacturers, including fastening materials and supports;
—
fill the bathtub with water above 60 degrees Celsius;
—
Throw away garbage or household waste in the bathtub;
—
pour cement and adhesive mixtures/solutions into the bathtub;
—
put or drop any items in the bathtub;
—
use sea, mineral water or other aggressive media.
Safety measures:
—
the bathtub surface is smooth, slippery if wet, be extremely careful when getting in and out of the
bathtub;
—
taking a bath in alcohol intoxication can lead to tragic consequences;
—
do not leave children unattended when taking bath;
—
do not use electrical appliances when taking bath;
—
to avoid falling, do not step on the side of the bathtub. Do
not allow any animals into the bathtub.
Annually check the mounting position and holding strength of the bathtub.
Instructions for care
Every time the bathtub is used, it is required to wipe the product with dry or wet (depending on pollution
type) soft cloth.
To avoid yellow spots and streaks, every time the bathtub is used, we recommend to wipe the product dry
with a soft cloth.
Avoid using bad water (hard water, water with mechanical impurities, etc.) when using bathtub. Do
not connect the bathtub to the water supply network having parameters inconsistent with the
given instructions.
The product surface is easy to clean. Use warm soapy water and detergent marked “for acrylic bathtubs
and plastic products” to clean the bathtub surface; do not use abrasive, acid, alkaline or other aggressive
cleaning agents, different solvents, including organic solvents, as they may damage the product coating.
Do not use hard and wire brushes (or other cleaning agents that may damage the product surface) when
cleaning the bathtub.
Bathtub repair
Physical damage of the bathtub (including cracks, chips, etc.) cannot be repaired.
Repair of the sewer the drain fittings is connected to, can be carried out only by qualified plumbers. Do not
clean the bathtub drain hole with abrasive, acid, alkaline or other aggressive cleaning agents, different
solvents, including organic solvents, as well mechanically, when the product coating can be damaged.
It is forbidden to use the bathtub with physical damages or malfunctions of drain fittings or sewerage
system. In the event of malfunction, turn off the water supply to the point of entry into the bathtub.
Transportation and handling of the bathtub
The bathtub shall be transported in an undamaged original package only. The product can be shipped by
any transport ensuring protection of cargo from atmospheric
8 Lavinia Boho
precipitations and physical damages in accordance with the transportation rules applicable for every mode
of transport. The product shall be securely fixed in the vehicle body in order to prevent any damages. The
front side of the bathtub has to be protected.
When transported by road, the bathtub in an undamaged original package shall be placed on the body
floor. It is prohibited to carry out transportation of bathtubs in two tiers with no transportation cushions or
place any other items on top of the installation system package. Stacking of the product, transportation in
an upright position with the bathtub on its the side is also prohibited. The bathtub is a fragile product with
considerable weight and dimensions, therefore, it shall be manually moved by at least two people.
It is prohibited to move the bathtub manually by persons who have not reached the age of 18, pensioners
and persons not allowed to lift weights due to health reasons. To move the bathtub, it is recommended to
engage workers briefed for occupational safety and health rules during handling operations.
In case the bathtub installation is not performed immediately after unpacking, the bathtub shall be placed
on a dry, clean and even surface for temporary storage, eliminating any possibility of physical damage to
the product.
Terms of warranty
The Manufacturer and the Seller guarantee normal operation of the bathtub, meeting the STB 1227-2000
requirements, and its usability for the purpose intended within the warranty period.
Warranty period for acrylic bathtubs is specified by the Seller in warranty card. The Manufacturer and the
Seller shall have no warranty obligation (the warranty is cancelled) if any defects are detected due to
improper mounting, unauthorized repair, negligent use, non-observance of rules for transportation,
handling, use and care of the bathtub. Warranty obligations do not apply to wear parts – legs, frame and
elements.
The warranty does not cover normal wear and tear.
Remounting and disposal of bathtub
The bathtub is designed for single mounting. Remounting and use of the previously mounted and
dismantled bathtub is prohibited.
Disposal of the bathtub is carried out in accordance with the legislation of the state the product is
mounted in.
Other information
There are no toxic pollutant emissions from the bathtub during its mounting and use. Our products have
no harmful effect on human organism.
The bathtub is not subject to obligatory certification.
Lavinia Boho 9
innovation & design
Iaviniaboho.com

This manual suits for next models

1

Popular Bathtub manuals by other brands

Summer LIL' LUXURIES 18930 owner's guide

Summer

Summer LIL' LUXURIES 18930 owner's guide

Kohler Evok Instructions for use

Kohler

Kohler Evok Instructions for use

ZUCCHETTI KOS 9S2TBIREBI Installation, use and maintenance handbook

ZUCCHETTI

ZUCCHETTI KOS 9S2TBIREBI Installation, use and maintenance handbook

American Standard Savona Oval Whirlpool 2903.018W Specifications

American Standard

American Standard Savona Oval Whirlpool 2903.018W Specifications

Kohler K-1822 Homeowner's guide

Kohler

Kohler K-1822 Homeowner's guide

Empava EMPV-FT106 installation manual

Empava

Empava EMPV-FT106 installation manual

Graff Finezza installation instructions

Graff

Graff Finezza installation instructions

Streamline M-2460-67FSWH-FM installation instructions

Streamline

Streamline M-2460-67FSWH-FM installation instructions

Clou InBe IB/05.40302 installation instructions

Clou

Clou InBe IB/05.40302 installation instructions

glass 1989 DEK Installation & maintenance manual

glass 1989

glass 1989 DEK Installation & maintenance manual

American Standard ACRYLUX 6030Y.BW installation instructions

American Standard

American Standard ACRYLUX 6030Y.BW installation instructions

Kohler K-1106 installation guide

Kohler

Kohler K-1106 installation guide

RAVAK ROSA 95 quick start guide

RAVAK

RAVAK ROSA 95 quick start guide

STROMBERG CELSIUS Assembly & Operating Instruction

STROMBERG

STROMBERG CELSIUS Assembly & Operating Instruction

THE BOLD LOOK OF KOHLER K-1188 installation guide

THE BOLD LOOK OF KOHLER

THE BOLD LOOK OF KOHLER K-1188 installation guide

Kohler K-1377 Roughing-In Guide

Kohler

Kohler K-1377 Roughing-In Guide

Kohler K-1800 Installation and care guide

Kohler

Kohler K-1800 Installation and care guide

Kohler Mendota K-513-H installation guide

Kohler

Kohler Mendota K-513-H installation guide

manuals.online logo
manuals.online logoBrands
  • About & Mission
  • Contact us
  • Privacy Policy
  • Terms and Conditions

Copyright 2025 Manuals.Online. All Rights Reserved.