Waterworks EEBT01 Instruction sheet

PRODUCT SUPPORT | 800.927.2120 | WATERWORKS.COM PAGE 1 OF 4 | UPDATED ON 4.29.2021
STYLE No. EEBT01
Emile 67” x 27” x 27-1/2” Freestanding Oval
Cast Iron Bathtub
INSTALLATION GUIDELINES
IMPORTANT:
Immediately after receiving the BATHTUB and removal of packing,
you MUST inspect the unit for freight damage. Any claims for damage,
whether apparent or hidden, must be made to the carrier immediately
in order for them to assume all associated costs. Should inspection
reveal any defect in the finish, do not install the BATHTUB. Damage or
defect to the finish claimed after the BATHTUB is installed is excluded
from the warranty. The warranty DOES NOT cover labor or materials
to remove or re-install the BATHTUB.
To ensure this product is installed properly, you must read and follow
these guidelines.
The owner/user of this product must keep this information for future
reference.
CAUTION: This product is extremely heavy and adequate floor support
is required. Ensure the product is properly supported by the base.
This product must be installed by a professional licensed contractor.
Be sure your installation conforms to all federal, state, and local codes.
Inspect this product to assure it is the correct model and you have
all parts required for proper installation. Take all the necessary
precautions to ensure this product is protected during installation and
do NOT install this product if it has been damaged.
All final connections are made below the finished floor. Accessibility
below the finished floor is required.
The use of certain plumber’s putty may stain stone or tile surfaces.
WARNING: The following basic safety precautions should always be
followed when using your BATHTUB.
●Caution should always be exercised when entering or leaving the
BATHTUB.
●DANGER: To reduce the risk of injury, do NOT permit children
or persons with a disability to use the BATHTUB without close
supervision.
●Keep all electrical appliances such as radios and hairdryers a safe
distance from the BATHTUB.
●Do NOT use the BATHTUB when sleepy or drowsy, under
the influence of alcohol or prescription medications or when
overheated.
If further assistance is required, please contact Product Support at
1-800-927-2120 Monday through Friday, 8am – 6pm EST.
TECHNICAL DETAILS:
DETAIL SPECIFICATION
ADJUSTABLE LEVELERS/FEET YES
DRAIN HOLE DIAMETER 2-1/16” [53mm]
OVERFLOW HOLE DIAMETER 2-1/16” [53mm]
SINGLE OR DOUBLE ENDED DOUBLE ENDED
WATER CAPACTIY 57 gal [215 liters]
WEIGHT DRY 437 lbs. [198 kg]
FILLED 912 lbs. [414 kg]
REQUIRED PLUMBING DETAILS:
Universal Drain Plug Waste and Overflow Drain
STYLE No. UNWO76
PRODUCT SUPPORT | 800.927.2120 | WATERWORKS.COM PAGE 2 OF 4 | UPDATED ON 4.29.2021
STYLE No. EEBT01
Emile 67” x 27” x 27-1/2” Freestanding Oval
Cast Iron Bathtub
INSTALLATION GUIDELINES
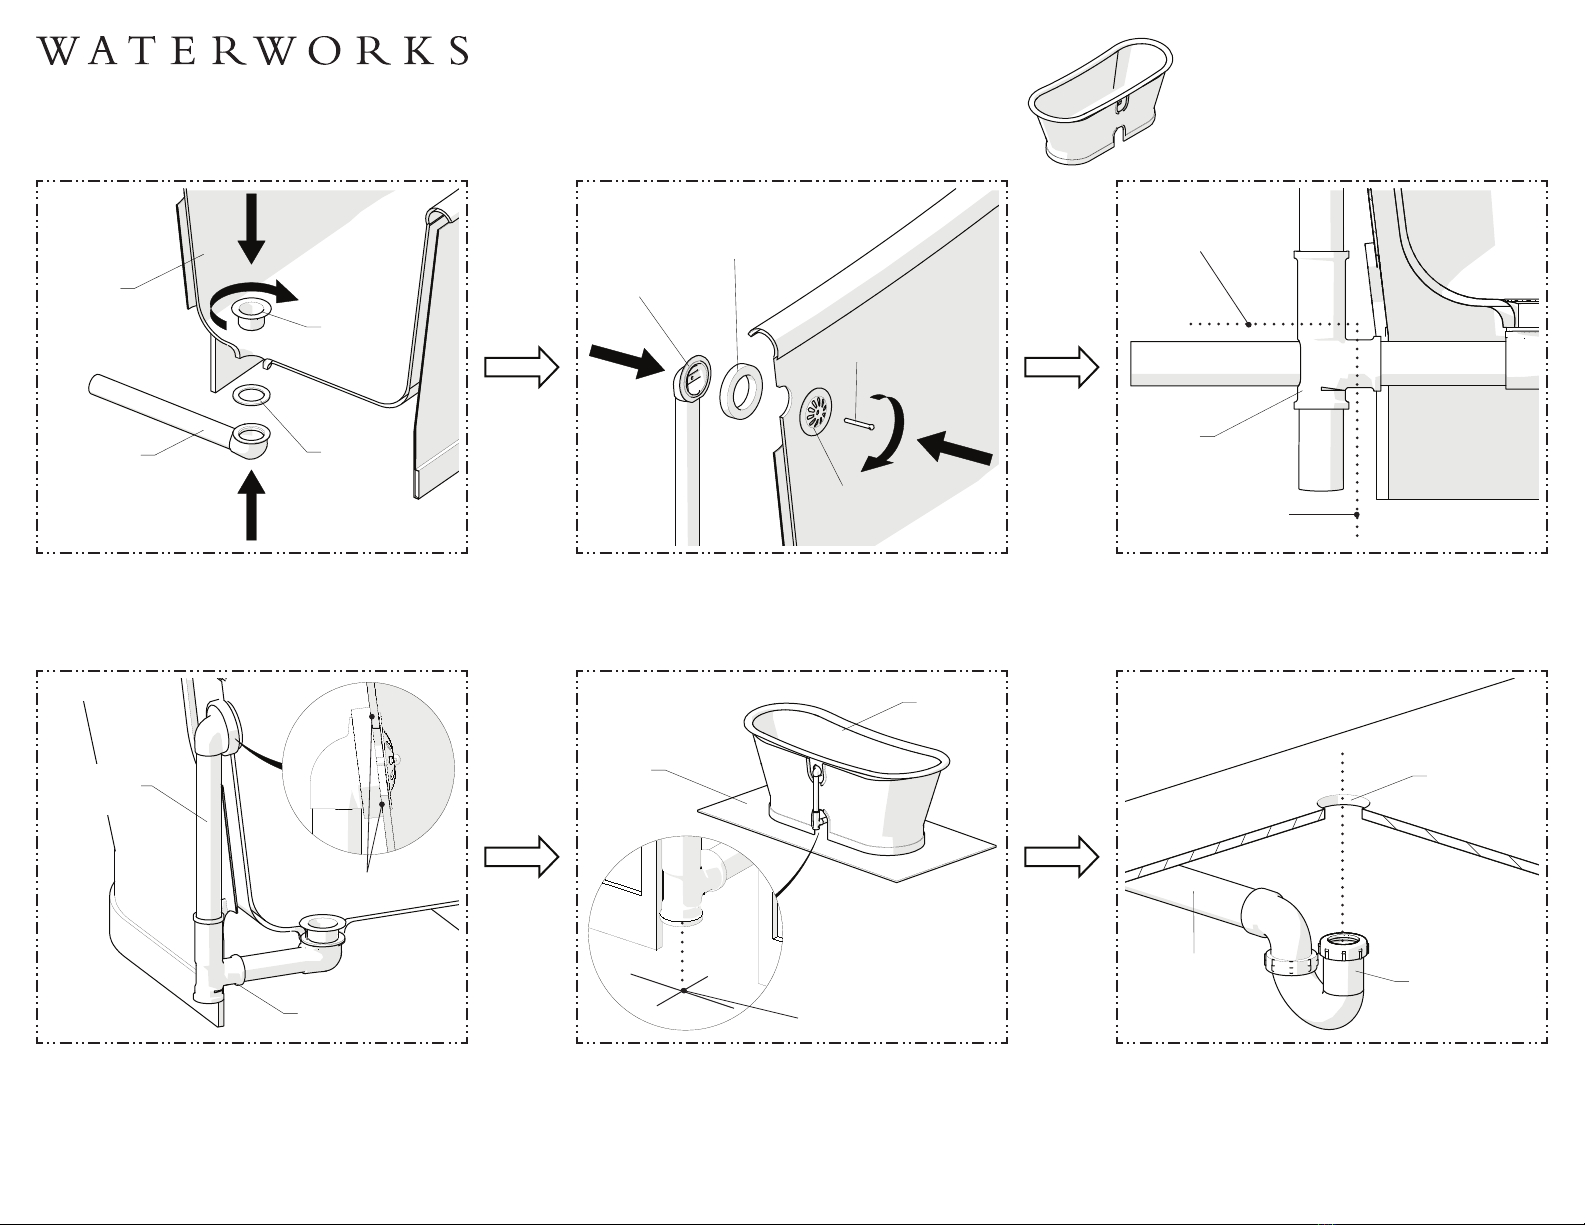
1. Dry-fit the DRAIN FLANGE and SHOE to the
BATHTUB using the DRAIN GASKET provided.
2. Dry-fit the OVERFLOW SHOE to the BATHTUB
using the OVERFLOW GASKET provided.
NOTE: The UNWO76 is provided with 1 flat GASKET
and 1 wedge GASKET. Use the appropriate GASKET
to ensure the OVERFLOW SHOE is plumb.
3. Hold the TEE up to the DRAIN and OVERFLOW
PIPES then mark and cut the PIPES to the
appropriate lengths.
NOTE: Ensure the PIPES will be inserted deep
enough into the TEE before cutting.
4. Connect the OVERFLOW to the DRAIN using the
TEE making sure the OVERFLOW PIPE is plumb
and there are no gaps between the OVERFLOW
GASKET and the BATHTUB.
5. If rough-in has not been completed, determine
the placement of the BATHTUB and mark the
floor where the TAILPIECE will pass through then
drill a hole through the floor to accommodate the
TAILPIECE.
NOTE: A 3” diameter ESCUTCHEON is provided
with the UNWO76 to conceal the hole in the floor.
6. Rough-in 1-1/2” diameter piping and ensure all
piping and fittings are well supported to eliminate
the possibility of shifting.
DRAIN SHOE RUBBER
GASKET
BATHTUB
DRAIN
FLANGE
* DRY-FIT
OVERFLOW
SHOE
RUBBER
GASKET
OVERFLOW
COVER
COVER
SCREW
* DRY-FIT
TEE
CUT MARK
[OVERFLOW PIPE]
CUT MARK
[DRAIN PIPE]
TEE
OVERFLOW
PIPE
[PLUMB]
* DRY-FIT
[FULL SEAL - NO GAPS]
FLOOR
BATHTUB
[MARK DRAIN LOCATION]
* POSITION BATHTUB
1-1/2" PIPE
[NOT SUPPLIED] TRAP ADAPTER
[NOT SUPPLIED]
DRAIN HOLE
* ROUGH-IN

PRODUCT SUPPORT | 800.927.2120 | WATERWORKS.COM PAGE 3 OF 4 | UPDATED ON 4.29.2021
STYLE No. EEBT01
Emile 67” x 27” x 27-1/2” Freestanding Oval
Cast Iron Bathtub
INSTALLATION GUIDELINES
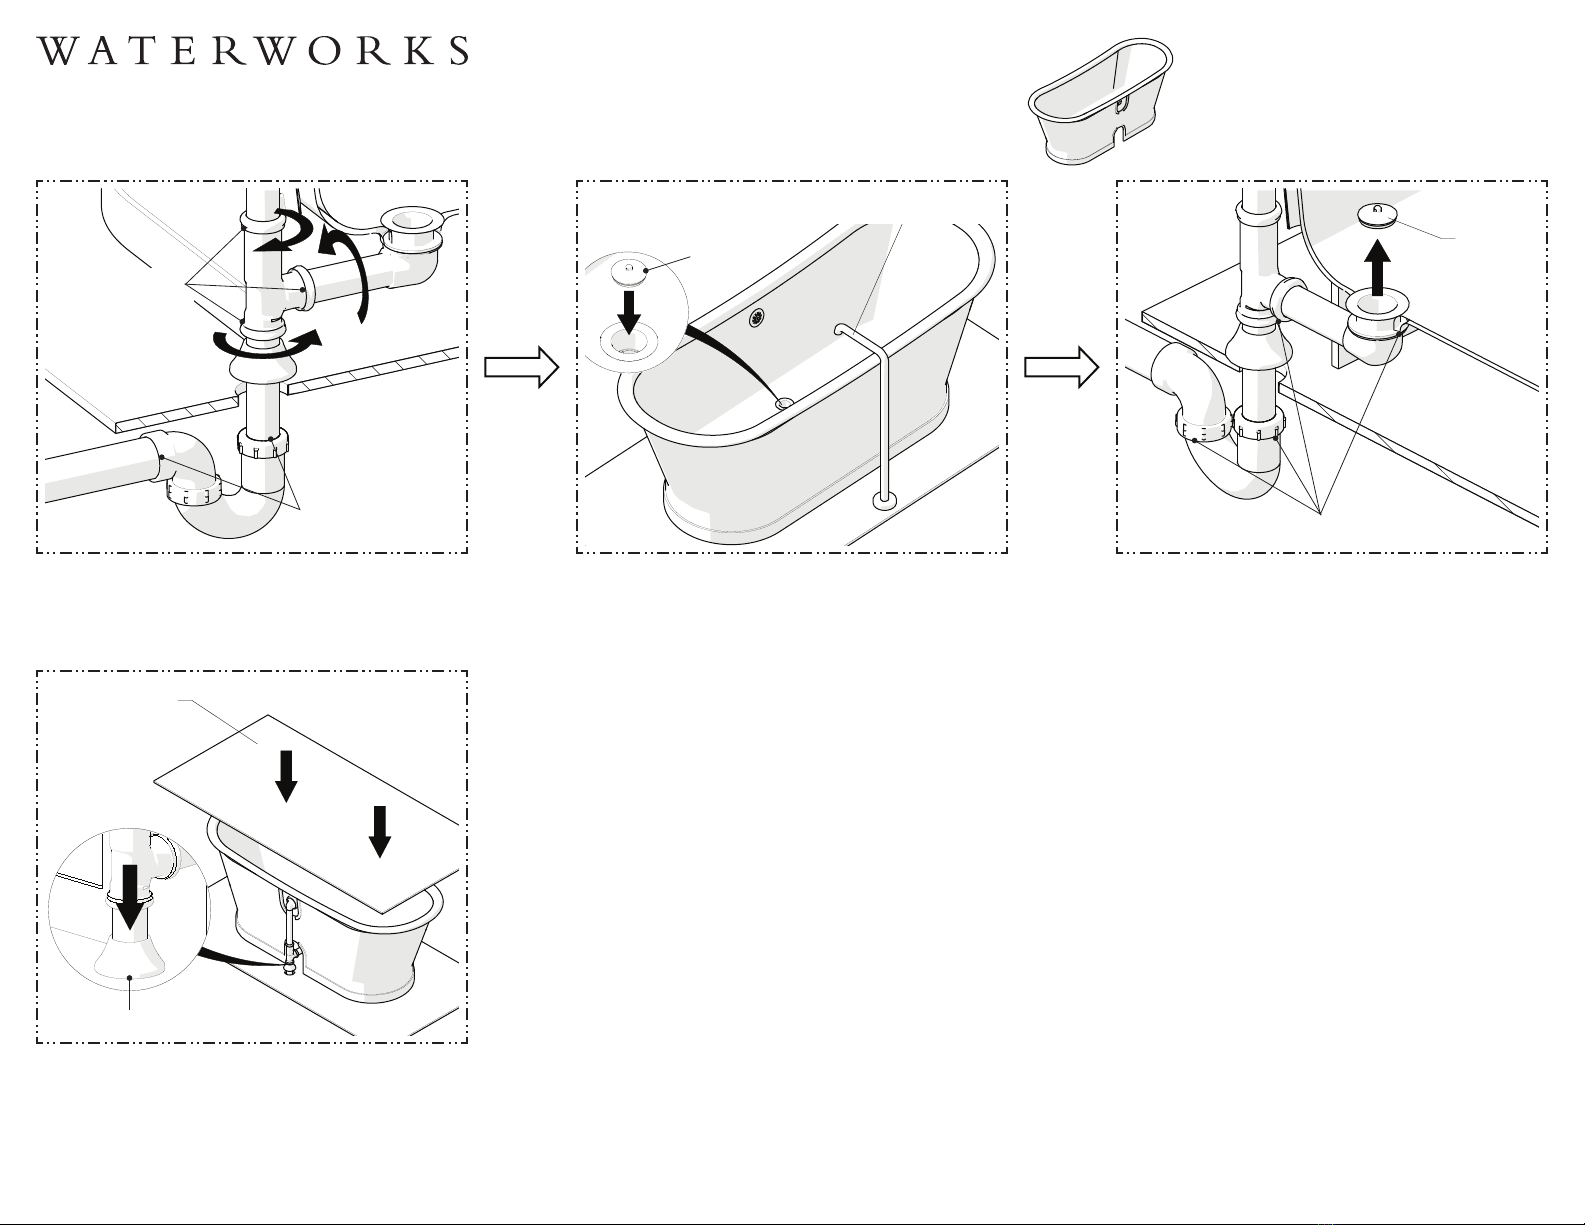
9. Slide a COMPRESSION NUT and RING onto the
DRAIN PIPE then connect the TEE to the PIPE.
7. Apply adequate non-staining plumber’s putty or
silicone to the DRAIN FLANGE then thread and
securely tighten the FLANGE into the DRAIN
SHOE.
8. Slide a COMPRESSION NUT and RING onto the
OVERFLOW PIPE then insert the PIPE into the TEE.
10. Using the appropriate GASKET, thread and securely
tighten the COVER SCREW into the OVERFLOW
SHOE.
11. Slide a COMPRESSION RING, COMPRESSION NUT
and the ESCUTCHEON onto the TAILPIECE then
apply pipe thread sealant to the TAILPIECE and
thread it into the TEE.
12. Position the BATHTUB so the TAILPIECE passes
through the hole in FLOOR and ensure the
BATHTUB sits level.
NOTE: The BATHTUB includes adjustable levelers.
DRAIN SHOE
RUBBER
GASKET
BATHTUB
DRAIN
FLANGE †
† APPLY PLUMBER'S
PUTTY OR SILICONE
OVERFLOW PIPE
COMPRESSION NUT
COMPRESSION RING
TEE
DRAIN PIPE
COMPRESSION NUT
COMPRESSION RING
TEE
OVERFLOW
SHOE
OVERFLOW
GASKET
OVERFLOW
COVER
COVER
SCREW
TEE
ESCUTCHEON
COMPRE-
SSION
NUT
COMPRESSION
RING
TAILPIECE
[THREAD
SEALANT]
FLOOR
BATHTUB
[ENSURE TUB
SITS LEVEL]
DRAIN HOLE
TAILPIECE
PRODUCT SUPPORT | 800.927.2120 | WATERWORKS.COM PAGE 4 OF 4 | UPDATED ON 4.29.2021
STYLE No. EEBT01
Emile 67” x 27” x 27-1/2” Freestanding Oval
Cast Iron Bathtub
INSTALLATION GUIDELINES
13. Cut the TAILPIECE as needed then make final drain
connections and tighten the COMPRESSIONS
NUTS.
14. Plug the DRAIN and fill the BATHTUB until water
enters the overflow hole.
15. Drain the BATHTUB and inspect all connections for
leaks.
16. Slide the ESCUTCHEON down the OVERFLOW
PIPE until it contacts the floor then cover the
BATHTUB surface with a liner or other protective
material (not supplied) until construction is
complete.
[MAKE FINAL DRAIN
CONNECTIONS]
COMPRESSION
NUT [x3]
SPOUT *
[SOLD SEPARATELY]
* TURN ON WATER
PLUG PLUG
[CHECK ALL CONNECTIONS
FOR LEAKS]
PROTECTIVE
MATERIAL
[NOT PROVIDED]
ESCUTCHEON
Other Waterworks Bathtub manuals

Popular Bathtub manuals by other brands


Lyons
Lyons Elite ETLxx663219 Series manual

Woodbridge
Woodbridge BJ500 Installation and care guide

Whirlpool
Whirlpool Ariel ARL-702 installation manual

TEIKO
TEIKO EXCELLENT DUO user manual

American Standard
American Standard Colony 5-1/2' x 32" Specification sheet

American Standard
American Standard 3052OD.X0X Installation instructions and owner's manual


