Lavorwash 152F User manual

ATTENZIONE: leggere le istruzioni prima dell’ utilizzo.
WARNING: read the instructions carefully before use.
ATTENTION: lire attentivement les istructions avant l’usage.
ACHTUNG: die anweisungen bitte vor gebrauch sorgfältig lesen.
ADVERTENCIA: leer atentamente las advertencias antes el uso de aparado.
ATENÇÃO: ler atentamente as instruções antes da utilização. и.
LET OP: vóór gebruik de gebruiksaanwijzing aandachtig lezen.
PAŽNJA: prije upotrebe pročitajte upute.
POZOR: pred uporabo preberite navodila.
MANUALE PER L’UTENTE pag. 4
MOTORE A BENZINA
OWNER’S MANUAL pag. 13
GENERAL GASOLINE ENGINE
MANUEL POUR L’UTILISATEUR page 21
MOTEURS À ESSENCE
BEDIENUNGSANLEITUNG Seite 31
BENZINMOTOREN
MANUAL PARA EL USUARIO pág. 40
MOTOR DE GASOLINA
GEBRUIKERSHANDLEIDING blz. 49
BENZINEMOTOR
MANUAL DO USUÁRIO pág. 58
MOTOR A GASOLINA
KORISNIČKI PRIRUČNIK str. 67
BENZINSKI MOTOR OPĆE NAMJENE
PRIROČNIK ZA UPORABNIKE str. 75
OBIČAJNI BENCINSKI MOTOR
2,5

INDICE
Prefazione................................................. pag. 4
Simboli ...................................................... pag. 4
Precauzioni di sicurezza ........................ pag. 4
Descrizione dei componenti................. pag. 5
Ispezione prima dell’avviamento.......... pag. 5
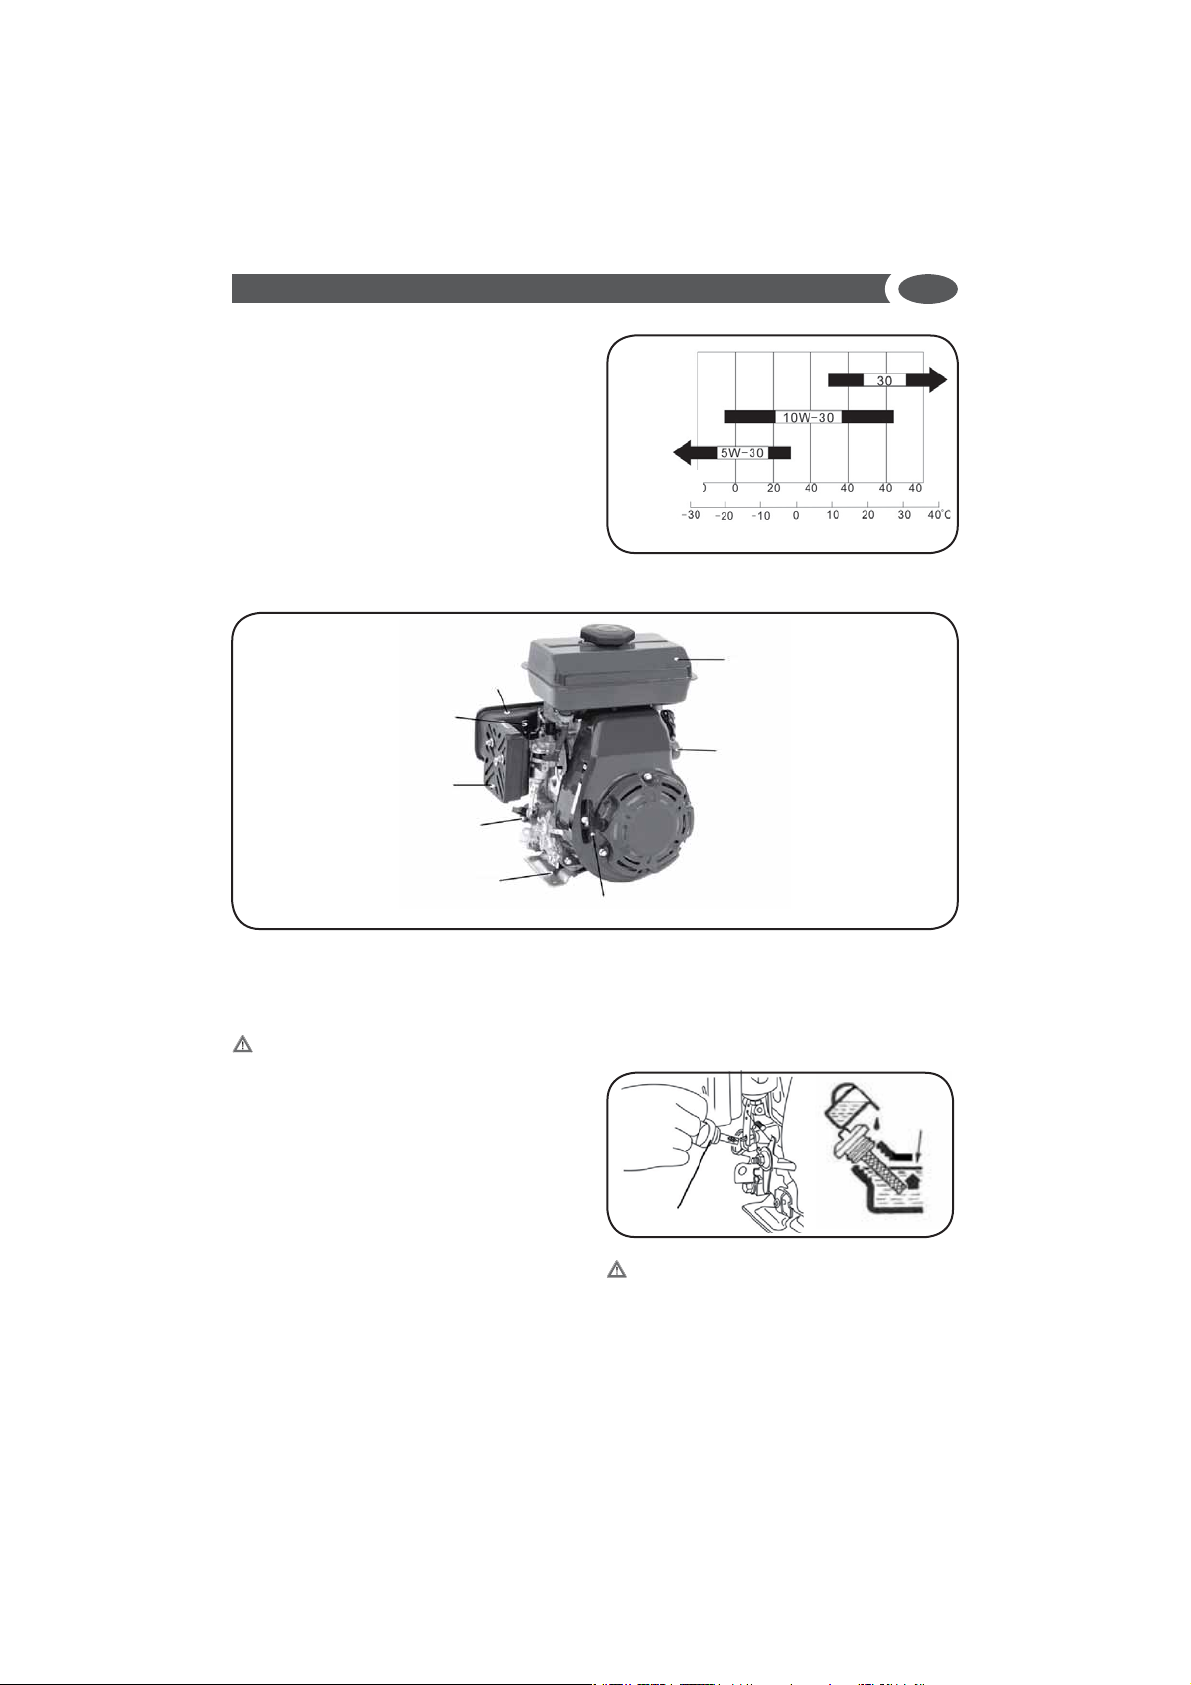
I. Olio motore .................................................pag. 5
II. Filtro aria .....................................................pag. 6
III. Carburante e serbatoio
carburante ................................................pag. 6
Avviamento motore ............................... pag. 6
Arresto motore ........................................ pag. 7
Manutenzione.......................................... pag. 8
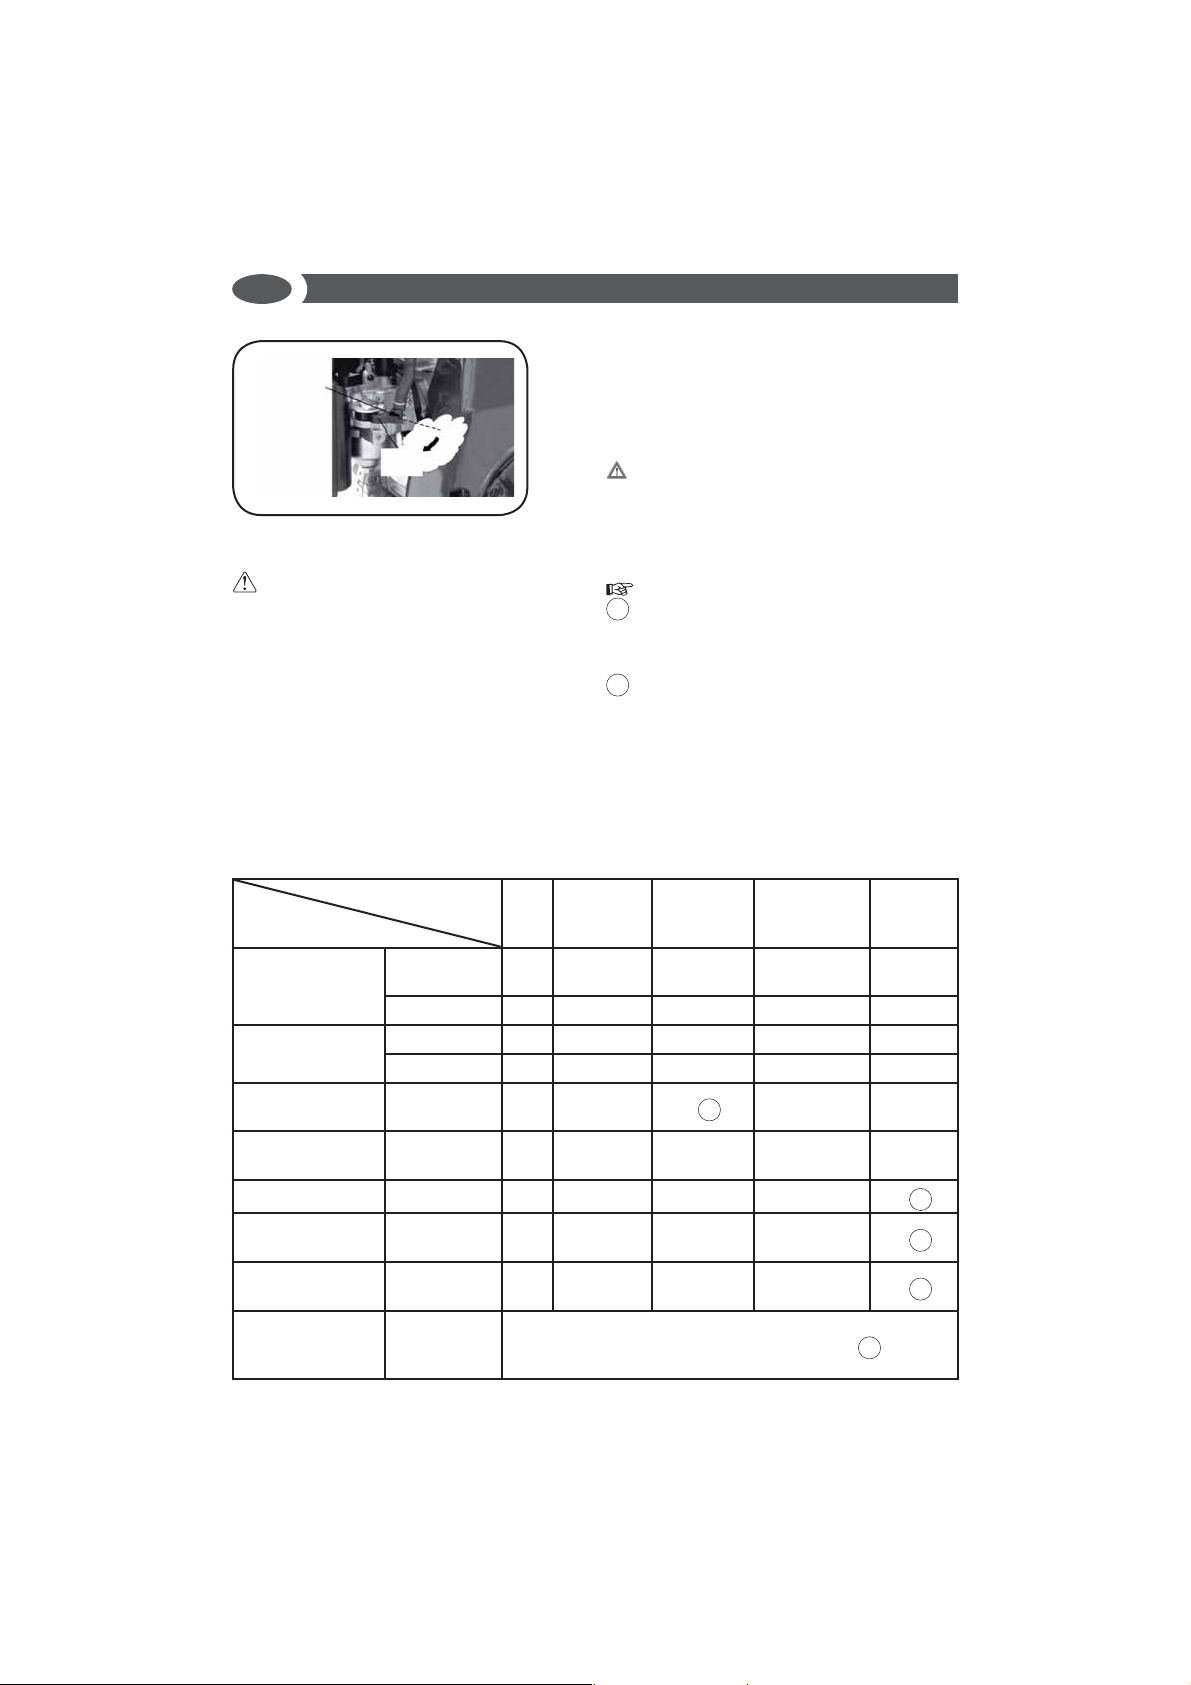
I. Programma di manutenzione ..............pag. 8
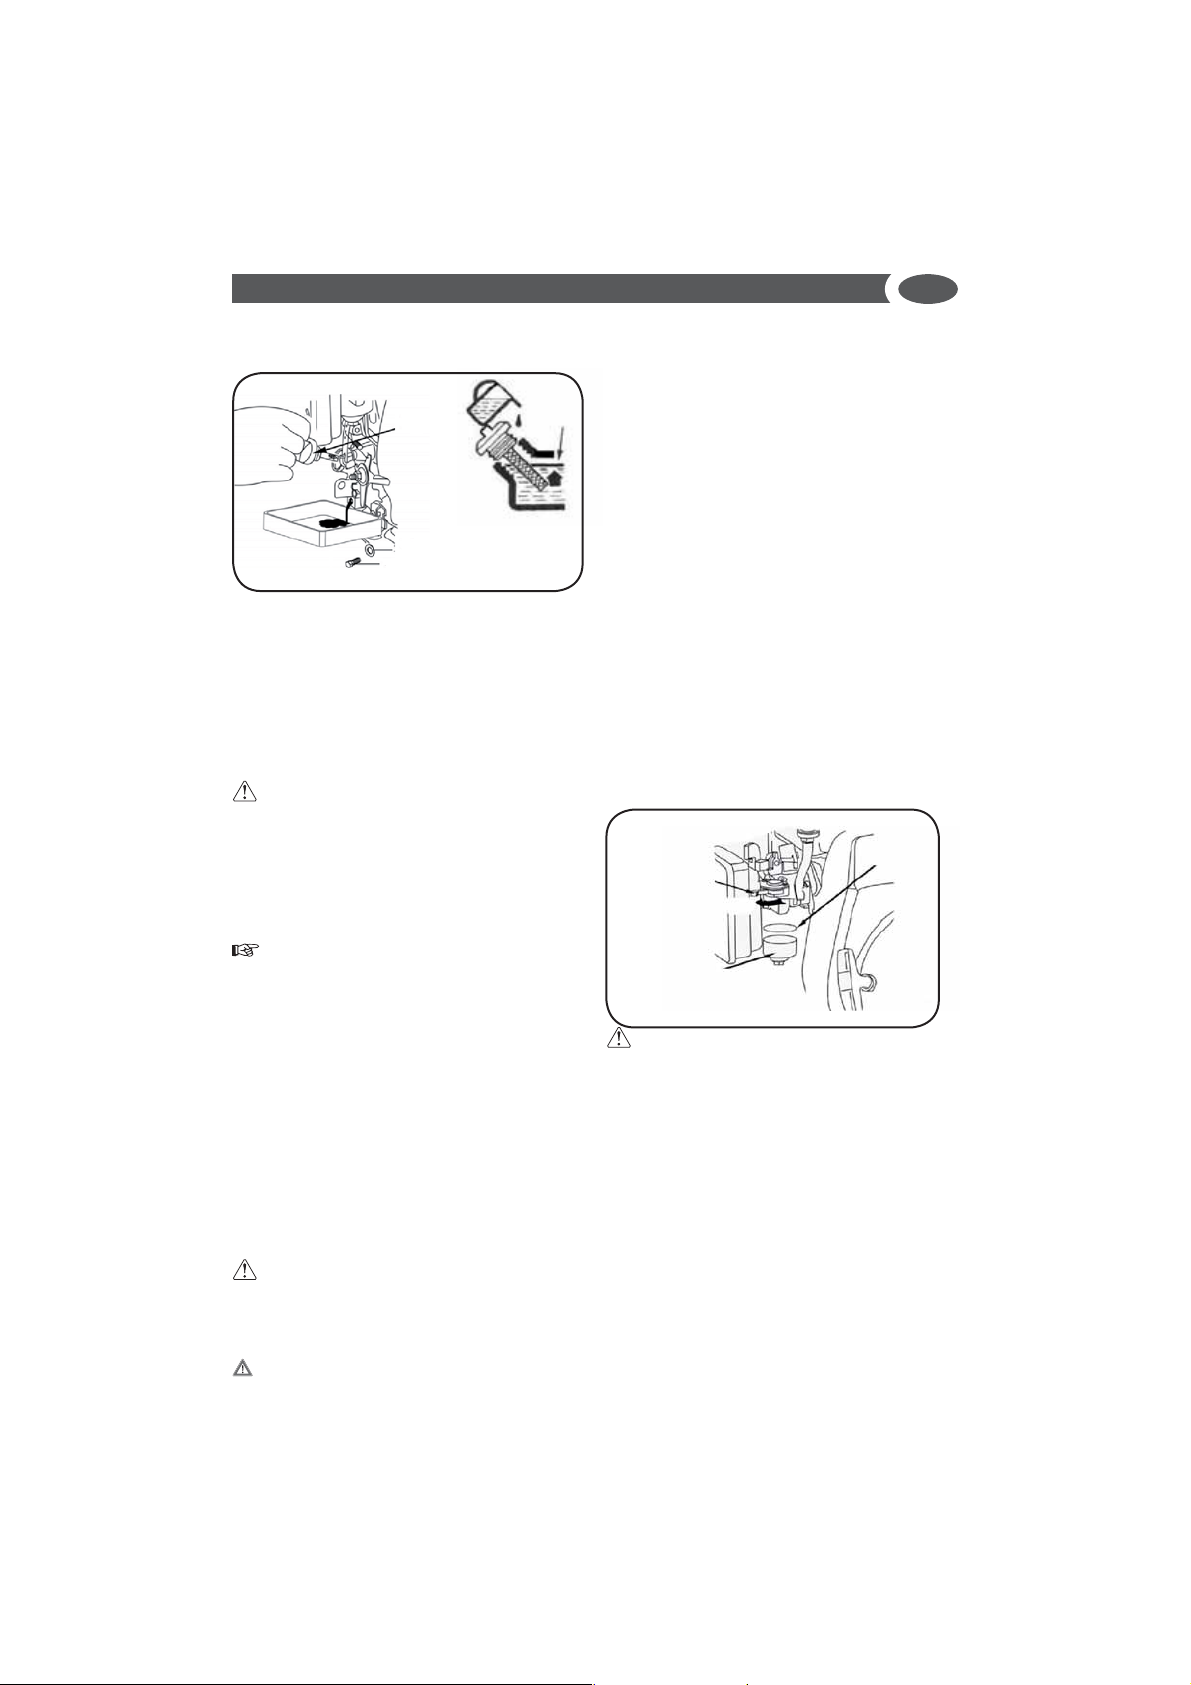
II. Sostituzione dell’olio motore...............pag. 9
III. Manutenzione del filtro aria................pag. 9
IV. Lavaggio della vaschetta
raccogli-sporco .......................................pag. 9
V. Candela........................................................pag. 9
Trasporto e stoccaggio .......................... pag. 10
I. Trasporto ......................................................pag. 10
II. Stoccaggio..................................................pag. 10
Identificazione problemi....................... pag. 11
Specifiche.................................................. pag. 12
Schema elettrico ..................................... pag. 12
INDEX
Preface....................................................... page 13
Symbols..................................................... page 13
Safety precautions.................................. page 13
Parts description ..................................... page 14
Pre-operation inspection...................... page 14
I. Engine oil ..................................................... page 14
II. Air cleaner................................................... page 14
III. Fuel and fuel tank ................................... page 15
Starting the engine................................. page 16
Stopping the engine............................... page 16
Maintenance ............................................ page 16
I. Maintenance schedule............................ page 16
II. Replacement of engine oil.................... page 17
III. Service of air cleaner.............................. page 17
IV. Washing of deposit cup........................ page 18
V. Spark plug................................................... page 18
Transport and storage............................ page 19
I. Transport ...................................................... page 19
II. Storage......................................................... page 19
Troubleshooting...................................... page 19
Specifications........................................... page 20
Electric diagram ...................................... page 20
SOMMAIRE
Préface....................................................... page 21
Symboles................................................... page 21
Précautions de sécurité.......................... page 21
Description des composants................. page 22
Contrôle avant le démarrage ................ page 22
I. Huile moteur............................................... page 22
II. Filtre air........................................................ page 23
III. Carburant et réservoir à
carburant................................................... page 23
Démarrage du moteur............................ page 24
Arrêt moteur............................................. page 25
Maintenance............................................. page 25
I. Programme de maintenance................ page 25
II. Vidange de l’huile moteur .................... page 26
III. Entretien du filtre à air........................... page 26
IV. Lavage du petit bac de
récupération de la saleté..................... page 27
V. Bougie.......................................................... page 27
Transport et stockage............................. page 28
I. Transport ...................................................... page 28
II. Stockage...................................................... page 28
Identification des problèmes ................ page 28
Spécifications tecniques ........................ page 30
Schéma électrique .................................. page 30
INHALT
Vorwort ..................................................... Seite 31
Symbole .................................................... Seite 31
Sicherheitsmaßnahmen......................... Seite 31
Beschreibung der Komponenten.......... Seite 32
Inspektion vor dem ersten
Anlassen.................................................. Seite 32
I. Motoröl ......................................................... Seite 32
II. Luftfilter....................................................... Seite 33
III. Kraftstoff und Kraftstofftank............... Seite 33
Anlassen des Motors............................... Seite 33
Motorstopp............................................... Seite 34
Wartung .................................................... Seite 35
I. Wartungsprogramm ................................ Seite 35
II. Wechsel des Motoröls............................. Seite 36
III. Wartung des Luftfilters ......................... Seite 36
IV.
Waschen des Schmutzbehälters
..... Seite 36
V. Zündkerze................................................... Seite 37
Transport und Lagerung ........................ Seite 37
I. Transport ...................................................... Seite 37
II. Lagerung..................................................... Seite 37
Feststellung der Probleme .................... Seite 38
Spezifikationen........................................ Seite 39
Schaltplan................................................. Seite 39
ÍNDICE
Introducción pág. 40
Símbolos pág. 40
Precauciones de seguridad pág. 40
Descripción de los componentes pág. 41
Inspección previa a la puesta
en marcha pág. 41
I. Aceite del motor pág. 41
II. Filtro del aire pág. 41
III. Carburante y tanque del
carburante pág. 42
Puesta en marcha del motor pág. 42
Parada del motor pág. 43
2

Parada del motor pág. 43
Mantenimiento pág. 44
I. Programa de mantenimiento pág. 44
II. Sustitución del aceite del motor pág. 44
III. Mantenimiento del filtro del aire pág. 44
IV. Lavado de la bandeja de
recogida de la suciedad pág. 44
V. Bujía pág. 45
Transporte y almacenamiento pág. 45
I. Transporte pág. 45
II. Almacenamiento pág. 47
Guía para la solución de problemas pág. 47
Especificaciones técnicas pág. 48
Esquema eléctrico pág. 48
INHOUD
Inleiding blz. 49
Symbolen blz. 49
Veiligheidsmaatregelen blz. 49
Beschrijving van de onderdelen blz. 50
Inspectie voor het starten blz. 50
I. Motorolie blz. 50
II. Luchtfilter blz. 51
III. Brandstof en brandstoftank blz. 51
De motor starten blz. 51
Stoppen van de motor blz. 52
Onderhoud blz. 53
I. Onderhoudsprogramma blz. 53
II. Verversen van de motorolie blz. 54
III. Onderhoud van het luchtfilter blz. 54
IV. Wassen van het
vuilopvangbakje blz. 54
V. Bougie blz. 54
Transport en opslag blz. 55
I. Transport blz. 55
II. Opslag blz. 55
Lokaliseren van problemen blz. 56
Specificaties blz. 57
Elektrisch schema blz. 57
ÍNDICE
Prefácio pág. 58
Símbolos pág. 58
Precauções de segurança pág. 58
Descrição dos componentes pág. 59
Inspecção antes do arranque pág. 59
I. Óleo do motor pág. 59
II. Filtro de ar pág. 60
III. Combustível e reservatório
combustível pág. 60
Arranque do motor pág. 60
Paragem do motor pág. 61
Manutenção pág. 62
I. Programa de manutenção pág. 62
II. Substituição do óleo do motor pág. 63
III. Manutenção do filtro de ar pág. 63
IV. Lavagem da cuba recolha
de sujidade pág. 63
V. Vela pág. 63
Transporte e armazenagem pág. 64
I. Transporte pág. 64
II. Armazenagem pág. 64
Identificação dos problemas pág. 65
Especificações pág. 66
Esquema eléctrico pág. 66
KAZALO
Uvod stranica 67
Simboli stranica 67
Sigurnosne mjere stranica 67
Opis dijelova stranica 68
Pregled prije uporabe stranica 68
I. Motorno ulje stranica 68
II. Filtar zraka stranica 68
III. Gorivo i spremnik goriva stranica 68
Pokretanje motora stranica 69
Zaustavljanje motora stranica 70
Održavanje stranica 70
I. Raspored održavanja stranica 71
II. Izmjena motornog ulja stranica 71
III. Servisiranje filtra zraka stranica 72
IV. Pranje posude za talog stranica 72
V. Svjećica stranica 72
Transport i skladištenje stranica 73
I. Transport stranica 73
II. Skladištenje stranica 73
Otklanjanje poteškoća stranica 73
Specifikacije stranica 74
Shema električnih instalacija stranica 74
KAZALO
Uvod stran 75
Simboli stran 75
Varnostni ukrepi stran 75
Opis delov stran 76
Pregled pred začetkom
obratovanja stran 76
I. Motorno olje stran 76
II. Zračni filter stran 76
III. Gorivo in rezervoar za gorivo stran 77
Zagon motorja stran 77
Zaustavitev motorja stran 78
Vzdrževanje stran 78
I. Načrt vzdrževanja stran 78
II. Zamenjava motornega olja stran 79
III. Pregled zračnega filtra stran 79
IV. Čiščenje posode za odlaganje stran 79
V. Vžigalna svečka stran 80
Prevoz in shranjevanje stran 80
I. Prevoz stran 81
II. Shranjevanje stran 81
Odpravljanje težav stran 81
Tehnični podatki stran 82
Električni diagram stran 82
3

PREFAZIONE
Grazie per aver scelto un motore a benzina della
nostra società.
Fondandosi sulla più moderna tecnologia
internazionale, la nostra società ha sviluppato motori
a benzina 152F, 154F monocilindro a quattro tempi,
valvole laterali e raffreddamento a circolazione
forzata di aria. Il motore è caratterizzato da design
avanzato, struttura compatta, prestazioni affidabili,
rumorosità e vibrazioni ridotte. É ampiamente
utilizzato come propulsore per svariate applicazioni
come pompe dell’acqua, set di generatori, cimatori,
trebbiatrici, macchine da giardinaggio ecc.
Il manuale fornisce informazioni relative al
comando e alla manutenzione del motore a benzina.
Si prega di leggerle accuratamente prima di utilizzare
il motore. Per aumentare le durata utile del motore,
seguire scrupolosamente le istruzioni sull’utilizzo e
la manutenzione contenute nel manuale.
Il presente manuale deve essere considerato parte
integrante del motore e deve essere consegnato
insieme al motore in caso di rivendita.
Tutti i materiali e gli schemi del presente manuale
sono riferiti ai prodotti più nuovi al momento
della pubblicazione. In seguito a revisioni ed altre
modifiche, le informazioni contenute nel presente
manuale potrebbero leggermente differire dalla
condizione attuale. Il copyright del presente manuale
è di proprietà della nostra società, pertanto è vietato,
sia alle società che alle persone fisiche, ristamparlo o
copiarlo. Con riserva di modifiche senza preavviso.
Si prega di porre particolare attenzione alle frasi
precedute dalle seguenti parole.
SIMBOLI
AVVERTENZA
Questo simbolo avverte l’utente che la mancata
osservanza delle procedure di esercizio e
manutenzione può comportare incidenti, a volte
mortali.
ATTENZIONE
Si avvisa l’utente che la mancata osservanza
delle procedure di esercizio e manutenzione può
comportare danni o distruzione delle attrezzature.
NOTA
Le note forniscono informazioni utili.
Nonostante il motore sia conforme agli standard di
sicurezza della EN 1679-1, l’utente deve considerare
il possibile pericolo derivante dalla sua installazione
insieme ad altri prodotti perché applicazioni diverse
potrebbero comportare nuovi rischi per il motore
e le macchine in cui è installato. Tutti gli utenti
devono quindi adottare le necessarie precauzioni di
sicurezza.
PRECAUZIONI DI SICUREZZA
AVVERTENZA
Assicurarsi di aver letto e compreso a fondo il
manuale prima di utilizzare il motore, perché
in caso contrario potrebbero accadere
incidenti alle persone e danni materiali.
Prestare particolare attenzione ai seguenti
punti:
1. Ispezionare sempre il motore prima di
avviarlo. In questo modo si possono
prevenire incidenti o danni alle cose.
2. Per prevenire pericoli di incendio e fornire
una ventilazione adeguata, mantenere il
motore a 1 metro di distanza dagli edifici e
dalle altre attrezzature mentre è in funzione.
Non collocare oggetti infiammabili vicino al
motore.
3. Tenere lontani bambini e animali dall’area
operativa del motore data la possibilità di
ustioni toccando i componenti caldi o di
incidenti derivanti dalle attrezzature.
4. Accertarsi di essere in grado di spegnere
rapidamente il motore e di aver compreso
l’utilizzo di tutti i comandi. Non consentire
a nessuno di utilizzare il motore senza
adeguate istruzioni.
5. Non collocare oggetti infiammabili come
carburante, accendini ecc. vicino al motore
funzionante.
6. Rifornirlo con carburante solo in aree ben
ventilate e a motore fermo.
7. Non riempire eccessivamente il serbatoio di
benzina. Nel bocchettone di riempimento
non deve rimanere carburante.
8. Dopo il rifornimento assicurarsi che il tappo
del serbatoio sia ben chiuso.
9. Se viene rovesciato carburante, pulirlo
accuratamente ed assicurarsi che l’area sia
asciutta prima di avviare il motore.
10. Non fumare e fare attenzione che non vi
siano fiamme o scintille nell’area in cui è
stoccato il motore o dove viene rifornito il
serbatoio.
11. Non far mai funzionare il motore in aree
chiuse. I fumi di scarico contengono un gas
velenoso, il monossido di carbonio (CO) che
può comportare svenimento e morte.
12. Collocare il motore su una piattaforma di
Istruzioni originali
IT
4

lavoro salda con pendenza non superiore a
20° per evitare la fuoriuscita di carburante.
13. Non appoggiare oggetti sul motore.
14. Durante il funzionamento il tubo di
scappamento diventa e rimane molto
caldo anche dopo l’arresto del motore. Non
toccarlo, pericolo di ustioni. Trasportare
o stoccare il motore solo quando è
completamente raffreddato.
DESCRIZIONE DEI COMPONENTI
Leparti principalidel motoresonoposizionate
come segue (Fig.1)
fig. 1
Serbatoio
Pulsante di
avviamento
Maniglia dello starter
Basamento
Astina di livello
Filtro dell’aria
Leva della valvola
dell’aria
Silenziatore
ISPEZIONE PRIMA DELL’AVVIAMEN-
TO
I. OLIO MOTORE
ATTENZIONE
t -PMJP EFM NPUPSF Ò VO FMFNFOUP
fondamentale per le prestazioni del motore.
Non utilizzare olio motore con additivi o per
motori a 2 tempi poiché non posseggono
capacità di lubricazione suciente e ciò
può ridurre la durata utile del motore.
t$POUSPMMBSFJMNPUPSFEBGFSNPFTVVOGPOEP
piano.
SAE15W – 40 (Fig. 2) è consigliato per un utilizzo
generale e tutte le temperature.
Poiché la viscosità varia a seconda delle regioni
e delle temperature, è necessario scegliere il
lubrificante secondo le nostre raccomandazioni.
Se viene utilizzato un olio per motori diverso,
tenere in considerazione la sua viscosità relativa
alla temperatura media della regione.
fig. 2
Temperatura ambiente
SAE
Temperatura
1. Assicurarsi che il motore sia fermo e su un
fondo piano.
2. Estrarre l’astina di livello e pulirla.
3. Reinserire l’astina di livello nel serbatoio
dell’olio senza avvitarla e controllare il livello
dell’olio.
4. Se il livello è insufficiente, aggiungere l’olio
raccomandato.
5. Reinserire l’astina di livello.
fig. 3
Livello
Astina di livello
ATTENZIONE
Il funzionamento del motore con un livello
di olio insuciente può comportare danni
molto gravi al motore.
IT
5

II. FILTRO ARIA
Controllare il filtro dell’aria e sostituirlo se è
sporco.
ATTENZIONE
Non avviare mai il motore senza ltro
dell’aria perché ciò accelererebbe l’usura del
motore.
III. CARBURANTE E SERBATOIO CARBURANTE
(Fig. 4)
1. Carburante
Questo motore funziona con benzina senza
piombo o con ridotto contenuto di piombo.
La benzina senza piombo riduce la possibilità
di produrre depositi di carbonio e aumenta la
durata utile del motore.
Non utilizzare mai una miscela di olio-benzina
o benzina impura. Fare attenzione che nel
serbatoio della benzina non possano penetrare
sporco, polvere o acqua.
2. Serbatoio carburante
Capacità del serbatoio: 1.4 litri
fig. 4
AVVERTENZA
t -B CFO[JOB Ò FTUSFNBNFOUF JOöBNNBCJMF
FEÒFTQMPTJWBJODFSUFDPOEJ[JPOJ
tFare rifornimento solo in aree ben
ventilate e a motore fermo. Non fumare e
fare attenzione che non vi siano amme
P TDJOUJMMF OFMMBSFB JO DVJ Ò DPOTFSWBUB MB
benzina o dove viene rifornito il serbatoio.
tNon riempire eccessivamente il serbatoio
(nel bocchettone non deve rimanere
benzina). Dopo il rifornimento, assicurarsi
che il tappo del serbatoio sia ben chiuso.
tFare attenzione a non rovesciare benzina
durante il rifornimento. La benzina
rovesciata o i suoi vapori possono
JOöBNNBSTJ4FÒTUBUBSPWFTDJBUBCFO[JOB
assicurarsi che l’area sia sucientemente
asciutta prima di avviare il motore.
tEvitare il contatto ripetuto o prolungato
con la pelle e non inalare i vapori di
benzina.
tTenere lontano dalla portata dei bambini.
AVVIAMENTO MOTORE
1.Portare ilrubinettodel carburantein posizione
ON (Fig. 5).
Rubinetto del
carburante
ON
fig. 5
2. Portare la leva della valvola dell’aria in
posizione OFF (Fig. 6).
NOTA
/POBQSJSFMBWBMWPMBEFMMBSJBTFJMNPUPSFÒ
DBMEPPMBUFNQFSBUVSBFTUFSOBÒFMFWBUB
fig. 6
Leva della valvola
dell’aria
ON
OFF
3. Abbassare leggermente la leva
dell’acceleratore in posizione FAST (veloce) (Fig.
7).
Leva acceleratore
Lento
Veloce
Manopola
fig. 7
4. Avviare il motore.
a) Portare la chiavetta di accensione in posizione
ON (Fig. 8).
b)Tirare leggermente la manopola (Fig. 7) della
IT
6

fune di avviamento fino a sentire resistenza,
quindi tirarla di colpo.
fig. 8
Pulsante d’avviamento
del motore
OFF
ON
ON
ATTENZIONE
Accompagnare con delicatezza il ritorno
della maniglia della fune di avviamento per
prevenire danni al motorino di avviamento.
5. APRIRE gradualmente la leva della valvola
dell’aria. Scaldare il motore finché gira bene
(Fig. 9).
fig. 9
Leva della valvola
dell’aria
ON
OFF
6. Agire sulla leva dell’acceleratore per far girare
il motore alla velocità desiderata (Fig. 7).
NOTA
Funzionamento ad alta quota
Ad alta quota, la miscela aria/benzina
TUBOEBSE OFM DBSCVSBUPSF Ò SFMBUJWBNFOUF
troppo ricca riducendo le prestazioni del
motore a causa dell’aumentato consumo di
benzina.
Le prestazioni ad alta quota possono
essere migliorate installando un iniettore
con diametro inferiore nel carburatore
e regolando lo spillo conico e la vite di
regolazione del minimo. Se il motore viene
sempre utilizzato ad altitudini superiori
a 1830 sul livello del mare, chiedere al
rivenditore di regolare il carburatore.La
potenzadel motorediminuiscedicircail3,5%
ogni 305 metri di aumento dell’altezza anche
se viene usato il corretto getto massimo
nel carburatore. L’inuenza dell’altitudine
TVMMB QPUFO[B Ò NBHHJPSF TF OPO WFOHPOP
apportate modiche al carburatore.
ATTENZIONE
Il motore allestito con il getto massimo
applicabile in altitudine può subire danni
gravi se utilizzato ad altitudini inferiori
QPJDIÏ MB NJTDFMB Ò USPQQP iQPWFSBw TJ
riduce la potenza ed il motore si surriscalda.
Rivolgersialpropriorivenditoreperriportare
il motore alla congurazione standard.
ARRESTO MOTORE
In caso di emergenza, portare l’interruttore di
accensione su“OFF”per arrestare il motore. A tal
fine procedere come segue:
1. Portare la leva dell’acceleratore nella
posizione SLOW (lento) (Fig. 10).
fig. 10
Leva acceleratore
Lento
Veloce
2. Portare l’interruttore del motore nella
posizione OFF (Fig. 11).
fig. 11
Pulsante d’avviamento
del motore
OFF
ON
OFF
3. Portare il rubinetto del carburante nella
posizione OFF (Fig. 12).
IT
7

Rubinetto
del
carburante
OFF
fig. 12
MANUTENZIONE
AVVERTENZA
t 4QFHOFSF JM NPUPSF QSJNB EJ FòFUUVBSF
qualsiasi intervento di manutenzione.
t1FSFWJUBSFBWWJBNFOUJBDDJEFOUBMJQPSUBSF
su OFF l’interruttore del motore e scollegare
la candela.
t *M NPUPSF EFWF FTTFSF SFWJTJPOBUP EBM
propriorivenditorea menoche ilproprietario
disponga di attrezzi adeguati, dei dati di
servizio e sia sucientemente qualicato.
I. PROGRAMMA DI MANUTENZIONE
Le ispezioni e le regolazioni periodiche
del motore sono essenziali per mantenere
prestazioni di alto livello. La manutenzione
regolare assicura anche una lunga durata utile
del motore. Gli intervalli di manutenzione ed
il tipo di manutenzione sono descritti nella
tabella che segue.
ATTENZIONE
Utilizzare solo pezzi di ricambio originali
fornitidalcostruttoreodiqualitàequivalente;
in caso contrario parti del motore potrebbero
subire danni.
NOTE
1
Se utilizzato in ambienti polverosi, il
motore deve essere revisionato con
maggiore frequenza di quella riportata
nella tabella.
2
(MJJOUFSWFOUJEFWPOPFTTFSFFòFUUVBUJEBM
rivenditore a meno che non possediate
una formazione specica o attrezzi
adeguati.
Frequenza
Componente
Ogni
volta
Primo mese
o dopo 20
ore
Ogni
stagione o
50 ore
Ogni 6 mesi o
100 ore
Ogni
anno o
300 ore
Olio motore
Controllo del
livello √
Sostituire √ √
Filtro dell’aria Controllare √
Pulire
Vaschetta raccogli-
sporco Pulire √ 1√
Candela Controllare/
Pulire √
Gioco valvola Pulire √ 2
Camera di
combustione Pulire √ 2
Serbatoio e filtro
carburante Pulire √ 2
Linea
alimentazione
carburante
Pulire Ogni due anni (se necessario sostituire) 2
IT
8

II. SOSTITUZIONE DELL’OLIO MOTORE
fig. 13
Livello
Tappo scarico
Serbatoio
olio
Rondella
Per facilitare lo scarico dell’olio motore, il
motore dovrebbe essere ancora caldo.
Svitare il tappo dell’olio e la vite di scarico per
a)
far fuoriuscire completamente l’olio.
Riavvitare bene il tappo di scarico.
b)
Riempire il serbatoio con l’olio specificato e
c)
controllare il livello.
Riavvitare il tappo del serbatoio.
d)
Rifornimento di olio motore: 0,45 litri
AVVERTENZA
Evitare il contatto ripetuto o prolungato
dell’olio motore con la pelle poiché potrebbe
provocare tumori alla pelle. Dopo aver
maneggiato l’olio, lavare accuratamente le
mani con acqua e sapone.
NOTA
Non gettare i barattoli dell’olio o l’olio
di scarto nella spazzatura o disperdere
l’olio nel terreno. Per tutelare l’ambiente,
raccomandiamo di conservare l’olio di scarto
in un contenitore chiuso e portarlo alla
stazione ecologica locale.
III. MANUTENZIONE DEL FILTRO ARIA
Un filtro dell’aria sporco può bloccare il flusso
dell’aria al carburatore, rendendolo insufficiente.
Per evitare che il carburatore dia problemi,
revisionare periodicamente il filtro dell’aria. Se il
motore viene utilizzato in zone molto polverose,
la manutenzione deve essere più frequente.
AVVERTENZA
Non pulire mai il ltro dell’aria con benzina
o detergenti con punto di esplosione basso,
pericolo di esplosioni.
ATTENZIONE
Non far mai funzionare il motore senza ltro
dell’aria perché nel motore, insieme all’aria,
penetrerebberosporcoe polvereaccelerando
l’usura del motore.
1. Svitare i 2 dadi M5, rimuovere il coperchio del
filtro aria ed estrarre l’elemento.
2. Lavare l’elemento del filtro con un solvente
non infiammabile o con un elevato punto di
esplosione ed asciugarlo accuratamente.
3. Immergere l’elemento in olio motore pulito
fino a quando è saturo, quindi strizzare via
l’olio in eccesso.
4. Rimontare le parti con la sequenza inversa a
quella dello smontaggio.
IV. LAVAGGIO DELLA VASCHETTA RACCOGLI-
SPORCO (Fig. 14)
Portare il rubinetto del carburante su “OFF”,
rimuovere la vaschetta raccogli-sporco e l’o-ring
e lavarli con un solvente non infiammabile o con
elevato punto di esplosione, farli asciugare e
rimontarli. Portare il rubinetto del serbatoio su
“ON”e controllare se vi sono perdite.
fig. 14
Rubinetto
OFF
O-ring
Vaschetta
AVVERTENZA
t-BCFO[JOBÒFTUSFNBNFOUFJOöBNNBCJMFFE
ÒFTQMPTJWBBDFSUFDPOEJ[JPOJ5FOFSFMPOUBOF
sigarette, scintille e amme libere.
t%PQPBWFSSFJOTUBMMBUPMBWBTDIFUUBSBDDPHMJ
sporco, controllare che non perda ed
assicurarsi che l’area attorno al motore sia
sucientemente asciutta.
V. CANDELA
Candele raccomandate: E5T, BM4A, BMR4A
(NGK).
Uno spazio adeguato della candela e l’assenza
didepositiattornoallacandelastessaconsentono
al motore di funzionare correttamente.
1. Rimuovere la candela mediante l’apposita
chiave (Fig. 15).
IT
9

fig. 15
AVVERTENZA
Fare attenzione a non toccare la marmitta
RVBOEP JM NPUPSF Ò JO GVO[JPOF P Ò BQQFOB
stato spento.
2. Controllare visivamente la candela. Pulirla
con una spazzola di ferro. Se l’isolatore è rotto
o spezzato o se la candela è usurata sostituirla
con una nuova.
3. Misurare lo spazio libero della candela con
uno spessimetro. Lo spazio deve essere di circa
0,6~0,7 mm (fig. 16). Se è necessario effettuare
una regolazione, piegare con delicatezza
l’elettrodo laterale.
4. Controllare che la guarnizione sia in buone
condizioni, in caso contrario sostituirla. Avvitare
la candela dapprima manualmente per non
danneggiare la filettatura (fig. 17).
5. Quindi serrarla con l’apposita chiave fino a
comprimere la guarnizione.
0.6 - 0.7 mm
fig. 16
NOTA
Se viene usata una nuova candela, girare
ulteriori 1/2 giri dopo il contatto con la
guarnizione, se viene rimontata quella
originale, girare 1/8~1/4.
ATTENZIONE
tLa candela deve essere avvitata saldamente,
in caso contrario si surriscalda danneggiando
il motore.
t Utilizzare solo candele raccomandate o
equivalenti. Una temperatura non corretta
della candela può provocare danni al
motore.
fig. 17
TRASPORTO E STOCCAGGIO
I. TRASPORTO
Trasportare il motore con il rubinetto del
carburante chiuso. Stoccarlo solo quando si è
raffreddato per evitare ustioni e incendi.
AVVERTENZA
Non inclinare il motore per evitare la
fuoriuscita di carburante. La benzina
rovesciata o i suoi vapori possono provocare
incendi.
II. STOCCAGGIO
Prima di stoccare il motore per tempi
prolungati:
Assicurarsi che l’area in cui verrà stoccato non
5.
sia troppo umida o polverosa.
Scaricare il carburante procedendo come
6.
segue:
AVVERTENZA
-BCFO[JOBÒFTUSFNBNFOUFJOöBNNBCJMFFE
Ò FTQMPTJWB JO DFSUF DPOEJ[JPOJ /PO GVNBSF
e fare attenzione che non vi siano amme o
scintille nell’area circostante il motore.
Chiudereilrubinettodelcarburante,rimuovere
a)
la vaschetta raccogli-sporco e pulirla.
Aprire il rubinetto e scaricare il carburante in
b)
un contenitore.
Rimontare la vaschetta raccogli-sporco.
c)
Allentare la vite di scarico del carburatore per
d)
scaricare il carburante nel contenitore.
Cambiare l’olio motore.
7.
Rimuovere la candela e versare circa un
8.
cucchiaio di olio pulito nel cilindro. Far girare
il motore per qualche giro per far distribuire
IT
10

bene l’olio all’interno del cilindro, quindi
rimontare la candela.
Tirare la fune d’avviamento fino a sentire
9.
resistenza, quindi chiudere la valvola. In
questo modo si evita che penetri polvere e si
proteggono i cilindri dalla ruggine.
Coprire il motore per tenere lontana la
10.
polvere.
IDENTIFICAZIONE PROBLEMI
Se il motore non si avvia con lo starter con
sistema di riavvolgimento:
1. L’interruttore di accensione del motore è in
posizione ON?
2. Vi è sufficiente olio motore?
3. Il rubinetto del carburante è in posizione ON?
4. Vi è benzina nel serbatoio?
5. La benzina arriva al carburatore?
Per controllare, allentare la vite di scarico del
carburatore e aprire il rubinetto (fig. 18).
fig. 18
Vite di
scarico
AVVERTENZA
4FÒTUBUBSPWFTDJBUBCFO[JOBBTTJDVSBSTJDIF
l’area sia sucientemente asciutta prima di
controllare la candela o avviare il motore. La
benzina rovesciata o i suoi vapori possono
inammarsi.
6. La candela emette una scintilla?
Scollegare il cappuccio della candela. Pulire
k)
lo sporco eventualmente presente attorno
alla base, quindi rimuovere la candela
Rimettere il cappuccio sulla candela.
l)
Collegandoaterral’elettrodolateralecon
m)
il corpo del motore, tirare lo starter con
sistema di riavvolgimento per vedere se
nello spazio libero vi è la scintilla.
Contattare il rivenditore se si presenta uno dei
suddetti problemi.
IT
11

SPECIFICHE
Motore a benzina
152F 154F
Tipo Monocilindro, 4 tempi, montato lateralmente
Cilindrata 98 cm
3
105 cm
3
Alesaggio x Corsa 52×46 54×46
Potenza 1h 1.1 kW/3600r/min 1.3 kW/3600r/min
Coppia massima 3.2 N.m/3000r/min 3.6 N.m/3000r/min
Consumo di carburante ≤445 g/kW.h
Sistema di raffreddamento Aria forzata
Sistema di avviamento Transistor magnetico senza contatto
Rotazione dell’albero della presa di forza Senso antiorario
Lunghezza 289 mm
Larghezza 270 mm
Altezza 345 mm
Peso a secco 9 kg
NOTA
-F TQFDJöDIF QPTTPOP EJòFSJSF B TFDPOEB EFJ NPEFMMJ F TPOP TPHHFUUF B NPEJöDIF TFO[B
preavviso.
SCHEMA ELETTRICO
B1 Pulsante avviamento motore
Transistor magnetico
Bobina di avviamentoCandela
B1
IT
12

PREFACE
Thank you for choosing a general gasoline
engine by the company.
Based on the latest engine technology at
home and abroad, our Co. has individually
developed general gasoline engine 152F-154F
with 4-stroke single cylinder, side-mounted
valve and forced-air cooling. The engine is
characterized by advanced design, compact
structure, reliable performance, low noise
and small vibration. It is widely used as ideal
power in many fields such as small-scale water
pump, generator set, cropper, thresher, garden
machinery, etc.
The manual gives information with respect
to operation and maintenance of the general
gasoline engine. Please read it carefully first
before operating. To extend the service life,
users should strictly follow the stipulations
stated in the manual to carry out operating and
maintenance.
This manual should be considered a
permanent part of the engine and should
remain with it if it is resold.
All the materials and diagrams of this manual
are in accordance with the newest products at
the publishing time. Due to revision and other
change, the information descried in this manual
may be a little different from the actual status.
The copyright of this manual belongs to our Co,
any group or individual is forbidden to reprint
or copy any it. The manual is subject to change
without notice.
Please pay special attention to statements
preceded by the following words.
SYMBOLS
WARNING
A warning is used to alert the user to fact
that hazardous operating and maintenance
procedures may result in injury to or death of
personnel if not strictly observed.
CAUTION
A caution is used to alert the user to fact
that hazardous operating and maintenance
procedures may result in damage to or
destruction of equipment if not strictly
observed.
NOTE
A note is used to give helpful information.
Although the engine conforms to the safety
requirement of EN1679-1, the user must notice
the possible danger when they install the engine
with other terminal products because the
different installing purposes maybe will result
in new danger to the engine and its driving
product. So, all users must be responsible to
take action for assuring the safety.
SAFETY PRECAUTIONS
WARNING
Before operating the engine, be sure to
read and familiar with the manual carefully,
otherwise injury to personnel or damage to
equipment may occur.
Please pay special attention to the following:
1. Always make a pre – operation inspection
before you start the engine. You may
prevent an accident or equipment damage.
2. To prevent fire hazards and to provide
adequate ventilation, keep the engine at
1 mater away from buildings and other
equipment during operation. Do not place
flammable objects close to the engine.
3. Children and pets must be kept away. From
the area of operation due to a possibility
of burns from hot engine components or
injury from any equipment the engine may
be used to operate.
4. Know how to stop the engine quickly, and
understand the operation of all controls.
Never permit anyone to operate the engine
without proper instructions.
5. Do not place flammable objects such as
gasoline, lighter, etc. Close to the engine
while it is running.
6. Refuel in a well – ventilated area with the
engine stopped.
7. Do not overfill the fuel tank. There should
be no fuel in the filler neck.
8. After refueling, make sure that the filler cap
is closed securely.
9. If any fuel is spilled, clean it up completely
and make sure the area is dry before starting
the engine.
10. Do not smoke or allow flames or sparks in
the area where gasoline is stored or where
the fuel tank is refueled.
11. Never run the engine in an enclosed area.
The exhaust contains poisonous carbon
monoxide (CO) gas that can cause loss of
consciousness and lead to death.
Translation of the original instructions EN
13

12. Locate the engine on a firm working
platform without an slant exceeding 20°to
avoid fuel’s spilling out.
13. Do not place any objects on the engine.
14. The exhaust muffler is very hot during
running the engine even after the engine
stops. Never touch it, or you may get burns.
Transport or store the engine with it cooling
down entirely.
PARTS DESCRIPTION
The main parts of engine are located as
follows (Fig.1)
fig. 1
Fuel tank
Ignition
switch
Starter handle
Base
Dipstick
Air cleaner
Choke lever
Muffler
PRE-OPERATION INSPECTION
I. ENGINE OIL
CAUTION
tEngine oil is a key factor in deciding the
engine’s performance. Do not apply engine
oilwithadditives or2–stroke gasoline engine
oil, as they haven’t enough lubrication, which
may shorten the engine’s service life.
tCheck the engine with it stopped on a level
ground.
SAE15W – 40 (Fig. 2) is recommended for
general, all temperature use.
As viscosity varies with regions and
temperatures, so the lubricant has to be selected
in accordance with our recommendation.
If single viscosity engine oil is to be used
instead, its viscosity corresponding to average
temperature of the region must be considered.
fig. 2
1. Ensure that the engine is stopped
on a level ground.
2. Remove the dipstick and clean it.
3. Reinsert the dipstick into the oil
filler without screwing in, and check
oil level.
4. If the oil level is too low, add the
recommended engine oil to the oil
filler nick.
5. Reinstall the dipstick.
fig. 3
Upper
level
Dipstick
CAUTION
Run with insucient engine oil may damage
the engine severely.
II. AIR CLEANER
Check the filter element for dirt, and remove it
if any.
CAUTION
Never run the engine without an air cleaner,
or severe wear of the engine may occur.
EN
14

III. FUEL AND FUEL TANK (Fig. 4)
1. Fuel
The engine must apply unleaded gasoline or
low–leaded gasoline. Using unleaded gasoline
will decrease the possibility of producing carbon
deposit and prolong the engine’s service life.
Never use an oil gasoline mixture or dirty
gasoline. Avoid getting dirt, dust or water in the
fuel tank.
2. Fuel Tank
Fuel tank capacity: 1.4 liters
fig. 4
WARNING
tGasoline is extremely ammable and is
explosive under certain conditions.
tRefueling in a well–ventilation area with
the engine stopped. Do not smoke and
allow ames or sparks in the area where
gasoline is stored or where the fuel tank is
refueled.
tDo not overll the tank (there should be
no fuel in the ller neck). After refueling,
make sure the fuel tank cap is set back
securely.
tBe careful not to spill fuel when refueling.
Spilled fuel or fuel vapor may ignite. If any
fuel is spilled, make sure the area is dry
enough before starting the engine.
tAvoid repeated or prolonged contact with
skin or breathing of fuel vapor.
tKeep out of reach of children.
STARTING THE ENGINE
1. Push the fuel cock to ON position (Fig. 5).
Fuel cock
ON
fig. 5
2. Push the choke lever to the OFF position (Fig. 6).
fig. 6
Chock lever
ON
OFF
NOTE
Do not the choke if the engine is warm or
the air temperature is high.3. Move down the
throttle lever slightly to the FAST position
(Fig. 7).
Throttle lever
Slow
Fast
Handle
fig. 7
4. Start the engine.
a) Push the engine switch to the ON position
(Fig. 8).
fig. 8
Engine switch
OFF
ON
ON
b)Pull slightly the starting rope handle (Fig. 7)
up until feeing anti-action, and then make a
rapid pull.
CAUTION
Return the starting rope handle gently to
prevent damage to the starter.
5. Gradually move the choke lever to the OPEN
position. Warm up the engine until it runs
smoothly (Fig. 9).
EN
15

fig. 9
Chock lever
ON
OFF
6. Set the throttle lever in proper position to
ensure the engine runs at required velocity (Fig.
7).
NOTE
Operating on Highlands
On highlands, the standard carburetor air/
fuel mixture is relatively too rich so the
engine performance may be impaired while
the fuel consumption may increase.
High altitude performance can be improved
by installing a smaller diameter main fuel
jet in the carburetor, and readjusting the
idle needle screw and the idle adjust screw.
If you always operate the engine at altitudes
higher than 1830m above sea level, ask your
dealer for adjusting the carburetor.
The engine power will decrease
approximately 3.5% for every 305 meters
increase in altitude, even the proper main jet
PG DBSCVSFUPS JT VTFE5IF BòFDU PG BMUJUVEF
on power will be greater than this if no
carburetor modication is conducted.
CAUTION
The engine equipped with the main jet
applicable to highlands may be damaged
seriously in area below specied altitude,
because its mixture ratio is too lean, output
dropsand the engineoverheatsfor operation
in low altitude area. In the case, ask your
dealer to recover the engine to its normal
technical status.
STOPPING THE ENGINE
In an emergency, push the engine switch to
“OFF”to stall the engine. Stop it in normal in the
following sequence:
1. Push up the throttle lever to the SLOW
position (Fig. 10).
Throttle lever
Slow
Fast
fig. 10
2. Push the engine switch to the OFF position
(Fig. 11).
Engine switch
OFF
ON
OFF
fig. 11
3. Set the fuel cock to the OFF position (Fig. 12).
Fuel cock
OFF
fig. 12
MAINTENANCE
WARNING
t4IVUPòUIFFOHJOFCFGPSFQFSGPSNJOHBOZ
maintenance.
t5P QSFWFOU BDDJEFOUBM TUBSU o VQ UVSO 0''
the engine switch and disconnect the spark
plug cap.
t 5IF FOHJOF TIPVME CF TFSWJDFE CZ ZPVS
dealer unless the owner has proper tools
and service data and fells hie is mechanically
qualied.
I. MAINTENANCE SCHEDULE
Periodic inspection and adjustment of the
engine is essential if high level performance is
to be maintained. Regular maintenance will also
ensure a long service life. The required service
intervals and the kind of maintenance to be
performed are described on the table below.
EN
16

CAUTION
Use only genuine parts manufactured by the
company or equivalents in quality; otherwise
damage to equipment may occur.
NOTES
1
The item should be serviced more often
than that in the schedule if used in dusty
circumstances.
2
The items should be done by your dealer
unless you are specially trained and is
well equipped with tools.
II. REPLACEMENT OF ENGINE OIL
fig. 13
Upper
level
Drain plug
Oil filler
Washer
A still hot engine is helpful to drain out the
engine oil in the crankcase rapidly and entirely.
Turn off the oil filler cap and drain plug to
a)
drain engine oil thoroughly.
Reinstall the drain plug and screw in securely.
b)
Fill the specified engine, and check the oil
c)
level.
Reinstall the oil filler cap.
d)
Engine oil capacity: 0.45L
WARNING
Do not contact engine oil repeatedly for
long–time, otherwise, it may cause skin
cancer. Wash your hands with soap and water
immediately after handling oil.
NOTE : Do not dump oil containers or
discardedengineoilintorubbishboxesoronto
the ground. For the sake of environmental
protection, we suggest you take in discarded
engine oil with a closed container and bring
to local recycling station.
III. SERVICE OF AIR CLEANER
A dirty air cleaner may block enough
air’s flowing into the carburetor. To prevent the
carburetor from producing of trouble, please
service the air cleaner periodically. If operating
the engine in extremely dusty area, the job
should be done more often.
WARNING
Never clean the air cleaner core in gasoline or
low ash–point detergents, or explosion may
happen.
CAUTION
Never run the engine without an air cleaner,
or air with dirt and dust may enter the engine
so speed the engine’s wear.
Frequency
Item
Each
time
First month
or 20 hrs
Each season
or 50 hrs
Each 6-month
or 100 hrs
Each year
or 300 hrs
Engine oil Oil level check √
Replace √ √
Air cleaner Check √
Clean
Deposit cup Clean √ 1√
Spark plug Check/Clean √
Valve clearance Clean √ 2
Combustion chamber
Clean √ 2
Fuel tank & fuel filter Clean √ 2
Fuel supply line Clean Every two years (do a replacement if necessary) 2
EN
17

1. Unscrew 2 nuts M5 and remove the air cleaner
cover, take out the element.
2. Wash the element in a nonflammable or high
flash point solvent and dry it thoroughly.
3. Soak the element in clean engine oil until it
becomes saturated, and then squeeze out the
excess oil.
4. Install the removed parts in the reverse order
of removal.
IV. WASHING OF DEPOSIT CUP (Fig. 14)
fig. 14
Fuel cock
OFF
O-ring
Deposit cup
Set the fuel cock at “OFF”, remove the deposit
cup and O-ring. Wash them in non-flammable
or high flash-point cleansing solvents, and then
dry them up, at last, carry out reinstallation. Set
the fuel cock to“ON” and check for leaks.
WARNING
t (BTPMJOF JT FYUSFNFMZ øBNNBCMF BOE
explosive in certain conditions. Keep
cigarette, sparks and open ames away.
t"GUFSSFJOTUBMMJOH UIF EFQPTJUDVQ DIFDL JU
for leakage and make sure the area around
the engine is dry enough.
V. SPARK PLUG
Spark plug recommended: E5T, BM4A, BMR4A
(NGK).
Proper spark plug clearance ensures the
engine’s normal running under no deposit
around the spark plug.
1. Remove the spark plug by means of spark
plug wrench (Fig. 15).
fig. 15
WARNING
Be careful not to touch the muer and the
spark plug during or just after running the
engine.
2.Visually inspect the spark plug. Clean the spark
plug with a steel brush. If the insulator is cracked
or chipped, or if there is apparent wear, replace
the spark plug with new one.
3. Measure the spark plug clearance with a feeler.
The clearance should be 0.6~0.7mm (Fig. 16).
0.6 - 0.7 mm
fig. 16
If adjustment is necessary, bend the side
electrode carefully.
4. Check if the spark plug gasket is in good
conditions, or replace with a new one. Screw
on the spark plug to the bottom first by hand to
prevent cross – threading (Fig. 17).
fig. 17
5. After the spark plug is seated, tighten it up by
a spark plug wrench to compress the gasket.
NOTE
If a new spark plug is used, twist 1/2 more
turns after impacting the gasket; if reinstall
the original one, just twist 1/8~1/4 more
turns.
CAUTION
tThe spark plug must be tightened securely,
or it may become very hot to damage the
engine.
t Only use recommended spark plug or the
equivalent. Incorrect heat range of the spark
EN
18

plug may damage the engine.
TRANSPORT AND STORAGE
I. TRANSPORT
Transport with the fuel cock turned off.
Transport or store the engine when it is cool so
as to avoid getting burns or fire.
WARNING
Do not incline the engine so as to avoid
spilling fuel. Spilled fuel or fuel vapor may
ignite to cause re.
II. STORAGE
Before storing the engine for an extended
period:
Be sure the storage area is free of excessive
5.
humidity and dust.
Drain the fuel as follows:
6.
WARNING
Gasoline is extremely ammable and is
explosive under certain conditions. Do
not smoke or allow ames or sparks in the
area.
Set the fuel cock to the OFF position, remove
a)
the deposit cup and clean it.
Set the fuel cock to the ON position, and
b)
drain the fuel into the container.
Install the deposit cup to the original
c)
position.
Loosen the carburetor drain screw to drain
d)
the fuel into the container.
Change the engine oil.
7.
Remove the spark plug and pour about
8.
a tablespoon of clean engine oil into the
cylinder. Cranktheengine severalrevolutions
to scatter evenly the oil inside the cylinder,
then reinstall the spark plug.
Pull the starter rope slowly until resistance
9.
is felt, thus closing the valve. Such operation
prevents getting of dust or protects the
cylinder well from rusting.
Cover the engine to keep out dust.
10.
TROUBLESHOOTING
When the engine will not start with the recoil
starter:
1. Is the engine switch in the ON position?
2. Is there engine oil enough?
3. Is there fuel cock in the ON position?
4. Is there fuel in the fuel tank?
5. If gasoline reaching the carburetor?
To check, loosen the carburetor drain screw and
set the cock to the ON position (Fig. 18).
fig. 18
Drain screw
WARNING
If any fuel is spilled, make sure that the area
is dry before checking the spark plug or
starting the engine. Spilled fuel or fuel vapor
may ignite.
6. Is there a spark the spark plug?
Disconnect the spark plug cap. Clean any
k)
dirt from around the spark plug base, the
remove the spark plug.
Install the cap onto the spark plug.
l)
Grounding the side electrode to the
m)
engine body, pull the recoil starter to see if
sparks jump across the gap.
Once you find any of above problems, contact
the authorization, entitle to the dealer of the
privilege helps for you.
EN
19

SPECIFICATIONS
Gasoline Engine
152F 154F
Type Single cylinder, 4 – stroke, Side – mounted rave
Displacement 98 cm
3
105 cm
3
Bore x Stroke 52×46 54×46
1h output 1.1 kW/3600r/min 1.3 kW/3600r/min
Max. torque 3.2 N.m/3000r/min 3.6 N.m/3000r/min
Fuel consumption ≤445 g/kW.h
Cooling system Forced air
Ignition system Non contact transistor magneto
PTO shaft rotation Counterclockwise
Lenght 289 mm
Width 270 mm
Height 345 mm
Dry weight 9 kg
NOTE
Specications may vary according to the types, and are subject to change without notice.
ELECTRIC DIAGRAM
B1 Engine switch
Transistor magneto
Ignition coilSpark plug
B1
EN
20
This manual suits for next models
1
Table of contents
Languages:
Other Lavorwash Engine manuals
Popular Engine manuals by other brands

Lenze
Lenze MCA10I40 Series Mounting and switch-on instructions

Becker
Becker E03a Assembly and operating instructions

MTD
MTD P90 Series Shop Manual

Siemens
Siemens SIMOTICS DP operating instructions

Wilo
Wilo MultiCargo MC Installation and operating instructions

Briggs & Stratton
Briggs & Stratton 190000 Series Operator's manual