LAWN STAR LSH 2660 P User manual

PRO-SERIES
PETROL HEDGE TRIMMER
OPERATING INSTRUCTIONS
MODEL: LSH 2660 P

2
Thank you for purchasing the Lawn Star Petrol hedge trimmer which is one of the finest
and most advanced hedge trimmers today’s technology can produce. Before you begin
using it, please read this manual carefully and familiarise yourself with the control and the
proper use of this product to ensure you get the best possible performance from it.
SAFETY PRECAUTIONS
Inspect your hedge trimmer before each operation. Pay special attention to the
cutting-bar. If any part is damaged or worn, repair or replace before operation.
Use only genuine Lawn Star (Pty) Ltd. replacement parts when servicing or repairing
the unit. These parts are available from your supplying dealer or service agent.
Check regularly that all screws are properly secured. Check the cutting blades
regularly and if they are damaged have them repaired or replaced by an authorised
service agent or dealer.
It is essential that the operator wears safety goggles, protective clothing and
sturdy, non-slip footwear.
Make sure the safety shield and blade guard are always mounted when using
the hedge trimmer. Never remove any of its components and never use a
damaged or incomplete machine. Never modify any of the machine
components.
Do not use your hedge trimmer for any jobs other than those for which it was
intended. Do not force your trimmer. If motor labours, pull away from hedge, bushes
and shrubs.
Use care in picking up or holding the unit. Do not grasp the cutting blades or carry the
hedge trimmer by taking hold of the blades.
Hold the hedge trimmer firmly with both hands during operation.
Avoid dangerous environments. Do not use the unit in poor light or in damp or wet
locations. Do not use in the rain. Do not use on steep slopes, especially if damp.
Work across slope faces, not up and down. Do not over-reach. Ensure good footing
and balance is maintained.
Keep hands and feet clear of the cutting blades while unit is in use. Cutting blades
continue to reciprocate after switch-off.
When not in use, stop the hedge trimmer and put it down in such a manner that there
is no risk of injury.
Do not allow children under 16, nor anyone who is not familiar with these instructions
to use the hedge trimmer. Children, pets and onlookers should be kept at least 15
meters away from the work area, unless shielded by an effective solid barrier.
The hedge trimmer should be used by trained and experienced persons only.
Keep the operating instructions for future reference.
Do not operate this equipment when tired, ill, or under the influence of alcohol, drugs
or medication.
Only operate the hedge trimmer if physically fit and alert.
Obey all safety instructions and warnings.
Before storage allow the engine to cool. When not in use, store the hedge trimmer in
a dry and locked place, out of reach of children.
Switch the device off, wait for the cutting bar to come to a complete standstill and
disconnect the spark plug before setting, servicing, cleaning, transportation or
storage.
Always use the cutting bar cover when transporting the hedge trimmer.
Hold the hedge trimmer firmly when starting. The cutting bar must be free.
Always ensure all handles and guards are fitted when using the hedge trimmer.
Ensure all screws and nuts are properly tightened before use.

3
Only operate this hedge trimmer once correctly and fully assembled.
Switch the hedge trimmer off immediately if you notice any changes in the machine.
Never leave the hedge trimmer unsupervised.
If the cutting bar becomes jammed or blocked by obstacles, switch the engine off
immediately and visually inspect the cutting bar for damage. Note, if the cutting bar is
damaged, repairs and servicing must only be performed by authorised dealers and
service agents.
Cut at high engine speeds. Never start the machine while the cutting bar rests on an
object.
WARNING: Petrol and its vapours are highly flammable. Always stop the engine
before refuelling. Do not smoke or light any flames while refuelling. Wipe off any fuel
that may have spilled. Refuel in a well ventilated area and never in closed
environments. Start the engine away from the place where it was refuelled. Ensure
the tank cap is tightened properly. Return the hedge trimmer to its normal operating
position before starting.
CAUTION: Exhaust fumes are toxic and asphyxiating. Inhalation may be lethal. Do
not start the engine in closed or poorly ventilated environments.
LIST OF MAIN PARTS
1. Front handle
2. recoil starter
3. Fuel tank
4. Engine switch
5. Throttle trigger lockout
6. Rear handle
7. Throttle trigger
8. Handle Locking knob
9. Air filter
10.Blade Safety Guard
11.Cutting blade
12.Fuel mixing bottle
13.Socket spanner
14.Screw driver
15.Safety shield
Fig. 1
15

4
PREPARATIONS FOR USE
Please always read the instruction manual carefully and check the machine before
operating.
This product is equipped with a 2-stroke engine which requires 2-stroke lubricating oil
to be pre-mixed with petrol. Mix both thoroughly (as per fuel-mix ratio) in a separate
container. Always prepare the fuel-mixture and refuel the hedge trimmer outside in a
well-ventilated environment.
Check the cutting attachment, never use blades that are dull, cracked or damaged.
Make sure the handle and safety features are in good working order. Never use a
machine that lacks a part or has been modified outside its specifications.
The enclosures must be correctly fitted and undamaged before you start the machine.
Inspect the hedge and work area to avoid damaging the cutting blades:
-Remove wire, rope and pieces of metal and other solid objects.
-When working close to the ground, make sure that no sand, grit or stones get -
between the blades.
-Take particular care when cutting hedges next to or against wire fences.
Remove the two plastic blade protection strips.
FUELLING
This product is equipped with a 2-stroke engine which requires 2-stroke lubricating oil
to be pre-mixed with petrol. Mix both thoroughly (as per fuel-mix ratio) in a separate
container. Always prepare the fuel-mixture and refuel the chainsaw outside in a well-
ventilated environment.
Use Lawn Star high performance 2-stroke oil (stock code 90-20000) and lead-free
petrol (Octane 95).
Oil/Fuel mix ratio for normal 2-stroke engine oil - 1:25 (4%) e.g. 40 ml of oil per
1 litre of petrol
Always stop the engine before refuelling. Do not smoke or light any flames while
refuelling.
Wipe off any fuel that may have spilled. Start the engine away from the place where it
was refuelled. Ensure the tank cap is tightened properly. Return hedge trimmer to its
normal operating position before starting.

5
STARTING COLD ENGINE
1. Switch the ON/OFF switch (Fig.2-No1) to the “1-ON” position.
2. Push the choke lever forward (Fig.2-No2) to place it in the H (closed) position.
3. Repeatedly press the primer bulb (Fig.2-No3) 5 to 10 times until the fuel is pumped
back to the tank through the second transparent pipe.
4. Stand behind the hedge trimmer and firmly grasp the front handle in your left hand
and grip the recoil starter handle with your right hand.
5. Pull the starter cord three times fully. Engine might start.
6. Immediately pull the choke lever backward into the lll (run) position (Fig.2-No4).
7. If the engine cut out or did not start pull the starter cord (Fig.1) repeatedly until the
engine starts and allow to run for a few seconds to warm up.
8. Depress the throttle lock trigger (Fig.2-No5) and pull throttle trigger (Fig.2-No6) to rev
the engine.
9. To stop the engine, switch the ON/OFF switch (Fig.2-No1) to the “0”-OFF position
Note: The cutting bar might not reciprocate when engine is idling. The clutch will
automatically engage when the throttle trigger is depressed and the engine revs
increase.
STARTING WARM ENGINE
Proceed as with cold engine start but with the choke lever in the (III) run position.
STOPPING ENGINE
1. Release the throttle trigger to allow the engine to idle for a few minutes.
2. To stop the engine, switch the ON/OFF switch (Fig.2-No1) to the “0”-OFF position
Fig. 2

6
.
Warning Symbols
Attention! Observe the following safety warnings
Hearing protection must be worn when using this product.
Eye protection must be worn when using this product
Strictly no naked flames or smoking near this product
Read the instruction manual before operating this product
Wear robust footwear when using this product
Gloves should be used when operating this product
Do not use in rain

7
OPERATING INSTRUCTIONS
WARNING!
Check that the cutting blade stop reciprocating when the engine is idling.
CUTTING
During cutting, keep the engine speed high. Prolonged use at low speed is likely to cause
premature wear of the clutch.
Adjust the throttle setting to suit the load.
When trimming a hedge the engine should always face away from the hedge.
Hold the machine as close to your body as possible to get the best balance.
Make sure that the tip does not touch the ground.
Do not rush the work, but work steadily until all the branches have been cut back cleanly.
CAUTION!
In an emergency, stop the engine by moving the engine switch to the off (0) position.
CAUTION!
Trim the sides of the hedge first, and then the top.
Cut slowly, especially with thick hedges.
If anything jams in the blades while you are working, switch off the engine and wait until it
has stopped completely, remove spark plug cap and clear the blades.
CAUTION!
To avoid possible injury, always remove spark plug cap before cleaning.
VERTICAL CUTTING
Use an arcing motion from the bottom upwards, then downwards using both sides of the
blades.
HORIZONTAL CUTTING
In order to get the best cutting results, tilt the blade slightly (5-10°) towards the cutting
direction.
KICKBACK

8
If the blade is snagged or pinched by a solid object, the edge of the blade that is entering
into the pinch point can dig into the surface of the material causing the blade to climb out
or kick out. The blade may either jump toward or away from the operator, depending on
direction of the blade’s movement at the point of pinching
Kickback is the result of misuse and/or incorrect operating procedures or conditions and
can be avoided by taking proper precautions as given below.
a) Maintain a firm grip on the power tool (hedge trimmer) and position your body
and arm to allow you to resist kickback forces.
b) Never place your hand near the rotating accessory. Accessory may kickback over
your hand.
c) Do not position your body in the area where power tool will move if kickback
occurs. Kickback will propel the tool in direction opposite to the wheel’s movement at
the point of snagging.
d) Use special care when working corners, sharp edges etc. Avoid bouncing and
snagging the accessory. Corners, sharp edges or bouncing have a tendency to snag
the rotating accessory and cause loss of control or kickback.
HANDLE ADJUSTMENT
To reduce fatigue when trimming hedges, the rear handle can be swivelled to 3 positions,
centre, left 90°, and right 90°.
WARNING!
Do not press the throttle trigger during this operation!
Proceed as follows:
1. Switch off the hedge trimmer
2. Push down the handle locking knob (Fig.1-8) and then turn the rear handle until the
handle locking knob clicks into place.
2. When the rear handle is locked in its new position, the user can start working again.

9
STOPPING THE ENGINE
1. Reduce the engine speed and let it run with no load for a few minutes.
2. To stop the engines, switch the ON/OFF switch (Fig.2-No1) to the “0”-OFF position
Before putting the hedge trimmer down ensure that the engine is switched off and the
blades have stopped moving.
WORKING ADVICE
CAUTION!
In an emergency, stop the engine by moving the engine switch to the stop (0) position.
Make sure you always have good balance and secure footing. Take special care in slippery
conditions: damp, snow, ice, on slopes or uneven ground.
Watch the cutting blades at all times: do not cut areas of the hedge that you cannot see.
Clear away fallen branches, scrub and cuttings. Be extremely careful when cutting tall
hedges, check the other side of the hedge before starting work.
The gearbox becomes hot during operation. To reduce the risk of burn injury, do not touch
the gear housing.
To reduce the risk of accidents, take a break in good time to avoid tiredness or exhaustion.
MAINTENANCE
Good maintenance is essential for safe, economical and trouble-free operation.
The purpose of the maintenance and adjustment schedule is to keep the machine in
the best operating condition.
Turn off the engine and remove the spark plug cap before performing any maintenance. If
the engine must be run, make sure the area is well ventilated. The exhaust contains
poisonous carbon monoxide gas
Use only genuine Lawn Star (Pty) Ltd. replacement parts when servicing or
repairing the unit. These parts are available from your supplying dealer or service
agent.

10
Maintenance
Before &
After Every
Use
25hr
maintenance
50hr
maintenance
Clean the outside of the machine.
X
Make sure the throttle trigger lock and the
throttle function correctly from a safety
point of view.
X
Check that the engine switch works
correctly.
X
Check that the blades do not move when
the engine is idling or when the choke is
in the start throttle position.
X
Check that the blades are undamaged
and show no signs of cracking or other
damage. Replace the blades if
necessary.
X
Check that the blade guard is not
damaged or distorted. Replace the blade
guard if it is bent or damaged.
X
Clean the air filter. Replace if necessary.
X
Check that nuts and screws are tight.
X
Check that there are no fuel leaks from
the engine, tank or fuel lines.
X
Clean and lubricate cutting blades
X
Check the starter and starter cord.
X
Clean the outside of the spark plug.
Remove it and check the electrode gap.
Adjust the gap to 0.6-0.7 mm or replace
the spark plug. Check that the spark plug
is fitted with a spark plug cap.
X
Clean the machine’s cooling system.
X
Clean the outside of the carburettor and
the space around it.
X
Clean the fuel tank.
X
Check all cables and connections.
X
Check the clutch, clutch springs and the
clutch drum for wear. Replace if
necessary by an authorized service
workshop.
X
Replace the spark plug.
X

11
AIR FILTER
1. Loosen the air filter cover screw and remove the air filter cover.
2. Wash the air filter with dishwashing liquid and warm water, allow to dry.
3. Lightly oil the air filter with 2-stroke oil.
4. Thoroughly squeeze the filter removing excess oil.
5. Reinstall the air filters.
6. Reinstall the air filter cover, and tighten the air filter cover screw.
WARNING:
The use of petrol or combustible solvents for cleaning can cause fire or explosion. Therefore only use
soap water or non-combustible solvent. Never operate the machine without the air filter.
SPARK PLUG
RECOMMENDED SPARK PLUG: LD L7RTF Lawn Star stock code 80-26055.
To ensure proper engine operation, the spark plug must be properly gapped and free of
deposits.
1. Remove the spark plug cover from the housing.
2. Remove the spark plug cap.
3. Clean any dirt from around the spark plug base.
4. Use the socket spanner provided to remove the spark plug.
5. Check the spark plug gap of the new spark plug. The acceptable gap should be
between 0,6-0,7mm.
6. Install /reinstall the spark plug carefully by hand.
9. Once the spark plug has been seated, tighten it with a spark plug wrench.
10. Reinstall the spark plug cap on top of the spark plug.
11. Reinstall the spark plug cover.
12
CLEANING
1. Keep your machine clean, the outside of the machine can be cleaned using a damp
soft cloth, never use water to clean the machine as it may cause damage to internal
parts.
2. Some maintenance products and solvents may damage the plastic parts, these
include products containing benzene. Trichloroethylene, chloride and ammonia.
3. Take special care to keep the ventilation inlets /outlets free from obstruction. Cleaning
with a soft brush followed by a compressed air jet will usually be sufficient to ensure
acceptable internal cleanliness.
4. Wear eye protection when carrying out cleaning.
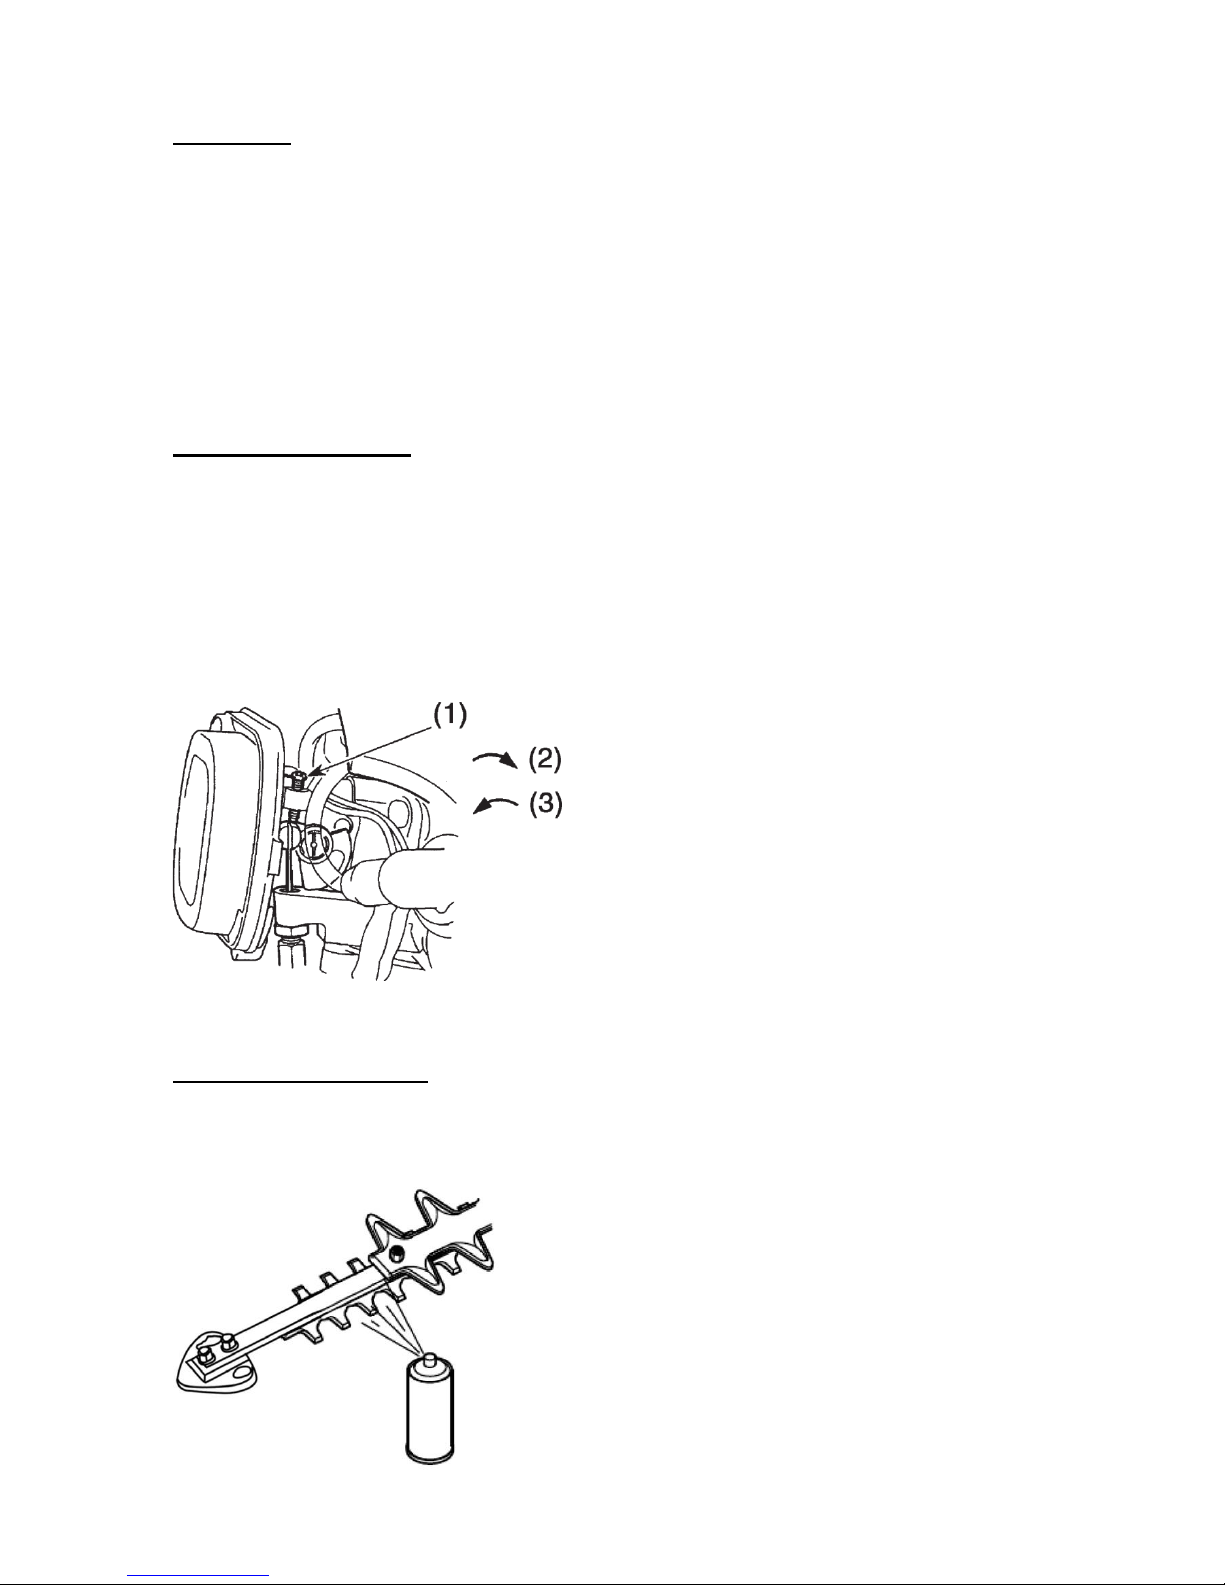
IDLE SPEED SETTING
The screw just behind air filter cover regulates the throttle setting at idle speed. The user
can adjust the idle speed, if it’s necessary.
Before any adjustment, make sure that the air filter is clean and the air filter cover is fitted.
Turn the screw clockwise can give a higher idle speed; turning it anti-clockwise gives a
lower idle speed.
The idle speed is correctly adjusted when the engine runs smoothly in every position.
There should also be a clear margin to the speed at which the blades start to move. The
blades must also remain stationary when the choke control is in the start throttle position.
(1) Idle adjusting screw (2) Higher speed (3) Lower speed
CUTTING BLADE CARE
Clean any resin and plant residue from the blades using cleaning agent before and after
using the machine. Lubricate the blades with a light anti-corrosion oil after cleaning.
Failure to do this can damage the gearbox and clutch mechanism.

13
TROUBLE SHOOTING GUIDE
PROBLEM
PROBABLE CAUSE
CORRECTIVE ACTION
Engine won’t start
No spark
Ensure the spark plug is clean.
Replace the spark plug if upon
inspection the electrodes are burned
or worn. Check the spark plug gap
(Fig.23) with a feeler gage. Check for
spark by using a Spark Tester.
No fuel
Pump primer bulb, if no fuel flows
then pipes blocked. Have serviced. If
primer bulb fills then engine may be
flooded
Flooded engine
Remove spark plug, turn engine
upside down, set choke to run, pull
starter cord 10 times, clean spark
plug and refit.
Check fuel/oil mix
Drain and use fresh and correct fuel
mix
Engine will not rev
Blocked air-filter
Remove air-filter, clean & refit
Blocked exhaust spark
arrestor
Remove spark arrestor, clean & refit
Carburettor needs
tuning
Have serviced
Engine Smokes and
will not rev
Incorrect fuel mixture
too much oil
Drain and use fresh and correct fuel
mix (Oil/Fuel mix ratio 1:25)
Dirty air filter or fuel
filter
Incorrect oil used
Clean as per instructions
Use Lawn Star High performance 2-
stroke engine oil (90-20000)
Oil leaks out of
exhaust muffler
Cutting blades
jammed
Incorrect fuel mixture
too much oil
Cutting blades dirty
Cutting blades
damaged
Drain and use fresh and correct fuel
mix (Oil/Fuel mix ratio 1:25)
Clean and oil
Have serviced

14
LAWN STAR ( PTY ) LTD.
WARRANTY CARD
LSH 2660 P
Please read carefully
This card is required for warranty repair claims. Please fill in this card and keep it in a safe place,
stapled to the original proof of purchase. The original proof of purchase (i.e. receipt, invoice,
docket, etc.) must show the original date of purchase and clearly identify the product.
WITHOUT THIS CARD AND ORIGINAL PROOF OF PURCHASE, ANY WARRANTY
BECOMES NULL AND VOID.
Make:……………………..Serial No:………..……………….Date of Purchase:………………….
Model:………………………………
PURCHASER PURCHASED FROM
NAME: NAME :
ADDRESS: ADDRESS:
PHONE : PHONE:
LIMITED DOMESTIC USE WARRANTY
Lawn Star (Pty) Ltd. guarantees this unit to be free from defects in material and workmanship. If
any such defect should become apparent during a period of
12 MONTHS
from the date of the original purchase, we undertake to repair this unit free of charge or replace
this unit with a factory reconditioned unit at our discretion. This does not prejudice your rights in
terms of the Consumer Protection Act.
Transport costs to our service centre and back to the owner, should such costs occur, will be
carried by the owner of the unit.
The repaired or replaced unit will be covered by this warranty for the remainder of the original
warranty period.
This warranty covers only the original purchaser of this unit.
This warranty becomes invalid if:
-the unit has been used commercially or for rental purposes;
-damage has been caused by misuse, abuse, accident or normal wear and tear;
-spares and accessories other than specified by Lawn Star are used with this unit;
-the unit has been opened, altered or otherwise tampered with;
Cutting blades and clutch shoes are wearing parts and are not covered by Warranty. Spark plugs
and air filters are consumables and also not covered by Warranty.
PLEASE READ AND UNDERSTAND THE INSTRUCTION MANUAL BEFORE YOU
OPERATE THIS UNIT.

15
LAWN STAR ( PTY ) LTD.
For service and warranty repairs please contact your nearest Service
Agent listed below:
CUSTOMER CARE : 0860-LAWNSTAR
HEAD OFFICE : 98 Bofors Circle, Epping 2 South, Cape Town
PO Box 496, Parow, 7499
Tel: 021-535-5249 Fax: 021-535-4624
EASTERN CAPE: Tel: 041-366-1300
FREE STATE : Tel: 082-556-6325 Fax: 086-691-6297
GAUTENG : Tel: 011-979-0162 Fax: 011-979-0174
KZN : Tel: 031-579-4390 Fax: 031-579-4400
WEST COAST : 082-460-3507
NORTHERN CAPE: 082-460-3507
OVERBERG : 084-609-7341
NAMIBIA : Tel: 061- 232-475 Fax: 061- 242-139
BOTSWANA : +267-318-6851
ZIMBABWE : +263-4-486 192/646
For more information visit: www.lawnstar.co.za
Table of contents
Other LAWN STAR Trimmer manuals


Popular Trimmer manuals by other brands


Ariens
Ariens 946101-ST622 Owner's/operator's manual

Elem Garden Technic
Elem Garden Technic THE800RH Original instructions

MTD
MTD T990 Original operating instructions

Snapper
Snapper 411SST parts manual

Maruyama
Maruyama H23DF Owner's/operator's manual

Spear & Jackson
Spear & Jackson HT500 instruction manual