LawnMaster LB4030001S User manual

40 V CHAINSAW
LB4030001S
i
INSTRUCTION MANUAL
CHAINSAW

READ FIRST BEFORE USE!
°

1
Safety, performance, and dependability have been given
top priority in the design of your cordless chainsaw.
INTENDED USE
The product is only intended for use outdoors. For safety
reasons the product must be adequately controlled by
using two handed operation at all times.
The product is designed for cutting branches, trunks, logs
and beams of a diameter determined by the cutting length
of the guide bar. It is only designed to cut wood. It is only
to be used in domestic application by adults who have
received adequate training on the hazards and preventative
measures/actions to be taken whilst using it.
Do not use the product for any purpose not listed above. It
is not to be used for professional tree services. The product
is not to be used by children or by persons not wearing
adequate personal protective equipment and clothing.
WARNING
When using the product, the safety rules must be
followed. For your own safety and that of bystanders, you
must read and fully understand these instructions before
operatingthe product. Youshould attend aprofessionally
organized safety course in the use, preventative actions,
first-aid and maintenance of chainsaws. Please keep
these instructions safe for later use.
WARNING
Chainsaws are potentially dangerous tools. Accidents
involvingtheuse ofchainsawsoftenresult in lossoflimbs
or death. It is not just the chainsaw that is the hazard.
Falling branches, toppling trees, rolling logs can all kill.
Diseased or rotting timber poses additional hazards.
You should assess your capability of completing the task
safely. If there is any doubt, leave it to a professional
tree surgeon.
WARNING
Read all safety warnings and all instructions. Failure
to follow the warnings and instructions may result in
electric shock, fire and/or serious injury.
Save all warnings and instructions for future reference.
The term “power tool’’ in the warnings refers to your
mains-operated (corded) power tool or battery-operated
(cordless) power tool.
WORK AREA SAFETY
■Keep work area clean and well lit. Cluttered or dark
areas invite accidents.
■Do not operate power tools in explosive
atmospheres, such as in the presence of flammable
liquids, gases or dust. Power tools create sparks
which may ignite the dust or fumes.
■Keep children and bystanders away while operating
a power tool. Distractions can cause you to lose
control.
ELECTRICAL SAFETY
■Avoid body contact with earthed or grounded
surfaces, such as pipes, radiators, ranges and
refrigerators. There is an increased risk of electric
shock if your body is earthed or grounded.
■Do not expose power tools to rain or wet
conditions. Water entering a power tool will increase
the risk of electric shock.
PERSONAL SAFETY
■Stay alert, watch what you are doing and use
common sense when operating a power tool. Do
not use a power tool while you are tired or under the
influence of drugs, alcohol or medication. A moment
of inattention while operating power tools may result in
serious personal injury.
■Use personal protective equipment. Always wear
eye protection. Protective equipment such as dust
mask, non-skid safety shoes, hard hat or hearing
protection used for appropriate conditions will reduce
personal injuries.
■Prevent unintentional starting. Ensure the switch
is in the off-position before connecting to power
source and/or battery pack, picking up or carrying
the tool. Carrying power tools with your finger on the
switch or energising power tools that have the switch
on invites accidents.
■Remove any adjusting key or wrench before turning
the power tool on. A wrench or a key left attached to
a rotating part of the power tool may result in personal
injury.
■Do not overreach. Keep proper footing and balance
at all times. This enables better control of the power
tool in unexpected situations.
■Dress properly. Do not wear loose clothing or
jewellery. Keep your hair, clothing and gloves away
from moving parts. Loose clothes, jewellery or long
hair can be caught in moving parts.

2
POWER TOOL USE AND CARE
■Do not force the power tool. Use the correct power
tool for your application. The correct power tool will
do the job better and safer at the rate for which it was
designed.
■Do not use the power tool if the switch does not
turn it on and off. Any power tool that cannot be
controlled with the switch is dangerous and must be
repaired.
■Disconnect the plug from the power source and/or
the battery pack from the power tool before making
any adjustments, changing accessories or storing
power tools. Such preventive safety measures reduce
the risk of starting the power tool accidentally.
■Store idle power tools out of the reach of children
and do not allow persons unfamiliar with the power
tool or these instructions to operate the power tool.
Power tools are dangerous in the hands of untrained
users.
■Maintain power tools. Check for misalignment or
binding of moving parts, breakage of parts and any
other condition that may affect the power tool’s
operation. If damaged, have the power tool repaired
before use. Many accidents are caused by poorly
maintained power tools.
■Keep cutting tools sharp and clean
Properly maintained cutting tools with sharp cutting
edges are less likely to bind and are easier to control.
■Use the power tool, in accordance with these
instructions, taking into account the working
conditions and the work to be performed. Use of
the power tool for operations different to those intended
could result in a hazardous situation.
BATTERY TOOL USE AND CARE
■Recharge only with the charger specified by the
manufacturer. A charger that is suitable for one type
of battery pack may create a risk of fire when used with
another battery pack.
■Use power tools only with specifically designated
battery packs. Use of any other battery packs may
create a risk of injury and fire
■When battery pack is not in use, keep it away from
other metal objects, like paper clips, coins, keys,
nails, screws or other small metal objects, that can
make a connection from one terminal to another.
Shorting the battery terminals together may cause
burns or a fire.
■Under abusive conditions, liquid may be ejected
from the battery; avoid contact. If contact
accidentally occurs, flush with water. If liquid
contacts eyes, additionally seek medical help.
Liquid ejected from the battery may cause irritation or
burns.
SERVICE
■Have your power tool serviced by a qualified repair
person using only identical replacement parts.
This will ensure that the safety of the power tool is
maintained.
ADDITIONAL GENERAL SAFETY WARNINGS
■Some regions have regulations that restrict the use of
the product. Check with your local authority for advice.
■Never allow children or people unfamiliar with the
instructions to use the product. Local regulations may
restrict the age of the operator.
■Ensure before each use that all controls and safety
devices function correctly. Do not use the power tool if
the “off” switch does not stop the motor.
■Wear full eye and hearing protection, strong sturdy
gloves as well as head protection while operating the
product; use a face mask if operation is dusty.
■Do not wear loose fitting clothing, short trousers or
jewellery of any kind.
■Secure long hair so it is above shoulder level to prevent
entanglement in moving parts.
■Beware of thrown, flying or falling objects; keep all
bystanders, children, and animals at least 15 m away
from work area.
■Do not operate in poor lighting. The operator requires a
clear view of the work area to identify potential hazards.
■Use of hearing protection reduces the ability to hear
warnings (shouts or alarms). The operator must pay
extra attention to what is going on in the working area.
■Operating similar tools nearby increases both the risk
of hearing injury and the potential for other persons to
enter your working area.
■Keep firm footing and balance. Do not overreach.
Overreaching can result in loss of balance and can
increase the risk of kickback.
■Keep all parts of your body away from any moving part.
■Inspect the machine before each use. Check for correct
operation of all controls including the chain brake.
Check for loose fasteners, make sure all guards, and
handles are properly and securely attached. Replace
any damaged parts before use.
■Do not modify the machine in any way or use parts
and accessories which are not recommended by the
manufacturer.
WARNING
If the machine is dropped, suffers heavy impact or begins
to vibrate abnormally, immediately stop the machine and
inspect for damage or identify the cause of the vibration.
Any damage should be properly repaired or replaced by
an authorized service centre.
CHAINSAW SAFETY WARNINGS
■Keep all parts of the body away from the saw chain
when the chainsaw is operating. Before you start the
chainsaw, make sure the saw chain is not contacting
anything. A moment of inattention while operating
chainsaws may cause entanglement of your clothing
or body with the saw chain.

3
■Always hold the chainsaw with your right hand
on the rear handle and your left hand on the front
handle. Holding the chainsaw with a reversed hand
configuration increases the risk of personal injury and
should never be done.
■Hold the power tool by insulated gripping surface
only, because the saw chain may contact hidden
wiring. Saw chains contacting a “live” wire may make
exposed metal parts of the power tool “live” and could
give the operator an electric shock.
■Wear safety glasses and hearing protection. Further
protective equipment for head, hands, legs and feet
is recommended. Adequate protective clothing will
reduce personal injury by flying debris or accidental
contact with the saw chain.
■Do not operate a chainsaw in a tree. Operation of
a chainsaw while up in a tree may result in personal
injury.
■Always keep proper footing and operate the
chainsaw only when standing on fixed, secure and
level surface. Slippery or unstable surfaces such as
ladders may cause a loss of balance or control of the
chainsaw.
■When cutting a limb that is under tension be alert
for spring back. When the tension in the wood fibres is
released the spring loaded limb may strike the operator
and/or throw the chainsaw out of control.
■Use extreme caution when cutting brush and
saplings. The slender material may catch the saw
chain and be whipped toward you or pull you off
balance.
■Carry the chainsaw by the front handle with the
chainsaw switched off and away from your body.
When transporting or storing the chainsaw always
fit the guide bar cover. Proper handling of the
chainsaw will reduce the likelihood of accidental contact
with the moving saw chain.
■Follow instructions for lubricating, chain tensioning
and changing accessories. Improperly tensioned
or lubricated chain may either break or increase the
chance for kickback.
■Keep handles dry, clean, and free from oil and
grease. Greasy, oily handles are slippery causing loss
of control.
■Cut wood only. Do not use chainsaw for purposes
not intended. For example: do not use chainsaw
for cutting plastic, masonry or non-wood building
materials. Use of the chainsaw for operations different
than intended could result in a hazardous situation.
Causes and operator prevention of kickback:
Kickback may occur when the nose or tip of the guide bar
touches an object, or when the wood closes in and pinches
the saw chain in the cut.
Tip contact in some cases may cause a sudden reverse
reaction, kicking the guide bar up and back towards the
operator.
Pinching the saw chain along the top of the guide bar may
push the guide bar rapidly back towards the operator.
Either of these reactions may cause you to lose control of
the saw which could result in serious personal injury. Do
not rely exclusively upon the safety devices built into your
saw. As a chainsaw user, you should take several steps to
keep your cutting jobs free from accident or injury.
Kickback is the result of tool misuse and/or incorrect
operating procedures or conditions and can be avoided by
taking proper precautions as given below:
■Maintain a firm grip, with thumbs and fingers
encircling the chainsaw handles, with both hands
on the saw and position your body and arm to allow
you to resist kickback forces. Kickback forces can
be controlled by the operator, if proper precautions are
taken. Do not let go of the chainsaw.
■Do not overreach and do not cut above shoulder
height. This helps prevent unintended tip contact and
enables better control of the chainsaw in unexpected
situations.
■Only use replacement bars and chains specified
by the manufacturer. Incorrect replacement bars and
chains may cause chain breakage and/or kickback.
■Follow the manufacturer’s sharpening and
maintenance instructions for the saw chain.
Decreasing the depth gauge height can lead to
increased kickback.
ADDITIONAL CHAINSAW SAFETY WARNINGS
■It is recommended to cut logs on a saw-horse or cradle
when operating the product the first time.
■Ensure all guards, handles and spiked bumper are
properly fitted and are in good condition.
■Persons using this chainsaw should be in good health.
The chainsaw is a heavy unit so the operator requires
to be physically fit. The operator should be alert, have
good vision, mobility, balance and manual dexterity. If
there is any doubt, do not operate the chainsaw.
■Do not start using the product until you have a clear
work area, secure footing, and a planned retreat path
away from the falling tree.
■Beware of the emission of lubricant mist and saw dust.
Wear a mask or respirator if required.
■Do not cut vines and/or small undergrowth (less than
75 mm in diameter).
■Always hold the chainsaw with both hands when
operating the saw. Use a firm grip with thumbs and
fingers encircling the chainsaw handles. Right hand
must be on the rear handle and left hand on the front
handle.
■Before starting the tool, make sure the saw chain is not
contacting any object.
■Do not modify your tool in any way or use it to power
any attachments or devices not recommended by the
manufacturer for your saw.
■There should be a first-aid kit containing large
wound dressings and a means to summon attention
(e.g., whistle) close to the operator. A larger more
comprehensive kit should be reasonably nearby.

■The operator may be tempted to remove the helmet if
there is no danger of falling objects in the work area, but
remember the helmet, particularly with the mesh visor,
can help reduce the potential for injury to the face and
head if kickback occurs.
■An incorrectly tensioned chain can jump off the guide
bar and could result in serious injury or fatality. The
length of chain depends on the temperature. Check the
tension frequently.
■You should get used to your new chainsaw by making
simple cuts on securely supported wood. Do this
whenever you have not operated the saw for some
time.
■To reduce the risk of injury associated with contacting
moving parts, always stop the motor, apply chain brake,
remove the battery pack and make sure all moving
parts have come to a stop before:
–cleaning or clearing a blockage
–leaving the product unattended
–installing or removing attachments
–checking, maintenance or working on the machine
■The size of the work area depends on the job being
performed as well as the size of the tree or work piece
involved. For example, felling a tree requires a larger
work area than making other cuts, i.e., bucking cuts,
etc. The operator needs to be aware and in control of
everything happening in this work area.
■Do not cut with your body in line with the guide bar
and chain. If you do experience kickback this will help
prevent the chain coming into contact with your head
or body.
■Do not use a back and forward sawing motion, let the
chain do the work, keep the chain sharp and don’t try to
push the chain through the cut.
■Do not put pressure on the saw at the end of the cut.
Be ready to take on the weight of the saw as it cuts free
from the wood. Failure to do so could result in possible
serious personal injury.
■Do not stop the saw in the middle of a cutting operation.
Keep the saw running until it is already removed from
the cut.
Push and pull
The reaction force is always opposite to the direction the
chain is moving. Thus, the operator must be ready to
control the tendency for the machine to pull away (forward
motion) when cutting on the bottom edge of the bar and the
push backwards (towards the operator) when cutting along
the top edge.
Saw jammed in the cut
Stop the chainsaw and make it safe. Do not try to force the
chain and bar out of the cut as this is likely to break the
chain which may swing back and strike the operator. This
situation normally occurs because the wood is incorrectly
supported and forcing the cut to close under compression
thereby pinching the blade. If adjusting the support does
not release the bar and chain, use wooden wedges or a
lever to open the cut and release the saw. Never try to start
the chainsaw when the guide bar is already in a cut or kerf.
4
Personal protective equipment
Good quality, personal protective equipment as used
by professionals will help to reduce the risk of injury to
the operator. The following items should be used when
operating your chainsaw:
Safety helmet
–should comply with EN 397 and be CE marked
Hearing protection
–should comply with EN 352-1 and be CE marked
Eye and face protection
–should be CE marked and comply with EN 166 (for
safety glasses) or EN 1731 (for mesh visors)
Gloves
–should comply with EN381-7 and be CE marked
Leg protection (chaps)
–should comply with EN381-5, be CE marked and
provide all-round protection.
Chainsaw safety boots
–should comply with EN ISO 20345:2004 and be
marked with a shield depicting a chainsaw to show
compliance with EN 381-3. (Occasional users
may use steel toe-cap safety boots with protective
gaiters which conform to EN 381-9 if the ground is
even and there is little risk of tripping or catching on
undergrowth)
Chainsaw jackets for upper body protection
– should comply with EN 381-11 and be CE marked
INSTRUCTIONS CONCERNING THE PROPER TECH-
NIQUES FOR BASIC FELLING, LIMBING, AND CROSS-
CUTTING
Understanding the forces within the wood
When you understand the directional pressures and
stresses inside the wood you can reduce the “pinches” or
at least expect them during your cutting. Tension in the
wood means the fibers are being pulled apart and if you
cut in this area the “kerf” or cut will tend to open as the saw
goes through. If a log is being supported on a saw horse
and the end is hanging unsupported over the end then
tension is created on the upper surface due to the weight
of the overhanging log stretching the fibers. Likewise, the
underside of the log will be in compression and the fibers
are being pushed together. If a cut is made in this area the
kerf will have the tendency to close up during the cut. This
would pinch the blade.
Felling a tree
See page 16- 17.
When bucking and felling operations are being performed
by two or more persons at the same time, the felling
operations should be separated from the bucking operation
by a distance of at least twice the height of the tree being
felled. Trees should not be felled in a manner that would
endanger any person, strike any utility line or cause any
property damage. If the tree does make contact with any
utility line, the company should be notified immediately.
The chainsaw operator should keep on the uphill side of
the terrain as the tree is likely to roll or slide downhill after
it is felled.

5
An escape path should be planned and cleared as
necessary before cuts are started. The escape path should
extend back and diagonally to the rear of the expected line
of fall.
Before felling is started, consider the natural lean of the
tree, the location of larger branches and the wind direction
to judge which way the tree will fall.
Remove dirt, stones, loose bark, nails, staples and wire
from the tree.
Do not attempt to fell trees which are rotten or have been
damaged by wind, fire, lightning, etc. This is extremely
dangerous and should only be completed by
professional tree surgeons.
Notching undercut
See page 16-17.
Make the notch 1/3 the diameter of the tree,
perpendicular to the direction of falls. Make the lower
horizontal notching cut first. This will help to avoid
pinching either the saw chain or the guide bar when the
second notch is being made.
Felling back cut
See page 16-17
Make the felling back cut at least 50 mm/2 in higher
than the horizontal notching cut. Keep the felling back cut
parallel to the horizontal notching cut. Make the felling
back cut so enough wood is left to act as a hinge. The hinge
wood keeps the tree from twisting and falling in the wrong
direction. Do not cut through the hinge. As the felling gets
close to the hinge, the tree should begin to fall. If there
is any chance that the tree may not fall in desired
direction or it may rock back and bind the saw chain,
stop cutting before the felling back cut is complete and
use wedges of wood, plastic or aluminium to open the
cut and drop the tree along the desired line of fall.
When the tree begins to fall remove the chainsaw from the
cut, stop the motor, put the chainsaw down, then use
the retreat path planned. Be alert for overhead limbs
falling and watch your footing.
Removing buttress roots
See page 17.
A buttress root is a large root extending from the trunk of
the tree above the ground. Remove large buttress roots
prior to felling. Make the horizontal cut into the buttress first,
followed by the vertical cut. Remove the resulting loose
section from the work area. Follow the correct tree felling
procedure after you have removed the large buttress roots.
Bucking a log
See page 18.
Bucking is cutting a log into lengths. It is important to
make sure your footing is firm and your weight is evenly
distributed on both feet. When possible, the log should be
raised and supported by the use of limbs, logs or chocks.
Follow the simple directions for easy cutting. When the log
is supported along its entire length, it is cut from the top
(overbuck).
When the log is supported on one end, cut 1/3 the diameter
from the underside (underbuck). Then make the finished
cut by overbucking to meet the first cut.
When the log is supported on both ends, cut 1/3 the
diameter from the top (overbuck). Then make the finished
cut by underbucking the lower 2/3 to meet the first cut.
When bucking on a slope always stand on the uphill side
of the log. When “cutting through”, to maintain complete
control release the cutting pressure near the end of the
cut without relaxing your grip on the chainsaw handles.
Don’t let the chain contact the ground. After completing the
cut, wait for the saw chain to stop before you move the
chainsaw. Always stop the motor before moving from tree
to tree.
Limbing a tree
See page 18.
Limbing is removing the branches from a fallen tree. When
limbing leave larger lower limbs to support the log off the
ground. Remove the small limbs in one cut. Branches
under tension should be cut from the bottom up to avoid
binding the chainsaw.
Cutting springpoles
See page 18.
A springpole is any log, branch, rooted stump, or sapling
which is bent under tension by other wood so that it springs
back if the wood holding it is cut or removed.
On a fallen tree, a rooted stump has a high potential of
springing back to the upright position during the bucking
cut to separate the log from the stump. Watch out for
springpoles—they are dangerous.
WARNING
Springpolesare dangerousand couldstrike theoperator,
causing the operator to lose control of the chainsaw.
This could result in severe or fatal injury to the operator.
This should be done by trained users.
RESIDUAL RISKS
Even when the product is used as prescribed, it is still
impossible to completely eliminate certain residual risk
factors. The following hazards may arise in use and the
operator should pay special attention to avoid the following:
■Injury caused by vibration. Always use the right tool for
the job, use designated handles and restrict working
time and exposure.
■Exposure to noise can cause hearing injury. Wear ear
protection and limit exposure
■Contact with exposed saw teeth of the chain (cutting
hazards).
■Unforeseen, abrupt movement or kickback of the guide
bar (cutting hazards).
■Parts ejected from the saw chain (cutting/injection
hazards).
■Thrown out pieces of the work piece (wood chips,
splinters)
■Inhalation of saw dust and particles.
■Skin contact with lubricant/oil.

RISK REDUCTION
It has been reported that vibrations from hand-held tools
may contribute to a condition called Raynaud’s Syndrome
in certain individuals. Symptoms may include tingling,
numbness and blanching of the ngers, usually apparent
upon exposure to cold. Hereditary factors, exposure to
cold and dampness, diet, smoking and work practices
are all thought to contribute to the development of these
symptoms. There are measures that can be taken by the
operator to possibly reduce the effects of vibration:
■Keep your body warm in cold weather. When operating
the unit wear gloves to keep the hands and wrists
warm. It is reported that cold weather is a major factor
contributing to Raynaud’s Syndrome.
■After each period of operation, exercise to increase
blood circulation.
■Take frequent work breaks. Limit the amount of
exposure per day.
■Protective gloves available from professional chainsaw
retailers are designed specifically for chainsaw use
which give protection, good grip and also reduce the
effect of handle vibration. These gloves should comply
with EN381-7 and must be CE marked.
If you experience any of the symptoms of this condition,
immediately discontinue use and see your doctor about
these symptoms.
WARNING
Injuries may be caused, or aggravated, by prolonged
use of a tool. When using any tool for prolonged periods,
ensure you take regular breaks.
KNOW YOUR PRODUCT
See page 11.
SAFETY DEVICES
Low kick-back saw chain
A low-kick-back saw chain helps to reduce the possibility
of a kickback event.
The rakers (depth gauges) ahead of each cutter can
minimize the force of a kick-back reaction by preventing the
cutters from digging in too deeply. Only use replacement
guide bar and chain combinations recommended by the
manufacturer.
6
As saw chains are sharpened, they lose some of the low
kickback qualities and extra caution is required. For your
safety, replace saw chains when cutting performance
decreases.
Spiked bumper
The integral bumper spike may be used as a pivot when
making a cut. It helps to keep the body of the chainsaw
steady while cutting. When cutting, push the machine
forward until the spikes dig into the edge of the wood, then
by moving the rear handle up or down in the direction of
the cutting line it can help ease the physical strain of
cutting
Guide bars
Generally, guide bars with small radius tips have somewhat
lower potential for kick-back. You should use a guide bar
and matching chain which is just long enough for the job.
Longer bars increase the risk of loss of control during
sawing. Regularly check the chain tension. When cutting
smaller branches (less than the full length of the guide bar)
the chain is more likely to be thrown off if the tension is
not correct.
Chain brake
Chain brakes are designed to quickly stop the chain
rotating. When the chain brake lever/hand guard is pushed
towards the bar, the chain should stop immediately. A
chain brake does not prevent kick-back. It only lowers the
risk of injury should the chain bar contact the operator’s
body during a kick-back event. The chain brake should be
tested before each use for correct operation in both the run
and brake positions.
ASSEMBLY
WARNING
If any parts are damaged or missing do not operate this
product until the parts are replaced. Failure to heed this
warning could result in serious personal injury.
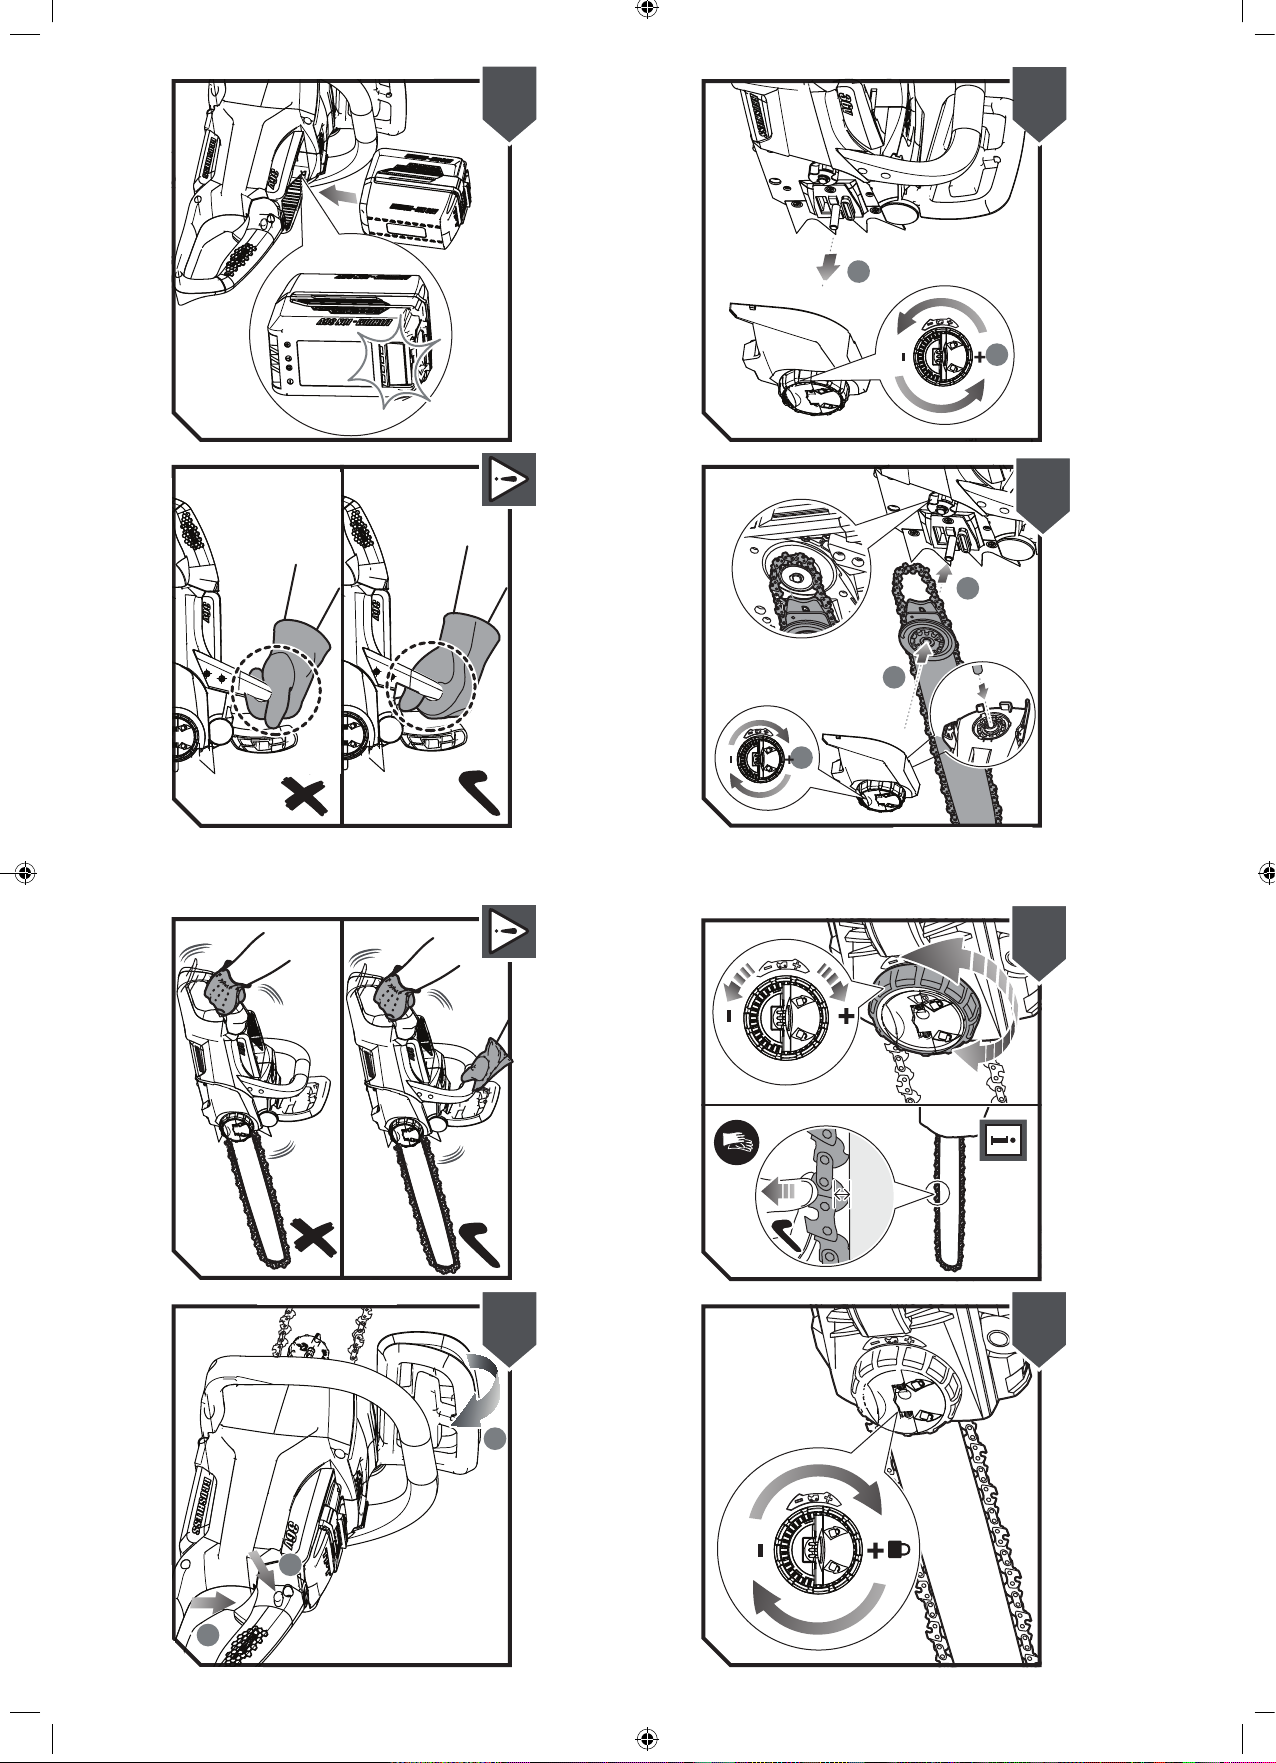
ASSEMBLING SAW CHAIN AND GUIDE BAR
See page 20-21.
1. Make sure to remove the battery pack from the unit.
Wear protective gloves.
2. Unclip the chain tensioner knob (12) and
completely unscrew to remove the sprocket cover
(10).
3. The saw chain should face in the direction of chain
rotation. If they face backwards, turn the loop over.
4. Place the chain drive links into the guide bar groove.
5. Position the chain so there is a loop at the back of the
bar.
6. Hold the chain in position on the bar and place the loop
around the drive sprocket. Lower the bar so that the
bolt goes through the hole in the attached chain tension
assembly. You may need to rotate this assembly so the
bolt and hole align. You may rotate this assembly again
to apply some tension to the chain which will help keep
it in place.
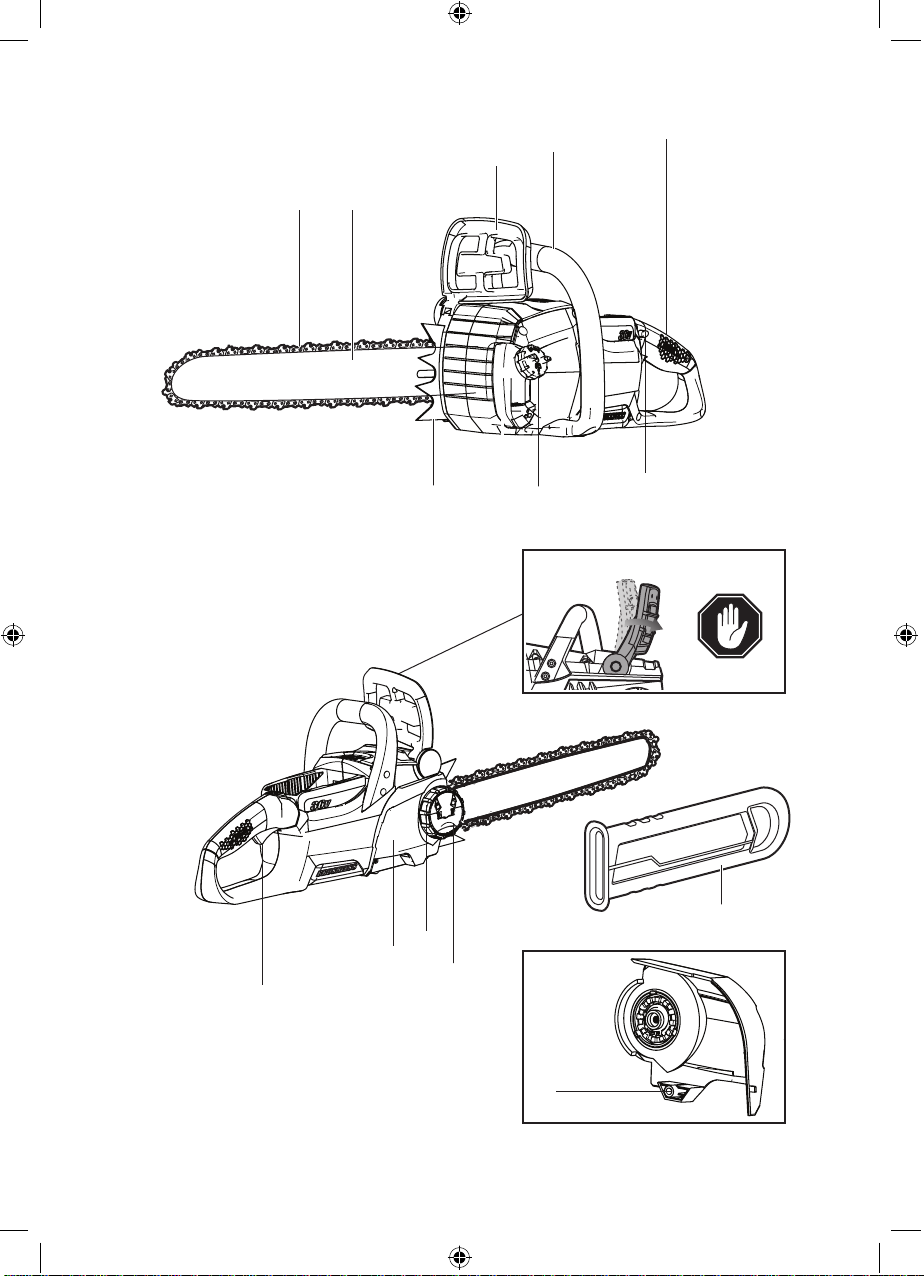
1. Front hand guard/Chain brake
2. Front handle
3. Rear handle
4. Chain
5. Guide bar
6. Spiked bumper
7. Chain lubricant cap
8. Trigger release
9. Throttle trigger
10. Sprocket cover
11. Chain tensioner adjustment ring
12. Chain tensioner knob
13. Guide bar cover
14. Chain catcher

7
7. Replace the sprocket cover (10) and turn the
chain tensioner knob (12) until nearly tight, turn the
chain tnesioner adjustment ring (11) until the saw chain
is properly tensioned. The guide bar must then be
pushed upwards, check chain tension again, do not
tension the chain too tight.
8. After the chain is well-tensioned using the chain
tensioner adjustment ring, tighten the chain tensioner
knob and clip this into place.
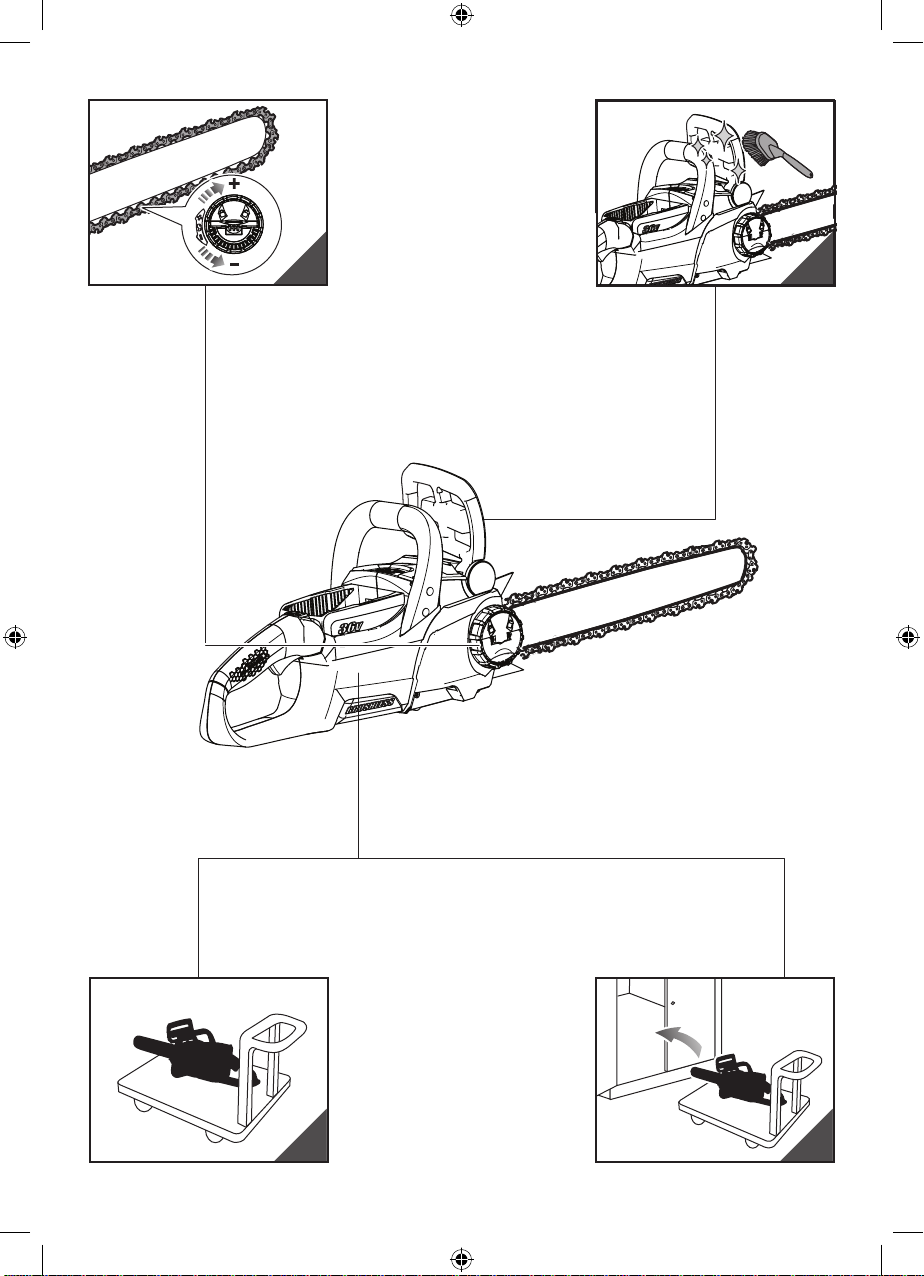
ADJUSTING THE CHAIN TENSION
See page 13. See page 22.
1. Loosen the chain tensioner (12) knob slightly by
turning it counterclockwise.
2. To increase the chain tension, turn the chain tensioner
adjustment ring (11) clockwise and check the chain
tension frequently. To reduce the chain tension, turn
the chain tensioner adjustment ring counterclockwise
and check the chain tension frequently.
3. The chain tension is correct when the gap between the
cutter in the chain and the bar is between 3 mm - 4
mm. Pull the chain in the middle of the lower side of the
bar downwards (away from the bar) and measure the
distance between the bar and the chain cutters.
4. Tighten the chain tensioner knob by turning it clockwise.
OPERATION
ADDING CHAIN LUBRICATING OIL
See page 12.
WARNING
Never work without chain lubricant. If the saw chain is
running without lubricant, guide bar and saw chain can
be damaged. It is therefore essential to check the oil
level in the oil level gauge frequently and every time
before starting to use the chain saw.
1. Clear surface around the oil cap to prevent
contamination.
2. Unscrew and remove the cap from the oil tank.
3. Pour the oil into the oil tank and monitor the oil level
gauge. Ensure that no dirt enters the oil tank while
filling.
4. Put the oil cap back on and tighten it up. Wipe away
any spillage.
5. A full oil tank will enable you to use the saw for 20-40
minutes.
Recommended chain lubricating oil
■The manufacturer recommends you use only Prime
Parts chainsawlubricating oil.
INSTALLING BATTERY PACK
See page 12.
1. Place the battery pack in the chain saw. Align raised
ribs on battery pack with grooves in the chain saw’s
battery port.
2. Make sure the latch on bottom of the battery pack
snaps in place and that battery pack is fully seated and
secure in the chain saw before beginning operation.
HOLDING THE CHAIN SAW
See page 13.
Always hold the chain saw with your right hand at the rear
handle and your left hand at the front handle. Grip both
handles with the thumbs and fingers encircling the handles.
Ensure that your left hand is holding the front handle so
that your thumb is underneath.
STARTING THE CHAIN SAW
See page 13.
1. Before starting for operation, you should install the
battery pack in the machine, and make sure chain
brake is in run position by pulling chain brake lever /
hand guard toward the front handle.
2. To start the machine: pull the trigger release, and then
press the throttle trigger.
CHECKING AND OPERATING CHAIN BRAKE
1. Engage the chain brake by rotating your left hand
around the front handle. Allow the back of your hand to
push the chain brake lever/hand guard toward the bar
while the chain is rotating rapidly. Be sure to maintain
both hands on the saw handles at all times.
2. Reset the chain brake back into the Run position by
grasping the top of the chain brake lever / hand guard
and pulling toward the front handle until you hear a
click.
WARNING
If the chain brake does not stop the chain immediately, or
if the chain brake will not stay in the run position without
assistance, take the saw to an authorised service centre
for repair prior to use.
TRANSPORTATION AND STORAGE
See page 24.
■Stop the machine, remove the battery pack and allow
the tool to cool before storing or transporting.
■Clean all foreign material from the product. Store it in
a cool dry and well-ventilated place that is inaccessible
to children. Keep away from corrosive agents such
as garden chemicals and de-icing salts. Do not store
outdoors.
■Fit guide bar cover before storing the unit, or during
transportation.
■For transportation, secure the machine against
movement or falling to prevent injury to persons or
damage to the machine.
MAINTENANCE
WARNING
Use only original manufacturer’s replacement parts,
accessories and attachments. Failure to do so can
cause possible injury, poor performance and may void
your warranty.

8
WARNING
Servicing requires extreme care and knowledge
and should be performed only be a qualified service
technician. For service we suggest you return the
product to your nearest authorized service center for
repair. When servicing, use only identical replacement
parts.
WARNING
Remove the battery before adjustment, maintenance or
cleaning. Failure to do so could result in serious personal
injury.
■You may only make adjustments or repairs described
in this manual. For other repairs, contact the authorized
service agent.
■
■
Consequences of improper maintenance may cause
the chain brake and other safety features to not function
correctly, thus increasing the potential for serious
injury. Keep your chainsaw professionally maintained
and safe.
Sharpening the chain safely is a skilled task. Therefore
the manufacturer strongly recommends that a worn or
dull chain is replaced with a new one, available from
your authorised LawnMaster service centre. The part
number is available in the product specification
table in this manual.
■Follow instructions for lubricating and chain tension
checking and adjustment.
■After each use, clean the product with a soft dry cloth.
■Check all nuts, bolts and screws at frequent intervals
for security to ensure the product is in safe working
condition. Any part that is damaged should be properly
repaired or replaced by an authorized service centre.
REPLACING GUIDE BAR AND SAW CHAIN
See page 19-20.
1. Make sure to remove the battery. Wear protective
gloves.
2. Unscrew the chain tensioner knob by turning it
counterclockwise until the sprocket cover comes loose.
3. Remove the sprocket cover. Remove the bar and saw
chain from unit.
4. To replace the bar with a new one, unscrew the nut of
the chain tension assembly. Mount the chain tension
assembly on to the new bar and tighten the nut.
5. Put the new chain in the correct direction onto the bar
and make sure that the drive links are aligned in the
bar groove.
6. Attach the bar to the chain saw and loop the chain
around the drive sprocket.
7. Replace the sprocket cover.
8. Adjust the chain tension. Refer to the “Adjusting the
chain tension” section. (Page 20-21)
WARNING
A dull or improperly sharpened chain can cause
excessive motor speed during cutting which may result
in severe motor damage.
WARNING
Improper chain sharpening increases the potential of
kick-back.
WARNING
Failure to replace or repair a damaged chain can cause
serious injury.
WARNING
The saw chain is very sharp. Always wear protective
gloves when performing maintenance to the chain.
INSPECTING AND CLEANING THE CHAIN BRAKE
See page 22.
■Always keep the chain brake mechanism clean by
lightly brushing the linkage free from dirt.
■Always test the chain brake performance after cleaning.
Refer to “Operation - Checking and Operating Chain
Brake” earlier in this manual for additional information.
MAINTENANCE SCHEDULE
Daily check
Bar lubrication Before each use
Chain tension Before each use and
frequently
Chain sharpness Before each use, visual
check
For damaged parts Before each use
For loose fasteners Before each use
Chain brake function Before each use
Inspect and clean
Bar Before each use
Complete saw After each use
Chain brake Operation Every 5 hours*
SYMBOLS ON THE PRODUCT
Safety alert
Read and understand all instructions
before operating the product, follow all
warnings and safety instructions.
Wear eye, ear and head protection.
Wear non-slip safety footwear when
using the product.

9
105
V0: 18m/s
Wear non-slip, heavy duty gloves.
Beware of chain saw kickback and
avoid contact with bar tip.
Do not expose to rain or damp
condition.
Hold and operate the saw properly
with both hands.
Do not operate the saw using only
one hand.
Conforms to all regulatory standards
in the country in the EU where the
product is purchased.
Waste electrical products should not
be disposed of with household
waste. Please recycle where facilities
exist. Check with your local authority
or retailer for recycling advice.
The guaranteed sound power level is
105 dB
Bar and chain lubricant
Minimum lubricant level
Lock
Unlock
Rotate to adjust chain tension
+ = Tighten the chain
- = Loosen the chain
Moving direction of the chain
(Marked under the sprocket cover)
No-load chain speed is 18 m/s
Lmax: 406mm Maximum guide bar length is 406 mm
SYMBOLS IN THIS MANUAL
Parts or accessories sold separately
Waste electrical products should not
be disposed of with household waste.
Please recycle where facilities exist.
Note
Warning
Wear eye and face protection.
Wear upper body protection.
Wear leg protection.
Stop the product.
The following signal words and meanings are intended to
explain the levels of risk associated with this product.
DANGER
Indicates an imminently hazardous situation, which, if
not avoided, will result in death or serious injury.
WARNING
Indicates a potentially hazardous situation, which, if not
avoided, could result in death or serious injury.
CAUTION
Indicates a potentially hazardous situation, which, if not
avoided, may result in minor or moderate injury.
CAUTION
Without safety alert symbol
Indicatesa situation thatmay result inproperty damage.

x 1
x 1
x 1
x 1
x 1
10
13
14
10 12
11
11
8
4 5
123
7
6
9

1 2
12
3
2
1
7
2
8
2
3
4
2
1
6
3-4 mm
5
9
33
1
3
2
14
15

1
3
2
5 cm / 2 in
5 cm / 2 in
1
English | 9
English | 9
English | 9
16

12
1
2
2
2
1
English | 9
17

1
2
1/3
2/3
2
1
2/3
1/3
18
Table of contents
Other LawnMaster Chainsaw manuals


