Layzee Living CarPort 4P User manual
Assembly Instructions
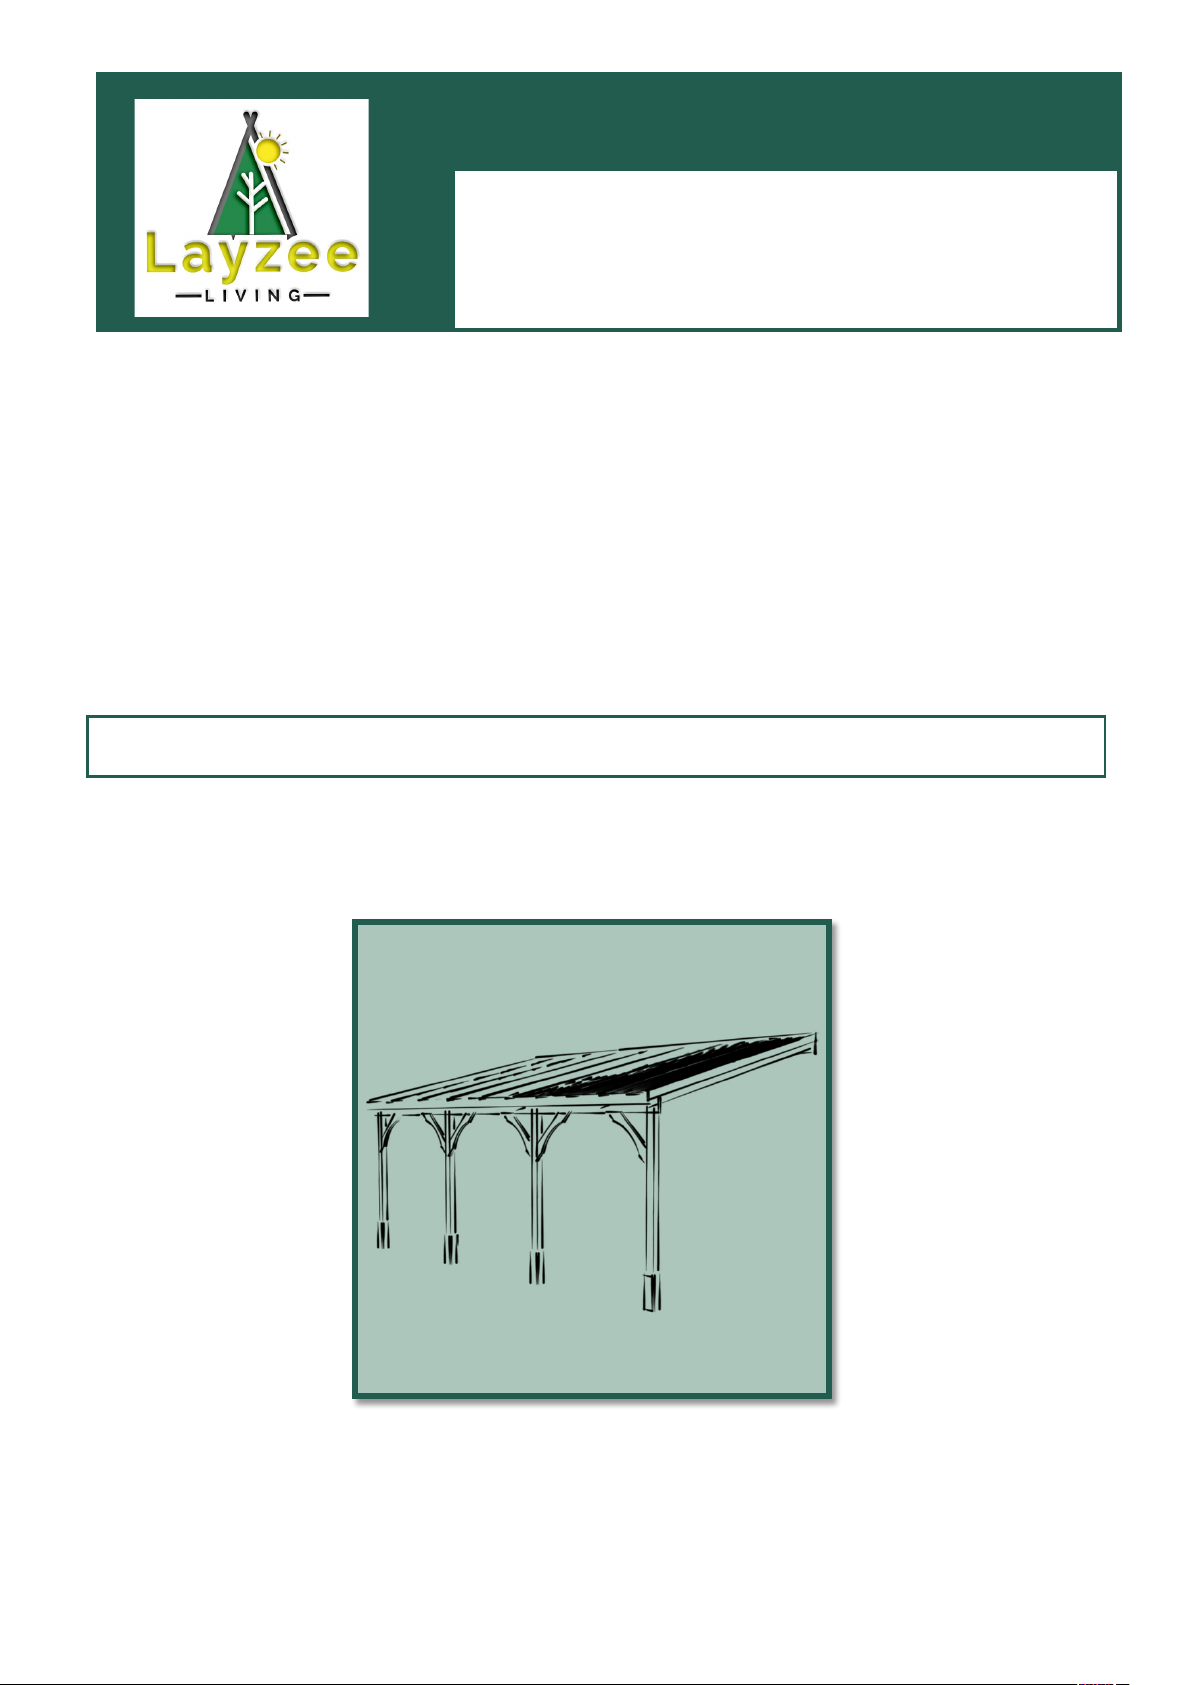
Layzee Car Port
4 Post (6.5 & 7.2M)
1
Before you commence the assembly process, we recommend that you read these instructions
thoroughly beforehand to familiarise yourself with the assembly process and to also check that you have
the correct components. If for any reason you need assistance, you can find our contact details on the
final page of these instructions.
We strongly recommend that any assembly is carried out on an open flat, level surface if possible and
with sufficient space. You will also require the assistance of at least 2 adults to complete assembly
safely.
Tools required:
10mm socket, No2 Pozidriv screwdriver (or electric driver), step ladder or
platform.
Eternity Car Port – 4 Post
2
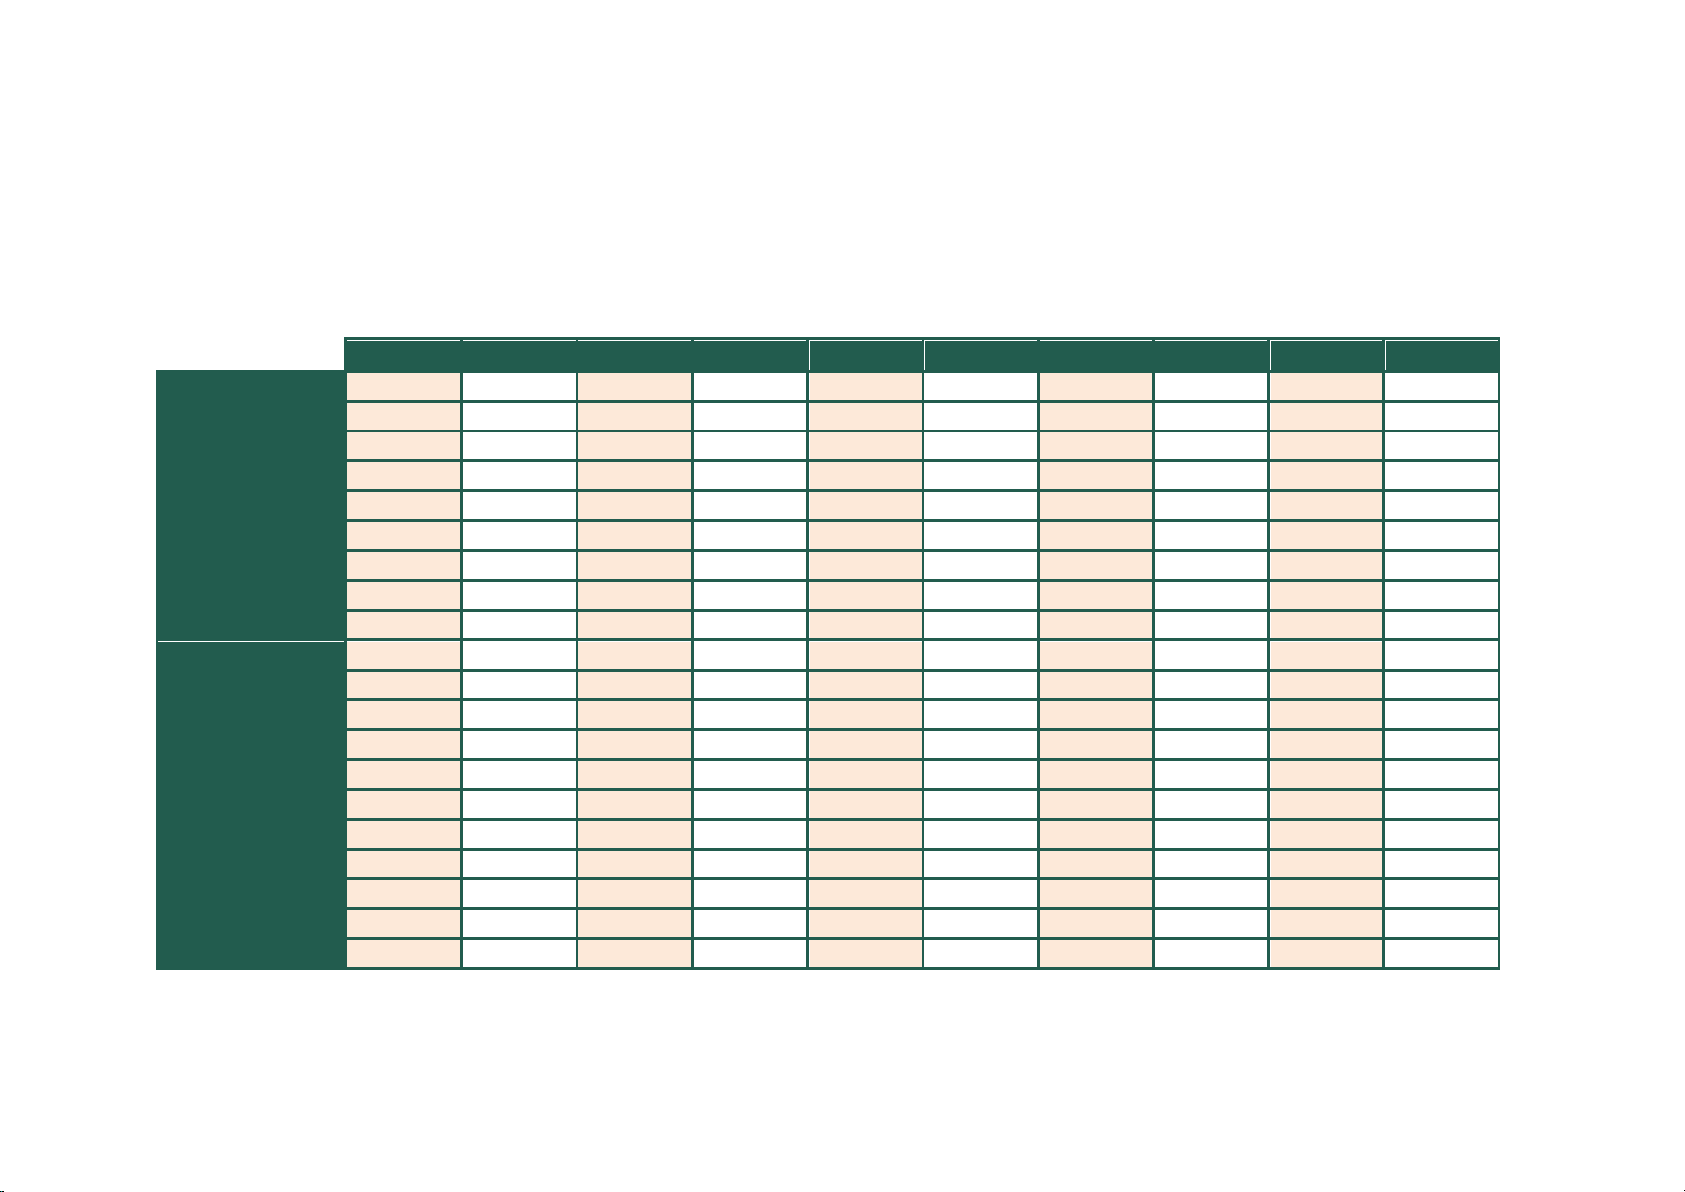
Product Specification Table
Please use the table below in conjunction with the Components list on page 3 to check you have the correct parts before commencing
assembly of your carport.
2 x 6.5M
2 x 7.2M
2.5 x 6.5M
2.5 x 7.2M
3 x 6.5M
3 x 7.2M
3.5 x 6.5M
3.5 x 7.2M
4.5 x 6.5M
4.5 x 7.2M
40mm Screws
8
8
10
10
12
12
12
12
16
16
60mm screws
142
148
152
159
162
170
162
170
182
192
50mm Coachscrew
4
4
4
4
4
4
4
4
4
4
100mm Coachscrew
14
14
14
14
14
14
14
14
14
14
120mm Coachscrew
20
22
20
22
20
22
20
22
20
22
60mm Roofing Screw
8
8
10
10
12
12
12
12
16
16
Roof panel
9
10
9
10
9
10
9
10
9
10
Glazing bar
8
9
8
9
8
9
8
9
8
9
Glazing bar capping
8
9
8
9
8
9
8
9
8
9
Glazing bar end cap
8
9
8
9
8
9
8
9
8
9
Panel closure strip
9
10
9
10
9
10
9
10
9
10
Posts
4
4
4
4
4
4
4
4
4
4
Wall plate
2
2
2
2
2
2
2
2
2
2
Runner
3
3
3
3
3
3
3
3
3
3
Rafter
10
11
10
11
10
11
10
11
10
11
Brace
6
6
6
6
6
6
6
6
6
6
Rafter brace
2
2
2
2
2
2
2
2
2
2
End cover
2
2
2
2
2
2
2
2
2
2
Fascia
2
2
2
2
2
2
2
2
2
2
Cladding
16
16
16
16
16
16
16
16
16
16
Layzee Car Port – 4 Post
Layzee Living
London W1W 7LT
info@layzeeliving
02078683959
3
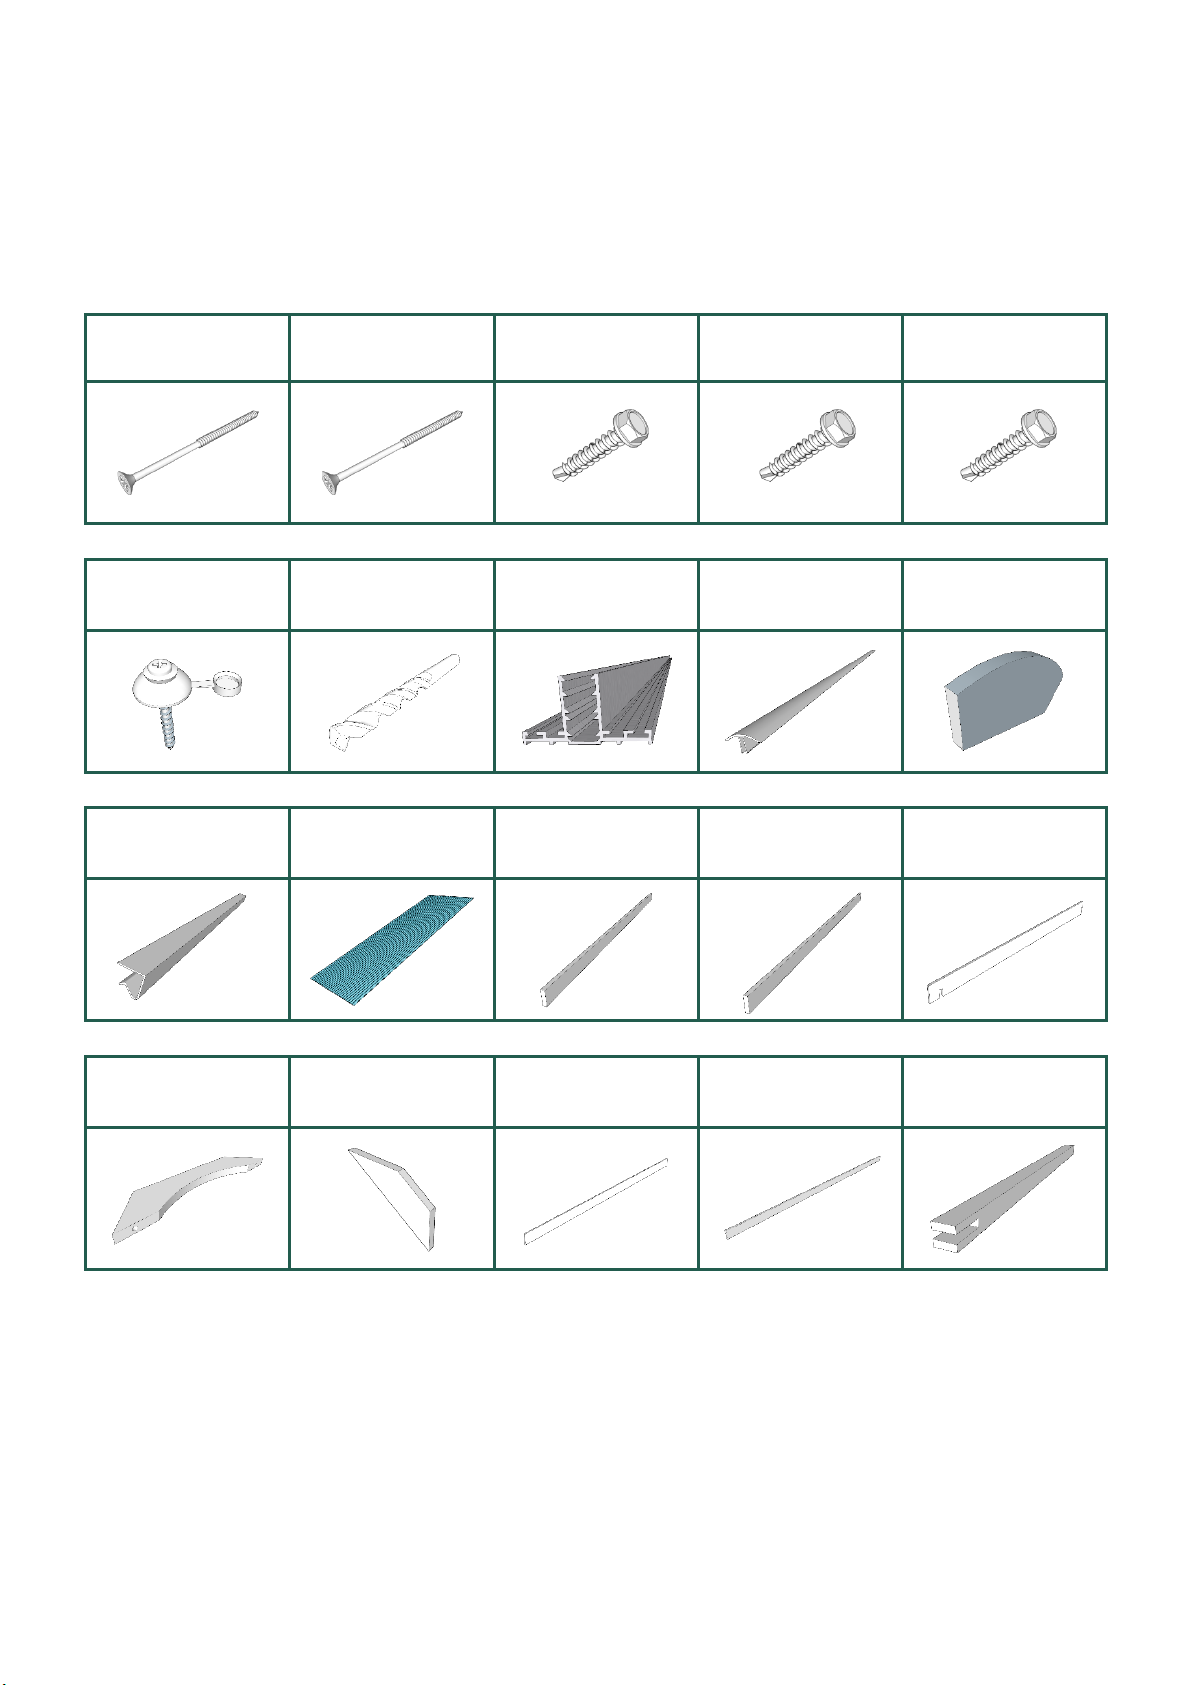
Component list
The Product Specification table on page 2 will contain quantities for the components shown below.
40mm woodscrews
60mm woodscrews
50mm coachscrews
100mm coachscrews
120 mm coachscrews
60mm Roofing screws
5mm Drill bit (x1)
Glazing bar
Glazing bar capping
Glazing bar end cap
Panel closure strip
Roof panel
Wall plate
Runner
Rafter
Brace
End brace
End cover
Fascia
Posts
Layzee Car Port – 4 Post
Layzee Living
London W1W 7LT
info@layzeeliving
02078683959
4
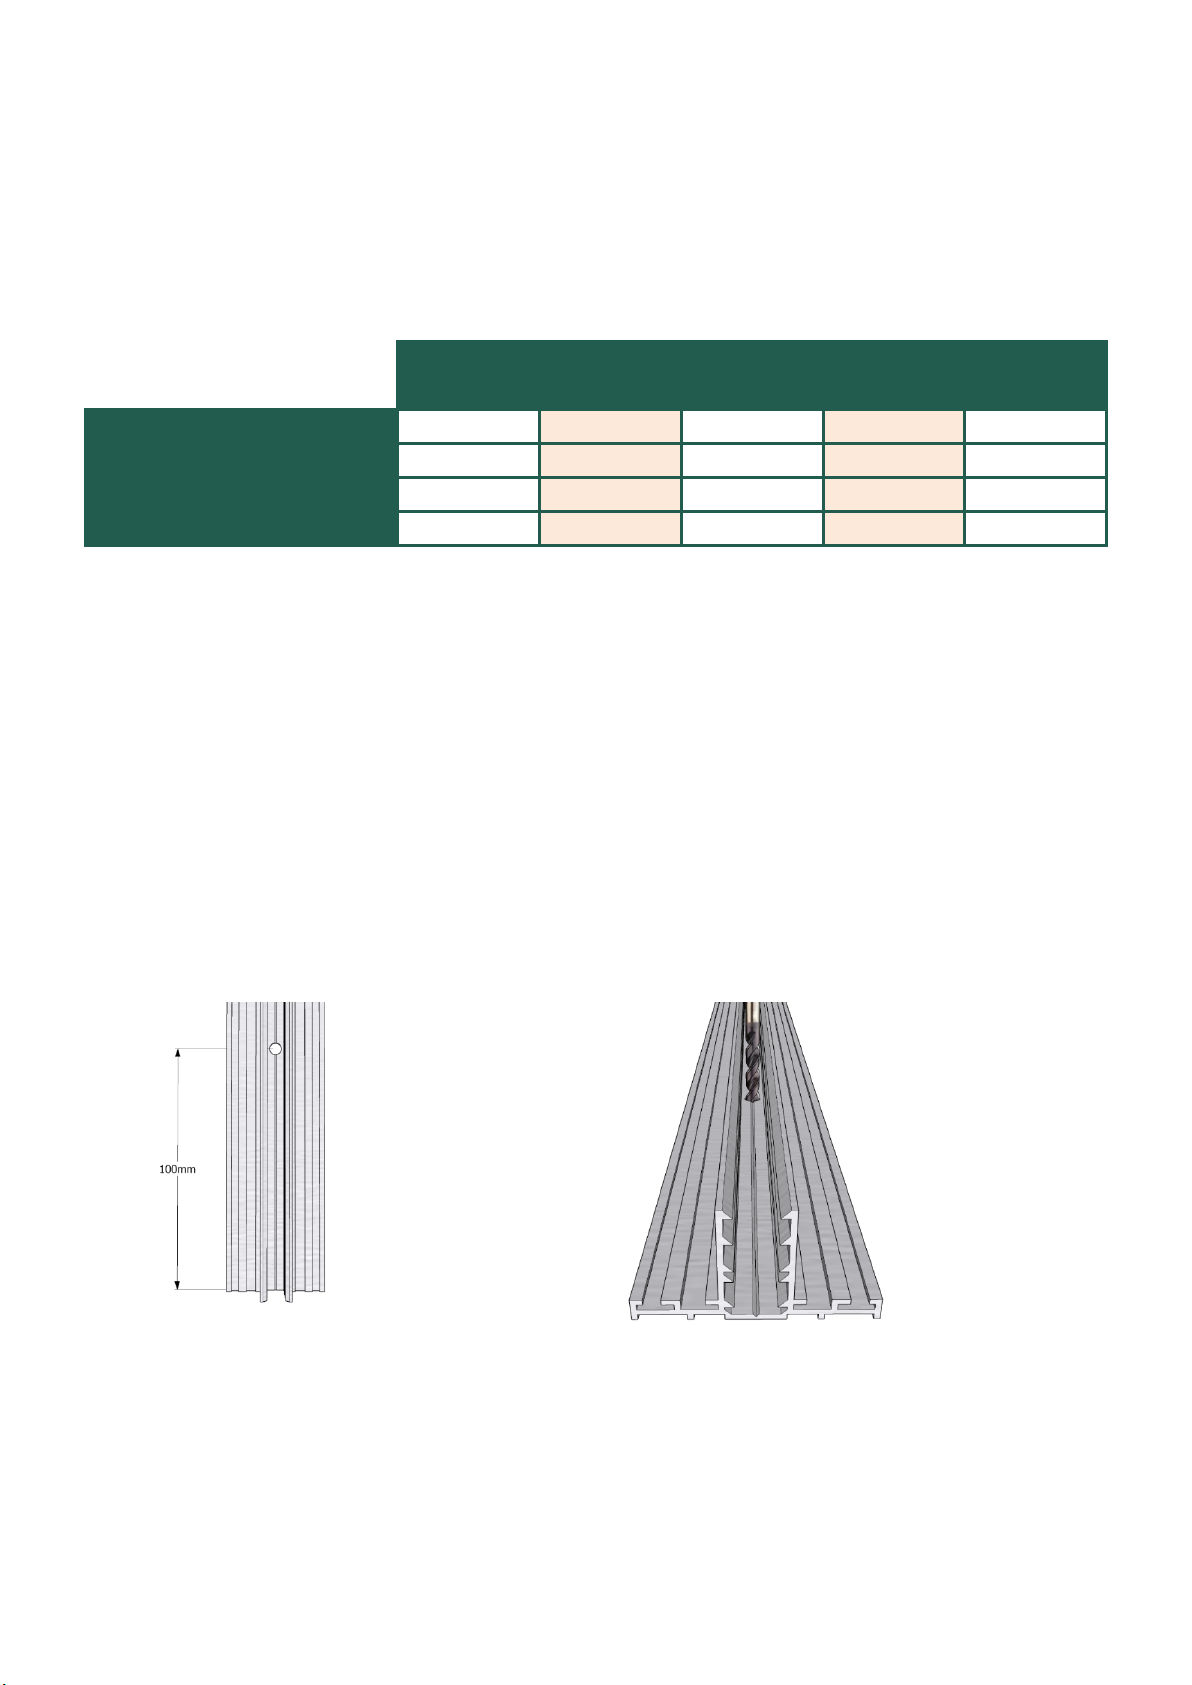
Panel and glazing bar preparation
Before commencing assembly, the outer panel edges and glazing bars will need to be pre-drilled as per
the following instructions using the spacings indicated in the table below.
Panel length
2M
2.5M
3M
3.5M
4.5M
Holes per panel/bar
4
5
6
6
8
Hole spacing (mm)
600
575
560
660
614
Wall plate height (top edge - mm)
2550
2637
2723
2810
2984
Post distance from wall (mm)
1707
2200
2690
3180
4170
Panel length table
Glazing bars
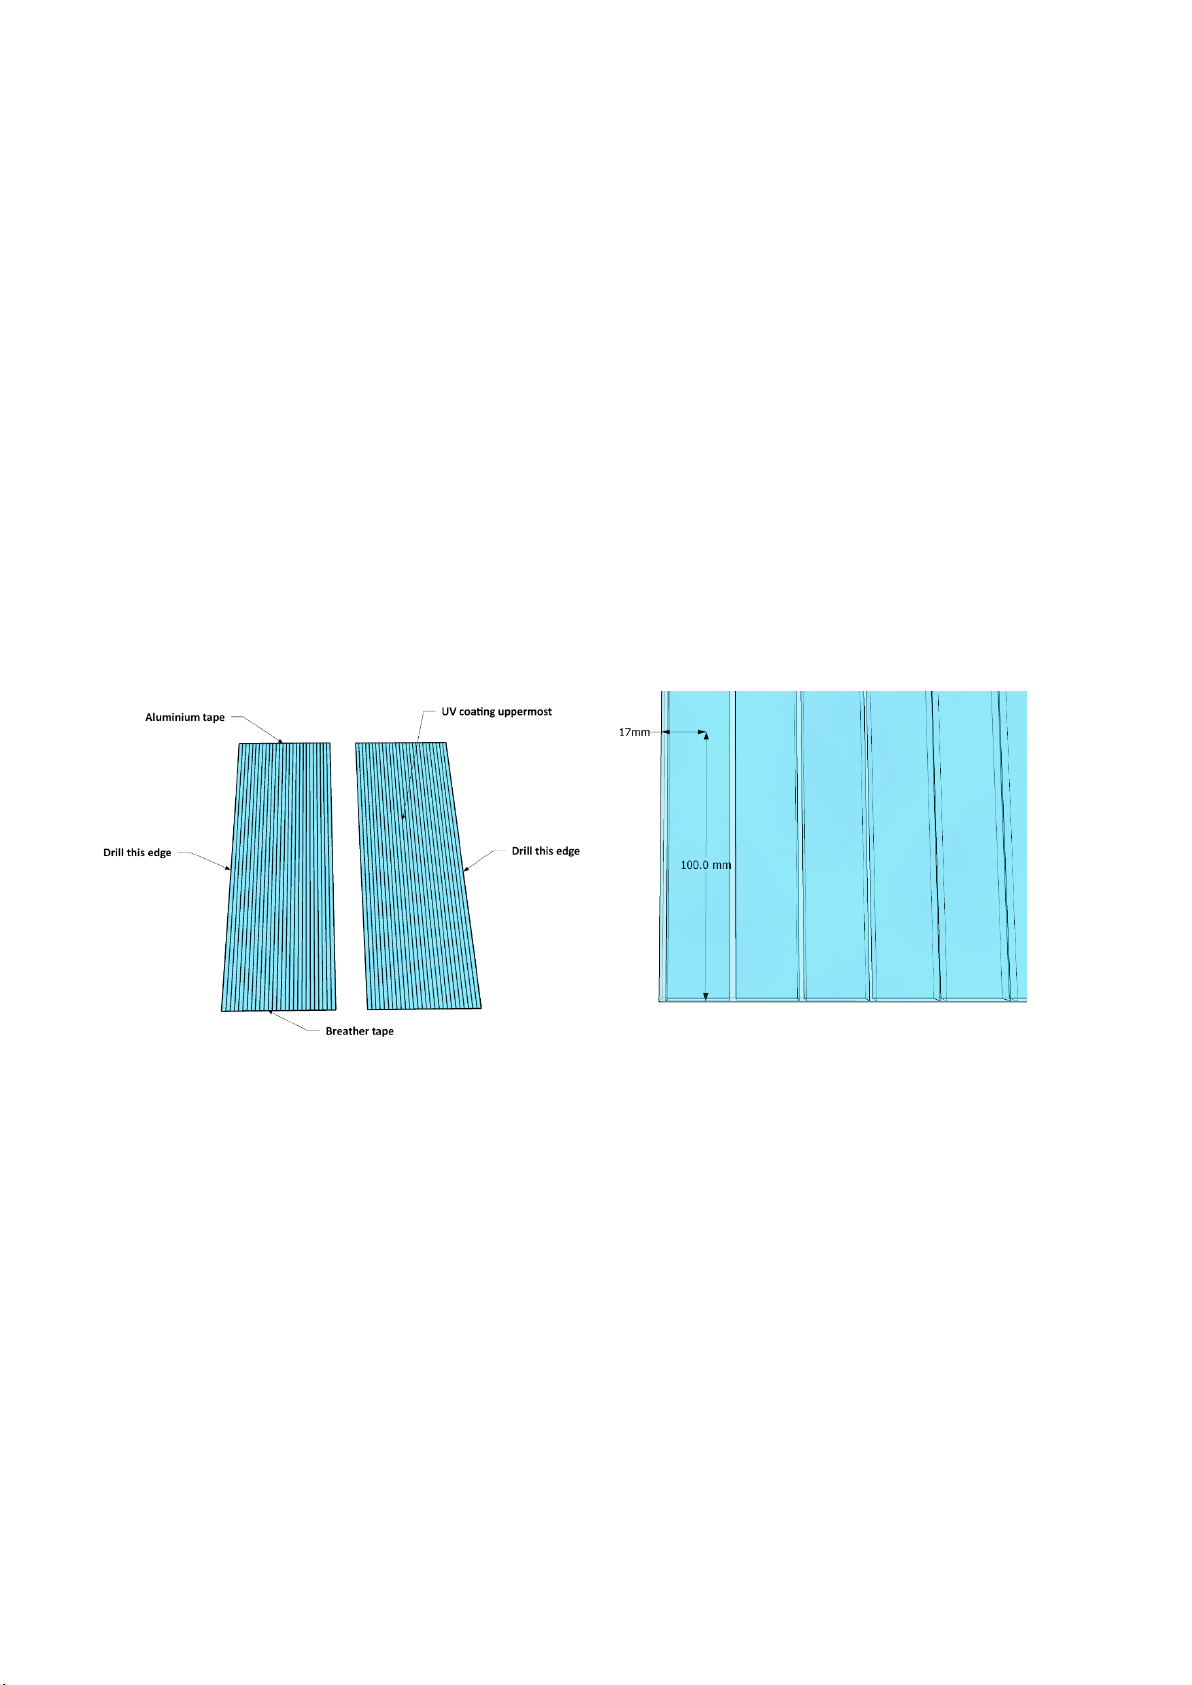
Measure 100mm from either end of the glazing bar (fig.1) and using the 5mm drill bit supplied, drill the
first hole by using the central groove in the base of the glazing bar as a guide and drilling through as
shown (fig. 2). Using the Panel length table, now measure along the glazing bar the appropriate length
from the centre point of the first hole and continue to add the remaining holes in the glazing bar in this
manner. The final hole should be approximately 100mm from the opposing end of the glazing bar.
fig.1
fig 2.
Layzee Car Port – 4 Post
Layzee Living
London W1W 7LT
info@layzeeliving
02078683959
5
Polycarbonate panels
Two of the roof panels will be fitted as a “mirror” pair with holes down one edge to allow them to be
fixed to the outer rafters. Lay out 2 panels with the UV coated side uppermost and the aluminium tape
on both panels at the same end (fig. 1). Start by placing a piece of scrap timber under the area to be
drilled. Now drill the first hole 100mm from either end of one the panels and 17mm from the edge
(fig.2) using the 5mm drill bit supplied. Using the Panel length table (page 4), now measure along the
panel the appropriate length from the centre point of the first hole, move the scrap timber into position
and continue to add the remaining holes, 17mm from the edge of the panel as before. The final hole
should be approximately 100mm from the opposing end of the panel. Repeat the drilling process for the
second panel, this time drilling the opposing edge as shown (fig 1). We recommend any protective film is
not removed until you are ready to install the panel.
fig.1
fig.2
Layzee Car Port – 4 Post
Layzee Living
London W1W 7LT
info@layzeeliving
02078683959
6
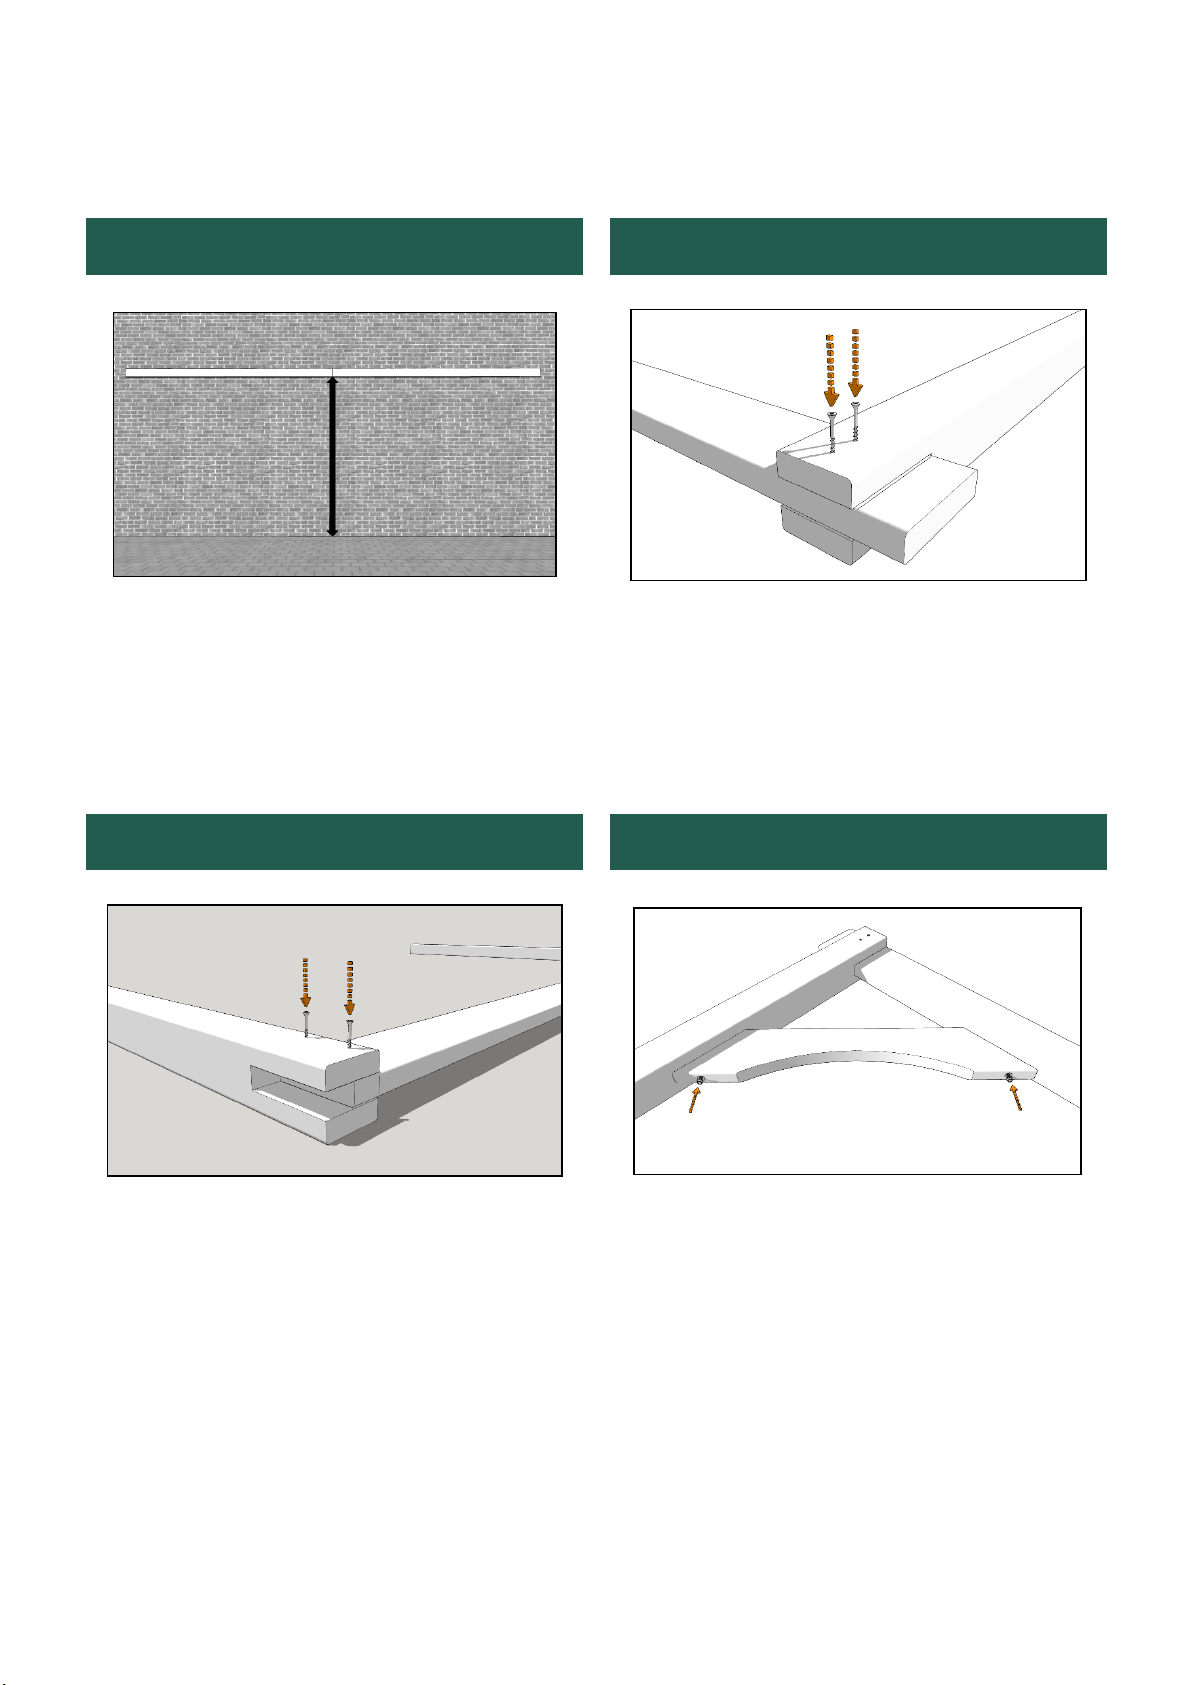
Step 1
Step 2
Begin by taking the wall plates, one at a time, and placing
them horizontally (use a spirit level or laser) on the wall
where you would like the car port located. Ensure the
distance from TOP of the wall plates to the floor matches
that shown on the Panel length table (page 4). Mark the
hole positions for your wall fixings then drill and fix them
into place.
Place one of the posts on a flat surface as shown and then
insert one of the longer runners into the post slot, using
the markings spaced at 95mm apart on the runner as a
guide to align the post. Fix into place with 2 x 60mm
woodscrews.
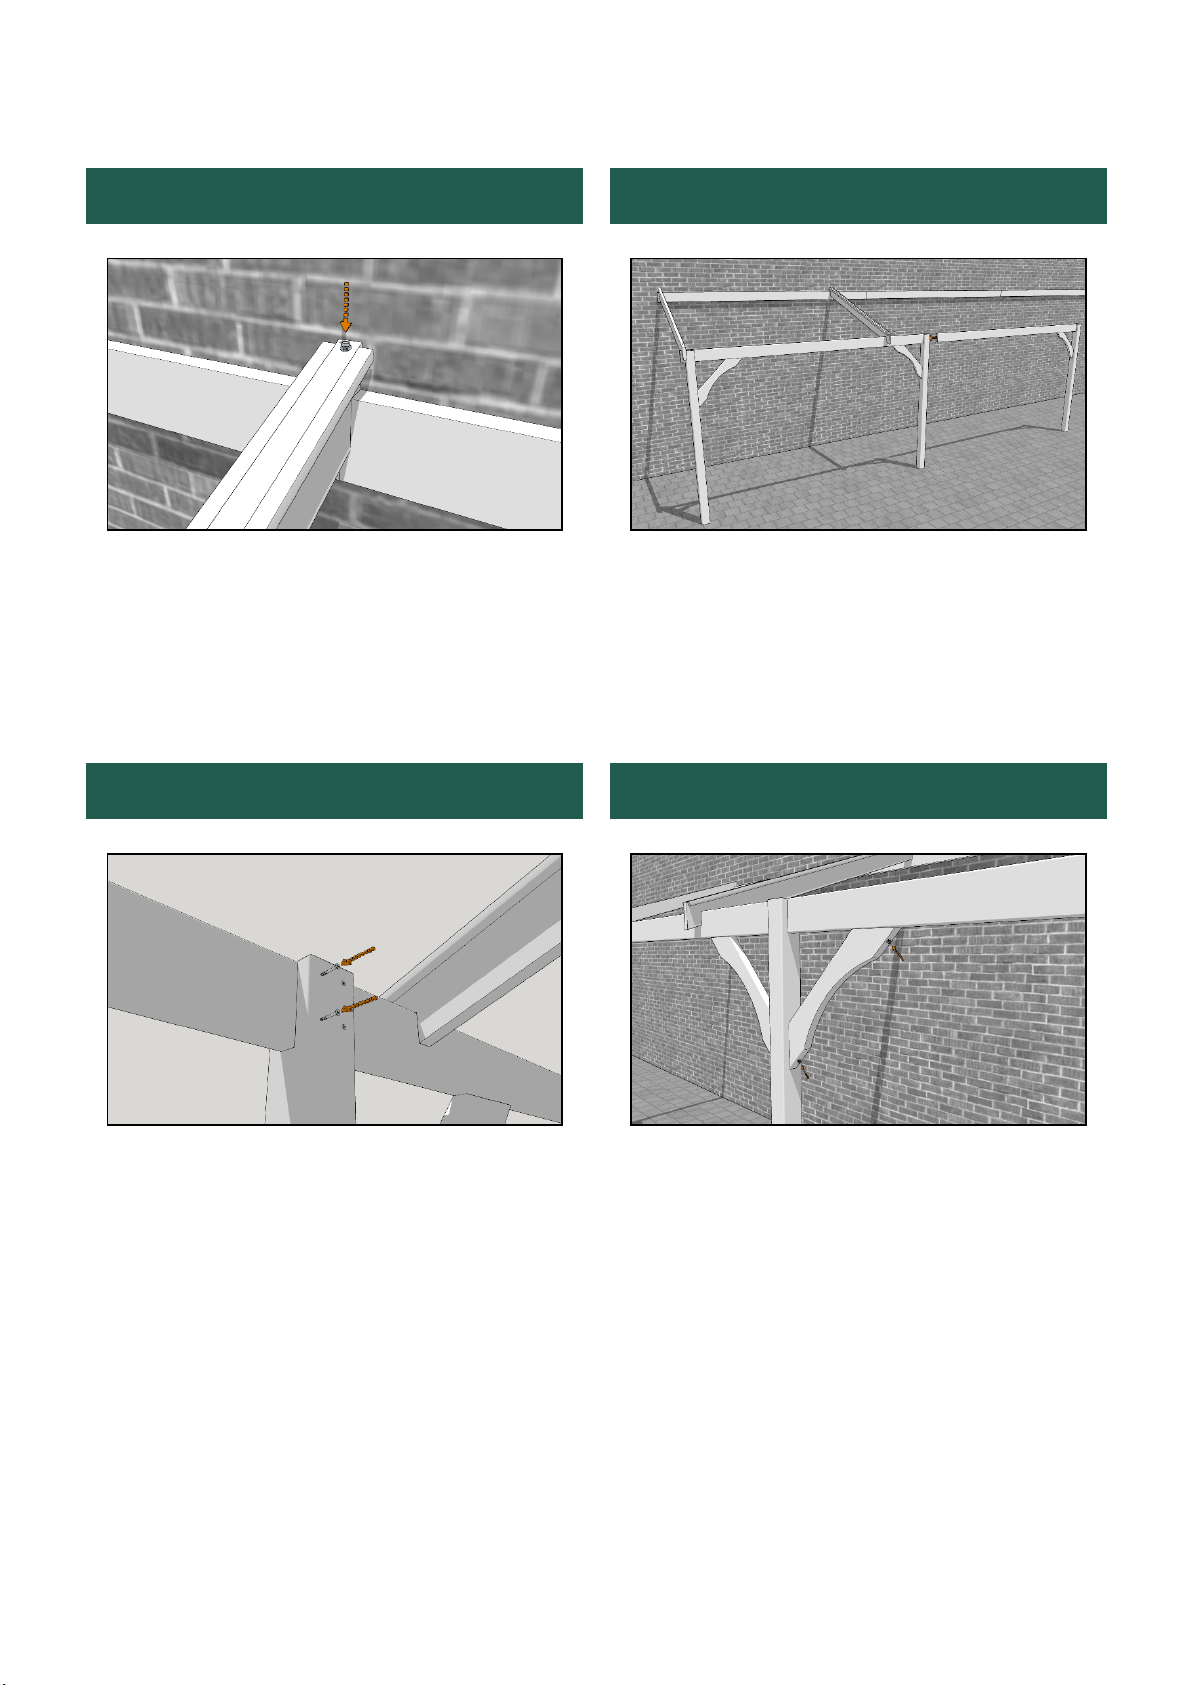
Step 3
Step 4
Slot another post over the other end of the runner,
aligning with the single mark on the runner top edge and
fix into place with 2 x 60mm woodscrews.
Align a brace with the underside of the runner (at either
end) and centrally across the inside face of the post as
shown. The mating faces should be flat against each other
before fixing the brace into place with a 100mm
coachscrew at each end. Repeat and attach the remaining
brace to the other end of the runner to form a “goal post”
structure.
Layzee Car Port – 4 Post
Layzee Living
London W1W 7LT
info@layzeeliving
02078683959
7
Step 5
Step 6
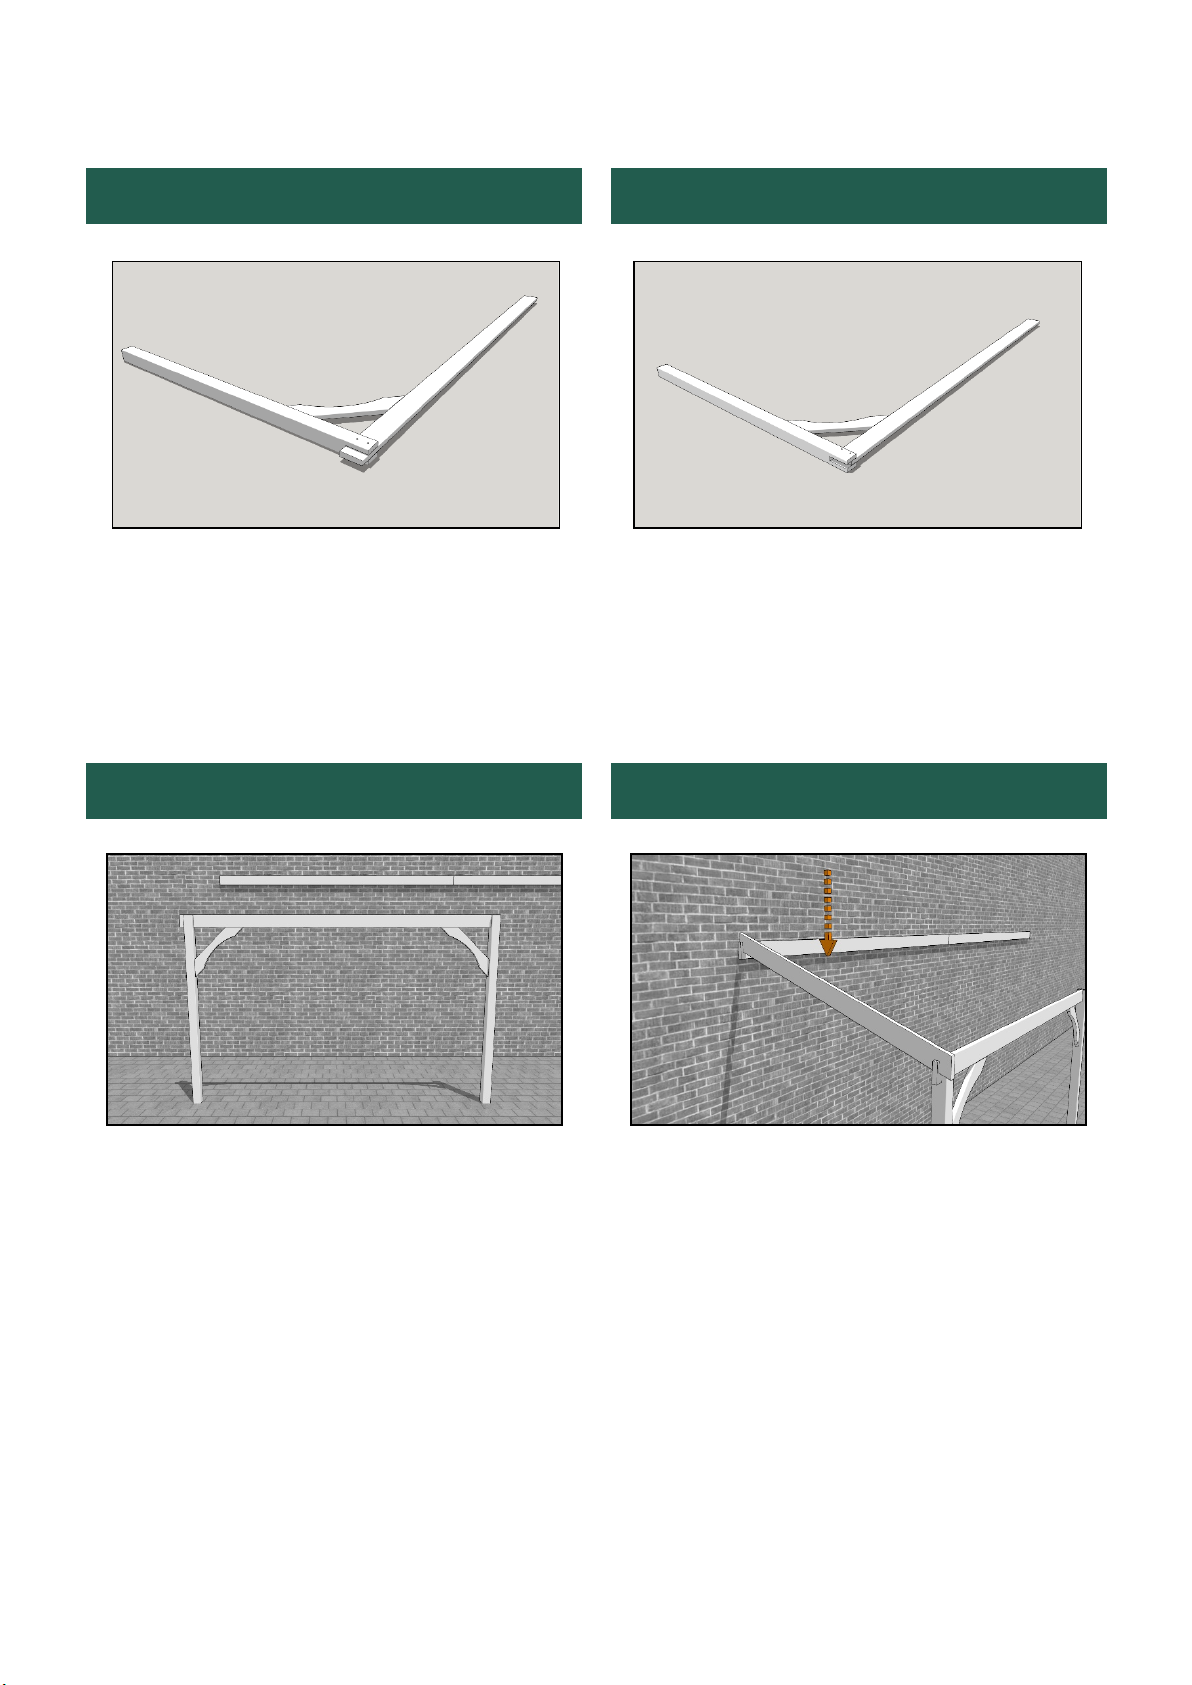
Assemble the remaining “goal post” type structures but
with only one post each, using the remaining posts,
runners and braces. One with a longer runner and the
runner overhanging the post...
…and the other with the shorter runner and the end
housed in the post joint.
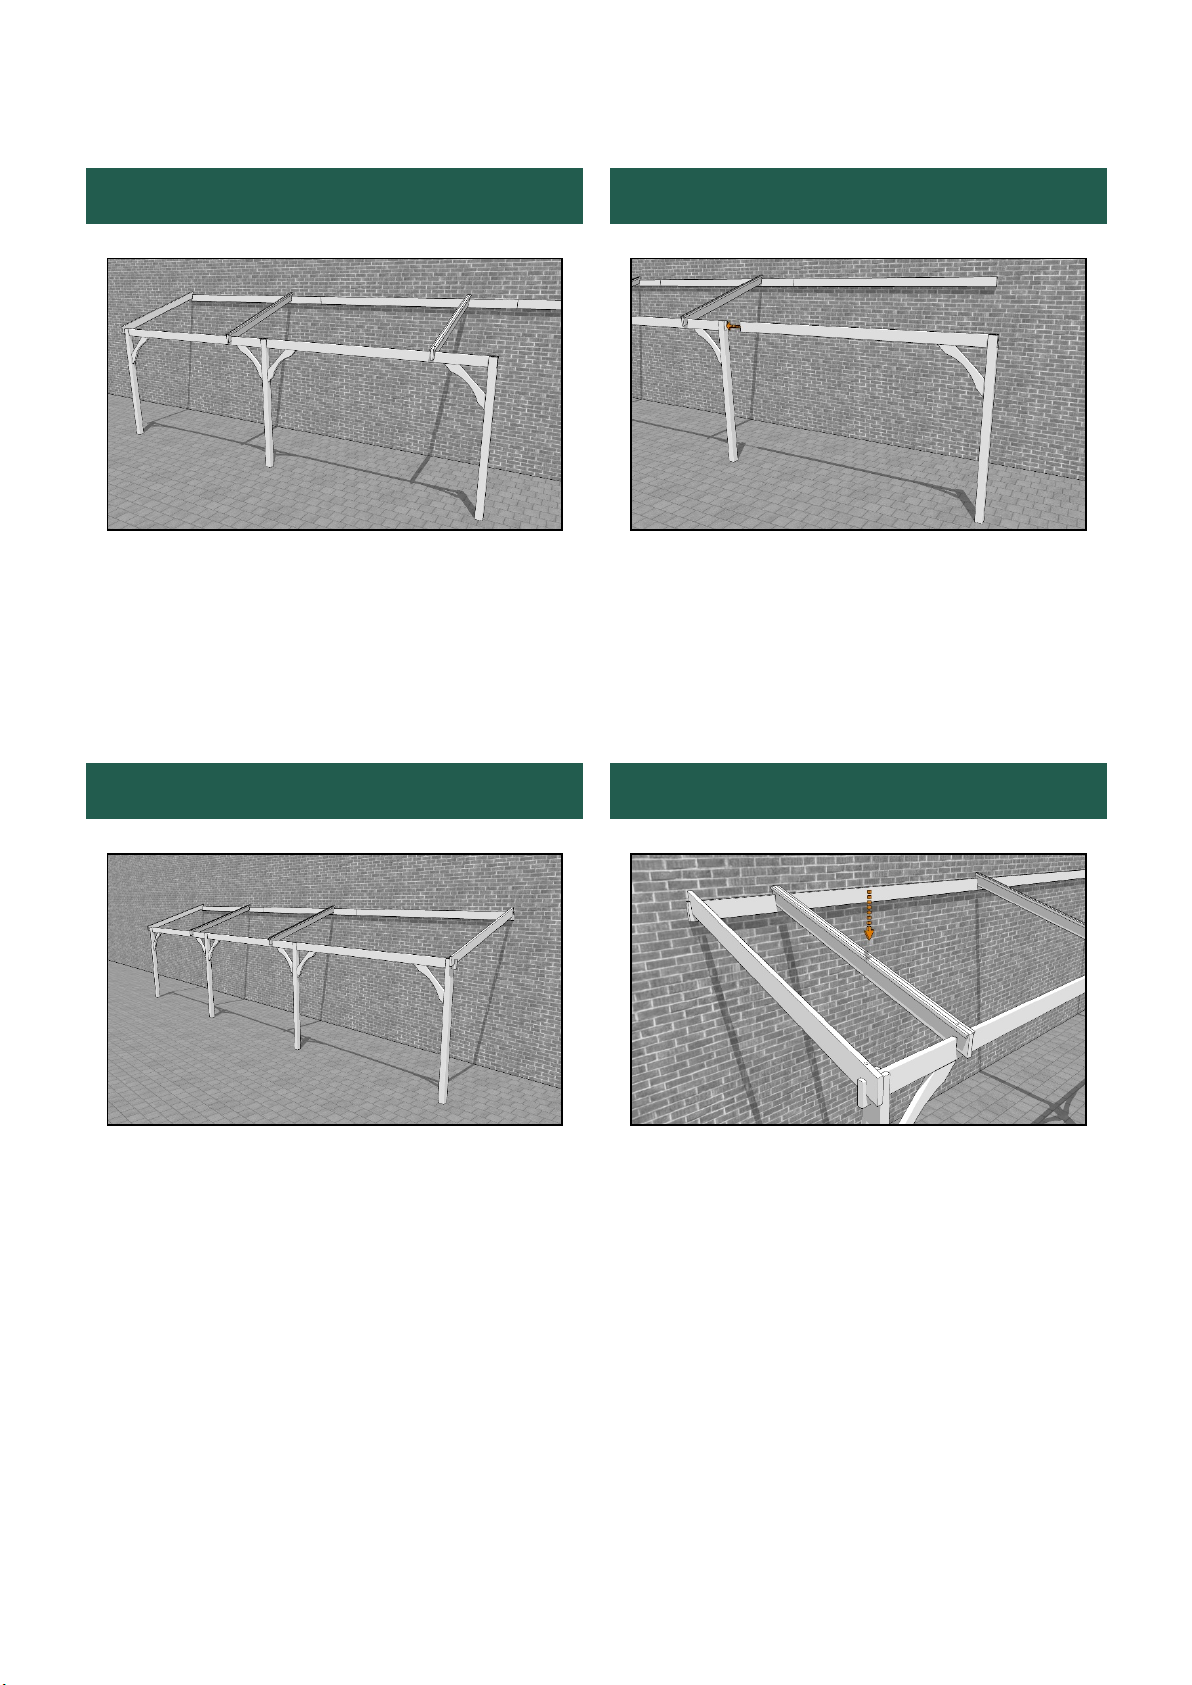
Step 7
Step 8
Using your assistants, manoeuvre the previously
assembled “goalpost” with 2 posts into place. Position it
parallel to the wall with the outer end post adjacent to
end of your of wall plate as shown. Consult the Panel
length table (page 4) to correctly distance the posts from
the wall.
Now drop one of the outer runners into place…
Layzee Car Port – 4 Post
Layzee Living
London W1W 7LT
info@layzeeliving
02078683959
8
Step 9
Step 10
Add an intermediate rafter to the other end of the runner,
aligning with the markings and adjusting the position of the
“goal post” as necessary. Do not fix in place at this stage.
Butt the outer rafter against the outer face of the post
before securing in place with a 120mm coachscrew driven
down into the runner.
Step 11
Step 12
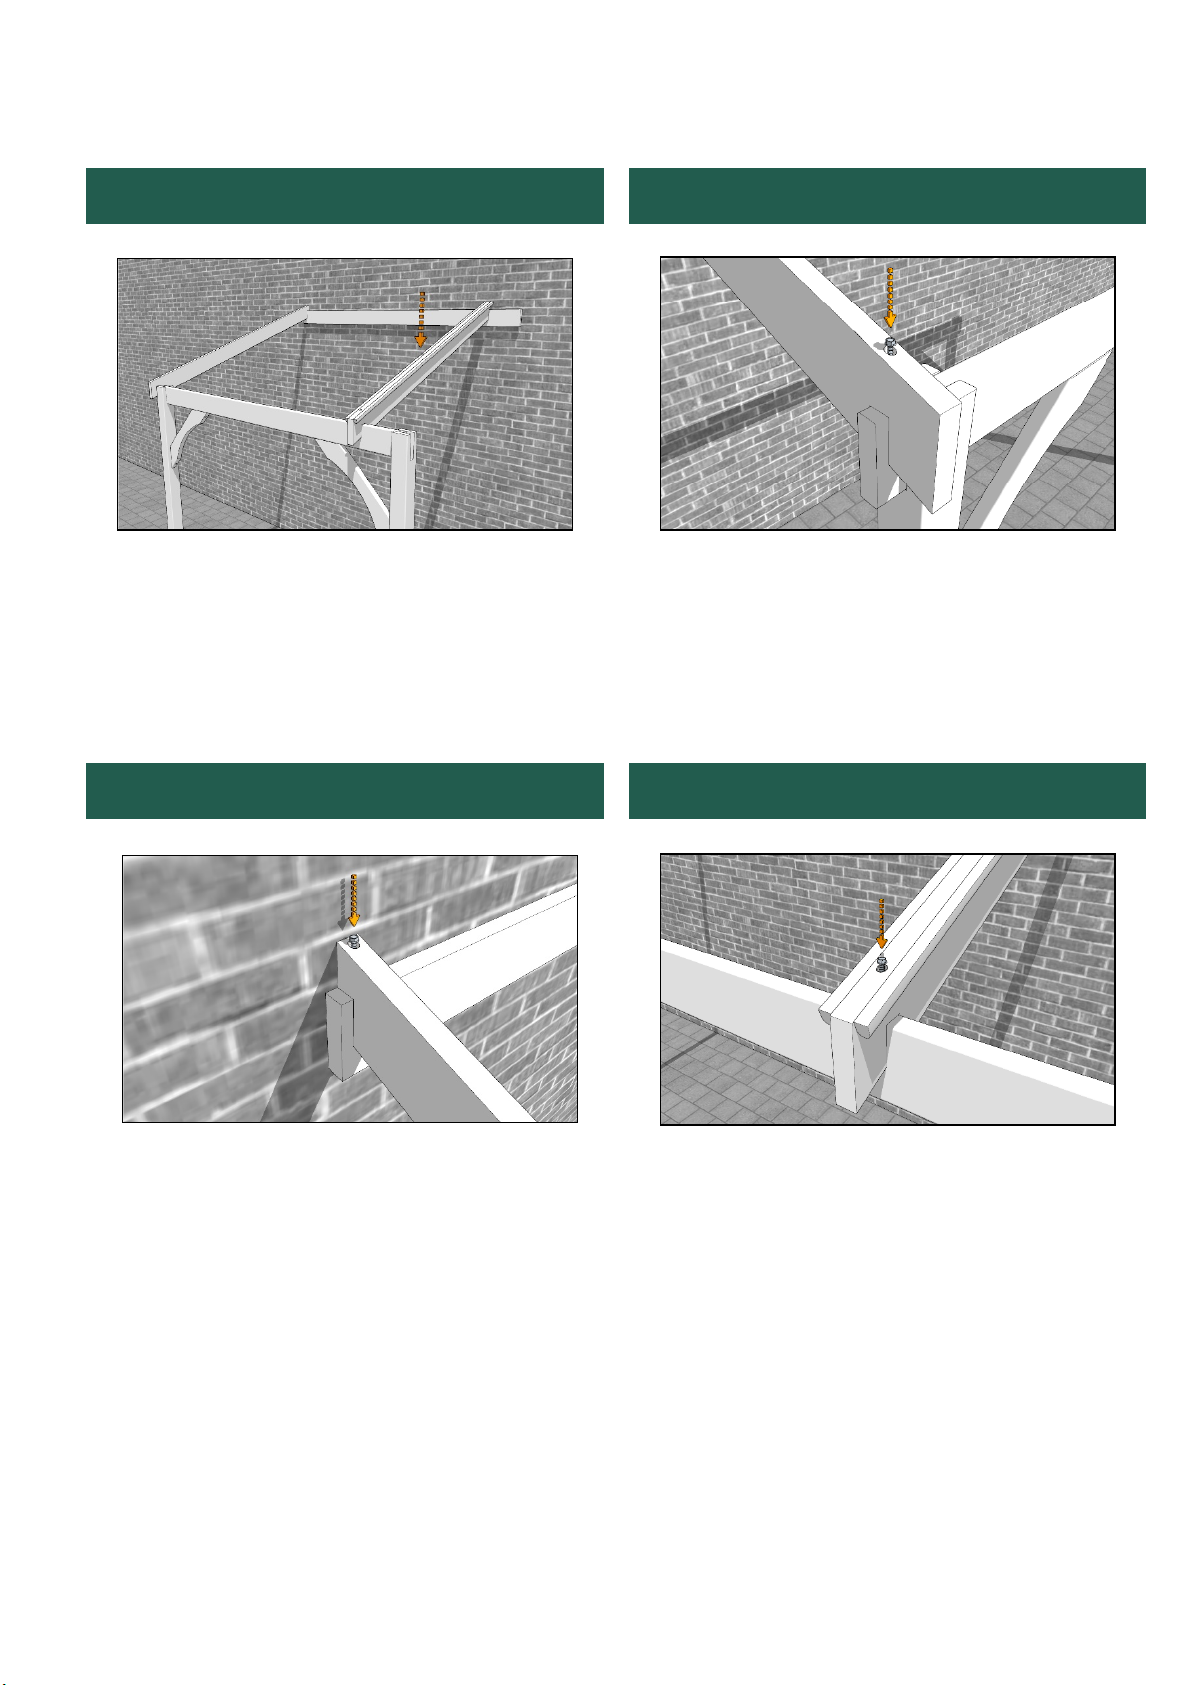
Adjust the positioning of the “goal post” if necessary, so that
the notch in the underside of the wall end of the outer rafter
sits snugly on the top of the wall plate and also lines up with
the markings indicating its correct position. Fix in place with
a 120mm coachscrew driven down into the runner.
Now fix the rafter into place with 120mm coachscrew into
the runner…
Layzee Car Port – 4 Post
Layzee Living
London W1W 7LT
info@layzeeliving
02078683959
9
Step 13
Step 14
…and another into the wall plate.
Using your assistants again, manoeuvre the previously
assembled “goal post” with shorter runner into place.
Slide the free runner end into the slot in the centre post
pushing it fully home until it butts against the other
runner…
Step 15
Step 16
… before securing it into place with 2 x 60mm screws
through the post into the runner.
Now fit the next brace into place, Aligning it the underside
of the runner and centrally across the inside face of the
post. Fix it into place with a 100mm coachscrew at each
end.
Layzee Car Port – 4 Post
Layzee Living
London W1W 7LT
info@layzeeliving
02078683959
10
Step 17
Step 18
Add another intermediate rafter as before, aligning it with
the markings on the wall plate and runner before securing
into place with a 120mm coachscrew at each end.
Using your assistants again, manoeuvre the final long
runner “goal post” into place. Slide the free runner end
into the slot in the intermediate post, pushing it fully
home until it butts against the other runner. Repeat steps
15-16 to fix to the post and add the final brace.
Step 21
Step 22
Add the final outer rafter as before in step 8 and secure in
place with 2 x 120mm coachscrews as in steps 10 – 11.
Starting from one end of the structure, add the remaining
intermediate rafters, using the markings on the runner
and wall plate and securing in place with a 120mm
coachscrew at each end as you go…
Layzee Car Port – 4 Post
Layzee Living
London W1W 7LT
info@layzeeliving
02078683959
11
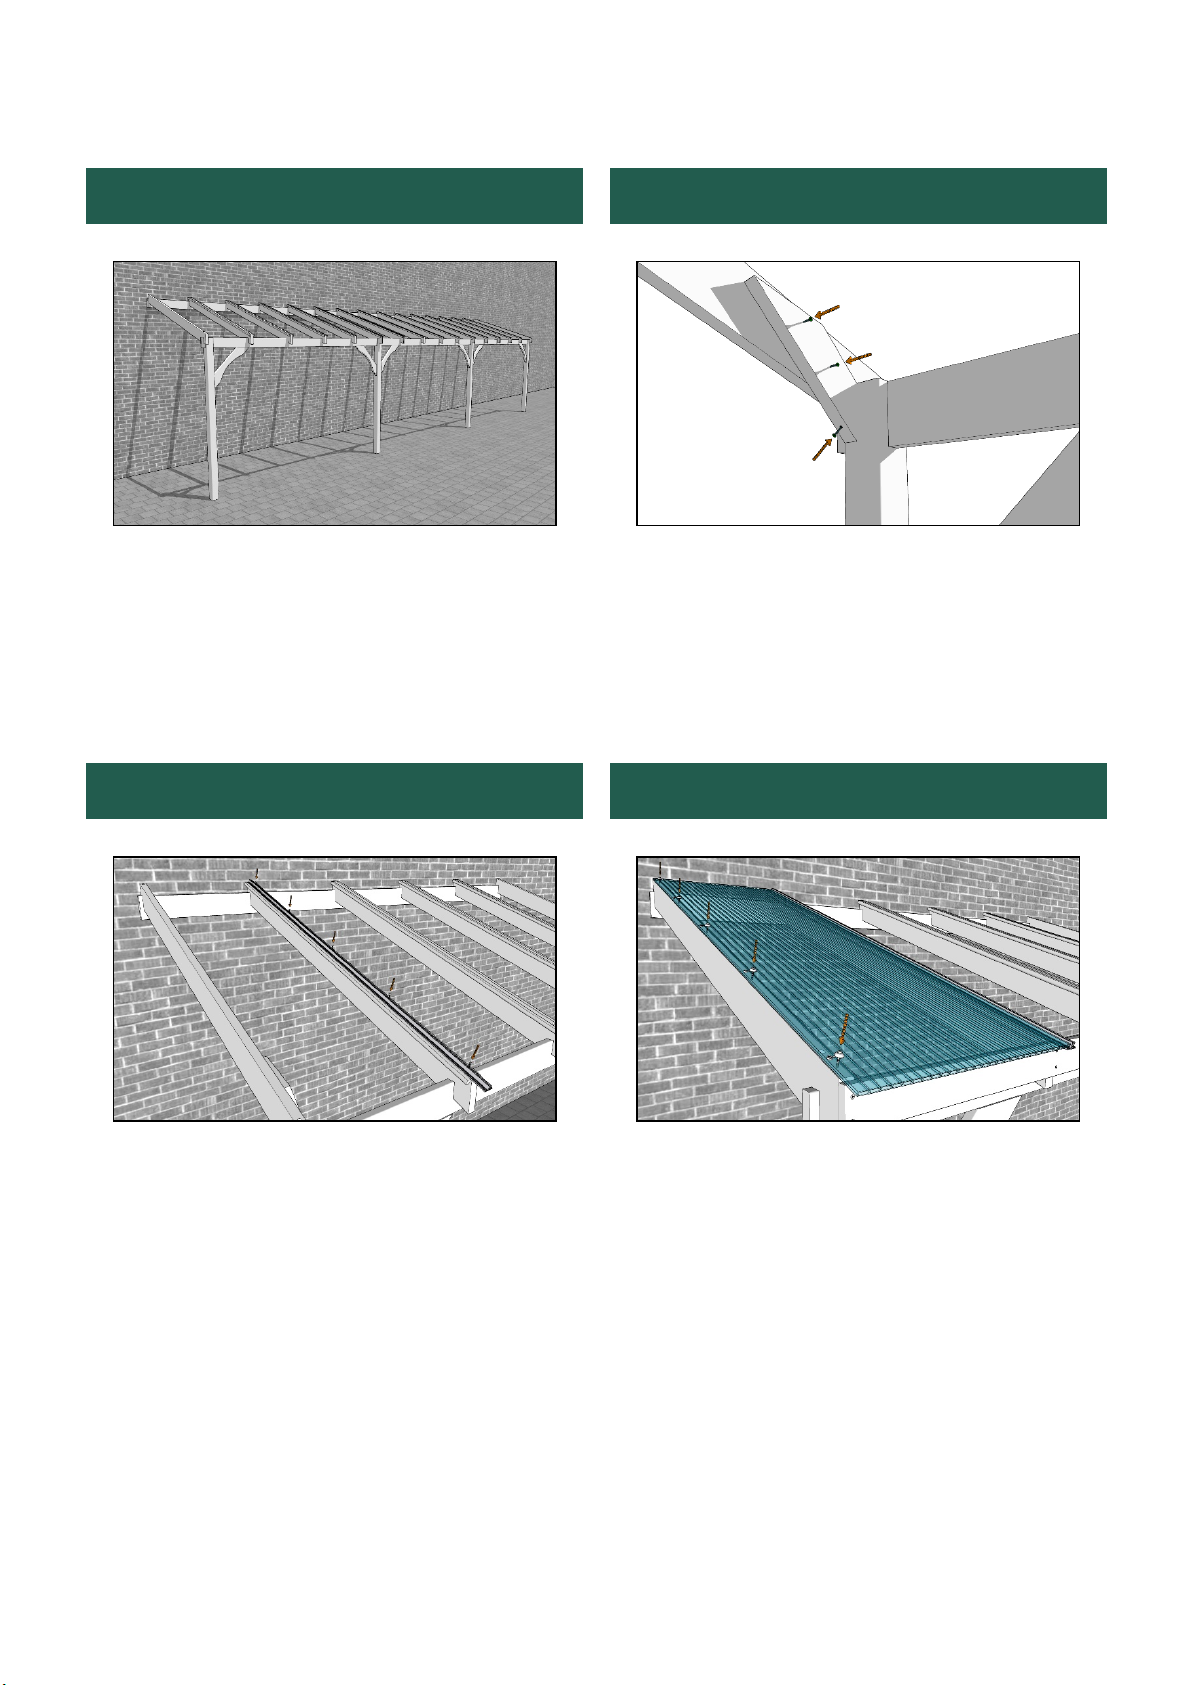
Step 23
Step 24
...until all of the rafters are fitted.
Place an end brace against the inner face of the outer
runner so that the lower face is butted against the inner
face of the post and the top edge is approximately 10mm
from the top edge of the rafter. Fix in place with 2 x
50mm coachscrews into the rafter and 1 x 100mm
coachscrew into the post as shown. Repeat for the other
end of the structure.
Step 25
Step 26
Starting from one end of the car port, attach the
previously drilled glazing bar so that it is centred on the
first inner rafter and butted up to the wall as shown. Fix in
place with 60mm screws.
Position one of the drilled polycarbonate panels so that it
sits on the glazing bar, aluminium tape at the wall, UV
coated side up and the drilled edge flush with the outer
rafter. Ensure the inner edge is parallel with glazing bar
and adjust the “goalpost” laterally if necessary before
fixing the panel in place with 60mm roofing screws and
then closing the cover caps.
Layzee Car Port – 4 Post
Layzee Living
London W1W 7LT
info@layzeeliving
02078683959
12
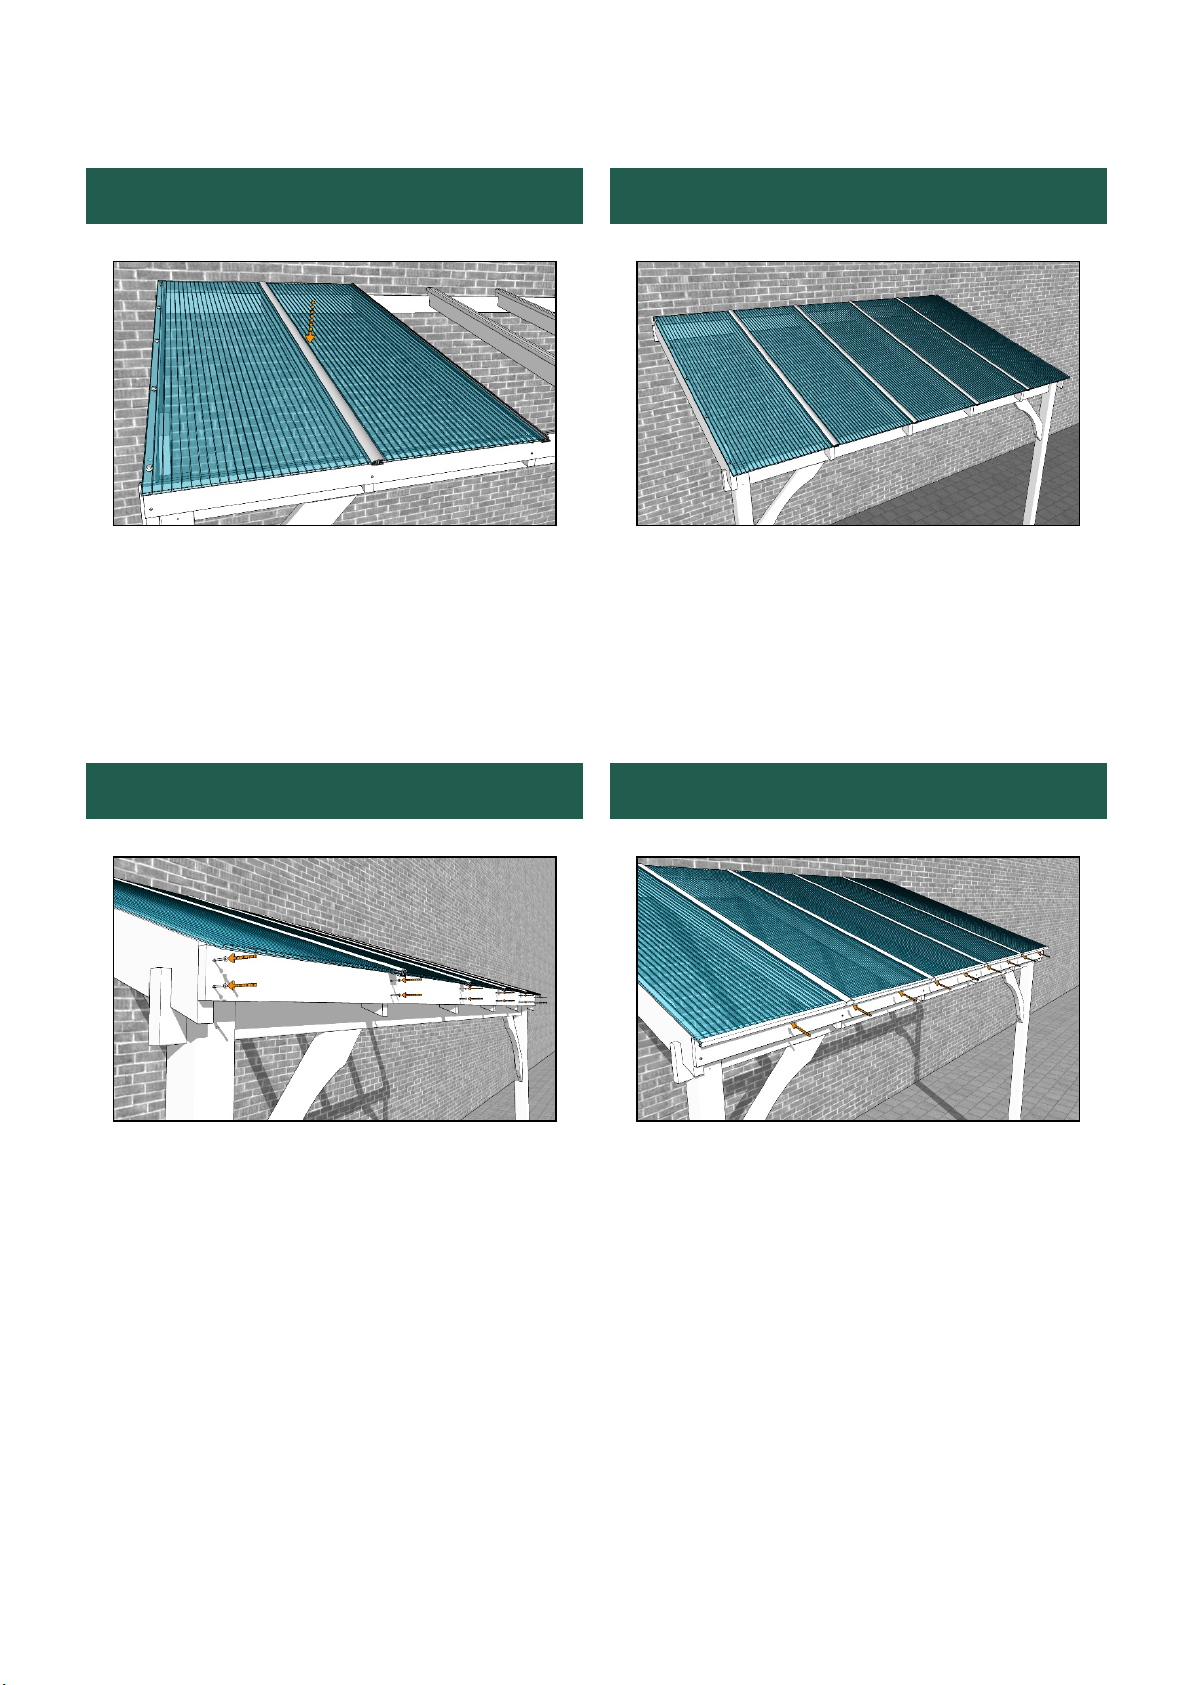
Step 27
Step 28
Add the next glazing bar as before, centred on the rafter
and butted against the wall. Add an undrilled panel,
aluminium tape at the wall and UV coated side up,
adjacent to the last panel and use an assistant to support
the lower panel edge whilst the glazing bar capping is
snapped into place on the first glazing bar as shown.
Continue adding further panels and cappings as you did in
Step 27 and finish off with the other drilled panel, fixed in
place with roofing screws as you did with the first panel in
Step 26.
Step 29
Step 30
Position a fascia section so that its end is flush with an
outer rafter and its top edge is just touching the underside
of the glazing bars. Fix into place with a pair of 60mm
screws into the rafter ends. Attach the remaining fascia
sections by butting them up to the first section and fixing
in place in the same manner.
Slot a panel closure strip onto the end of each panel and a
glazing bar cap onto the end of each capping.
Layzee Car Port – 4 Post
Layzee Living
London W1W 7LT
info@layzeeliving
02078683959
13
Step 31
Step 32
Position the end cover so that its rear edge is butted
against the wall and the top edge is 30mm above the roof
panel…
...and fix into place with 40mm screws spaced as per the
Panel length table (page 4).
Step 33
Step 34
Finish off by applying suitable flashing to the wall/roof
join to weatherproof the structure. Your Eternity car port
is now complete.
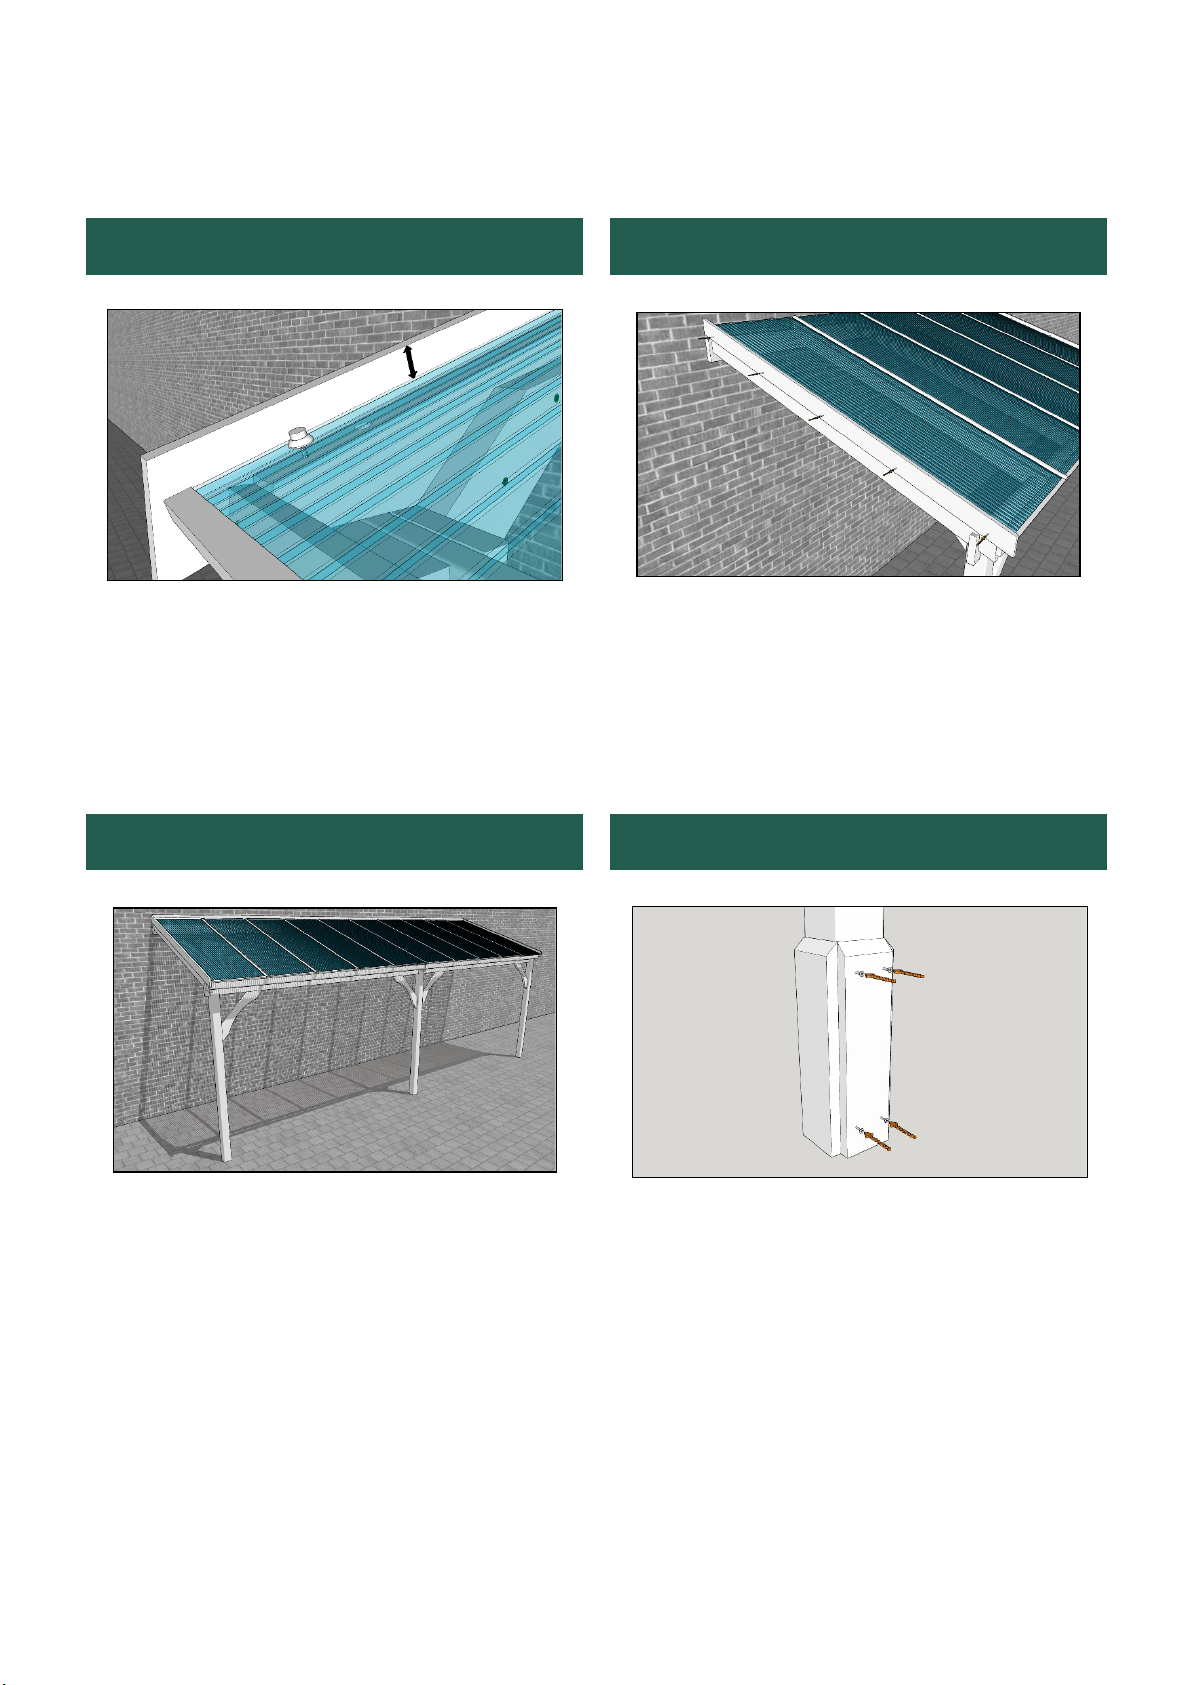
To attach cladding panels simply align as shown at the
base of the post before screwing into place using 4 x
60mm woodscrews through the pre-drilled holes per
panel. Repeat for each face of the post.
We hope that you found your product quick and easy to assemble but if not and you require any further assistance or have
any questions you can contact us by telephone on: 0207 8673959
Email: info@layzeeliving.co.uk www.layzeeliving.co.uk
Table of contents
Popular Tent manuals by other brands

Clam
Clam Quick-Set Escape Series owner's manual

Adventure Kings
Adventure Kings Gazebo Setup manual

L.L.Bean
L.L.Bean Woodlands Screen House quick start guide

Exped
Exped VELA I EXTREME instructions

Skanholz
Skanholz Toulouse 371334 Aassembly Instructions

Dura-Max
Dura-Max 10x15 Ft with Extension Kit owner's manual


KING CANOPY
KING CANOPY Garden Party 10ft X 10ft quick start guide

Texsport
Texsport 02848 instructions

ClearSpan
ClearSpan R030B00007 manual

hayneedle
hayneedle PACA012-3 manual

Primal Vantage
Primal Vantage Field & Stream HEH00770 Assembly instructions

Life Under Canvas
Life Under Canvas Bell Tent Series Care and Instructions