LC-POWER LC-PRO-35B-MTV2 User manual

LC-PRO-35B-MTV2 USER MANUAL
Contents
BRIEF INTRODUCTION ............................................................................. 1
FEATURES ........................................................................................................ 1
PRODUCT DETAILS .................................................................................... 2
PACKING LIST ................................................................................................... 2
FRONT VIEW .................................................................................................... 2
REAR VIEW ..................................................................................................... 4
REMOTE CONTROL .................................................................................. 4
BASIC OPERATION ..................................................................................... 6
POWER CONNECTION ........................................................................................ 7
CONNECTION OF TV AUDIO AND VIDEO OUTPUT ................................................ 7
CONNECTION METHODS TO WATCH TV ............................................................. 9
CONNECT RECORDING DEVICE .......................................................................... 10
NETWORK CONNECTION ................................................................................... 14
OPERATING INSTRUCTIONS ................................................................. 17
BROWSER ...................................................................................................... 18
TV/AV IN ................................................................................................... 2
TIMER .......................................................................................................... 2
INTERNET SERVICES ......................................................................................... 27
FILE COPY ..................................................................................................... 28
SETUP MENU ................................................................................................. 29
NETWORK FUNCTION ............................................................................ 33
I

WIRED LAN SETUP ....................................................................................... 33
WIRELESS SETUP ............................................................................................ 34
INSTALL AND USE BT/SAMBA ............................................................... 39
INITIAL INSTALLATION ...................................................................................... 40
IP ADDRESS SETUP ......................................................................................... 41
NEIGHBOR WEB ............................................................................................. 41
PRODUCT SPECIFICATIONS .................................................................. 45
MAINTENANCE ......................................................................................... 47
FAQ ................................................................................................................ 47
OT ERS ........................................................................................................ 52
II

Brief Introduction
Thank you for choosing a product from LC-Po er.
Features
The LC-PRO-35B-MTV2 is a Home Media Center ith optional 3.5” hard disk drive. It
allo s the display of Digital HD TV ith its TV tuner, play and record media files in High
Definition (movies, audio and photos) and hen connected to a PC, it can also copy
and play shared files via net ork.
Basic Performance
TV sho s - Supports DVB-T digital terrestrial television signal reception and output
functions
Recording - Supports one-touch recording, scheduled recording and time shift recording
Video decoding - MPEG 1/2/4, Divx, Xvid, H.264, VC-1, RM/RMVB
Video format - WMV, MKV, MOV, AVI, MP4, MPG, TS/M2TS/TP/TRP, FLV, ISO, IFO,
VOB, DAT, RM/RMVB
Audio format - MP3, WMA, WAV, AAC, OGG, FLAC, Dolby Digital, DTS Digital
Image - JPG/BMP/PNG/GIF
Card - 3-in-1 card (SD/MMC/MS)
USB HOST - Connect USB mass storage device (like USB Flash Drive, MP3 Player,
USB HDD etc.)
USB2.0 - High speed USB2.0 port
HDMI - HDMI High Definition port
External DVD - Supports USB external DVD drive to playback DVD movies
Internet - RJ45 port, 10/100Mbps, WLAN (IEEE 802.11 b/g/n), supports Internet
services
1

Product Details
Pac ing List
Check the accessories after receiving the product, belo accessories should be
included.
No. Name Quantity
1 Media player 1
2 Po er adapter 1
3 Remote control 1
4 AV cable 2
5 USB cable 1
6 User manual 1
7 Batteries 2
8 Scre s several
Front View
2
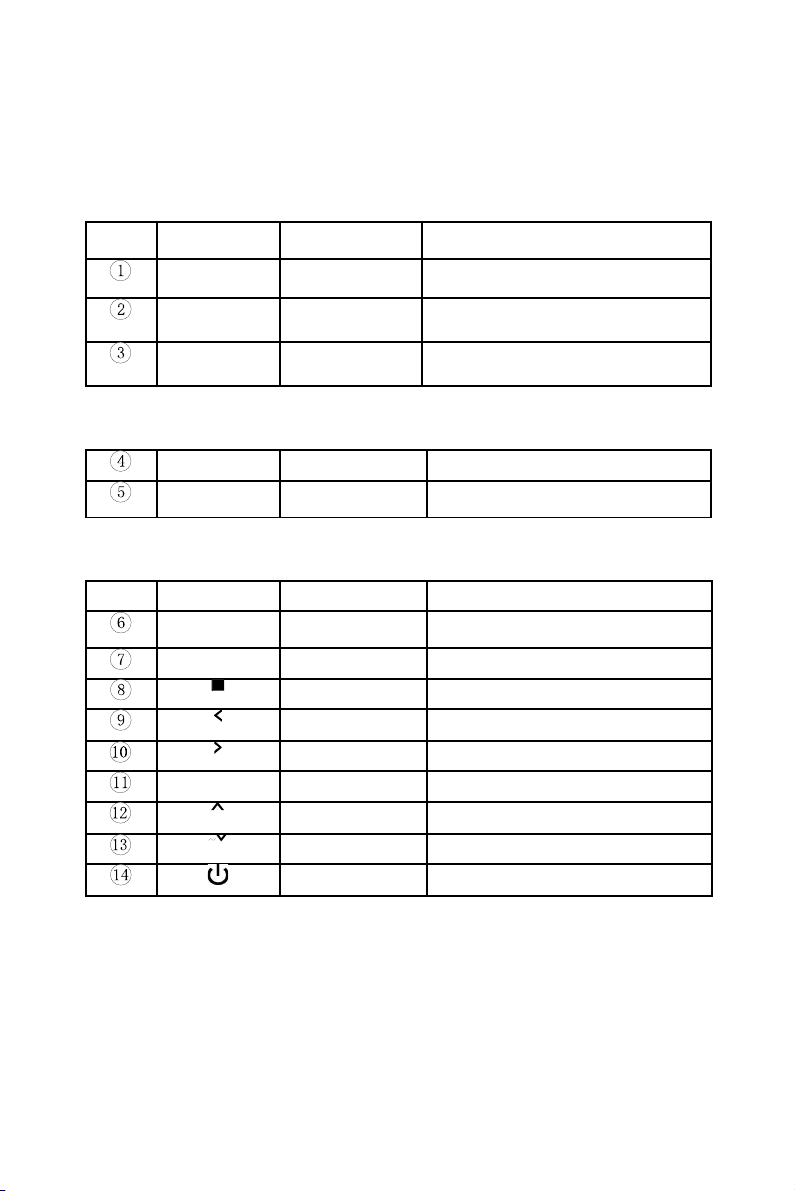
Button Definition
1)LED Definition
LED LED definition Instruction
REC Rec LED Turns red hile recording
Po er Po er LED Turns yello hile s itched on
Stand-by Standby LED Turns red in stand-by mode
2)Other Definition
IR Remote sensor Remote control receiver
Card reader 3-in-1 card-
reader
Reads MS / SD / MMC cards
3)Key Definition
Key Key definition Instruction
REC REC key Enter recording mode, choose the
Rec time
MENU Menu key Return to the main menu
Stop key Stop current operation
Left key Move cursor to left
Right key Move cursor to right
OK Enter key Confirm the current operation
Up key Move cursor up
Do n key Move cursor do n
Po er key S itch on/off
3
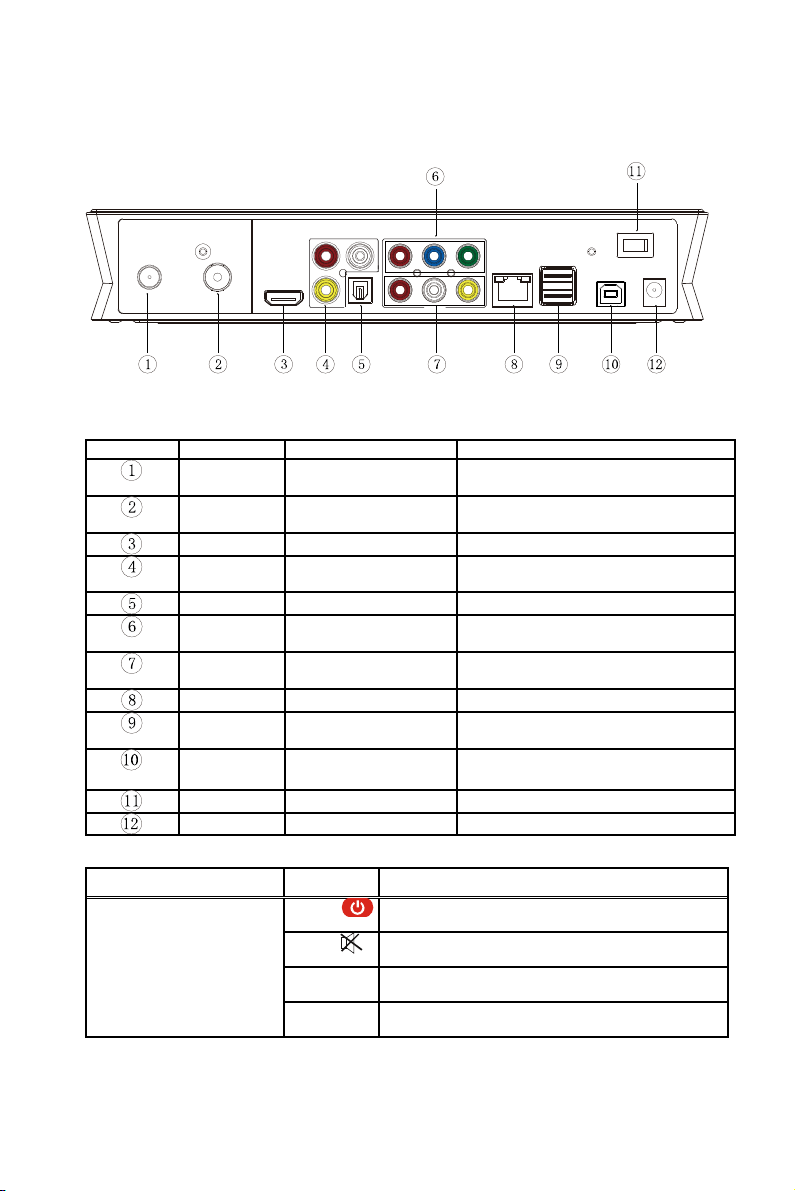
Rear View
Port Definition
Port Port definition Instruction
LOOP RF output interface Output DVB-T digital television
signals
ANT IN RF input interface Input DVB-T digital television
signals
HDMI High Definition port Output digital signal via HDMI port
AV IN Composite video
input port
Input video and audio hen
connected to video device
Optical Optical output port Output 5.1 audio via optical port
YPbPr Component video
output port
Output progressive scan
component video
AV Composite video
output port
Output composite video and audio
LAN Net ork port Connect to net ork via Internet port
USB HOST USB host port Read external USB storage device
via USB port
USB
DEVICE
USB port PC communication via this USB
port
ON/OFF Po er s itch Turn on or off po er
DC IN Po er input Connect poer adapter here
Remote Control
BUTTON FUNCTION
POWER Turn device on and off (standby mode)
MUTE Mute and unmute sound
REC Start recording in REC mode, press repeatedly to select
recording time
STANDBY Press to enter STANDBY mode
4
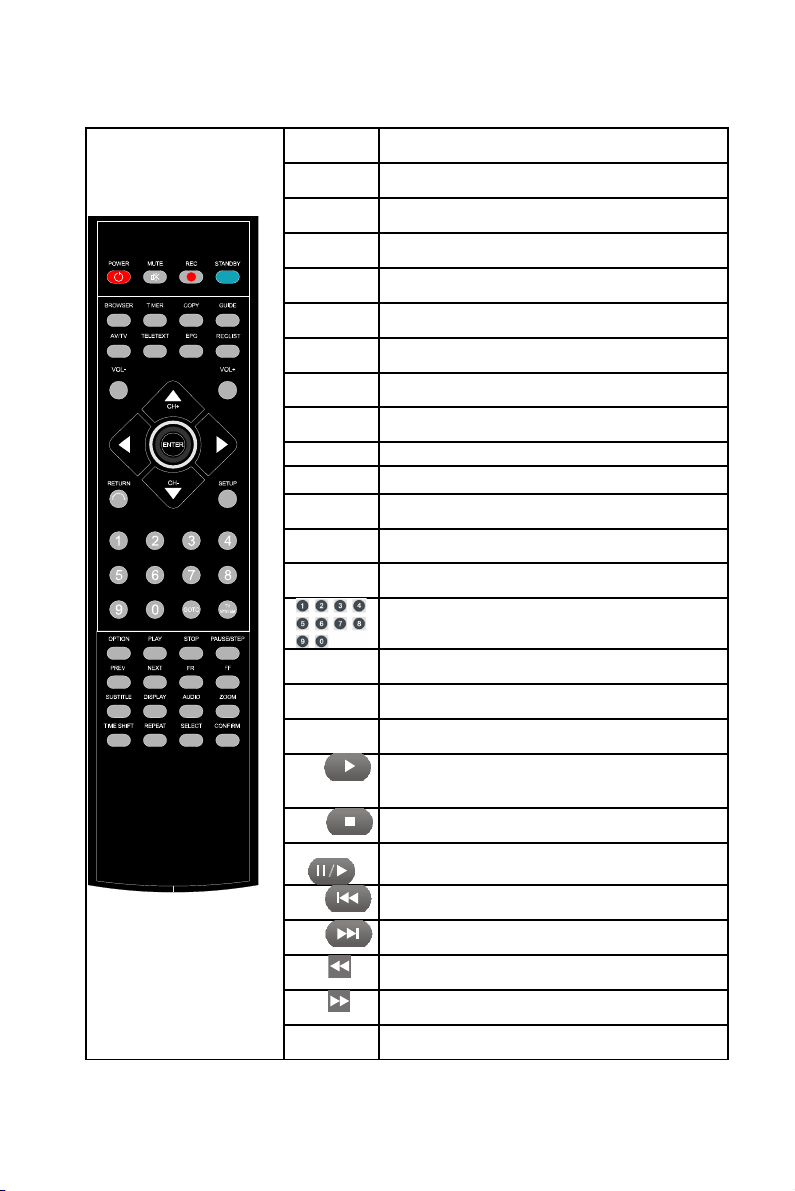
BROWSER Enter the bro ser menu
TIMER Enter the time menu to edit, add, delete recording schedule
COPY Enter the copy mode
GUIDE Enter the main menu
AV/TV S itch video input source bet een AV and TV
TELETEXT Access Teletext
EPG Access electronic program guide
REC LIST Display recording list
VOL- Decrease volume
VOL+ Increase volume
Navigation keys for up, do n, left and right
ENTER Press to confirm
RETURN Return to the previous menu
SETUP Enter the menu
Press to input digital
GOTO Press to play the video at the chapter after setting schedule
TV SYSTEM S itch bet een different TV system,
OPTION Press to select option bar. To rename or delete the file.
PLAY Press to play file;
Or play recording file under time shift mode.
STOP Press to stop play/recording
PAUSE/STEP Press to pause play/recording, and again for step playing
PREV Press to return to previous file
NEXT Press to go to next file
FR Press to fast re ind from current play and again to select
the speed
FF Press to fast for ard from current play and again to select
the speed
SUBTITLE S itch the subtitle if the file supported

DISPLAY Press to display time, title, information of chapter hen play
video and photo.
AUDIO S itch the audio format output
ZOOM Press to zoom hen playing back photos or Video
programs.
Photo zoom levels:2X,4X,8X,16X;
Video zoom levels:2X,3X,4X,8X.
TIME SHIFT Press to activate time shift in recording mode.
Operation as follo :
Press ”Time shift” and ait until the screen display, Press
“pause” to pause program, press “Play” to resume
playback, and press “Stop” to stop time shift function.
If you need to use the Timeshift function, please use the
machine to format the hard disk first.
REPEAT Press to set repeat option: chapter, Title or off
SELECT Press to select the file and then press “confirm” to add
or delete file in the playlist;Select copy files or folders in the
copy mode
CONFIRM Press to add or delete option in playlist
Basic Operation
6
Power Connection
Remove the po er adapter from the package and connect.
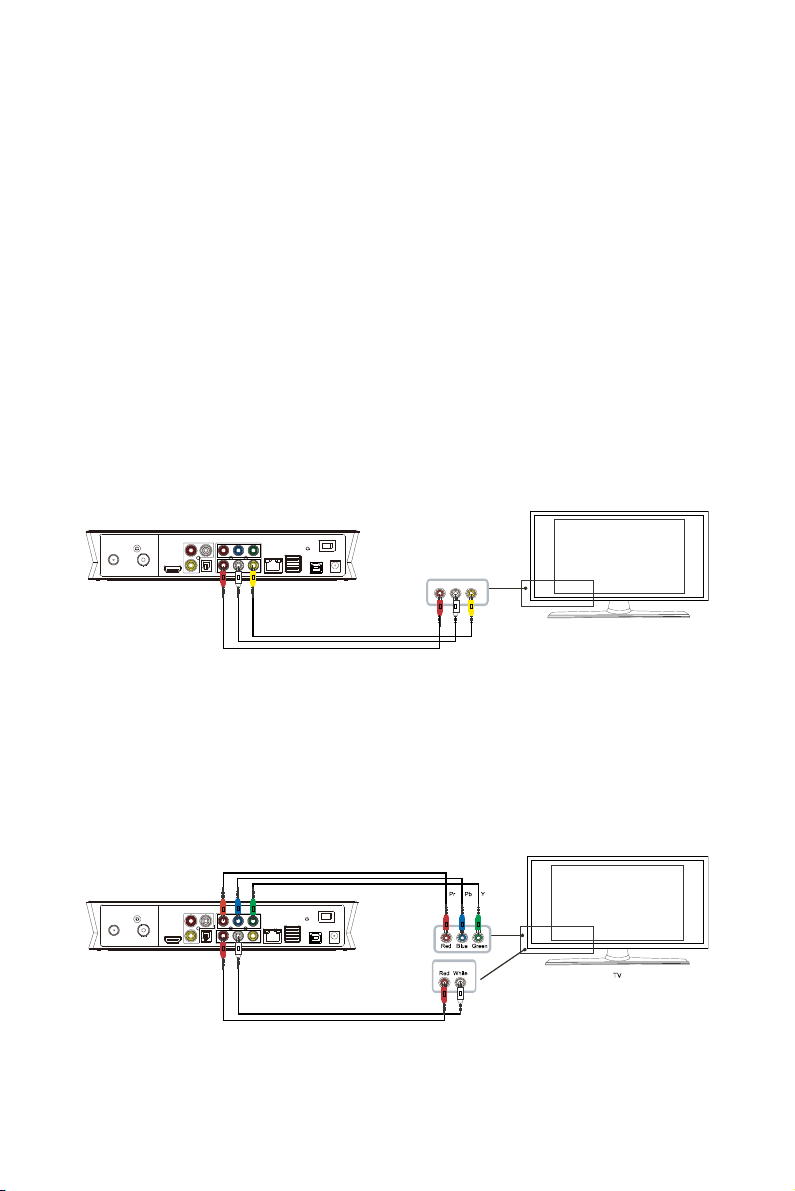
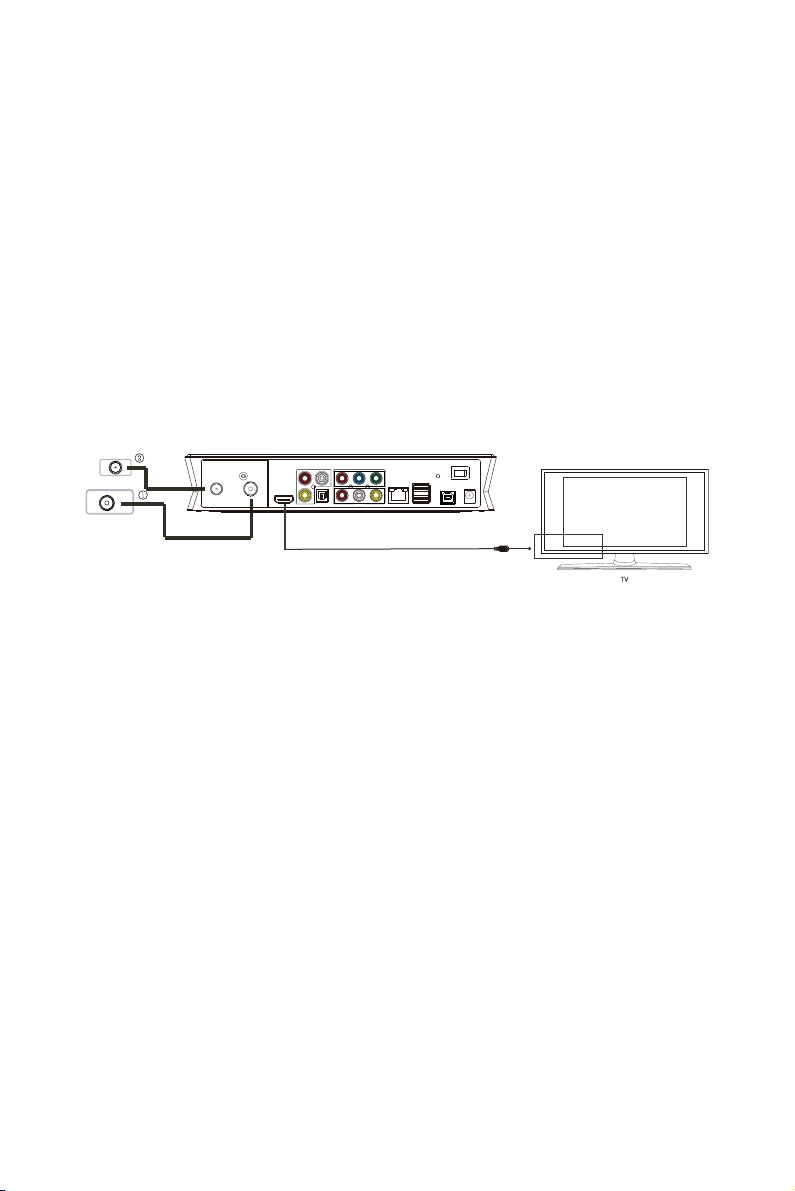
Connection Of TV Audio And Video Output
The product is designed ith multi-output, including composite (AV) and HDMI. Select
different interface according to various needs. The product detects video output
automatically, making the operation user-friendly and convenient. Please refer to the
follo ing instruction for connection.
Composite Output Connection (AV)
Plug the yello connector into the AV output of the device and AV input of your TV set,
and plug the red and hite connectors into the audio input of your TV set or hi-fi. Turn
on the TV and select AV mode. Turn on the product to display the initial menu.
Component Output Connection (YPbPr)
Plug the YPbPr cable into the output of the device and input of your TV set. The cable
7

only transmits the video signal and additional audio cable is necessary. Plug the red and
hite AV cable into the audio output of the device and into the audio input of TV set or
hi-fi. Turn on the TV and select YPbPr mode. Turn on the product to display the initial
menu.
Optical Output Connection
Connect the optical connector of the media player ith the optical connector of other
video or audio device by via optical cable. Enter the audio menu, select the digital
output option "SPDIF LPCM" or "SPDIF RAW". Enjoy 5.1 high quality sound via multi-
channel decoder/amplifier ith optical input.
HDMI Output Connection
8
HDMI is an output ith best audio and video effects, hich outputs digital video and
audio at the same time. Connect HDMI cable to output and to display device ith HDMI
input. Select HDMI mode for TV. Turn on the product to display the initial menu.
Connection Methods To Watch TV
TV Signal Input
ANT IN interface receives DVB-T digital television signals. LOOP interface outputs
DVB-T digital television signals. After connecting television signals press SETUP key to
enter settings, select TV.
①TV Signal Input
ANT IN interface receives DVB-T digital television signals. After connecting television
signals press SETUP key to enter settings, select TV.
②TV Signal Output
LOOP output for DVB-T digital television signals directly accessing to TV input.
Ho ever, there must be TV signal input first.
Operation Steps:
Step 1: Connect ANT IN to DVB-T digital TV signal, and the other interface LOOP to TV
signal via the product’s tuner, or the product’s other interfaces (e.g. AV or HDMI output).
Step 2: After turning on the product, press SETUP key to access to the setup menu.
Select TV, enter the TV Region, and choose your country or region.
9

At the same time, choose Channel Scan. Select AUTO SCAN for automatically
scanning the channels.
Select MANUAL SCAN for manual channel search, here you need to kno the specific
band idth and frequency parameters. If in doubt ask your local provider to obtain
access.
Select the appropriate channels (CH), band idth and enter the correct Frequency, then
press "ENTER" key to start scanning. The number of channels and signal quality is
displayed. If the parameter setting is rong "Error" is displayed. Please reset the
parameters for scanning.
Watch television programs and at the same time record television programs.
Press the "AV/TV" key on your remote control to s itch bet een different input sources.
Connect Recording Device
The product supports to atch television programs hile recording television programs.
In DVB-T mode atch digital terrestrial television and press the REC key on the remote
control to start recording.
In addition to recording television programs also other input signals are recorded. TV
signal can be generated from TV set top box or satellite receiver.
Important notice: The product also supports TV recording from other set top box or
satellite receiver. When recording signals of other television set top box or satellite
receiver input, please refer to the follo ing illustration to connect the product.
For set top box or satellite receiver ith one signal output, please refer to the follo ing
connection method:
10

Connect AV IN and set top box or satellite receiver and make sure the output of set top
box or satellite TV receiver orks ell. Turn on your TV and select AV mode. Turn on
the product and select AV IN after entering the menu. The TV program displays on
screen and is ready to record.
Start Recording
Before recording select the recording device. Press the SETUP key to enter the setup
menu, then select REC Device and here select HDD or USB device to record the
channel.
1. HDD Format
If you choose HDD in REC Device (in setup menu), the hard drive must be formatted
before recording. Please copy files in HDD first. Then choose the HDD Format option in
the setup menu.
HDD formatting steps:
Step 1: Set Timeshift Buffer
The product needs the special space for timeshift to assign the hard drive’s space. At
least one hour, maximum 4 hours. One-hour hard disk space occupies about 4GB,
select up to 4 hours to occupy about 16GB.
Step 2: Hard Disk Formatting
Press / on the remote control to select “Back“ or “Format”.
When “Format” is highlighted press “OK” to start. Other ise, select “Back” to return.
11

Step 3: Complete HDD Formatting
When HDD formatting is finished the system ill be restarted to access to the product’s
main menu.
2. Recording
When using the recording function there are t o input sources for recording: video and
DTV. Press the "AV/TV" key on the remote control to s itch bet een different input
sources. AV IN mode and tuner mode are the t o ays for recording.
a. TV IN Mode (DVB-T Signal Input)
ANT IN receives DVB-T signal. Please refer to the connection belo . After connecting to
television signal press the SETUP key to access the setup menu, select TV option to
start setup (refer to the previous chapter “Connection Methods To Watch TV”). After
setup you can atch the television program.
Press “REC” key on the device or remote control, the “REC” LED on front panel turns
red, hich sho s the start of the recording. Press REC key repeatedly to change the
recording time (ORT30min, ORT60min, ORT90min). Press the ■ key on the remote
control or device to stop recording.
Watching While Recording
When you are atching one channel you can also record the channel’s program at the
same time. When your TV receives television signals enter the DTV menu and press
the REC key to start recording; a red dot is displayed in the upper right corner of the
screen.
If you press the ENTER key, then the screen ill display the PR menu as follo s. Press
/ to select the channel you ant to atch. Then press ENTER to confirm. In this ay
you can atch one channel’s program hile recording another channel.
12

Note:
The recording is stored in the folder named after the time hen you started recording.
b. AV IN Mode
After correct connection of the AV in signal, po er on the set top box (or satellite
receiver), TV and this device and s itch the signal of the TV to AV IN.
If you only ant to atch TV, do not po er off the recorder and keep the input signal of
TV ith the set top box signal.
If you ant to record the program please choose the input video frequency option. To
enter the television picture choose the television channel through the set top box (or
satellite receiver).
Select “TV/AV IN” menu to enter the TV screen, select the TV channel through set top
box (or satellite receiver), and press the REC key to start recording.
3. Watch The Recorded Video
All the recorded files are recorded in a file folder named “REC”. Press the “REC LIST”
key on the remote control or enter the “Bro ser” in the main menu and select “HDD”,
you ill find this folder and recorded videos ere saved in this folder named according
to system time.
It is available to previe the recorded files and press “ENTER” key to playback.
13
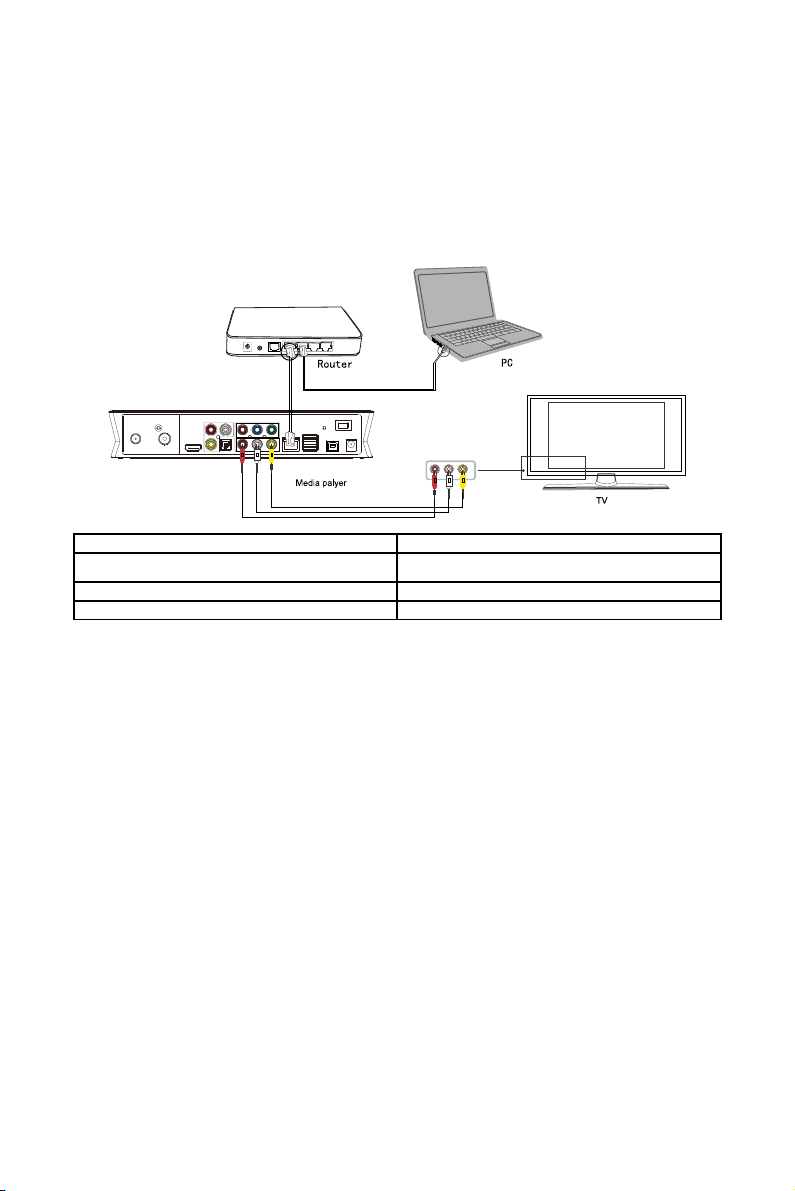
Networ Connection
The product can play the files stored in the net ork directly through router or hub.
Please connect the RJ45 cable according to the follo ing illustration. The net ork
connects ell hen the LED of net ork status and W/R flash.
Router
Media player
PC
TV
Connect one end of the RJ45 cable to the product like the PC and connect the video
output. Press the “SETUP” key or select “SETUP” menu in the initial menu. Select
“Net ork” option in the setup indo and press “ENTER” to confirm. It is available for
both automatic and manual IP setup. Press “SETUP” key again to exist. Before
accessing the PC via net ork, the media files must be shared on the net ork.
USB HOST Port
Player ith ability to expand to large capacity. The USB HOST port can read external
mobile hard disk, USB sticks, digital cameras, card readers and other data storage
devices.
Even ithout the installation of hard drive players, you can connect external storage
devices via the USB HOST port. Directly playback a variety of high definition formats,
high-fidelity audio and video files stored in external storage devices. Watch HD movies
14
and digital photos, at the same time output digital audio signals to audio equipment for
best high-fidelity sound effects.
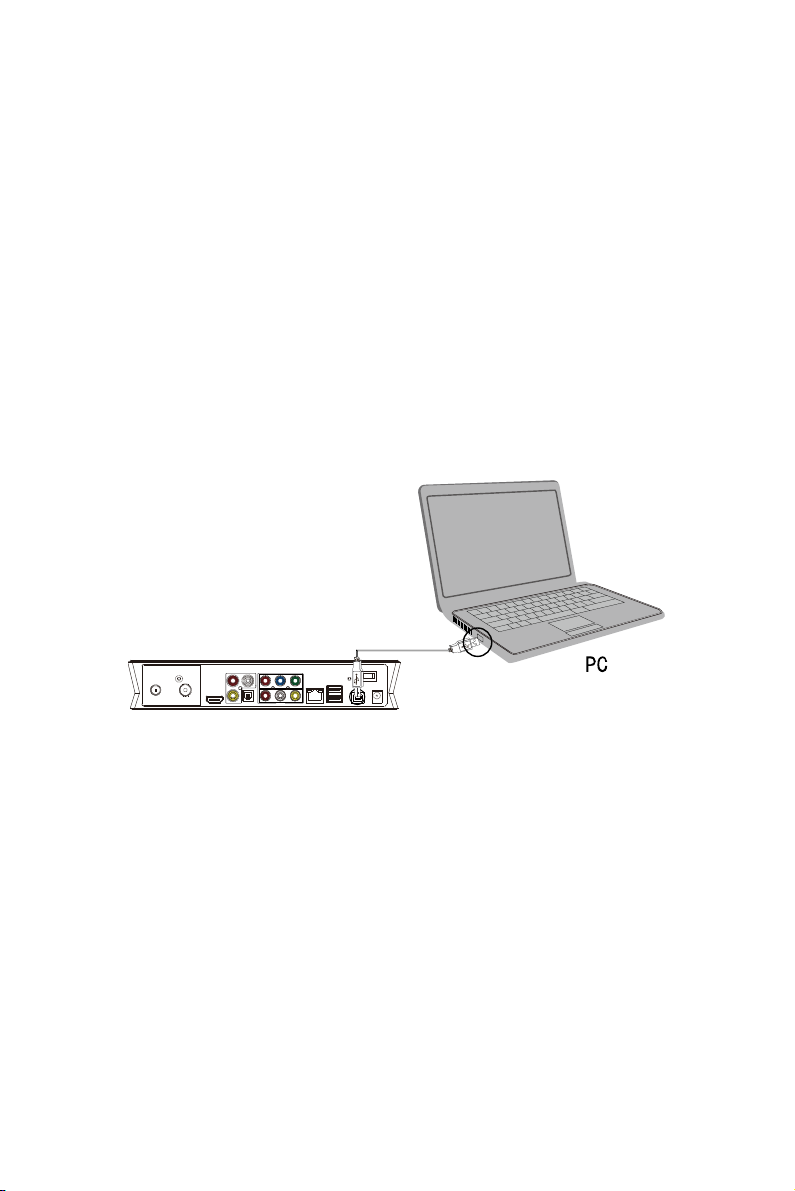
Connect USB Port To PC
This HDD recorder & player is also a personal multimedia file storage device and can
be used to connect to PC via USB port.
1. Connect To Po er Supply
While using the HDD recorder & player ith PC, po er supply is also needed.
2. Connect To PC Via USB Cable
Connect the HDD recorder & player to PC via USB cable to copy and transfer data.
Follo the instructions of the illustration and connect the device to PC.
Po er on the PC and enter the system. The PC detects the device automatically and
the device can be used as an external USB storage device.
After data transfer is finished, please remove the USB storage device safely (click the
USB device icon to stop the USB device and then disconnect the USB cable).
Notes: 1. Please do not power off when connect to PC for reading and writing.
2. If there is no USB detected after connection via USB cable, the PC is
operating other programs; please disconnect the USB cable, wait about 10
seconds and connect again.
This HDD recorder & player is also a personal multimedia file storage device and can
1

be used to connect to PC. Bro se and copy files easily.
Setup Media File Sharing On PC
File Sharing Under Windows XP
T o conditions are necessary for a successful playback via net ork connection.
1. Folder sharing and security setup.
2. Set the same gate ay and subnet mask.
Procedure of file sharing under Windo s XP:
1. Select the folder to be shared, right-click and select the option ”Sharing and
safety”, then click left.
2. Select “Sharing” in the property option and select “Share this folder on the
net ork” and click “Apply” for confirming to exit.
3. Open “Control panel - Management tool - Computer management - Local users
and groups” and click “Users” option. Right-click Guest and select “Properties”.
4. Select “Users cannot change your pass ord” and “Pass ord never expires”. Keep
the other checkboxes unchecked.
5. Open ”Control panel - Net ork connection”, and select “Local Area connection”
and right-click to select “Properties”.
6. In the pop-up indo select ”Internet protocol (TCP/IP)”.
7. Set up the relevant IP address, subnet mask and gate ay, chooser select to
automatically design.
8. Windo s XP net ork sharing is completed.
9. Finally, please close the Windo s Net ork Connection Fire all.
File Sharing Under Windows Vista
1.Please make sure that the Vista operation system is installed as Administrator
user.
16

2.From the desktop select ”Start – Setup - Control panel - Select user account”.
3.Open User account and select ”Open a ne account” and name it “Guest”.
4.Select the folder to be shared and right-click, then select the “Sharing” option.
5.Open the shared folder and add guest account to the list.
6.Give the right to all users after adding the Guest to the list.
7.Select “Sharing”, the folder is shared.
8.Sharing procedure is completed.
9. Operate the device similar to XP system.
Operating Instructions
Po er on the player, the system sho s the guide menu after a fe seconds. There ill
be six function options, or enter this guide menu by pressing the “GUIDE” key on the
remote control.
Note: When connecting for the first time, the device ill po er on automatically.
Please navigate to the setup menu and set up the “Menu Language”, “TV Region”,
“Time Setup” etc. hen operating the first time.
Browser: Bro se and playback media files.
With this function, you can bro se movie, photo and music files stored on HDD, card,
net ork and USB device by pressing the “Up” and “Do n” navigation keys to choose
the source device. Press the “ENTER” key to confirm or press the “Bro ser” key on the
remote control to enter this function directly.
Rec_List: Quick automatic search function to access record folder and playback
recorded files. The time of the recording determines the order in hich they are named.
TV/AV in: Select the input source to atch and record.
Connect the device of the recording source, such as the DVB-T digital terrestrial
17

television or set top box to AV-in output, enter the “TV/AV in” menu, then atch or
record the current TV program.
Timer: Plan recording schedules.
With this function create, edit or delete the schedule and vie status and history.
Please read the follo ing instructions carefully.
Internet Service: Enjoying various Internet services on TV.
With this function access ne s, video, photo, eather or do nload streams for atching
TV. Enjoy many kinds of Internet services ithout using your PC.
File copy: Copy files from one device to another.
With this function copy files from hard disk, NET, USB or card from one media to
another.
Setup: Enter the setup menu.
With this function configure system, movie, music, photo, net ork and record settings.
Browser
Select “Bro ser” in the guide menu or press the “Bro ser” key on the remote control to
bro se movie, photo and music files stored on HDD, card, net ork and USB by
pressing the “Up” and “Do n” navigation keys to choose the source devices and press
the “ENTER” key to confirm and playback the files on the selected device.
Select the file or folder by pressing “Up” and “Do n” navigation key and press the
“ENTER” key to enter and playback the files, press the “Return” key to return to the
previous list.
File Sort Function
To make file bro sing and playback easier, there is a function to sort all files into
different folders named “All”, “Music”, “Photo” and “Movie”. Access any folder by
18
Table of contents


