LDL TECHNOLOGY Tire Watch User manual

LDL TECHNOLOGY COPYRIGHTS www.aimshop.com 1/8
DISPLAY USER MANUAL
TIRE WATCH TM RACING
Thank you for buying our tire pressure and temperature monitoring system. With TIRE WATCH you will improve
your performances by optimizing your pressure values and you will get more precise.
A –GENERAL FEATURES
The system consists of 4 to 32 sensors (transmitter), a display (receiver) and a remote control unit (LF Trigger)
which allows you to activate the RF transmission when the vehicle is at stop. To help you inflate your tire, the
display also keeps in memory the maximal pressure and the maximal temperature that every tire achieved during
the race or the session.
Tire Watch Sport enables you to pre-equip up to 32 wheel rims. You can then change your wheels at any time of
the race while keeping the information of pressures and temperatures of the 4 wheels on the vehicle. The display
recognizes “automatically” (after an initial phase of learning) the wheel which was changed.
1 –SYNOPTIC
The sensors constantly measure tire pressure and
temperature and send the informations every seconds
thanks to the Radio Frequency Technology.
The display decods and shows in real time the
measured values. The driver is alerted by a light
indicator (led is blinking) and can react before
the tire may place his safety at risk.
Rear left
Rear right
Front right
Front left

LDL TECHNOLOGY COPYRIGHTS www.aimshop.com 2/8
2 –The display
The display (receiver) decodes and shows pressure and temperature data in real time on 3 digits ; it keeps in
memory the maximal pressure and the maximal temperature that every tire achieved during the race or the session
(flash memory that can be consulted during 15 minutes before the display turns off).
You can set up : pressure unit -> bar or Psi
Temperature unit -> °C or °F
Pressure and temperature alert thresholds
Pressure and temperature display sequence
3 –The sensors and their transmitting mode
To preserve battery life duration, the sensors transmit the data as soon as an acceleration of up to 20km/h is
detected. The ON button of the LF trigger forces the sensor to transmit even at stop.
The transmitting mode :
Force frame mode :: the sensor will send a RF frame with this identifying code (ID) –You will need this
function to learn all your sensors on the display and allocate a position or when you have to replace a
damaged sensor.
Sleeping mode : no acceleration and no LF transmission
Paddock mode : the sensors have been wake up by the ON button of the LF Trigger to force data
transmission. Then, the sensors will transmit every 5 second and will shut off 13 hours later. The off button
allows you to stop transmission and to save battery life duration.
Driving mode : The sensors have been wake up by acceleration –Data will be transmitted every seconds
The sensor will stop transmitting after a stop of more than 7 minutes.
4 –The alert thresholds
You can set up and modify the following alert thresholds :
- High pressure alert for front tires
- High pressure alert for rear tires
- Low pressure alert for all the wheels
- High temperature alert for all the wheels

LDL TECHNOLOGY COPYRIGHTS www.aimshop.com 3/8
B –SET UP YOUR DISPLAY AND MAIN FUNCTION
FIG 1 –BUTTON FUNCTION PRESENTATION –MAIN DISPLAY
Bt1: ON / Unrolling menus and validation / Backlight only (4s)
Bt2: ON / OFF / Digits setting
Bt1 + Bt2 : permanent backlight activation
FIG 2 –TURN THE DISPLAY ON & OFF
ON
short push on Bt1 or Bt2
OFF
long push on Bt2 or automatically turn off after 15mn caused by engine stop or no wheel unit sensor
reception.
NB : Always turn the display on before driving.
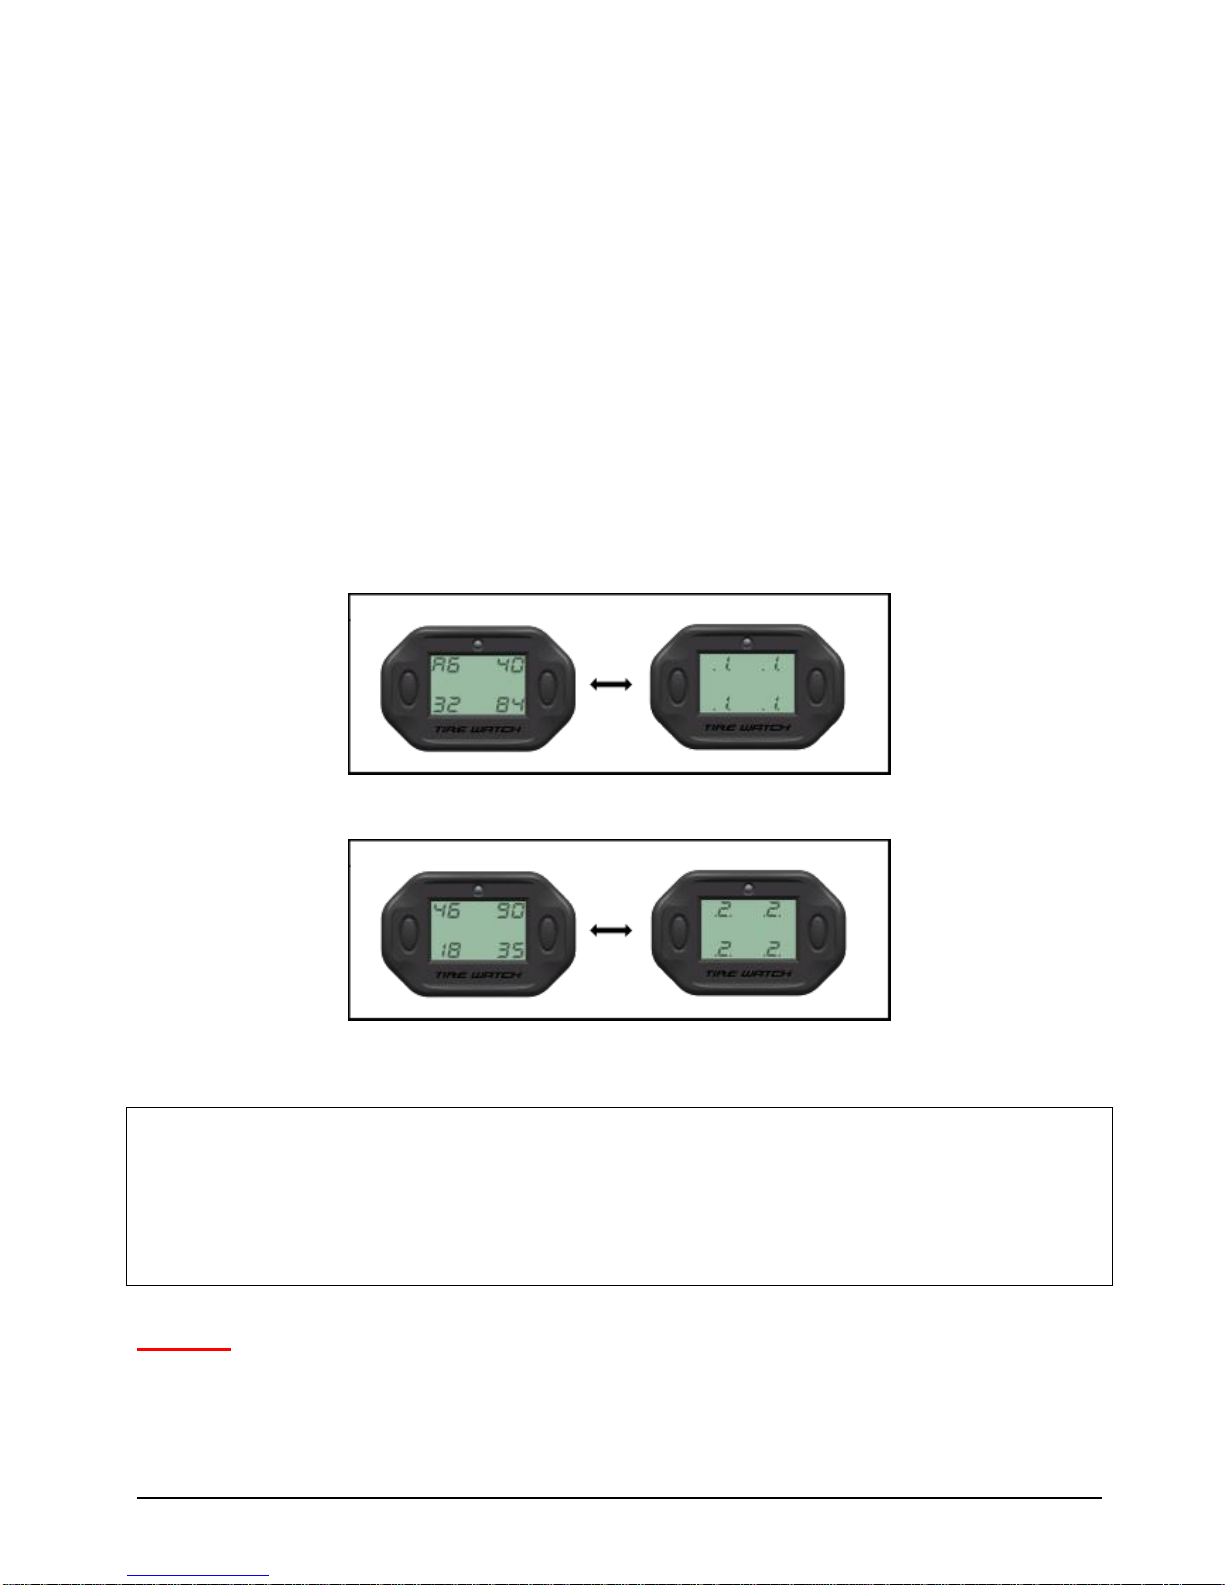
FIG 3 –CHANGE FROM PRESSURE TO TEMPERATURE DISPLAY
The pressure is the display by default A sequence enables the display to show automatically the pressure towards
the temperature (see the chapter C: set your values)
To display the T° even in the sequence short push on Bt2
To come back to the pressure display short push on Bt2 / or wait the end of the sequence

LDL TECHNOLOGY COPYRIGHTS www.aimshop.com 4/8
FIG 4 –DISPLAY THE MAXIMAL VALUES MEASURED
The display keeps in memory the maximal pressure and the maximal temperature that every tire achieved during
the race or the session
Pressure is displayed by default. To display the maximal pressure recorded short push on Bt1 from main menu.
. To display the maximal temperature recorded repeat short push on Bt1.
PS : The display will turn back automatically to the main display after 8 seconds if no button is pressed during this
lapse of time.
C –SET YOUR VALUES
Accede to the rolling menu > long push on Bt1 -
Once the wanted menu is reached the first digit is blinking to inform you that you enter the menu, to set the 1st
digit short push on Bt2 until the wanted value is reached.
To validate the 1st digit and set the 2nd digit short push on Bt1
Repeat the operation until the last digit.
To validate the last digit and the on going menu short push on Bt1.
To accede on the following menu short push on Bt1.
To go back to the main mode : (FIG 3) long push on Bt1.

LDL TECHNOLOGY COPYRIGHTS www.aimshop.com 5/8
D –SET UP YOUR VALUES –UNROLLING MENUS
FIG 5 - MENU 01 : CHOOSE THE PRESSURE AND TEMPERATURE UNIT
By default the pressure is in Bar. To display en PSI short push on Bt2
To return in Bar push again on Bt2
To validate pressure unit short push on Bt1
Same operation to change °C in °F.
FIG 6 –MENU 02 : SET UP THE PRESSURE/TEMPERATURE SEQUENCE
Setting range : from 00 to 60 seconds. A sequence programmed with the value 00 deactivate the sequence .For
exemple, if you don’t want to see the tires temperature, you have to set 00 at the temperature sequence.
Pressure sequence : pre programmed at 10 seconds.
Temperature sequence : pre programmed at 05 seconds.
FIG 7 –MENU 03 : HIGH PRESSURE THRESHOLD SETTING FOR FRONT TIRES
Setting range for front and rear wheels : from 0,1 à 3,5 bar (or 01 to 51 PSI)
Maximum pressure alert : Pmax (HI) pre-programmed at 3,5 bar

LDL TECHNOLOGY COPYRIGHTS www.aimshop.com 6/8
FIG 8 –MENU 04 : HIGH PRESSURE THRESHOLD SETTING FOR REAR TIRES
Setting range for front and rear wheels : from 0,1 à 3,5 bar (or 01 to 51 PSI)
Maximum pressure alert: Pmax (HI) pre-programmed at 3,5 bar
FIG 9 –MENU 05 : LOW PRESSURE THRESHOLD SETTING FOR ALL THE WHEELS
Setting range for front and rear values from 0,1 à 3,5 bar (or 01 to 51 PSI)
Minimum alert pressure : Pmin (LO) pre-programmed at 0,1 bar
This threshold will be registered for all the wheels.
FIG 10 –MENU 06 : HIGH TEMPERATURE THRESHOLD SETTING FOR ALL THE WHEELS
Setting range : from -19°C to +99°C ( 000 to 210 °F)
Maximum temperature threshold alert : Tmax (HI) preprogrammed at 99 °C
This threshold will be registered for all the wheels.

LDL TECHNOLOGY COPYRIGHTS www.aimshop.com 7/8
E - LF TRIGGER LEARNING PROCEDURE
FROM ON MODE
long push on Bt1 until you reach the following menu that corresponds to the learning of
sensors ID number.
To activate the learning short push on Bt2.
The arrows are blinking making a rotation ; the display is waiting for a RF frame. Push on FORCE FRAME button of
the LF Trigger.
As soon as the RF frame is received by the display, the two last digits of the ID are shown (you can then stop
pushing on the button).If no frame is received within 4 minutes, the display returns to FIG 11. You have to trig again
the sensor.
The ID is received. You have to validate or cancel the ID learning (in case you have trigged a sensor already
leraned).
To validate the ID learning, you have to validate first the value « y » YES (default value) short push on Bt1
To cancel the ID learning, push shortly on Bt2 to display « n » NO. Validate « n » short push on Bt1
Once the ID has been learned, FL (Front Left) is blinking -> You have to learn on the display the final position of the
sensor on the car.
2 last ID
digits
Choose the posiiton and validate
Choose the wheel rim set number and
validate
LDL TECHNOLOGY COPYRIGHTS www.aimshop.com 8/8
You have to define a wheel position for each sensor, from 4 to 32 sensors.
The different positions FL: Front Left N° 1 / 2 / 3 / 4
RL : Rear Left N° 1 / 2 / 3 / 4
FR : Front Right N° 1 / 2 / 3 / 4
RR : Rear Right N° 1 / 2 / 3 / 4
The positions will appear on the following order it is to say that the display has been parameter to learned by set of
4 wheels : FL1 (Front Left 1), RL1 (Rear Left 1), FR1 (Front Right 1) and RR 1 (Rear Right 1). It will then
automatically propose you the set n°2 : FL2, RL2, FR2 et RR2 and so on.
- To change and choose a different position short push on Bt2. To validate the position short push on Bt1.
- To change and choose the set number short push on Bt2. To validate your choice short push on Bt1.
Once the first ID is learned, the display returns to FIG 11 or 12.
Repeat this procedure for all sensors you have (up to 32).
Once you have learned all ID sensors, a short push on Bt1 enables you to see all ID learned, their position and their
set number.
To see the set 2 -> short push on Bt2 and so on for all sets.
To come back to the main menu, long push on Bt1
SUMMARY
1 –Note all your identifiers and attribute them a position on the vehicle
2 –Trig the sensor with force frame button
3 –Once the ID is received, check and validate the ID learning
4 –Choose the position and the set number
5 –Learn all ID sensors
6 –Go and see each set to check each ID position.
Be careful : When you change a wheel, you have to respect strictly the positions you attributed to this
wheel during the learning procedure. The display will then recognize automatically the wheel which was
changed and will show the right wheel information. If you have to invert one wheel –change rear right
wheel with front right wheel, you will have to do the learning again by using force frame button.
Table of contents
Popular Monitor manuals by other brands


Rockwell Automation
Rockwell Automation Allen-Bradley VersaView 6300M Series user manual

Sanyo
Sanyo CE52LH2WP instruction manual

mikroElektronika
mikroElektronika PIC18FK manual

Iiyama
Iiyama Vision Master Pro 413 Service manual

Alcatel-Lucent
Alcatel-Lucent IP Technical manual

AMIX
AMIX AFFseries-2 user manual