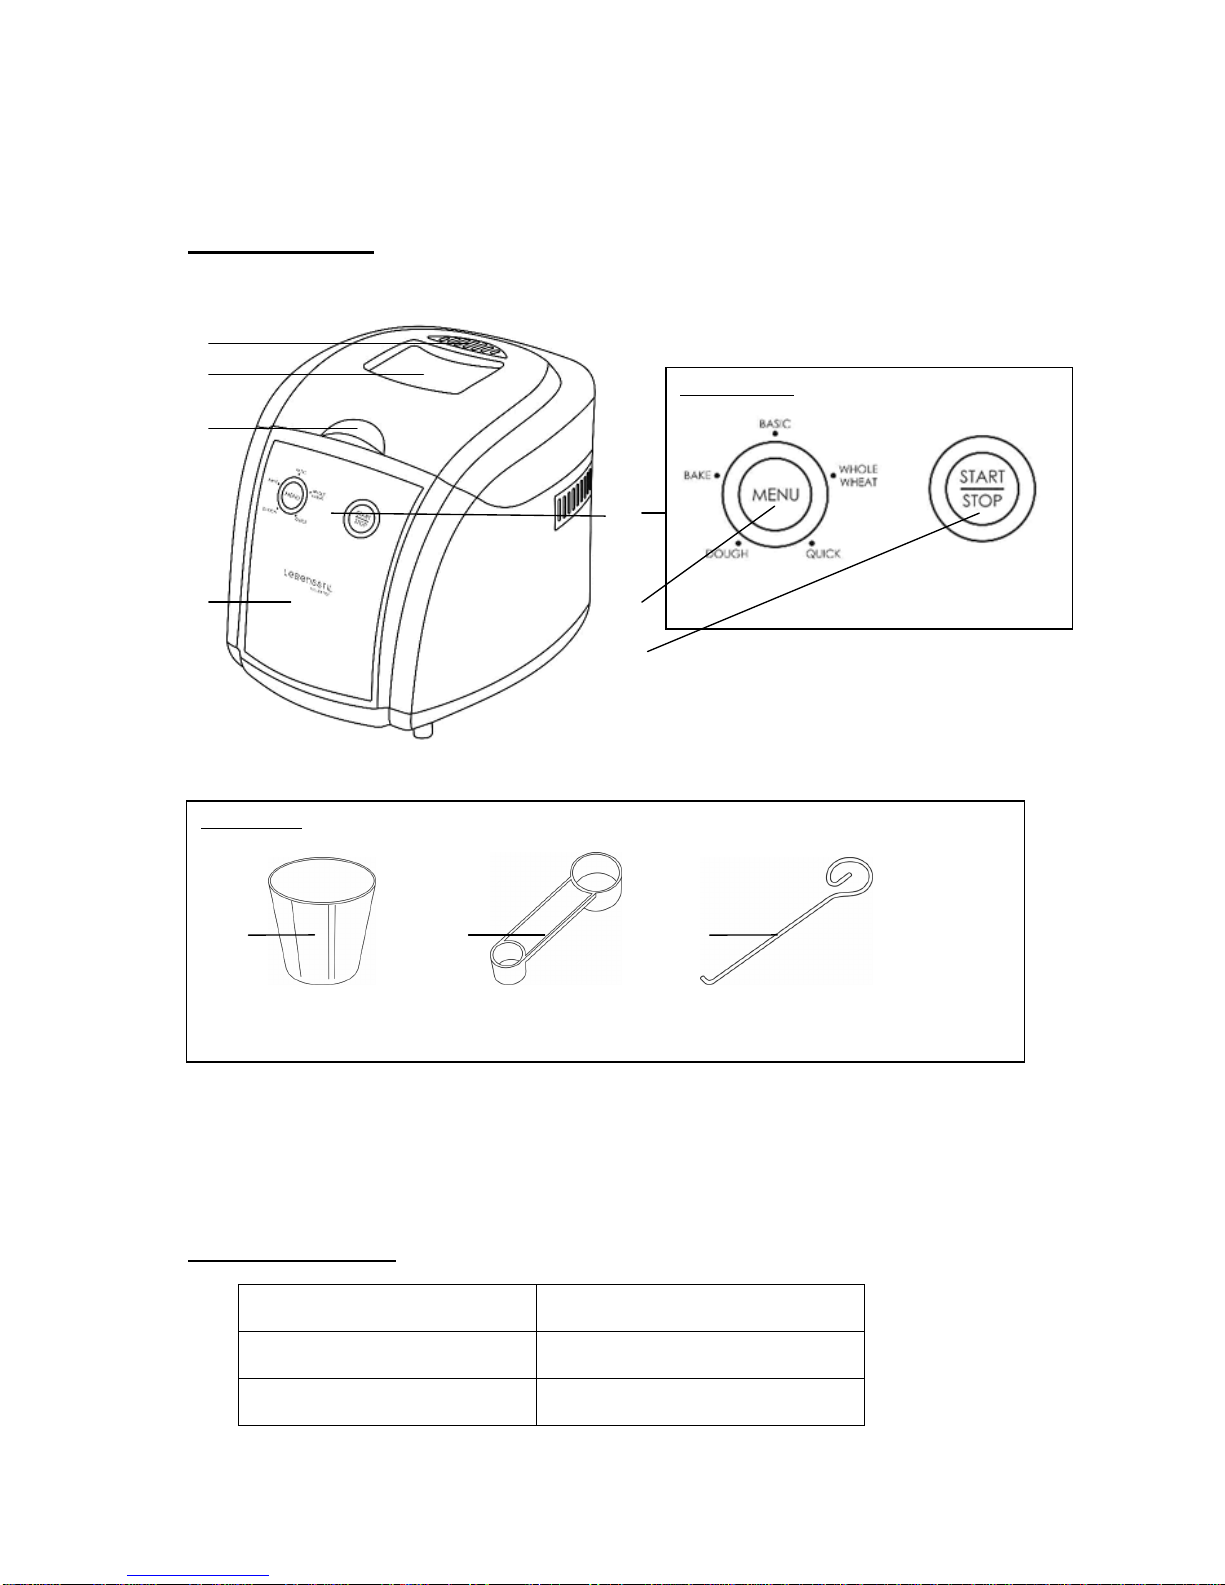
Lebensstil Kollektion LKBM-1102W User manual


CONTENTS
Title Page No.
Parts Introduction 1
Technical Specifications 1
Before Using 2
How to Use Bread Maker 2 – 3
How to Make Bread 4
Trouble-shooting 4 – 5
Cleaning and Maintenance 5
Important Guidelines 6
Recipe Book 7

Thank you for choosing LEBENSSTIL KOLLEKTION Bread Maker.
Parts Introduction
1. Steam Vent 6. MENU Button
2. ViewWindow 7. START/STOP Button
3. Lid 8. Measuring Cup
4. Outer Body 9. Measuring Spoon
5. Control Panel 10. Hook
Technical Specifications
Voltage 220 – 240V~
Wattage 530W
Frequency 50Hz
1
Control Panel
1
2
3
4
5
6
7
Accessories
8 9 10

Before Using
·Please read these instructions carefully before use and keep them forfuture reference.
·Check your local main voltage whether it is the same as stated on the rating label.
·Do not operate any appliance with a damaged cord or plug or after the appliance malfunctions, or
is dropped or damaged in any manner. Return appliance to manufacturer or the nearest
authorized service agent for examination, repair or electrical or mechanical adjustment.
·Do not touch hot surfaces. Use handles or knobs.
·To protect against electric shock do not immerse cord, plugs, or housing in water or other liquid.
·Unplug from outlet when not in use, before putting on or taking off parts, and before cleaning.
·Do not let cord hang over edge of table or hot surface.
·The use of accessory attachments not recommended by the appliance manufacturer may cause
injuries.
·This appliance is not intended for use by persons (including children) with reduced physical,
sensory or mental capabilities, or lack of experience and knowledge, unless they have been given
supervision or instruction concerning use of the appliances by a person responsible for their
safety.
·Do not place on or near a hot gas or electric burner, or in a heated oven.
·Extreme caution must be used when moving an appliance containing hot oil or other hot liquids.
·Do not touch any moving or spinning parts of the machine when baking.
·Never switch on the appliance without properly placed bread pan filled ingredients.
·Never beat the bread pan on the top or edge to remove the pan this may damage the bread pan.
·Metal foils or other materials must not be inserted into the bread maker as this can give rise to the
risk of a fire or short circuit.
·Never cover the bread maker with a towel or any other material, heat and steam must be able to
escape freely. A fire can be caused if it is covered by, or comes into contact with combustible
material.
·Always attach plug to appliance first, then plug cord into the wall outlet. To disconnect, turn any
control to OFF, then remove plug from wall outlet.
·Do not operate the appliance for other than its intended use.
·Do not use outdoors.
·The appliances are not intended to be operated by means of an external timer or separate
remote-control system.
·This appliance is intended to be used in household and similar applications such as:
– Staff kitchen areas in shops, offices and other working environments;
– Farm houses;
– By clients in hotels, motels and other residential type environments;
– Bed and breakfast type environments.
·Do not operate the unit without bread pan placed in the chamber to avoid damaging the appliance
How to Use Bread Maker
·Plug in the power and you will hear a beep sound and the indicating light on the Basic program will be
on. This is a default setting whenever you turn on the unit.
START / STOP
·Press the “START/STOP” button once to start the program. The unit will beep once and the program
starts. The entire function buttons will be deactivated once the program has begun.
·Press the “START/STOP” button again and hold for approximately 3 seconds until a beep sound is
heard to stop the program. This feature will help to prevent any unintentional disruption to the
operation of program.
2

MENU
·Press the MENU button to select your desired operating functions which will be indicated by the LED
under the indicator cover. Each function of menus will be explained as follows:
OPERATING TIME
·The operating time for each function are as follows:
Program(s) Operating Time (hrs)
Basic 3:00
Whole wheat 3:40
Quick 1:55
Dough 1:30
Bake 0:45
KEEP WARM
·The unit will automaticallyswitch to keep warm mode for 60 minutes after anybaking program.
·Always turn off the unit by pressing the “START/STOP” button once should you want to serve
immediately after the completion of each baking. Otherwise, the unit will switch to keep warm
automatically.
MEMORY
·This unit is equipped with memory function. If there is a power failure for not more than 5 – 8 minutes
during the baking process, the selected program will be resumed again thereafter.
·If the power failure is extended more than 5 – 8 minutes during the baking process, the baking memory
will not be kept and the baking program has to be restart again.
ERROR CODE
·Please check the following before contacting your local distributor or service centre. Explain the
fault clearly so that repairs may be completed quickly for you.
- If the LEDs under the “MENU” button are twinkling, while the buzzer keep beeping – it means the
temperature inside is still too high or the sensor is disconnected. Turn off the unit and let it cool down for
about 10 – 20 minutes, or disconnect the sensor.
For First Time Used
·The appliance may emit a little smoke and a characteristic smell when you turn it on for the first
time. This is normal and will soon stop. Make sure the appliance has sufficient ventilation.
Program(s) Function(s)
Basic Kneading, rise and baking normal bread.
Whole wheat Kneading, rise and baking of whole wheat bread. This setting has longer pre-
heat time to allow the grain to soak up the water and expand accordingly.
Quick Kneading, rise and baking loaf with baking soda or baking powder. This setting
usuallybaked smaller bread with a dense texture.
Dough Kneading, rise but without baking. For making bread rolls, pizza, steam breads,
etc
Bake Only baking, no kneading and rise. Also used to increase the baking time on
selected settings.
3

HOW TO MAKE BREAD
·Place the pan and turn it clockwise to secure it into position.
·Fix the kneading blade onto the drive shaft and turn it clockwise to lock it into position. (Note: It is
advisable to fill the holes with margarine prior to placing the kneading blade as to avoid the dough being
stick on the kneading blade.
·Place the ingredients into the pan accordingly. Always add yeast or baking powder as the last
ingredients and vice-versa for making the heavy dough.
·Gently closethe lid and plug in the power.
·Press the “MENU” button until your desired program is selected.
·Press “START/STOP” button to start operate.
·You will hear 10 beeps sound once the baking process is completed. Press and hold the
“START/STOP” button for approximately 3-5 seconds to turn off the unit and the bread is ready to be
served. (Note: Always turn off the unit once the baking is completed, otherwise it will switch to keep
warm mode automatically)
·Open the lid and firmly grasp the bread pan handle with oven mitts. Turn the pan anti-clockwise and
gently pull the pan up-straight and out.
·Remove the bread from the pan and let the bread cool for about 20 minutes before slicing. (Caution:
Always handle with care as the pan and bread may extremely hot once baking is completed)
·Unplug the power from mains electricity supply.
NOTE: Before slicing the loaf, use the hook to remove out the Kneading blade hidden on the bottom
of loaf. The loaf is hot hence never uses the hand to remove the kneading blade.
Trouble-shooting
Problem Course Solution
Smoke from
ventilation hole when
baking
Some ingredients adhere to
the heat element or nearby,
for the first use, oil remained
on the surface of heat element
Unplug the bread maker and clean
the heat element, but be careful not
to burn you, during the first use, dry
operating and open the lid.
Bread bottom crust
is too thick
Keep bread warm and leave
bread in the bread pan for a
long time so that water is
losing too much
Take bread out soon without
keeping it warm
It is very difficult to
take bread out Kneader adheres tightly to the
shaft in bread pan
After taking bread out, put hot
water into bread pan and immerge
kneader for 10 minutes, then take it
out and clean.
1.Selected program menu is
improper Select the proper program menu
2.After operating, open cover
several times and bread is
dry, no brown crust color Don’t open cover at the last rise
Stir ingredients not
evenly and bake
badly 3.Stir resistance is too large
so that kneader almost can’t
rotate and stir adequately
Check kneader hole, then take bread
pan out and operate without load, if
not normal, contact with the
authorized service facility.
Display “H:HH” after
pressing “start/stop”
button
The temperature in bread
maker is too high to make
bread.
Press “start/stop” button and
unplug bread maker, then take
bread pan out and open cover until
the bread maker cools down
Hear the motor
noises but dough
isn’t stirred
Bread pan is fixed improperly
or dough is too large to be
stirred
Check whether bread pan is fixed
properly and dough is made
according to recipe and the
ingredients is weighed accurately
Bread size is so Yeast is too much or flour is Check the above factors, reduce
4

large as to push
cover excessive or water is too
much or environment
temperature is too high
properly the amount according to
the true reasons
Bread size is too
small or bread has
no rise
No yeast or the amount of
yeast is not enough,
moreover, yeast may have a
poor activity as water
temperature is too high or
yeast is mixed together with
salt, or the environment
temperature is lower.
Check the amount and
performance of yeast, increase the
environment temperature properly.
Dough is so large to
overflow bread pan
The amount of liquids is so
much as to make dough soft
and yeast is also excessive.
Reduce the amount of liquids and
improve dough rigidity
1.Used flour is not strong
powder and can’t make dough
rise Use bread flour or strong powder.
2.Yeast rate is too rapid or
yeast temperature is too high Yeast is used under room
temperature
Bread collapses in
the middle parts
when baking dough 3. Excessive water makes
dough too wet and soft. According to the ability of absorbing
water, adjust water on recipe
1.Too much flour or short of
water Reduce flour or increase water
Bread weight is very
large and
organization
construct is too
dense 2.Too many fruit ingredients or
too much whole wheat flour
Reduce the amount of
corresponding ingredients and
increase yeast
1. Excessive water or yeast or
no salt Reduce properly water or yeast and
check salt
Middle parts are
hollow after cutting
bread 2.Water temperature is too
high Check water temperature
1.There is strong glutinosity
Ingredient in bread such as
butter and bananas etc.
Do not add strong glutinosity
ingredients into bread.
Bread surface is
adhered to dry
powder 2.stir not adequately for short
of water Check water and mechanical
construct of bread maker
Crust is too thick and
baking color is too
dark when making
cakes or food with
excessive sugar
Different recipes or
ingredients have great effect
on making bread, baking color
will become very dark
because of much sugar
If baking color is too dark for the
recipe with excessive sugar, press
start/stop to interrupt the program
ahead 5-10min of intended finishing
time. Before removing out the
bread you should keep the bread or
cake in bread pan for about 20
minutes with cover closed
Cleaning and Maintenance
·Always unplug the product from the wall socket and shut down completely prior to cleaning.
·Do not use abrasive sponge, scouring pads or stiff brush to clean the appliance.
·Please be cautious when cleaning the product near tothe heater housing area.
·Use only damp cloth to wipe the exterior surfaces of the unit. Do not immerse the main body in water.
·Do not allow the electrical components to be exposed to water.
·For proper storage, always place the unit in a low humidity environment.
5

Important Guidelines
·Use only original accessories supplied.
·The current voltage which indicates on the plate must correspond to your local voltage.
·The bread maker should be used only on condition that the type of power supply corresponds to the
marking label. Otherwise, it will not work or even be damaged.
·Never use the bread maker inside the bath, under a shower or over a wash basin full of water.
·If the bread maker falls into water, pull the power plug out from the power socket immediately.
·Never use the bread maker unless it is fully assembled.
·Do not overload outlets or extension cords. It can result in fire or electric shock.
·Do not use the appliance if the power supply cord or plug has been damaged.
·This bread maker is intended for indoor and household use only; not for outdoor, commercialand
industrial use.
·Do not immerse the cord, plug or appliance in water or other types of liquid and do not pour water onto it
to avoid from fire, electrical shock or personal injury.
·To protect against risk of electrical shock, do not force anyforeign objects such as pins and wires into
any openings.
·Do not pull the cord to remove the plug from wall socket, pull on the plug instead.
·Do not attempt to insert or remove the plug with wet hands.
·Do not place the appliance on or near hot gas/electric burner, or a heated oven.
·Do not let cord hang over the edge of table or counter or touch any hot surfaces.
·In the event not using the appliance for a long period of time, please remove the plug from the power
outlet.
·Never let children use electrical equipment without adult supervision.
·Educate children about the danger and safety rules associated with operating electrical equipment.
·This appliance should not be used by the physicallychallenged, slow response or mentally disabled
people (including children) unless guidance is provided during operation.
·Do not operate any appliance with a damaged cord or plug, or after the appliance malfunctions or has
been damaged in any manner. Repairs and services should always be carried out by authorized
Customer Care/Service Centre.
This marking indicates that this product should not be disposed with
other household wastes throughout the nation. To prevent possible
harm to the environment or human health from uncontrolled waste
disposal, recycle it responsibly to promote the sustainable reuse of
material resources. To return your used device, please use the return
and collection systems or contact the retailer where the product was
purchased. They can take this product for environmental safe
recycling.
6

Recipe Book
1. White Bread 5. Sweet Bread
Water 180ml Water 180ml
Margarine / Butter 1 tbsp Egg 1
Salt 1 tsp Milk powder 1 tbsp
Sugar 1 tbsp Vegetable oil 2 tbsp
Plain flour
2+1/3cups
Salt 1/2 tsp
Dry yeast 1 tsp Sugar 3 tbsp
Program: Basic Plain flour 2+1/4cups
Dry yeast 1 tsp
Program: Basic
2. Onion Bread 6. Whole Wheat Bread
Water 180ml Water 180ml
Salt 1 tsp
Whole wheat flour 140g
Margarine / Butter 1 tbsp Plain flour 185g
Sugar 0.8 tbsp Oil 2 tbsp
Grilled Onion 20g Salt 1 tsp
Plain flour 2+1/4cups
Brown Sugar 1 tbsp
Dry yeast 1 tsp Dry yeast 1 tsp
Program: Basic Program: Whole wheat
3. Nut & Raisin Bread 7. Coconut Bread
Water / Milk 180ml Water 175ml
Margarine / Butter 1.5 tbsp Egg 1
Salt 1 tsp Honey 1 tbsp
Sugar 1 tbsp Milk powder 1/3 cup
Plain flour 2 cups Salt 1/2 tsp
Dry yeast 1 tsp Sugar 3 tbsp
Raisins 34g Plain flour 2 cups
Crushed walnuts 25g Dry yeast 1 tsp
Program: Basic Oil 2 tbsp
Tips: Add the raisins and nuts after the acoustic
signal during the second kneading phase. Shredded coconut 1/4 cup
Program: Basic
4. Sesame Bread
Water 190ml
Egg 1
Milk powder 2 tbsp
Oil 2 tbsp
Salt 1 tsp
Sugar 1 tbsp
Plain flour 2+1/4cups
Dry yeast 1 tsp
Sesame 2 tbsp
Program: Basic
Tips: Wait until the last 15min of baking, open the
lid, use a small brush to spread some egg yolk on
the bread and sprinkle the sesame on top.
7

Table of contents
Other Lebensstil Kollektion Bread Maker manuals