Montageanleitung
Installation instruction
®
Alle Modelle sind international gesetzlich geschützt.
All models are protected by international law.
Daimlerstraße 73 · DE-74545 Michelfeld · Tel. +49 (0) 791-47077 · Fax +49 (0) 791-47555 · E-Mail: info@leccor.de
LECCOR Leuchten GmbH
Beschreibung
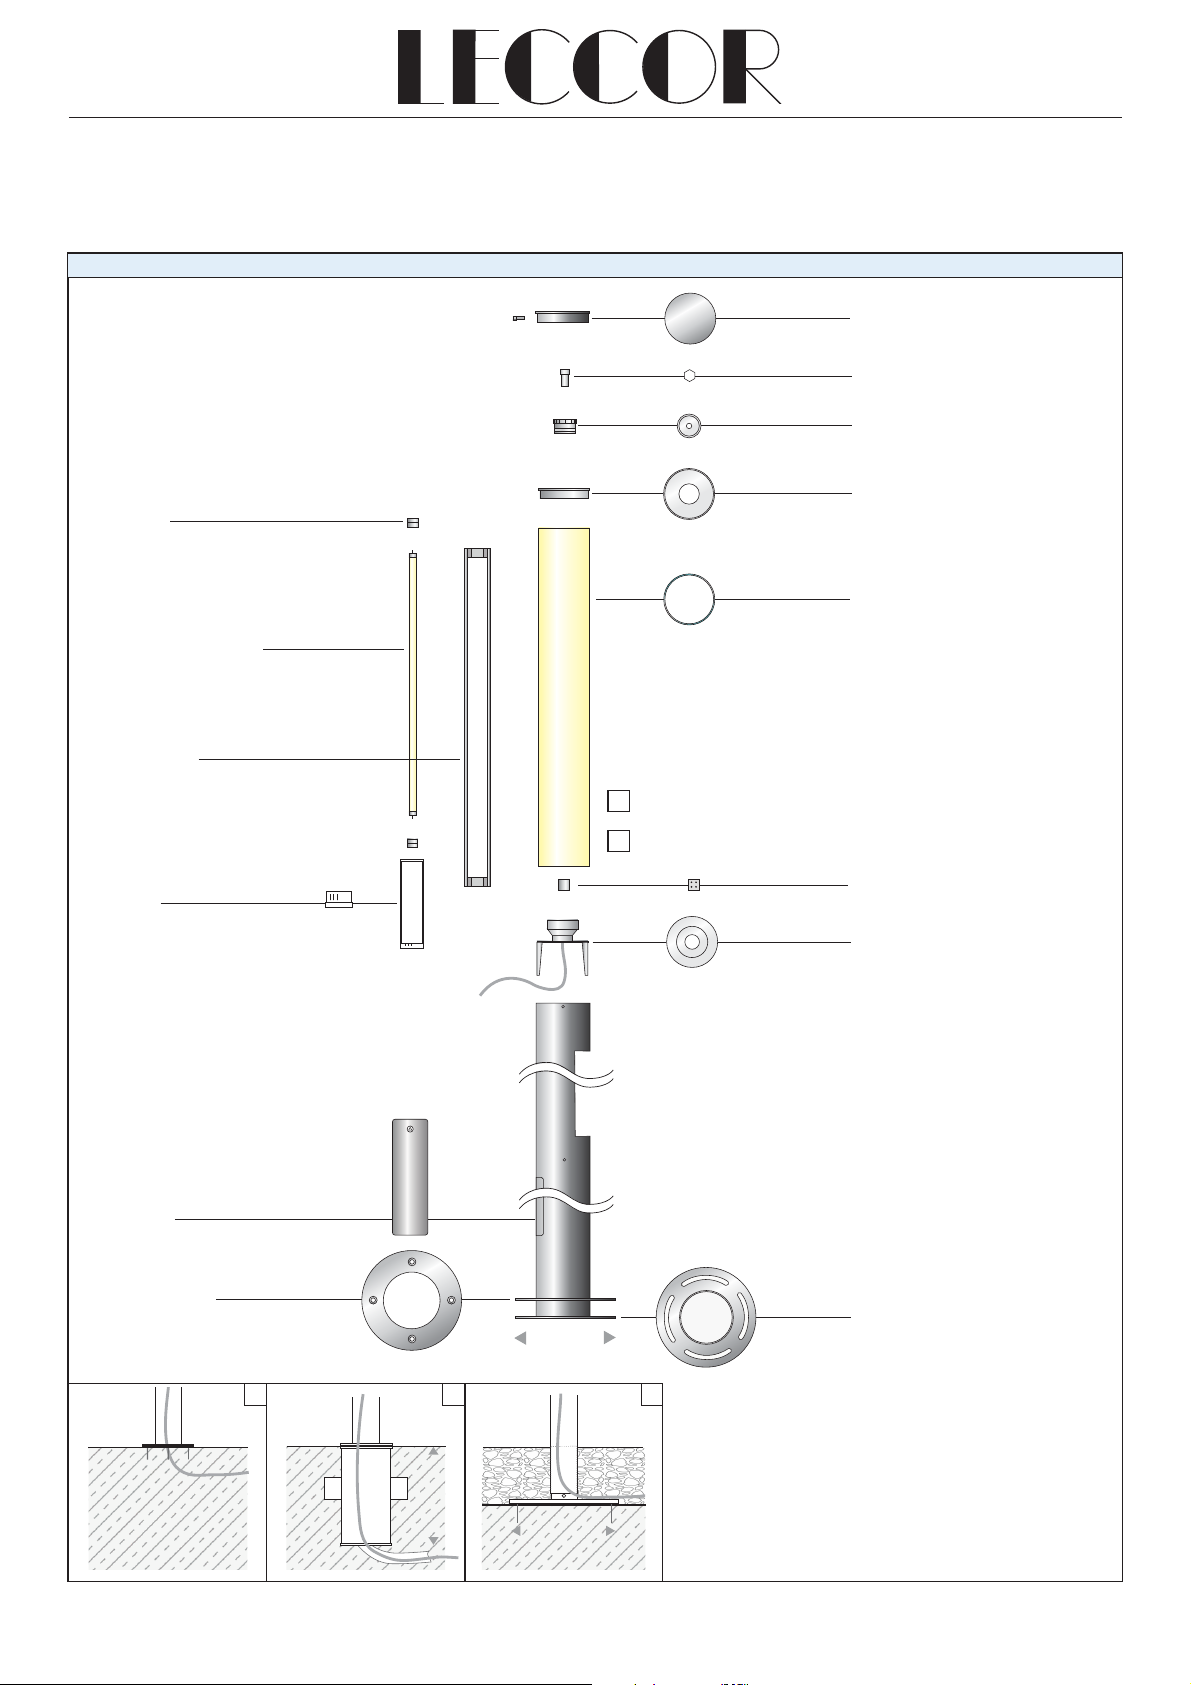
LEUCHTE IM 3- ROHR- SYSTEM
Im Kern das „Lichtrohr“ gesichert vom transparenten oder mattierten
„Schutzrohr“ umhüllt vom „Designrohr“ aus Edelstahl.
1. Technische Daten
Prüfzeichen: siehe Homepage
Alle Modelle sind gesetzlich geschützt.
Technische Änderungen behalten wir uns vor.
Edelstahl Designrohr aus V2A oder V4A mit Ø68 , Ø76,1 ,mm mm
( mm, Ø140mmØ114,3 ), Oberfläche glasperlengestrahlt oder
pulverbeschichtet.
Schutzrohr aus transparentem oder mattiertem Polycarbonat oder
Acrylglas. Schutzart IP54 / IP65, Schutzklasse 1/2.
Lichtarmaturen mit:
TC-L, PL-C, T8, T5, LED
weitere Leuchtmittel auf Anfrage.
2. Gebrauchshinweise
Die Leuchte wird in komplett zusammengebautem Zustand mit dafür
vorgesehenem Zubehör geliefert. Sie ist zuerst auf etwaige Transport-
schäden zu untersuchen und zu prüfen (siehe AGB). Um Fehler zu
vermeiden bitten wir Sie, die einzelnen Punkte der Montageanleitung
zu beachten.
ACHTUNG: Vor Montagearbeiten oder Lampenwechsel ist die
Leuchte spannungslos zu schalten!
3. Montage / Elektrischer Netzanschluß
·Rohrkappe demontieren: 2 x Schrauben M6 entfernen und
Rohrkappe abnehmen.
(bei LED-Ausführung Fixierschraube M5 und/oder Adapter lösen)
·Lichtarmatur mit Schutzrohr am Ausziehstift aus dem Designrohr
herausziehen.
·2x M5 demontieren und Zwischenstück/Anschluss-Rohrkappe vom
Adapter trennen.
·Netzleitung durch M20 Kabelverschraubung einführen.
Bei werksseitigem Netzkabel sind die vorangegangenen Punkte
nicht zu beachten!
·Der Zusammenbau erfolgt in umgekehrter Reihenfolge.
4. Leuchtmittelwechsel
·Rohrkappe demontieren: 2x Schrauben M6 demontieren und
Rohrkappe abnehmen.
·Lichtarmatur mit Schutzrohr am Ausziehgriff aus dem Designrohr ziehen.
·PVC-Verschraubung mit Anschlussstecker lösen und Lichtarmatur
komplett herausziehen.
·Leuchtmittel wechseln.
·Zusammenbau erfolgt in umgekehrter Reihenfolge.
Die Konusverschraubungen müssen mit ca. 3 Nm (handfest, bis
zur Deformierung der Abdichtungen) angezogen werden, um die
Schutzart IP 65 zu gewährleisten!
5. Reparatur und Ersatzteile
·Bei Instandsetzung / Instandhaltung nur Originalteile verwenden.
Bitte geben Sie bei Bestellungen unsere Bestellnummer an, um
Fehler zu vermeiden.
·Werden nachträglich Änderungen am LECCOR Produkt
vorgenommen, so erlischt die Gewährleistung / Garantie.
·Der Hersteller übernimmt keine Haftung für Schäden, die durch
unsachgemäßen Einsatz entstehen.
Description
3- SYSTEMTUBE LUMINAIRE
With a lighting tube in it‘s centre, safeguarded by a transparent or
frosted protection tube and encased by a tube made of glass-
beaded stainless steel.
1. Technical data
Cerificates: See homepage.
All models are protected by international law.
We reserve technical modifications due to innovation.
Tube made 304 ( ) 316 ( ) mmof stainless steel V2A or V4A Ø68 ,
Ø76,1 , Ø114,3 with glass bead blasted surface.mm ( mm, Ø140mm)
Protection rosted polycarbonate, acid-,tube made of transparent / f
oil-, gasoline jet and dust proof, protection category: IP65-, - IP54 / ,
safety class 1/2.
Available with following illuminants:
TC-L, PL-C, T8, T5, LED
further versions on request.
2 Handling and installation instructions.
The light is delivered completely withassembled belonging
equipment. First of all you should examine for possiblethe luminaire
damages caused by transport To avoid please follow the. defects
installation instructions.
CAUTION: before maint nance works or changing ofe illuminant,
the has to be disconnected from electricity!luminaire
3. Mounting /electrical connection
·Removal of tube cap: Remove 2x 6 ( tubescrews M Pos.1) and take off
cap.
·Pull out the protection by using grip.tube
·Remove 2x screws M5 and separate the stainless
interfacesteel from adaptor.
·Insert cable through M20 cable-screwing.
·The remounting of the theluminaire works in reverse order.
4 ing illuminant. Chang
·Removal of tube cap: Remove 2x 6 (screws M Pos.1) and take off
tube cap.
·Pull out the protection by using grip.tube
·Loosen PVC-screwing with connecting plug and pull out light fitting.
illuminant.Change the
·The remounting of the theluminaire works in reverse order.
The have to be fastened with about 3Nm (untilconical boltings
the seal deforms) to secure Ip65!
5. Repair and spare parts
·.We advise you to use only original parts for maintenance
By placing order, p item to avoidlease indicate our number
confusions.
·In case of subsequent modifications warranty / guaranty expires
automatically.
·The producer does not liability for damagassume any es caused by
inappropriate use.
ISO 9001
COLLONA Leuchte für Außen- und Innenbereich
in- and outdoor illuminant