Legend 738BXN (NG) Manual

Legend
4001379-06
©2010, Miles Industries Ltd.
Manufactured by
British Columbia, Canada
www.valorreplaces.com
WARNING
HOT GLASS WILL
CAUSE BURNS.
DO NOT TOUCH GLASS
UNTIL COOLED.
NEVER ALLOW CHILDREN
TO TOUCH GLASS.
HOT GLASS WILL
CAUSE BURNS.
DO NOT TOUCH GLASS
UNTIL COOLED.
NEVER ALLOW CHILDREN
TO TOUCH GLASS.
WARNING
!
HOT GLASS WILL
CAUSE BURNS.
DO NOT TOUCH GLASS
UNTIL COOLED.
NEVER ALLOW CHILDREN
TO TOUCH GLASS.
WARNING
!

For purchasing a Valor by Miles Industries. Your new radiant gas heater is a technical
appliance that must be installed by a qualied dealer. Each Valor replace is fully
tested during the production process for your safety and comfort.
Your unit has been professionally installed by:
Dealer Name _______________________________________
Phone Number ______________________________________
.
The information contained in this installation manual is believed to be correct at
the time of printing. Miles Industries Ltd. reserves the right to change or modify any
information or specications without notice. Miles Industries Ltd. grants no warranty,
implied or stated, for the installation or maintenance of your heater, and assumes no
responsibility for any consequential damage(s).
Do not put
furniture or other objects
in this space in front of
the replace:
36” (0.9 m)
Fireplace
Hearth
2

= Updated content
◊
◊
◊
◊
◊
◊
◊
Table of Content
3

Safety and Warning Information
Children and adults should be to the hazards
of high surface temperature and should to
avoid burns or clothing ignition.
should be
when they are in the same room as
the appliance. Toddlers, young children and others
may be susceptible to
. A physical barrier is recommended if there
are at risk individuals in the house. To restrict access
to a replace or stove,
to keep toddlers, young children and
other at risk individuals out of the room and away from
hot surfaces.
place furniture or any other combustible
household objects within 36” of the replace front.
and all instructions carefully
before starting the installation.
these installation instructions may result in possible re
hazard and will void the warranty.
Prior to the rst ring of the replace, the
Owner’s Information section of this manual.
this appliance if any part has been under
water. Immediately, a qualied service technician
to inspect the unit and to replace any part of the control
system and any gas control that has been under water.
Installation and repair should be by a
qualied service person. The appliance and venting
system should be before initial use and at
least annually by a professional service person. More
frequent cleaning may be required due to excessive
lint from carpeting, bedding, etc. It is that
the unit’s control compartment, burner, and circulating
air passageways to provide for
adequate combustion and ventilation air.
Always the appliance clear and free from
combustible materials, gasoline, and other ammable
vapors and liquids.
the ow of combustion and
ventilation air. Keep the front of the appliance
of all obstacles and materials for servicing and proper
operation.
Due to the high temperature, the appliance should be
out of trafc areas and away from furniture
and draperies. Clothing or ammable material
on or near the appliance.
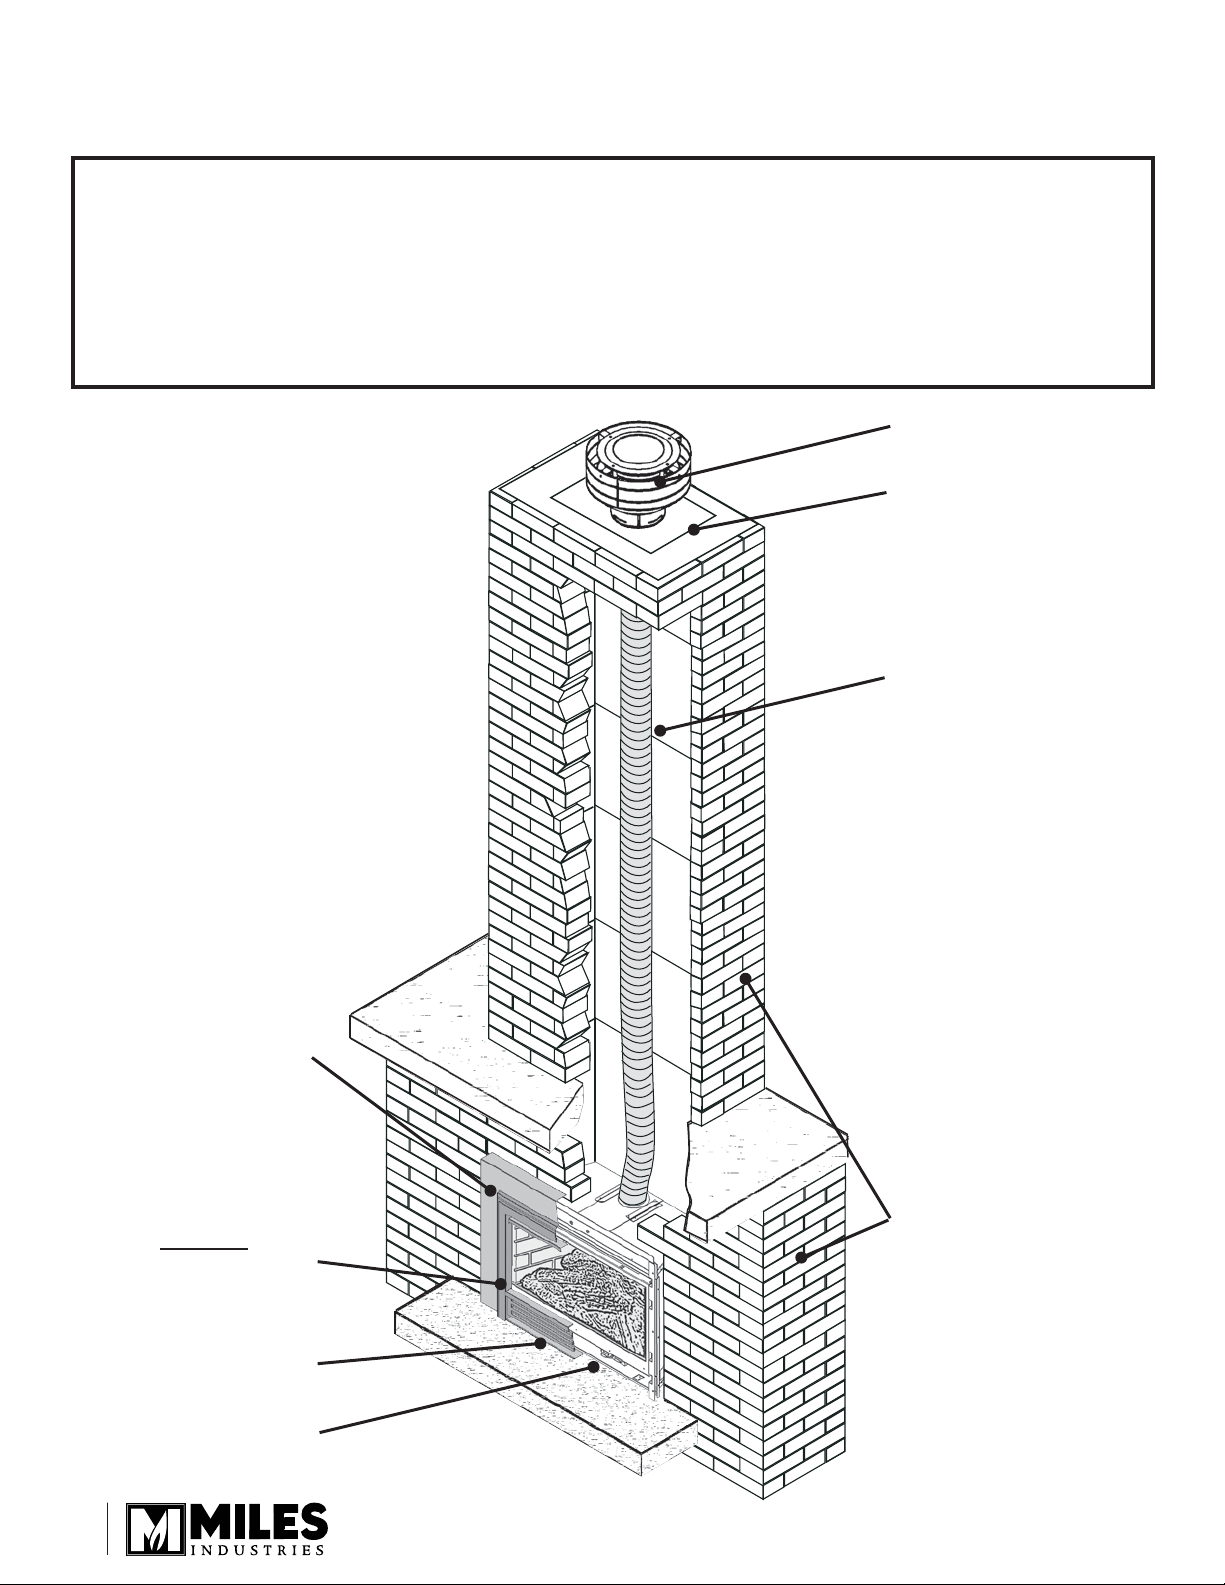
This unit MUST be used with a vent system as
described in this installation manual. vent
system or components .
This gas replace and vent assembly be vented
directly to the outside and be attached
to a chimney serving a separate solid fuel burning
appliance. Each gas appliance a separate
vent system. Common vent systems are .
the external vent cap on a regular basis to
make sure that no debris, plants, trees, shrubs are
interfering with the air ow.
The glass door assembly be in place and sealed
before the unit can be placed into safe operation.
this appliance with the glass door
removed, cracked, or broken. Replacement of the glass
door should be performed by a licensed or qualied
service person. strike or slam the glass door.
The glass door assembly be replaced
as a complete unit, as supplied by the replace
manufacturer. material may be used.
abrasive cleaners on the glass door
assembly. to clean the glass door
when it is hot.
the gas before servicing this appliance.
It is recommended that a qualied service technician
perform an appliance check-up at the beginning of each
heating season.
Any safety screen or guard removed for servicing
before operating this appliance.
not to put any decorating objects
sensitive to heat to close above or around the replace
as it gets very hot when operating.
use this heater as a temporary source of heat
during construction.
This appliance is a
. It must not be used for any other purposes
such as drying clothes, etc.
Fuels
used in gas, wood-burning or oil red appliances,
and the products of combustion of such fuels, contain
chemicals known to the State of California to cause
cancer, birth defects and other reproductive harm.
California Health & Safety Code Sec. 25249.6.
4

Safety and Warning Information
Natural Propane
0-4,500 feet*
24,000 24,000
6,500 13,000
3.95 9.5
5.0 11.0
10.5 14.0
82-650 92-260
35 27
Min. Rate By-Pass Screw 125 125
Specications
This appliance is certied to ANSI Z21.88-2009 / CSA
2.33-2009 American National Standard / CSA Standard
for Vented Gas Fireplace Heaters for use in Canada
and USA, and to CGA 2.17-91 High Altitude Standard
in Canada. This appliance is for gravity vent insert
installations.
This appliance complies with CSA P4.1-09 Testing
method for measuring annual replace efciencies.
The installation must conform to local codes or, in the
absence of local codes, with the National Fuel Gas
Code, ANSI Z223.1 or the Natural Gas and Propane
Installation Code CAN/CGA-B149. Only qualied
licensed or trained personnel should install this
appliance.
This appliance must be electrically grounded in
accordance with local codes, or, in the absence of local
codes, with the National Electrical Code, ANSI/NFPA
70 or the Canadian Electrical Code, CSA C22.1.
Input ratings are shown in BTU per hour and are
certied without deration for elevations up to 4,500 feet
(1,370 m) above sea level.
For elevations above 4,500 feet (1,370 m) in USA,
installations must be in accordance with the current
ANSI Z223.1 and/or local codes having jurisdiction.
Heating value of gas in some areas is reduced to
compensate for elevation—consult your local gas utility
to conrm.
For installations at elevations above 4,500 feet (1,370
m) in Canada, please consult provincial and/or local
authorities having jurisdiction.
Heater engine 738BXN is used with natural gas.
Heater engine 738BXP is used with propane gas.
The supply pressure must be between the limits shown
in the Ratings section above.
The supply connection is 3/8” NPT female and located
on the left hand side of the control valve. The gas line
entry point is on the left hand side on the replace.
The 738BX Legend G3 is supplied as natural gas or
propane gas and is eld convertible between fuels. See
instructions packaged with the conversion kit for further
information.
The 738 does not require an electrical power source to
operate as a heater.
When operating your new replace for the rst time,
some vapors may be released due to the burning of
curing compounds used in the manufacture of the
appliance. They may cause a slight odor and could
cause the ames to be the full height of the rebox, or
even slightly higher, for the rst few hours of operation.
It is also possible that these vapors could set off any
smoke detection alarms in the immediate vicinity.
These vapors are quite normal on new appliances. We
recommend opening a window to vent the room. After
a few hours use, the vapors will have disappeared and
the ames will be at their normal height.
5

Overview
6

28-5/8” (727 mm)
19-1/2” (495 mm)
12” (305 mm)
or 12-5/8” (321 mm)
Varies with
outer trim options
7-7/8” (200 mm)
or 8-1/2” (216 mm)
Varies with
outer trim options
20”
(508 mm)
Gas inlet Gas connection
Optional Outer Trim or
Surround sold separately
X
Y
Dimensions
Cavity
Check that masonry step does not interfere with install dimensions or
vent pipe.
If mantel is combustible, see section Clearances for allowable
clearances.
Minimum width of replace opening at front: 28” (711 mm)
X = 12” (305 mm) or 12-5/8” (321 mm)—varies with outer trim options
Y = 20” (508 mm)
7

9” (229 mm)
A
B
Do not put
furniture or
objects within
36” (914 mm)
of the front of
appliance
*Measure taken from the underside of the mantel to nished hearth
or surface that the unit is sitting on.
Material such as wood,
compressed paper, plant bers, plastics or any material
capable of igniting and burning, whether ame-proofed or
not, plastered or un-plastered.
Material such as steel, iron
brick, tile, concrete or materials that bear the UL mark for
zero (0) re rating.
distance from side of appliance (liner box) to
combustible wall: 9” (229 mm).
1”
(25 mm)
4”
(101 mm)
8”
(203 mm)
14”
(355 mm)
28”
(711 mm)
32”
(813 mm)
35”
(889 mm)
38”
(965 mm)
sidewall
8
Clearances

Approved Termination Required
Max. 36” offset at 10’-0” min. vertical
3” Liner
3” min. Bend
Radius
Min. 10 feet (with offset)
Min. 8 feet (without offset)
Minimum Vent Liner Radius
Allowable Vent Configurations
Minimum vent lengths.
For other allowable configurations,
refer to the venting tables in the
National Fuel Gas Code Z223.1 or the
Natural Gas or Propane Installation
Code B149.1.
Terminal Cap
Flashing
1 x 3” ex liner
The vent terminal must be located through the roof. This gravity
vent appliance is designed to opreate when an undistrubed
airow hits the outside vent terminal from any direction.
Check local codes for allowable vertical vent termination.
Use a 3” diameter aluminum ex liner approved for gas
venting when installed as an insert (existing chimney). Use a
4” diameter type “B” vent when installed with a 770ZCK Zero
Clearance Kit (see separate instructions packaged with the kit
for details).
Where possible, avoid joining ex pipe. If joints are required,
use a approved connector and seal joints with RTV high temp
sealant.
Horizontal offsets are permissible to allow for routing around
masonry projections. Avoid bending ex pipe over a 45 degrees
radius where possible.
9
Venting

Installation Planning
2. Unpack the appliance.
3. Check that you have everything.
4. Clean cavity, chimney, ash dumps, clean-outs.
5. Install venting pipe.
6. Attach conversion plate to existing replace.
7. Fit appliance into cavity.
8. Connect and test gas supply.
9. Install the remote control system.
10. Install bricks and logs.
11. Ret window.
12. Verify operation and adjust aeration settings.
Existing Fireplace Preparation
A few points must be considered before inserting the
738BX into an existing replace cavity. Generally, no
modications are allowed to the existing replace that
will compromise the integrity of the existing replace.
Components that are bolted or screwed on such as
dampers or bafes may be removed to accommodate
the installation of the 738BX engine.
. Check with local authorities if in doubt.
Have the chimney swept and the replace cavity
including ash dumps and clean-outs cleaned before
installing the 738BX heater and vent liners. Any
creosote or soot residue remaining in the replace
cavity chimney or clean-out may cause odors or
stains once the 738BX insert is installed. Consult with
chimney sweep for information on how best to clean.
Factory-built, zero-clearance replaces will require the
damper to be removed in order to install the vent liners.
These dampers are usually bolted into place. Dampers
in masonry replaces must be xed open and may
remain in place.
13. Install the remote control handset wall holder.
15. Install the surround trim and front.
16. Install the fret if required.
• Packing knife
• Screwdriver set
• Pliers
• Adjustable Wrench
• Sealant
• Dish soap/water solution
• Gloves
• Eye Protection
Some replaces (particularly factory-built) have a
raised curb at the front edge to retain ashes. Check the
dimensions carefully to ensure the 738BX engine will t
behind any raised curb (some curbs may be removed
separately from the refractory base).
Plan the routing of the gas line before proceeding.
Use the existing hole for the gas line in factory-built
replaces. If the replace has no access hole, carefully
drill an access hole of 1.5 inch (38 mm) or less through
the lower sides or bottom of the rebox. The access
hole must be plugged with non-combustible insulation
after the gas supply line has been installed. See
Dimensions section for detailed location of gas inlet.
Also, take into consideration whether or not a shut-off
valve will interfere when planning routing of the gas
line.
10

1. Unpack the appliance.
2. Unpack any loose items from around the appliance
and check against the Pack Content list provided in
the documentation package.
3. Remove the window and set aside in a safe place to
avoid damage.
including:
-brick panels & logs;
- surround/doors/fret;
- venting components and accessories.
Appliance Preparation
Existing Fireplace Preparation
prior to installing the 738BX insert.
Combustible mantel clearances must conform to those
required for the original solid-fuel replace into which
the 738BX is being installed.
The window is held in place by four spring-loaded bolts,
two at the top and two at the bottom.
1. To remove the window, turn each bolt a quarter turn
to disengage the bolt pin.
2. Gently pull the bottom of the window outward and
unhook it from the rebox’s opening frame.
3. Set the window aside in a safe place to avoid
damage.
Attach the “This replace has been converted...”
label to the existing replace using screws or other
mechanical means and store any removed parts in
back of the existing replace for future use.
11

IMPORTANT: This appliance’s venting system requires room air to be used
in the combustion process.
1. Rough-in one 3” diameter vent liner into the existing chimney
system from the roof. Be careful not to tear or damage the liner
in the process. Leave plenty of liner at the bottom to facilitate the
connection of the liner to the vent slider.
Slide the appliance into the cavity.
Release the two screws retaining the vent slider to the front of the
rebox.
Remove the slider from the rebox by sliding it towards the back of
the rebox.
3. Secure the liner to the collar on the vent slider using 4 tapping
screws.
If the vent slider was removed from the rebox, slide the rebox
onto the vent slider in the cavity taking care not to damage the liner.
Secure the vent slider to the front of the rebox with two screws
removed earlier.
4. From the roof, pull the liner and t the ashing.
5. Fit the terminal cap. Secure with screws.
6. Seal the terminal and ashing from water penetration as required.
Appliance Preparation
Failure to position the parts in
accordance with these diagrams or
failure to use only parts specically
approved with this appliance
may result in property damage or
personal injury.
12

Supply
pressure
test tapping
Manifold
pressure
test tapping
Supply Gas
The gas supply inlet connection is a 3/8” NPT female
connector and is located on the left hand side of the
control valve.
Use only new black iron or steel pipes or copper tubing
if acceptable—check local codes. Note that in USA,
copper tubing must be internally tinned for protection
against sulfur compounds.
The burner platform and gas train on this appliance
may be removed as a unit for servicing or to install or
remove the optional circulating fan (if installed). Provide
some form of pipe union (depending on type of piping)
as close as possible to appliance valve.
Unions in gas lines should be of ground joint type.
The gas supply line must be sized and installed to
provide a supply of gas sufcient to meet the maximum
demand of the appliance without undue loss of
pressure.
Sealant used must be resistant to the action of all
gas constituents including LP gas. Sealant should be
applied lightly to male threads to ensure excess sealant
does not enter gas lines.
Pressure test the supply line for leaks.
The appliance and its individual shut-off valve must be
disconnected from the gas supply piping system during
any pressure testing of that system at test pressures in
excess of 1/2 psig (3.5 kPa).
The appliance must be isolated from the gas supply
piping system by closing its equipment shut-off valve
during any pressure testing of the gas supply piping
system at test pressures equal to or less than 1/2 psi
(3.5 kPa).
Failure to either disconnect or isolate the appliance
during pressure testing may resulting regulator or valve
damages and void the warranty. Consult your dealer in
case of damages.
The minimum supply pressure is given in the
subsection Ratings of this manual—page 5.
All piping and connections must be tested for leaks
after installation or servicing. All leaks must be
corrected immediately.
When testing for leaks:
• Make sure that the appliance is turned off.
• Open the manual shut-off valve.
• Test for leaks by applying a liquid detergent or soap
solution to all joints. Bubbles forming indicate a gas
leak.
The pressure test tapping locations are shown in the
gure below. An internal regulator within the valve
controls the burner manifold pressure. The correct
pressure range is shown in the table in subsection
Ratings of this manual on page 5. The pressure
check should be made with the burner alight and at its
highest setting. See Lighting Instructions section for full
operating details on page 24.
Pressure Testing
13

Thermostat Knob Gas Control Knob
The pilot burner and electrode unit are at the left end of the burner.
Push in the lighting knob and turn it counter-clockwise through the “IGN” position to “PILOT”. A spark should ash
across from the pilot electrode to the pilot burner shield as shown below.
Ignition Spark Check
14

Receiver GV34 Valve
Push-on
Connector
Remote Control Preparation
1. Connect the wiring harness to the receiver box,
by pushing the wire connector on to the receiver
circuit board. The plug will only go on one way so
please ensure that the wires are pointing up and the
slot in the board is in line with the tab on the wiring
harness plug.
2. Connect the wires as shown. Please note that
the “L” connectors are different sizes; the smaller
one ts to the lower connection and the larger one
the top connection on the top left hand side of the
valve. The other two wire connectors can be tted to
either terminal located to the left of the ame control
button.
3. Remove the remote control receiver lid.
4. Fit four AA 1.5 V alkaline batteries. Ret the lid.
5. Place the remote control receiver on the base of the
replace beside the valve.
6. Fit the 9 V alkaline battery to the handset
transmitter.
a screwdriver or other metallic object
to remove the batteries from the receiver or the
handset! This could cause a short circuit to the
receiver.
Remote control
receiver
15

Ceramic Bricks
The following guidelines apply for all brick liners.
1. Inside the rebox, on the top of each side, release
the screw of the side brick anchors (one per side)
just enough to allow them to rotate.
2. Place the rear panel against the back of the rebox,
on the ledge at bottom.
3. Rotate the anchor up and out of the way and slide
the left hand side panel against the rebox side.
Rotate the anchor back down to hold the panel.
Ceramic Logs
Unpack he ceramic logs very carefully to avoid damaging the fragile material. Install the logs as shown below.
1. Spread the decorative charcoals on each side of
the log tray, covering the sheet metal as shown.
4. Rotate the anchor up and out of the way and slide
the right hand side panel against the rebox side.
Rotate the anchor back down to hold the panel.
5. Tighten the side brick anchors on each side of the
rebox.
6. Install the port cover xing it using the two screws
already in the rebox top.
16

Both front logs to rest slightly on the
edge of the rebox window frame.
5. Identify the right cross log; it has
a hole under on of its end and it is
the shortest cross log. Place it on
the right pin located on the rear
log. Rest its other end in the crook
of the front right log.
6. Identify the middle cross log. It does not have a
hole underneath. Place its narrow end on the at
depression in the rear log next to the right cross log
on the rear log. Place its wider end on the front log.
7. Identify the left cross log; it has a hole under its
narrow end. Place its narrow end on the pin located
on the rear log. Rest its wider
end on the the crook in the
front left log at an angle of
approximately 30 degrees
from the center line of the
replace to allow for the
ame to come up in front of
the rear log.
2. Place the rear log centering it side to side in the
rebox. Position forward until it sits against the
sheet metal return behind the burner.
3. Place the front left log on top of the burner with its
front edge resting slightly on the window frame.
4. Place the front right log on the top of the burner
with its left end abutted to the front left log and its
front edge resting slightly on the window frame.
Ceramic Logs
17

Bottom
of window
(wider frame)
Open
Open
Close
Close
Flashback
shield (for
LPG only)
LPG Air Shutter
Slider Open
Close
NG Air Shutter
Slider & Cover
Window Retting
1. To ret the window, hook its top part to the rebox’s
opening frame.
2. While you hold it, push in and turn the two top
spring-loaded bolts a quarter turn to engage their
pin.
3. Push in the bottom of the window against the rebox
and fasten the two bottom spring-loaded bolts a
quarter turn.
Turn the replace ame up and down using the
remote control to conrm that the full range of inputs
is achieved—see the remote control operation
instructions on pages 22–23.
Light the re and allow the unit to warm up for 10–15
minutes to evaluate the ame picture. Burners are
equipped with an adjustable shutter to control primary
aeration. See the gures below. The shutters are
factory-set to an aeration gap which will give optimum
performance for the vast majority of installations.
In a few unusual installations, the ame picture may
be improved by adjusting the aeration. The need for
adjustment should be determined only by operating the
appliance with the ceramic logs and window installed.
will cause the ames
to appear more transparent and blue showing more
ceramic log glow.
will cause the ames to
appear more yellow or orange showing less ceramic
log glow.
Too little aeration may result in black carbon
forming and dropping into the rebox.
Operation Check & Aeration Settings Adjustment
18

Packing Contents:
1 Wall Bracket A
2 Screws B
1 Screw C
2 Wall Anchor D
1 Spacer E
(detach before assembly)
1 Wall Bracket F
Switch Plate
Alternative 1
Alternative 2 Alternative 3
Remote Control Handset Wall Holder Installation
The remote control kit for this replace comes complete with a wall-mounted holder. This holder is not required in all
installations but is provided as an optional feature for those customers who wish to mount the remote handset to the
wall.
To install the holder to the wall, nd a convenient location and use the hardware provided with the kit. See the
diagram below for required hardware and congurations. Note that the holder can be installed at the base of a light
switch plate.
. The location of the remote control handset is important to assure proper temperature regulation. To
obtain a constant temperature, we recommend that the handset should be between 3 and 15 feet away from the
appliance . We also advise that the handset should be located away from any other heat
source and not in direct sunlight as this may affect the temperature sensor located in the remote handset.
19

Bottom
of window
(wider frame)
Warranty
Card at the
back of this
manual.
For your safety, this appliance is tted with a ame
supervision device which will shut-off the gas supply
if, for any reason, the pilot ame goes out. This device
incorporates a xed probe, which senses the heat
from the pilot ame. If the probe is cool, the device will
prevent any gas ow unless manually lighting the pilot.
See full lighting instructions on page 24 of this manual.
One of the by-products of the combustion process in
a gas appliance is a mineral which can show up as a
white lm on the ceramic glass of the viewing door.
The composition of the deposit varies widely from
various locations and also from time to time in the
same location. It seems this is associated with the
varying sulfur content of the gas. You may have the
problem for a time and then not see it for many months
when it will reappear in your area.
We have discussed this problem with ceramic glass
manufacturers and they cannot give us a denitive
answer to this problem. Dealers have tried various
cleaning products with varying results. The following
recommendations will not guarantee results in your
particular case.
Owner’s Information
Performance of LPG appliances may be affected by
the quality of commercial gas supplied in your area.
• Clean the glass regularly as soon as you notice
the buildup (white lm). If the lm is left for a longer
period of time, it will bake on. It is then much harder,
if not impossible, to remove.
• NEVER use an abrasive cleaner on the ceramic
glass. Any abrasion of the surface has the
immediate effect of compromising the strength of the
glass. An emulsion type cleaner is recommended.
• Use a soft damp cloth to apply the cleaner. Dry the
glass with a soft, dry, preferably cotton cloth. Most
paper towels and synthetic materials are abrasive to
ceramic glass and should be avoided.
• Our dealers have had good results from the
products listed below. We cannot, however,
guarantee the results of these products.
»»Brasso,»Polish»Plus»by»KelKem,»CooK»ToP»Clean»
Creme»by»elCo,»WhiTe»off»by»ruTland,»TurTle»Wax
Do not clean the glass while it is hot. Always
securely replace the
window before lighting.
To remove the window for
cleaning:
1. Turn each bolt a quarter
turn to disengage the bolt
pin.
2. Gently pull the bottom
of the window outward
and unhook it from the
rebox’s opening frame.
3. Set the window aside
in a safe place to avoid
damage.
To ret the window:
1. Hook its top part to the rebox’s opening frame.
2. While you hold the window, push in and turn the
two top spring-loaded bolts a quarter turn to engage
their pin.
3. Push in the bottom of the window against the rebox
and fasten the two bottom spring-loaded bolts a
quarter turn.
Let the replace cool rst before cleaning it.
Your replace becomes very hot when operating.
Avoid placing decorating objects sensitive to heat
within 36 inches (0.9 m) around it.
Do not put
furniture or other objects
in this space in front of
the replace:
36” (0.9 m)
Fireplace
Hearth
20
This manual suits for next models
1
Table of contents
Other Legend Indoor Fireplace manuals
Popular Indoor Fireplace manuals by other brands

Enviro
Enviro CARA DR 50-1628 owner's manual

Next
Next Genoa Assembly instructions

Regency Fireplace Products
Regency Fireplace Products Classic I2450M Owners & installation manual

Nordpeis
Nordpeis Davos A Low installation manual

Dimplex
Dimplex FABER ALBANY ECO ABN15 ECO manual

Dru
Dru GLOBAL 55 CF installation instructions