Leisure bay spas Hilo User manual

SPA OWNER’SMANUAL
“Trend Setting Innovations Since 1973”
This Manual Contains
IMPORTANT SAFETY
INSTRUCTIONS
READ AND FOLLOW ALL INSTRUCTIONS
“SAVE THESE INSTRUCTIONS”
Hilo - Santo - Santo S - Tonga

SAFETY
IMPORTANT SPA SAFETY INSTRUCTIONS ................. 1, 2, 3
Important Safety Precautions .................................................. 2
Ground Fault Circuit Interrupter ............................................... 5
Safety Factors In Placement of Receptacle ............................ 5
SPA LOCATION
Selecting A Good Site .............................................................. 3
Site Load Bearing Requirements............................................. 3
Site Surface Requirements...................................................... 3
SPA WATER LEVELS
Filling Your Spa ........................................................................ 4
Draining Your Spa ................................................................... 4
Winterizing Your Spa ............................................................... 4
HILO & SANTO EQUIPMENT
All Electrical Wiring Must be Installed By A Certified Licensed
Electrician
NEMA 5-20 amp Receptacle ................................................... 5
Isolated, Dedicated 120 volt, 20 amp Circuit ........................... 5
Ground Fault Circuit Interrupter Plug................................... 5, 6
Conversion, 120 volt to 240 volt .................................... 8, 9, 10
240 volt 40 amp Circuit ............................................................ 9
240 volt, 30 amp Circuit ........................................................... 9
Control Console ..................................................................... 13
Additional Features ............................................................... 15
Display Messages ................................................................. 16
TABLE OF CONTENTS
HILO, SANTO, SANTO S AND TONGA
Cabinet Panels Installation / Removal ..................................... 7
SANTO S AND TONGA EQUIPMENT
All Electrical Wiring Must be Installed By A Certified Licensed
Electrician
Hard Wire Installation .............................................................11
Dip Switch Configuration ....................................................... 12
Control Console ..................................................................... 14
Additional Features ............................................................... 15
Display Messages ................................................................. 16
FILTERS
Skim Filter.............................................................................. 17
WATER PURIFICATION and MAINTENANCE
Recommended Schedule ...................................................... 18
pH .......................................................................................... 19
Total Alkalinity ........................................................................ 19
Calcium Hardness ................................................................. 19
Cleaning The Spa .................................................................. 19
Water Marks On Spa Shell .................................................... 19
Removing Tub Ring ............................................................... 19
Cleaning The Spa Cabinet .................................................... 19
WARNING SIGN MUST BE POSTED
An important WARNING sign is packed with your Leisure Bay Spa. This sign must be
posted in a prominent place in close proximity to the spa installation site immediately
upon completion of spa installation.
THIS WARNING SIGN MUST BE POSTED BEFORE THE SPA IS USED!
!WARNING
DURING PREGNANCY, SOAKING IN HOT WATER MAY CAUSE DAMAGE TO THE FETUS.
LIMIT USE TO 10 MINUTES AT A TIME.
PREVENT DROWNING
SPA HEAT SPEEDS UP EFFECTS OF ALCOHOL,
DRUGS, OR MEDICINE AND CAN CAUSE
UNCONSCIOUSNESS.
IMMEDIATELY LEAVE SPA IF
UNCOMFORTABLE OR SLEEPY.
PREVENT CHILD DROWNING
WATER ATTRACTS CHILDREN.
ALWAYS ATTACH A SPA COVER AFTER EACH
USE.
PL601035 Rev A

SAVE THESE INSTRUCTIONS
THIS SPA IS FOR RESIDENTIAL USE ONLY!
IMPORTANT SAFETY INSTRUCTIONS
When installing and using this electrical equipment, basic safety precautions should always be followed, including the following:
1. READ AND FOLLOW ALL INSTRUCTIONS
2. Warning
To reduce the risk of injury, do not permit children to use this product unless
they are closely supervised at all times.
3. A wire connector is provided on this unit to connect a minimum No. 8AWG
(8.4mm) solid copper conductor between this unit and any metal equipment,
metal enclosures of electrical equipment, metal water pipe, or conduit within
5 feet (1.5m) of the unit.
4. Danger Risk of Injury
(For cord and plug connected units)
A. Replace damaged cord immediately
B. Do not bury cord
C. Connect to a grounded, grounding type receptacle only.
4A. (For units with a G.F.C.I.)
WARNING - This product is provided with a Ground Fault Circuit Interrupter
“G.F.C.I.” on the end of the spa’s power cord. This G.F.C.I. must be tested
before each use. With the product operating depress the “test” button on
the G.F.C.I. The spa should not operate. Depress the “Reset” button on
the G.F.C.I. The product should now operate normally. If the spa fails to
operate in this manner, there is a ground current flowing indicating a possible
electric shock. Disconnect the power until the fault has been identified and
corrected by a certified licensed electrician.
5. Warning
FOR PERMANENTLYINSTALLED UNITS - The electrical supply for this
product must include a suitably rated switch or circuit breaker to open all
ungrounded supply conductors to comply with Section 442-20 of the
National Electric Code. ANSI / NFPA 70-1987. In addition, all 230 volt
installations must be protected by a 230 volt Ground Fault Circuit Interrupter
"G.F.C.I.". Any G.F.C.I. circuit breaker used in the house panel must read
current returning through the neutral conductor. 230 volt 2 conductor G.F.C.I.
circuit breakers will not operate correctly for your application.
6. Danger
Risk of Accidental Drowning. Extreme caution must be exercised to prevent
unauthorized access by children. To avoid accidents, ensure that children
cannot use this spa unless they are supervised at all times. For additional
protection, select a cover which is classified by the Underwriters
Laboratories Meeting ASTM F1346-91 requirements.
7. Danger
Risk of Injury. The suction fittings in this spa are sized to match the specific
water flow created by the pump. Should the need arise to replace the suction
fittings or the pump, be sure that the flow rates are compatible.
Never operate spa if suction fittings are broken or missing. Never replace
a suction fitting with one less than the flow rate marked on the original
suction fitting.
8. Danger
Risk of Electric Shock. Install at least 5 feet (1.5m) from all metal surfaces.
As an alternative, a spa may be installed within 5 feet (1.5m) of metal
surfaces if each metal surface is permanently connected by a minimum
No. 8AWG (8.4mm) solid copper conductor to the wire connector on the
terminal box that is provided for this purpose.
9. Danger
Risk of Electric Shock. Do not permit any electric appliance, such as light,
telephone, radio, or television, within 5 feet (1.5m) of a spa.
10. Warning To reduce risk of injury:
A. The water in a spa should never exceed 104°F (40°C). Water
temperatures between 100°F (38°C) and 104°F (40°C) are considered
safe for a healthy adult. Lower water temperatures are recommended
for your children and when spa use exceeds 10 minutes.
B. Since excessive water temperatures have high potential for fetal damage
during the early months of pregnancy, pregnant or possibly pregnant
women should limit spa water temperatures to 100°F (38°C).
C. Before entering spa, the user should measure the water temperature
with an accurate thermometer since the tolerance of water temperature-
regulating devices vary.
D. The use of alcohol, drugs, or medication before or during spa use may
lead to unconsciousness with the possibility of drowning.
E. Persons suffering from obesity or with a medical history of heart disease,
low or high blood pressure, circulatory system problems, or diabetes
should consult a physician before using a spa.
F. Persons using medication should consult a physician before using a
spa since some medication may induce drowsiness while other
medication may affect heart rate, blood pressure, and circulation.
11.Warning Sign
Included with this spa is a warning sign. It is extremely important that this
sign be permanently placed in clear view of any persons using the spa.
Occasional spa users may not be aware of some of the dangers hot water
poses to pregnant women, small children, and people under the influence
of alcohol, drugs or medication. If you did not receive a warning sign or
your sign has become damaged, please contact your spa dealer and ask
for sign number PL601035 Rev A.
1

1. Never permit the spa to be used unless it is attended
by at least one person other than the bather.
Someone should be present to lend assistance if the bather should be in
trouble due to injuries, cramps, drowning especially in case of children,
etc.
2. Always use care in and around your spa.
The spa has many rigid, unyielding parts and many areas that become wet
and slippery. These all are potentially dangerous when rough play is
permitted or if care is not used, particularly when entering or leaving the
spa.
3. Keep the water sanitary and healthful at all times.
Your filter system will remove suspended particles from the water. Regular
application of spa chemicals in proper quantities will destroy harmful bacteria
and prevent formation of algae. Your surface skimmer will remove insects,
leaves, and other debris from the water surface. Unsanitary water is a
serious health hazard.
4. The water in your spa should NOT be warmer than
100°F - 104°F (38° - 40°C).
Always keep an accurate thermometer in the water because your spa’s
thermostat may be in error. Use a high quality, shatterproof thermometer
with increments of one degree or less.
The National Spa and Pool Institute considers a temperature of 100°F
(38°C) safe and comfortable for a healthy adult. Most healthy adults can
enjoy this water temperature for as long as desired, although it may raise
the body temperature to the water temperature and eventually become
uncomfortable (like a fever). At higher water temperatures the soaking
time should be shorter. Never soak for more than 20 minutes when the
water temperature is 102°F (39°C) or higher. If you are planning a long
rest in the spa, lower the water temperature closer to normal body
temperature, about 99°F (37.2°C). Some people find even lower water
temperatures relaxing and pleasing. Try different water temperatures in
the 98°-102°F (36.6°-39°C) range until you find what temperatures suit
you best.
5. Hot water can raise the body temperature high
enough to cause heat stroke.
This can be fatal even to healthy adults. If you have any questions about
your own fitness or whether you should soak in the spa, check with your
physician.
6. Prolonged immersion in hot water may induce
hyperthermia.
Hyperthermia occurs when internal body temperature reaches a level
several degrees above the normal body temperature of 98.6°F (36.6°C).
The symptoms of hyperthermia include: (1) dizziness, (2) fainting, (3)
drowsiness, (4) lethargy and (5) increase in the internal body temperature.
The effects of hyperthermia include: (1) unawareness of impending hazard,
(2) failure to perceive heat, (3) failure to recognize the need to exit spa, (4)
physical inability to exit spa and (5) unconsciousness resulting in danger
of drowning.
7. WARNING-The use of alcohol, drugs or medication
can greatly increase the risk of fatal hyperthermia
in hot tubs or spas.
Despite the popular image of people in spas drinking wine or other alcoholic
beverages, DO NOT use alcoholic beverages before or during spa use.
Alcohol and certain drugs and medications, are depressants which cause
slowed reflexes and drowsiness, especially in conjunction with the relaxed
soaking in hot water. This can lead to sleep or unconsciousness and possibly
result in drowning. Using your spa with other people who are also drinking
or under the influence of drugs or medications is not a preventative measure
since they are likely to become similarly affected by the combinations of
alcohol, drugs or medication and hot water soaking.
Soaking in hot water causes changes in the circulatory system, such as
enlargement of blood vessels near the skin. Therefore, people with a
medical history of heart disease, circulatory problems, diabetes, low or
high blood pressure should check with their physician before using spas.
Additionally, people taking medications causing drowsiness, such as
tranquilizers, narcotics, antihistamines, or anticoagulants should not use
spas without asking their physician.
8. Broken or missing drain covers should be replaced
immediately.
Accidents can occur when long hair or a body part is trapped by suction
from a drain or outlet whose cover is broken or removed. Children are
particularly vulnerable, and they should be warned against danger.
Your spa can be a source of great pleasure. It offers healthful stimulating recreation and is a delightful fun
center for you, your family and friends. However, it contains large quantities of water and is deep enough to
present inherent dangers to life and health unless the following safety rules are strictly observed.
IMPORTANT SAFETY PRECAUTIONS
DO NOT :
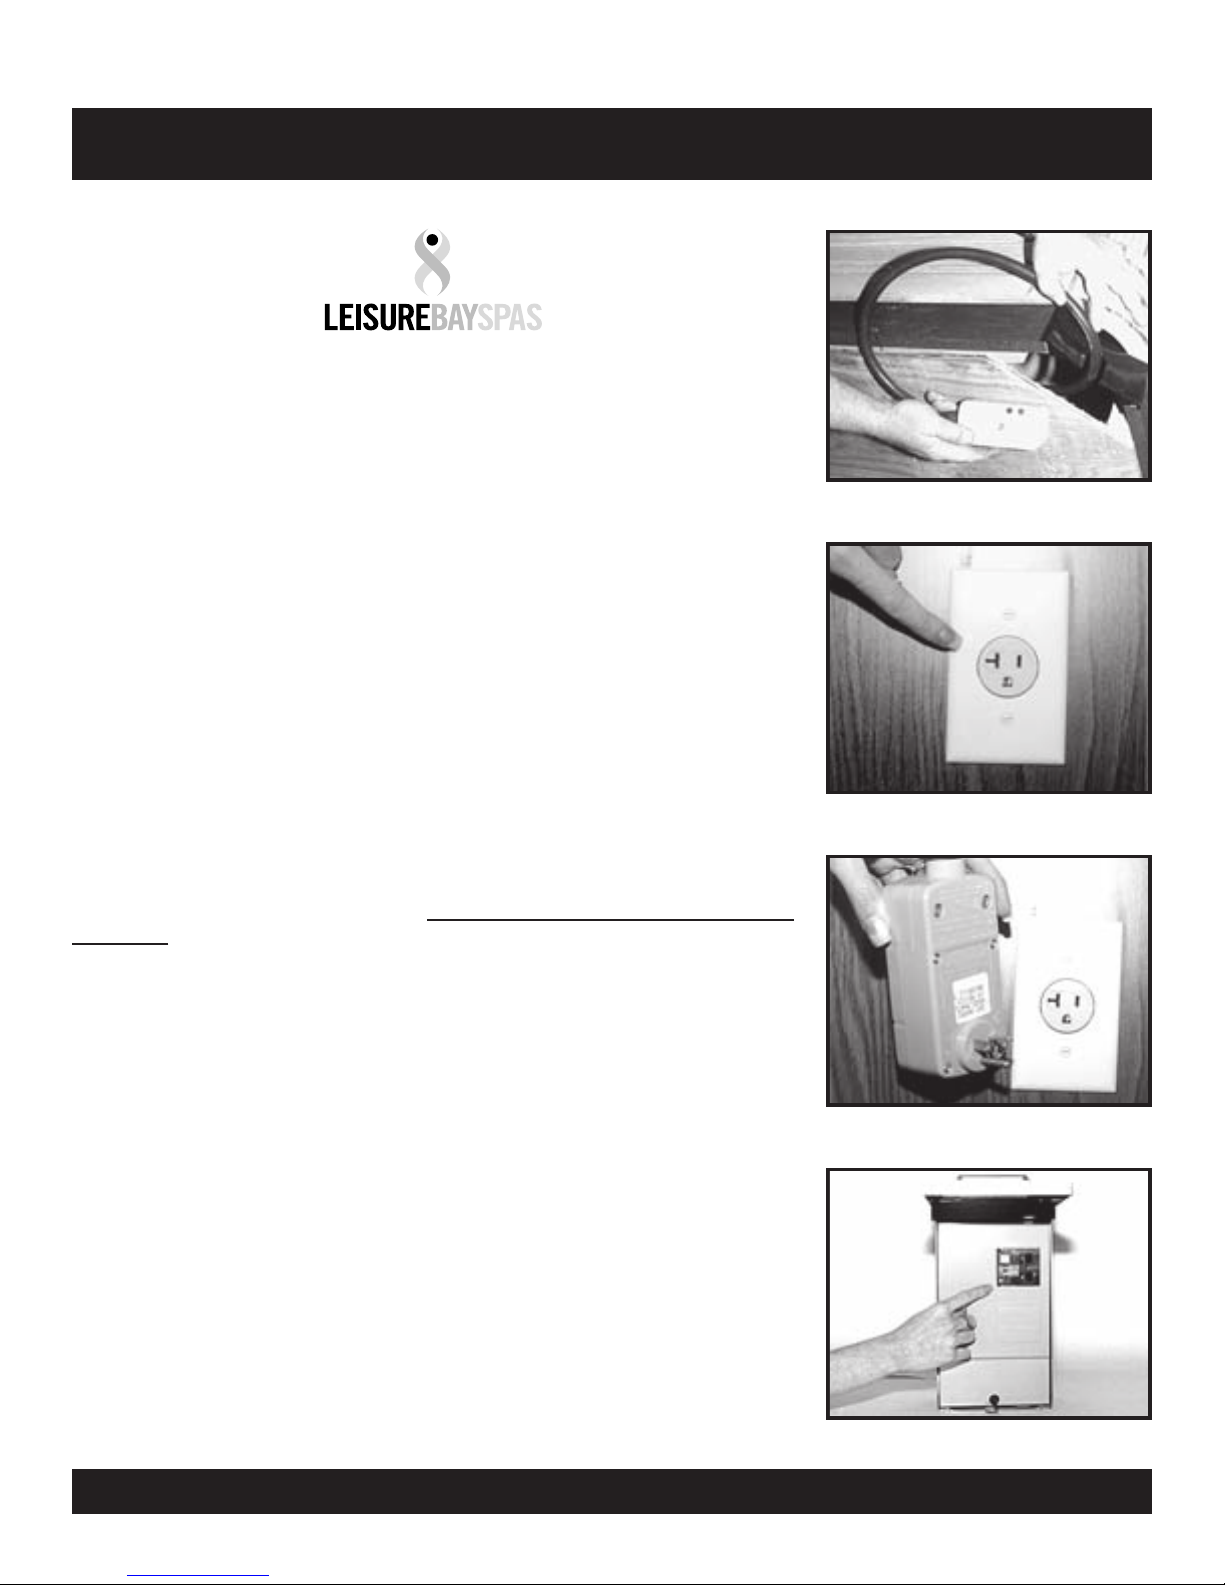
Do not use electrical appliances in or around your spa. Do not use glass or other breakable items in or around your
spa. Do not remove spa cabinet panels and attempt to make repairs. Do not attempt electrical repairs. Retain a
certified licensed electrician.
SAVE THESE INSTRUCTIONS
2

Selecting A Good Location
LEVEL, FLAT & SOLID LOAD BEARING SITE CRITICAL
Solid Load Bearing Site
The site must provide a solid foundation with a minimum load bearing capacity
of 135 pounds per square foot (61.23 kgr per 929.03 sq. cm). Concrete slabs
and decks must be designed to support this weight. Do not select a site composed
of individual unsupported bricks, blocks or other materials which will shift unevenly
and cause damage to your spa’s internal frame.
Site Selection...
Your new spa will provide you and yours with hour upon hour of healthy, relaxing enjoyment. The following suggestions and
recommendations will help you select a safe and compatible site for your spa, maximizing your enjoyment.
1. Certified Licensed Electrician Required
Electrical installation, (approval of and connection to power source) must
be completed by a qualified certified licensed electrician in compliance
with all codes.
2. No Overhead Power Lines
Do not locate your spa under overhead power lines or in near proximity to
existing buried or exposed electrical circuits. See your certified licensed
electrician.
READ ALL SAFETY INSTRUCTIONS!
See pages 1 and 2 for other safety requirements and instructions
3. Childproof Your Spa
Plan for limiting access of children. Precautions such as self closing and
locking gates or access doors, fencing and other child barriers, as dictated
by the site would be recommended.
4. UL Safety Cover Required
In addition to its insulating factors, a good cover also provides a measure
of additional protection from unwanted access. Select a cover which is
classified by the Underwriters Laboratories meeting ASTM F1346-91
requirements.
Level Site, Flat Surface
A level site is critical to both the performance and enjoyment of your spa. Water
is unforgiving and will always settle level. A flat and level site provides the surface
necessary to properly disperse weight between the footwell which bears most of
the spa’s weight and the structural frame which primarily provides stabilization
and secondary support. The importance of proper support for the footwell in
conjunction with the spa cabinet cannot be over stressed.
THE BULK OF YOUR SPA’S WEIGHT IS SUPPORTED BY THE FOOTWELL
Failure to provide support will result in damage to the spa’s shell and will void the shell warranty!
15%
WEIGHT
LOAD
70% OF THE SPA’SWEIGHT LOAD
15%
WEIGHT
LOAD
3
Solid, Level, Flat Surface Capable of Supporting 135 Pounds Per Sq. Ft.

CAUTION: Drain waste water may contain chemical residue and unsanitary contaminants which
could be a hazard to health or the environment. Drain to specified sanitary sewer only.
WARNING: DO NOT SUPPLY POWER TO AN EMPTY SPA!
FILLING YOUR SPA
Filling your spa is the first step in maintaining water quality
and chemical balance. Use only clear, uncontaminated
potable water when filling the spa.
When Filling the spa open all jets and air controls.
WINTERIZING YOUR SPA
Warning: Allowing the spa water to freeze will cause severe
damage to the spa shell, equipment, and plumbing.
A spa can be a great asset to your health and relaxation during the
winter months. However, for those who will be using a spa in freezing
cold weather it is critical that a water temperature be maintained well
above freezing.
Freeze Protection
Your Leisure Bay spa is equipped with a special feature called freeze
protection. If the high limit sensor detects 40°F (4°C) at the heater, then
all the equipment is automatically activated to provide freeze protection.
This equipment stays on until the sensor detects 45°F (7°C) at the heater.
WARNING: We strongly recommend that you inspect and test your spa
and controls on a daily basis during periods when temperatures are
below 32°F (0°C). Every installation is different and many factors
contribute to possible freeze damage situations; rate of temperature drop,
thermal cover insulating properties, thermal cover installation, spa
installation location, wind exposure, power outage, spa water temp., etc.
The spa’s freeze protection system is designed to protect your spa from
unforeseen freeze situations. However, in severe freeze conditions or if
you do not plan to use your spa for a period of time, it may be impossible
for the freeze protect system to fully protect your spa. When severe
conditions threaten, we strongly recommend that you have the unit
drained and winterized by a “Spa Professional.” Properly winterizing a
spa is a complicated process and should not be attempted by an amateur.
Water Level
The correct water fill level varies with each individual
installation. Every person entering a spa displaces a given
volume of water.
Suggested “Fill Range” Provided
A fill range label has been placed on the surface skimmer
face plate at the factory (see fig. 1). This label has a
suggested minimum and maximum fill level that will provide
a starting point for selecting a water level that meets your
individual needs.
Chemically Treat Water Immediately
To assure the maintenance of water quality, it is imperative
that you chemically threat the spa water immediately upon
completion of filling. See the treatment sections on pages
18 and 19.
fig. 1
4
DRAINING YOUR SPA
(Warning: Do not supply power to an empty spa!)
1. Turn Power Off
Turn power off at the spa consoles and deactivate disconnect
switches at the G.F.C.I. plug or load center.
2. Locate Spa Drain Valve
Located under the lower corner of the spa as you are facing the
console. See arrow.
Drain Every Three Months
Draining your spa on a regular basis rids the spa of dissolved solids and
protects your spa equipment from the effects of residual calcium hardness
and total alkalinity problems.
3. Remove Drain Valve Safety Cap
Remove safety drain cap (see figure 1) and store for use when refilling
your spa. Attach a standard garden hose to the drain valve.
4. Attach Hose & Select Safe Suitable Drain
Route the hose to a sewer drain capable of safely assimilating 300 plus
gallons of water which may contain both unsanitary contaminants and
chemical residue. To open drain valve twist counter clockwise and pull
(see figure 2).
Figure 1 Figure 2
TOCLOSE TOOPEN
PUSH PULL
TURN
TURN

ELECTRICAL DATA FOR THE USE OF CERTIFIED LICENSED ELECTRICIAN
WARNING: Shock Hazard! Under No Circumstances Should This Spa Be Installed By Anyone
Other Than A Certified Licensed Electrician!
All wiring MUST be in accordance with the National Electrical Code and all local codes.
WARNING: USE COPPER CONDUCTORS ONLY!
Ground fault interrupter plug & power cord
fished through arched corner of the spa
NEMA 5-20 20 amp Receptacle
G.F.C.I. Equipped Plug
Load Center
HILO AND SANTO CONVERTIBLE EQUIPMENT PACKAGE
This convertible equipment pack is designed to accept either
120 or 240 volt power input.
Your spa has a factory installed 120 volt power cord with a G.F.C.I. 20 amp configured plug connector
designed for use with a NEMA 5-20R receptacle. See below for further details. Conversion from the
standard 120 volt cord connection to a 240 volt hard wire connection must be completed by a certified
licensed electrician in accordance with the National Electrical Code and all local codes.
A G.F.C.I. MUST BE A INTEGRAL PART OF THE CONNECTION
The National Electrical Code requires that both 120 and 240 volt circuits be protected by a Ground
Fault Circuit Interrupter "G.F.C.I." and a Disconnect Switch: See National Electric Code Article 680-42
& 680-12
WARNING:
THIS G.F.C.I. PLUG PROVIDES GROUND FAULT PROTECTION FOR THE SPA
AND SHOULD NEVER BE REMOVED, ALTERED OR DISABLED FOR ANY
REASON!
This G.F.C.I. plug has one vertical and one horizontal blade in addition to a grounding prong. This plug
configuration is to be plugged into a like receptacle.
Under no circumstance should this configuration
be modified.
A NEMA 5-20R 20 AMP RECEPTACLE IS REQUIRED
A NEMA 5-20 amp receptacle is required for a power cord installation. This receptacle must be installed
in accordance with the National Electrical Code and all local codes.
ISOLATED, DEDICATED 120 VOLT, 20 AMP CIRCUIT IS REQUIRED
All 120 volt installations require an isolated, dedicated 120 volt circuit to provide the power necessary
for the proper operation of the electrical equipment.
SAFETY FACTORS IN PLACEMENT OF THE 20 AMP RECEPTACLE
Special consideration should be given to safety when selecting a location for the 20 amp receptacle.
The receptacle should be placed no closer than six (6) feet (1.8m) from the spa and in such a manner
as to be out of the way of traffic to and from the spa and normal foot traffic. The power cord should be
situated so it will not cause any other type of hazard.
WIRE SIZING MUST MEET ELECTRICAL CODES
All installations are different. Wire sizing must meet the National Electrical Code and all local code
specifications.
5

GROUND FAULT CIRCUIT INTERRUPTER
Your Leisure Bay Spa has a factory mounted power cord which is equipped with a Ground Fault
Circuit Interrupter “G.F.C.I.” built within the plug housing.
The G.F.C.I. has two mode buttons. The first is labeled “Test.” This button has a dual function. First it
acts as a disconnect switch. Depress this button and power to the spa is disconnected. The same
action is preformed to test the G.F.C.I. circuit.
The second button labeled “Reset” also has two functions. The “Reset” button is also the connect
(on) switch. Depressing the “Reset” button returns power to the spa equipment. This same button is
used to “Reset” the G.F.C.I. during a test cycle. See page 1 number 4A.
Should a G.F.C.I. circuit test fail immediately disconnect the power plug and contact a
certified licensed electrician to diagnose and correct the problem.
6

WARNING: Shock Hazard!
Spa Cabinet panels should be removed by qualified spa service professionals only!
Cabinet Panel Removal & Installation Instructions
(For Use By Qualified Professionals Only)
1. Remove and save
fastener from
corners.
7
2. Remove corner.
3. Locate bottom
center screw.
5. Remove side
bottom screws
leaving the center
one for last.
Remove center
screw while
supporting panel
in place
7. When Installing
the panel, ensure
that it is
completely
inserted in the top
channel. Then
follow the removal
steps in reverse
order.
4. Place a small
mark on the base
board below the
screw. This will
serve as a
reference point
during installation
6. After the center
screw is removed,
the panel will slide
down, then
remove panel.

ELECTRICAL DATA FOR THE USE OF CERTIFIED LICENSED ELECTRICIAN
WARNING: Shock Hazard! Under No Circumstances Should This Spa Be Installed By Anyone
Other Than A Certified Licensed Electrician!
All wiring MUST be in accordance with the National Electrical Code and all local codes.
WARNING: USE COPPER CONDUCTORS ONLY!
HILO AND SANTO CONTROL WIRING DIAGRAM
Conversion of the Equipment
The conversion of the equipment package from a factory installed 120 volt system to a hardwired 240 volt system must be completed by a certified
licensed electrician.
A G.F.C.I. AND A DISCONNECT SWITCH ARE REQUIRED
The National Electrical Code requires that spas connected to 240 volts circuits be equipped with a “G.F.C.I.” and Disconnect Switch. See National
Electric Code Articles 680-12 and 680-42.
LEISURE BAY’S SPAS ARE NOT EQUIPPED WITH A 240V G.F.C.I. OR A DISCONNECT SWITCH. A G.F.C.I. SHOULD BE
INSTALLED BY A CERTIFIED LICENSED ELECTRICIAN
OUTDOOR LOAD CENTER
The addition of an outdoor load center such as a Siemens W0408ML 1125 or equal must be added to the circuit. This type of load center provides both
a G.F.C.I. and Disconnect Switch in a convenient configuration as required by the National Electric Code.
(
See page 9 for suggested wiring configuration)
ISOLATED, DEDICATED 240 VOLT, 30 OR 40 AMP CIRCUITS ARE REQUIRED
An isolated, dedicated 240 volt, 30 or 40 amp circuit is required to provide the power necessary to properly operate the 240V equipment package.
PERMANENTLY HARD WIRED
All 240 volt operations wiring must be permanently hard wired, installed in grounded conduit and installed in compliance with the National Electrical
Code and all local codes.
WIRE SIZING MUST MEET ELECTRICAL CODES
All installations are different. Wire sizing must meet the National Electrical Code and all local code specifications.
See pages 9 & 10 for more conversion details.
8

ELECTRICAL DATA FOR THE USE OF CERTIFIED LICENSED ELECTRICIAN
WARNING: Shock Hazard! Under No Circumstances Should This Spa Be Installed By Anyone
Other Than A Certified Licensed Electrician!
All wiring MUST be in accordance with the National Electrical Code and all local codes.
•Terminal Block Torque field connections should be between 21 and 23 inch lbs.
•Readily accessible disconnecting means to be provided at time of installation.
• Connect only to a circuit protected by a Class A Ground Fault Circuit Interrupter “G.F.C.I.” mounted at least 6 feet (1.8m)
from the inside walls of the spa and in line of sight from the equipment compartment.
•Remove white wire from J11 to J32 and move key #10 to Off position for 40 amp configuration.
CONVERSION OF HILO AND SANTO FROM 120V TO 240V
120V Power Connection
Hilo and Santo
1Test Mode (normally off)
2Pump Time Out
In “ON” position, Pump turns off after 30 minutes
In “OFF” position, Pump turns off after 15 minutes
3Panel Option (must be OFF)
In “ON” position, enables mini panel
In “OFF” position, enables current panel
4Aux Freeze (must be OFF)
5Panel Button Layout (must be OFF)
In “ON” position, enables J/L/-/+/w/BLW/AUX
In “OFF” position, enables B/J/T/L or J/T/L
6Frequency (must be OFF)
In “ON” position, 50Hz operation
In “OFF” position, 60Hz operation
7Mode Changes (must be OFF)
In “ON” position, standard mode only
In “OFF” position, enables standard/economy/sleep
8Temperature Display
In “ON” position, temperature is displayed in degrees Celsius
In “OFF” position, temperature is displayed in degrees Fahrenheit
9Blower / Pump 2 Enable
In “ON” position, enables pump 2
In “OFF” position, disables pump 2
10 Amperage Setting
In “ON” position, for Low Amp service
In “OFF” position, for High Amp service
DIP SWITCH KEY
A grounding lug has been provided on the exterior of the pack chassis to allow connection
of a ground wire to a local grounding point to be establish in compliance with the National
Electric Code (NEC) and all local codes.
240V Power Connection
Hilo and Santo
9

REQUIRED WIRING FOR 240 VOLT INSTALLATION
Home Breaker Panel
GFCI Load Center
10

ELECTRICAL DATA FOR THE USE OF CERTIFIED LICENSED ELECTRICIAN
WARNING: Shock Hazard! Under No Circumstances Should This Spa Be Installed By Anyone
Other Than A Certified Licensed Electrician!
All wiring MUST be in accordance with the National Electrical Code and all local codes.
WARNING: USE COPPER CONDUCTORS ONLY!
TONGA AND SANTO S CONTROL WIRING DIAGRAM
WIRING SYSTEM MUST BE COMPLETED BY A CERTIFIED LICENSED ELECTRICIAN.
A G.F.C.I. AND A DISCONNECT SWITCH ARE REQUIRED.
The National Electrical Code requires that spas connected to 240 volt circuits be equipped with a G.F.C.I. and Disconnect Switch. See National Electric
Code Articles 680-12 and 680-42.
LEISURE BAY’S SPAS ARE NOT EQUIPPED WITH A 240V G.F.C.I. OR A DISCONNECT SWITCH. A G.F.C.I. SHOULD BE
INSTALLED BY A CERTIFIED LICENSED ELECTRICIAN
OUTDOOR LOAD CENTER PROVIDES BOTH
The addition of an outdoor load center such as a Siemens W0408ML 1125 or equal must be added to the circuit. This type of load center provides both
a G.F.C.I. and Disconnect Switch in a convenient configuration as required by the National Electric Code.
ISOLATED, DEDICATED 240 VOLT, 40 OR 50 AMP CIRCUITS ARE REQUIRED
An isolated, dedicated 240 volt, 40 or 50 amp circuit is required to provide the power necessary to properly operate the 240V equipment package.
PERMANENTLY HARD WIRED
All 240 volt operations wiring must be permanently hard wired and installed in grounded conduit and installed in compliance with the National Electrical
Code and all local codes.
WIRE SIZING MUST MEET ELECTRICAL CODES
All installations are different. Wire sizing must meet the National Electrical Code and all local code specifications.
11

Tonga and Santo S Factory Set
ELECTRICAL DATA FOR THE USE OF CERTIFIED LICENSED ELECTRICIAN
WARNING: Shock Hazard! Under No Circumstances Should This Spa Be Installed By Anyone
Other Than A Certified Licensed Electrician!
All wiring MUST be in accordance with the National Electrical Code and all local codes.
TONGA AND SANTO S DIP SWITCH CONFIGURATION
DIP SWITCH KEY
A grounding lug has been provided on the exterior of the pack chassis to allow connection of a ground wire to a local
grounding point to be establish in compliance with the National Electric Code (NEC) and all local codes.
1Test Mode (normally off)
2Pump Time Out
In “ON” position, Pump turns off after 30 minutes
In “OFF” position, Pump turns off after 15 minutes
3Panel Option (must be OFF)
In “ON” position, enables mini panel
In “OFF” position, enables current panel
4Aux Freeze (must be OFF)
5Panel Button Layout (must be OFF)
In “ON” position, enables J/L/-/+/w/BLW/AUX
In “OFF” position, enables B/J/T/L or J/T/L
6Frequency (must be OFF)
In “ON” position, 50Hz operation
In “OFF” position, 60Hz operation
7Mode Changes (must be OFF)
In “ON” position, standard mode only
In “OFF” position, enables standard/economy/sleep
8Temperature Display
In “ON” position, temperature is displayed in degrees Celsius
In “OFF” position, temperature is displayed in degrees Fahrenheit
9Blower / Pump 2 Enable
In “ON” position, enables pump 2
In “OFF” position, disables pump 2
10 Amperage Setting
In “ON” position, for Low Amp service
In “OFF” position, for High Amp service
12

Personal Comfort Control Console
The Leisure Bay Personal Comfort Control Console is your direct link to the most sophisticated solid state spa control center available. With a simple
touch of the finger you can select any spa’s functions from turning on the lights to powering up the jets. This state of the art control console allows
you to program the spa’s various operating functions to suit your individual needs by following the user friendly directions which follow. Should you
have any questions regarding operations please contact your local Leisure Bay dealer.
WARNING: SHOCK HAZARD! NO USER SERVICEABLE PARTS. Do not attempt service of this control. Contact your dealer or service center
for assistance. Follow all owner’s manual power connection instructions. Installation must be performed by a certified licensed
electrician and all grounding connections must be properly installed.
Hilo & Santo Control
Initial Start-Up
When your spa is first activated, it will perform a self diagnostics test
showing a series of numbers followed by Pr, then by – along with the
low speed pump. Also the internal clock that keeps track of the
filtration cycles every 12 hours will start at that point. The system is
preset to heart up to 100°F and it is also preset to run on low speed
for two hours. (F2)
Temperature Adjustment 70°-104°F
When the temp pad is touched once, the LCD will flash and
display the temperature which has been set. While flashing, press
the temp pad again to increase or decrease the temperature. For the
opposite temp. setting wait until LCD stops flashing, then press the
temp pad again to change. The temperature will change in 1°F
increments.After 5 seconds, the LCD automatically display the current
spa temperature.
Jets
Press the pad to turn the pump on and off. If left running, the
pump will automatically turn off after 30 minutes, (Factory preset).
For 15 minutes, see page 9 for dip switch settings.
Light
Press the pad to turn the spa light on and off. If the light is left
on, it will automatically turn off in 4 hours.
Freeze Protection
If the high-limit sensor detects 44°F at the heater, then the equipment
is automatically activated to provide freeze protection.This is a normal
spa function; no corrective action is necessary. The equipment stays
on until the sensor detects 45°F at the heater. Freeze protection is
enabled regardless of the spa’s status.
Standby Mode
The spa can be disabled when the filter needs to be replaced. To place
the system in standby mode, press the pad then the pad
and the display will show “SY”. All spa functions are disabled except
for freeze control. Press any panel button to resume spa operation.
Spa Water Maintenance
This function enables you to program the amount of water filtration
and (ozone purification “optional”) time.
Press the then the to enter the programing mode. Once in
the programing mode press to select the filtration time. Once
selected, press the button to exit the programing.
(F2) In this mode the water will be filtered for 2 hours every 12 hours.
(F4) In this mode the water will be filtered for 4 hours every 12 hours.
(F6) In this mode the water will be filtered for 6 hours every 12 hours.
(FC) In this mode the water will be filtered continuously.
FOR ADDITIONAL FEATURES (see page 15)
Display Messages (see page 16)
13
LIGHT
MODE
TEMP DISPLAY
TEMP UP & DOWN
PUMP

Personal Comfort Control Console
The Leisure Bay Personal Comfort Control Console is your direct link to the most sophisticated solid state spa control center available. With a simple
touch of the finger you can select any spa’s functions from turning on the lights to powering up the jets. This state of the art control console allows you
to program the spa’s various operating functions to suit your individual needs by following the user friendly directions which follow. Should you have any
questions regarding operations please contact your local Leisure Bay dealer.
WARNING: SHOCK HAZARD! NO USER SERVICEABLE PARTS. Do not attempt service of this control. Contact your dealer or service
center for assistance. Follow all owner’s manual power connection instructions. Installation must be performed by a certified licensed
electrician and all grounding connections must be properly installed.
Tonga & Santo S Control
Initial Start-Up
When your spa is first activated, it will perform a self diagnostics test
showing a series of numbers followed by Pr, then by – along with the
low speed pump. Also the internal clock that keeps track of the
filtration cycles every 12 hours will start at that point. The system is
preset to heart up to 100°F and it is also preset to run on low speed
for two hours. (F2)
Temperature Adjustment 70°-104°F
When the temp pad is touched once, the LCD will flash and
display the temperature which has been set. While flashing, press
the temp pad again to increase or decrease the temperature. For the
opposite temp. setting wait until LCD stops flashing, then press the
temp pad again to change. The temperature will change in 1°F
increments.After 5 seconds, the LCD automatically display the current
spa temperature.
Jets
Press the pad to turn pump 1 and press pad to turn pump
2 (Tonga Model Only) on and off. If left running, the pump will
automatically turn off after 30 minutes, (Factory preset). For 15
minutes, see page 12 for dip switch settings.
Light
Press the pad to turn the spa light on and off. If the light is left
on, it will automatically turn off in 4 hours.
Freeze Protection
If the high-limit sensor detects 44°F at the heater, then the equipment
is automatically activated to provide freeze protection.This is a normal
spa function; no corrective action is necessary. The equipment stays
on until the sensor detects 45°F at the heater. Freeze protection is
enabled regardless of the spa’s status.
Standby Mode
The spa can be disabled when the filter needs to be replaced. To place
the system in standby mode, press the pad then the pad
and the display will show “SY”. All spa functions are disabled except
for freeze control. Press any panel button to resume spa operation.
Spa Water Maintenance
This function enables you to program the amount of water filtration
and (ozone purification “optional”) time.
Press the then the to enter the programing mode. Once in
the programing mode press to select the filtration time. Once
selected, press the button to exit the programing.
(F2) In this mode the water will be filtered for 2 hours every 12 hours.
(F4) In this mode the water will be filtered for 4 hours every 12 hours.
(F6) In this mode the water will be filtered for 6 hours every 12 hours.
(FC) In this mode the water will be filtered continuously.
FOR ADDITIONAL FEATURES (see page 15)
Display Messages (see page 16)
14
LIGHT
TONGA PUMP 2 / MODE
(MODE BUTTON ONLY FOR
SANTO S)
TEMP DISPLAY
TEMP UP & DOWN
PUMP 1

Additional Features
Spa Heating Modes
The Heating Mode offers the ability to control your heater in special circumstances. Your spa is preset at the factory to
Standard Mode. However, the Heating Mode can be changed to Economy or Sleep by pressing the then
button. With each press of the buttons, the display will cycle through the three different modes described below:
1. Standard Mode (
ST
): Your spa is preset to this mode. This mode operates the heater whenever needed to maintain
the programmed spa water temperature. (See Temperature Adjustment).
2. Economy Mode (
EC
): This mode operates the heater only during programmed Heating Cycles (See “Setting Heating
Cycles” below). This mode is ideal for areas that charge a premium for electricity during peak
hours. This mode will maintain the thermostat setting. If it does not reach the thermostat
setting, you may have to allow for more heating time by increasing the Heating Cycles.
3. Sleep Mode (
SL
): This mode works in the same manner as the Economy Mode except the thermostat setting is
automatically lowered by 20 degrees. This mode is best suited for extended leaves from home
when it is not important to maintain constant water temperature, such as vacations or business
trips.
Summer Set Temperature
In hot weather, it is possible for water temperature to exceed the temperature setting. This is especially common when
your temperature setting is lower than air temperature. If the water temperature exceeds the temperature setting more
than 3°, an automatic safety circuit will turn off all of the electrical systems. The systems will remain off until either the water
temperature cools to below the setting, or the setting is increased above the water temperature.
15

Display Messages
ACTION REQUIRED
The control panel will be disabled until power returns. Spa settings
will be preserved until next power up.
After the pump has been running for 2 minutes, the temperature will
be displayed.
DO NOT ENTER THE WATER. Remove the spa cover and allow water
to cool. Once the heater has cooled, reset by pushing any button. If
spa does not reset, shut off the power to the spa and call your dealer
or service organization.
DO NOT ENTER THE WATER. Remove the spa cover and allow water
to cool. At 107°F, the spa should automatically reset. If spa does not
reset, shut off the power to the spa and call your dealer or service
organization.
No action required. The pump and blower automatically will activate
regardless of spa status.
If the problem persists, contact your dealer or service organization.
(May appear temporarily in an overheat situation and disappear when
the heater cools.)
If the problem persists, contact your dealer or service organization.
(May appear temporarily in an overheat situation and disappear when
the heater cools.)
If the problem persists, contact your dealer or service organization.
Check water level in spa. Refill if necessary. If the water level is okay,
make sure the pumps have been primed. If problem persists, contact
your dealer or service organization.
Follow action required for "HL" message. Heating capability of the
spa will not reset automatically; you may press any button to reset.
Check water level in spa. Refill if necessary. If water level is okay,
make sure the pumps have been primed. Press any button to reset,
or this message automatically will reset within 15 minutes. If problem
persists, contact your dealer or service organization.
Follow action required for "dr" message. Spa will not automatically
reset. Press any button to reset.
MEANING
No message on display.
Power has been cut off to the spa.
Temperature unknown.
"Overheat" - The spa has shut down. One of the sensors
has detected 118°F at the heater.
"Overheat" - The spa has shut down. One of the sensors
has detected that the spa water is 110°F.
"Ice" - Potential freeze condition detected.
Spa is shut down. The sensor that is plugged into the
Sensor "A" jack is not working.
Spa is shut down. The sensor that is plugged into the
Sensor "B" jack is not working.
Sensors are out of balance. If alternating with spa
temperature, it may just be a temporary condition. If
flashing by itself, spa is shut down.
A significant difference between temperature sensors has
been detected. This could indicate a flow problem.
Persistent low flow problems. (Displays on the fifth
occurrence of "HL" message within 24 hours.) Heater is
shut down, but other spa functions continue to run
normally.
Possible inadequate water, poor flow, or air bubbles in
detected in the heater. Spa is shut down for 15 minutes.
Inadequate water detected in heater. (Displays on third
occurrence of "dr" message.) Spa is shut down.
MESSAGE
--
HH
OH
IC
SA
SY
Sn
HL
LF
dr
dY
16

17
Skim Filter
CLEANING YOUR SPA FILTER
Proper care and cleaning of your spa filter is very important
to the enjoyment of your spa. The filter is designed to remove
emerged debris and contaminants, providing clear clean
water for the bather. The most important maintenance step
is to establish a cleaning routine to fit your use pattern. Heavy
use and introduction of contaminants such as oily body lotions
could mean cleaning on a weekly basis while average use
might require only monthly cleaning.
1. Activate the standby mode or turn off electrical power. Remove
filter cover and set aside.
2. To remove floating weir and basket rotate it a 1/4 turn counter
clockwise.
3. Remove the floating weir and basket. 4. Remove filter cartridge and wash it with a garden hose inside and
out until the cartridge is clean. Reinsert the filter and follow the
steps in the reverse sequence.
NOTE:
1. Body oils, algae, and suntan oil can form a coating on the spa filter cartridge pleats which may not be thoroughly removed by the garden hose. To
remove such substances, soak the filter in a solution of filter cleaner. Various brands of such cleaners are readily available at your local dealer.
2. Improper spa filter maintenance will alter the spa sensing device on your spa. This will lead to faulty heater and or pump operation. But generally,
cleaning or replacing the filter cartridge regularly will remedy this situation.

You Deserve Pure, Crystal Clear Water
Pure, crystal clear water is part of the reward you receive for owning your very own spa. Maintaining water quality is a simple matter when a
Use/Maintenance Routine is established early on in ownership.
Use/Maintenance Routine
The tasks required to maintain superior water quality are divided into two categories, Regular and Special. “Regular” tasks include those that should be
routinely performed regardless of use pattern. For example, the spa filter should be cleaned at a minimum monthly, even if the spa is used only
occasionally. “Special” tasks are those performed to compensate for increased spa use. For example, the filter on a spa that has experienced a heavy
bather load resulting from vacation time and visiting friends or relatives might need cleaning on a weekly basis or more. Planning and establishing a
routine of Regular and Special maintenance as required by time and bather load will significantly simplify your spa maintenance.
Starting Point For Developing A Use/Maintenance Routine
No hard set rules can be established for creation of a spa maintenance program since each individual spa has its own unique location conditions and
bather patterns. The following chart of regular and special maintenance tasks is meant to provide a starting point. Water testing and experience will be
the final indicators of what your routine should be.
LIGHT USAGE AVERAGE USAGE ABOVE AVG. USAGE HEAVY USAGE
Test & Adjust pH (7.2-7.8 Range) Weekly Twice Weekly Thrice Weekly Daily
Test & Maintain Bromine (3.0-5.0 ppm) Weekly Twice Weekly Daily Daily
Vacuum Spa Monthly Twice Monthly Thrice Monthly Weekly
Clean Spa Shell Water Line Weekly Weekly Twice Weekly Daily
Clean Spa Filter Monthly Twice Monthly Twice Monthly Weekly
Test & Maintain Alkalinity Bi-Weekly Weekly Twice Weekly Twice Weekly
Add “Non Chlorine Shock” Weekly As Required
Test & Maintain Calcium Hardness Weekly Weekly Weekly Weekly
Clean Cartridge with Chemical Cleaner Quarterly Monthly Twice Monthly As Required
ALWAYS FOLLOW THE MANUFACTURERS DIRECTIONS & INSTRUCTIONS ON THE CHEMICAL CONTAINER’S LABEL
IMPROPER WATER BALANCE WILL DAMAGE YOUR SPA’S SHELL & EQUIPMENT
Water Purification & Maintenance
18
This manual suits for next models
6
Table of contents
Other Leisure bay spas Hot Tub manuals
Popular Hot Tub manuals by other brands

Jacuzzi
Jacuzzi J-300 Series Instructions for preinstallation

Vita Spa
Vita Spa M15 Series instructions

Jacuzzi
Jacuzzi J-400 Series Instructions for preinstallation

Whitehall
Whitehall E-27-S Instructions for operation and care

Wellis
Wellis Venus Setup instructions

Dimension One Spas
Dimension One Spas Home Series owner's guide

Dimension One Spas
Dimension One Spas Aqua Fit 16 Specifications

AQUATHERMA
AQUATHERMA Nature Series owner's manual

Comfort
Comfort AiriSpa DS1oval110v owner's manual

Koriks
Koriks 800 L User and maintenance manual

Jacuzzi
Jacuzzi Opalia 9635 Specification sheet

Saratoga Spa
Saratoga Spa LUXURY SERIES owner's manual