manuals.online logo
Brands
  1. Home
  2. •
  3. Brands
  4. •
  5. Leisure Sinks
  6. •
  7. Plumbing Product
  8. •
  9. Leisure Sinks GEMINI Installation guide

Leisure Sinks GEMINI Installation guide

05/04 1818
EINBAUANLEITUNG
GEMINI SPÜLE
HINWEIS:
Beim Einbau ist darauf zu achten, daß die Spüle nicht
durch Scheuern oder Kratzen beschädigt wird. Die an
die Spüle angeschlossenen Leitungen und Armaturen
möglichst nicht verschmutzen und nicht übermäßig,
fest verschrauben. Der Installateur sollte sorgfältigst
kontrollieren, ob Deckleiste und Kanten der Spüle voll-
kommen waagerecht sind, damit das Wasser von der
Ablauffläche abfließen kann.
BITTE VOR EINBAU DER SPÜLE AUFMERKSAM LE-
SEN.
VORBEREITUNG DER
ARBEITSPLATTE
1. Es empfiehlt sich, die Einbauspüle zuerst in die
Arbeitsplatte einzulassen und dann erst dauerhaft
am Unterschrank zu befestigen.
2. Drehen Sie die Spüle um und legen Sie sie in der
gewünschten Einbaulage auf die Arbeitsplatte.Dabei
daraul achten, daß die Spüle und dazugehörigen
Teile nicht ans Gestell des Unterschranks anstoßen.
Dann zeichnen Sie die Umrisse der Spüle mit einem
angespitzten weichen Bleistift möglichst genau
nach.
3. Die markierte Fläche mit einem möglichst großen
Bohrer anbohren und dann mit einer Stichsäge,
Lochsäge o.a. aussägen. Wir
empfehlen, die Schnittkante der
Arbeitsplatte jetzt abzudichten.
Dazu die Kante mit PVAKleber
oder Lack bestreichen bzw.
Silikondichtmasse auftragen.
EINBAU DER SPULE
1. Silikon-Dichtungsmasse (keine
Beistellung) an der Unterseite des
Waschbeckenrandes auftragen,
siehe Abb. 1.
2. Spüle in die Ausnehmung
einstezen.
3. Die Befestigungsklemmen, wie
auf Seite 5 in Abb. 2 dargestellt,
spannen. Darauf achten, daß die
Schaumstoffdichtung so fest wie
möglich zusammengedrückt ist,
die Klemmen jedoch nicht zu fest
anziehen.
4. Uberflüssige Silikon-
Dichtungsmasse and der
Waschbeckenkante mit einem
feuchten Tuch abswischen.
5. Heiß-und Kaltwasserleitung an
den Wasserhahn anschließen.
INSTALLATION DETAILS
GEMINI SINKS
NOTE:
During installation care should be taken to ensure the
sink is protected from scuffs and scratches. Straining
and overtightening of all plumbing fixtures connected to
the sink should be avoided. Installers should carefully
check that the moulding and edges of the sink are dead
level so that water will flow off the drainer.
PLEASE READ THOROUGHLY BEFORE ATTEMPT-
ING TO INSTALL SINK.
PREPARING THE WORKTOP
1. It is recommended that the inset sink is fitted to
the worktop before being permanently fixed to the
cabinet.
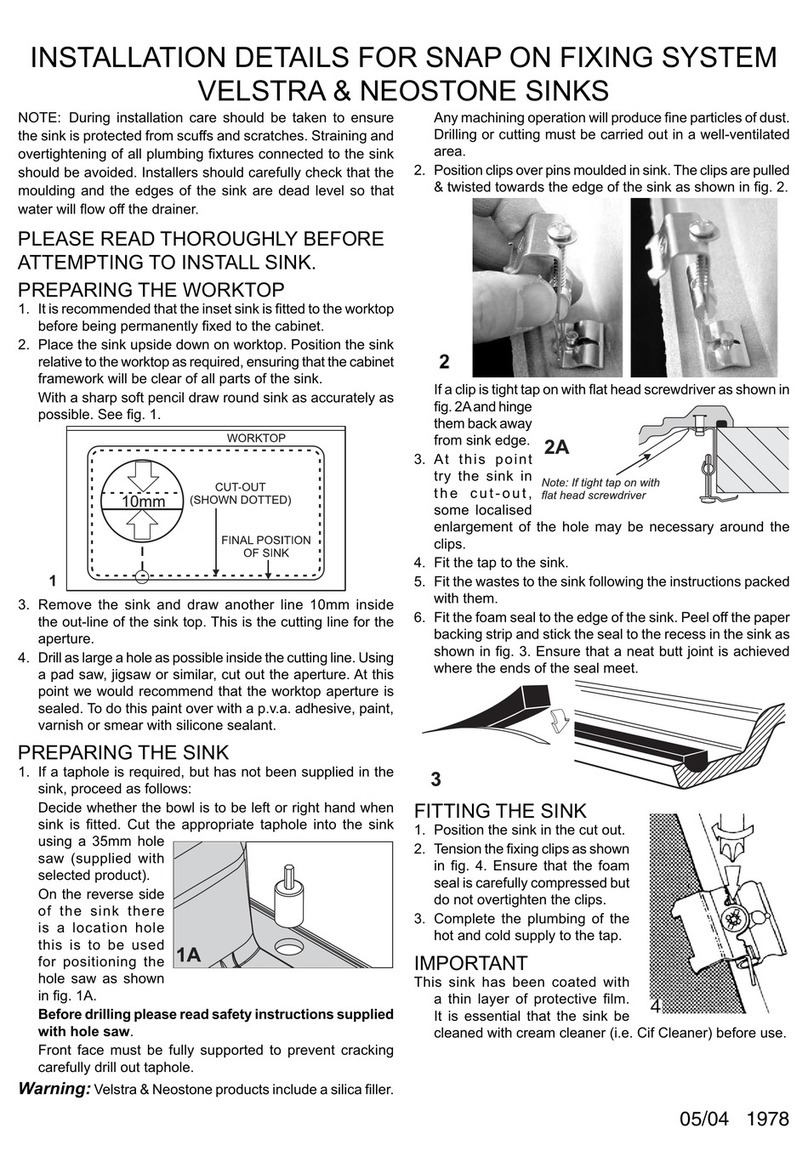
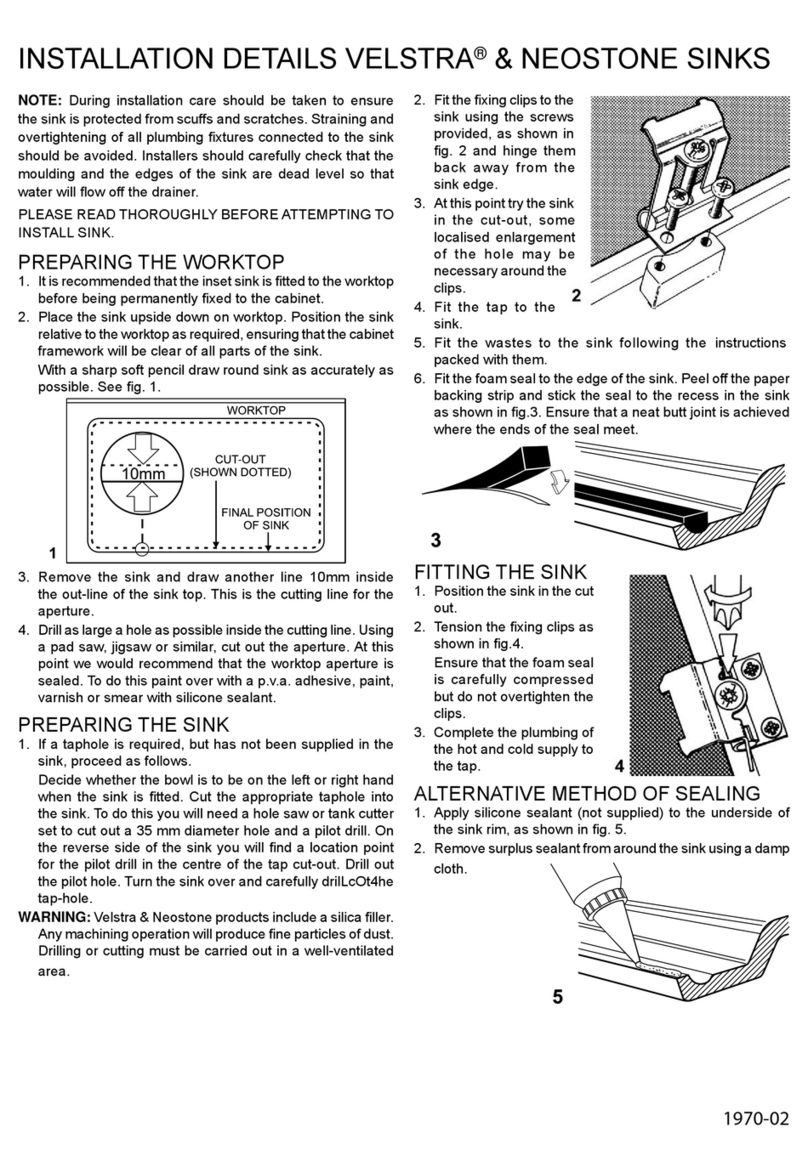
2. Position the cut-out template on the worktop as
required, ensuring that the cabinet framework will be
clear of all parts of the sink. With a sharp, soft pencil
draw round the template as accurately as possible.
3. Drill as large a hole as possible inside the cutting
line. Using a pad saw, jig saw or similar, cut out the
aperture. At this point, we would recommend that the
worktop aperture is sealed. To do this paint over with
a p.v.a. adhesive, paint, varnish or smear with silicone
sealant.
FITTING THE SINK
1. Apply silicone sealant (not supplied)
to the underside of the sink rim, as
shown in fig. 1.
2. Position the sink in the cut-out.
3. Tension the fixing clips as shown in
fig. 2. Do not overtighten the clips.
4. Remove surplus sealant from
around the sink using a damp
cloth.
5. Complete the plumbing of the hot
and cold supply to the tap.
05/04 1818
GEMINI - PFLEGE
TAGLICHE PFLEGE
Wir empfehlen eine routinemäßige Reinigung Ihrer Gemini-
Spüle, damit sie immer in tadellosem Zustand bleibt. Nach
Gebrauch wischen Sie Ablauffläche und Becken mit einem
weichen, mit Seifenlauge angefeuchteten Tuch ab und spü-
len mit klarem Wasser nach. In Gebieten mit hartem Wasser
können Sie durch Anwendung einer Scheuermilch verhin-
dern, daß es zu Wasserflecken bzw. Ablagerungen kommt.
VERFARBUNGEN UND HARTNACKIGE
FLECKEN
Mitunter entdecken Sie vielleicht Flecken auf der Velstra Ab-
lauffläche oder in den Edelstahlbecken. Mögliche Ursachen
für solche Flecke sind:
Eine Ablagerung von im Wasser enthaltenen Stoffen (Kalk),
die sich auf Edelstahl zunächst oft als Regenbogeneffekt be-
merkbar macht
Korrosion von Metallgegenständen wie Kochgeräten
Nahrungsmittel und Flüssigkeiten wie Kaffee und Tee
Versehentliche Verunreinigungen, z.B. durch Schuhcreme
VORSICHT!
Es gibt Haushaltsprodukte, die Velstra zwar nicht schaden,
jedoch Edelstahl angreifen und deshalb zu meiden sind. Da-
bei handelt es sich um:
BLEICHMITTEL - fast alle gängigen Bleichmittel enthal-
ten Chlor in Form von Hypochlorit. Chlor greift den hauch-
dünnen Chromoxidfilm auf der Oberfläche an und kann zu
Lochfraß führen.
SILBERTAUCHBAD - Reiniger dieser Art sind besonders
schädlich für Velstra und Edelstahl, weil sie starke Säuren
enthalten, die Verfärbung und Lochfraß verursachen kön-
nen.
AGGRESSIVE NAHRUNGSMITTEL - Obstsäfte,
feuchtes Salz, Essig, Senf, und Mayonnaise können bei län-
gerem Kontakt mit Edelstahl Lochfraß und Korrosion verur-
sachen.
SAUREN - Schwefelsäure, Salzsäure und andere starke
Säuren führen zu Lochfraß, ebenso auch Fotoentwickler.
FALLS EINES DER OBIGEN MITTEL MIT
IHRER SPULE IN BERUHRUNG KOMMT, BITTE
SOFORT MIT REICHLICH KLAREM WASSER
ABSPULEN.
BEHANDLUNG VON VERFARBUNGEN UND
HARTNACKIGEN FLECKEN
Verwenden Sie stets ein weiches Tuch. Grobe Scheuerpulver
oder Reinigungskissen aus Stahlwolle können die Ablaufflä-
che und die Edelstahlbecken Ihrer Spüle zerkratzen.
Die meisten Flecken lassen sich durch kräftiges Abreiben mit
einem weichen Tuch und Scheuermilch oder unverdünntem
Spülmittel entfernen. Kalkflecken behandeln Sie am besten
mit einem handelsüblichen Kalkentferner. Halten Sie sich
stets an die Anweisungen des Herstellers und lassen sie kei-
ne nassen Reinigungstücher o.ä. auf der Spüle liegen.
KRATZER VERHINDERN
Wir raten davon ab, in einer Edelstahlspüle Spülschüsseln
aus Plastik ohne Kunststoffunterlage zu verwenden.
GEMINI - AFTER CARE
DAY TO DAY CARE
Routine cleaning of your Gemini sink is recommended to
keep your sink looking in pristine condition. After use wipe
the surface of the drainer and the bowls with a soft, damp,
soapy cloth, and rinse with clean water. In hard water areas,
an application of a cream cleaner such as Jif will avoid any
build-up of waterborne deposits.
DISCOLOURATION AND HEAVY STAINING
From time to time you may find stains appearing on the
Velstra draining board or in the stainless steel bowls. Such
stains can
be the result of:
A build-up of waterborne deposits (limescale), often seen ini-
tially as a rainbow effect on stainless steel
Corrosion from metal objects such as cooking utensils
Foodstuffs and liquids such as coffee and tea
Spilt materials such as shoe polish
CAUTION
Certain household products while not harmful to Velstra con-
tain substances which will attack stainless steel and should
therefore be avoided. These are:
BLEACHES - most common bleaches contain Chlorine in
the form of a hypochlorite. Chlorine attacks the microscopic
Chromium Oxide film on the surface and can cause pitting.
SILVER DIP CLEANERS - these are particularly harmful
to both Velstra and stainless steel since they contain strong
acids which can cause discolouration and pitting.
CORROSIVE FOODSTUFFS - fruit juices, damp salt,
vinegar, ready-made mustards, pickle and mayonnaise can
cause pitting and corrosion if left in contact with stainless
steel for long periods.
ACIDS - sulphuric, hydrochloric and other strong acids will
cause pitting corrosion as will photographic developing solu-
tion.
IF ANY OF THE ABOVE COME INTO CONTACT
WITH YOUR SINK, THEY SHOULD BE
IMMEDIATELY RINSED OFF WITH PLENTY OF
CLEAN WATER.
DEALING WITH DISCOLOURATION AND
HEAVY STAINING
Always use a soft cloth.The use of course grit scouring pow-
ders or soap-filled wire wool cleaning pads can scratch the
surface of both the draining board and your stainless steel
bowls.
Vigorous rubbing with a soft cloth using a cream cleaner or
neat detergent will remove most stains. Limescale is best re-
moved using a proprietary limescale remover.
Always refer to manufacturer’s instructions and remove wet
cleaning aids i.e. cloths from the sink after cleaning.

Other Leisure Sinks Plumbing Product manuals

Leisure Sinks Velstra Installation guide

Leisure Sinks

Leisure Sinks Velstra Installation guide

Leisure Sinks Velstra Installation guide

Leisure Sinks

Leisure Sinks Velstra Installation guide

Popular Plumbing Product manuals by other brands

Axor Montreux 16534XX1 Specification sheet

Axor

Axor Montreux 16534XX1 Specification sheet

American Standard Afwall Elongated Toilet Flush Valve Toilet... Specification sheet

American Standard

American Standard Afwall Elongated Toilet Flush Valve Toilet... Specification sheet

American Standard Bath/Shower Trim Kit T028.50X installation instructions

American Standard

American Standard Bath/Shower Trim Kit T028.50X installation instructions

URIMAT 12.201 Installation instruction

URIMAT

URIMAT 12.201 Installation instruction

baliv WT-190 manual

baliv

baliv WT-190 manual

Sanela SLZN 83E3 Instructions for use

Sanela

Sanela SLZN 83E3 Instructions for use

miseno MNO601CH manual

miseno

miseno MNO601CH manual

Alape WT.RS450H installation instructions

Alape

Alape WT.RS450H installation instructions

Maxxus MX-J306-01 instruction manual

Maxxus

Maxxus MX-J306-01 instruction manual

Brizo RP37762 Series Installation

Brizo

Brizo RP37762 Series Installation

Howdens Lamona TAP1118 manual

Howdens

Howdens Lamona TAP1118 manual

Ideal-Standard Ceratherm C100 A7537AA installation instructions

Ideal-Standard

Ideal-Standard Ceratherm C100 A7537AA installation instructions

Spirax Sarco FT44 Installation and maintenance instructions

Spirax Sarco

Spirax Sarco FT44 Installation and maintenance instructions

Xylem McDonnell & Miller Uni-Match WF2 Series instruction manual

Xylem

Xylem McDonnell & Miller Uni-Match WF2 Series instruction manual

Graff 9959 installation instructions

Graff

Graff 9959 installation instructions

Clou New Flush 2 composite CL/03.13420 installation instructions

Clou

Clou New Flush 2 composite CL/03.13420 installation instructions

Laufen TWINPLUS SLIM HF905414100000 manual

Laufen

Laufen TWINPLUS SLIM HF905414100000 manual

Hans Grohe Raindance Select S 240 27129 Series Instructions for use/assembly instructions

Hans Grohe

Hans Grohe Raindance Select S 240 27129 Series Instructions for use/assembly instructions

manuals.online logo
manuals.online logoBrands
  • About & Mission
  • Contact us
  • Privacy Policy
  • Terms and Conditions

Copyright 2025 Manuals.Online. All Rights Reserved.