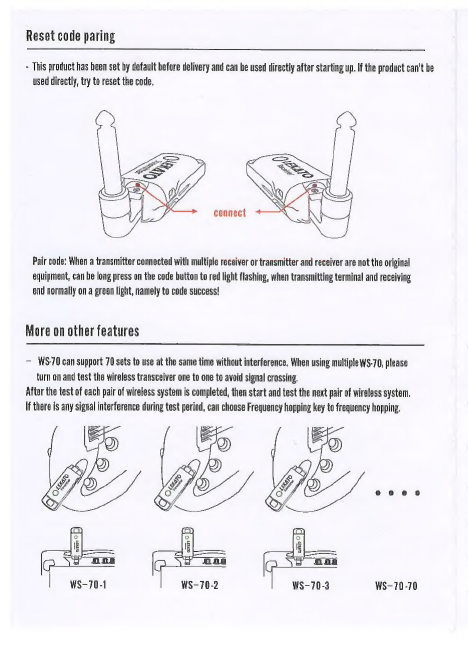
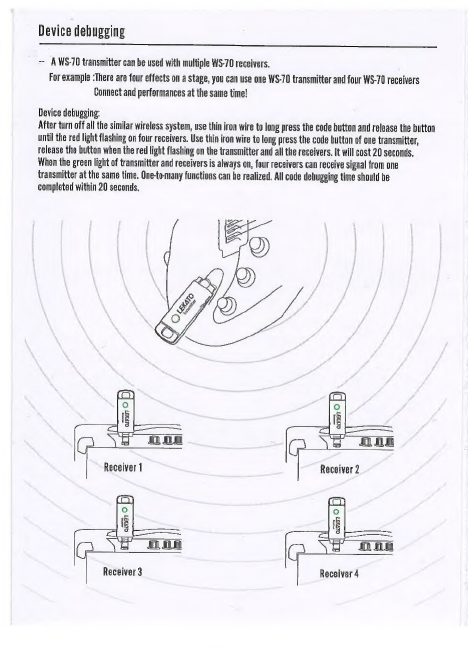
LEKATO WS-70 User manual

LEKATO
Winciess
system
Please
read
the
instructions
carefully
before
using
this
product
warning:
In
ie
to
reduce
the
risk
of
fire
or
electric
shock, please
do
not
put
the
equipment
in
the
rain
or
wet
place
Note:
please
do
not
disassemble
the
equipment
without
permission.
There
is
no
part
that
can
be
repaired
by
the
user.
Please
hand
it
over
to
qualified
maintenance
personnel
@
Please
use
the
attached
charging
line
for
charging.
If
you
are
unsure
of
the
type
of
power
available,
please
consult
your
dealer.
@®
The
device
has
a
built-in
lithium
battery.
Please
do
not
put
it
into
the
fire
or
near
the
heat
source.
®
This
equipment
is
not
waterproof,
do
not
put
into
water
or
other
liquids.
@
Please
do
not
attempt
to
repair
the
equipment,
because
open
the
lid
after
may
make
you
touch
the
danger
point
voltage
or
other
risks,
if
this
equipment
is
the
need
for
maintenance,
please
to
qualified
maintenance
personnel
for
repair.
©
Ifyou
are
not
using
this
product
for
a
long
time,
you
should
unplug
the
charging
cable.
©
ae
ae
a
cord
being
trampled
or
the
position
of
the
socket
and
the
connecting
device
being
too
tight
at
the
plug.
Website:
www.lekatodeal.com
E-mail:[email protected]

Specification
Channel
70
channel
System
frequency
response
|
20~20KHz
Distortion
<0.05%
Reception
sensitivity
<
-110dbm
@20dhsinad
Signal-to-noise
ratio!
>85dB
Transmission
distance
25~40m
Latency
<3ms
Full
working
hours
>4.5
hours(circumstantial)
Wireless
System
~
WS-70
is
a
mini
wireless
system,
apply
with
6.35mm
audio
devices,
with
strong
anti-interference
ability,
through
the
obstacles
of
strong,
stable
transmission
no
pause
etc
in
order
to
avoid
signal
attenuation,
wireless
system
should
be
close
to
acting
area
as
far
as
possible,
and
with
a
large
metal,
wall,
scaffolding
and
other
objects
at
least
keep
a
distance
of
1.5
meters,
and
as
far
as
possible
to
ensure
that
between
transmitter
and
receiver
are
empty
signal
direct
way.
To
avoid
heing
unable
to
use
due
to
low
battery,
please
kindly
check
the
batteries
are
good
hefore
use,
Package
contents
Transmitter
X
1
Receiver
X
1
USB
charging
cable
X
1
User
manual
X
1
Product
Introdution
}—
USB
charging
port
6.35mm
plug
Button
Code
Button

Check
battery
capacity
~
When
the
device
is
shut
down
or
started
up,
double-click
the
front
button,
and
the
four
green
lights
on
the
sidle
will
display
the
current
power
information,
which
will
be
off
after
3
seconds,
——
When
the
first
light
flashes,
it
indicates
that
eli
————
the
power
is
lower
than
20%,
At
this
point,
the
ee
ad
X
transmitter
(receiver)
needs
to
be
charged.
One
green
light
keeps
on,
means
20%-40%
battery
Two
green
lights
keeps
on,
means
41%60%
battery
Three
green
lights
keeps
on,
means
61%-80%
battery
Four
green
lights
keeps
on,
means
81%-100%
battery
Device
charging
—
Our
product
uses
polymer
lithium
hattery.
Please
charge
the
product
before
using
it.
If
not
used
for
a
long
time,
charge
the
product
once
or
more
than
three
months,
1.
With
Dual-ended
USB
cable
that
can
charge
hoth
the
receiver
and
transmitter,
please
choose
SV
2A
adapter
for
charging.
2.When
charging,
the
battery
capacity
is
displayed
as
the
picture
The
first
light
is
flickerin
the
battery
was
charged
1%-25%.
*
No
charger
plug
included
The
second
light
is
flicke
the
battery
was
charged
26%-50%.
The
third
light
is
flickerin
the
battery
was
charged
51%-75%.
The
fourth
light
is
flicker
the
battery
was
charged
75%-100%.

Device
on
/
off
—
Power
on:
Long
press
the
button
for
2
seconds
when
the
transmitter
and
receiver
are
in
power
off
state.
The
LED
indicator
light
is
always
green,
the
device
power
on
successfully.
Enter
normal
working
condition.
—
Power
off:
Long
press
the
button
for
2
seconds
while
the
transmitter
and
receiver
are
in
power
on
state.
The
LED
indicator
light
is
off
and
the
device
shut
down
successfully.
*
After
power
on,
the
green
light
of
the
transmitter
is
always
on,
while
the
green
light
of
the
receiver
is
flashing,
indicating
that
the
device
is
not
connected
normally.
Device
Testing
-
Connect
the
transmitter
to
the
guitar
and
the
receiver
to
the
sound,
long
press
the
start
button
of
transmitter
and
receiver,
the
green
lights
of
the
transmitter
and
receiver
always
Keeps
on,
enter
normal
working
condition.
If
the
following
situations
occurs,
please
solve
as
follows,
Not
paring
successfully:
If
the
transmitter
green
light
keeps
on
and
the
receiver
red
light
flashing,
proves
that
the
paring
is
not
successful.
Should
restart
the
transmitter
and
receiver.
No
sound
after
paring:
If
there
is
no
green
light
on
both
the
transmitter
and
receiver,
no
sound
when
playing,
you
can
try
to
re-pairing
the
products.
Frequency
hopping
button
Device
frequency
hopping
When
using
the
device,
there
are
signal
interference
around
the
device
that
cause
the
device
not
work
properly.
Frequency
hopping
can
he
performed
on
the
device.

Reset
code
paring
~
This
product
has
been
set
by
default
before
delivery
and
can
be
used
directly
after
starting
up.
If
the
product
can't
be
used
directly,
try
to
reset
the
code,
Pair
code:
When
a
transmitter
connected
with
multiple
receiver
or
transmitter
and
receiver
are
not
the
original
equipment,
can
be
long
press
on
the
code
button
to
red
light
flashing,
when
transmitting
terminal
and
receiving
end
normally
on
a
green
light,
namely
to
code
success!
More
on
other
features
—
WS-70
can
support
70
sets
to
use
at
the
same
time
without
interference,
When
using
multiple
WS-70,
please
turn
on
and
test
the
wireless
transceiver
one
to
one
to
avoid
signal
crossing.
After
the
test
of
each
pair
of
wireless
system
is
completed,
then
start
and
test
the
next
pair
of
wireless
system.
If
there
is
any
signal
interference
during
test
period,
can
choose
Frequency
hopping
key
to
frequency
hopping.
i
|
ona
| |
f0a
i
WS-70-1
1
WS-70-2
1
WS-70-3
WS-70-70

Device
debugging
—
AWS-70
transmitter
can
be
used
with
multiple
WS-70
receivers.
For
example
‘There
are
four
effects
on
a
stage,
you
can
use
one
WS-70
transmitter
and
four
WS-70
receivers
Connect
and
performances
at
the
same
time!
Device
debugging:
After
turn
off
all
the
similar
wireless
system,
use
thin
iron
wire
to
long
press
the
code
button
and
release
the
button
until
the
red
light
flashing
on
four
receivers.
Use
thin
iron
wire
to
long
press
the
cote
button
of
one
transmitter,
release
the
button
when
the
red!
light
flashing
on
the
transmitter
and
all
the
receivers.
It
will
cost
20
seconds.
When
the
green
light
of
transmitter
and
receivers
is
always
on,
four
receivers
can
receive
signal
from
one
transmitter
at
the
same
time.
One-to-many
functions
can
be
realized.
All
code
debugging
time
should
be
completed
within
20
seconds.
Receiver
2
Receiver
3
Receiver
4
Table of contents
Other LEKATO Music Equipment manuals
Popular Music Equipment manuals by other brands

Hoshino Gakki
Hoshino Gakki Tama COBRA CLUTCH HH905XP instruction manual

DAPAudio
DAPAudio ZoneControl MKII Product guide

Yamaha
Yamaha DOM-30 owner's manual

Propellerhead
Propellerhead AUDIOMATIC Operation manual

Yamaha
Yamaha L-255 Assembly instructions

Acoustic Signature
Acoustic Signature TA-700 instruction manual