LeMaitre Radiance Hazer User manual

lemaitrefx.com
V. 01.18.07
Radiance Hazer
Operator’s Manual

lemaitrefx.com
Table of Contents
Page 1 Introduction
Page 2 Warnings
Page 3 Technical Specifications
Page 4 Operating Procedures
Page 5 Priming the Fluid Line
Page 5 DMX Operation
Page 6 Cleaning Procedure
Page 8 Recommended Fluid
Page 8 Warranty
Page 9 Safety Precautions
Please Read Carefully Before Operating

lemaitrefx.com 1
Introduction
The Radiance Hazer is a compact unit for producing a resilient light enhancing haze quickly.
Adjustable output allows for the venue to be hazed just prior to use and then adjust to maintain
levels during the event. The exclusive chambered 4-Port Rapid Clean Vaporizer is the heart of
the unit. The easy-clean design allows for simple servicing and fast return to operation. The
robust single lock-pin bracket serves as an adjustable floor stand, truss mount hanger and
carry handle. Users can select from 3 different modes of control. Hand held remote, DMX, or
stand-alone mode could be used dependent on their application. Jugs of 2 or 4 liter in size can
be used in the integral holder. A 500-watt heater allows for a fast warm-up time. The output
port has over 200 cfm of air to direct and assist dispersion. Neutron Haze Fluid has become
the preferred form of product for use around personnel and property. The Radiance Hazer will
produce a quality haze, while offering the benefits of the unique properties of the fluid.
Radiance Hazer shown with optional fan.

lemaitrefx.com
Warnings
M.S.D.S. available at www.lemaitrefx.com
2
Important Safety Instructions: Do not touch or place hands, expose skins,
within 50 cm. of discharge nozzle.
Important Safety Instructions: Do not remove the outer case until power has
been disconnected from the machine.
Important Safety Instructions: Persons suffering from asthma or allergenic
sensitivity may experience irritation, discomfort, or allergic symptoms when
exposed to fog effects.
Important Safety Instructions: Never use alternative fluids. Toxicity free output
is your responsibility.
Important Safety Instructions: Ensure that this unit is grounded at all times.
Failure to do so may result in serious injury.

lemaitrefx.com
Technical Specifications
Model: Radiance Hazer
Part Number: CLF 2460
Length: 16 1/8” 41cm
Width: 10” 25cm
Height: 7” 18cm
Net Weight: 28lbs 12.7kg
Power Rating: 110 Volt A.C. 60 Hz.5 Amps.
Fluid: Neutron Water Base Haze
Consumption - 27 - 380 cc/ hour
(rate can be reduced with the use of the Interval Timer)
Included: On-Board 5-Pin USITT DMX 512 Protocol
Truss Mount/ Angle Floor Stand
Radiance Hazer
3
7.00
10.0
12.75
15.125
16.175
7
10
12 3/4
16 1/8

lemaitrefx.com 4
Operating Procedure
1) Insert a 2 or 4 Litre jug of Neutron Fluid into
the fluid jug holder.
2) Remove the cap and break the foil seal. In-
sert the pickup tube into the jug and tighten the
lid. Ensure the pickup end will sit at the lower
end if the unit is not mounted level.
3) Plug the Hand Remote cable into the rear
connector marked remote. Note that DMX con-
trol will override the hand remote settings. DMX
control is indicated with the valid DMX light on
solid.
Operation with Hand Remote
Stand Alone Operation
1) Insert a 2 or 4 Litre jug of Neutron Fluid into the
fluid jug holder.
2) Remove the cap and break the foil seal. Insert
the pickup tube into the jug and tighten the lid.
Ensure the pickup end will sit at the lowest end if the
unit is not mounted level.
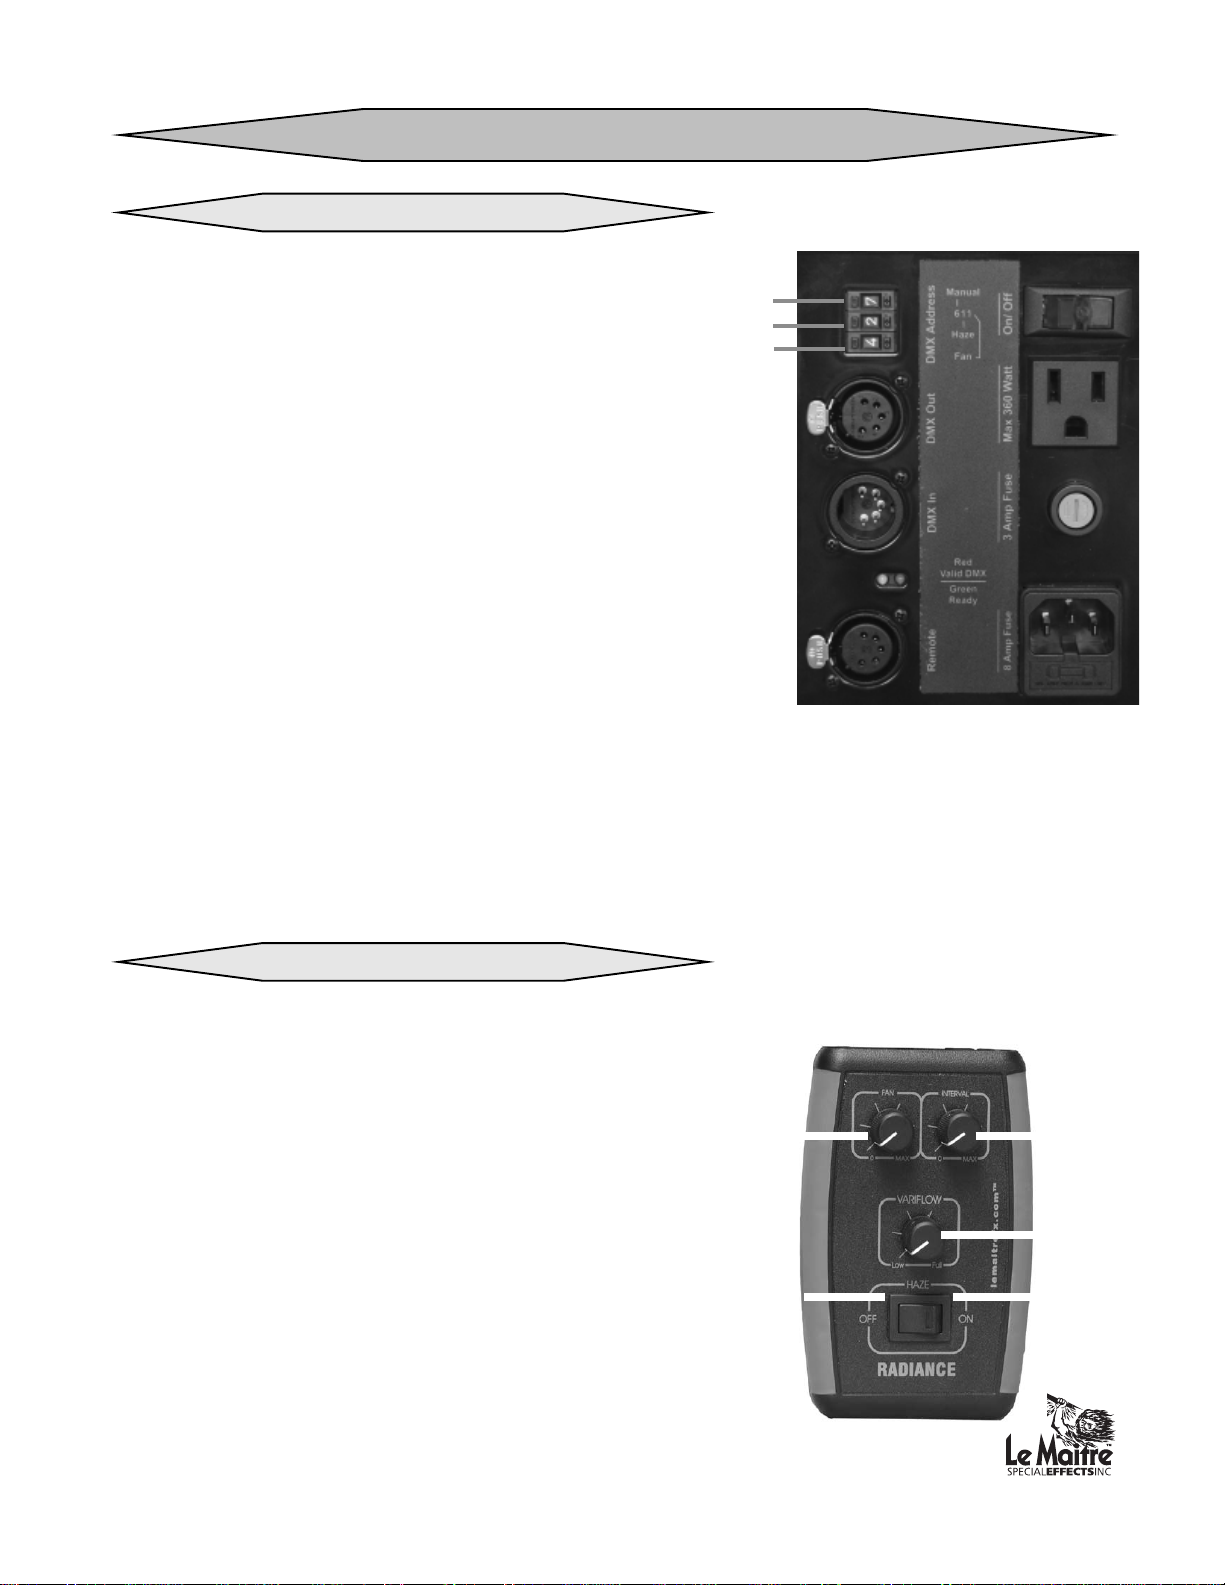
3) Control is limited to 8 steps and OFF for the
assist fan and the haze - rate. The DMX switches
are used to select the desired operation. The ‘Hun-
dreds’ switch must be set to 6 before the unit is
turned on. This starts the unit in stand-alone
mode. This mode is indicated by the valid DMX
light flashing. The ‘Tens’ switch controls the haze
rate. ‘0’ is off, 1 - 8 runs from low to full (9 sets the
same level as 8). The ‘Ones’ switch controls the assist fan in the same way, 1 - 8 is low to full.
The fan has a minimum setting and should always run when the power is applied. The fan
only speeds up when haze is issued.
4) Plug the unit into a suitable power source. Turn the main power switch on and it will illumi-
nate if power is present. The valid DMX light should also now be flashing. The unit requires
about 7 minutes to heat before haze can be produced.
Fan Speed
Control
Interval
Control
Haze On/Off
Switch
Handset
Indicator
Vari Flow
Control
Hand Remote
Hundred
Tens
Ones

lemaitrefx.com
DMX Operation
1) Insert a 2 or 4 Litre jug of Neutron Haze Fluid into the jug holder.
2) Remove the cap and break the foil seal. Insert the pickup tube into the jug and tighten the
lid. Ensure the pickup end will sit at the lowest end if the unit is not mounted level.
3) Select the desired DMX address for the hazer. Note that the hazer occupies two sequential
addresses. The selected address is the Haze - rate and the selected address + 1 is the fan
speed. Control is from 0 - 100% with ‘0’ turning the output off. Insert the DMX line into “DMX
in” connector.
4) Plug the unit into a suitable power source. Turn the main power switch on and it will illumi-
nate if power is present. The valid DMX light will be solid when DMX signal is present. The
unit requires about 7 minutes to heat before haze can be produced.
5
4) Plug the unit into a suitable power source. Turn the main power switch on and it will illumi-
nate if power is present. The unit requires about 7 minutes to heat before haze can be pro-
duced. The Hand Remote indicates the heating cycle by flashing the haze switch light. When
the unit is ready to haze the light will be solid.
5) The haze rate can be switched on and off and varied using the Hand Remote controls.
Haze - rate increases as the variflow knob turns clockwise.
6) The assist fan is always on low. Fan speed can be increased by rotating the fan knob
clockwise. The fan only speeds up during haze output.
7) The interval knob is used to provide cycled output. It must be set fully counter-clockwise
when not in use. The hazer will produce 10 seconds of output at the requested flow spaced by
1 - 300 seconds dependent on the knob position.

lemaitrefx.com
Cleaning Procedure
6
Note: Cleaning is recommended after every 25 litres of fluid.
1) Using a #2 Philips screw driver remove the 4 screws.Two
by the jog holder and two on the rear, above the fan. (Fig. 1)
2) Lift the rear of the lid up then slide it forward.
3) Using a pair of Needle-nose pliers remove the 2 Hold-
Down Springs; this will release the insulation cover and
allow access to the 4-Port Rapid Clean Vaporizer. Grasp a
spring and lift until the spring disengages from its retaining
hole. (Fig. 2)
4) Remove the Insulation Cover. (Fig. 3)
5) Remove the 4 nuts from the top of the 4-Port R-C-V using
a 7/16” wrench. (Fig. 4)
6) Remove all 4 nuts, lock washer and flat washers as well
as the aluminum top plate and gasket material. (Fig. 5)
7) By removing the silicone tube from the inlet tube, the
chamber can now be held over a container for cleaning.
8) Use a flat screwdriver to clean the 4-Port R-C-V by scrap-
ing away loose deposits. Brush out all of the ash material
from each of the 4 ports. A light coating is okay; the ports do
not need to be spotless. (Fig. 6)
9) Use a 5/64” drill bit to clean the nozzle. Ensure both
nozzles are cleaned of any debris.
10) Ensure the mating block surfaces are clean to allow for
proper heat transfer to take place before replacing the
chamber
Fig. 1
Fig. 3
Fig. 2
Springs
Fig. 4
Fig. 6
Fig. 5
Inlet
• Make sure the main power cord is disconnected from power before at-
tempting to remove the outer cover
• Make sure unit has cooled sufficiently to perform the operation

lemaitrefx.com
10) Replace the gasket with a new one. Ensure all of the
surfaces are clean.
11) Reinstall the aluminum top plate and place flat and lock
washers on the bolts (Fig. 6) with a 7/16” wrench, tighten
until the lock washers flatten down and add 1/4 turn.
12) Reinstall the Insulation cover and attach the hold down
springs on both sides. Ensure that none of the wires are
pinched by the cover. (Fig. 7)
13) Verify that all of the hoses are connected.
14) Insert the tabs on the Radiance chassis cover into the
slots located on the front of the Radiance Hazer. Slide the lid
back until it drops into place. Using a #2 Philips screw driver
fasten the lid by installing the 4 screws while ensuring the
fluid tube is not pinched. (Fig. 8 & 9)
Note: Place the machine is a well-ventilated area. Allow the
machine to heat up following the installation of a new gasket.
A very strong odour will be emitted as the unit heats up and
sets the new gasket. This will dissipate in 15 minutes.
7
Fig. 6
Fig. 7
Fig. 8
Fig. 9
Gasket
Fig. 5

lemaitrefx.com
Recommended Fluids
Warranty
Warranty: All warranty is one year parts and labour unless specified and is on
manufacturer defect only. Abuse or poor maintenance is not ac-
cepted. Le Maitre fluids must always be used. Any trace of other
fluids will automatically void ALL warranties.Accept no substitutions
as there are no exceptions to this rule. Proof of purchase or proof of
sale must always accompany any warranty returns. An RA (return
authorization) number must be noted on the outside of any box re-
turned to our facilities. Any packages without a clearly marked RA
number will not be accepted by our receiving department. Freight on
warranty items are freight prepaid to our facility and we will prepay
freight back to your facility after repair, by the most economical
means available. Should you require the item express-returned, then
you are responsible for any difference in freight cost.
Return Policy: Return of any product must be done within 30 days of purchase. The
package must be returned freight prepaid and the RA number clearly
marked on the outside of the box. A restocking charge of up to 25%
may be levied. Only credits are issued to the dealers account. Any
product not returned within 30 days is considered purchased.
Warning: Le Maitre Special Effects Inc. considers all it's product to be safe for
use in the application it was intended. Le Maitre Special Effects takes
no responsibility for misuse or incorrect use. Always refer to equip-
ment owners manual for proper use.
Neutron Haze Fluid: This fluid is specifically designed for use with our Neutron and Radiance
lines of haze machines. This safe, water-based fluid creates a dry, long-lasting, evenly
dispersed haze that leaves no residue. Neutron Haze Fluid is highly concentrated to allow for
low fluid usage.
8

lemaitrefx.com
1. Ensure that operation of the machine is supervised by suitably trained and authorised
personnel.
2. Do not modify the machine or use a machine which has been damaged in any way.
3. Allow sufficient air circulation around the machine at all times.
4. Protect the Radiance Hazer from direct weather effects and wet locations.
5. Only use fluids recommended by the Le Maitre Special Effects.
6. Do not continue to produce haze output in an enclosed area when visibility is reduced
below 50cm.
7. Avoid direct haze output continuously at persons, structure or objects within close prox imity
of the discharge nozzle.
8. Ensure that adequate exhausting arrangements are available in the event of an
emergency.
9. Do not place hands, or exposed skin within the first 50cm of the discharge nozzle at
any time during haze production.
10. Haze effects can trigger smoke alarms and detectors. Please take suitable precautions to
prevent false alarms.
Safety Precautions
9
This manual suits for next models
1
Table of contents
Other LeMaitre Dj Equipment manuals
Popular Dj Equipment manuals by other brands

Shehds
Shehds DMX Conlose Sunny 512 user manual

Talent
Talent LP64LED user manual

Beamz professional
Beamz professional Razor500 instruction manual

auna
auna Areal 525 manual

Cameo Light
Cameo Light INSTANT AIR 1000 PRO user manual

Chauvet Professional
Chauvet Professional COLORado Solo Batten 4 Quick reference guide

Pioneer
Pioneer DJ DDJ-REV1 quick start guide

American Audio
American Audio PSX - REV 1-2 User guide and reference manual

EuroLite
EuroLite LED STP-14 user manual

Chauvet DJ
Chauvet DJ EZbar Quick reference guide

American DJ
American DJ SS-DMX19CTM User instructions

Chauvet Professional
Chauvet Professional ROGUE R2X SPOT user manual