Leon Engineering LD5208 User manual

LD5208 USER MANUAL, REV. 0: NOVEMBER 2005 1
ELECTRONIC WEIGHT INDICATORS
MODEL LD5208
U
US
SE
ER
R
M
MA
AN
NU
UA
AL
L

LD5208 USER MANUAL, REV. 0: NOVEMBER 2005
2
All rights reserved.
No art of this ublication may be re roduced, stored in a retrieval system, or transmitted in any form or by
any means, mechanical, hotoco ying, recording, or otherwise, without the rior written ermission of Leon
Engineering SA.
No atent liability is assumed with res ect to the use of the information contained herein. While every
recaution has been taken in the re aration of this book, Leon Engineering SA assumes no res onsibility for
errors or omissions. Neither is any liability assumed for damages resulting from the use of the information
contained herein.
The information herein is believed to be both accurate and reliable. LEON ENGINEERING, however, would be
obliged to be informed if any errors occur. LEON ENGINEERING cannot acce t any liability for direct or
indirect damages resulting from the use of this manual.
LEON ENGINEERING reserves the right to revise this manual and alter its content without notification at any
time.
Neither Leon Engineering SA nor its affiliates shall be liable to the urchaser of this roduct or third arties
for damages, losses, costs, or ex enses incurred by urchaser or third arties as a result of: accident,
misuse, or abuse of this roduct or unauthorized modifications, re airs, or alterations to this roduct, or
(excluding the U.S.) failure to strictly com ly with Leon Engineering o erating and maintenance instructions.
Leon Engineering SA shall not be liable against any damages or roblems arising from the use of any o tions
or any consumable roducts other than those designated as Original Leon Engineering Products.
.
..
. NOTICE:
The contents of this manual are subject to change without notice.
Co yright © 2004 by Leon Engineering SA, Athens, Greece, Euro ean Union
.
..
. NOTE
Notes have im ortant information and useful ti s on the o eration of your equi ment.
WARNING
Warnings must be followed carefully to avoid bodily injury.
CAUTION
Cautions must be observed to avoid damage to your equi ment.

LD5208 USER MANUAL, REV. 0: NOVEMBER 2005 3
TABLE OF CONTENTS
1. DECLARATION OF CONFORMITY ................................................................................................ 4
2. STANDARD WARRANTY ..............................................................................................................5
3. MODIFICATIONS ......................................................................................................................... 6
4. INTRODUCTION .......................................................................................................................... 6
5. UNPACKING ................................................................................................................................6
6. INSTALLATION ............................................................................................................................
6.1 MOUNTING LOCATION – ENVIRONMENTAL CONSIDERATIONS ............................................................................ 7
6.2 POWER ................................................................................................................................................................ 7
. FRONT PANEL SURVEY................................................................................................................8
7.1 WEIGHT DISPLAY ................................................................................................................................................ 8
7.2 STATUS ANNUNCIATORS ..................................................................................................................................... 8
7.3 FRONT PANEL KEYS............................................................................................................................................. 9
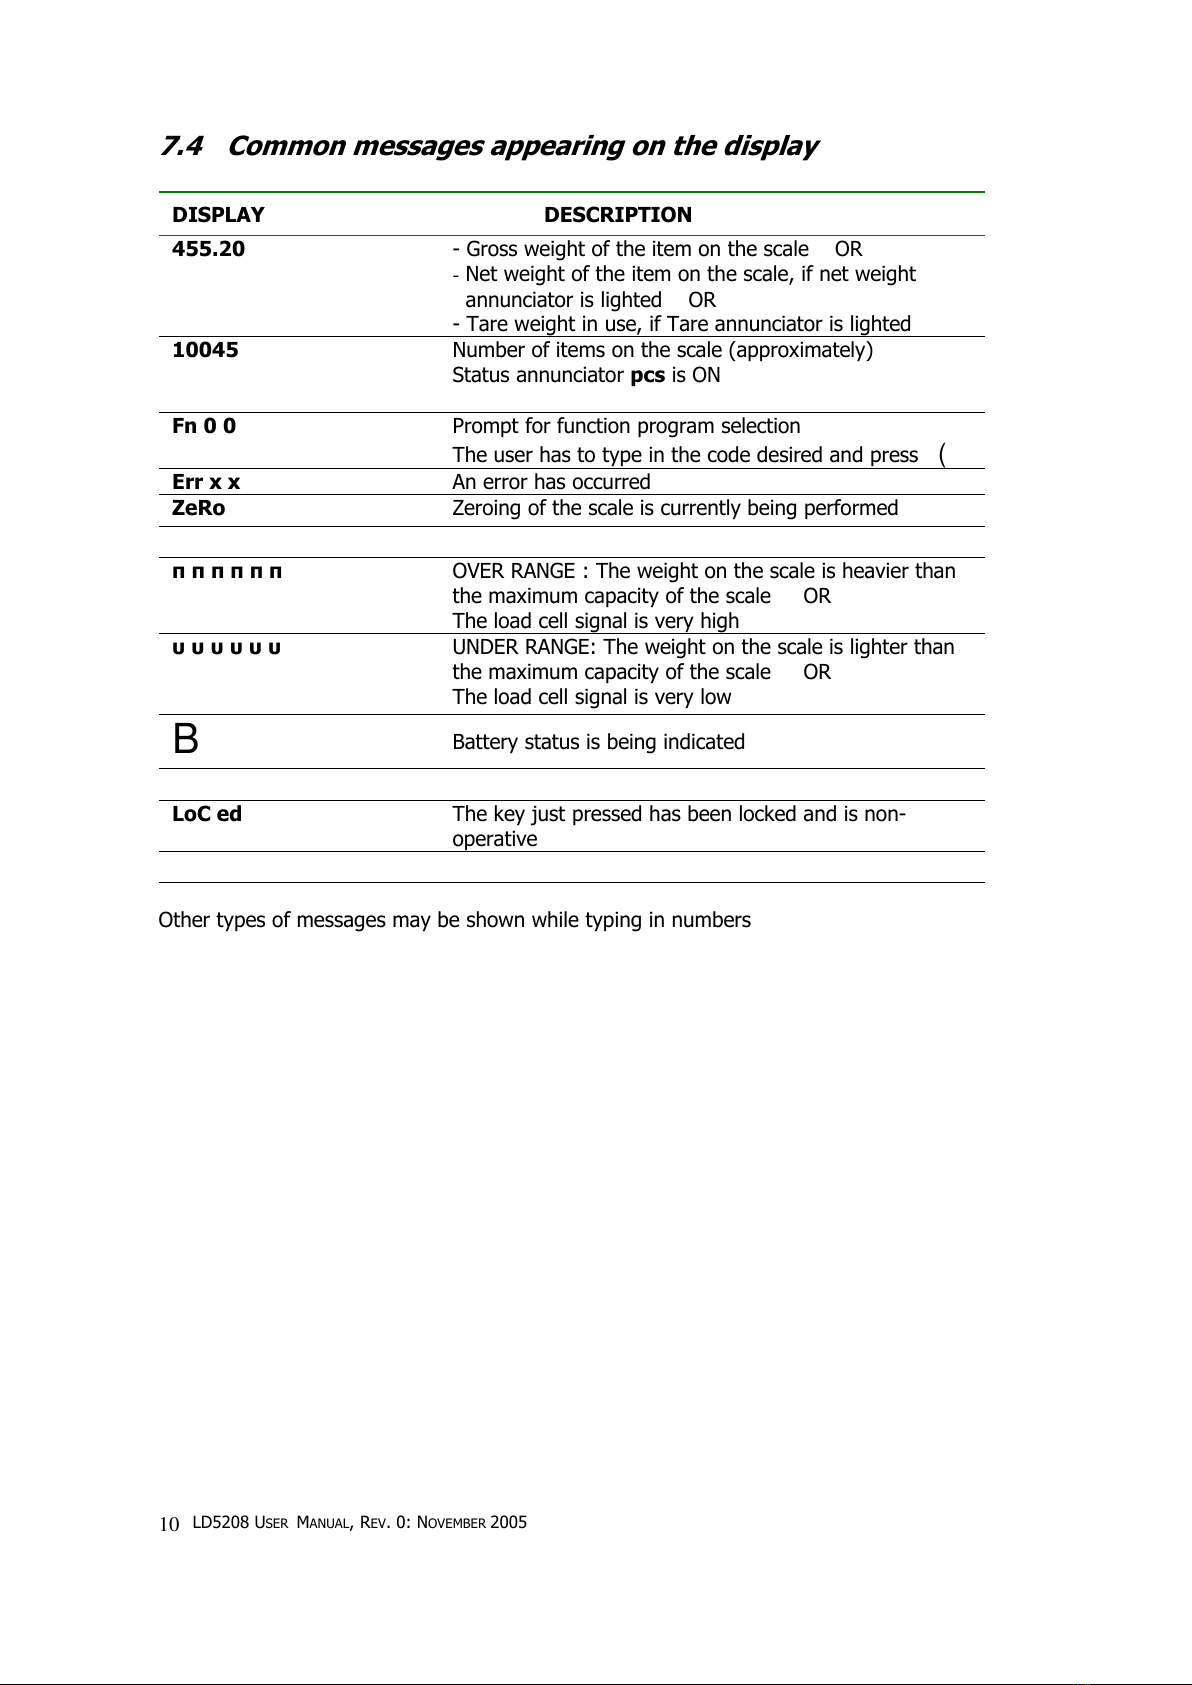
7.4 COMMON MESSAGES APPEARING ON THE DISPLAY ............................................................................................ 10
8. FUNCTION MENU ......................................................................................................................11
8.1 ACCESSING THE FUNCTION MENU ..................................................................................................................... 11
8.2 LIST OF FUNCTION PROGRAMS ......................................................................................................................... 11
9. TURNING THE INDICATOR ON..................................................................................................14
10. USING THE INDICATOR ..........................................................................................................15
10.1 ZEROING THE SCALE ......................................................................................................................................... 15
10.2 TARING THE SCALE ........................................................................................................................................... 15
10.2.1 Taring with unknown tare weight............................................................................................................ 16
10.2.2 Taring with known tare weight................................................................................................................ 16
10.3 WEIGHING......................................................................................................................................................... 17
10.3.1 Accumulating the weight measurements.................................................................................................. 17
10.4 PIECE COUNTING ............................................................................................................................................... 18
10.4.1 Piece counting by sampling – Function 51.............................................................................................. 18
10.4.2 Piece counting by entering the average piece weight – Function 52 ...................................................... 19
10.4.3 Calculating a series of average piece weights......................................................................................... 19
10.5 PRINTING .......................................................................................................................................................... 19
10.5.1 To print a weigh ticket :........................................................................................................................... 20
10.5.2 To produce a copy of the last weigh ticket : ............................................................................................ 20
10.5.3 To temporarily disable the printer output : ............................................................................................. 20
10.6 SELECTING PRINT FORMAT................................................................................................................................ 21
10.7 PROGRAMMING THE PIN (PERSONAL IDENTIFICATION NUMBER)...................................................................... 23
11. SERIAL COMMUNICATIONS ....................................................................................................24
11.1 SERIAL PORT – RS232 C ................................................................................................................................. 24
11.1.1 Printer output (SETUP 2, 2.t=01, 03, 04, 05, 06, 07, 08, 10,11) ............................................................ 25
11.1.2 Continuous weight output (SETUP 2, 2.t=02)........................................................................................ 25
11.1.3 Print on demand mode (SETUP 2, 2.t=09) ............................................................................................ 25
12. TROUBLE SHOOTING ..............................................................................................................26
13. SET UP AND CALIBRATION RECORD.......................................................................................2
CALIBRATION DATA ....................................................................................................................................................... 27
SCALE PARAMETERS ...................................................................................................................................................... 27
SET UP 1 – OPERATIONAL PARAMETERS ...................................................................................................................... 27
SETUP 2 - SERIAL PORT............................................................................................................................................... 27
SETUP 4 – ANIMAL WEIGHING ..................................................................................................................................... 27
SETUP 6 – KEYS LOCKED ............................................................................................................................................. 27

LD5208 USER MANUAL, REV. 0: NOVEMBER 2005
4
1. DECLARATION OF CONFORMITY
LEON ENGINEERING S.A
INDUSTRIAL WEIGHING AND PROCESS AUTOMATION
TSOKA 8 Str., THESI XIROPIGADO
19600 MANDRA, ATTICA
GREECE
Declaration of Conformity
The Non-Automatic Weighing Instrument
Manufacturer:
LEON ENGINEERING S.A.
Ty e/Model:
LD5208
No of the EC Ty e A roval Certificate
DK 0199.27
No of relevant Test Certificates
(Where A ro riate)
Corres onds to the roduction model described in the EC Ty e-A roval Certificate and to the
requirements of the following Directives:
90/384/EEC, 89/336/EEC as amended by EC Directive 92/31/EEC, 93/68/EEC by a lication of the
harmonised standards EN-55011 Class A and EN-45501
73/23/EEC as amended by EC Directive 93/68/EEC by a lication of the harmonised standard EN-60950
Signature:
Dimitrios Ploumakis
Date:
23.12.2005
Being the res onsible erson em loyed and a ointed by Leon Engineering S.A.
III

LD5208 USER MANUAL, REV. 0: NOVEMBER 2005 5
2. STANDARD WARRANTY
LD52xx Weighing Indicators Series®
Leon Engineering SA warrants that the equi ment covered by this warranty will be free from defects in
workmanshi and materials for a eriod of 1 (one) year from date of installation or eighteen (18) months
from date of shi ment to the buyer, whichever comes first. Should any such defects be found and re orted,
Leon Engineering (herein referred to as the "Com any"), will, at its o tion, refund the urchase rice or
furnish re lacements arts. The following are NOT covered under any of these warranties:
1) Initial installation and ongoing scale calibration.
2) Damage to scale com onents by gross abuse, fire, flooding, ex losion, water, voltage surges, or civil
disturbance, or other external events.
3) Normal maintenance or consumable items.
This warranty information covers the all Models of LD5200 SERIES (LD5204, LD5206, LD5208, LD5218,
LD5250, DJB, RDT52, DWI)
THE COMPANY EXPRESSLY WARRANTS THE EQUIPMENT MANUFACTURED BY IT AS SET FORTH HEREIN.
THE COMPANY MAKES NO OTHER WARRANTIES EITHER EXPRESSED OR IMPLIED (INCLUDING WITHOUT
LIMITATION WARRANTIES AS TO MERCHANTABILITY OR FITNESS FOR A PARTICULAR PURPOSE). IN
ADDITION, THIS DOCUMENT SHALL CONSTITUTE THE SOLE AND EXCLUSIVE REMEDIES OF THE BUYER
FOR ANY BREACH BY THE COMPANY OF ITS WARRANTIES HEREIN.
COMPANY LIABILITY UNDER THIS WARRANTY OR ANOTHER WARRANTY WHETHER EXPRESSED OR
IMPLIED IN LAW OR FACT SHALL BE LIMITED TO THE REPAIR OR REPLACEMENT OF DEFECTIVE MATERIAL,
AND IN NO EVENT SHALL IT BE LIABLE FOR CONSEQUENTIAL OR INDIRECT DAMAGES.
APPLICATION GUIDES
The only warranty of Leon Engineering is for the roduct it su lies under the Product Warranty Statement
listed above.
CAUTION READ this manual BEFORE o erating or servicing this equi ment
FOLLOW these instructions carefully.
SAVE this manual for future reference.
DO NOT allow untrained ersonnel to o erate, clean, ins ect, maintain, service, or tam er
with this equi ment.
ALWAYS DISCONNECT this equi ment from the ower source before cleaning or erforming maintenance.
CALL LEON ENGINEERING for arts, information, and service.
WARNING ONLY PERMIT QUALIFIED PERSONNEL TO SERVICE THIS EQUIPMENT.
EXERCISE CARE WHEN MAKING CHECKS, TESTS AND ADJUSTMENTS THAT MUST BE
MADE WITH POWER ON. FAILING TO OBSERVE THESE PRECAUTIONS CAN RESULT IN
BODILY HARM.
WARNING FOR CONTINUED PROTECTION AGAINST SHOCK HAZARD CONNECT TO
PROPERLY GROUNDED OUTLET ONLY. DO NOT REMOVE THE GROUND PRONG.
WARNING DISCONNECT ALL POWER TO THIS UNIT BEFORE REMOVING THE FUSE
OR SERVICING.
WARNING BEFORE CONNECTING/DISCONNECTING ANY INTERNAL ELECTRONIC
COMPONENTS OR INTERCONNECTING WIRING BETWEEN ELECTRONIC EQUIPMENT
ALWAYS REMOVE POWER AND WAIT AT LEAST THIRTY (30) SECONDS BEFORE ANY
CONNECTIONS OR DISCONNECTIONS ARE MADE. FAILURE TO OBSERVE THESE PRECAUTIONS COULD
RESULT IN DAMAGE TO OR DESTRUCTION OF THE EQUIPMENT OR BODILY HARM.
CAUTION OBSERVE PRECAUTIONS FOR HANDLING ELECTROSTATIC SENSITIVE
DEVICES.

LD5208 USER MANUAL, REV. 0: NOVEMBER 2005
6
3. MODIFICATIONS
Initial version.
4. INTRODUCTION
The electronic weight indicator model LD5208 is a com act micro-controller based unit s ecifically
designed for use on systems utilising strain gauge load cells.
The standard configuration includes:
1. High accuracy analog to digital converter (max 550.000 internal counts).
2. Front anel with 7 membrane keys with tactile feedback.
3. 6 digits, 7 segments, LCD dis lay black (24 mm) lus annunciators.
4. Non volatile memory for system arameters and calibration data.
5. Serial ort RS232C (COM1) for rinting weighing data on a serial rinter or host com uter.
6. The microcontroller technology allows the instrument to erform in software all measuring
functions, o erator in ut-out ut, automatic controls and sequences necessary for the
o eration of weighing systems.
7. The setting of the unit is done through a guided keyboard o eration, enabling the
ada tation to o erating environment and system requirements.
8. A totaliser and counter is available that may be viewed or rinted.
9. Several rint formats are available selectable in setu .
10. A iece count facility, with selectable sam le size, is available in the standard software.
11. Animal weighing with selectable number of sam les is also included in the standard
software.
5. UNPACKING
Prior to un acking the equi ment, examine the carton for exterior shi ing damage and if any
notify the carrier immediately.
Remove the equi ment from the carton and lastic bag.
Ins ect extent of su ly for any sign of damage.
Save ackaging material.
Verify that your indicator has been shi ed with the following items :
Indicator LD5208 in lastic enclosure
230VAC to 9VDC/800mA, mains ower ada ter.
User manual.
An accessory kit including the connection lugs for the load cell and the serial ort.

LD5208 USER MANUAL, REV. 0: NOVEMBER 2005 7
6. INSTALLATION
6.1 Mounting location – Environmental considerations
The mounting location must be such that the instrument is not subject to excessive vibrations, heat
or humidity. Avoid direct sunlight on the front of the instrument. The unit has to be installed at the
right height to allow an easy reading of the dis lay and convenient keyboard o eration.
AMBIENT : Storage - 10 to +70 0C.
TEMPERATURE O erating -10 to +40 0C.
HUMIDITY : 40 to 90% RH (non condensing).
VIBRATION : Severe vibration can affect the accuracy of weighing and damage
electric / electronic com onents.
AIR : The surrounding air should be dust free and not contain any corrosive
gasses or materials which could adversely affect the equi ment.
PROTECTION : IP40.
ELECTROMAGNETIC : Heavy electrical equi ment should not be installed close to
FIELDS the weighing equi ment.
INCOMING AND : Relays and contactors connected to the equi ment must have
OUTGOING SIGNALS reliable and effective interference su ression. This also a lies to other
equi ment located within a distance of 3m from out equi ment.
Cabling must be erformed according to normal ractice.
NOTES : - WELDING on or in the vicinity of the equi ment is strictly rohibited.
- STATIC loads, caused by thunderstorms, have to be revented from
develo ing by use of reliable lightning conductors.
- ENSURE that the cooling of the equi ment is not obstructed.
6.2 Power
The instrument is owered from external ower ada tor (9VDC/800mA) or internal battery.
Battery charging is erformed while the external ower su ly is connected.
As the instrument is com uter controlled it requires clean ower for reliable o eration.
Power su lied should come from a source that is isolated from other rocess equi ment.
WARNING
Verify that the AC POWER SOCKET outlet is ro erly rotected.
To avoid shock hazards, always be certain that the ower ada tor is disconnected from the
wall outlet BEFORE o ening the enclosure.
DO NOT USE any other ty e of ower ada tor than the one su lied with the indicator.
DO NOT create a safety hazard by defeating the grounding feature.

LD5208 USER MANUAL, REV. 0: NOVEMBER 2005
8
. FRONT PANEL SURVEY
.1 Weight display
The indicator LD5208 has a 6-digit dis lay for the indication of:
measured weight (gross or net)
error messages
other messages indicating the status of the scale
user guidance for the settings of the scale and the selection of o erations
technician guidance for the configuration and calibration rocedures and checking ur oses
.2 Status annunciators
At the left and right side of the digits small messages, called STATUS ANNUNCIATORS, a ear in
order to rovide status information during the weighing rocess.
O It is illuminated when the scale is stable.
ZERO It is illuminated when the scale weight is stable and within 1/4 division of actual zero.
TARE It indicates that a tare value is being dis layed.
NET It is illuminated when the scale has been tared and the dis lay is in NET mode.
pcs It is illuminated when ieces are dis layed.
b It lights u steady when the battery charge is being dis layed. It flashes when the battery
charge is below 20% of the scale ca acity.
ob Battery charge indicator (under the dis lay). Red colour: charging.
Green colour: charging com leted.

LD5208 USER MANUAL, REV. 0: NOVEMBER 2005 9
.3 Front panel keys
! POWER ON-OFF KEY
-By ressing momentarily the unit turns on and initiates ower on self-test.
-By ressing again momentarily the unit turns off.
) ZERO / CLEAR ERROR/ESCAPE KEY
-It is used to reset the weight dis lay to zero. Zeroing will be effective only if the
scale is stable, in gross mode, and the weight is within + 2% of max weighing ca acity.
-If an error is resent on the dis lay ress this key to acknowledge.
> NET / FUNCTION KEY / MOVE ONE DIGIT (Move left and right)
-It is used to tare the scale. Taring will be effective only if the scale is stable and within
the max weighing ca acity.
-If the scale has already been tared ressing of the key will cause the tare to be
cancelled and the weight dis lay to return to Gross mode.
- During an entry ressing this key will move the blinking cursor one digit to the right.
-If the key is ke t ressed for more than 3 sec the function menu is entered.
When the dis lay shows Fn 00, ress ( to return to weight dis lay or ty e in the function
code desired in order to select a function. The function menu is used to activate a number
of software utilities. Refer to FUNCTION MENU, cha ter 9 for details.
~ TARE RECALL KEY / PRESET TARE / INCREMENT FLASHING DIGIT
In Net mode only : Pressing this key will cause the tare memory to be dis layed briefly.
In Gross mode: This key is also used for entering a reset tare via the keyboard.
The dis lay shows PtAre and then 0 0 0 0 0 . Use the > and ~ keys to enter the desired
tare and ress P to roceed or ress ) to abort. When P is ressed the tare keyed in will
be automatically in effect and the weight dis lay will turn to Net mode. To be acce ted the
tare value must be within the weighing range. The reset tare will be lost in ower down.
( PRINT / ACCUMULATE KEY / ACCEPT ENTRY
It is used to transmit weight data to eri heral devices via the serial ort.
The transmitted weight will also be accumulated. The weight will be rinted only if it is
stable and within the weighing range of the indicator.
Printing/accumulation will take lace if enabled in setu (SETUP 1.1=1 and SETUP 2.t ≠ 00)
- In the Animal Weigh mode the reselected number of sam les will be count down,
averaged and dis layed / rinted / accumulated. (if enabled in SETUP 4.A≠00)
< TOTAL / BATTERY CHARGE KEY / SCROLL KEY (Move up and down)
It is used to dis lay the current accumulated total (activated only if SETUP 1.1=1).
Press < again to see the number of weighings.
Press < again to end the total dis lay or
Press ( to rint/delete the total.
If the key is ressed for more than 5 sec the battery charge in % of ca acity is dis layed.
Press Y again to end battery charge indication.
& PIECE COUNTING KEY
The key toggles between weight mode or iece counting mode

LD5208 USER MANUAL, REV. 0: NOVEMBER 2005
10
.4 Common messages appearing on the display
DISPLAY DESCRIPTION
455.20 - Gross weight of the item on the scale OR
- Net weight of the item on the scale, if net weight
annunciator is lighted OR
- Tare weight in use, if Tare annunciator is lighted
10045 Number of items on the scale (a roximately)
Status annunciator pcs is ON
Fn 0 0 Prom t for function rogram selection
The user has to ty e in the code desired and ress (
Err x x An error has occurred
ZeRo Zeroing of the scale is currently being erformed
π π π π π π OVER RANGE : The weight on the scale is heavier than
the maximum ca acity of the scale OR
The load cell signal is very high
υ υ υ υ υ υ UNDER RANGE: The weight on the scale is lighter than
the maximum ca acity of the scale OR
The load cell signal is very low
B Battery status is being indicated
LoC ed The key just ressed has been locked and is non-
o erative
Other ty es of messages may be shown while ty ing in numbers

LD5208 USER MANUAL, REV. 0: NOVEMBER 2005 11
8. FUNCTION MENU
The function menu enables the selection of a number of software rograms indirectly. Such
rograms are the selection of the setu and calibration dialogues, the high resolution mode,
selecting the desired rint format and other service and checking facilities.
8.1 Accessing the Function menu
While in the Weighing Mode, ress key > and hold ressed for ~ 3 sec.
Dis lay shows Fn 00
Key in the function code you need (all function codes are listed below)
Use key > to move one digit to the right
Use key ~ to increment the flashing digit
Use key ( to acce t the dis layed number
The corres onding rogram will be activated.
To exit the function selection, ress ( while Fn 00 is dis layed.
To exit from any function rogram, ress )
8.2 List of Function programs
Fn 01 EDIT SETPOINTS
The dis lay shows SEtP 1 and then x x x x x the existing value of the set oint 1 or
low. Use the > and ~ keys to enter the desired value and ress P to roceed or
ress ) to abort. The dis lay shows SEtP 2 and then x x x x x the existing value of
the set oint 2 or high. Use the > and ~ keys to enter the desired value and ress
P to roceed or ress ) to abort. When P is ressed the set oints are saved in non
volatile memory.
Fn 02 DISPLAY REMAINING BATTERY CAPACITY
The battery charge will be dis layed as a ercentage of the remaining ca acity.
Fn 05 EDIT DATE TIME SERIAL NUMBER
Activated only if setu 1.6=1 .
The dis lay shows date briefly then 000000 .
Enter the date (day,month,year if setu 1.7=0 ) or (month, day,year if setu 1.7=1 ).
The dis lay shows 000000 . Enter the time (hour, min, sec).
The dis lay shows n00000 . Enter the serial number of the rintout.
Press ) to exit and return to normal weight dis lay.
Fn 06 HIGH RESOLUTION
The dis lay shows Hi rES briefly, then the weight is dis layed in x10 accuracy for
4sec and then the dis lay reverts to normal accuracy.
Press ~ to dis lay in high resolution for another 4sec.
Press ) to exit and return to normal resolution

LD5208 USER MANUAL, REV. 0: NOVEMBER 2005
12
Fn 20 - 30 PRINT TYPE SELECT Refer to aragra h 11.6
Equivalent to 2.t in SETUP 2 (i.e. Fn23 corres onds to 2.t=03)
The functions are activated only if SETUP 2.8=1
Fn 20 DISABLE PRINTER OUTPUT
Fn 21 PRINT FORMAT 1 (Date time nr and weight)
Fn 22 CONTINUOUS WEIGHT OUTPUT
Fn 23 PRINT FORMAT 3 (single line gross or net)
Fn 24 PRINT FORMAT 4 (single line gross or 3line g , t , n)
Fn 25 PRINT FORMAT 5 (single line gross or 3line g , t , n em hasized)
Fn 26 PRINT FORMAT 6 (single line nr & gross or g , t , net)
Fn 27 PRINT FORMAT 7 (single line weight without any designation)
Fn 28 PRINT FORMAT 8 (single line nr & indicated weight)
Fn 29 PRINT FORMAT 9 (single line gross or 3line g , t , n demand mode)
Fn 30 PRINT FORMAT 10 (Two line gross, tare, net label)
Fn 31 PRINT FORMAT 11 (One line date, time, gross, tare, net label)
Fn 40 PIN CHANGE Refer to aragra h 11.8
Used to change the current Personal Identification Number that enables access to
the calibration rocedure. (The unit is factory set so that the PIN is not active i.e.
000000).
The dis lay shows Pin 0 briefly then 000000. Key in the old in and ress (.
The dis lay shows Pin 1 if the in was correct else the unit resets.
Key in the new Pin and ress ( .
The dis lay shows Pin 2. Key in the same Pin for validation and ress (.
The new in is stored and the dis lay shows PASS briefly.
If the two entries are not the same, FAIL is dis layed briefly and the rogram
returns with the old in remaining in memory.
CAUTION
Make sure you do not forget the code entered. If the code is lost the unit must be
returned to the factory to initialise the Pin and a fee will be charged.
Fn 43 COPY LAST PRINTOUT
Used to re rint the ticket just rinted, in case the a er is damaged.
Fn 48 CALIBRATION NR CHECK
Dis lays the audit trail counter. Press ( to exit.
Fn 49 SETUP & CALIBRATION
Detailed in the technical manual.
Fn 50 PIECE COUNT
The dis lay will show the number of ieces on the scale calculated using the average
iece weight already in memory (identical o eration with key & ).
Fn 51 SAMPLE & DISPLAY PIECES
- Dis lay shows P c X X. Enter the sam le size.
- Dis lay shows the number of ieces ( iece count symbol illuminates).
- Press < to dis lay the average iece weight (Press again to return to ieces

LD5208 USER MANUAL, REV. 0: NOVEMBER 2005 13
dis lay)
or ress > to tare the scale or ress ( to rint weight and ieces.
Press & to return to weight mode.
Fn 52 EDIT AVERAGE PIECE WEIGHT & DISPLAY PIECES
-Dis lay shows X X X X X . Edit the average iece weight in * 100 accuracy.
-Dis lay shows the number of ieces ( iece count symbol illuminates).
-Press < to dis lay the average iece weight ( ress again to return to ieces
dis lay) or ress > to tare the scale or ress ( to rint weight and ieces.
Press & to return to weight mode.
Fn 53 SAMPLE & DISPLAY AVERAGE PIECE WEIGHT
Dis lay shows P c X X . Enter the sam le size.
Dis lay shows the average iece weight in * 100 accuracy. Press ) to exit.

LD5208 USER MANUAL, REV. 0: NOVEMBER 2005
14
9. TURNING THE INDICATOR ON
1. After all connections have been made, lug in the ower cord.
2. Em ty the scale
3. Press the ON/OFF key on the front anel to turn the indicator ON.
4. When the LD5208 is owered u a self test routine is initiated during which the following data
is dis layed:
Program Number
The software identification code is dis layed briefly
e.g. LD5208
Program Date
The date of issue of the software version is dis layed briefly
e.g. 290705 (day - month - year)
Dis lay segment test.
All dis lay segments are turned on then off for 2 sec (
8.8.8.8.8.8
)
5. The dis lay shows the weight on the latform, then ZERO.
If the weight is within the zeroing range s ecified during the configuration of the scale (+2%
or +10% of scale ca acity) it will be zeroed automatically.
If the scale can not be zeroed Err 15 is dis layed. Unload the scale and ress ) key
momentarily to acknowledge the error.
6. Power u the rinter if one is connected to the LD5208.
7. The unit is ready for o eration.
.
..
. If any other error message is dis layed refer to List of Error codes, cha ter 13.
Refer to aragra h 8.3 for descri tion of o eration of keys and aragra h 9.2 for descri tion of
functions.

LD5208 USER MANUAL, REV. 0: NOVEMBER 2005 15
10. USING THE INDICATOR
10.1 Zeroing the scale
Sometimes the indicator’s dis lay shows a figure higher or lower than zero, although the scale
seems to be em ty. This may ha en, for instance, when water or dirt have gathered on the
surface of the scale and are difficult to be removed during the weighing o eration. This could be
also due to environmental conditions, which cause the center of zero to move from its initial
osition.
Pressing the ZERO key resets weight dis lay to zero, roviding a com ensation for the above
unwanted weights.
In order to zero the scale:
1. Wait for the scale to become stable
2. Press the key )
3. The dis lay shows Z E r o briefly
4. The current weight is set as the zero oint
5. The Zero annunciator “ zero “ turns on
.
..
. Zeroing is ossible only if the scale is stable and the indicator in gross mode
.
..
. Zeroing is ossible only if the weight on the scale is within + 2% of the scale ca acity (or +
10% de endant on how the zero range has been defined in the set u of the indicator). If
the weight is outside the zero range, ressing the zero key will have no effect
.
..
. The Zero oint acquired with this key will be in effect until a new zeroing o eration or ower
down.
10.2 Taring the scale
If the item to be weighed comes in a container, the scale needs to be tared, i.e. the weight of the
container needs to be measured and subtracted from the total weight (weight of container +
weight of the item), so that the net weight is acquired.
When the scale is tared, it o erates in the so called ‘NET mode’, which is indicated via the status
annunciator NET.
.
..
. Taring is ossible only if the scale is stable
.
..
. Taring is ossible only if the weight on the scale is within the scale ca acity

LD5208 USER MANUAL, REV. 0: NOVEMBER 2005
16
10.2.1 Taring with unknown tare weight
If the weight of the container is not known, in order to tare the scale:
If the scale is already in NET mode (NET annunciator ON)
1. Press the key > in order to cancel the existing tare and return to gross mode.
The scale is in GROSS mode
2. Place the em ty container on the scale, wait for the dis lay to stabilize and ress the key
> in order to measure the new tare
3. The weight dis lay is reset to zero and the NET annunciator is turned ON
4. Remove the em ty container. The weight dis layed is the tare with a negative sign.
5. Proceed with the weighing.
To return to the GROSS weighing mode, ress the key > again. The indicator will show then
the gross weight, i.e. the total weight of the item lus the weight of its container.
10.2.2 Taring with known tare weight
If the weight of the container is known, the scale can be tared by the manual entry of this known
weight. Similarly, the weight of the container will be subtracted from the total weight measured by
the scale and the NET weight will be acquired.
In order to tare the scale:
If the scale is already in NET mode (NET annunciator ON)
1. Press the key > in order to cancel the existing tare
The scale is in GROSS mode and dis lays zero
2. Press the key ~ . Dis lay shows P t A r e and then 0 0 . 0 0 0
3. Ty e in the weight of the container, using key ~ to increment the flashing digit and key
> to move one digit to the right
4. Press key ( to acce t the value
5. The weight dis layed is the tare with a negative sign and NET annunciator is turned ON
6. Continue with the weighing rocedure
To return to the GROSS weighing mode, ress the key > . The indicator will show then the
gross weight, i.e. the total weight of the item lus the weight of its container.
.
..
. While in NET mode, ressing the key ~ will cause the existing tare value to be dis layed briefly
.
..
. Preset taring is ossible only if the scale is stable and zero
.
..
. Preset taring is ossible only if the reset tare value is within the scale ca acity

LD5208 USER MANUAL, REV. 0: NOVEMBER 2005 17
10.3 Weighing
To weigh an item:
1. If the item comes in a container, the scale needs to be tared first (see revious aragra h)
2. Place the item on the scale
3. Wait for the dis lay to stabilize (the status annunciator turns ON)
4. The weight of the item is to read on the indicator’s dis lay
10.3.1 Accumulating the weight measurements
The indicators LD5208 rovide the facility of adding each measured weight to an accumulated
total. This could be useful for the o erator to check how much has been weighed on the scale over
a certain eriod of time.
Set u requirement: Parameter Setu 1, 1.1 =1
1. Place the item on the scale
2. Press the key (. The measured weight is added to total
3. Press key <. The dis lay shows the current total
4. Press key < again. The dis lay shows the number of all accumulated weights (no. of
measurements)
5. Press key < again to return to the normal weight dis lay OR
PRESS KEY ( TO PRINT AND RESET THE total .
.
..
. Pressing the Print key causes data out ut to a rinter or PC in the form :
Current serial number – total weight
.
..
. Pressing the Print key clears the totalizing memory

LD5208 USER MANUAL, REV. 0: NOVEMBER 2005
18
10.4 Piece counting
You can enter the PIECE COUNTING MODE by ressing the key &.
In this mode the res ective status annunciator will switch ON .
Pressing this key again will get you back to the WEIGHING MODE .
Piece counting can be effected in 2 ways
Piece counting by sam ling
Piece counting by entering the average iece weight
10.4.1 Piece counting by sampling – Function 51
First you have to determine the average iece weight. This is done with the method of sam ling.
You have to ut a small sam le on the scale (i.e. a known quantity of items), weigh this sam le
and enter the known number of ieces that com rise the sam le (sam le size). The indicator
divides the weight of the sam le with the number of ieces and stores the average iece weight in
its memory .
.
..
. Sam le size should not be higher than 99 or less than 5 and sam le weight
Piece counting procedure
1. If the sam le is stored in a container, tare the scale first
2. Put the sam le on the scale
3. Press key > and kee ressed for about 3sec
4. Dis lay shows F n 0 0 . Ty e in the number 51, using key ~ to increment the flashing digit
and key > to move one digit to the right
5. Press key ( to acce t the value
6. The dis lay shows P C S X X
7. Ty e in the sam le size and ress (
8. The indicator calculates the average iece weight and stores it in its memory
9. The dis lay shows the number of items that com rise your sam le.
10. The indicator is already in the iece counting mode – Status annunciator pcs is ON
11. Add an unknown quantity of items on the scale
12. The dis lay shows the number of ieces
To exit the iece counting mode and return to the weighing mode, ress key &

LD5208 USER MANUAL, REV. 0: NOVEMBER 2005 19
10.4.2 Piece counting by entering the average piece weight – Function 52
You can follow this rocedure if the average iece weight is known in advance.
You can enter the average iece weight directly, via the indicator’s front anel, without using a
sam le.
Piece counting procedure
1. Press key > and kee ressed for about 3sec
2. Dis lay shows F n 0 0 . Ty e in the number 52, using key ~ to increment the flashing digit
and key > to move one digit to the right
3. Press key ( to acce t the value
4. The dis lay shows X X X X X X
5. Ty e in the known average iece weight in high resolution (100 times more accurate than the
redefined weight)
6. The indicator stores calculates the average iece weight in its memory
7. The dis lay shows the number of items that com rise your sam le.
8. The indicator is already in the iece counting mode – Status annunciator pcs is ON
9. Add an unknown quantity of items on the scale
10. The dis lay shows the number of ieces
To exit the iece counting mode and return to the weighing mode, ress key &
10.4.3 Calculating a series of average piece weights
This rocedure may be used for instance for the calculation of a series of average iece weights of
items frequently counted by your scale
1. If the sam le is stored in a container, tare the scale first
2. Put the sam le on the scale
3. Press key > and kee ressed for about 3sec
4. Dis lay shows F n 0 0. Ty e in the number 53, using key ~ to increment the flashing digit
and key > to move one digit to the right
5. Press key ( to acce t the value
6. The dis lay shows P C S X X
7. Ty e in the sam le size and ress (
8. The indicator calculates the average iece weight and shows it on the dis lay in * 100 accuracy.
9. Press ) to exit
10.5 Printing
The indicators LD5208 rovide the rinting of the weighing result, in various formats according to

LD5208 USER MANUAL, REV. 0: NOVEMBER 2005
20
the needs of each a lication.
Data out ut is effected via COM1 (RS232C) and can be driven to a rinter (TM-295 or Seikosha SP-
2400 com atible) or to a PC.
Data out ut format is selected via SETUP 2, arameter 2.t or functions 21-30 (see aragra h 9.2)
Errors that may occur during the rinting are listed in cha ter 13.
10.5.1 To print a weigh ticket :
1. Wait for the scale to stabilize (res ective status annunciator ON)
2. Press the Print key )
3. The dis lay shows P r I n t briefly and returns to the normal weight dis lay
10.5.2 To produce a copy of the last weigh ticket :
If the first weigh ticket has not been rinted clearly, or the a er has been damaged, you can
roduce a co y of the last weigh ticket,
.
..
. provided no other action has been taken after the last print (no other key has been
pressed)
1. Press key > and kee ressed for about 3sec
2. Dis lay shows F n 0 0 . Ty e in the number 43, using key ~ to increment the flashing digit
and key > to move one digit to the right
3. Press key ( to acce t the value
4. The dis lay shows P r I n t briefly and a co y of the last weigh ticket is rinted
.
..
. The last printout is lost in power down
10.5.3 To temporarily disable the printer output :
If for some reason you wish disable the rint function, then
1. Press key > and kee ressed for about 3sec
2. Dis lay shows F n 0 0 . Ty e in the number 20, using key ~ to increment the flashing digit
and key > to move one digit to the right
3. Press key ( to acce t the value
.
..
. Printer output is enabled automatically on power up
Other manuals for LD5208
1
Table of contents
Other Leon Engineering Accessories manuals
Popular Accessories manuals by other brands

X10
X10 Motion Monitor PR511 owner's manual

Behringer
Behringer U-PHONO UFO202 user manual

Cloudinary
Cloudinary WR-180 instruction manual

Seeed
Seeed Grove Moisture Sensor user manual

HoMedics
HoMedics AromaSpa ARM-CAN1 Instruction manual and warranty information

Chal-tec
Chal-tec WALDBECK 10030596 quick start guide

Skywalk
Skywalk RANGE X-ALPS2 manual

SCANDIA ELEVATOR
SCANDIA ELEVATOR I Series Assembly instructions

Pepperl+Fuchs
Pepperl+Fuchs RMS-D manual

Snom
Snom M500 Quick installation guide

Johnson Controls
Johnson Controls NS-DTN7043-2 installation instructions

ORELL
ORELL DEK Installation, operation and maintenance manual