Leon Paul Wireless User manual

1
Instructions
Table of Contents
Hardware and Controls................................................................................................
.....
Base station front face .............................................................................. 4
Side panel.................................................................................................. 6
Fencer pack ............................................................................................... 7
Radio link and sync process ................................................................
..............................
How to sync packs to the base station ..................................................... 8
Radio channel............................................................................................ 8
Fencing ................................................................................................
..............................
Pack location and orientation ................................................................. 10
Calibration............................................................................................... 10
Piste detection ........................................................................................ 11
Testing..................................................................................................... 11
Charging and Power................................................................................................
..........
Base station battery ................................................................................ 12
Fencer pack battery ................................................................................ 12
Extension / repeater lights...................................................................... 12
Troubleshooting................................................................................................
................
Please read the quick start guide for an annotated description of all of the systems,
features and an explanation of how to get started fencing.
Please read and retain these instructions for future reference.

2
Wireless Essentials
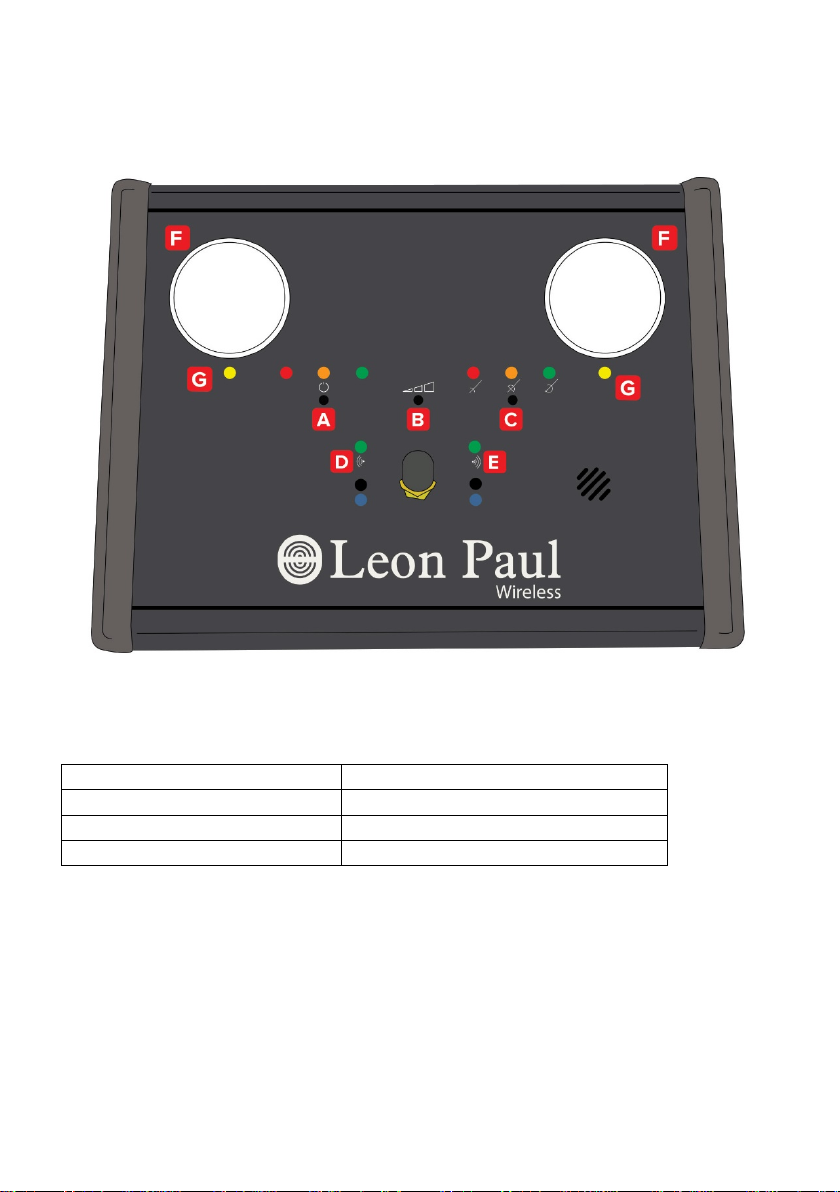
•To turn the base station on, press the power button[A] on the left hand side
of the face.
•To start fencing you need a fencer pack synchronised to each side of the
base station.
•There is a 2 stage detection and synchronisation process, when a pack (or
any item) is within the required distance from the antenna [B], the light [F]
will show yellow to signify that the base station is attempting to synchronise
with a pack, if a pack that is switched on is being held close to the antenna
then it will show blue to signify that it is synchronising, once complete the
light on the side of the base station that you are holding the pack over will
show solid green. This indicates that the pack is synchronised to this side of
the piste/box.
•Once a pack is synced to a base station each time the two units are turned
on the pack will automatically link to the base station and bring on the green
link light. You do not need to re sync your packs each time you fence.
•If you don’t have a pack linked to each side of the base station you can’t
start fencing.
•Ensure that the fencer pack is placed in your pocket with the antenna logo
facing outwards. This is essential to maintain a proper connection. The pack
must be close to your body in a snug pocket, not loose, for example in a side
pocket of tracksuit trousers. If there is more than 1cm between the pack
and your body then the system will not work correctly.
•Select your weapon using the button [C] on the right hand side of face of the
box.
•You then need to select if you are using a metal piste or not using the
button [J] on the side of the base station. Press the button for a few seconds
to switch between piste mode on (small green light on [K]) and off (small
green light off). It is important that the piste mode is set correctly for your
use.
•For Foil and Epee you will need to calibrate the system before you fence.
You must do this each time you change a fencer or a piece of fencing
equipment. In foil and epee mode as soon as the base station detects any
hit the blue lights will come on until you have calibrated.
•To calibrate in Foil mode, you need to hit your opponents target area three
times. Each fencer needs to do this in turn (3 then 3). For epee instead of
hits to the target you need to do hits to the guard. Once calibrated the blue
light will go out and you are then ready to fence.
•You must recalibrate each time there is a change of fencer or in equipment.
To recalibrate you need to turn off any one of the three pieces of kit
momentarily. (Base/Pack/WHAT?) Switching one of the fencer packs off is
the easiest way to tell the system to recalibrate. With a bit of practice you

3
can do this without removing it from your pocket. It will then initiate a
calibration before you start fencing again.
•For Sabre there is no calibration but you need to make sure you have a jump
lead plugged in between the fencer pack and the body wire on each pack.
•Do not depress the tip in Foil or Epee with your non fencing hand or let
another person or your opponent press the tip with their bare hand. Hit
registration on bare skin will not be reliable and it will upset the
calibration.
•Always test ONLY on the floor, your foot or your opponents target area. You
may get a coloured light, white light or no light when you hit bare skin, this
does not mean the system is faulty.
•When testing do not hold your weapon with you non fencing hand, allow
your opponent to hold your weapon with their non-fencing hand or allow a
third person such as the referee to hold your weapon. Holding the blade
will interfere with the proper registration of hits and may upset the
calibration.

4
Hardware and controls
Base station front face
A) Power switch and battery level indicator
Press to turn on
Red flashing
Less than 10% left
Red
Less than 30% left
Orange
Less than 50% left
Green
more than 50% left
We recommend that you do not charge the base station until you are down to 10%
battery. This will help maintain the life of the battery.
B) Volume button
Press to cycle between mute, low, medium and high.
C) Weapon select
Press to toggle between weapons.

5
D) Proximity sensor and Link Light Left hand side
The proximity sensor detects packs that are held close to the side of the antenna.
They then link to each other and the green link light should come on.
E) Proximity sensor and Link Light Right hand side
As above but for the fencer on the Right hand side of the piste.
F) Hit indicator
This is the main hit indication lamp but will also show a yellow light when an object is
in proximity to the antenna and a blue light when a pack has successfully synced to
the base station
G) Amber blocking lamp
This will light amber when a fencer touches their lame with their own weapon.
Table of contents