Leonics VIPER User manual

USER’S GUIDE
CONTENT
1. SAFETY INSTRUCTIONS ................................................................................... 1
1.1 Electrical safety ................................................................................................................... 1
1.2 Safety instruction for installation and operation ................................................... 1
1.3 Battery safety ...................................................................................................................... 2
2. INTRODUCTION ............................................................................................... 3
2.1 General .................................................................................................................................. 3
2.2 Features................................................................................................................................. 3
2.3 Optional ................................................................................................................................ 3
2.4 Special Optional ................................................................................................................. 4
3. FRONT AND REAR PANEL ................................................................................ 4
3.1 Front panel ........................................................................................................................... 4
3.2 Rear panel ............................................................................................................................ 5
4. INSTALLATION AND OPERATION .................................................................... 6
4.1 Preparation .......................................................................................................................... 6
4.2 Installation ........................................................................................................................... 6
5. TROUBLESHOOTING ........................................................................................ 8
6. BATTERY REPLACEMENT.................................................................................. 9
7. STORAGE .........................................................................................................10
8. SOFTWARE INSTALLATION ............................................................................ 10

- 1 -
SAFETY INSTRUCTIONS
Please read carefully and follow this user’s guide carefully and completely.
Important: Please keep this user’s guide for reference in order to use the UPS properly and safety.
This user’s guide consists of safety instructions, introduction, front and rear panel,
installation, operation and troubleshooting.
For product safety, please check this product annually by our service qualied personnel or if
there are any symptom of problems which are not mentioned in this guide or any queries, please
contact your LEONICS local distributors, LEONICS Service Center, send e-mail to support@leonics.
com or visit www.leonics.com
For your convenience and quick reference for our service, pleas ll the
requested informations in the blanks below:
UPS Model:
Serial Number:
Purchased Date:
Purchased From:
Warning
Risk of electric shock, DO NOT remove cover. No user serviceable part inside,
please refer servicing to qualied service personnel.
1.1 Electrical Safety
1.1.1 Do not work alone where there are electrically hazardous conditions.
1.1.2 Contact with live conductors will cause burns and dangerous electric shock.
1.1.3 Only qualied electricians allow to install and wiring this unit and system.
1.1.4 Periodically check your cable, outlets, terminal blocks and power source to make sure
that they are in good condition.
1.1.5 To reduce risk from electric shock, if you can not nd the electrical ground ( ) of
the building, connect loads to UPS before plug in the UPS to AC power source.
1.1.6 Do not touch any electrical connection when the unit is operating.
1.1.7 Use ONLY one hand when plugging or unplugging the loads in order to avoid electric
shock from touching two surfaces with dierent potential.
1.1.8 It is recommended to connect the UPS to a three wires AC power source (two live wires
and an electrical ground) which connects to a protected circuit such as employs a fuse
- 2 -
or circuit breaker.
1.2 Safety instruction for installation and operation
1.2.1 Before installing or using this unit, read all instructions and caution markings on the
UPS and all connected loads, and all sections of this user guide.
1.2.2 Install this unit in a temperature and humidity controlled indoor area with adequate
air ow and away from chemical particles or ammable substances. Avoid installing
the unit near radio transmission station, heat dissipation equipment and direct
sunlight.
1.2.3 This unit has ventilation grills. Ensure that sucient ventilation is provided. DO NOT
block the ventilation grills. The distance of minimum 30 cm. between the wall and the
unit is necessary.
1.2.4 Use insulated tools to reduce your risk of electric shock.
1.2.5 Remove all jewelry or other metal objects such as rings, necklace, bracelets and
watches when installing this product.
1.2.6 Verify correct terminal block connections to prevent the damage occurs.
1.2.7 Before connecting the communication interface signal cable, turn o the UPS and
disconnect the UPS from utility power source.
1.2.8 Turn on the UPS before turn on all connected loads to prevent surge damage.
1.2.9 DO NOT connect the utility power source into the UPS OUTPUT. This may cause the
UPS damaged.
1.2.10 During a heavy rain storm, avoid using electrical appliances including the UPS to
prevent damage from lightning strike.
1.2.11 Use soft cloth to clean the UPS when it is turned o. DO NOT clean it with solvent.
1.2.12 This UPS is not intended for use with life rescue equipment! A failure of the UPS might
cause the life rescue equipment to fail and endanger human lives.
1.3 Battery Safety
1.3.1 The UPS has hazardous voltages inside, do not disassemble any parts of UPS except for
the battery. Users are not allowed to repair, recondition or disassemble the UPS. This
must be done by Leonics qualied technicians only.
1.3.2 The UPS contains sealed lead acid battery and must be recycled properly. For recycling
please return it to a LEONICS local distributor or LEONICS Service Center or contact
your local recycling center for proper disposal information.
1.3.3 Do not dispose of battery in a re. They may be exploded.
1.3.4 Do not disassemble battery. They contains poisonous electrolyte which is harmful to
your skin and eyes.
1.3.5 Replace battery with the same type and rating.

- 3 -
1.3.6 When replacing a battery, use tools with insulated handles and remove any watch
rings or other metal objects that you wear in order to avoid electric shock.
1.3.7 If you have to storage UPS for long period of time, be sure that battery is fully charged
and it need to be recharged every three months to preserve the condition of the
internal battery. Only connect the UPS to utility line and turn on, then leave the UPS
connected to utility line for at least 8 hours.
INTRODUCTION
2.1 General
VIPER UPS is a compact and light weight uninterruptible power supply for oce
automation equipment (computers and peripherals such as monitors, modem, printers, fax
machines, etc.). Its major function is to eliminate any power problems such as a blackout,
brown out, sag, surge, spike, etc. that might cause malfunctions of the connected loads. It
also provide automatic voltage regulator (AVR), surge suppressor and backup power system.
The LED and alarm indication indicates the operating status both in normal operation
and power failure, low battery power alarm. UPS can be started when there is no utility power
to supply backup power the connected loads in an emergency.
2.2 Features
- Surge protection for telephone line: Protect electrical appliances or data from surges
coming from telephone line.
- Surge protection for laser printer: Surge protection outlet for prevent the laser
printer from surges (This outlet does not supply backup power when power fails).
- Automatic No load shutdown: UPS shuts down itself automatically when there is no
connected load when power fails in order to save battery power.
- Automatic restart: After the utility line turns back to normal, UPS will restart itself
automatically.
- Automatic UPS and Battery Test: When startup the UPS, it will start testing itself and
battery automatically.
- AC/DC start: UPS can be started by AC power from utility line or DC power from
battery.
2.3 Optional
The optional for VIPER UPS has an alphabet sux in the model number as follow.
- “H” sux in the model number (Hot swappable battery): User can replace new battery
even when the UPS is running.
- 4 -
- “S” sux in the model number (Easy-Mon X Software): This optional model will
provide RS-232 communication port at the rear side of UPS for connecting to the
computer in order to display the electricity status and UPS operation via Easy-Mon X
software.
2.4 Special optional
- No load shutdown option setting: The special optional switch to enable automatic
shutdown when there is no load and power fails. (No load means the total power of
all connected loads are lower than 60 Watt)
- Additional UPS output: The special extra Europe CEE-7 sockets which can plug more
electrical appliances.
FRONT AND REAR PANEL
3.1 Front panel
3.1.1 LINE (
): Indicates that UPS is operating under normal condition.
3.1.2 ALARM (
): Indicates that UPS is operating under power fails or there is fault. The
following tables show the meaning of LED and alarm indication.

- 5 -
LINE
(green)
ALARM (red) Audible alarm UPS status
When user starts the UPS or the UPS starts automatically, then the UPS tests itself.
Blink once - - Battery is in good condition.
- Lit for 2 seconds alarm sound for 2 seconds Battery power is very low
When UPS is operating
Lit - UPS is operating normally.
Blink - UPS received shutdown command from
computer and it will shutdown in 2
seconds (option)
- Slow blink
(Lit 1 second/
O 3 seconds)
Alarm sound every
3 seconds
Blackout or power fails. UPS is supplying
backup power from battery.
- Fast blink
(Lit 0.5 second/
O 0.5 seconds)
Alarm sound every
0.5 seconds
Battery backup power is running out.
- Lit Alarm sound continuosly UPS output shorts circuit.
UPS will automatically shutdown.
3.2 Rear panel
3.2.1 POWER swtich: The switch to turn on and o the UPS.
3.2.2 SURGE PROTECTION FOR TELEPHONE LINE/LAN LINE (option): The ports to plug in
telephone or LAN jacks before fax machine, modem, telephone or computer in order
to protect them from signal surge.
3.2.3 SURGE PROTECTION OUTPUT FOR LASER PRINTER: The socket which connects to surge
protection circuit for laser printer. (This socket does not supply backup power when
power fails)
3.2.4 Magnetic Breaker: Resettable breaker for protecting UPS from over load or short circuit.
3.2.5 AC INPUT power cord: The input power cord to connect to utility line.
3.2.6 RS-232 port (option): The optional communication port for connecting RS-232 signal
cable to computer and monitor via Easy-Mon X software.The standard model does not
provide this communication port. It is available only “S” sux model.
3.2.7 UPS OUTPUT: The sockets which are connected to the UPS backup power system for
connecting to electrical appliances such as computer, monitor, modem, printer, fax
machine, etc.
3.2.8 NO LOAD SHUTDOWN switch (option) : The special optional switch to enable auto-
matic shutdown when power fails and there is no connected loads. (Total power of all
connected loads are lower than 60 Watt). This special optional switch is not supplied
with the standard product.
- 6 -
3.2.9 Additional UPS Output (option) : The special optional extra Europe CEE-7 socket which
is connected to UPS backup power system. These special optional socket is not
supplied with standard product.
INSTALLATION AND OPERATION
Caution: The warranty will be voided, if this product has been improper installation,
not following the installation instruction that mentioned in this user’s guide.
4.1 Preparation
4.1.1 Before you install the UPS, give it a through visual examination to ensure it has not
been subjected to shipping damage. If it is not in perfect condition, please contact
4.1.2 Check the rating of your AC power source and all connected loads to suit with the UPS
rating.
4.1.3 Transport the UPS with its packaging until it arrive the installation location to avoid
shipping damages.
4.1.4 Install the UPS at least 30 cm free space from wall to enable easy access for installation,
operation and maintenance.
4.2 Installation
4.2.1 For the optional “S” sux model, connect a RS-232 signal cable from computer to the
RS-232 port at the rear side of UPS for monitoring the operating status via Easy-Mon X
software.
Caution: Before connecting the signal cable, turn o the POWER switch
and disconnect the AC INPUT power cord from the utility line.
4.2.2 Connect a signal cable to telephone line or LAN line (option).
IN : Connect telephone line / LAN line (option) to the UPS
OUT: Connect telephone line / LAN line (option) from the UPS to the input
socket of the telephone, fax machine, modem or LAN card (option).
Note: To achieve maximum performance of surge protection, UPS must be
connected to grounded electrical system to work properly. Connecting to
non-grounded electrical system, it will not be able to properly protect your
electrical equipment from transient voltage surge suppression.

- 7 -
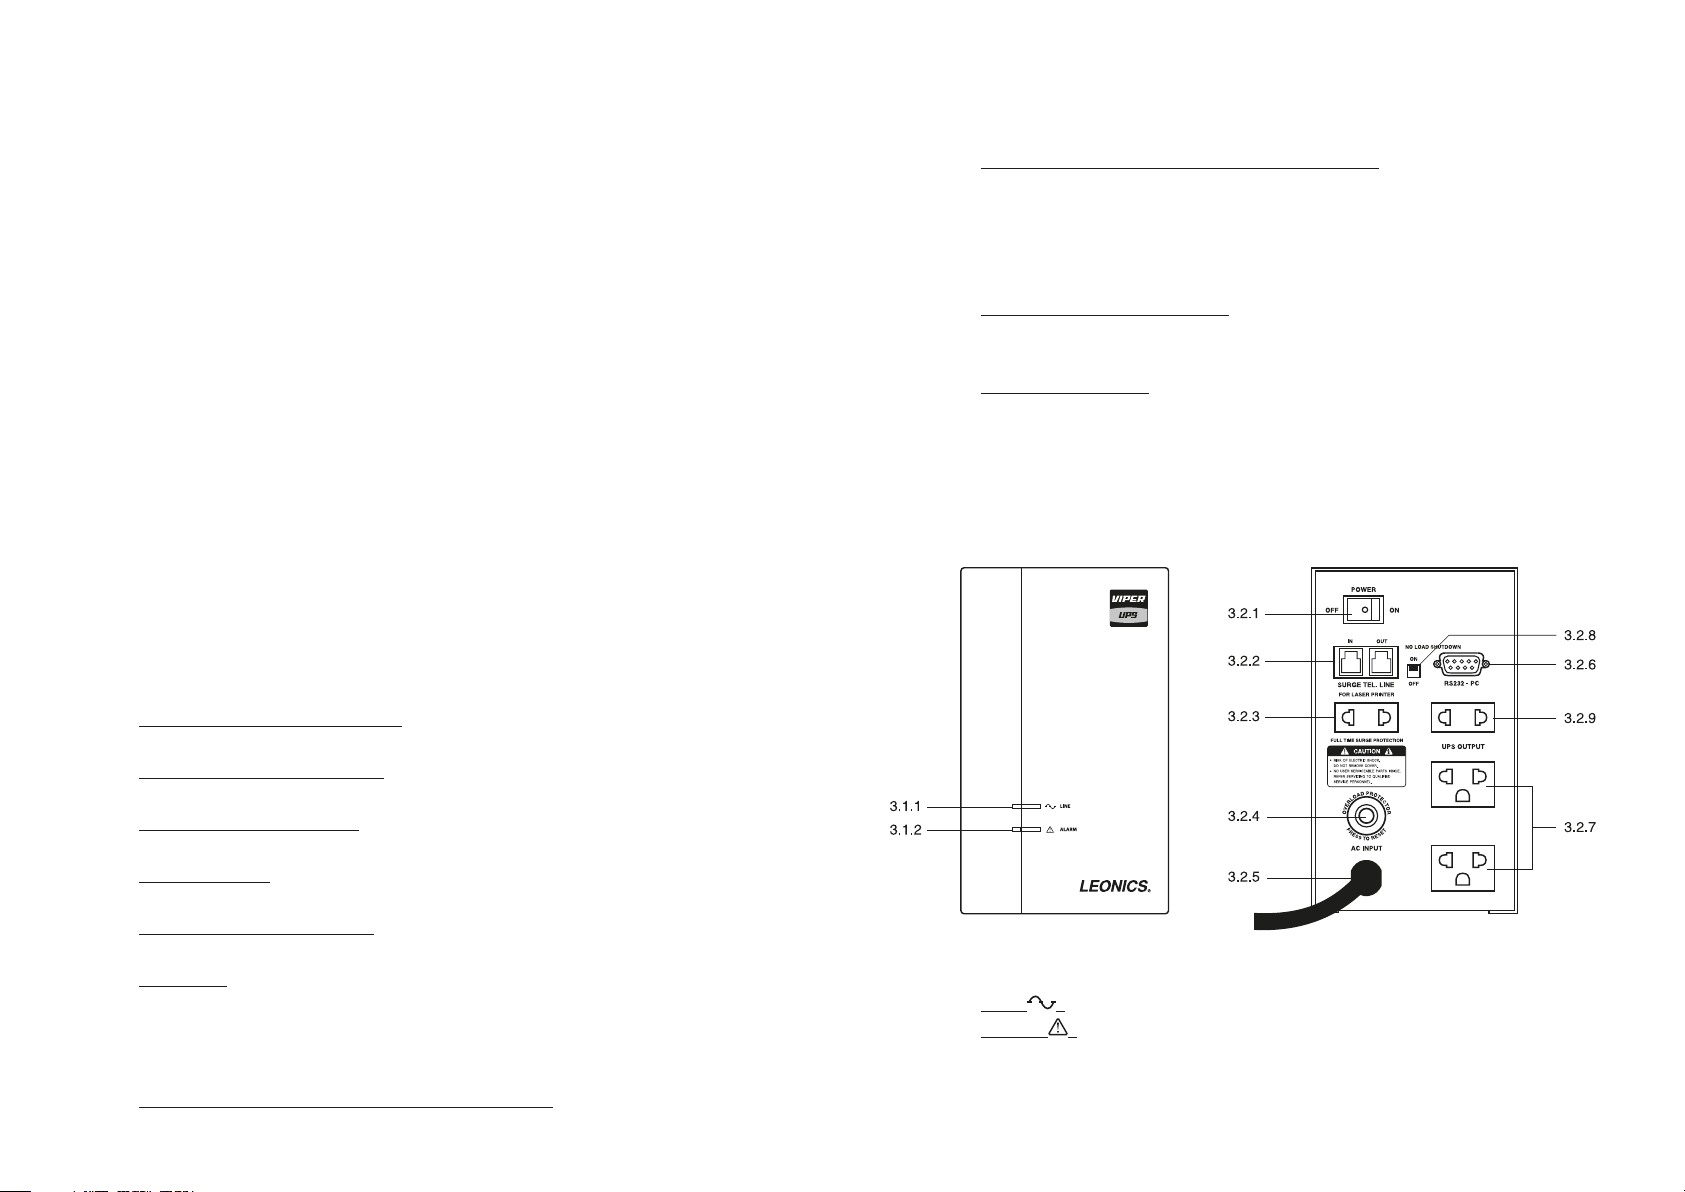
4.2.3 Set NO LOAD SHUTDOWN switch (special optional) to ON position to shutdown UPS
automatically when power fails and all connected loads are less than 60 W in order to
save battery power. (This optional switch is set at OFF position as default from factory)
If the connected load is PABX which consumes power less than 60 Watt, set the switch
to OFF position.
Note: For the standard product which does not have the NO LOAD SHUTDOWN
switch at the rear side of the UPS, UPS has built-in this features. It will auto-
matically shutdown when power fails and detects that connected loads are
less than 60 Watt.
4.2.4 Plug in the electrical appliances such as computer, monitor, modem, fax machine, etc.
to the UPS OUTPUT outlets at the rear side of the UPS.
4.2.5 Plug in the laser printer to the“FOR LASER PRINTER”outlet which is connected to surge
protection system. (This socket does not supply backup power when power fails)
4.2.6 Plug in the AC INPUT power cord to the utility line.
4.2.7 Turn on the POWER switch of the UPS and then turn on all connected loads.
4.2.8 Test the UPS after the battery is charged by turn on POWER switch and wait until the
LINE indicator is lit. Then, turn on all connected loads. To simulate blackout situation,
unplug AC INPUT power cord from utility line, UPS will supply backup power to loads
automatically. The ALARM indicator blinks slowly and alarm sounds simultaneously.
Then, plug the AC INPUT power cord back to utility line. The ALARM indicator is o,
no alarm sound and the LINE indicator is lit. Notice that all connected loads are still
operating during test. For more condence, repeat the test for 3-4 times.
4.2.9 After nished work with the computer, shut it down and turn o the UPS to keep
sucient battery power is available when there is blackout.
4.2.10 If you have to storage UPS for long period of time, be sure that battery is fully charged
and it need to be recharged every three months to preserve the condition of the
internal battery. Only connect the UPS to utility line and turn on, then leave the UPS
connected to utility line for at least 8 hours.
- 8 -
TROUBLESHOOTING
Symptoms Possible causes Solutions
Turn on POWER switch, LINE
indicator extinguished and
alarm sounds, but UPS oper-
ates normally.
AC INPUT power cord is not
properly plugged in to the
utility line.
Properly plug in the AC INPUT power
cord.
There is no power supply to
AC input power cord.
Move the UPS to another wall outlet.
If the problem persists, please con-
tact us.
Magnetic breaker is tripped. Reset breaker at the rear side of the
UPS.
ALARM indicator blinks and
alarm sounds simultaneously.
Magnetic breaker does not
trip.
AC input power cord is not
properly plugged in to the
utility line.
Properly plug in the AC INPUT power
cord.
Main circuit breaker of
AC power source is tripped.
Reduce loads which are connected
to the same wall outlet or move the
UPS to another wall outlet.
ALARM indicator is lit and
alarm sound continuously.
UPS does not supply backup
power and magnetic breaker
tripped.
UPS is overloaded or short
circuit.
1. Turn o the UPS and reduce some
loads until the total consumption of
all connected loads are less than UPS
power rating.
2. Reset breaker at the rear side of
the UPS.
When a blackout occur, the
ALARM indicator is lit and
alarm sound continuously.
Magnetic breaker is normal,
but UPS does not supply
backup power.
UPS is overloaded. Turn o the UPS and reduce some
loads until the total consumption of
all connected loads are less than UPS
power rating.
When a blackout occur, the
LINE and ALARM indicators
extinquished and no alarm
sound. UPS does not supply
backup power.
Battery power is running out. Once the utility line turns back to
normal, turn on the UPS for at least 8
hours to recharge its battery.
UPS supplies backup power
very short time.
UPS is overloadded. Reduce some loads until the total
power consumption of all connected
loads are less than UPS power rating.
Battery is deteriorating. Turn on the UPS for at least 8 hours
to recharge its battery, then test. if
the symptom persists, it need to re-
place the new battery. Please con-
tact us.

- 9 -
BATTERY REPLACEMENT
Battery replacement is only provided in“H” sux model. The standard product does not have
this feature.
Warning
1. Although battery replacement can be done when the UPS is power on,
we recommend to turn o all connected loads and UPS before replace
the battery for your own safety.
2. When removing and installing the new battery. DO NOT short metal
parts across the battery terminals and do not to short the battery
terminals to each other. Electric shock could occur and it could cause
harm to you and battery.
6.1 Lay down the UPS and unscrew 2 fasteners as shown.
6.2 Open the battery cover. Then, tilt the UPS to let the battery come out.
- 10 -
6.3 Disconnect the black and red wires from the battery terminals respectively. Then pull out the
battery and replace the new one.
6.4 Reconnect the black ( - ) and red ( + ) wire to the battery terminals respectively.
Caution: Replacing battery with the same number and type of battery.
6.5 Replace and screw the battery cover in place and continue using the UPS normally.
STORAGE
If you have to storage UPS for long period of time, be sure that battery is fully charged and it
need to be recharged every three months to preserve the condition of the internal battery.
7.1 Plug the AC INPUT power cord to utility line.
7.2 Turn on the POWER switch and leave the UPS connected to the utility line for at least 8 hours.
7.3 Test the UPS by following the section 4.2.8
7.4 Turn o the UPS and disconnect UPS from utility line. Then, keep it in dry and cool place.
7.5 Recharge battery every 3 months and battery must be fully charged to prolong battery life.
SOFTWARE INSTALLATION
Easy-Mon X software is compatible to “S” sux model only. The standard product can not
works with this software.
8.1 Turn o computer and UPS by pressing the POWER switch at the rear side of the UPS. Then,
unplug the AC INPUT power cord from utility line.
8.2 Connect the RS-232 cable from computer to RS-232 port at the rear side of the UPS.
8.3 Plug in the AC INPUT power cord to utility line, then turn on the computer.
8.4 Insert the Easy-Mon X software CD into CD-ROM drive.
8.5 Leonics presentation will automatic show on computer monitor. Press the“ESC” button on
keyboard to exit the Macromedia ash presentation, then the Easy-Mon X CD window
will display on screen.

- 11 -
8.6 Install Easy-Mon X Package by select the operating system of your computer. Then, click
“Select” button and follow instruction on screen.
8.7 When Easy-Mon X is completely installed, Open the “Easy-Mon X Setup”. Then, click “Auto
Detect UPS” button to search for UPS and communication port automatically.
8.8 Once the location of UPS communication port has been found. Open the “Easy-Mon X Spy”
program to monitor power data and operating status of the UPS.
LEN.MAN.UPS.107 Rev.3.00/2012
█www.leonics.com █Copyright © 2012 Leonics Co., Ltd. All rights reserved.
Table of contents
Other Leonics UPS manuals