manuals.online logo
Brands
  1. Home
  2. •
  3. Brands
  4. •
  5. Lettuce Grow
  6. •
  7. Lawn And Garden Equipment
  8. •
  9. Lettuce Grow Glow Rings User manual

Lettuce Grow Glow Rings User manual

GLOW RINGS™
A S S EMBLY
GUIDE
Copyright © 2020, Lettuce Grow®
An Initiative of:
FAQs
lettucegrow.com/faq
Facebook Community
facebook.com/groups/LettuceGrowCommunity
Digital Assembly & Growing Guide
lettucegrow.com/growing-guide
Indoor Grow Guide
lettucegrow.com/resources/the-lettuce-grow-
guide-to-indoor-growing
CONTACT US
If you have any other questions, please reach
out to us! We can’t wait to help you grow!
help@lettucegrow.com
Call or text (512) 234-4001
100% RECYCLED &
RECYCLABLE PAPER
02 03
TABLE OF CONTENTS
GLOW RINGS BOX CONTENTS
ASSEMBLING YOUR GLOW RINGS
WHEN TO GET GLOWING
03
04
07
INDIVIDUAL BOX CONTENTS
GLOW RINGS
Need help? Call or text (512) 234-4001
Please note the power supply will get hot to the touch. The high temperature is normal but could cause adverse effects on
certain materials such as linoleum, countertops, and carpet. Do not place in direct sunlight. Keep away from children. If you
have concerns we recommend using a cord storage box.
California Residents: Prop 65 compliance information available on lettucegrow.com
1 RING BOX 2 RING BOX 4 RING BOX
Dual-Cabled Glow Ring
Top Single-Cabled Glow Ring
Pipe Coupler
Glow Ring Pipe Extension
Power Supply
Timer
"DUAL-CABLED" LIGHT RING
TOP "SINGLE-CABLED" LIGHT RING
PIPE COUPLER
POWER SUPPLY
PIPE EXTENSION FOR LIGHT RING KIT
"DUAL-CABLED" LIGHT RING
TOP "SINGLE-CABLED" LIGHT RING
PIPE COUPLER
POWER SUPPLY
PIPE EXTENSION FOR LIGHT RING KIT
"DUAL-CABLED" LIGHT RING
TOP "SINGLE-CABLED" LIGHT RING
PIPE COUPLER
POWER SUPPLY
PIPE EXTENSION FOR LIGHT RING KIT
"DUAL-CABLED" LIGHT RING
TOP "SINGLE-CABLED" LIGHT RING
PIPE COUPLER
POWER SUPPLY
PIPE EXTENSION FOR LIGHT RING KIT
"DUAL-CABLED" LIGHT RING
TOP "SINGLE-CABLED" LIGHT RING
PIPE COUPLER
POWER SUPPLY
PIPE EXTENSION FOR LIGHT RING KIT
"DUAL-CABLED" LIGHT RING
TOP "SINGLE-CABLED" LIGHT RING
PIPE COUPLER
POWER SUPPLY
PIPE EXTENSION FOR LIGHT RING KIT
"DUAL-CABLED" LIGHT RING
TOP "SINGLE-CABLED" LIGHT RING
PIPE COUPLER
POWER SUPPLY
PIPE EXTENSION FOR LIGHT RING KIT
"DUAL-CABLED" LIGHT RING
TOP "SINGLE-CABLED" LIGHT RING
PIPE COUPLER
POWER SUPPLY
PIPE EXTENSION FOR LIGHT RING KIT
04 05
ASSEMBLING YOUR
G L OW R I N G S
Get your next module level ready and feed the longer,
non-connected Glow Ring cable up and through the
center hole before you attach the second module to
the rst Glow Ring. Hint: It’s easier to feed the cable
through the module center before locking the module
in place.
Repeat step 3 & 4 for each dual-cabled Glow Ring and
module, and save the top single-cabled Glow Ring
for last. The short connector cords should always
connect to the lower ring, and the longer connector
cords should always thread up to the ring above.
Attach the single-cabled Glow Ring to the top module
and connect the long cable from the ring below to
the single cable connection. There should not be an
unconnected cable once all Glow Rings are installed.
Any unconnected cables will cause damage to the
device.
4
If you already have a Farmstand, begin by
unplugging your Farmstand, removing the lid,
diuser cap, ll port cap, gasket, and all modules
except for the rst one. If you are setting up a new
Farmstand follow the Farmstand Assembly guide
and add just one module. For all indoor Farmstands
we recommend placing it on a mat to avoid water
dripping o plants and onto the oor.
Set aside your top single-cabled Glow Ring (you’ll use
this last). The two ends of the dual-cabled rings will
arrive screwed together. You will need to unscrew
them in order to connect them to the rings above and
below. Pass the connector side of the power supply
cord through the ll port opening and up through the
center module hole. Make sure the cord goes down
before up, creating slack in the cord.
Attach the rst dual-cabled Glow Ring™ to the top
of the rst module. Once attached, connect the ring
cable to the power supply cable. The cap should be
screwed until it meets the tip of the arrow. A tight
connection will protect from water damage and is
important for the longevity of the lights.
1
Power Supply
Power Supply
Power Supply
Dual-Cabeled
Glow Ring
Top Single-Cabled
Glow Ring
2
3
5
Power Supply
Dual-Cabeled
Glow Ring 6
Power Supply
Cable Cap
06
ASSEMBLING YOUR
G L OW R I N G S
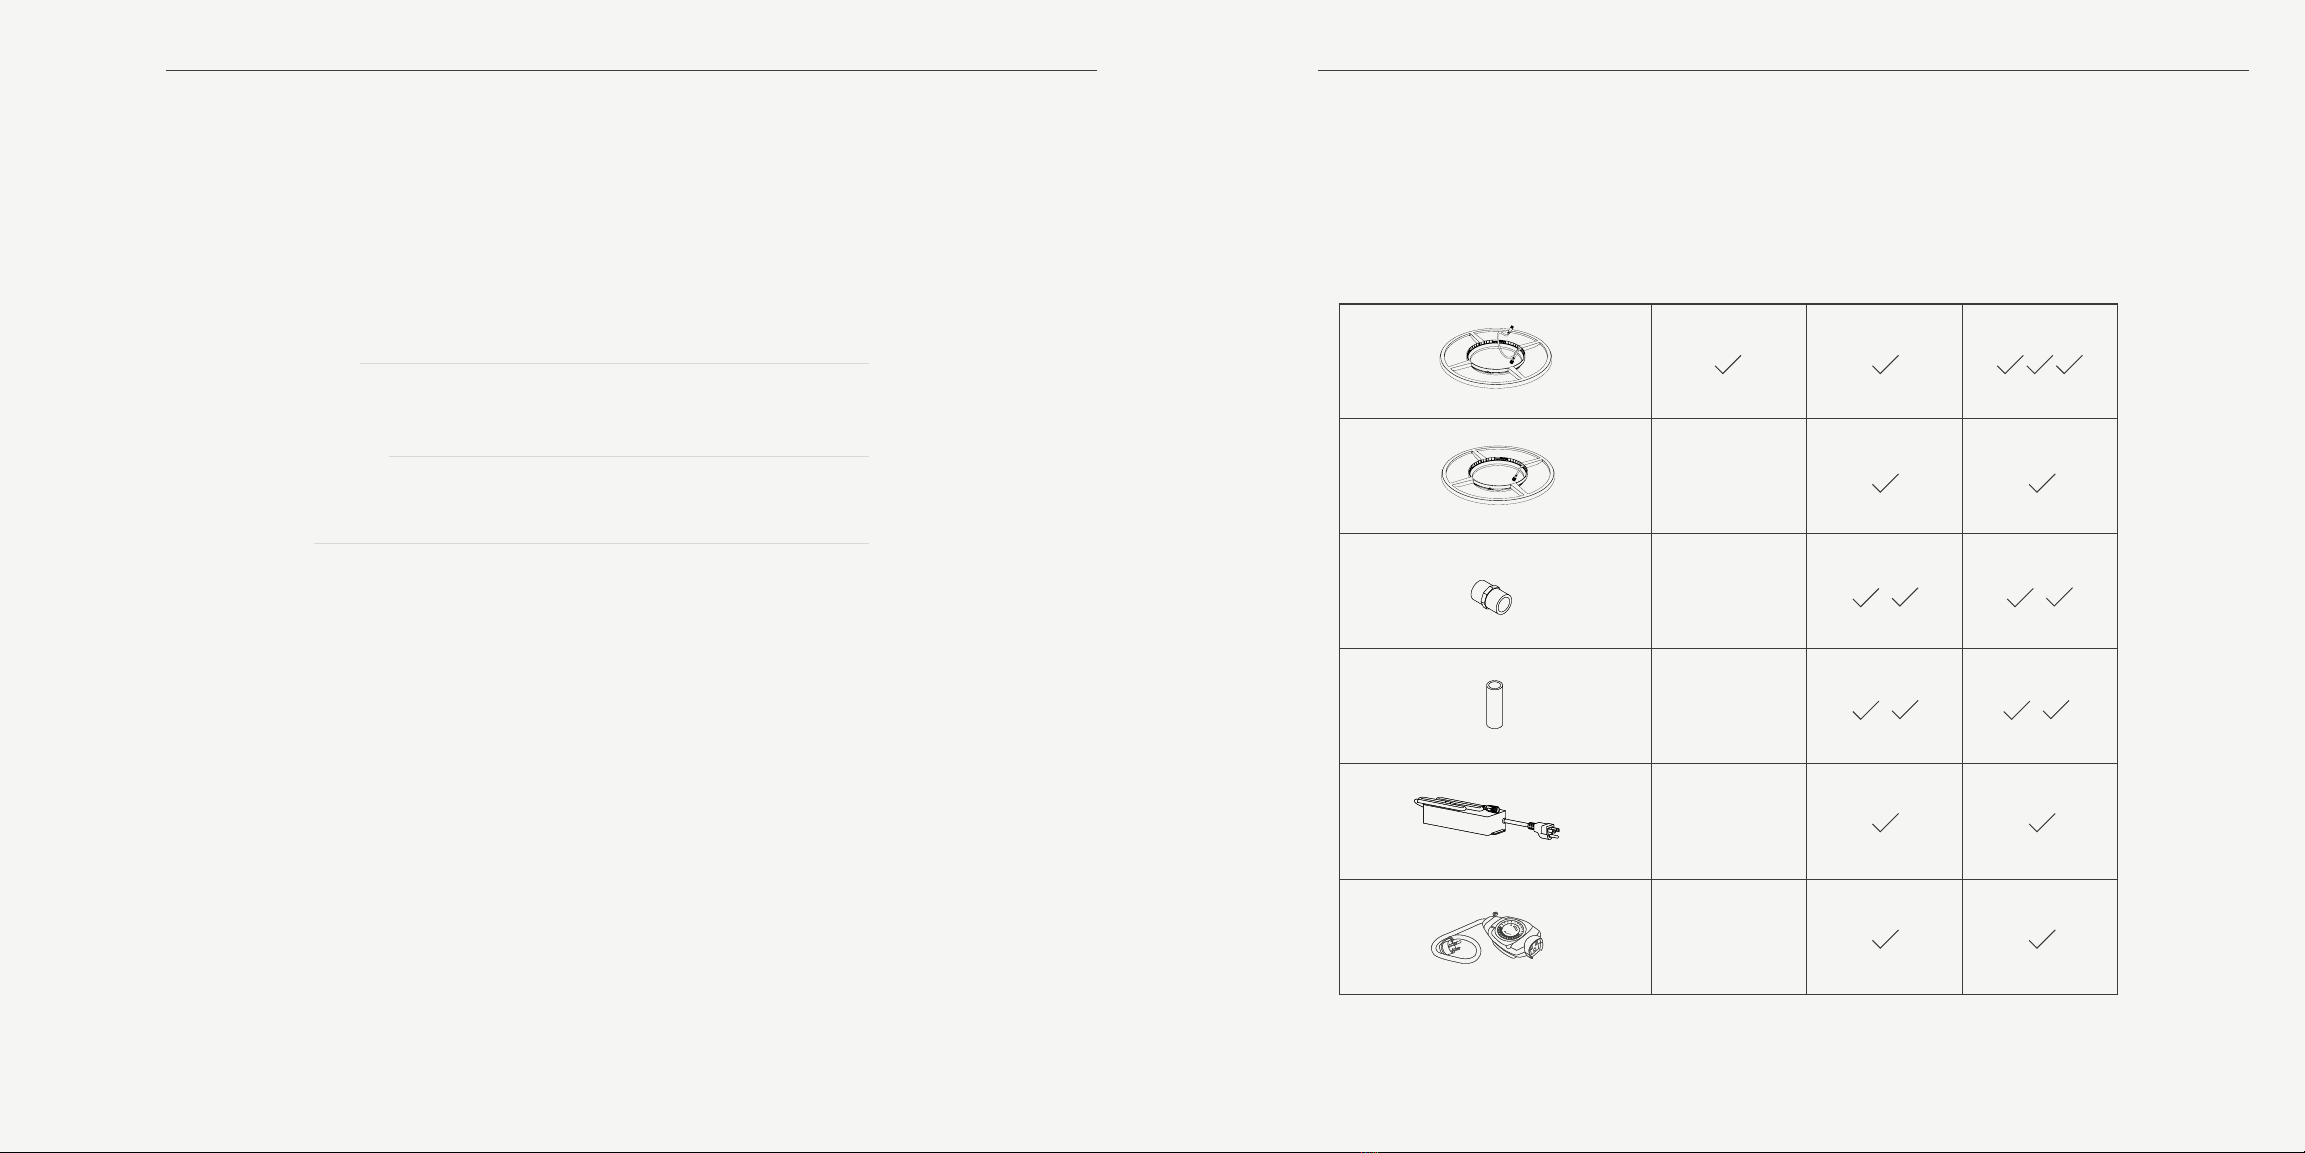
The small pipe extender and coupler (received in
the Glow Rings box) should be placed at the top of
the pipe stack, closest to the diuser. Note: Pipe
extensions and couplers are only needed for 24-, 30-
and 36-plant Farmstands. 36-plant Farmstands will
need two pipe extensions and two couplers.
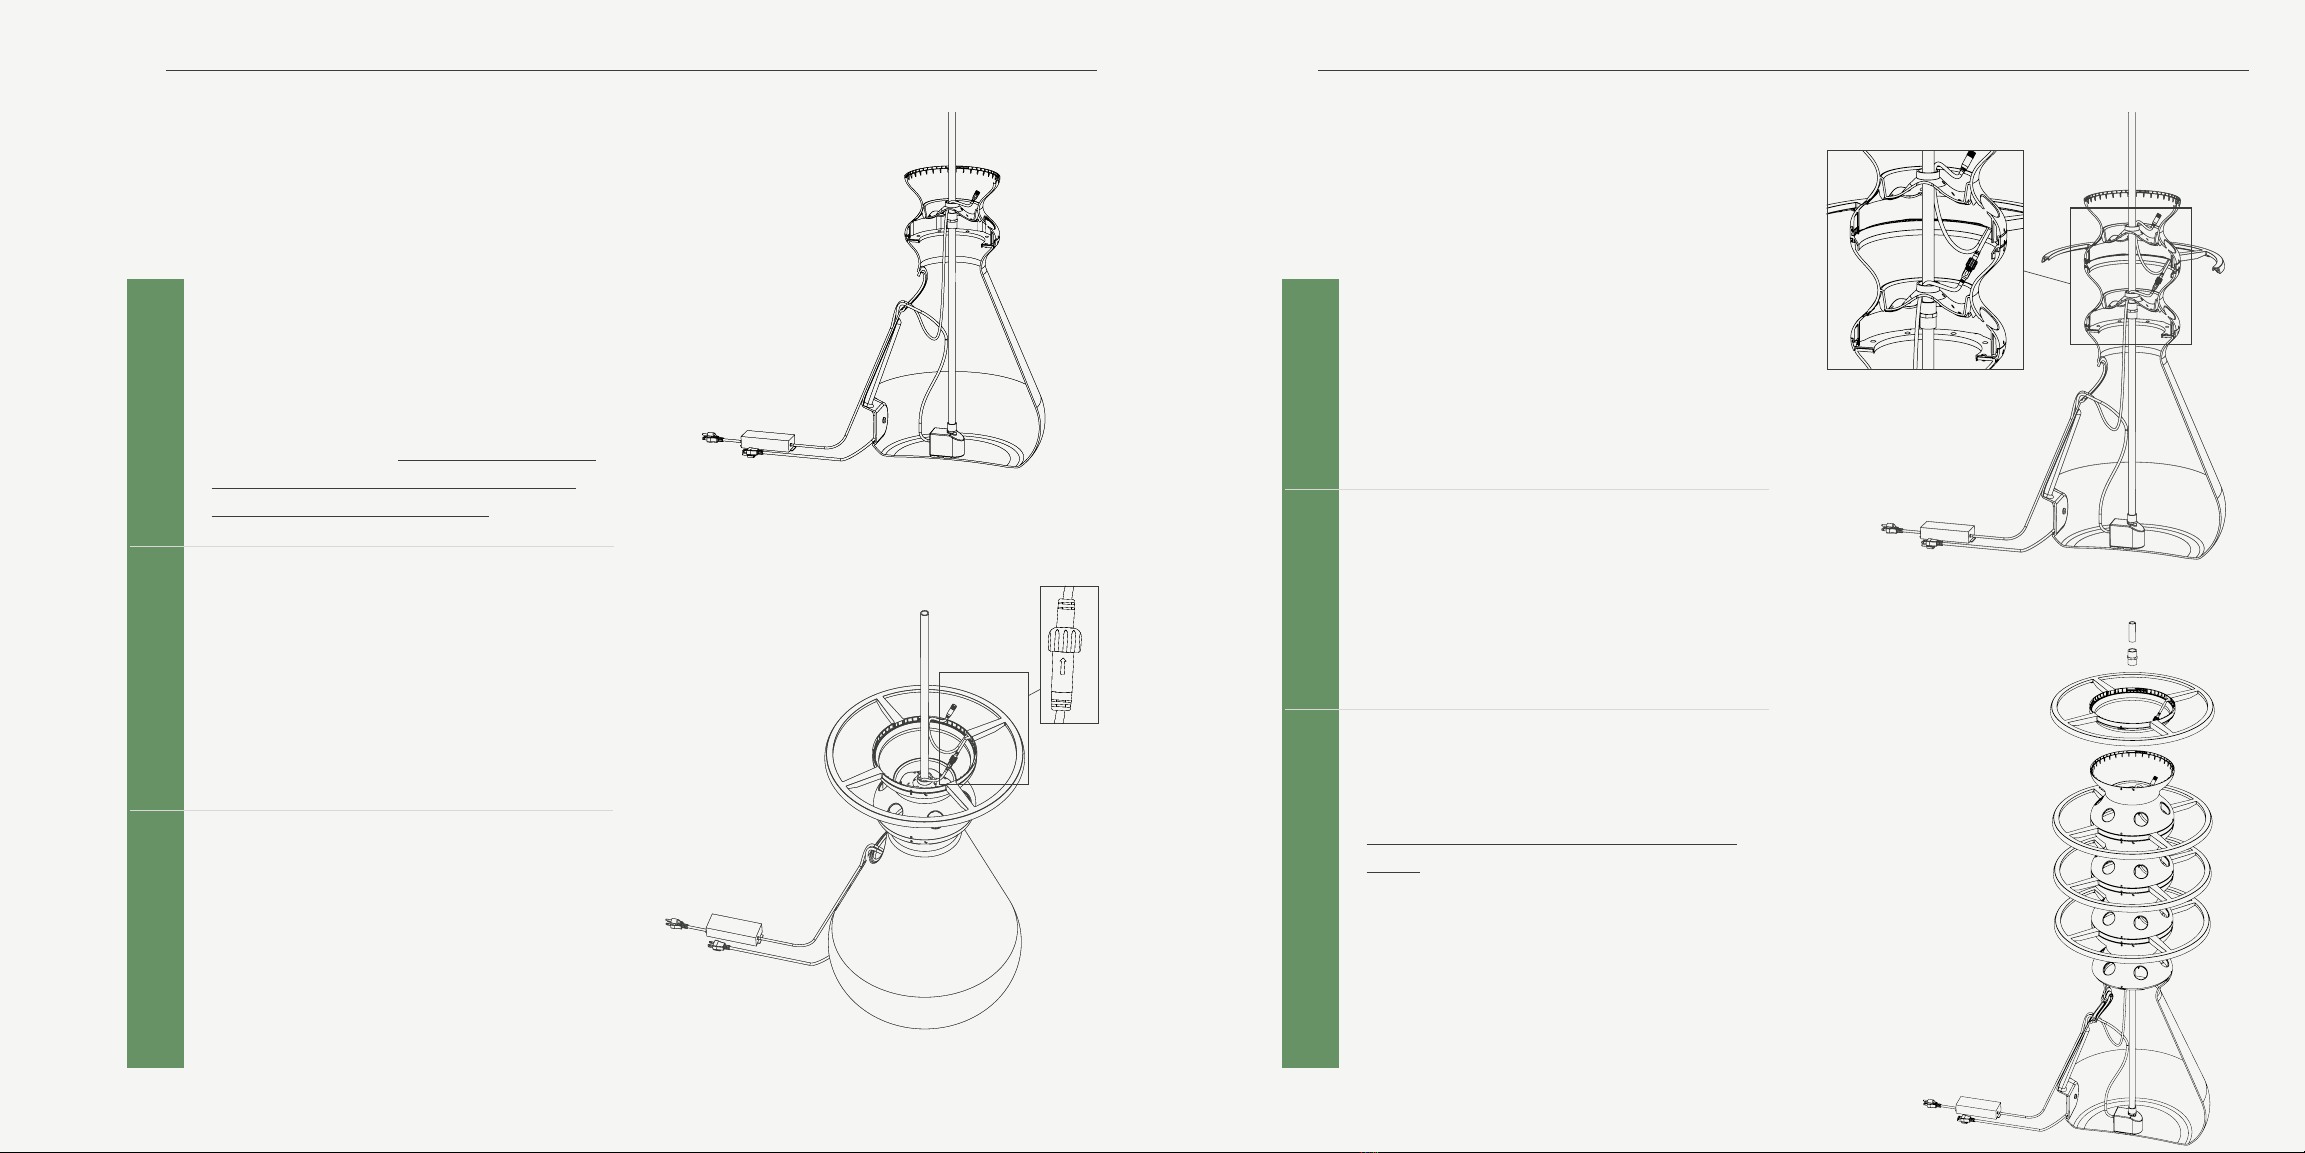
Remember to put the diuser cap on and then the
lid can attach to the top Glow Ring™.
Aer the Glow Rings are assembled, run the power
supply cord through the second hole in the ll port
gasket. If there is a temporary plug in that hole you
will need to remove it. When you lock the gasket into
place make sure there is enough cord slack so it goes
down before going up the center of the farmstand.
7
8
Diuser
Pipe Coupler
Glow Ring™
Pipe Extension
Pump
Power Supply
Gasket
Cord Slack
9
If the gasket that came with your Farmstand does not have two
holes, contact us at help@lettucegrow.com for a replacement.
07
WHEN TO GET
GLOWING
You will have two timers: one for your Glow Rings and one
for your water pump. The watering cycle will be dierent
when the Glow Rings are on than when they are o so it’s
important to make sure the timers are synced to the same
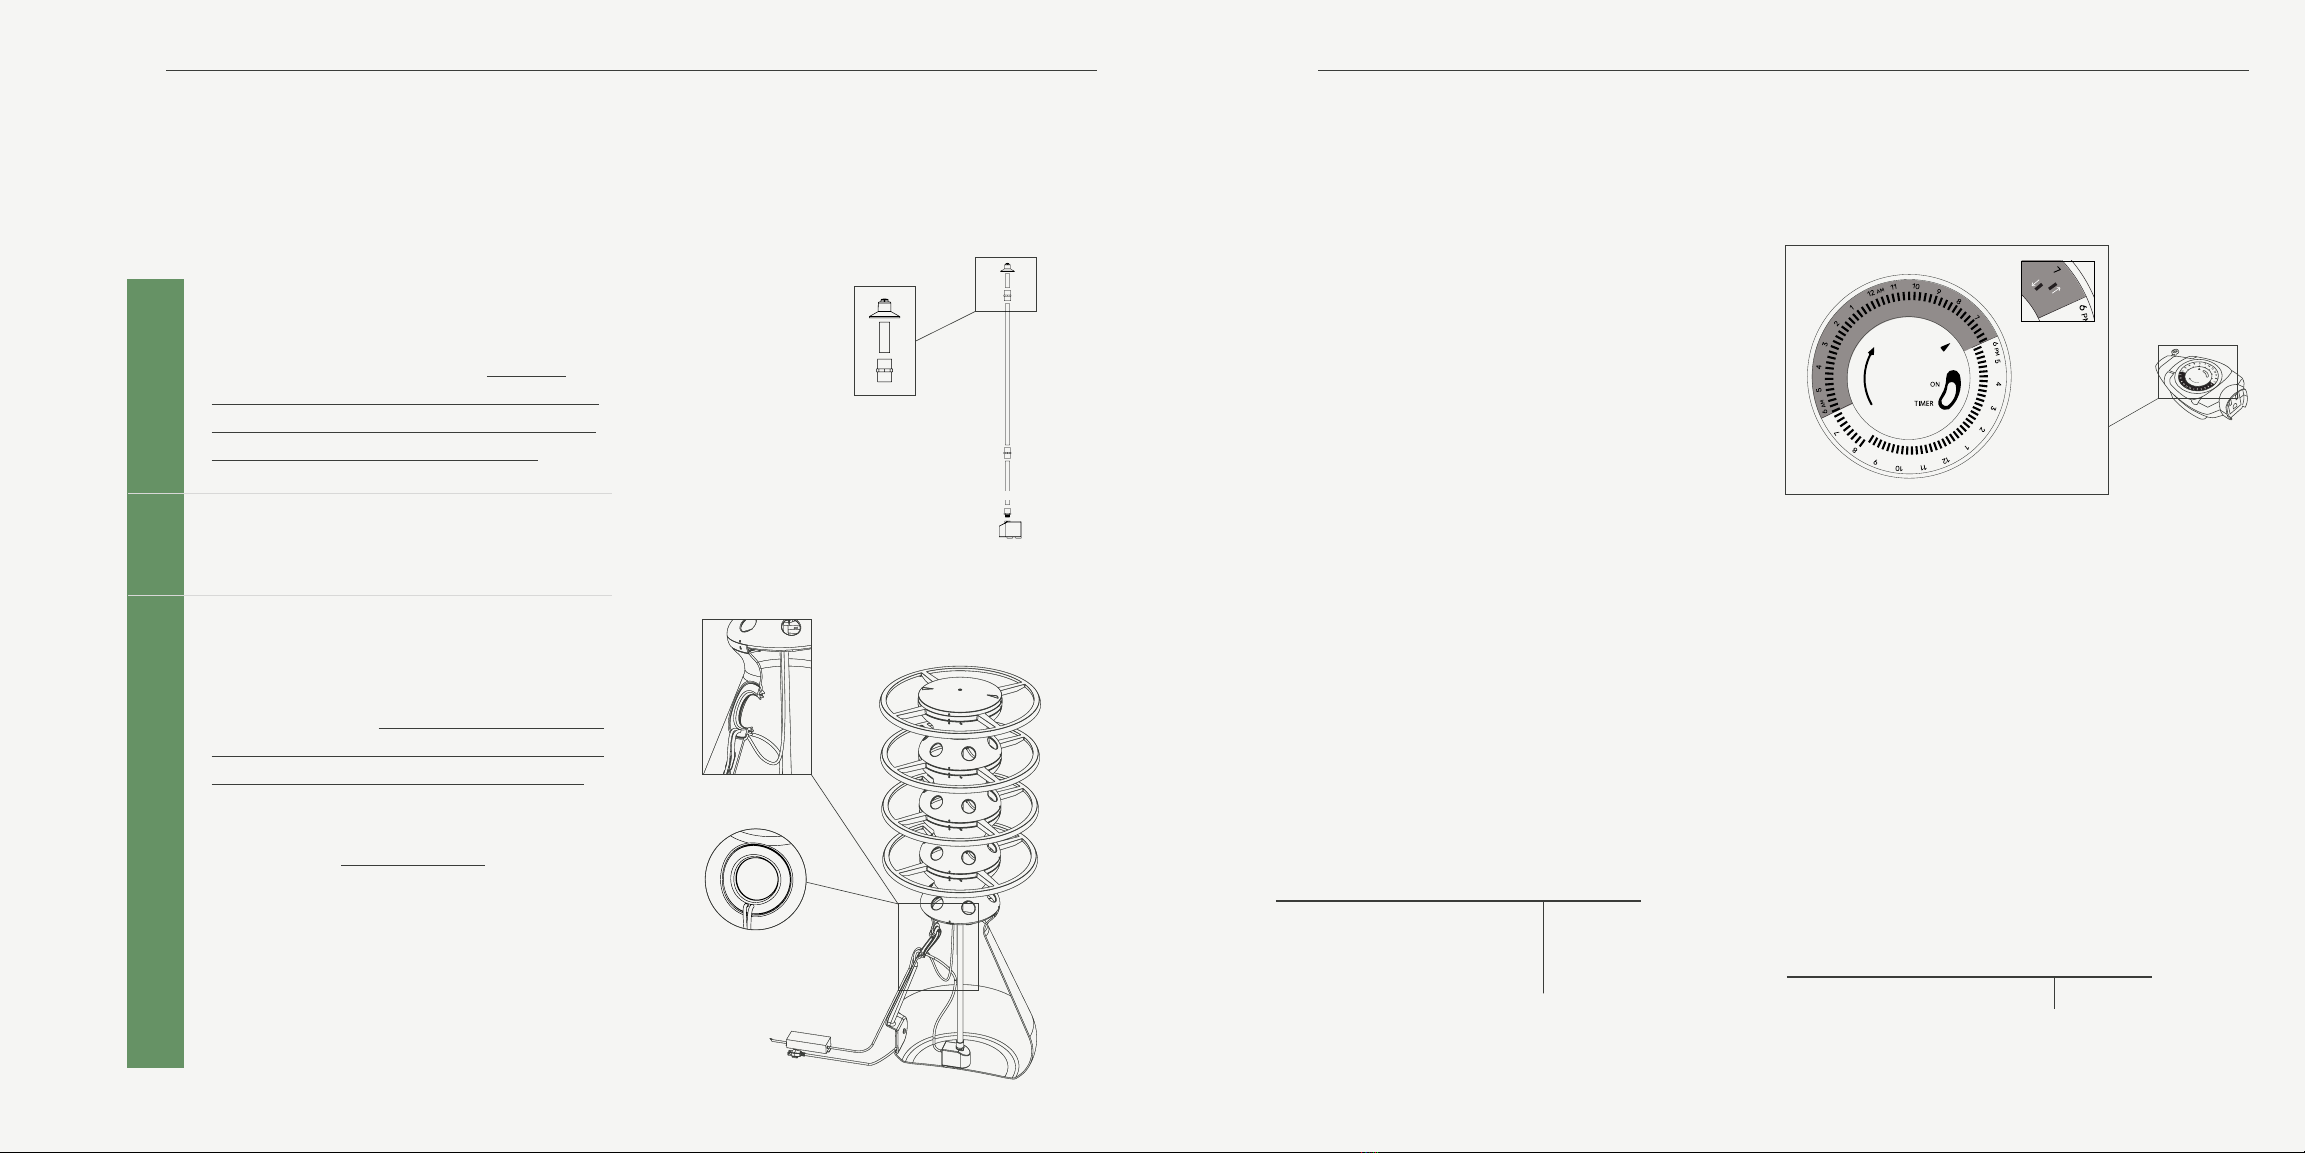
time. Make sure the arrow is lined up to the current time of
day on both your water pump and Glow Rings timer.
You get to decide when it is daytime for your plants! In the
timer image to the right we have the 14 hour light cycle on
during the night (dark side of the dial). This way the lights
will be less intrusive during the day, however, you can
always choose a time that better ts your schedule.
View the light cycle timer setting for each Glow Ring size in
the table below.
The Farmstand’s watering cycle will be dierent when the
Glow Rings are on than when they are o because seedlings
do not need as much water or nutrients when the Glow
Rings are o. Use the ‘Lights On (Day)’ watering cycle when
your lights are on and the ‘Lights O (Night)’ watering cycle
when your lights are o. View the watering cycle for Glow
Rings in the table below.
WATERING CYCLES LIGHTS ON
(DAY)
LIGHTS OFF
(NIGHT)
TIMER SETTINGS ON OFF ON OFF
Indoor 15 45 15 120
GLOW RINGS TIMER SETTINGS
WATER CYCLE TIMER SETTINGS
TIMER SETTINGS* LIGHTS ON
(DAY)
LIGHTS OFF
(NIGHT)
2-4 Glow Rings 14 HR 10 HR
5 Glow Rings 15 HR 9 HR
6 Glow Rings 17 HR 7 HR
*Timer settings are a recommended starting point. You
may need to adjust the settings based on the natural light,
temperature, and Farmstand location within your home.
Note: This example displays the setting for 2-4 GLOW RINGS.
Each notch represents 15 minutes on the timer.
Dial
Night
ON
OFF
Need help? Call or text (512) 234-4001 Need help? Call or text (512) 234-4001

Other Lettuce Grow Lawn And Garden Equipment manuals

Lettuce Grow GROW RINGS User manual

Lettuce Grow

Lettuce Grow GROW RINGS User manual

Lettuce Grow Farmstand User guide

Lettuce Grow

Lettuce Grow Farmstand User guide

Popular Lawn And Garden Equipment manuals by other brands

Euro Systems MFL 03 user manual

Euro Systems

Euro Systems MFL 03 user manual

Gardman 07720 Assembly instructions

Gardman

Gardman 07720 Assembly instructions

Sabo 45-220 Operator's manual

Sabo

Sabo 45-220 Operator's manual

Cardigo 70072 instruction manual

Cardigo

Cardigo 70072 instruction manual

Orbegozo MQ 5016 instruction manual

Orbegozo

Orbegozo MQ 5016 instruction manual

Hunter BTT-101 quick start guide

Hunter

Hunter BTT-101 quick start guide

Westfalia X-GRUBBER instructions

Westfalia

Westfalia X-GRUBBER instructions

Billy Goat MV650H PUSH owner's manual

Billy Goat

Billy Goat MV650H PUSH owner's manual

Stihl KombiTool KombiSystem SP-KM instruction manual

Stihl

Stihl KombiTool KombiSystem SP-KM instruction manual

Weitech Garden Protector 2 manual

Weitech

Weitech Garden Protector 2 manual

YAT YT6702 Assembly manual

YAT

YAT YT6702 Assembly manual

FarmTek Growers supply 112413S3X08T22 manual

FarmTek

FarmTek Growers supply 112413S3X08T22 manual

Voltr LGSACC6TSTAND manual

Voltr

Voltr LGSACC6TSTAND manual

sunjoe GTS4001C-LT-RM Operator's manual

sunjoe

sunjoe GTS4001C-LT-RM Operator's manual

1 BY ONE 323NA-0001 quick guide

1 BY ONE

1 BY ONE 323NA-0001 quick guide

Zest 4 Leisure Sleeper Raised Bed Assembly instructions

Zest 4 Leisure

Zest 4 Leisure Sleeper Raised Bed Assembly instructions

Garten Meister GMXB1020-2 Original instructions

Garten Meister

Garten Meister GMXB1020-2 Original instructions

Step 2 Lakewood Raised Planter Assembly instructions

Step 2

Step 2 Lakewood Raised Planter Assembly instructions

manuals.online logo
manuals.online logoBrands
  • About & Mission
  • Contact us
  • Privacy Policy
  • Terms and Conditions

Copyright 2025 Manuals.Online. All Rights Reserved.