Levita Babyviewer 2500 User manual

BABYVIEWER 2500
HANDLEIDING
USER GUIDE
V1.1 - 07/11

NL De in deze handleiding beschreven mogelijkheden worden gepubliceerd onder
voorbehoud van wijzigingen.
UK The features described in this manual are published with reservation to modifications.

IJ
ij
Ĵ
ĵ
ķ
ĸ
Ĺ
ĺ
IJı
IJij
IJĴ
IJĵ
IJĶ
IJ
ij
Ĵ
ĵ
Ķ
ķ
ĸ
Ĺ
ĺ
ıIJIJ
IJij
IJĴ
1
IJ
2
IJ
3
IJ
5
IJ
4
IJ
6
IJ
7
IJ
8
IJ
10
IJ
11
Ĵ
IJ
9
ij
IJ
12
ij
IJ
13
ij
IJ
14
ij
IJ
15
ij
IJ
16
ij
IJ
17
IJĶ
ij
IJ
18
IJĶ
ij
IJ
19
IJĶ
ij
IJ
20
IJĶ
ij
IJ
21
IJĶ
ij
IJ
22
IJĶ
ij
IJ
23
IJĶ
ij
IJ
24
IJ
ij
IJ
25
IJ
ij
IJ
26
IJ
ij
IJ
27
ij
IJ
28
IJ
ij
IJ
29
ĺ
IJ
ij
IJ
30


5
Babyviewer 2500
NEDERLANDS
1 Inleiding
Wij danken u voor uw aankoop van de Babyviewer 2500. Hiermee kunt u uw baby zien en
horen tijdens zijn slaap of uw kinderen gadeslaan tijdens het spel in de speelkamer.
2 Veiligheidsvoorschriften
WAARSCHUWING:
Dit toestel moet door een volwassene worden geïnstalleerd. Houd bij de
installatie kinderen uit de buurt.
Dit product is geen speelgoed. Laat kinderen niet met het toestel spelen.
• Lees de gebruiksaanwijzing zorgvuldig door voor u het toestel gebruikt.
• Bewaar deze handleiding voor later gebruik.
• Plaats de camera niet in het kinderbedje of binnen het bereik van de baby.
• Gebruik nooit verlengsnoeren met de meegeleverde netadapters.
• Plaats alle kabels buiten het bereik van de baby.
• Test de monitor voor gebruik. Maak u vertrouwd met de werking ervan.
• Gebruik de monitor niet in de nabijheid van water.
• Plaats de monitor niet op warmtebronnen.
• Gebruik uitsluitend de meegeleverde adapter. Gebruik geen andere adapters, omdat dit
de batterijcellen kan beschadigen.
• Gebruik uitsluitend oplaadbare batterijen van hetzelfde type. Gebruik nooit gewone,
niet-oplaadbare batterijen. Let bij het plaatsen van de oplaadbare batterijen op de
polariteit (aangeduid in het batterijvak van de handset).
• Raak de laad- en stekkercontacten niet aan met scherpe en metalen voorwerpen.
3 Beschrijving
Zie flap van het voorblad.
3.1 Ontvanger
1. Display
2. LED VOX-indicator (Voice Operated
Transmission)
3. LED Melodie-indicator
4. LEDs Luidsprekervolume
5. Luidspreker
6. LED Verbindingsindicator
7. LED Stroomindicator
8. VOX-toets
9. Melodie kiezen-toets
10. Melodie starten/stoppen-toets
11. Antenne
12. Riemclip
13. Batterijdeksel
14. Aansluiting netadapter
15. Aan/Uit/Volume-toets
16. LCD lage helderheid-toets
17. LCD hoge helderheid-toets

6Babyviewer 2500
Babyviewer 2500
3.2 Babymonitor
18. Nachtlamp
19. Nachtlamp-toets
20. Microfoon
21. Steun
22. Lens
23. Infrarood LEDs
24. LED Stroomindicator
25. Antenne
26. Aan/Uit-schakelaar
27. Aansluiting netadapter
28. Batterijdeksel
29. Luidspreker
30. Bevestigingsklem
4 Beginnen
4.1 Batterijen in de babymonitor plaatsen
De camera werkt met 4 AAA batterijen (bij voorkeur alkalinebatterijen) of netspanning. De
babymonitor heeft geen oplaadfunctie!.
2
1
3
1
2
3
1. Draai met een kleine schroevendraaier de schroef van het batterijdeksel linksom.
Verwijder het batterijdeksel.
2. Plaats 4 AAA alkaline of oplaadbare batterijen en let daarbij op de polariteit. Sluit het
batterijvak.
3. Zet de Aan/Uit-schakelaar (26) op de AAN-positie. De LED (24) bovenaan de camera
licht rood op.
Zet de Aan/Uit-schakelaar (26) in de UIT-positie om de babymonitor af te zetten.
Wanneer het lichtje (24) knippert, zijn de batterijen bijna leeg en moet u ze vervangen.
Plaats nooit nieuwe en oude batterijen samen in het toestel.
Houd de batterijen uit de buurt van kleine kinderen.
Sluit de batterijen niet kort en gooi ze nooit in het vuur.
Verwijder de batterijen wanneer u het toestel langere tijd niet gebruikt.

7
Babyviewer 2500
NEDERLANDS
4.2 De babymonitor aansluiten op netstroom
1. Sluit de plug van de netadapter aan op de babymonitor en steek de stekker in het
stopcontact (230 V/50 Hz).
Gebruik uitsluitend de meegeleverde adapter (6V DC / 1,75 A).
2. Zet de Aan/Uit-schakelaar (26) op de AAN-positie. De LED (24) bovenaan de camera
licht rood op.
Zet de Aan/Uit-schakelaar (26) in de UIT-positie om de babymonitor af te zetten.
4.3
1
3
4
Batterijen in de ontvanger plaatsen
1. Draai de riemclip naar boven.
2. Druk op het batterijdeksel en schuif het naar
beneden.
3. Plaats het oplaadbare batterijpak (3,7 V Li-ion) en
let daarbij op de polariteit. Zorg ervoor dat de
metalen contactpunten de contactpunten in het
toestel aanraken.
Sluit het batterijvak.
4. Draai het Aan/Uit/Volume-wieltje (15) linksom om
de ontvanger aan te zetten, en stel het gewenste
volume in.
Draai het Aan/Uit/Volume-wieltje (15) rechtsom
om de ontvanger af te zetten.
Wanneer het lichtje (7) knippert, zijn de batterijen
bijna leeg en moet u ze vervangen.
4.4 De ontvanger aansluiten op netstroom

8Babyviewer 2500
Babyviewer 2500
1. Sluit de plug van de netadapter aan op de ontvanger en steek de stekker in het
stopcontact (230 V/50 Hz).
2. Draai het Aan/Uit/Volume-wieltje (15) linksom om de ontvanger aan te zetten, en stel het
gewenste volume in.
Draai het Aan/Uit/Volume-wieltje (15) rechtsom om de ontvanger af te zetten.
Als de babymonitor en de ontvanger ingeschakeld zijn, moeten de videobeelden van de
babymonitor op het scherm van de ontvanger te zien zijn en moet het groene lampje van de
LED-verbindingsindicator (6) op de ontvanger gaan branden.
Als er geen verbinding is tussen de babymonitor en de ontvanger, verschijnt ‘OUT OF
RANGE’ op het scherm. Controleer of de babymonitor en de ontvanger stroom krijgen
of plaats de ontvanger dichter bij de babymonitor om de verbinding tot stand te
brengen.
5 De Babyviewer 2500 gebruiken
5.1 Scherpstelling
• Plaats de camera op een gepaste plaats en richt de lens van de
camera op de plaats die u wilt observeren.
• Pas de hoek aan door de babymonitor te draaien.
Plaats de camera niet binnen het bereik van de baby!
5.2 Nachtlamp
• Druk op de Nachtlamp-toets (19) De nachtlamp (18) begint te branden.
5.3 Nachtvisie
De camera heeft 9 LEDs met hoge intensiteit voor het filmen van beelden in het donker. Een
ingebouwde fotosensor meet het lichtniveau. Wanneer het te donker wordt, gaan de LEDs
branden.
Het beeld verandert automatisch naar de zwart-/witkleuren van de nachtvisiestand.
5.4 De helderheid van de ontvanger instellen
• Druk op de Helderheid laag-toets (16) om de display donkerder te maken.
• Druk op de Helderheid hoog-toets (17) om de display helderder te maken.
5.5 VOX-functie
• Druk op de VOX-toets (8) aan de zijkant van de babymonitor. De display schakelt zich
uit en de VOX-indicator (2) licht op.
In de VOX-modus schakelt de display zich weer in wanneer de babymonitor de stem
van de baby of andere geluiden registreert. Hij schakelt zich weer uit na 30 seconden.
• Druk opnieuw op de VOX-toets (8) om de VOX-modus uit te schakelen. Het LCD-
scherm staat continu aan.

9
Babyviewer 2500
NEDERLANDS
5.6 Melodie-functie
U kunt de babymonitor van op afstand een liedje laten afspelen.
• Druk op de Melodie starten/stoppen-toets (10) om het liedje te starten. De geactiveerde
melodie verschijnt op de ontvanger.
• Druk op de melodie kiezen-toets (9) om te wisselen tussen de 3 verschillende
melodieën of om ‘Melody repeat all’ te selecteren, zodat alle melodieën na elkaar
afgespeeld worden.
• Druk op de Melodie starten/stoppen-toets (10) om het liedje te stoppen.
6 Verbindingsprocedure
Wanneer de ontvanger ‘OUT OF RANGE’ blijft weergeven, zelfs wanneer de afstand tussen
de ontvanger en de camera (babymonitor) minder is dan 30 cm, dan dient u volgende
procedure te volgen om de camera met de ontvanger te verbinden.
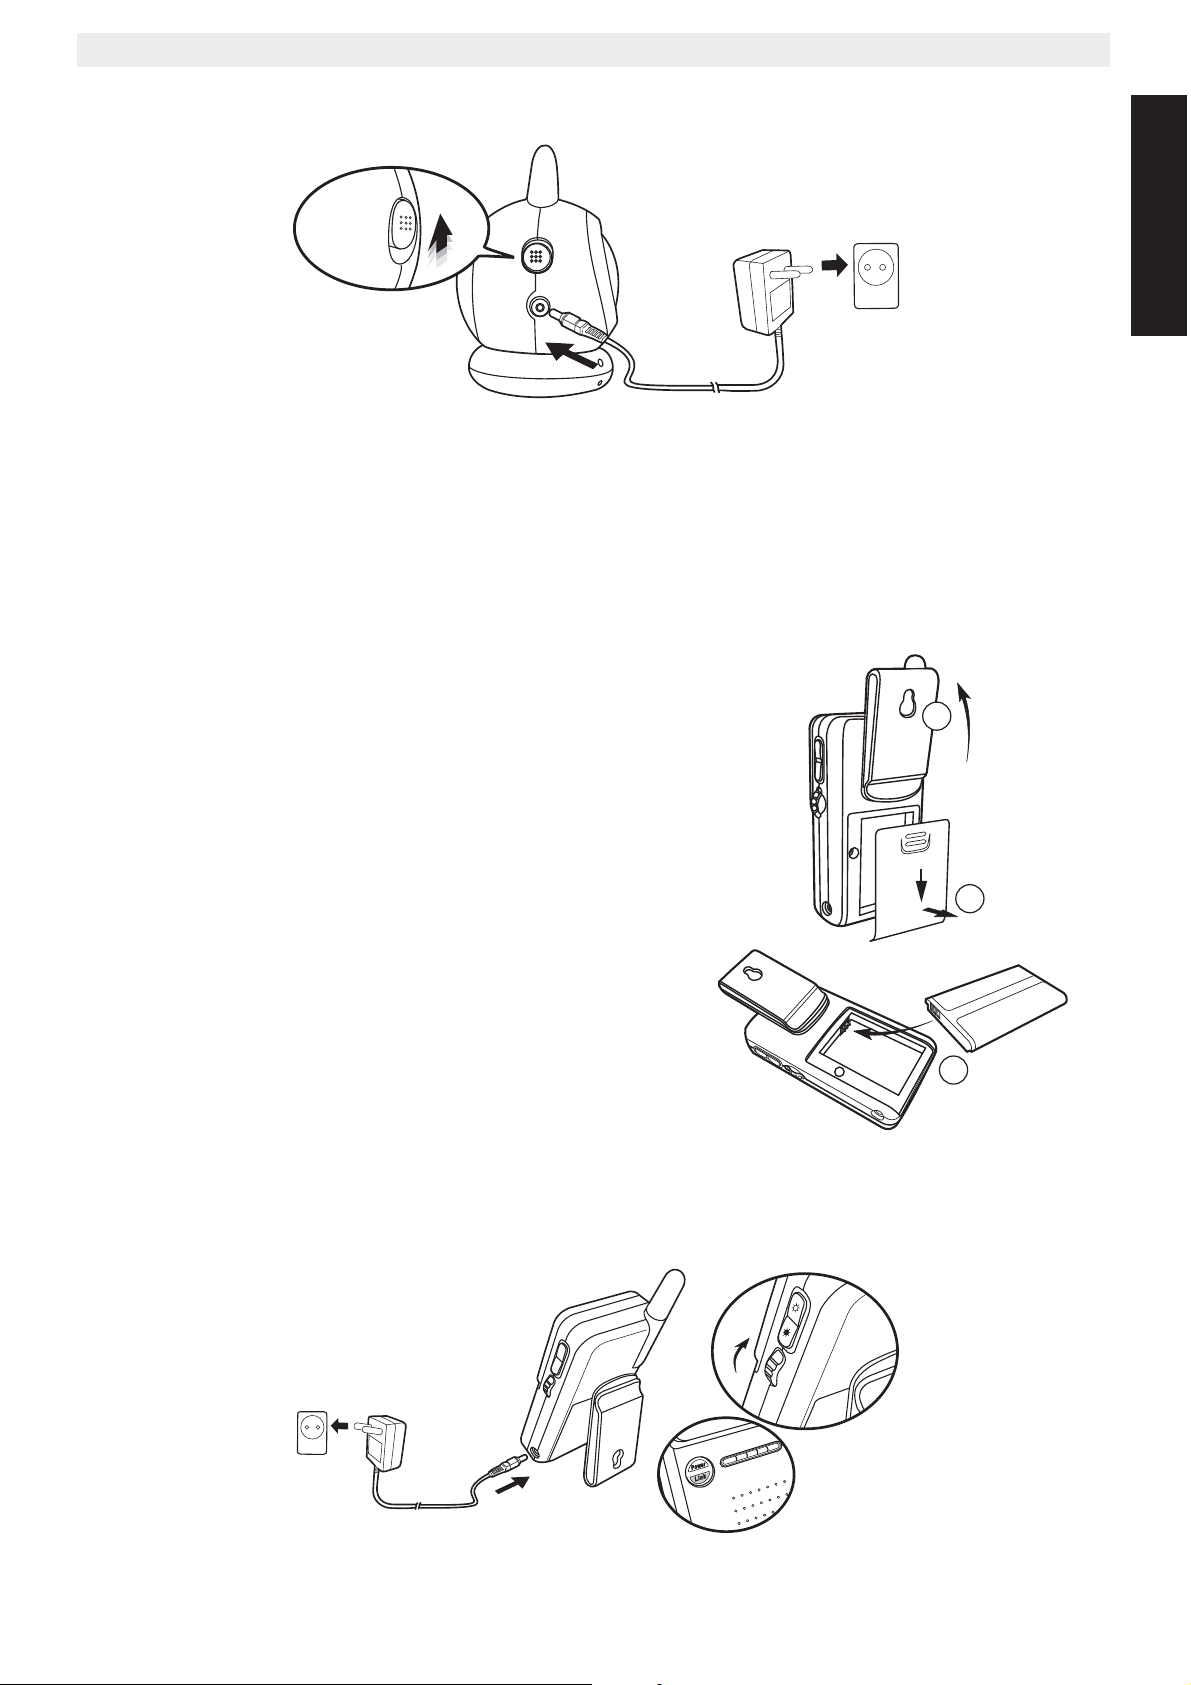
1. Verbind de ontvanger en de camera met de spanningsadapter.
2. Zorg ervoor dat beide toestellen zijn aangeschakeld.
3. Druk gelijktijdig op de VOX-toets (8) van de ontvanger en de nachtlamp-toets (19) van
de camera en houd deze ingedrukt voor ongeveer 5 seconden.
4. Wanneer er ‘SIGNAL SEARCHING’ op de display verschijnt en wanneer zowel de
stroomindicator LED (7) op de ontvanger als de nachtlamp (18) op de camera 3 keer
knipperen, laat u de toetsen los.
5. De ontvanger en de camera zullen de identificatiecode uitwisselen en de verbinding zal
opnieuw worden ingesteld.
6. Na enkele seconden zal de ontvanger het camerabeeld weergeven.
7. Zet de camera en ontvanger uit en opnieuw aan om te controleren of de procedure is
gelukt.
7 Afvoeren van het toestel (milieu)
Na afloop van de levenscyclus van het product mag u het niet met het normale
huishoudelijke afval weggooien, maar moet u het naar een inzamelpunt brengen
voor recycling van elektrische en elektronische apparatuur. Dit wordt aangeduid
door het symbool op het product, in de handleiding en/of op de verpakking.
Sommige materialen waaruit het product is vervaardigd, kunnen worden hergebruikt als u ze
naar een inzamelpunt brengt. Door onderdelen of grondstoffen van gebruikte producten te
hergebruiken, levert u een belangrijke bijdrage aan de bescherming van het milieu.
Wend u tot de plaatselijke overheid voor meer informatie over de inzamelpunten bij u in de
buurt.
Verwijder de batterijen uit het toestel voordat u het afvoert.
Batterijen dienen bij een inzamelpunt voor batterijen te worden ingeleverd en mogen
niet met het huishoudelijk afval worden meegegeven.

10 Babyviewer 2500
Babyviewer 2500
8 Reinigen
Reinig de toestellen met een licht vochtige of antistatische doek. Gebruik nooit
reinigingsmiddelen of agressieve oplosmiddelen.
Dit product is conform de wezenlijke vereisten en andere relevante
bepalingen van de Europese richtlijn betreffende radioapparatuur en
telecommunicatie-eindapparatuur.
De verklaring van overeenstemming treft u aan op:
http://www.levita-electronics.com/cedeclarations.asp
9 Specificaties
Ontvanger
Frequentie
Maximaal bereik
Modulatie
Display
Displaykleuren
Helderheidscontrole
Afmetingen
Gewicht
Stroom
Bedrijfstemperatuur
2,4 GHz
300 m LOS (Line of sight)
GFSK, FHSS
2,36’’ TFT LCD
Full-color
5 niveaus
6,6 (W) x 14,5 (H) x 4,1 (D) cm
120 g
DC 6 V, 800 mA + Li-ion
batterij (oplaadfunctie)
0 °C ~ 40 °C
Babymonitor
Frequentie
Modulatie
Beeldsensor
Lens
IR LED
VOX
Afmetingen
Gewicht
Stroom
Bedrijfstemperatuur
2,4 GHz
GFSK, FHSS
Kleur CMOS
f 6,0 mm – F 2,0
9 st.
Stemactivering
8,9 (B) x 10,7 (H) x 8,2 (D) cm
175 g
DC 6 V, 800 mA of 4 x AAA
batterijen (geen oplaadfunctie)
0 °C ~ 40 °C
10 Garantie
10.1 Garantieperiode
Op de toestellen wordt een garantie van 36 maanden verleend. De garantieperiode gaat in
op de dag waarop het nieuwe toestel wordt gekocht. Er is geen garantie op standaard of
oplaadbare batterijen (type AA/AAA).
Kleine onderdelen of defecten die een verwaarloosbaar effect hebben op de werking of
waarde van het toestel zijn niet gedekt door de garantie.
De garantie moet worden bewezen door voorlegging van het originele aankoopbewijs of
kopie waarop de datum van aankoop en het toesteltype staat.
10.2 Garantiebeperkingen
Schade of defecten te wijten aan onoordeelkundig gebruik of bediening en schade te wijten
aan het gebruik van niet-originele onderdelen of accessoires worden niet gedekt door de
garantie.
De garantie dekt geen schade te wijten aan externe factoren, zoals bliksem, water en brand,
noch enige transportschade.
Er kan geen garantie worden ingeroepen als het serienummer op het toestel is gewijzigd,
verwijderd of onleesbaar gemaakt.
Garantieclaims zijn ongeldig indien het toestel hersteld, gewijzigd of aangepast werd door de
koper.

11
Babyviewer 2500
ENGLISH
1 Introduction
Thanks for purchasing the Babyviewer 2500. Now you can see and hear your baby during
sleeping or you can monitor your older children in their playroom.
2 Safety Instructions
WARNING:
Adult assembly required. Keep small parts away from children when
assembling.
This product is not a toy. Do not allow children to play with it.
• Always read the user guide instructions carefully before using the device
• Keep this User's Manual for future reference.
• Do not place the camera in the crib or within the arm’s reach of the baby.
• Never use extension cords with the enclosed AC adapters.
• Secure the cords away from babies reach.
• Test the monitor before use. Get confident with the functionality.
• Do not use the monitor near water.
• Do not install the monitor on heat sources.
• Only use the charger plug supplied. Do not use other chargers, as this may damage the
battery cells.
• Only insert rechargeable batteries of the same type. Never use ordinary,
non-rechargeable batteries. Insert rechargeable batteries so they connect to the right
poles (indicated in the battery compartment of the handset).
• Do not touch the charger and plug contacts with sharp or metal objects.
3 Description
See folded cover page
3.1 Parent Unit
1. Display
2. VOX indicator LED (Voice Operated
Transmission)
3. Melody indicator LED
4. Volume indicator LED’s
5. Speaker
6. Link indicator LED
7. Power indicator LED
8. VOX button
9. Melody select button
10. Melody start/stop button
11. Antenna
12. Belt clip
13. Battery cover
14. DC power adapter Jack
15. On/Off/Volume switch
16. LCD brightness Low button
17. LCD brightness High button

12 Babyviewer 2500
Babyviewer 2500
3.2 Baby unit
18. Night Light
19. Night Light button
20. Microphone
21. Support
22. Lens
23. Infrared LED’s
24. Power indicator LED
25. Antenna
26. On/Off switch
27. DC power adapter Jack
28. Battery cover
29. Speaker
30. Baby bed fastener
4 Getting started
4.1 Baby unit battery Installation
The camera uses either 4 AAA - Size batteries (alkaline batteries recommended) or the
household AC current. The Baby unit has no charging function.
2
1
3
1
2
3
1. Loosen the screw in a counter clockwise direction using a small screw driver. Remove
the battery cover.
2. Install 4 ‘AAA’ alkaline or rechargeable batteries following the polarity as shown. Close
the battery compartment.
3. Slide the Power switch (26) to the ON position. The LED (24) on top of the camera
should light up red.
Slide the Power switch (26) to the OFF position to turn off the baby unit.
When the light (24) is blinking, the batteries are low and need to be replaced.
Do not mix old batteries with new ones.
Keep batteries away from small children.
Do not short-circuit & dispose of in fire.
Remove the batteries if this device is not going to be used for a long period.

13
Babyviewer 2500
ENGLISH
4.2 Baby unit power supply
1. Connect the small plug of the AC adaptor to the Baby unit and the other end of the
adapter cable to the electric socket (230V/50Hz).
Only use the enclosed adapter (6V DC / 1,75A).
2. Slide the Power switch (26) to the ON position. The LED (24) on top of the camera
should light up red.
Slide the Power switch (26) to the OFF position to turn off the baby unit.
4.3
1
3
4
Parent unit battery Installation
1. Turn the belt clip facing upwards.
2. Press the battery cover and slide it downwards.
3. Install the rechargeable battery pack (3,7V Li-ion)
following the polarity as shown. Ensure that the
metal contacts touch the contact in the unit.
Close the battery door.
4. Turn the On/Off/Volume switch (15) counter
clockwise to turn the unit on and change to the
desired audio volume.
Turn the On/Off/Volume switch (15) clockwise to
turn the parent unit off.
When the light (7) is blinking, the batteries are low
and need to be replaced.
4.4 Parent unit power supply

14 Babyviewer 2500
Babyviewer 2500
1. Connect the small plug of the AC adaptor to the parent unit and the other end of the
adapter cable to the electric socket (230V/50Hz)
2. Turn the On/Off/Volume switch (15) counter clockwise to turn the unit on and change to
the desired audio volume.
Turn the On/Off/Volume switch (15) clockwise to turn the parent unit off.
Once the baby unit and parent unit have been switched on, the display of the parent unit must
show the captured video from the baby unit and the link indicated LED (6) on the parent unit
will illuminate green.
If there is no connection between Baby- and Parent unit, ‘OUT OF RANGE’ will be
displayed. Check the power on both units or move the parent unit closer to the baby
unit to establish the connection.
5 Using the Babyviewer 2500
5.1 Fine tuning
• Place the camera in a convenient location, point the lens of the
camera to the observation area.
• Adjust the angle by rotation the baby unit.
Do not place the camera within the babies reach!
5.2 Night Light
• Press the Night Light button (19). The night light (18) will illuminate.
5.3 Night vision
The camera has 9 high-intensity LED’s for picking up clear images in the dark. When the
build in photo sensor measures the ambient light level as low, the LED’s will automatically
activate.
The image changes automatically into black and white mode under the night vision
mode.
5.4 Setting the Parent - Unit display brightness
• Press the Brightness Low button (16) to make the display darker.
• Press the Brightness High button (17) to make the display brighter.
5.5 VOX function
• Press the VOX-button (8) on the side of the monitor. This will turn off the display, but the
VOX indicator (2) will turn on.
In VOX mode, the display will turn on when it is activated by the babies voice or other
sound around the baby unit. It will turn off again after 30 seconds.
• Press the VOX-button (8) again to turn off VOX - mode. The LCD will be on
continuously.

15
Babyviewer 2500
ENGLISH
5.6 Melody function
You can remotely activate a melody broadcasted on the baby-unit.
• Press the Melody start/stop button (10) to active the melody. The active melody is
displayed on the parent unit.
• Press the melody select button (9) to switch between 3 different melodies or to select
‘Melody repeat all’ to play the melodies successively.
• Press the Melody start/stop button (10) to deactivate the melody.
6 Linking procedure
If the receiver (parent unit) keeps showing ‘OUT OF RANGE’, even if the camera (baby unit)
and receiver are within 30 cm from each other, follow the next procedure to link the camera
with the receiver.
1. Connect the camera and the receiver to the power adapter.
2. Switch the camera and receiver on.
3. Press the VOX button (8) on the receiver and the night light button (19) on the camera
simultaneously for about 5 seconds.
4. When you see ‘SIGNAL SEARCHING’ displayed on the screen and both the power
indicator LED (7) on the receiver and the night light (18) on the camera flashes 3 times,
release the buttons.
5. The receiver and camera will exchange the identification code and the link will be
established.
6. The receiver should show the captured image after a few seconds.
7. Switch both units off and on again to verify the link procedure is successful.
7 Disposal of the device (environment)
At the end of the product lifecycle, you should not throw this product into the
normal household garbage but bring the product to a collection point for the
recycling of electrical and electronic equipments. The symbol on the product, user
guide and/or box indicate this.
Some of the product materials can be re-used if you bring them to a recycling point. By re-
using some parts or raw materials from used products you make an important contribution to
the protection of the environment.
Please contact your local authorities in case you need more information on the collection
points in your area.
Remove the batteries from the unit before disposal.
Dispose of batteries at a designated battery disposal unit and not in the household
waste.

16 Babyviewer 2500
Babyviewer 2500
8 Cleaning
Clean the device with a slightly damp cloth or with an anti-static cloth. Never use cleaning
agents or abrasive solvents.
This product is in compliance with the essential requirements and other
relevant provisions of the R&TTE directive.
The Declaration of conformity can be found on:
http://www.levita-electronics.com/cedeclarations.asp
9 Specifications
Parent unit
Frequency
Maximum range
Modulation
Display
Display colors
Brightness control
Dimensions
Weight
Power
Operation temperature
2,4GHz
300 m Line of Sight
GFSK,FHSS
2,36’’ TFT LCD
Full-color
5 steps
6,6(W)x14,5(H)x4,1(D) cm
120g
DC 6V, 800mA + Li-ion
battery (charging function)
0°C ~40°C
Baby unit
Frequency
Modulation
Image sensor
Lens
IR LED
VOX
Dimensions
Weight
Power
Operation temperature
2,4GHz
GFSK,FHSS
Color CMOS
f 6.0mm, F 2.0
9 pcs
Voice activation
8,9(W)x10,7(H)x8,2(D) cm
175g
DC 6V, 800mA or 4 x AAA
batteries (no charging function)
0°C ~40°C
10 Warranty
10.1 Warranty period
The devices have a 36-month warranty period. The warranty period starts on the day the new
unit is purchased. There is no warranty on standard or rechargeable batteries (AA/AAA type).
Consumables or defects causing a negligible effect on operation or value of the equipment
are not covered.
The warranty has to be proven by presentation of the original or copy of the purchase receipt,
on which the date of purchase and the unit-model are indicated.
10.2 Warranty exclusions
Damage or defects caused by incorrect treatment or operation and damage resulting from
use of non-original parts or accessories are not covered by the warranty.
The warranty does not cover damage caused by outside factors, such as lightning, water and
fire, nor any damage caused during transportation.
No warranty can be claimed if the serial number on the units has been changed, removed or
rendered illegible.
Any warranty claims will be invalid if the unit has been repaired, altered or modified by the
buyer.


BABYVIEWER 2500
visit our website
www.levita-electronics.com
For use in:
AT
BE
BG
CY
CZ
DK
EE
FI
* FR
DE
GR
HU
IE
IT
LV
LT
LU
MT
NL
PL
PT
RO
SK
Sl
ES
SE
GB
NO
MD5100349
*En France, ce produit
peut être utilisé
uniquement à l’intérieur
Table of contents
Languages: