Lexi PI00499 User manual

User Guide - PI00499
1080p HD Dashcam
Protected by

Support: www.lexiprotect.com/support
2
Contents
Contents Page
Warnings .................................................................................................................................................................................................................................................2
Important Information ................................................................................................................................................................................................................2
1. Introduction ......................................................................................................................................................................................................................................3
2. Features .............................................................................................................................................................................................................................................3
3. Camera parts and controls................................................................................................................................................................................................4
4. Key functions............................................................................................................................................................................................................................4-5
5. Charging the battery ..............................................................................................................................................................................................................5
6. Memory card requirements and use .......................................................................................................................................................................5
7.Camera adjustment ..................................................................................................................................................................................................................6
8. Switching the camera on/o...........................................................................................................................................................................................6
9. Basic operation ......................................................................................................................................................................................................................6-8
10. Specications ..............................................................................................................................................................................................................................8
12. Technical Support ...................................................................................................................................................................................................................8
Warning
• The camera requires a Micro SD card to store les we recommend you select a high speed
(Class 10 memory) Micro SD card from a reputable manufacturer.
• Keep away from dripping or splashed uids.
• The unit should not be exposed to direct sunlight, very high or low temperatures, moisture, vibrations,
strong magnetic elds high frequencies and dusty environments.
• Do not use abrasives, benzene, thinner or other solvents to clean the surface of the unit. To clean, wipe
with a clean soft cloth it and a mild detergent solution.
• Do not disassemble or modify the dashcam, there are no user serviceable parts.
• If the dashcam is damaged in anyway or malfunctions do not use. Consult a qualied service engineer.
• This product contains a Lithium battery. It must be used and charged properly. Improper use can cause
the battery to catch re or explode resulting in serious or fatal injury.
• Do not operate the dashcam while driving. Stop or park your car in a safe place before operating it.
• Do not install the unit where it can interfere with the driver’s vision.
• Do not operate the camera with wet hands.
Important Information
Please note that this product contains a battery. Do not dispose of this product with household waste
at the end of its life cycle; hand it over to a collection center for the recycling of electrical and electronic
appliances. By recycling, some of the materials can be reused. Please check with your Local Authority for
recycling advice.

Support: www.lexiprotect.com/support
3
1. Introduction
This high resolution dashcam is ideal for recording your car journeys and providing evidence if an accident
occurs. It also has a parking mode which automatically records if an impact occurs when you are parked.
In parking mode you can also activate motion detection to show any person or vehcle that might cause
damage to the car without activating the G sensor.
The dashcam is easy to setup and the suction cup tting supplied makes it easy to attach to your
windscreen. When the car charger/power adaptor supplied is plugged in the camera will automatically
switch on and o when the ignition is switched on or o.
2. Features
1. Supports Full HD 1080p @ 30fps video recording and up to 12M photos
2 2.4” High denition LCD TFT screen for real-time display and playback.
3. Gravity sensor activates recording in the event of sudden braking, collision, rapid acceleration or sharp
cornering and saves the current video segment.
5. Parking monitor activates recording after any large vibration/impact when ignition is o.
4. Parking monitor recording powered by built in rechargeable battery.
5. Motion sensor option records movement in front of the camera when the car is parked.
6. High denition F=2.0/f=3.2mm ultra wide angle lens.
7. Supports up to 32G micro SD card (not supplied).
8. Supports Enhanced Night Vision recording for low light/night time driving
9. Camera mode allows you to take photos with or without ash up to 8M resolution.
10. USB connection allows 3 options: video and photo le download, the use of your dash cam as a web
cam and camera recording mode
11. HDMI output allows HD playback to TV or monitor.
12. Protect le save key.
1. Box contents
1x Dashcam with windscreen mount
1x DC Car power adaptor with 3m mini USB cord
1x User Guide

Support: www.lexiprotect.com/support
4
3. Camera parts and controls
2. OK Key
LCD
Screen
4. Mode/ Lock Key
6. Down Key
Parking/Monitor Key
5. Up Key
Mini USB
Port
Mini HDMI
Port
AV Port
Speaker Infra Red Light
Lens
1. Power Key
3. Menu Key
Micro SD
Slot
Reset
Windscreen
Mount Socket
Mic
4. Key Functions
A. Power key :
i) Switch On/O: Press to switch on.
Press and hold for about 2 seconds, to save recorded le automatically and to switch o your dashcam.
ii)
Supplementary light: Press to switch the infra red light On/O when in standby, video or camera mode.
B. OK key OK:
i) Stop/Start recording: In standby mode, press OK to start recording. In recording mode, press OK again to
stop recording.
ii) Photograph: Press OK in camera mode to take a photo.
iii) Play video: In Playback mode Press OK to play / pause a video recording.
iv) Conrm: In the video/setup/camera/playback menu options, press the OK key to conrm / save setting.
C. Menu key M:
i) In standby mode, press the Mkey once to enter the setup menu, press again to return to standby mode
In camera mode, press the Mkey once to enter the setup menu, press again to return to camera mode.
In Playback mode, press the M key once to enter the le delete/lock menu, press twice to enter the
setup menu.

Support: www.lexiprotect.com/support
5
4. Key Functions - continued
D. Mode key :
i) Switching Modes: Video mode opens automatically when the dashcam is switched on, press once to
change to camera mode.
In camera mode, press again to enter playback mode;
In playback mode, press once to enter the video mode.
ii) Protect les: When the camera is recording , press to save a video segment which can be locked or
unlocked
E. Up key p:
i) In each menu, press the pkey to move upward for selection.
ii) In the video or camera mode, press the pkey to zoom in.
iii) When a video is playing, press the pkey to fast forward.
iv) In Playback mode, press the pkey to enter the 9 grid, 9 photos or videos records can be viewed.
F. Down key q:
i) In menus, press the qkey to move selection downward
ii) In the video or camera mode press the qkey to zoom out function.
iii) When a video is playing , press the key qto fast forward.
G. P key - Parking Monitor P:
i) When the vehicle ignition is switched o, press key P and then switch o the dashcam. The letter ‘P’
will be shown on the right side of the screen.
If in this mode if the vehicle is vibrated, the camera will record for 60 seconds automatically and the video
le is saved to the micro SD card and won’t be overwritten, recording will continue until 60 seconds after
the vibration stops.
ii) To switch o the parking monitor function press the P key the letter ‘P’ will disappear from the screen.
5. Charging the battery
There are two methods :
a) Connect to a computer using a mini USB cable (not supplied) for charging;
b) Use the car USB power cord and plug in adaptor to charge the camera.
During charging, a battery charging icon will be displayed on the LCD screen. The icon will stop ashing
when the battery is fully charged. Full charging will take about 120 minutes.
6. Memory card requirements and use
The dashcam requires a 4-32GB Class 10 micro SDHC card.
When installing the card make sure it is the right way round, the gold terminals facing forward facing in the
same direction as the lens.
Slide the card gently into the slot and press all the way down and release until the card stays in position.
To remove the card, gently press the card down and release the card will pop-up and you will be able to
remove it.
Please Note:
1. To avoid any damage to the card and les stored on it, always switch the camera o before removal.
2. If the micro SD card is inserted the wrong way round, both the camera and the card may be damaged.
3. If the camera doesn’t recognise the card try reinserting the card. If it still doesn’t work change the card.
Make sure it is a micro SDHC card and is of no more than 32GB capacity.

7. Camera adjustment
The camera when attached to the windscreen mount is fully adjustable through 360°horizontally and
through 60° vertically.
When positioning your camera make sure that it won’t interfere with the driver’s vision
Once mounted adjust to achieve the best view of the road and your vehicle.
8. Switching the camera On/O
1. Switching On/O Manually: Press the power key once, the screen will light up; press the key and hold for
approximately 2 seconds to switch o the dash cam.
2. Switching On/O Automatically: When the car charger/power adaptor supplied is plugged in the camera
will automatically switch on and o when the ignition is switched on or o. The camera will remain on
for a further 10 seconds after the ignition is switched o to save the most recent data.
Please Note: When using the dashcam’s built-in power supply, if the battery is running low you will see
‘low battery’ notication shown on the screen and the camera will shutdown after 2 seconds.
9. Basic operation
Switching operating modes
Press the mode key to switch between video, photo and playback mode.
Menu and system settings
In video or camera mode, press the menu key twice to enter
System Preferences. Press the up pand down qkeys to select a
menu item and press OK key to conrm the setting.
Press the Menu Mkey again to exit.
System Setup Options
Date I Time: Use p/qkeys to select
Automatic shutdown: O/1/3 minute
Beep Sound: On/O
Languages: English/Portuguese/Russian/Chinese Simplied/
Traditional Chinese/Japanese/Spanish/French/German/Italian
TVMode : PAL/NTSC
Frequency: 50/60Hz
G-sensor: High/Medium/Low/O
Parking Monitor: On/O 2G/4G/8G
Flash: o/on
Screen Protection : O/1/2/5 minutes
Format: Cancel /OK
The default settings: Cancel/OK
Version: The version number
Auto Power O: O/1 minute/3 minutes
Recording video
When the camera is in video recording mode, the screen opposite
will appear. Press the OK key to start recording and a red circle icon
will appear and start ashing. Press the OK key again to stop
recording and the red icon will disappear. Recording will also start/
stop automatically when the ignition is switched on/o while the
camera is connected to the DC car power adaptor.
Video Mode Options
Image parameters: 1080p FHD/1080p/720p/WVGA/VGA
Loop recording: O, 1/2/3/5/10minutes
Exposure: EV-2.0, EV-5/3, EV-4/3, EV-1.0, EV-2/3, EV-1 /3, EV + 0.0,
EV + 1/3, EV + 2/3 , EV + 1.0, EV + 4/3, EV + 5/3, EV + 2.0
Support: www.lexiprotect.com/support
6
Video Mode
Video Settings
System Setup Options

Support: www.lexiprotect.com/support
7
Video Mode Options - continued
Motion detection: On/O
Video Audio recording: On/O
Date Stamp: On/O
LDW: On/O, Car type, Sensitivity, Area choice,
Start Speed On/O Sound
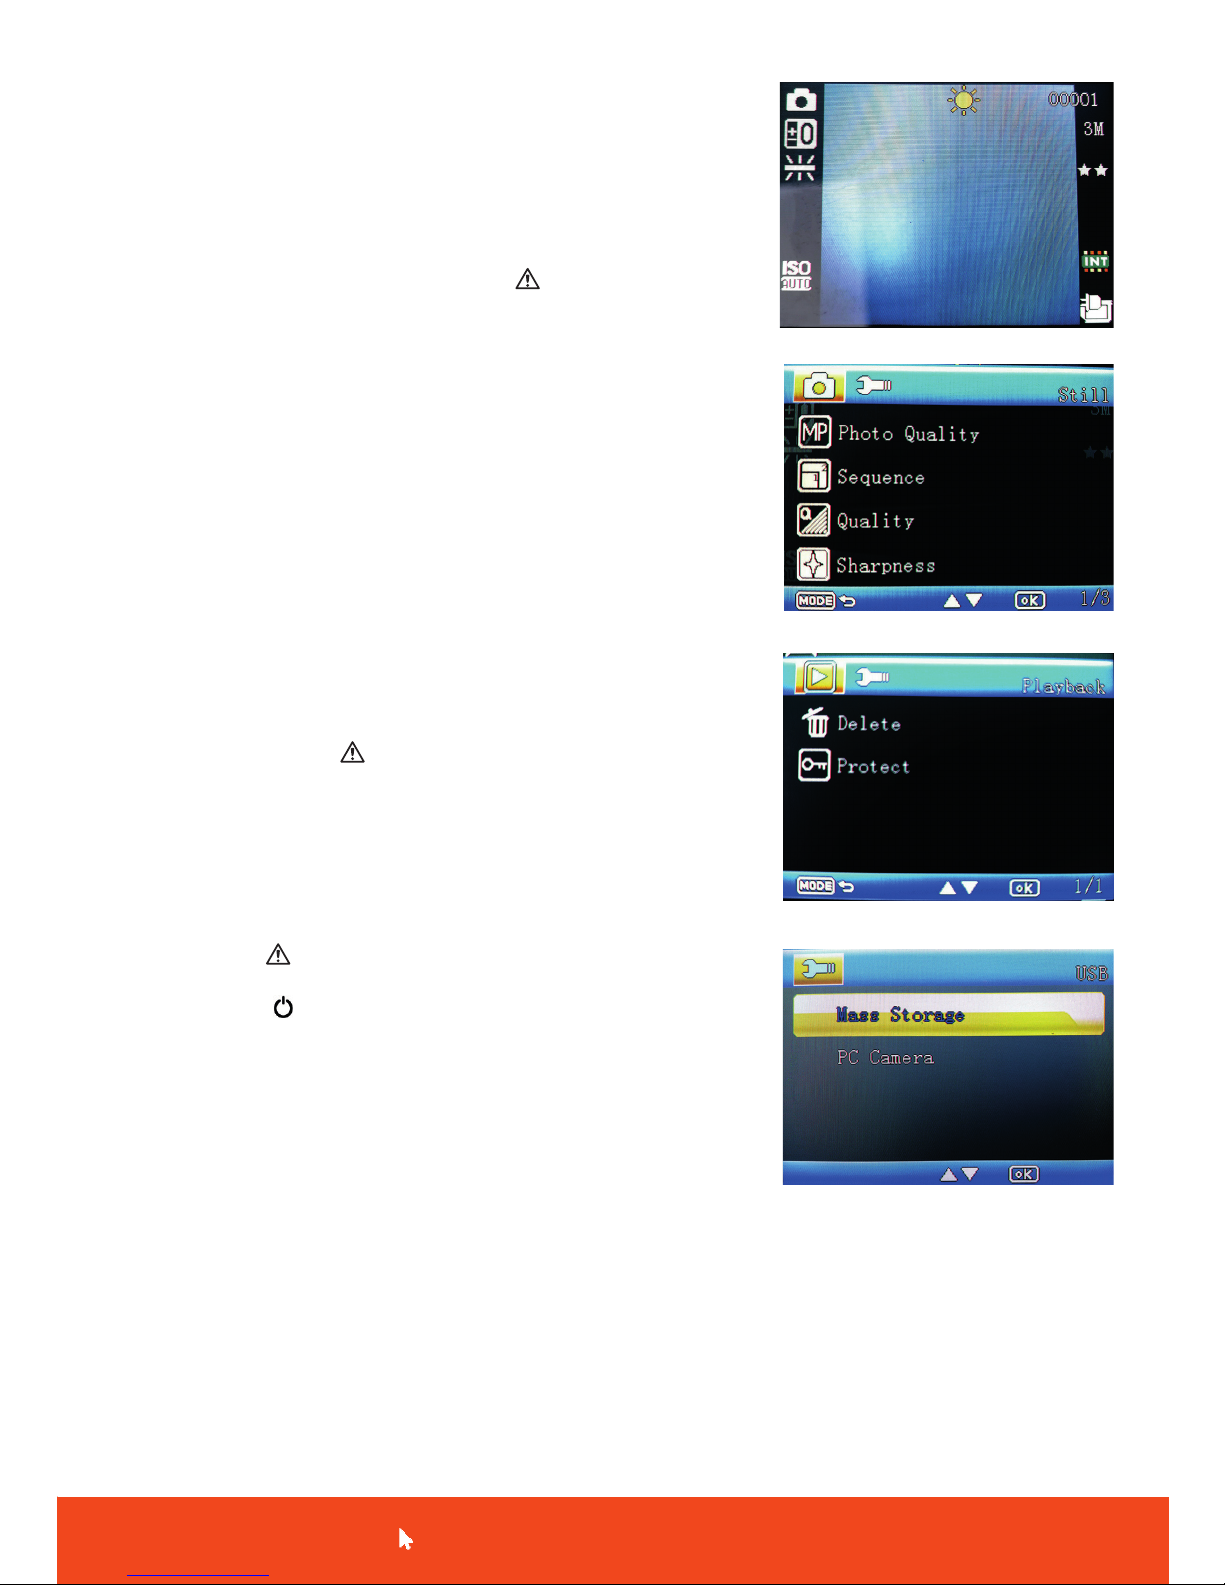
Photo Mode
Video mode is the default option, press the key to switch to
photo mode, the screen opposite will appear. To take a photo press
the OK key.
Photo Mode Options
Shooting mode: single shot, 2/5/10 seconds timer
Resolution: 12M, 10M, 8M, 5M, 3M, 2M, VGA, 1.3M
Sequence : On/O
Image quality: Fine, normal , economy
White Balance: Auto, daylight, cloudy, tungsten, uorescent
Colour: colourful, black and white, sepia
ISO: Auto, 100,200
Exposure: EV-2.0, EV-5/3, EV-4/3, EV-1.0 , EV-2 /3, EV-1 /3, EV + 0.0,
EV + 1/3, EV + 2/3 , EV + 1.0, EV + 4/3, EV + 5/3, EV + 2.0
Anti-shake: On/O
Quick preview: O, 2 seconds, 5 seconds
Date Stamp: O, Date, Date I Time
Playback Mode
In video mode press the key twice to switch to playback mode, use
up pand down qkeys to select video or photo les, thn OK to view.
Delete and Protection: In playback mode, delete or protection can be
selected on the menu. Press OK key to enter “Delete Current”,
“Delete All” option, press the OK key again to conrm the selection.
You can also lock the le.
Video Recording Shortcuts
Press the mode key in emergency situations to lock and unlock the
current le.
Press the power
key switch on supplementary light.
Press the up p key to switch o the microphone On/O when in
recording mode.
Connecting to a Computer
Use a mini USB cable (not supplied) to connect the camera to a
computer, the screen opposite appears oering 2 connection modes:
Mass storage and PC camera mode. Press the up pkey to select the
connection mode.
1. In Mass Storage mode, the PC or Mac will display the contents of the
micro SD card so that you can view or download stored video and photo les.
2. In PC camera mode, the camera can be used as a web cam for video chat.
(Operating system required · Windows 2000/XPNi sta/ Windows 7, MAC)
Please Note: As an alternative to the Mass Storage option the micro SD card can also be read directly when
inserted into a suitable card reader connected to a computer.
Remember to switch o the camera before removing the micro SD card from your dashcam.
Photo Mode
Photo Settings
Playback Settings
Computer Connection Menu

Waste electrical and electronic products should
not be disposed of with household waste.
Please recycle where facilities exist. Check with
your Local Authority for recycling advice.
© Philex Electronic Ltd 2018. v1 MK42 0NX
11. Technical Support
If you experience problems using your action
camera, please visit our technical website at
www.lexiprotect.com/support
Support: www.lexiprotect.com/support
8
LCD Screen 2.4” TFT
Language Options English/Portuguese/Russian/ Chinese Simpl ed/TraditonalChinese/Japanese/
Spanish/French/Germany/Italian
Video Resolutions FHD (1920 x 1080p ), HD (1280 x 720p), WGA (854 x 480p) VGA (640 x 480p)
Compression Format AVI
Microphone/ speaker Built-in
Car power supply DC input 12V𝌂1.5A
Battery Built-in lithium polymer battery
Charging time 120 minutes
System Requirements Windows 2000/XPNista/ Windows 7, MAC, Windows 8 and Windows 10
Display 2.4-inch display
Lens A+ grade high-resolution multi-layer optical wide-angle lens F=2.0/f=3.2mm
Video Specications AVI
Image Format JPEG
Video Output AV output HDMI HD output
USB version USB2.0
Power Interface 12V 1.5A
Capacity support Up to 32GB
Built-in speaker 8R 1W
Integrated recorder Fidelity speakers
Dimensions (Dashcam only) 62 x 71.5 x 32mm
10. Specications
9. Basic operation - continued
Connecting to an HD display
You can playback your videos and view stored photos on an HD TV or Monitor by conecting it via an HDMI
cable to the mini HDMI port on your camera (HDMI cable not supplied).
Table of contents