Lexicon Studio Core-32 LDI-12T User manual

SAFETY SUMMARY
The following general safety precautions must be observed during all phases of operation, service and
repair of this instrument. Failure to comply with these precautions, or with specific warnings elsewhere
intheseinstructionsviolatessafetystandardsofdesignmanufactureandintendeduseoftheinstrument.
Lexicon assumes no liability for the customer's failure to comply with these requirements.
SAFETY SYMBOLS
General definitions of safety symbols used on equipment or
in manuals.
Instruction manual symbol: the product
willbe markedwiththissymbolwhenitis
necessary for the user to refer to the
instruction manual in order to protect
against damage to the instrument.
Indicatesdangerousvoltage. (Terminals
fed from the interior by voltage exceed-
ing 1000 volts must be so marked.)
TheWARNING signdenotesahazard.It
calls attention to a procedure, practice,
conditionorthelikewhich,ifnotcorrectly
performed or adhered to, could result in
injury or death to personnel.
The CAUTION sign denotes a hazard. It
callsattentiontoanoperatingprocedure,
practice,conditionorthelikewhich,ifnot
correctly performed or adhered to, could
result in damage toor destruction of part
or all of the product.
The NOTE sign denotes important infor-
mation. It calls attention to procedure,
practice, condition or the like which is
essential to highlight.
GROUND THE INSTRUMENT
To minimize shock hazard the instrument chassis and cabi-
net must be connected to an electrical ground. The instru-
ment is equipped with a three-conductor AC power cable.
The power cable must either be plugged into an approved
three-contact electrical outlet orused with a three-contact to
two-contact adapter with the grounding wire (green) firmly
connected to an electrical ground (safety ground) at the
power outlet. The power jack and mating plug of the power
cable meetInternationalElectrotechnical Commission (IEC)
safety standards.
DO NOT OPERATE IN AN EXPLOSIVE
ATMOSPHERE
Do not operate the instrument in the presence of flammable
gases or fumes. Operation of any electrical instrument in
such an environment constitutes a definite safety hazard.
KEEP AWAY FROM LIVE CIRCUITS
Operating personnel must not remove instrument covers.
Component replacement and internal adjustments must be
made by qualified maintenance personnel. Do not replace
components with power cable connected. Under certain
conditions, dangerous voltages may exist even with the
power cable removed. To avoid injuries, always disconnect
power and discharge circuits before touching them.
DO NOT SERVICE OR ADJUST ALONE
Donotattemptinternalserviceoradjustmentunlessanother
person, capable of rendering first aid and resuscitation, is
present.
DO NOT SUBSTITUTE PARTS OR MODIFY
INSTRUMENT
Because of the danger of introducing additional hazards, do
not install substitute parts or perform any unauthorized
modification to the instrument.
DANGEROUS PROCEDURE WARNINGS
Warnings, such as the example below, precede potentially
dangerous procedures throughout this manual. Instructions
contained in the warnings must be followed.
Dangerousvoltages,capableofcausingdeath,arepres-
ent in this instrument. Use extreme caution when han-
dling, testing and adjusting.
WARNING
NOTE:
CAUTION
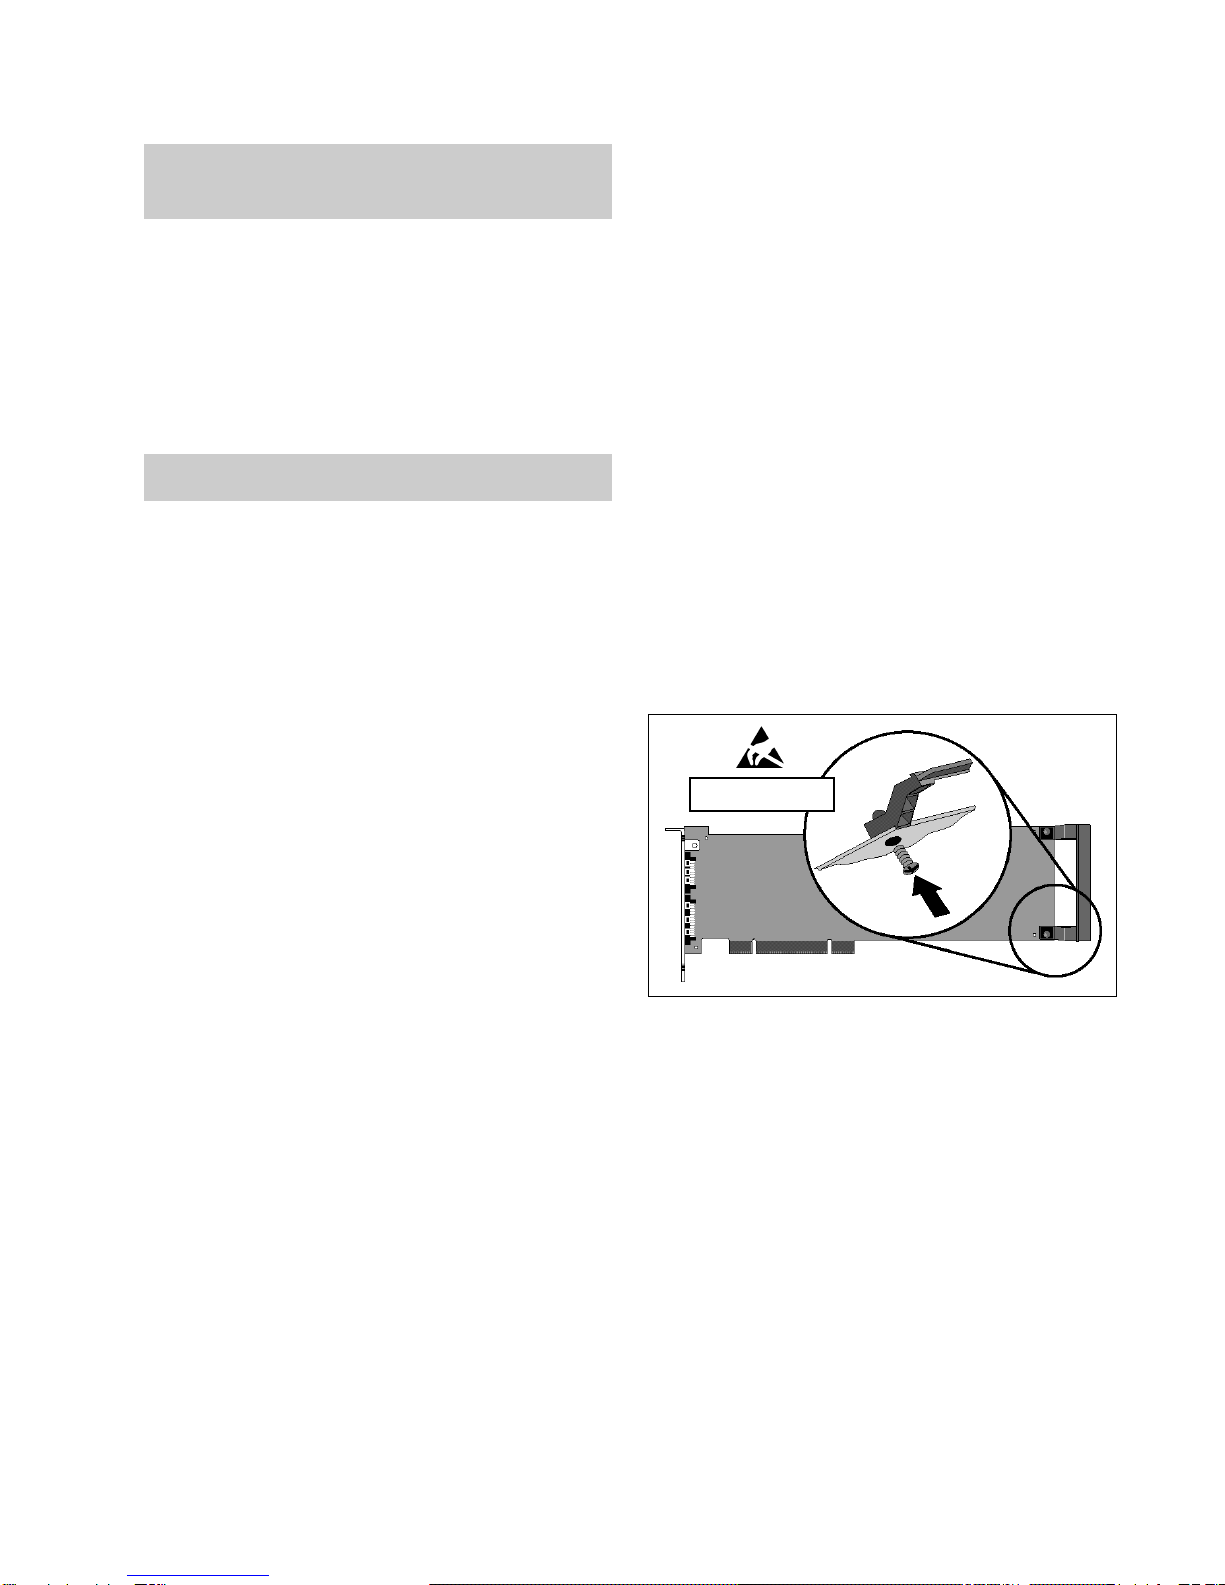
Electrostatic Discharge (ESD) Precautions
The following practices minimize possible damage to ICs
resulting from electrostatic discharge or improper inser-
tion.
• Keep parts in original containers until ready for use.
• Avoid having plastic, vinyl or styrofoam in the work
area.
•. Wear an anti-static wrist-strap.
• Discharge personal static before handling devices.
• Remove and insert boards with care.
• When removing boards, handle only by non-conduc-
tive surfaces and never touch open-edge connectors
except at a static-free workstation.*
• Minimize handling of ICs.
•. Handle each IC by its body.
• Do not slide ICs or boards over any surface.
• Insert ICs with the proper orientation, and watch for
bent pins on ICs.
• Use anti-static containers for handling and transport.
*To make a plastic-laminated workbench anti-static, wash with
a solution of Lux liquid detergent, and allow to drywithout rinsing.
CAUTION
WARNING

Lexicon Studio Installation Instructions
Hardware and Software Installation Instructions
for the LDI-12T Interface, Core-32 and PC-90
Precautions
• Turn off and unplug your computer.
• Use the anti-static wrist strapprovided with your systemand makesure that youare
grounded during the entire installation process to prevent static charges that can
damage components.
• Put the anti-static bags containing your cards near your computer to avoid walking
around witha card after it isremoved from its bag (and generating static electricity).
• Before handling any Lexicon Studio cards, discharge any personal static electricity
that may be on your clothes or body by touching a grounded metal surface, such as
the power supply case inside your computer.
• Handle the cards only by their edges, as you would a CD. Avoid touching the pins
on the bottom edge of the cards.
• Save the anti-static bags containing your Core-32 System card and PC-90 module.
These prevent static electricity from damaging sensitive electronic components on
the cards. Whenever cards are removed from your computer, they shouldbe stored
in these bags.
BEFORE PERFORMING ANY OF THE SOFTWARE OR HARDWARE INSTALLATION PROCEDURES,
READ THE "MANUAL ADDENDUM" ELECTRONIC FILE.

Hardware Installation
Setup
1. Put on the anti-static wrist strap.
2. Place the foam from your Lexicon Studio package on
top of a work surface next to your computer. (Any flat
piece of static-safe foam with similar dimensions to the
Core-32 card can be used).
3. Makesurethatyou computerisproperlyshutdownand
unplugged.
4. Remove the computer top cover and PCI slot cover(s)
for the slots you’ve chosen for your Lexicon Studio
cards. If you do not know how to open your computer,
consult your computer owner’s manual.
5. Touch the computer power supply case to discharge
any personal static electricity.
6. RemovetheCore-32fromitsanti-staticbag,holdingthe
card only by its edges. Be careful to avoid touching the
pins on the bottom edge of the card. Place the Core-32
bag on top of the foam and place the card on the foam
with the white PC-90 connector facing up as shown
below.
Mount the PC-90 card onto the Core-32 card
The PC-90 module can only be mounted onto a Lexicon
Studio Core-32 system card. Attempting to attach your PC-
90 to any other type of PCI card may damage your PC-90
module.
1. Touch the computer power supply case to discharge
any personal static.
2. Remove the PC-90 module from its anti-static bag,
holdingthecardonlybyitsedges.Placethebagonyour
work surface next to your computer and place the PC-
90 on it with its white connector facing up.
Installation isaneasyprocess,buttoavoidproblems,please
follow these instructions carefully.Pay particularattention to
theprecautionslistedinthesafetysummaryandthosewhich
appear throughout these instructions. Any damage caused
during installation is not covered under warranty.
3. PickupthePC-90cardandorientitsothattheconnector
side faces away from the palm of your hand.
4. Pick up the Core-32 card in your other hand. Orientthe
cards with their connector sides facing each other and
aligntheconnectorsatthetopofeachcard.Firmlypress
the cards together until they connect fully. The holes on
theedgesoftheCore-32cardshouldbealignedwiththe
standoffs on the PC-90 card.
5. Once thecards are mated,place theassembly, withthe
Core-32 card on top, onto the Core-32 anti-static bag.
Use the four screws providedto attach the PC-90 to the
Core-32card.Donotovertightenthescrewsasyoumay
damage the PC board.
Attach the PCI Extender
The extender provides support for cards installed horizon-
tally and prevents boards from touching each other and
shorting. To attach the extender:
1. Holding the Core-32 assembly by its edges, align the
holes of the board and the extender.
2. Insert two screws (provided) from the back of the Core-
32cardasshown.Donotovertightenthescrews,asyou
may damage the PC board.
Install the Core-32/PC-90 assembly
TheCore-32 System cardmust be installedin afull-size PCI
slot which is a bus master. Refer to your computer owner’s
manual to determine which slots are available as bus mas-
ters. (On some older motherboards, the PCI slot next to the
ISA bus connector[the PCI/ISA shared slot] is nota PCIbus
master slot.)
1. Touch the computer power supply case to discharge
personal static.
2. Pick up the Core-32/PC-90 assembly by the top of the
metal bracket and the top of the other end of the card.
3. Alignthecardassemblyovertheslotyou’vechosenand
insert it.
4. Placeonehandalongthe topedge ofthecardandpush
downfirmlyuntilthecardisfullyseatedintheslot.Donot
use excessive force.
Install Supported Third Party
Audio Software
LexiconStudiorequirescompatiblefront-endsoftware(such
as Cubase Audio VST) to operate. Please refer to your
particular software installation guide for assistance.
As Lexicon Studio installs software within directories of your
front-end software, you should install your audio software
first and verify that it launches properly before installing
Lexicon Studio hardware (even though it will not be audio-
capable until installation of the Lexicon Studio system).
CAUTION

Lexicon Part No. 070-12432 Rev 1
3 Oak Park
Bedford MA 01730-1441
Tel: 781-280-0300
Fax: 781-280-0490
Web: www.lexicon.com
When Windows is finished loading the drivers, you will be
promptedtorestartyourcomputer.Ifyouareinstalling aPC-
90, you should choose not to restart. Windows will prompt
you twice — select No at both prompts and proceed with
theseinstallation instructions. If youare only installing Core-
32 drivers, you may now restart your machine.
Following is a list of files installed and their locations:
File Location
asiolex.dll C:\IDS
Core32.dll C:\IDS
Coredsp.pci C:\IDS
Corefpga.bin C:\IDS
Corev40.bin C:\IDS
Diagv40.bin C:\IDS
ids.inf Installs as LexiconStudio.inf within
C:\Windows\Inf\Other
ids.vxd C:\Windows\System
lexmtc.drv C:\Windows\System
LxStudio.ini C:\Windows
Install the PC-90 Software for Windows 95
1. Insert Lexicon Studio Software Disk 1: PC-90 Plug-Ins.
2. Open the disk and double-click on Setup.exe to launch
the Installer.
3. Click Next > at the InstallShield Welcome screen.
4. Make certain that the installer is directed toward the
desired plug-in folder (example: C:\..\Cubase Audio
VST\vstplugins) and click Next >.
5. Click Next > at the summary screen to begin installing
PC-90 software.
6. hen prompted, insert Disk 2: PC-90 Plug-Ins, and click
Continue.
7. Click Finish to complete setup.
8. Restart your computer (even if youíve alreadyrestarted
after installing the Core-32 Drivers).
Installing the PC-90 software will file it within the registry. To
remove or update this software,remove the PC-90 install by
using the Add/Remove Programs control panel, highlight-
ingPC-90 Install,andselecting Remove.This controlpanel
is located at Start/Settings/Control Panel/Add/Remove Pro-
grams.
5. Oncethecardisfullyseated,attachtheCore-32bracket
to the computer chassis with the screws provided with
your computer. If you are standing the computer up,
check to see that boards are not bending and shorting
against each other.
6. Replacethecoveronthe computer.Donotoperatethe
system without the cover.
Connect the LDI-12T Interface to Audio Sources
1. Use only the proprietary Lexicon cable (provided) to
connect the Core-32 card to the LDI-12T Interface.
2. WithboththecomputerandtheLDI-12Tpowereddown,
attach the cable between the lower connector on the
back of theCore-32 card and theComputer port on the
LDI-12T rear panel.
3. Connect the 9V connector to theAC Power port on the
rear panel of the LDI-12T, and plug the other end into a
wall socket.
The LDI-12T supports various formats of analog and digital
I/O. Make certain your cables are the correct types prior to
connection. (Analog XLR connectors are +4dBu balanced
(Pin 2 hot) , analog RCA connectors are –10dBV unbal-
anced). To select a source for input or output within the
application software, refer to the documentation provided
with your particular software package
Software Installation
Install the ASIO Lexicon Studio Driver
for Windows 95
1. With the Core-32 assembly installed, power up your
computer and your LDI-12T interface. Once your com-
puter is fully booted, Windows 95 will identify your
CORE-32 asa new PCImultimedia device (Inthe event
ofbootingproblems,refertothetroubleshootingsection
of you 12T System manual).
2. Insert Lexicon Studio Software Disk 1: Studio Drivers.
3. Click the Next > button. Windows will find the driver
information for the Lexicon Studio Sound System.
4. Click the Finish button to install the drivers.
This manual suits for next models
2
Table of contents