LFF LAQ961 User manual

-USER MANUAL-
CO2MONITOR
Ref.: LAQ961

PACKAGE LIST
ITEM NO PART NAME FIGURE QTY
1
2
3
CO2 monitor unit
with back-up battery
USB-C cable
User manual
1
1
1
1
-USER MANUAL-
CO2MONITOR
Ref.: LAQ961

2
OVERVIEW
INTRODUCTION
Thank you for selecting the LFF LAQ961. The Carbon Dioxide (CO2) monitor is
designed for air quality control and health control by measuring Carbon Dioxide
level in areas where CO2could be concern. The measured CO2value in ppm
(parts-per-million.)
Temperature, Humidity and Time will be displayed on the LCD along with three
CO2status indications: Normal (400 to 800ppm), Warning (801 to1600ppm),
Dangerous (>1600ppm). An acoustic alarm sounds when the CO2level exceeds a
defined level. This meter is shipped fully tested and calibrated and, with proper
use, will provide years of reliable service.
5
4
6
7
8
9
10
1 2 3
1211 13

3
MAIN FEATURES
▲/ LIGHT button
SET button
▼/CO2 AL /CAL button
CO2status LED indicator
Tempertaure and humidity reading
comfort status symbol
Carbon dioxide value
Low battery indicator
Time display
Alarm indicator
ON/OFF button
Input power port
Reset button
1
2
3
4
5
6
7
8
9
10
11
12
13
• Large true black display with color.
• Non-dispersive infrared (NDIR) gas sensor for CO2detection.
• Wide CO2measuring range from 400 to 5000ppm with 3 colors status
indications.
• Real time clock.
• Alarm clock with snooze function.
• Color display of ventilation recommendation on basis of CO2concentration in
the air.
• Adjustable CO2high and low value alert with optional alarm sound for high
value alert.
• CO2Auto-Calibration and Manual Calibration.
• Backlight with adjustable brightness levels.
• Built-in memory chip to save setting when power is off.
• 3 x Touch Buttons Operation & 1 key for on/off.

• When the monitor is in OFF status, press and hold [ON/OFF] button over 3
seconds to turn ON the monitor.
• Time, temperature, humidity and CO2readings will show on the display. The CO2
sensor starts to warm up. CO2 reading shows “550” initially. In around 60
seconds, a relevant CO2data will be displayed.
• When the monitor is in ON status, press and hold [ON/OFF] button over 3
seconds to turn OFF the monitor.
• Unpack and take out the CO2monitor. Insert the USB-C cable to the monitor and
connect to the USB adaptor.
• Press and hold the [ON/OFF] button over 3 seconds to turn on the CO2
monitor.
• Time, temperature, humidity and CO2readings will show on the display. The CO2
sensor starts to warm up. CO2 reading shows “550” initially. In around 60
seconds, a relevant CO2data will be displayed.
4
11
11
11
Normal Time Display
FIRST TIME TO USE
SWITCH ON/OFF THE MONITOR

5
OPERATION
1 TIME SETTING
In Normal time mode, press and hold [SET] button over 3 seconds to enter
time setting mode.
Press [▲/ LIGHT]and [▼/CO2AL /CAL] button to adjust the values.
Press and hold [▲/ LIGHT]and [▼/CO2AL /CAL] button over 3 seconds
to adjust the values quickly.
Press and release [SET] button to confirm and move to next item.
1.1 SETTING ORDER
1.) Press and hold [SET] button entering the setting, 12 Hr flashes. Press
[▲/ LIGHT]and [▼/CO2AL /CAL] button to adjust 12 hour or 24 hour
time format. Press [SET] button to select hour.
2.) When Hour flashes, Press [▲/ LIGHT]and [▼/CO2AL /CAL] button to
adjust hours. Press [SET] button to select minute.
3.) When Minute flashes, Press [▲/ LIGHT]and [▼/CO2AL /CAL] button
to adjust minutes . Press [SET] button to select ℃/℉ format.
4.) When ℉ flashes, Press [▲/ LIGHT]and [▼/CO2AL /CAL] button to
adjust ℃/℉ format . Press [SET] button to select low CO2alert level.
5.) When Low CO2 Alert level flashes (default =400), Press [▲/ LIGHT]and
[▼/CO2AL /CAL] button to adjust low CO2alert level . Press [SET] button
to select high CO2alert level.
6.) When High CO2 Alert level flashes (default =1200), Press [▲/ LIGHT]and
[▼/CO2AL /CAL] button to adjust high CO2alert level . Press [SET]
button to save all settings and exit to the normal time mode.
Note : If there is no valid operation within 10 seconds, it will automatically
return to the Normal display mode from the setting mode.
2
1
1
3
3
1 3
1 3
1 3
1
1
1
3
3
3
2
2
2
2
2
2
2
2
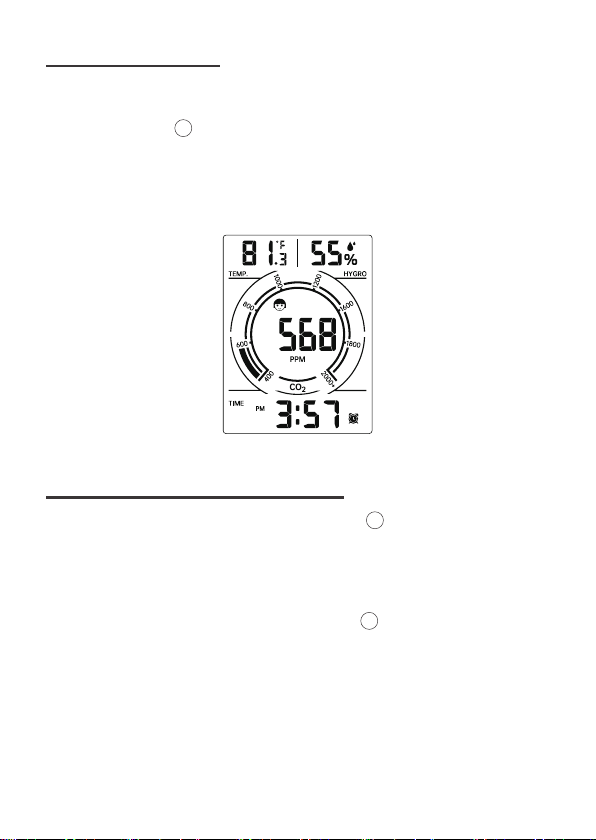
1. 12/24 Hour Format
4. ℃/℉ format
3. Minute
6. High CO2Alert level
2. Hour
5. Low CO2Alert level

6
Normal Time Display
High CO2 Alert level
12/24 Hour Format
Low CO2 Alert level
Hour
℃/℉ format
Minute

7
2
2
2
Alarm Time Mode
2 ALARM
2.1 CHECK ALRAM TIME
In Normal time display, press and release [SET] button to switch display
alarm time (Alarm Time mode).
2.2 SETTING THE DAILY ALARM
In Alarm time setting mode, press and release [SET] button to confirm and
move to the next item.
• press and hold [SET] button over 3 seconds to enter alarm setting mode.
Hour of Alarm starts to flash.

8
• Press [▲/ LIGHT]and [▼/CO2AL /CAL] button to set required alarm
hours.
Press and hold [▲/ LIGHT]and [▼/CO2AL /CAL] button to adjust alarm
hours quickly.
Press [SET] button to select minute of Alarm.
• When minute of Alarm flashes,
• Press [▲/ LIGHT]and [▼/CO2AL /CAL] button to set required alarm
minutes.
Press and hold [▲/ LIGHT]and [▼/CO2AL /CAL] button to adjust alarm
minutes quickly.
Press [SET] to save all setting and exit to Normal time mode.
Note : If there is no valid operation within 10 seconds, it will automatically
return to the Normal display mode from the setting mode.
2
2
1 3
1 3
1 3
3
31
2.3 DEACTIVATE/ ACTIVATE ALARM FUNCTION
• In Alarm time mode display, press and release [▼/CO2AL /CAL] button to
select the Alarm on or off.
• If the alarm is on, its corresponding alarm icon will be shown on the display.

9
2
2
Alarm On Alarm Off
Note : When the alarm is set ON, the alarm function will be normal when the
monitor is OFF mode.
2.4 SWITCHING OFF THE ALARM SIGNAL
• When the alarm time reaches, alarm is ringing and alarm icon is flashing,
press any key except [SET] to stop the alarm signal. It is not necessary to
reactivate the alarm. It will ring again this time next day.
3 CO2DISPLAY
3.1 CO2STATUS INDICATION
• There are 3 stages indication : Normal, Warning and Dangerous.
2.5 SNOOZE FUNCTION
• When the alarm time reaches, alarm is ringing and alarm icon is flashing,
press [SET] button to pause the alarm. The snooze indicator icon keep
flashing.
• The alarm will resume after 5 minutes.
Normal
Warning
Dangerous
CO
2
801 -1600 ppm (Indication bar and LED color is Yellow)
CO
2
≤ 800 ppm (Indication bar and LED color is Green)
CO
2
>1600ppm (Indication bar and LED color is Red)

1.) Place the CO2monitor in a 400ppm calibration surrounding. Turn the CO2
monitor on and wait until the first CO2reading displayed.
2.) Press and hold [ON/OFF] and [▼/CO2AL /CAL] buttons together over
3 seconds to enter CO2Manual Calibration mode.
3.) When “CAL SET” appears and flashes, press [SET] to confirm CO2manual
calibration operation. Press other buttons except [SET] to exit CO2manual
calibration operation.
10
2
2
11
3.2 CO2LOW and HIGH ALERT
• When the measured CO2 reaches the set high/low alert level, the related or
and its measured CO2 will be flashing to remind you.
3.3 TO USE ACOUSTIC CO2ALARM (FOR HIGH ALERT)
• Press [▼/CO2AL /CAL] button to turn on the CO2alarm. When the alarm is
on, the CO2sound alarm icon appears on the display.
• When the measured CO2reaches the set high alert level, the measured CO2,
and CO2 sound alarm icon flash and an audible beep sound will be
given continuously.
• The beep sound will accelerate when the measured CO2level exceeds more
over the set alert level.
If this happens, please open the windows, adjust the air ventilation and avoid too
many people gathering together to improve the air quality of your environment.
• Press [▼/CO2AL /CAL] button to disable the CO2sound alarm. The
measured CO2 and remain flashing if CO2exceeds the set high alert.
3.4 TO CALIBRATE THE CO2SENSOR
3.4.1 AUTOMATIC BASELINE CALIBRATION
• The monitor is establishes a baseline calibration to eliminate the zero drift of
the infrared sensor. The Automatic Baseline Calibration function is always
“ON” when the monitor is turned on. The Automatic Baseline Calibration is
designed to calibrate the monitor at the minimum CO2reading detected during
7 days of continuous monitoring (power on). It assumes that the area being
tested receives fresh air with a CO2level of approximately 400ppm at some
period of time during seven days. It is not suitable to use a desktop CO2monitor
in closed area with consistently high CO2levels, 24 hours a day.
3.4.2 MANUAL CALIBRATION OF THE CO2SENSOR
3
3
3

11
4.) The calibration time is around 15 minutes, the calibration time is counting
down on the display. After count down is finished, the initial calibration is
completed. The CO2monitor will return to the normal display mode and will
continue the calibration in the background. It takes 24 hours to let your
monitor run and display the correct CO2level.
Note: Please wait for your CO2monitor to complete the calibration process by
itself. DO NOT press any buttons during the calibration process.
4 ADJUST DISPLAY BACKLIGH BRIGHTNESS
• Press [▲/ LIGHT]button to adjust the brightness of the display from low to
high.
5 BATTERY INDICATION AND BATTERY CHARGING
The monitor will show its battery level indication.
• When the battery level is low (display empty battery level), please charge the
CO2monitor by connection it with USB cable and power supply.
• During the charging, the battery indication display is scrolling representing
battery is under charging.
• When the charging is completed, the battery indication will be stop scrolling
and changed to solid (full battery level).
6 RESET THE CO2MONITOR
If there is malfunction, press [RESET] button to reset the monitor.
CARE AND MAINTENANCE
1.) Place the CO2monitor on a stable surface, away from the sources of direct
sunlight or excessive heat or moisture.
2.) Clean the CO2monitor with a soft cloth moistened only with mild soap and
water. Stronger agents such as Benzine, thinner or similar materials can
damage the surface of the item. Make sure the CO2monitor is unplugged
before cleaning.
3.) Do not open the back case or tamper with any components of this monitor.
4.) Do not plug in any other AC/AC or AC/DC adaptor with incorrect specifications
or voltage.
1
13

12
PRECAUTIONS
•
The item is intended to be used only indoors.
•
Do not subject the item to excessive force or shock.
•
Do not expose the item to extreme temperatures, direct sunlight, dust or
humidity.
•
Do not immerse in water.
•
Avoid contact with any corrosive materials.
•
Do not dispose this item in a fire as it may explode.
•
Do not open the inner back case or tamper with any components of this item.
SPECIFICATION
Dimension : 2.99 x3.78 x1.42 inches ( 76 x 96 x36mm)
Input : DC 5V, 1A
Rechargeable battery capacity : 2000mAh
Operation temperature : 32.0℉ to 122℉ (0℃ to 50℃)
CO2
Measuring range : 400 – 5000 ppm
Resolution : 1 ppm
Accuracy : ±5%+ 50ppm
Warm up time : ~ 1 minute
Temperature & Humidity
Temperature range : 14.2℉ to 122℉ (-9.9℃ to 50℃)
Temperature resolution : 0.1℃ /0.1℉
Humidity range : 1% to 99% RH
Humidity resolution : 1% RH
Default Setting
Time format : 12 hour format
Alarm time : 6:30 am
CO
2
alert level : Low – 400, High – 1200
CO
2
sound alert : ON
Temperature : ℉
Display brightness level : High

CO2MONITOR
Made in China
LAQ961
support@lfftech.com
Table of contents
Popular Measuring Instrument manuals by other brands

Sun Microsystems
Sun Microsystems MGA-1400 installation instructions

Tektronix
Tektronix P5934 instruction manual

CUBETAPE
CUBETAPE PRO quick start guide

Teledyne Lecroy
Teledyne Lecroy USB Advisor T3 quick start

TSI Instruments
TSI Instruments 9535A Operation and service manual

Waytronic
Waytronic WT-XS2 manual