LG L8004R User manual

TypeAir
MODELS,: LSOO4R

@
FOR YOUR RECORDS
Wr_e the model and seria_ numbers here,:
Model #
Serial #
You can find the numbers on a label or_the side of the
product,
Dealer's Name
One Purchased
iii Staple your receipt to this page in the @_en_you need
to prove _te or purchase or for warranty issues.
READ THIS MANUAL
ilnside you will find many _lp{ul hints on ihow to use and
maintain your air co_itioner prosily. Ju_ a Ilittlepreve_ive
care on your part can save you a great dear of time and
mor_y over the _ifeof your air co,nd_i,0ner.
"fbu'][ find mar_y answers to common problems in the chart
of troubleshooting t#s. If you rev@w our c_rt of
Troubleshooting _ps first, you may not _ed to ca_i for
service at aU.
PRECAUTION
•Contact an Authofl:z_ _rv_ Center for repair or
mainlenance of this unit. Call 1-800,-243_00 I_o
|_a_e the neares_ ASC_
•Th_s a_r condR_oner is not int_ded for u_ by young
chi|dren or |nvalids without superv|sion,
,Young children shofa|d he _rvis_ to ensure that
they do not p|ay w_h the air conditioner.
-|f the power cord r_uir_, repla_ment, have an
Authorized Serv|cer install an exact rep|ac_ent par1,
,|nstallat|on wo_ mus_ b,e performed |n accordance
wRh the National E|ec_ric Code by _a|_fied and
author|zed personn,e| on|y:
2 Roem iAir Conditioner

To prevent injury to the user or other _ople and property damage, the following instructions
must be foIFowed.
[] _n_rrect operation due to ignoring instructions wfl] cause harm or damage. The seriousness
is classified b,y the foi]]o,wing indications.
[] B_ause of the weight of the product, it is recommend_ that you have a hel_r to assist in
the instaHatiion.
• Meanings of sym_]s used in this manual are as shown bel_.
Be sure not to do.
Be sure to follow the instruction.
miinstallation
*Improperassembly or [nstalfat[onmay cause
inco_ect operation, includinginjury,fire, and • It may _use fire and electdc shock
•It may cause ex or fiire. • lit may _use electric slhock and failure.
Owner_ Manual 3

[] Operation
. ._he_ise, it will cause
electric shock or fire
, _will _use electric shock or
fire.
, _herwise it will cause fire
and electric shock accident.
• It willlcause e_ectricshock or
fire.
• It will cause ele_ric sho_ or
fire.
• It may cause fire and electri.c
shock...
•litwiillcause ellectric shock or
fire.
• No grounding may _use
ele_ric sho_.
4 Room Air Conditioner
• It may cause electric shock.

* The air co,nd_ioner must be operated in a
enclosed area to _ most effective, *It may cause explosion, fire, and burn.
'i _t _I cause ele_ric sho_ or faillure of
machine..
[] Installation
*They are sharp and may
cause inju_.
* Water may enter the unit and degrade the
insulation. It may cause an electric shock..
C c,uT,o.h
, It may cause failure of
appliance or performance •IIfthe outer case is damaged,
must be repaired or
replaced immediately.
Leaving it damaged could
result in the air cond_ioner
falling out of the window,
creating a safety hazard.
Owner_ Manual 5

=Operation
. It may cause injury. • It may cause electric shock
and damage. , it will waste power
consumption in vain and it
may cause accident.
, Since the fan rotates at high
spe_ during operation, it may
cause injury.
, Operation without fi_ters will
cause failure.
•This _uld iniury the _t or
plant. • It is an air _nditioner, not a
precision refrigeration system
• Tlhe ap_arance of the air
cond_ioner may deteriorate,
change color, or develop
surface flaws.
, It is not sanitary and coulld
cause illness or _r_nal
injury hazard.
6Room Air Conditioner

Before, Operation
1. Plug in the power cord properly.
i ¸?
2. Use a dedicated circuit. Ovedoadiing the line could create a fire, Ihazard.
3. Do not use an extension cord. See page 11 for more details.
4. Do not start/stop operation by plugging/unplugging the power cord.
5. If the power co_d is damaged and requires replacement, Ihave an Authorized
Servicer install an exact replacement part.
ii _i_(i_i!_!_!_!_!__ I
i. Being exposed to direct aidlow for an extended p,eriodl of time could Ibe
hazardous to your health. Do not expose occupants, pets, or plants to direct
airflow for extended periods of tiime.
2. Due to the possibility of oxygen deficiency, ventilate the room when used
together with stoves or other heating devices,
3 Do not use this air conditioner for non-specified sp,ecia! purposes (e.g_
preserving precision devices, food, pets, plants, and art objects). Such usage
co,uid damage the items.
4 The air conditioner is a consumer comfort appliance, not a precision climate
control system.
1. Do not touch the metal parts of the unit when removing the filter. Injuries can
occur when handling sharp metal edges.
2. Do not use water to clean inside the air conditioner. Exposure to water can
destroy the insulation, leading to, p,ossible electric shock.
3. When cleaning the unit, first make sure that the power and breaker are turned
off. The fan rotates at a very high speed during operation. There iisa
possibility of injury if the unit's power is accidentally triggered on while
cleaning inner parts o,fthe unit.
For repair .and maintenance, contact an Authorized Service Center. See the
warranty page for details or cal! (800) 243-0000. Have your model number and
serial number available. They should be written on page 2 of this manual.
Owner_ Manual 7

/ntrodu'c#on
This symbol alerts you to the risk of electric shock.
This symbol alerts you to hazards that could cause harm to the
air conditioner.
This symbol indicates s_cial notes.
WARNING: This appliance should be install_ in accordance with the
National El_tric C_e.
Upper Guide
Cabinet
Front Grille
Air Filter
Horizontal Air Deflector
(Horizontal Louver)
Ve_ica! Air Deflector
(Vertical Louver),
Air Diischarge
Brace
Evaporator
Control Board
Remote Controi][er ...............................................
Compressor
Condenser
Base Pan
Power Cord
8 Room Air Conditioner

Elect'ricalSafety,
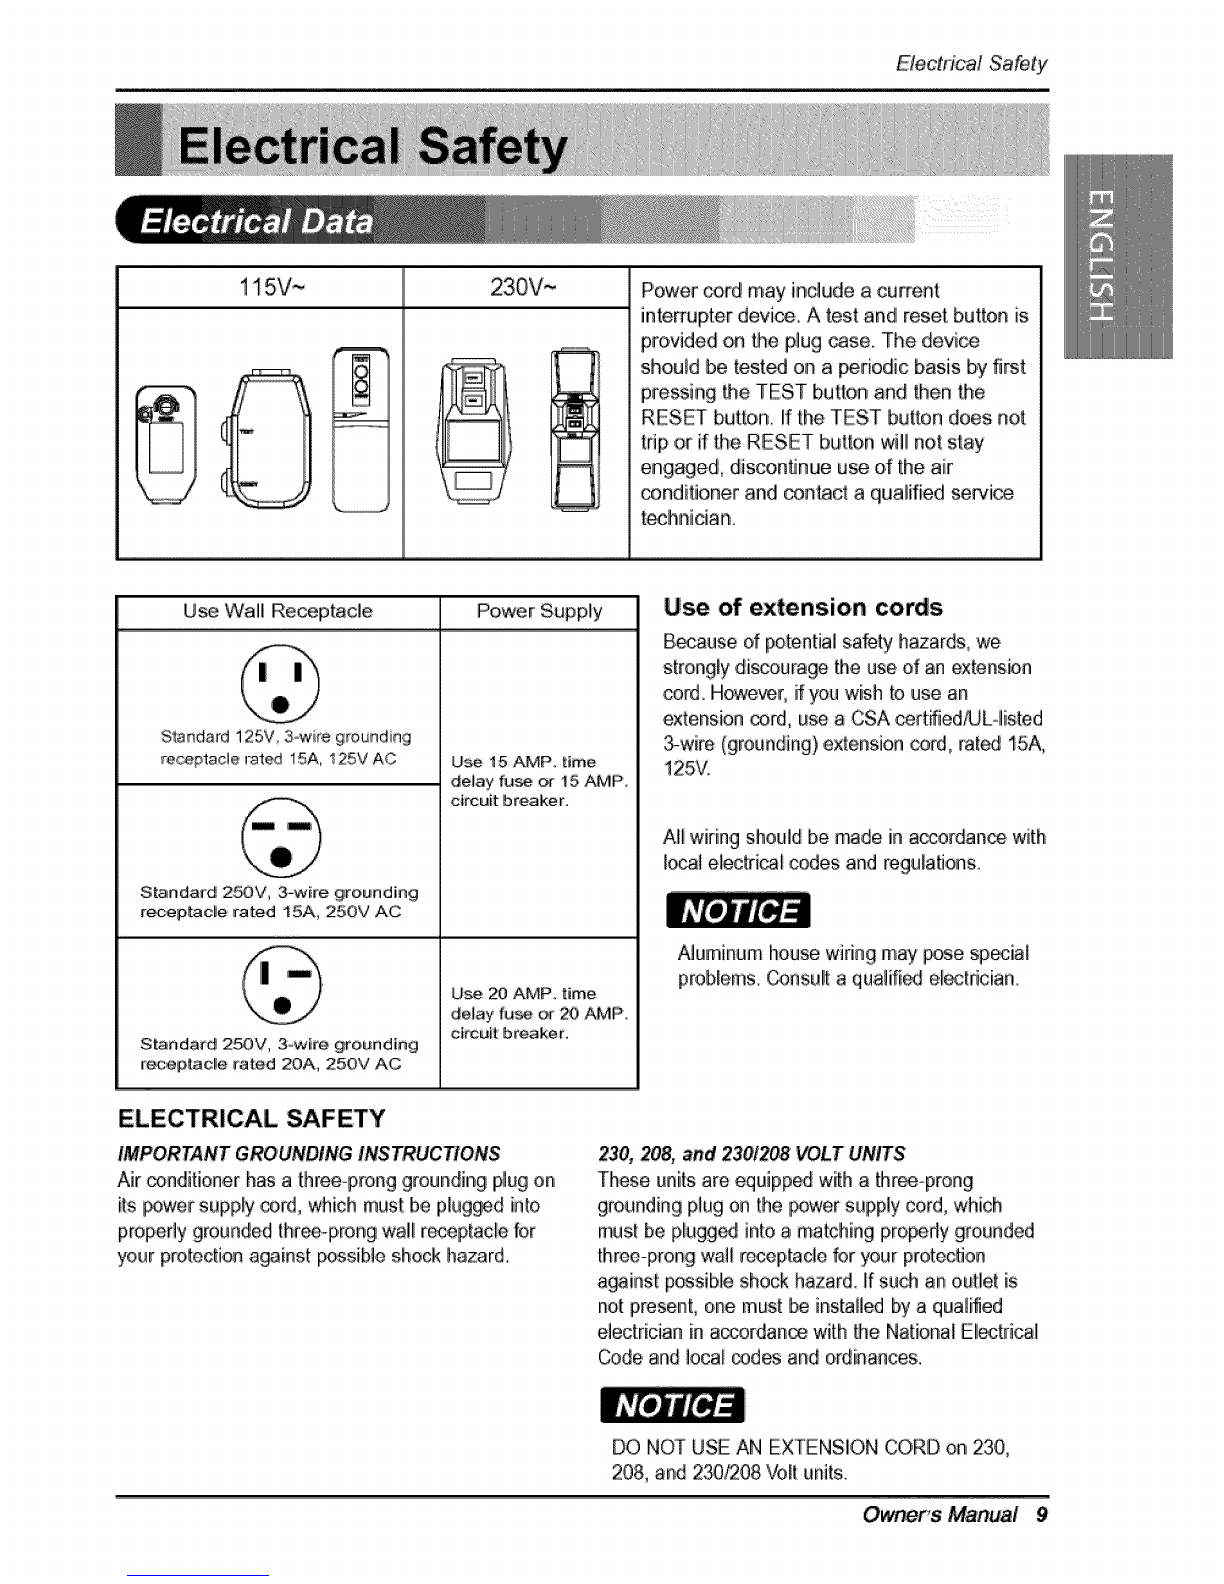
115V~ 230V,~ Power coKJ may include a current
interrupter device. A test and reset button is
provided on the plug _se. The device
should be tes,t_ on a _riodic basis by frst
pressing the TEST button and then Me
RESET butt,on, if the TEST button does not
trip ,oirif the RESET button will not stay
engaged, disco,nfinue use d' the air
conditioner and con_ct a qiualified servia
teclhnician.
Use Wall Receptacle Power Supply
Staadard 125V 3_ire grouading
re_pta,cle rat_ 15A, t25V AC U_ 15 AMP. _e
delay fu_ _ 15 AMP
circuit breaker.
Standard 2_V, 3-wke grounding
receptacle rated 15A, 250V AC
_...__' Use 20 AMP. time
de_ay fu_ _ _ AMP.
ckcu_ breaker_
S_ndard 250V, 3owlre grour_ding
_'¢_epiacl!e _'ated 20A, 250V AC
Use of extension cords
Because dpotential safety hazards, we
strongly discourage the use of an extension
cord Howe_r, if you wish to use an
extension cord, use a CSA cert#iedML4isted
3-wire (groun,dJng)extension co_, rat_J 15A,
125V.
AI_wiring should be _de in a_rdan_ wiith
local electri_ codes and regulations.
Aluminum house wiring may _se isp_ial
pr,oblems, Consult a qualifii_ eF_[dcian.
ELECTRICAL SAFETY
IMPORTANT GROUNDING INSTRUCTtONS
Air ®nditioner has a three-prong grounding plug on
its _wer supply cord, which must be pNgg_d into
properly grounded three-prong wal! receptacle for
your protection a_inst possible shock hazard,
23& 208, and 2301208 VOLT UNITS
These units are equipped w_h a three-prong
grounding IPNgon the _wer supply cord, which
must be pliugg_ intoa matching propedy gro,unded
three-prong wall receptacle for your protection
a_ins[ possiNe shock hazard, ff such an out:let is
not presenL one must _ installed by a quailed
electrician in accordan_ with _e National Eliectdcal
Code,and Joca_codes and ordinan_s.
DO NOT USE AN EX"[ENSIION CORD orli 230,
208 and 2_I208 Volt units
Owner's' Manual 9

WARNING: This appliance must be properly grounded.
The power cord of this appliance is equipped with a three-prong grounding plug.
To miinimize the risk of electric shock, use the plug with a standard three-slot
grounding wall power ,outlet. If the power ,outlet does not include a grounding slot,
have a qualified eiectrician replace the outlet before you use the room air
conditio, ner_
Changing the outlet without making the appropriate wiring
changes will create an unsafe condition that could result in fire o.r
el_trical shock, Refer all such work to a li.cens_ and qualified
Prefert_ meth_
exists _:ore u_
Do not cut or remove the grounding prong from the _wer
WARNING: Attaching the adapter ground terminal to the wall
receptacle cover _rew does not ground tlhe appliance unless the
cover screw is metal and not insulate, and the wall receptacle is
grounded through the house wiring.
WARNING: If you have any doubt whether the air conditioner is
properly ground_, have the wall r_eptacle and circuit checked by a
qualified el_trician.
10 Room Air Conditioner

We strongly discourage the use of an adapter due to potential :safety h_ards.
For temporary connections, use only a UL-fisted adapter, available from most
local hardware stores. Ensure that the, large sbt in the adapter is aligned with
the large slot in the receptacle for a proper polarity connection.
To disconnect the power cord from the adapter, use one hand on each to avoid
damaging the ground terminal. Avoid frequently unplugging the p,ower cord as
this can lead to eventual ground terminal damage.
Temporarymeth_ ,_,(_ __..i, .i
A_p_e_ Rug
ReceptacleCover
-Metal Screw
Never use the ,appliance with a broken adapter,
We strongly discourage the use, of an extension cord due to potential safety
hazards. For temporary situations, use only CSA certified and UL listed 3-wire
grounded extensio, n cords, rated 15 A, 125 V.
Ownerb Manud 11

tnstafla#on
TypeA: 11 EA Type B: 5 EA Ty_ C: 1 _ Type D: 3 EA
(ShodScrew) (WoodScr@a_} (DrainJoint Pipe) (L Bra_et)
E
lype E: 1 EA Type F: 1 EA Tyipe G: 2 EA ..../°y_ H: 1 EA
(Seai Strip} (Guide Pane_} /Suppo_ Briacket/
(Adlr_ve _cked} (Not:ad_sive ba,cked)
Have, the following tools available for installation:
* Screwdriver (Slott:edl and Phillips) * Ruler
* Knife * Hiammer
* Pencil * Level
This room air conditioner is
designed for insta!lation iinstandard
double°hung windows with actual
opening widths from 22" to 36"
The upper and Io'wer window sash
must open sufficiently to allow a
clear vertical opening of 13" from the
bosom of the upper sash to the
window sto,ol.,
- 22" to 36" ---,
13'_rain
WARNING: This product is a WINDOW AIR: CONDITIONER.
As such, a standard single-hung or double-hung window is requir_i
for proi_r installation. Non-window installations, including using
sleeves, holes in wails, and other installations are not recommendS.
12 Room Air Conditioner

bstdtation
Proper clearance enhances the cooling efficiency of the unit and prevents heat
radiation of the condenser.
1. If a storm window presents interference, fasten a 2" wide wood strip, to the inner
window sill across the full width of the sill. The wood strip should be thick
enough to, raise the height of the window sill so that the unit can be installed
without interference by"the storm window frame.
2. See Figure. B. The top, of the wood strip should be approximately 3/4" higher
than the storm window frame (Storm Window Frame) or wood strip (Outdoors.)
to help condensation to drain properly to the outside
3. Install a second wood strip (approximately 6" long by 1 /2 wide and same
thickness as first strip,) in the center of the sill flush against the back off the
inner sil! This. wil! raise the L bracket as shown Figure, B,
4. if the distance between Storm Window Frame and Wood Strip Mounted on Top
of Inner Sill is more than 1", two, o,fwood strips are not necessary.
hndoors
on
ir'iner Sill
Wood:Stripfor
L 8[iack@t
_ndoors
Outer%
Outd®rs
Figure, AFigure, 8
Owner_ Manud 13

installation
iiii
1. Insert the guide panels into,the,guide,s
of the air conditioner. Fasten the
curtains to,the unit with screws
(Type A).
: Use a long screwdriver and
installing the screws will be easier,
2 Cut the adhesive-backed seal strip
(Type E) to the window width.
Remove the backing from the seal
strip and attach the seal strip to the
underside of the bottom window.
(Type
3. Locating unit in window
Open the window and mark center line
on the center of the inner sill.
Ro_ Side
,4. Attach L bracket
4-1. Install the L brackets behind the
inner window sill, with short side of
bracket as shown, Use the 2 screws
(Type A),provided.
4-2. The bracket helps to hold unit
securely in place. Be sure toi place
bracket edge flush against back of
inner sill.
Ou_ide
LBracket
14 Room Air CoinditioRef

instalfa#on
Caution: During the following step, hold unit firmly until window sash
is lowered to top channel behind side panel frames. Personal injury or
p.ro_dy diamage may result if unit falls from window.
1. Ilnstall the air conditioner in the window
1-1 Carefully Iiiftthe air conditioner and
slide it into the open window. Make
sure the bottom guide of the lair
conditioner drops into,the notches of
the L bracket.
_1: When tihe air conditioner drops.
into the Lbracket, the air conditioner
will be centered in window opening.
.....................!!'iiii................................II
While steadying the, air conditioner,
carefully bring the window sash
down behind the upper guide of the
air conditioner.
When the air ,conditioner is properly
installlied, it should tilt slightly down at
the back. If it is set correctly in the
window, it will hang Ilower in the back
automatically. If it does not, there is a
problem with the insta]lati,on.
2. Secure the guide panels
Extend the guide panels (Type G) to,
filll the window opening usiing 4
screws (Type B) to secure them.
3. Install the sash _al and _sh lock
3_1_
3-2°
Cut the sash seal (Type F) to the
window width. Stuff the sash seai
between the glass and the window
to prevent air and insects from
geeing into the room.
Fasten the Lbracket using a screw
(Type A).
3-3. Remove the screws that secure the
cabinet and base pan in the right
side.
Gui_
IL Bracket
Type B
Owner_ Manual 15

installation
3-4. Fasten the support bracket (Type H)
using a screw removed from the air
conditioner cabinet. Attach the
support bracket (Type H) to the inner
window sill with a screw (Type B),
SupF#_Brackd (Ty_, H}
4,,Window installation of room air conditioner is=now completed,
S_ ELECTRICAL DATA for attaching power cord to electrical outlet.
16 Room Air Conditioner

The _ntrois I_k like this:
Operating lnstru_ons
i_ iiiI ii_iii
O_ration sta_ when this button is pres_ and
stops when _u pros Me bu_on again.
FAN SPEED SELE_OR
For increas_ power mile c_iing, sel_ ahigher
_n sp_.
3 ste_: High --_-- M_
ON/OFF _MER
The fim_ _n be set to_and stop_ un_ in
_urly in_em_ (upto t2 houm).
OPERA.ON MODE SELEC_R
Sei_ _ling mode to cr_ _morn.
SeJ_ energy_r mode for energy,_ing
Sei_ _n m_e for basic ,_nUiating _rt _emUon,
Sel_ d_ m_e _r d_ opera_n.
_MPERATURE CONTROL
ther_stat mon_o_ r_ tem_ture to
maln_in thed_l_ temperature.
_the_stat _n _ set between6
_ unit _kes an averageof 30 minutes t,oadju_ the.
room tempemtu_ _ 1T.
REM_E CONTROL SENSOR
Owner's Manual 17

Operating Instructions
CAUTION: Tlhe Remote Controller will not _nction pro_rly if strong
light strikes the sensor wind_ of the air conditioner or if there are
obs_cIes be_een the Remote Controller and the air conditioner.
Operation stads when this button is pressed and
stops when you press the button again
Temperature Control
The thermostat monitors room temperature to
maintain the desired temperature,
The thermostat can be set between 60°F-86°F
(16°C~30°C).
The unit takes ;anaverage of 30 minutes to adjust the
room temperature by i F,
Fan Speed
For in,eased power while cooll[ng, select a higher
fan speed.
3 steps: H[gh-Low-Med
On/Off Timer
The timer can be set to sta_ and stop the unit in
houdy increments (up to 12 hours),
Operation Mode Selector
SeLect c_![ng mode to coo,] the room,
Select energy saver mode for energy saving
Select fan mode for basic vent[iating fan operation,
Select d_ mode for dry operation.,
How to Inseff Batteries
1.,Remove the cover from the back dthe remote
_ntro,Her
2. Insert two batteries.
Be sure o# the polarity when installing the
batteries.
Be sure that _th ba_er[_ are n_.
3. Re-attach the cover,
Do, not use rechargeab_e
batteries. Such batteries
d_er from standard dry _!ls
in sha_, dimensions, and
_rform.ance.
Remove the _tteries from
the remote _ntroller if the air
_n,diti,oner is not going to,
us_ for an extend_ length
dflme,
18 R_rm?Air Co_i#oner

Operating ins#'ucfions
Air Direction
Airflow _n _ adjusted by chang ingthe dir_tiien of the
air _nd!itJoner"s Iouve_ This ,can also increase the
_,oling e_dency of the air conditioner
Adjusting Horizontal ,Air Flow Direction
Adjusting Me ve_ica_ louvers _eftand right will
change horizon_l .airTlow,
Adjusting Verticali ,Air Flow Direction
Adius.ting the horizon_J vane up and down will
change veAi_l aifflow_ The vane can be adjusit_
by nudging Me back or rup,and down, of the 'vane.
Recommended orientation of louvers
Adiust Iot_vers to,face upwards when cooting
to maximize coo_ing efficient.
Adjusting horizonta_air flow
Adjusting vertical air 'flow
Vent Control
For maximum cooilin,gefficiency, CLOSE the venL Thiswillallow internat air circuiation.
OPEN the ven[ to discharge stale air,
CLOSE_VENT_O, PEN
Owner's Manual 19

Operating InstnJctions
Drain Pipe
In humid weather, excess water may
cause the Base Pan to overflow. To
drain the water, remove the Drain Cap
and secure tlhe Drain Pipe to the rear
hole of the Base Pan,
Press the drain pipe into the hole by
pushing down and away _o,m the fins
to avoid injury.
This air _nditioner is equipped with a
slinger fan. (See d_awin,g, below.)
The fan has an outer ring that runs in
the water that collects in the base pan
if it gets deep. That ._ndensate is then
picked up by the fan and expelled
through the condenser, making the air
conditioner more efficient.
CAUTION: Be careful when in.fling the drain pi_, Push arway from
the sharp fin area to avoid slipping injuring yourself.
Removal From Wind_
Turn the air _n,d[tioner off, disconnect the power _,rd, remove the L bracket, the
screws and Support Bracket insta]lied through the top and bottom of the guide
panels, and save for reinstallation later. ,Close the guide panels. Keeping a firm grip
on the air conditioner, raise the sash, and carefully tilt the air conditioner ba_ward,
draining any condensate. Lift the air conditioner from the window and remove the
sash seal from between the windows.
Be sure to ,drain ALL condensate from the air conditioner. If you don't, litcould run
out while you carry the unit, making a mess and creating a slipping hazard. This
simple step will save you much cleaning and make a safer work environment.
20 Room Air ,Condidonet
Table of contents
Languages:
Other LG Air Conditioner manuals
Popular Air Conditioner manuals by other brands

Mitsubishi Electric
Mitsubishi Electric MS-GK36VAT operating instructions

Mitsubishi Electric
Mitsubishi Electric MSZ-FA25VA Service manual

Samsung
Samsung AS07P2GE/XCH Owner's instructions

Fujitsu
Fujitsu AF Series operating manual

Carrier
Carrier ROOM AIR CONDITIONER operating manual

Fujitsu
Fujitsu ASY7FSACW Service manual