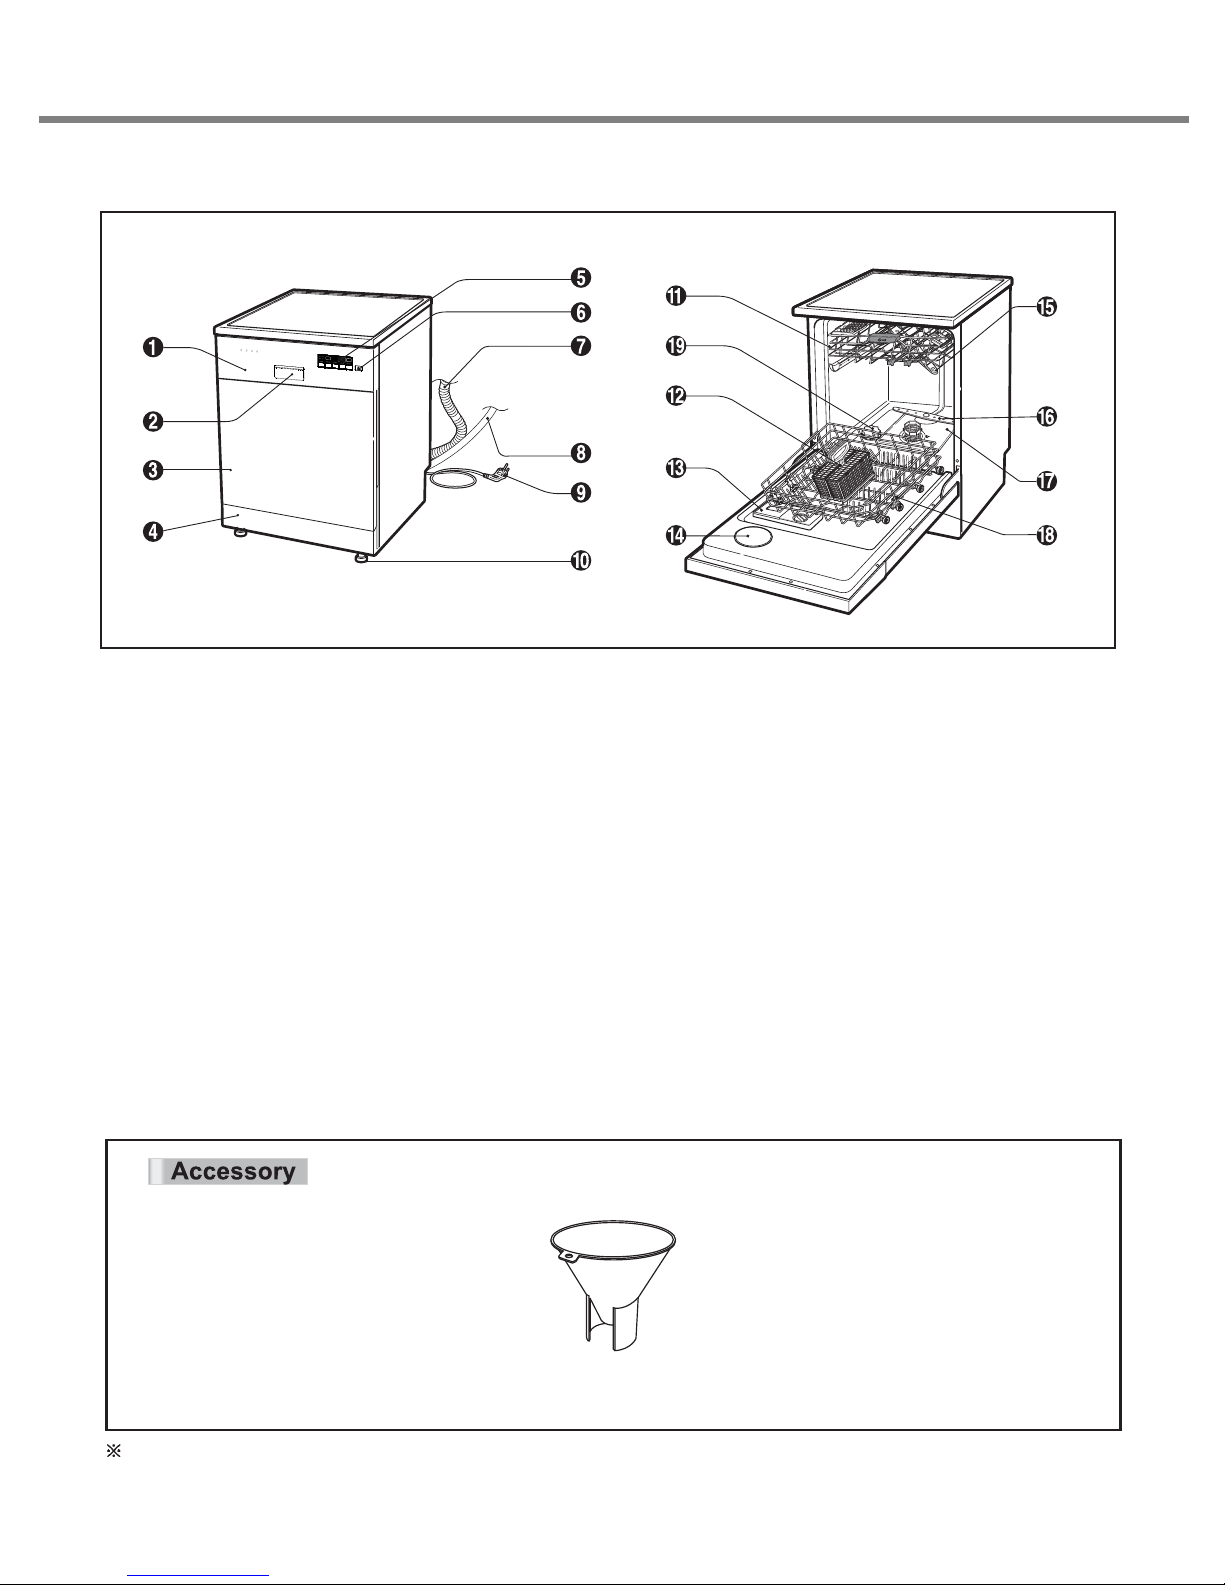
LG LD1455WLFCS2 User manual

DISHWASHER
SERVICE MANUAL
BEFORE SERVICING THE UNIT, PLEASE READ THIS MANUAL CAREFULLY
FOR SAFETY AND CORRECT SERVICES.
NOTE
MODEL : LD1455W(L,M,T,B,C)FCS2
LD1454W(L,M,T,B,C)FES2
LD1453W(L,M,T,B,C)FEN2
LD1452W(L,M,T,B,C)FEN2
You may also find user manual in video version at following link
www.lg.com/steamdishwasher


CONTENTS
1. CAUTION
2. SPECIFICATIONS
3. PARTS NAME
4. FEATURES & TECHNICAL EXPLANATION
5. WIRING DIAGRAM
6. PROGRAM CHART (SCHEMATIC DIAGRAM)
7. HOW TO DISASSEMBLE
8. TROUBLE SHOOTING METHODS
9. INSTALLATION INSTRUCTION
10. EXPLODED VIEW
4
5
6
8
19
21
23
34
47
51
3

DISCONNECT POWER CORD BEFORE SERVICING
RECONNECT ALL GROUNDING DEVICES
IMPORTANT SAFETY NOTICE !
This service information is intended for individuals
possessing adequate backgrounds of electrical,
electronic and mechanical experience.
Any attempt to repair this appliance may result in
personal injury and property damage.
The manufacturer or seller can not be responsible
for the interpretation of this information, nor can it
assume any liability in connection with its use.
CAUTION !
4

2. SPECIFICATION
IITTEEMMSSPPEECCIIFFIICCAATTIIOONN
RRaatteedd VVoollttaaggee // FFrreeqquueennccyyAACC 222200~~224400 VV // 5500 HHzz
IInnssttaallllaattiioonnFFrreeeessttaannddiinngg
PPllaaccee SSeettttiinnggss1144
PPrroodduucctt DDiimmeennssiioonn((mmmm))660000((WW)) XX 660000((DD)) XX 885500((HH))
PPrroodduucctt WWeeiigghhtt((kkgg))6600kkgg
CCoolloorrWWhhiittee // LLuuxxuurryy SSiillvveerr // TTiittaanniiuumm // SSTTSS // BBllaacckk // AACCMM
TTuubb MMaatteerriiaallSSttaaiinnlleessss SStteeeell
CCoonnttrroollEElleeccttrroonniicc
RRaatteedd PPoowweerr((WWaatttt))118800441188886611996688
HHeeaatteerr PPoowweerr((WWaatttt))117744221188221111990000
PPrrooggrraammss
RRaacckkNNyylloonn CCooaattiinngg
UUppppeerr RRaacckkAAuuttoo AAddjjuussttaabbllee
LLoowweerr RRaacckk
WWaatteerr CCoonnssuummppttiioonn((ℓℓ))
PPoowweerr CCoonnssuummppttiioonn((kkWWhh))
OOppeerraattiinngg TTiimmee((mmiinn))226677
FFaann DDrryy SSyysstteemmYYeess
DDeellaayy SSttaarrtt FFuunnccttiioonnYYeess
AAuuttoo--OOffff PPoowweerr SSwwiittcchhYYeess
PPrroocceessss MMoonniittoorrYYeess
WWaasshh LLeevveell55
OOppeerraattiinngg WWaatteerr PPrreessssuurree((MMppaa))00..0055~~00..66
LD1455 : 7 / LD1454 : 7
LD1453 : 6 / LD1452 : 5
LD1455 : 7 / LD1454 : 7LD1455 : 7 / LD1454 : 7
LD1453 : 6 / LD1452 : 5LD1453 : 6 / LD1452 : 5
LD1455 / LD1454 / LD1453 : 100% Fold downLD1455 / LD1454 / LD1453 : 100% Fold down
LD1452 : 50% Fold down LD1452 : 50% Fold down
LD1455 / LD1454 / LD1453 : 10.4 (Eco and Soft Spray)LD1455 / LD1454 / LD1453 : 10.4 (Eco and Soft Spray)
LD1452 : 11.5 (Eco Plus) LD1452 : 11.5 (Eco Plus)
LD1455 / LD1454 / LD1453 : 0.74 (Eco and Soft Spray)LD1455 / LD1454 / LD1453 : 0.74 (Eco and Soft Spray)
LD1452 : 0.74 (Eco Plus) LD1452 : 0.74 (Eco Plus)
5

3. PARTS NAME
1. Control Panel
2. Door Handle
3. Front Cover
4. Lower Cover
5. Display Window
6. Power Button
7. Drain Hose
8. Inlet Hose
9. Power Cord
10. Adjustable Leg
11. Upper Rack
12. Cutlery Basket
13.Detergent And Rinse Aid Dispenser
14.Vapor Vent Cover
15.Upper Spray Arm
16.Lower Spray Arm
17. Filter ASM
18. Lower Rack
19. Salt Container Cap
20. Cutlery Rack
21. Steam Nozzle(Steam models only)
※ The appearance and specifications may vary without notice.
6

1. Control Panel
2. Door Handle
3. Front Cover
4. Lower Cover
5. Display Window
6. Power Button
7. Drain Hose
8. Inlet Hose
9. Power Cord
10. Adjustable Leg
11. Upper Rack
12. Cutlery Basket
13. Detergent And Rinse Aid Dispenser
14. Vapor Vent Cover
15. Upper Spray Arm
16. Lower Spray Arm
17. Filter ASM
18. Lower Rack
19. Salt Container Cap
The appearance and specifications may vary without notice.
Funnel
7

4. FEATURES & TECHNICAL EXPLANATION
4-1 New Technology Introduction
4-1-1. Smart Rack System
More capacity, flexibility, and functionality means more convenience.
LG has engineered the new SmartRack™ system
to provide Smart solution for loading convenience.
4-1-2. Steam Technology (Steam models only)
LG’s Truesteam™ technology promises the best results
in washing without pre or after washing dishes by hand
4-1-3. Eco frendly
LG dishwashers are designed in a way that puts
both cleaning performance and energy efficiency first.
An innovative system enabling an efficient transfer of energy,
the Inverter Direct Drive Motor is what makes the LG dishwasher
one of the most energy efficient high performance lines in the industry.
4-1-4. Washing performance
The Inverter Direct Drive Motor is an innovative system enabling
more efficient water pressure control and better cleaning performance.
8

① Programme
• Press the cycle that corresponds to your desired wash cycle.
② Rinse
• Repeated pressing of the Rinse button will select Extra Hot, Rinse+, Extra Hot & Rinse+.
• If you select the Extra Hot( ) function, the operating temperature will be up to 80℃.
(Eco, Auto, Steam Care, Steam Dual Spray, Steam Power)
• When you select Rinse+( ) an additional rinse cycle is added.
③ Child Lock ( )
• Used to lock or unlock the control buttons to prevent all the settings from being changed by a child.
• To activate or release the Child Lock function, press the Child Lock button for 3 seconds while the dishwasher is
in operation.
• All controls will be disabled except the Child Lock and Power buttons.
• Turning off the dishwasher will not reset the Child Lock function. You must release the Child Lock before you can
operate the dishwasher.
④ Spray
• With each press, the water spray intensity level is changed to Soft ( ), Medium( ) and Strong( ) in a sequence.
(Only Eco, Steam Care and Steam Dual Spray)
⑤ Half load
•
In case of a small load, use the upper or lower rack to save energy.
• With each press, select Upper( ) or Lower( ) rack only. (Except Quick & Dry, Steam Power)
• In case you don’t select this button, the machine always defaults to vario washing, which operates upper and lower spray
arm alternately.
4-2 Display Panel
MODEL : LD1455W(L,M,T,B,C)FCS2
9

⑥ Delay Start
• If you want to delay the start of the selected programme, press this button.
• Pressing this button will increase the starting time by 1 hour increments.
• The delay start time can be adjusted from 1 hour to 19 hours.
⑦ Power
• For operating, press this button first for power on.
• After the programme has completed, this button automatically switches off for safety and energy saving.
• The unit will automatically turn off if the programme is interrupted and not resumed, or started within 4 minutes.
• In case of irregular mild power surges to the machine, the power may be automatically turned off for safety.
• To turn the power off during a programme, press the Power button twice.
⑧ Beep On/Off
• The dishwasher must be switched on.
• The beep on/off function can be set by pressing the Spray and Delay Start button simultaneously for a few seconds.
"ON" or "OFF" will be displayed retrospectively.
⑨ Steam( )
• TheSteam symbol light will stay on when the Steam course has been selected.
⑩ Indicator
• Child Lock.
• Refill with special salt.
• Refill with rinse aid.
⑪ Time Left
• Before starting, the display window shows the running time of the selected programme.(except for the Auto programme)
• After starting, the display window shows the remaining time.
• If the dishwasher has a problem, the error type will be displayed. (OE, FE, IE, EI, HE, LE, tE)
• If these error letters are displayed, please refer to the trouble shooting on page 34 and follow the guide.
NOTE
The Dishwasher can be used without salt if not required,
however, the hardness level will need to be set to H0 so that
the indicator does not remain lit.
10

MODEL : LD1454W(L,M,T,B,C)FES2
① Programme
• Press the cycle that corresponds to your desired wash cycle.
② Rinse
• Repeated pressing of the Rinse button will select Extra Hot, Rinse+, Extra Hot & Rinse+.
• If you select the Extra Hot( ) function, the operating temperature will be up to 80℃.
(Eco, Auto, Steam Care, Steam Dual Spray, Steam Power)
• When you select Rinse+( ) an additional rinse cycle is added.
③ Child Lock ( )
• Used to lock or unlock the control buttons to prevent all the settings from being changed by a child.
• To activate or release the Child Lock function, press the Child Lock button for 3 seconds while the dishwasher is
in operation.
• All controls will be disabled except the Child Lock and Power buttons.
• Turning off the dishwasher will not reset the Child Lock function. You must release the Child Lock before you can
operate the dishwasher.
④ Spray
• With each press, the water spray intensity level is changed to Soft ( ), Medium( ) and Strong( ) in a sequence.
(Only Eco, Steam Care and Steam Dual Spray)
⑤ Half load
•
In case of a small load, use the upper or lower rack to save energy.
• With each press, select Upper( ) or Lower( ) rack only. (Except Quick & Dry, Steam Power)
• In case you don’t select this button, the machine always defaults to vario washing, which operates upper and lower spray
arm alternately.
11

⑥ Delay Start
• If you want to delay the start of the selected programme, press this button.
• Pressing this button will increase the starting time by 1 hour increments.
• The delay start time can be adjusted from 1 hour to 19 hours.
⑦ Power
• For operating, press this button first for power on.
• After the programme has completed, this button automatically switches off for safety and energy saving.
• The unit will automatically turn off if the programme is interrupted and not resumed, or started within 4 minutes.
• In case of irregular mild power surges to the machine, the power may be automatically turned off for safety.
• To turn the power off during a programme, press the Power button twice.
⑧ Beep On/Off
• The dishwasher must be switched on.
• The beep on/off function can be set by pressing the Spray and Delay Start button simultaneously for a few seconds.
"ON" or "OFF" will be displayed retrospectively.
⑨ Steam( )
• TheSteam symbol light will stay on when the Steam course has been selected.
⑩ Indicator
• Child Lock.
• Refill with special salt.
• Refill with rinse aid.
⑪ Time Left
• Before starting, the display window shows the running time of the selected programme.(except for the Auto programme)
• After starting, the display window shows the remaining time.
• If the dishwasher has a problem, the error type will be displayed. (OE, FE, IE, EI, HE, LE, tE)
• If these error letters are displayed, please refer to the trouble shooting on page 34 and follow the guide.
NOTE
The Dishwasher can be used without salt if not required,
however, the hardness level will need to be set to H0 so that
the indicator does not remain lit.
12

① Programme
• Press the cycle that corresponds to your desired wash cycle.
② Rinse
• Repeated pressing of the Rinse button will select Extra Hot, Rinse+, Extra Hot & Rinse+.
• If you select the Extra Hot( ) function, the operating temperature will be up to 80℃.
(Eco, Auto, Care, Dual Spray)
• When you select Rinse+( ) an additional rinse cycle is added.
③ Child Lock ( )
• Used to lock or unlock the control buttons to prevent all the settings from being changed by a child.
• To activate or release the Child Lock function, press the Child Lock button for 3 seconds while the dishwasher is
in operation.
• All controls will be disabled except the Child Lock and Power buttons.
• Turning off the dishwasher will not reset the Child Lock function. You must release the Child Lock before you can
operate the dishwasher.
④ Spray
• With each press, the water spray intensity level is changed to Soft ( ), Medium( ) and Strong( ) in a sequence.
(Only Eco, Steam Care and Steam Dual Spray)
⑤ Half load
•
In case of a small load, use the upper or lower rack to save energy.
• With each press, select Upper( ) or Lower( ) rack only. (Except Quick & Dry)
• In case you don’t select this button, the machine always defaults to vario washing, which operates upper and
lower spray arm alternately.
MODEL : LD1453W(L,M,T,B,C)FEN2
13

⑥ Delay Start
• If you want to delay the start of the selected programme, press this button.
• Pressing this button will increase the starting time by 1 hour increments.
• The delay start time can be adjusted from 1 hour to 19 hours.
⑦ Power
• For operating, press this button first for power on.
• After the programme has completed, this button automatically switches off for safety and energy saving.
• The unit will automatically turn off if the programme is interrupted and not resumed, or started within 4 minutes.
• In case of irregular mild power surges to the machine, the power may be automatically turned off for safety.
• To turn the power off during a programme, press the Power button twice.
⑧ Indicator
• Child Lock.
• Refill with special salt.
• Refill with rinse aid.
⑨ Time Left
• Before starting, the display window shows the running time of the selected programme.(except for the Auto programme)
• After starting, the display window shows the remaining time.
• If the dishwasher has a problem, the error type will be displayed. (OE, FE, IE, EI, HE, LE, tE)
• If these error letters are displayed, please refer to the trouble shooting on page 34 and follow the guide.
⑩ Beep On/Off
• The dishwasher must be switched on.
• The beep on/off function can be set by pressing the Spray and Delay Start button simultaneously for a few seconds.
"ON" or "OFF" will be displayed retrospectively.
NOTE
The Dishwasher can be used without salt if not required,
however, the hardness level will need to be set to H0 so that
the indicator does not remain lit.
14

①
Process Indicator
• Indicates current program phase.
• The Wash,Rinse and Dry lamps will flash during each phase of washing process.
•
The Clean lamp flashes for 4 minutes at the end of the cycle.
②
Salt & Rinse Refill Indicator
• Salt : Refill with special salt when the
Salt
turns on.
• Rinse : Refill with rinse aid when the Rinse turns on.
③
Half Load
• In case of a small load, use upper or lower rack to save energy.
• With each press, you can select the Upper or Lower rack only.
•
In case you don’t select this button, the machine always operates the vario washing, which operates the upper
and lower spray arm alternately.
④
Extra Hot & Child Lock Indicator
• Lamp will turn on when the Extra Hot setting is on.
• Lamp will turn on when the Child Lock setting is on.
⑤
Time Left
• Before starting, the display window shows the running time of the selected program(except for the Auto programme).
• After starting, the display window shows the remaining time.
•
If the dishwasher has a problem, the error type will be displayed. (OE, IE, EI, FE, HE, tE, LE)
•
If these error letters are displayed, please refer to the trouble shooting on page 34 and follow the guide.
⑥
Delay Start
• If you want to delay the start of the selected program, press this button.
• Press this button to increase the starting time by 1 hour incr easements.
• The delay start time can be adjusted from 1 hour to 19 hours.
NOTE
The Dishwasher can be used without salt if not required,
however, the hardness level will need to be set to H0 so
that the indicator does not remain lit.
MODEL : LD1452W(L,M,T,B,C)FEN2
①
15

②
③ ④
⑦
⑥
⑪⑩
⑤ ⑨
⑧
⑦
Program
• Press the cycle that corresponds to your desired wash cycle.
⑧
Extra Hot
• If you select the Extra Hot function, the operating temperature will be up to 80ºC.
(Dual Intensity, Auto, Eco, Eco Plus)
• To engage the Extra Hot rinse in the allowable cycles, hold down the Dual Intensity & Auto buttons
simultaneously.
⑨
Beep On/Off
• The dishwasher must be switched on.
• The beep on/off function can be engaged or disengaged by pressing the Delay Start and Quick & Dry buttons
simultaneously for a few seconds.
⑩
Eco Plus
• If you want to use Eco Plus course, press & hold Eco button for 3 seconds.
⑪
Child Lock
• Used to lock or unlock the control buttons to prevent all the setting from being changed by a child.
• To activate or release the Child Lock function, press the Quick & Dry and Quick buttons simultaneously for a
few seconds while the dishwasher is in operation.
• All controls will be disabled except the Child Lock and Power buttons.
• Turning off the dishwasher will not reset the Child Lock function. You must release the Child Lock before you
can operate the dishwasher.
⑫
Power
• For operating, press this button first for power on.
• After the programme has completed, this button automatically switches off for safety and energy saving.
• The unit will automatically turn off if the programme is interrupted and not resumed, or started within 4 minutes.
• In case of mild power surges to the machine, the power may be automatically turned off for safety.
•
To turn the power off during a programme, press the
Power
button twice.
16

4-3 TEST MODE
LD1455 / LD1454 / LD1453
Button The number of
pushing button Top Display Checking point (Load / Display) Door 상태
Half + Delay +
Power
1 time All LEDs are lighting -
PGM 1 time All LEDs are lighting -
Rinse 1 time All LEDs are lighting -
Child Lock 1 time All LEDs are lighting -
Spray 1 time All LEDs are lighting -
Half Load 1 time All LEDs are lighting -
Delay Start
1 time AG temp.
-:--
Closed
2 time -
3 time Closed
Closed
Closed
Closed
Closed
Closed
Closed
Closed
Closed
Closed
n:xx / d:xx / U:xx
n:xx / d:xx / U:xx
n:xx / d:xx / U:xx
n:xx / d:xx / U:xx
n:xx / d:xx / U:xx
n:xx / d:xx / U:xx
4 time Sensing value
5 time -:-- Nothing
6 time n06 Regeneration Valve
7 time AG water level
-:--
(LD1455 / LD1454) Displaying H170 / L170↑by turns
(LD1453) Aqua Stop
8 time Pump RPM Drain Pump(More than 3000rpm)
9 time Water Level Aqua Stop
10 time Sump heater
Washing motor
RPM
Sump Thermostat
1) Washing Motor(1600rpm) for 10sec
2) Sump heater on after Washing motor operating for 3sec
(Electric Power : Less than 2000W)
11 time Cr →LO LQC Auto mode
- Vario : Lower position
- Washing pump(1700RPM) + Heater 20s
- If vario is restricted, displaying "nE"
12 time - Auto Off
(LD1455 / LD1454) AG Thermostat, AG Heater for 1.2 sec
(LD1453) Nothing
n02 Fan Motor
n03 Dispenser
Turbidity sensor
↑↑
17

LD1452
Button The number of
pushing button Top Display Checking point (Load / Display) Door
Power + Half Load +
Delay start
1 time n:xx / U:xx / d:xx All LEDs are lighting -
Delay Start 1 time -:-- Nothing Closed
2 time n02 Fan Motor Closed
3 time n03 Dispenser Closed
4 time Sensing Value Turbidity sensor Closed
5 time -:-- Nothing Closed
6 time n06 Regeneration Valve Closed
7 time -:-- Aqua Stop Closed
8 time Pump RPM Drain Pump(More than 3000rpm) -
9 time Water Level Aqua Stop Closed
10 time Sump heater
Washing motor RPM
Sump Thermostat
1) Washing Motor(1600rpm) for 10sec
2) Sump heater on after Washing motor
operating for 3sec
(Electric Power : Less than 2000W)
Closed
11 time Cr LO LQC Auto mode
- Vario : Lower position
- Washing pump(1700RPM) + Heater 20s
- If vario is restricted, displaying " nE"
Closed
12 time - Auto Off Closed
1
-:--
-
-
18

5. WIRING DIAGRAM
19

20
This manual suits for next models
8
Table of contents
Other LG Dishwasher manuals
Popular Dishwasher manuals by other brands

Hotpoint Ariston
Hotpoint Ariston LSFF 9H124 instruction manual

Bosch
Bosch SHP68TL5UC installation instructions

Whirlpool
Whirlpool WIC3C24PE FULL Daily reference guide

CMA Dishmachines
CMA Dishmachines CMA-44L Specifications

AEG
AEG FAVORIT COMPACT 315 operating instructions

Zanussi
Zanussi ZUCAIDPWS 502051 Specifications

GE
GE PDWF800RBB - Profile 24 in. Dishwasher Dimensions and installation information

NEFF
NEFF S299ZB802E INFORMATION FOR USE

Frigidaire
Frigidaire FDBL955B Factory parts catalog

Concept2
Concept2 MNV2545 manual

NEFF
NEFF S145ITS04G user manual

Maytag
Maytag MDB6759AWW - 24 Inch Fully Integrated... installation instructions