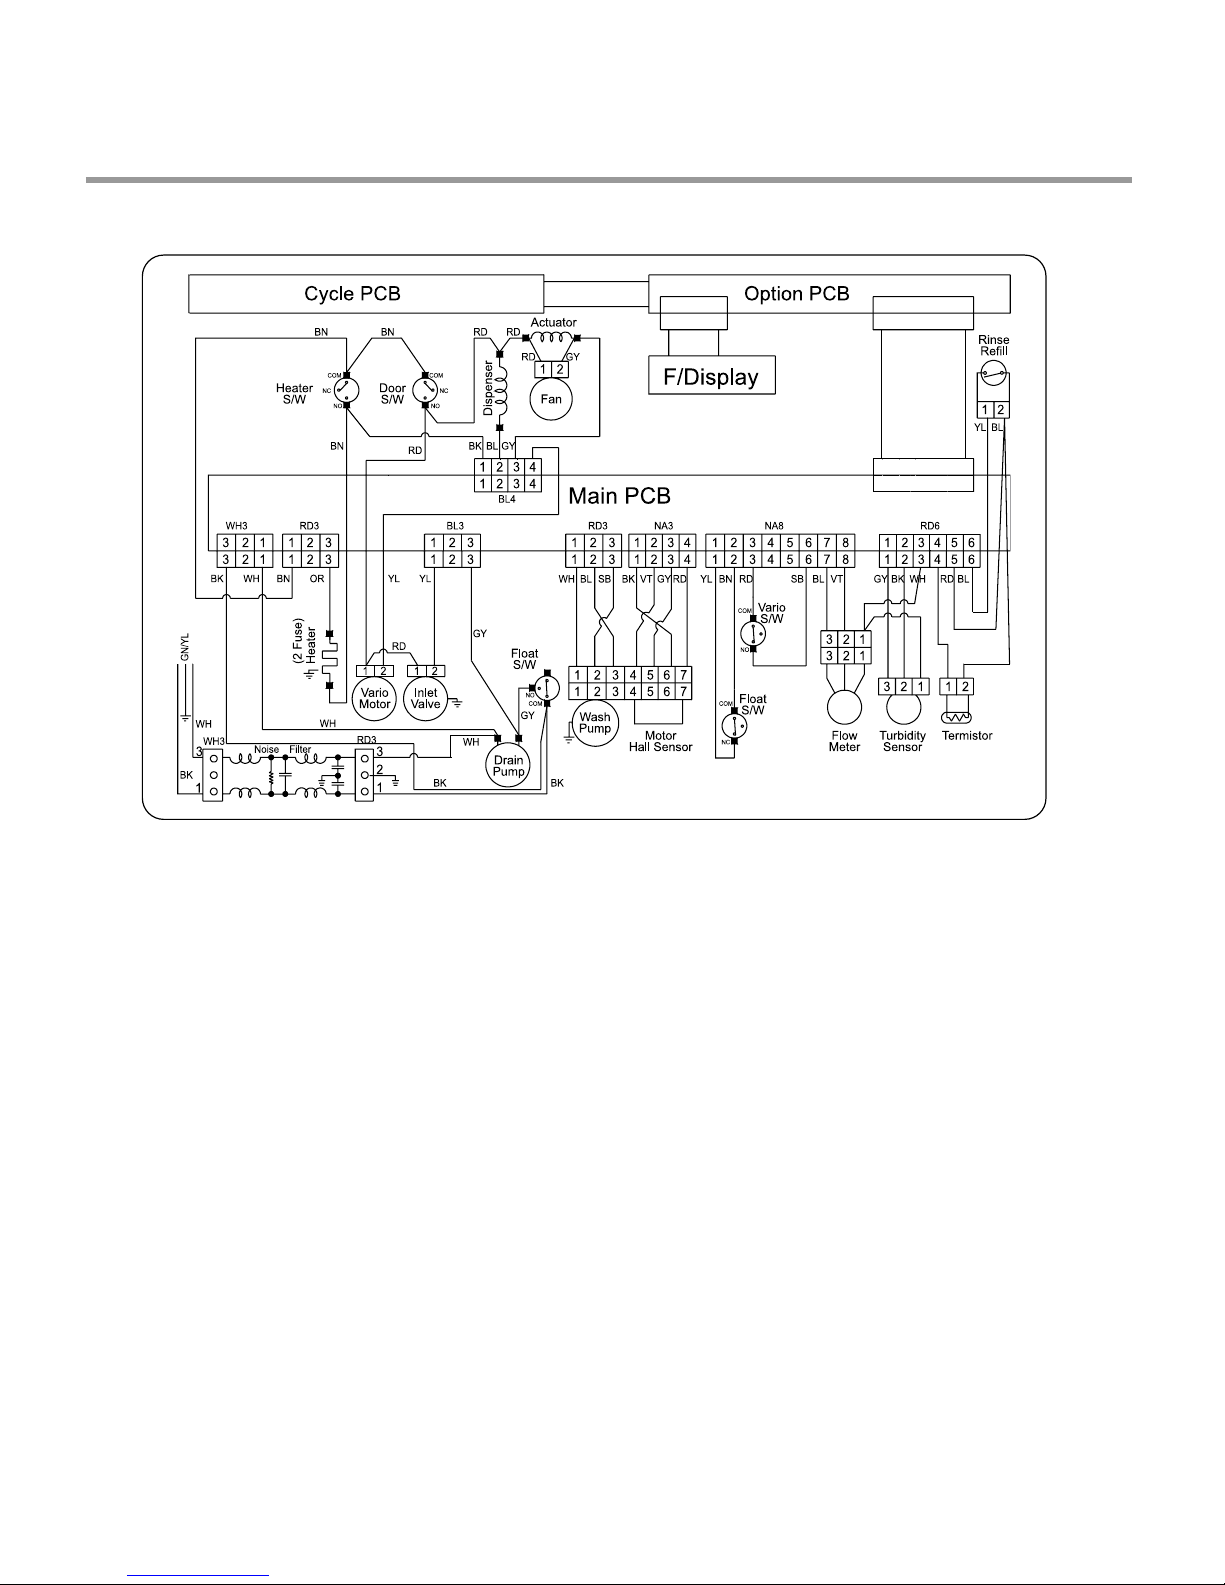
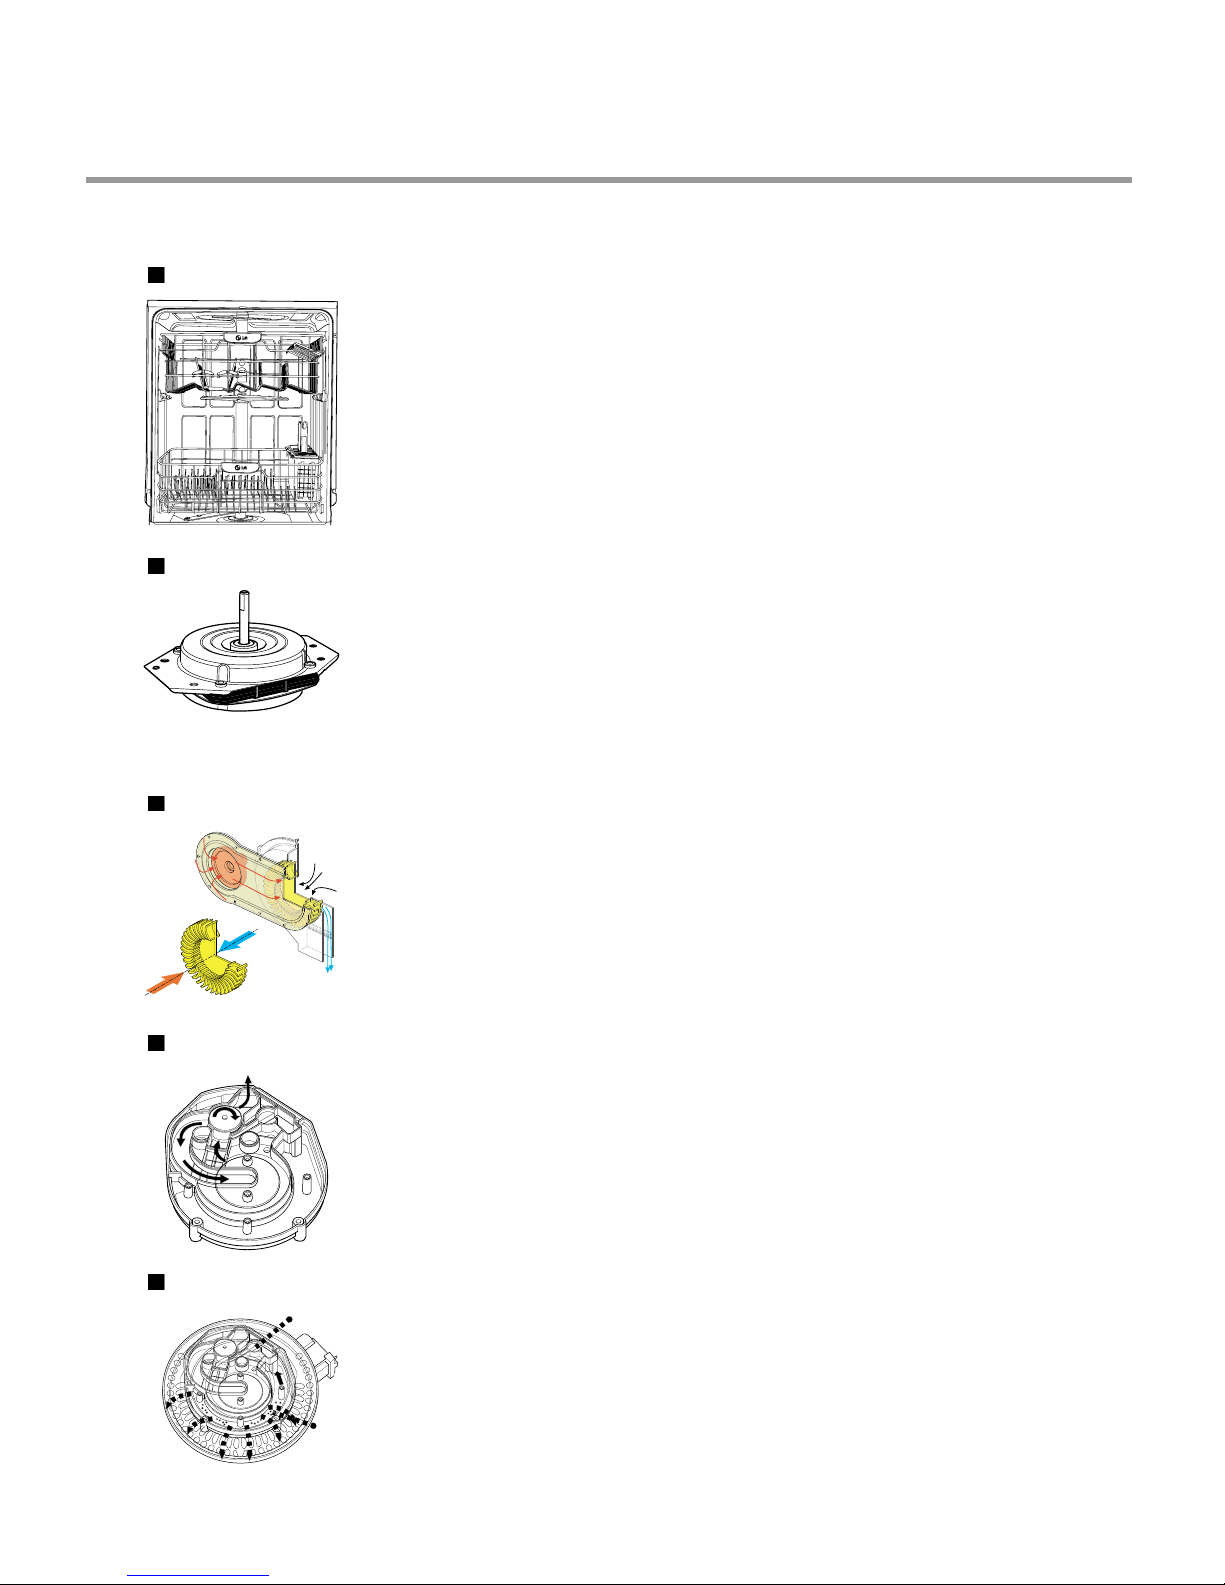
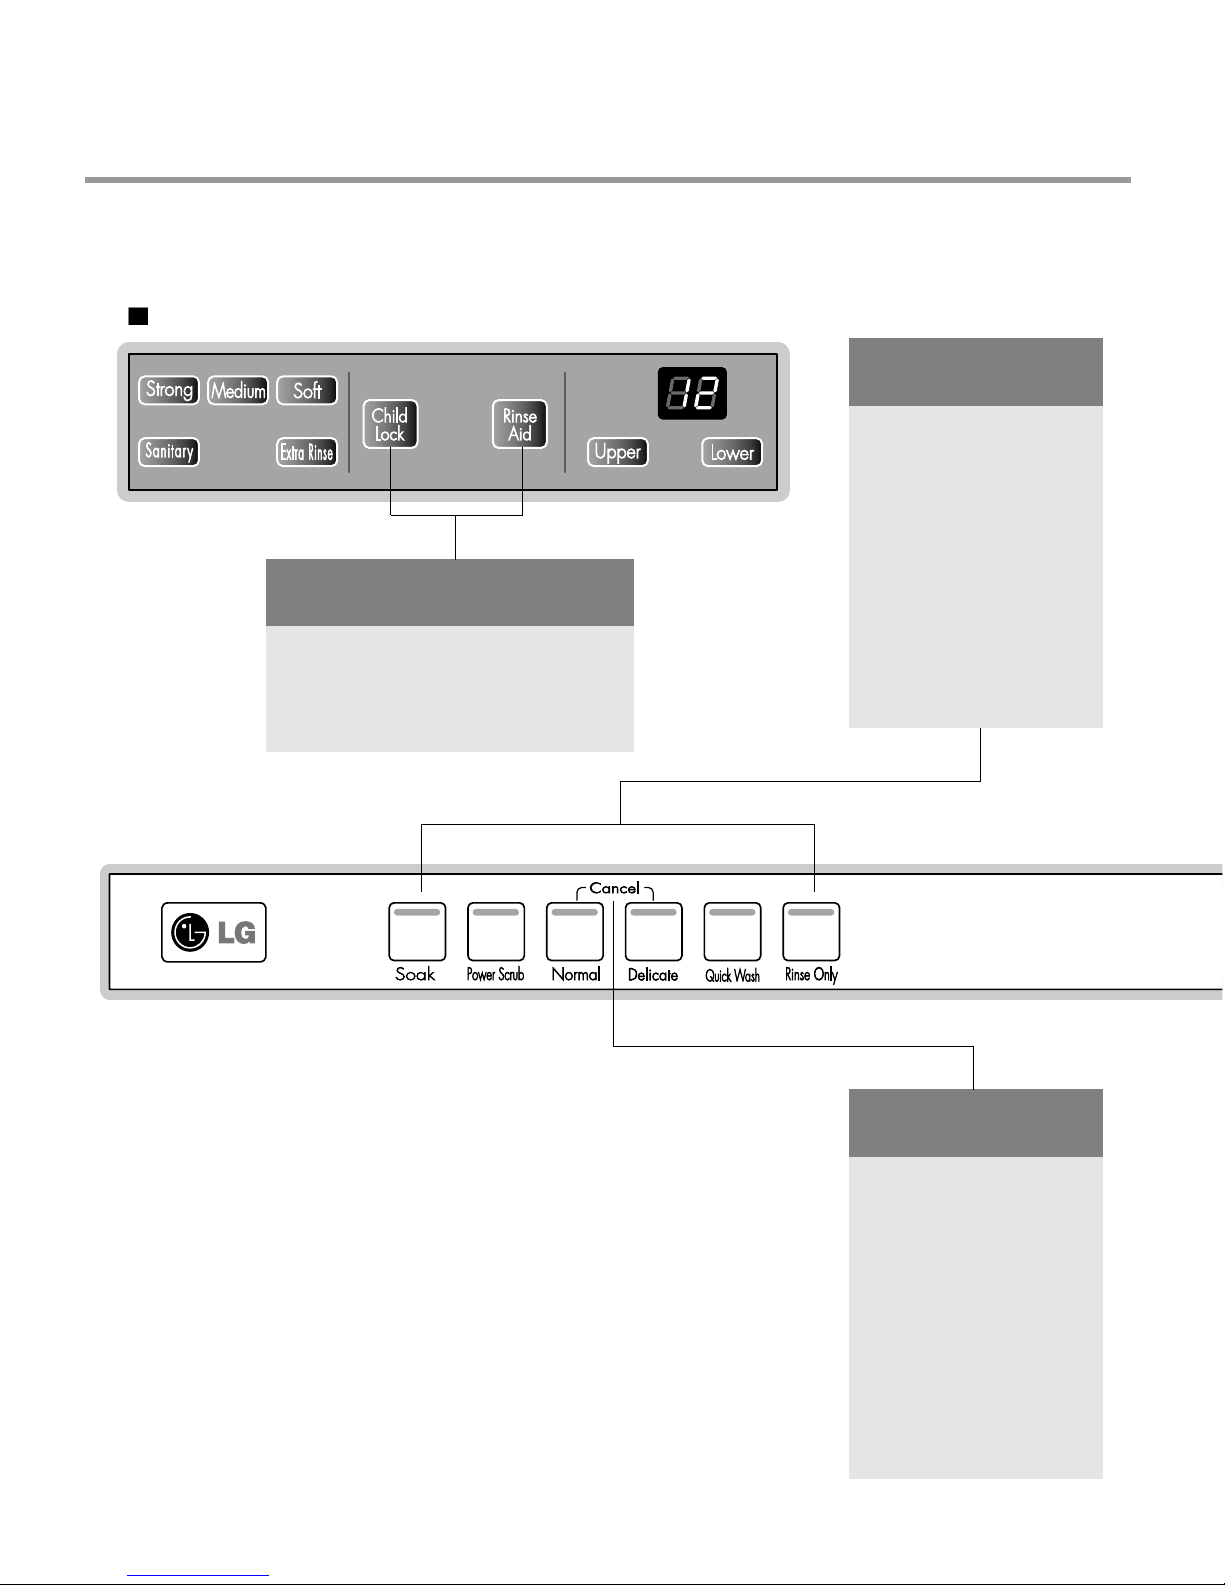
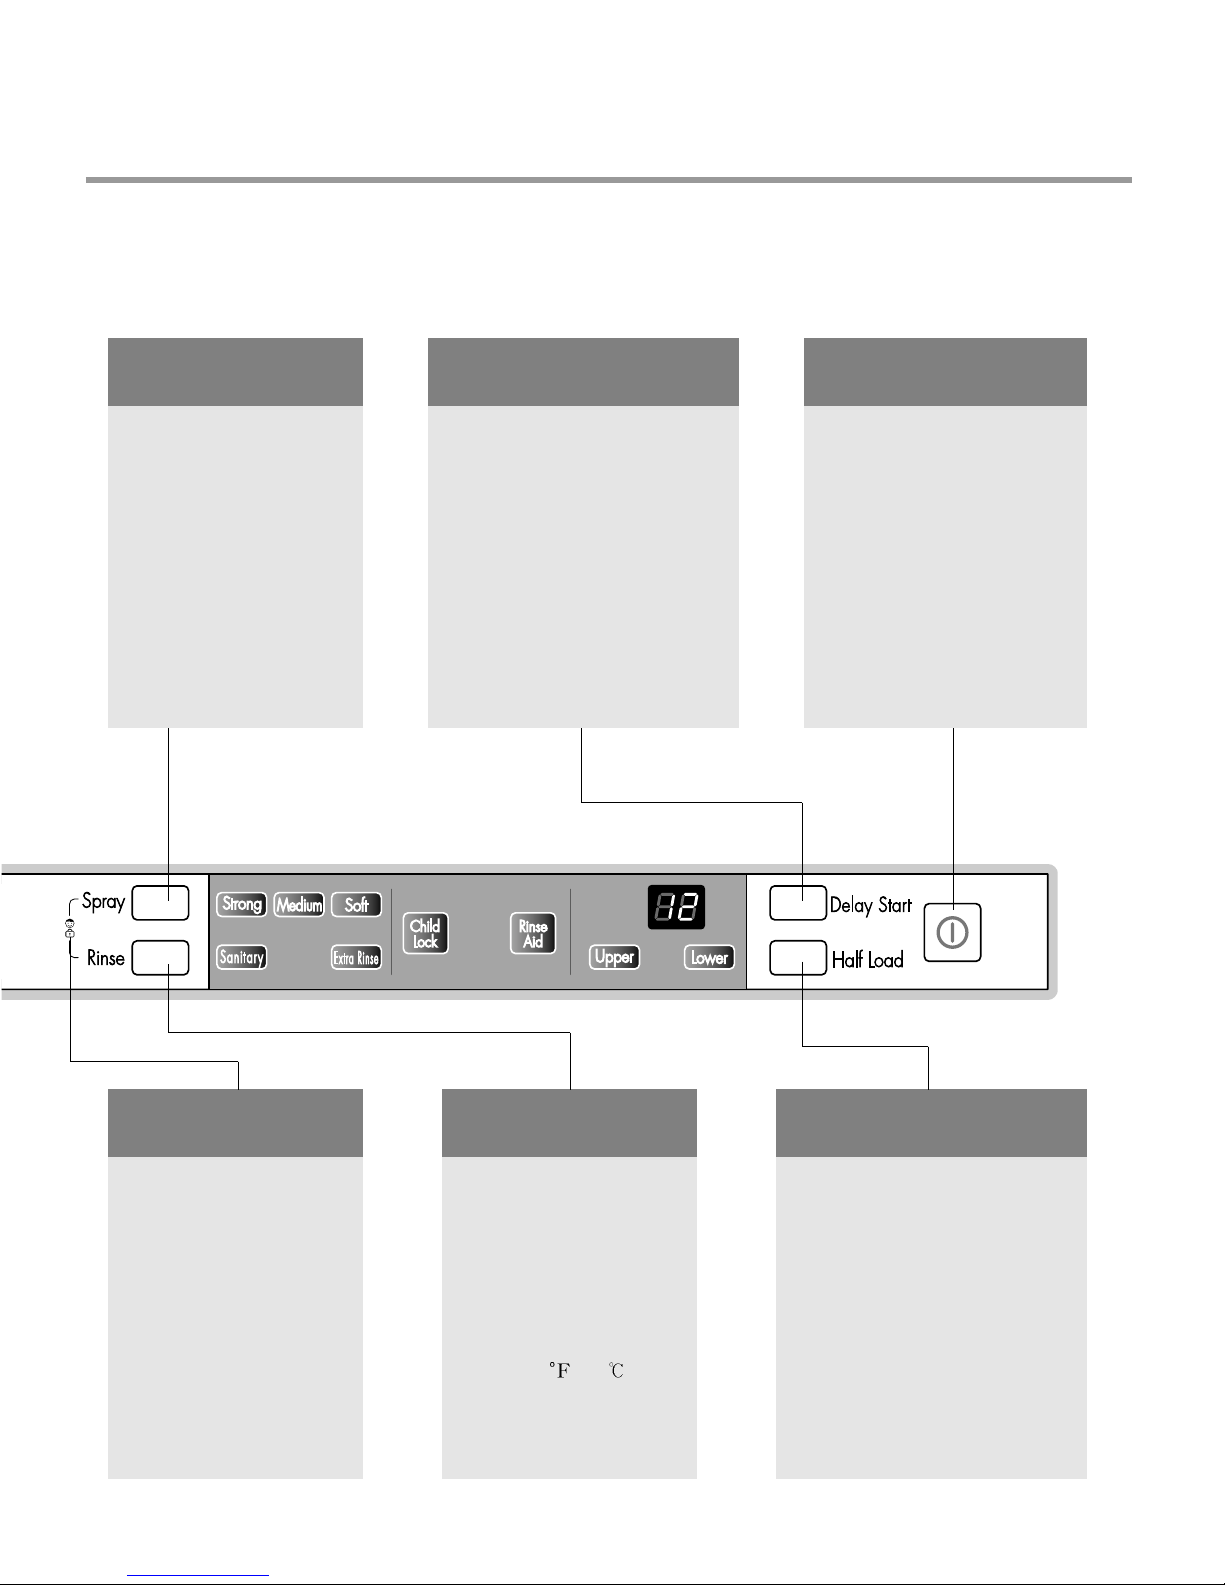
LG LDS 5811ST User manual

DISHWASHER
SERVICE MANUAL
BEFORE SERVICING THE UNIT, PLEASE READ THIS MANUAL CAREFULLY
FOR SAFETY AND CORRECT SERVICES.
NOTE
MODEL : LDF6810WW / LDF6810BB / LDF6810ST
MODEL : LDF7810WW / LDF7810BB / LDF7810ST
MODEL : LDF7811WW / LDF7811BB / LDF7811ST
LDS5811WW / LDS5811BB / LDS5811ST

- 3 -
1. CAUTION......................................................................................................................... 4
2. SPECIFICATIONS ........................................................................................................... 5
3. WIRING DIAGRAM........................................................................................................ 6
4. FEATURES & TECHNICAL EXPLANATION ................................................................... 7
5. PARTS NAME................................................................................................................ 16
6. PROGRAM CHART ..................................................................................................... 19
7. HOW TO DISASSEMBLE ............................................................................................ 21
8. TROUBLE SHOOTING METHODS.............................................................................. 30
A. TROUBLE SHOOTING ACCORDING TO DISPLAYED ERROR MESSAGE...........30
B. TROUBLE DIAGNOSES AND REPAIR BY SYMPTOM........................................... 32
9. INSTALLATION INSTRUCTION ................................................................................... 36
10. EXPLODED VIEW .......................................................................................................43
11. REPLACEMENT PART LIST ........................................................................................52
CONTENTS

- 4 -
DISCONNECT POWER CORD BEFORE SERVICING
RECONNECT ALL GROUNDING DEVICES
IMPORTANT SAFETY NOTICE !
This service information is intended for individuals
possessing adequate backgrounds of electrical,
electronic and mechanical experience.
Any attempt to repair this appliance may result in
personal injury and property damage.
The manufacturer or seller can not be responsible
for the interpretation of this information, nor can it
assume any liability in connection with its use.
CAUTION !

- 5 -
2. SPECIFICATION
Rated Voltage / Frequency AC 120V/60Hz
Installation Built-In
Place Settings 16
Product Dimension(in) 23 7/8 x 25 x 33 7/8
Product Weight(lbs) 7811/7810 series : 115lbs, 5811/6810 series : 110lbs
Door Color White, Black, Stainless
Tub Material Stainless Steel
Control Electronic
Rated Power(Watt) 1,350
Heater Power(Watt) 1,200
Programs 7811/7810 series : 6, 6810 series : 5
Upper Rack Position 7811/7810 series : Adjustable, 5811/6810 series : manual
Lower Rack 50% Fold down
Water Consumption 21-30 (Normal)
Power Consumption(kWh/year) 352~370
Operating Time (min) 101-135 (Normal)
Fan Dry System Yes
Delay Start Function Yes
Auto-Off Power Switch Yes
Process Monitor Yes
Wash Level 5
Racks Nylon Coating
Operating Water Pressure (Bar) 20-120 (140-830kPa)
ITEM SPECIFICATION

- 6 -
3. WIRING DIAGRAM

- 7 -
4. FEATURES & TECHNICAL EXPLANATION
4-1. Product Features
If you raise the Upper Rack, you can load large dishes in the Lower Rack.
(Max. 14 in.)
The tall tub provides large dishes loading as well as large capacity.
LG dishwashers let you load oversized items in the Lower and Upper Rack.
Newly introduced Slim Direct Inverter motor is inverter-controlled. Speed is
controlled based on program selection. It also offers high energy efficiency to
minimize energy loss.
This is one of the best performance solutions for drying dishes because it
minimizes venting humid air to the outside of the dishwasher. In addition, this
system ensures better drying results compared to the condensing drying
system.
Because of alternating water spray between the Upper and Lower
Rack, the water pressure allows superior performance and reduced
consumption of water and electricity.
For best wash results, the self-cleaning filter system continuously cleans the
water as it circulates. Your LG dishwasher has a self-cleaning filter that grinds
food into small particles before it goes down the drain.
Ultra Big Capacity
Slim Direct Inverter Motor
Hybrid Drying System
Vario Spray System
Self Cleaning Filter
Moist
Air
Dry
Air
Mixed
Air
to
Upper
Arm
to
Lower
Arm
Soil Sensor
Fine Mesh
to Drain

- 8 -
4-2. Display Panel
4-2-1. LDF 7811/7810 Series
PROGRAM
• Press the program that
corresponds to your
desired wash cycle.
CANCEL
•To cancel a running
program, open the door,
then press and hold the
Normal and Delicate
buttons for 3 seconds.
INDICATOR
•Child lock: Lamp will turn on
when Child Lock setting is on.
•Rinse Aid: Refill with Rinse aid
when Lamp turns on.
This program is for very heavily soiled loads including pots,
pans and casserole dishes which may have dry food residue.
This program is for very heavily soiled loads
This program is for normally soiled everyday loads.
This program is for washing delicate items like glasses.
This program is for that quick wash of lightly soiled recently
used dishes and cutlery.
This program is for very lightly soiled loads.
Soak
Normal
Quick Wash
Rinse Only
Delicate
Power Scrub
Control panel may vary on some models.

- 9 -
SPRAY
(INTENSITY)
•Repeated pressing of the
Spray button will select
Strong, Medium or
Soft.
DELAY START
•If you want to delay the start of
a selected program, press the
Delay Start button.
•Each press of Delay Start will
delay the start of the cycle by
one hour.
•The delay start time can be
adjusted from 1 to 24 hours in
one-hour increment.
HALF LOAD
•In case of a small load, use the
upper or lower rack only to save
energy.
•Each press of the Half Load
button cycles between upper
rack only and lower rack only.
•If you don't press Half Load,
the dishwasher runs normally,
i.e, operation of upper and
lower spray arm alternating
periodically.
POWER
•For operating, press this
button first for power on.
•After operating, the power
automatically switches off
for safety and economy.
•In case of an unusual Power
surge or disturbance, the
power may be automatically
turned off for safety.
CHILD LOCK
•Lock the control buttons
to prevent the settings
from being changed.
•To lock/unlock, press
Spray and Rinse
buttons simultaneously
for 3 seconds with door
open.
SANITARY/
EXTRA RINSE
•Repeated pressing of the
Rinse button will select
Sanitary, Extra Rinse
or both.
•If you select the Sanitary
function, the temperature
of Heating Rinse can
reach 161 (72 ).
•When you select Extra
Rinse, an additional
rinse cycle is added.

- 10 -
SPRAY
(INTENSITY)
•Repeated pressing of the
Spray button will select
Strong, Medium or
Soft.
CHILD LOCK
•Lock the control buttons
to prevent the settings
from being changed.
•To lock/unlock, press
Spray and Rinse buttons
simultaneously for 3
seconds.
SANITARY/
EXTRA RINSE
•Repeated pressing of the
Rinse button will select
Sanitary, Extra Rinse
or both.
•If you select the Sanitary
function, the temperature
of Heating Rinse can
reach 161 (72 ).
•When you select Extra
Rinse, an additional
rinse cycle is added.
HALF LOAD
•In case of a small load, use the
upper or lower rack only to save
energy.
•Each press of the Half Load
button cycles between upper
rack only and lower rack only.
•If you don't press Half Load,
the dishwasher runs normally,
i.e, operation of upper and
lower spray arm alternating
periodically.
4-2-2. LDF 5811 Series

- 11 -
INDICATOR
•Child lock: Lamp will turn
on when Child Lock
setting is on.
•Rinse Aid: Refill with
Rinse aid when Lamp turns
on.
PROCESSING
INDICATOR
•Current program
phase is indicated.
TIME LEFT
•Before starting, the display window shows
the running time of the selected program.
•After starting, the display window shows
the remaining time.
•If the dishwasher has a trouble, the trouble
type is displayed.
PROGRAM
•Press the
program that
corresponds to
your desired
wash cycle.
CANCEL
•To cancel a
running program,
press and hold
the Normal and
Delicate buttons
for 3 seconds.
DELAY START
•If you want to delay the start of
a selected program, press the
Delay Start button.
•Each press of Delay Start will
delay the start of the cycle by
one hour.
•The delay start time can be
adjusted from 1 to 12 hours in
one-hour increment.
POWER
•For operating, press this
button first for power on.
•After operating, the power
automatically switches off
for safety and economy.
•In case of an unusual Power
surge or disturbance, the
power may be automatically
turned off for safety.

- 12 -
PROGRAM
•Press the program that
corresponds to your
desired wash cycle.
CANCEL
•To cancel a running
program, open the door,
then press and hold the
Power Scrub and
Normal buttons for 3
seconds.
INDICATOR
•Child lock: Lamp will turn on
when Child Lock setting is on.
•Rinse Aid: Refill with Rinse aid
when Lamp turns on.
This program is for very heavily soiled loads
This program is for normally soiled everyday loads.
This program is for washing delicate items like glasses.
This program is for very lightly soiled loads.
This program is to wash some items loaded on the upper rack.
Normal
Rinse Only
Upper Only
Delicate
Power Scrub
Control panel may vary on some models.
4-2-3. LDF 6810 Series

- 13 -
DELAY START
•If you want to delay the start of
a selected program, press the
Delay Start button.
•Each press of Delay Start will
delay the start of the cycle by
one hour.
•The delay start time can be
adjusted from 1 to 12 hours in
one-hour increment.
POWER
•For operating, press this
button first for power on.
•After operating, the power
automatically switches off
for safety and economy.
•In case of an unusual Power
surge or disturbance, the
power may be automatically
turned off for safety.
CHILD LOCK
•Lock the control buttons
to prevent the settings
from being changed.
•To lock/unlock, press
Delicate and Rinse Only
buttons simultaneously
for 3 seconds with door
open.
SANITARY/
EXTRA RINSE
•Repeated pressing of the
Rinse button will select
Sanitary, Extra Rinse
or both.
•If you select the Sanitary
function, the temperature
of Heating Rinse can
reach 161 (72 ).
•When you select Extra
Rinse, an additional
rinse cycle is added.

4-3. TEST MODE
4-3-1. LDF 7811/7810 LDS 5811 Series
CHECK PROGRAM
BUTTON The number of
pushing button Front Display
Top
Display Load and Checking points Door open/
closed
Rinse + Time Delay +
POWER S/W
Soak
Power Scrub
Normal
Delicate
Quick Wash
Rinse Only
Supply
Rinse
Half Load
Time Delay
Normal Water Level : 315
Pure Water : more than 229
1 TIME
1 TIME
1 TIME
1 TIME
1 TIME
1 TIME
1 TIME
1 TIME
1 TIME
1 TIME
1 TIME
2 TIME
3 TIME
4 TIME
5 TIME
6 TIME
7 TIME
8 TIME
9 TIME
10 TIME
11 TIME
12 TIME
13 TIME
31
32
33
34
35
36
37
38
39
3A
3b
3c
n : 3H/U:023H/U2
11
22
33
44
55
66
77
88
99
1 : 11
2 : 22
3 : 33
4 : 44
5 : 55
6 : 66
7 : 77
8 : 88
9 : 99
Soil Level
n : 02
n : 03
Frequency
n : 05
n : 06
n : 07
n : 08
Temp. ( )
n : 0A
n : 0b
n : 0c
Soil Sensor
Wash Pump
Drain Pump
Inlet Valve
Dispenser
Heater
(for 10 sec)
Fan
Thermistor
Lower Nozzle
(VARIO)
Upper Nozzle
(VARIO)
Wash-Drain-
Water Supply
Auto-Off
Delay Start
Child Lock +
Rinse Aid
Wash
Rinse
Dry
Wash-Rinse-Dry
Strong-Soft
Sanitary-Extra
Upper-Lower
Soak-Normal
Delicate-Rinse
Only
Rinse Aid
All LEDs are lighting Both
All LEDs are lighting
Strong/Medium/Soft
Sanitary-Extra Rinse
Upper-Lower
Both
Both
Both
Both
Both
Both
Both
Both
Both
Both
Closed
Closed
Both
Closed
Closed
Closed
Both
Closed
Closed
Closed
Closed
Supply water before operating the Test Mode.
- 14 -

Normal Water Level : 295
- 15 -
4-3-2. LDF 6810 Series
CHECK PROGRAM
BUTTON The number of
pushing button Top
Display Load and Checking points Door open/
closed
Upper Only +
Time Delay +
POWER
Power Scrub
Normal
Delicate
Rinse Only
Upper Only
Rinse
Time Delay
1 TIME
1 TIME
1 TIME
1 TIME
1 TIME
1 TIME
1 TIME
1 TIME
2 TIME
3 TIME
4 TIME
5 TIME
6 TIME
7 TIME
8 TIME
9 TIME
10 TIME
11 TIME
12 TIME
13 TIME
31
32
33
34
35
36
37
38
39
3A
3b
3c
3H/U2
11
22
33
44
55
66
Wash Pump
Drain Pump
Inlet Valve
Dispenser
Heater
(for 10 sec)
Fan
Thermistor
Lower Nozzle
(VARIO)
Upper Nozzle
(VARIO)
Wash-Drain-
Water Supply
Auto-Off
Child Lock + Rinse Aid
Sanitary-Extra
Power Scrub +
Normal + Delicate
Rinse Only +
Upper Only
Rinse Aid
All LEDs are lighting
Both
Both
Both
Both
Both
Both
Both
Both
Both
Both
Closed
Both
Closed
Closed
Closed
Closed
Both
Closed
Closed
Closed
Closed

- 16 -
5. PARTS NAME
Control Panel
Front Display
Door Handle
Front Cover
Lower Cover
Leveling Foot
Side Cabinet
Base
Top Spray Arm
Upper Spray Arm
Removable Tines
Lower Spray Arm
Detergent & Rinse Aid Dispenser
Vapor Vent Cover
Upper Rack
Cutlery Basket
Lower Rack
Top Display
Power Button
The appearance and specifications may be varied without notice according to localities.
INSTALL BRACKET WOOD SCREW
5-1. LDF 7811/7810 Series

- 17 -
Control Panel
Front Display
Door Handle
Power Button
Front Cover
Lower Cover
Leveling Foot
Side Cabinet
Base
Top Spray Arm
Upper Spray Arm
Removable Tines
Lower Spray Arm
Detergent & Rinse Aid Dispenser
Vapor Vent Cover
Upper Rack
Cutlery Basket
Lower Rack
The appearance and specifications may be varied without notice according to localities.
INSTALL BRACKET WOOD SCREW
5-2. LDF 5811 Series

- 18 -
Control Panel
Door Handle
Front Cover
Lower Cover
Leveling Foot
Side Cabinet
Base
Top Spray Arm
Upper Spray Arm
Lower Spray Arm
Detergent & Rinse Aid Dispenser
Vapor Vent Cover
Upper Rack
Cutlery Basket
Lower Rack
Top Display
Power Button
The appearance and specifications may be varied without notice according to localities.
INSTALL BRACKET WOOD SCREW
5-3. LDF 6810 Series

- 19 -
6. PROGRAM CHART(SCHEMATIC DIAGRAM)
Drain A
26 10 10 46 10 10 30 30
49 65 72
18 10 10 38 10 10 26 30
63 68
10 10 10 30 10 20 30
60 65
10 10
61
22 10 26 30
49 68
86 20
20
46 60
10 30 8 30 3 30
W/Motor
Drain Pump
Inlet Valve
Heater
Vario Motor
Fan Motor
Dispenser
Thermal Act
Auto Off S/W
Program chart
Rinse Dry
Main Wash
Wash Rinse 1 Rinse 2 Heating Rinse Dry
Program
Wash
Wash
Wash
Rinse
Stop
Stop
Stop
Wash
Wash
Wash
Wash
Wash
Water Supply
Water Supply
Water Supply
Water Supply
Water Supply
Water Supply
Water Supply
Water Supply
Wash
Drain
Drain
Drain
Drain
Drain
Heating A
Heating B
Dry
Drain D
Drain
Drain
Drain
Stop
Stop
Drain
Drain
Water Supply
Water Supply
Stop
Drain C
Drain
Water Supply
Water Supply
Rinse
Drain
Drain
Drain
Drain
Drain
Drain
Drain
Drain
Drain
Drain B Drain B Drain C
Drain
Drain
Drain
Stop
Drain
Drain
Stop
Pre Wash 1 Pre Wash 2 Pre Wash 3
Drain B Drain B
Wash
Wash
Wash
Wash
Drain
Stop
Water Supply
Wash
Power Scrub
Soak
Rinse Only
Quick
Delicate
NORMAL
6-1. LDF 7811/7810 LDS 5811 Series

- 20 -
Drain A
18 10 10 38 10 10 26 30
63 68
10 10 10 30 10 20 30
60 65
10 10
61
22 10 26 30
49 68
86 20
20
46 60
10 30 8 30 3 30
W/Motor
Drain Pump
Inlet Valve
Heater
Vario Motor
Fan Motor
Dispenser
Thermal Act
Auto Off S/W
Program chart
Rinse Dry
Main Wash
Wash Rinse 1 Rinse 2 Heating Rinse Dry
Program
Wash
Wash
Wash
Rinse
Stop
Stop
Stop
Wash
Wash
Wash
Wash
Wash
Water Supply
Water Supply
Water Supply
Water Supply
Water Supply
Water Supply
Water Supply
Water Supply
Wash
Drain
Drain
Drain
Drain
Drain
Heating A
Heating B
Dry
Drain D
Drain
Drain
Drain
Stop
Stop
Drain
Drain
Water Supply
Water Supply
Stop
Drain C
Drain
Water Supply
Water Supply
Rinse
Drain
Drain
Drain
Drain
Drain
Drain
Drain
Drain
Drain
Drain B Drain B Drain C
Drain
Drain
Drain
Stop
Drain
Drain
Stop
Pre Wash 1 Pre Wash 2 Pre Wash 3
Drain B Drain B
Wash
Wash
Wash
Wash
Drain
Stop
Water Supply
Wash
Power Scrub
Rinse Only
Quick
Delicate
NORMAL
6-2. LDF 6810 Series

- 21 -
BEFORE DISASSEMBLING THE DISHWASHER ;
1) Remove the cord from electric outlet to avoid electric shock.
2) Close the Water Tap (faucet).
3) Remove all dishes and items in the dishwasher.
4) Remove the Lower Rack and the Upper Rack.
5) Remove the inlet hose and drain hose connetion to avoid the hose damages.
6) Prepare some towels to avoid floor wet by the water left in the dishwasher.
7. HOW TO DISASSEMBLE
7-1. FULL DISASSEMBLE
1. Lower Cover and Lower Felt
1) Remove the front 2 screws.
2) Pull the Felt.
3) Remove the Inlet Hose and Power Supply
Cable.
2. Cabinet and Tub Felt
1) Cabinet-R
Remove front 2 screws.
Remove rear 3 screws.
2) Cabinet-L
Remove front 2 screws.
Remove rear 3 screws.
3) Tub Felt
Lower Felt
Lower Cover
Tub Felt
Cabinet-L
Cabinet-R
Other manuals for LDS 5811ST
1
This manual suits for next models
11
Table of contents
Other LG Dishwasher manuals

LG
LG LDF8574ST User manual

LG
LG LDF7811 User manual

LG
LG nvde12s User manual

LG
LG LD-1482T 4 Series User manual

LG
LG D1444 Series User manual

LG
LG LDF9932ST - FULLY INTEGRATED DISHWASHER User manual

LG
LG LDF9810BB User manual

LG
LG LDFN343 Series User manual

LG
LG DC75 Series User manual

LG
LG D1451WLF User manual