LG 26TS30MF User manual

•Openframe
•Media Player
•Transparent
•Video Wall
•Other Models
•Accessories
MONITOR SIGNAGE MODELS
V3.2

1 OPENFRAME SIGNAGE
1-1. Keep temperature (Mandatory)
1-2. Consider using a cooling & heater solution(Mandatory)
1-3. Do not disassemble Handle, Fan or Side bracket(Mandatory)
1-4. Check Screw hole depth to avoid LCD panel damage(Mandatory)
1-5. Please install cooling system when exposed to direct sun light(Mandatory)
1-6. Use the side bracket to mount into an enclosure
1-7. Refer to brightness of according to ambient luminance
1-8. How to measure fan noise when it is installed indoors
1-9. Be careful not to damage the cable within an enclosure
2 MEDIA PLAYER
2-1. Install dust filter & keep temperature 0°C ~ 40°C(Mandatory)
2-2. Minimum distance between media player and structure(100mm)
2-3. the importance of periodic cleaning for ventilation area (Mandatory)
3 TRANSPARENT SIGNAGE
3-1. Preparation for Installation
3-2. Portrait mode: Rotate the set clockwise 90°(Mandatory)
3-3. Attach the product by using the screw holes (Mandatory)
3-4. How to connect cable assembly
3-5. Reference guide to the ventilation hole of enclosure
3-6. Reference guide to lighting set up
3-7. Reference to storage place(AD Board & Media Player)
3-8. Dimension of screw holes(26TS30MF/47TS30MF)
3-9. Recommendation: Lighting should be 600 LUX or more
3-10. Recommendation of operation Time
4 VIDEO WALL
4-1. Precaution when moving and handling
4-2. Installing the product
4-3. Tiling Displays (How to join Sets)
4-4. How to daisy chain monitors
4-5. Function Setting(Multivision Configuration)
4-6. Setting the Installation Menu
4-7. Setting the Tile Mode
4-8. Setting the Picture ID
4-9. The Heat Distribution of 47WV30
CONTENTS
2

4-10. Guide for installing the signage to reduce gap
4-11. White Balance Calibration Instruction
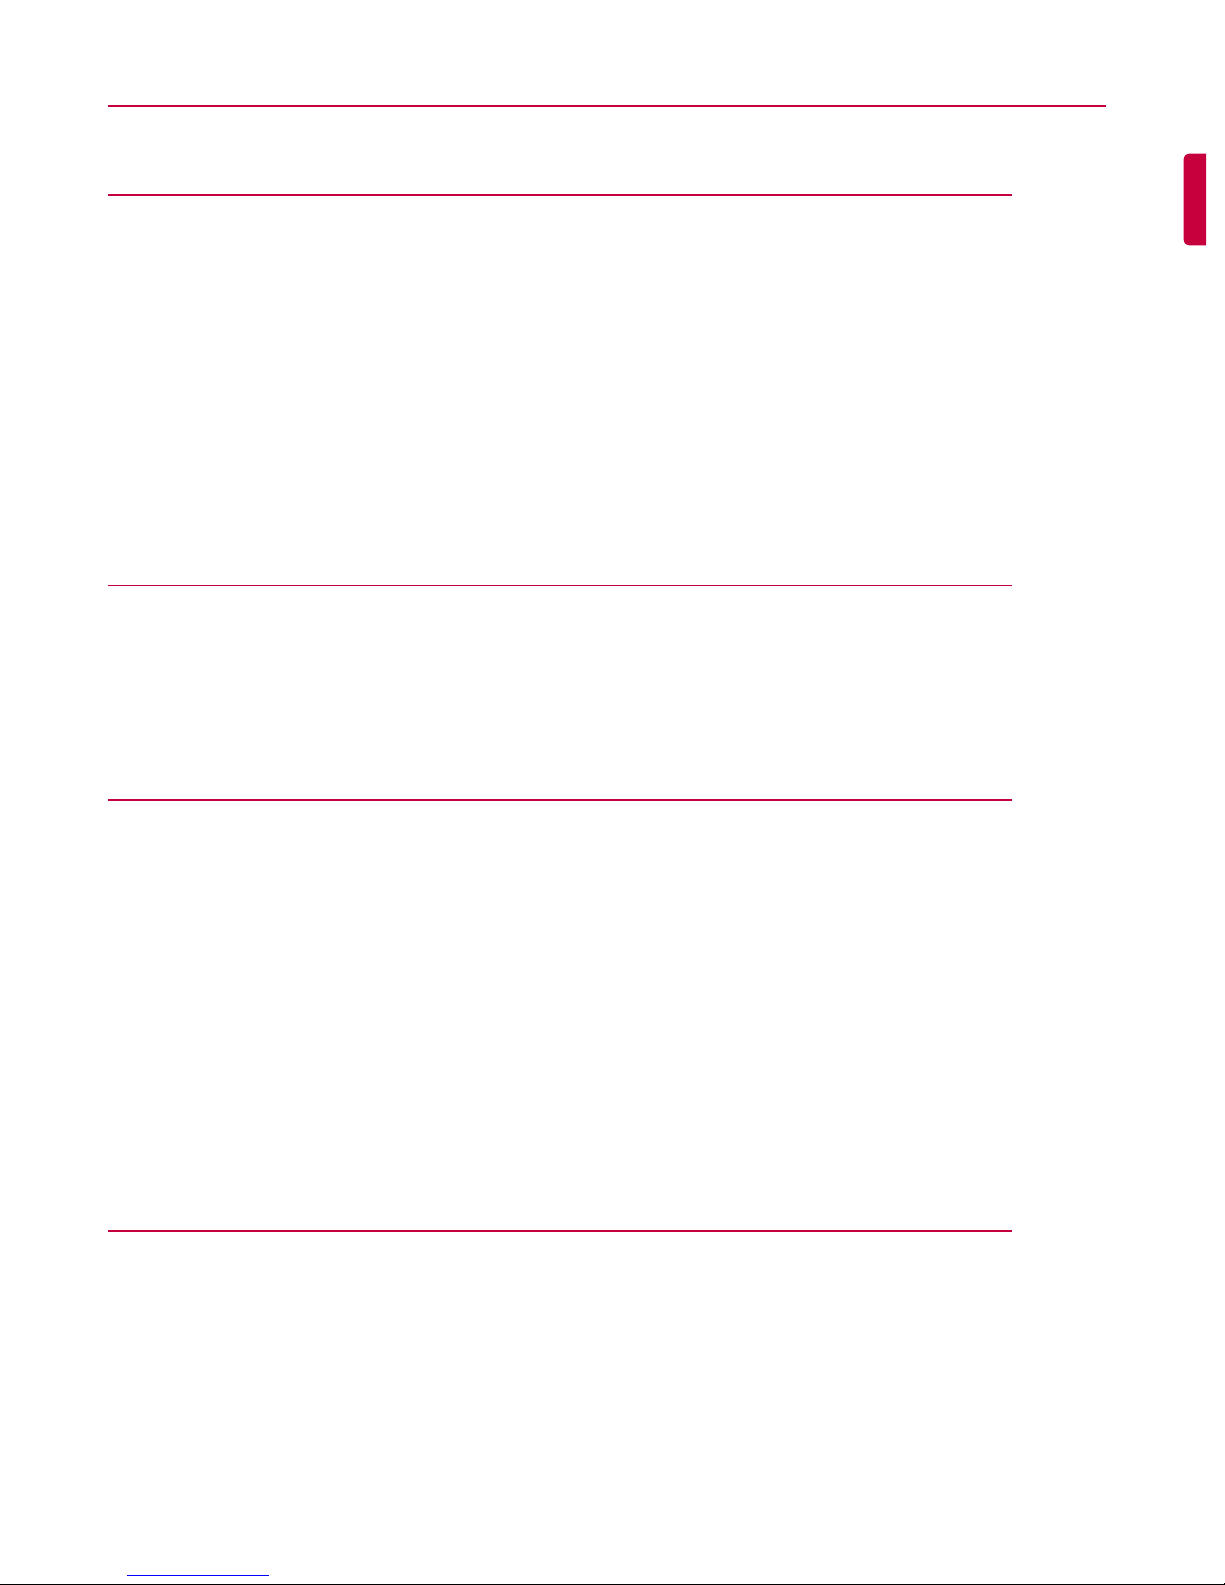
4-12. How to prevent the panel falling out
584WS70(84 inch UD Signage)
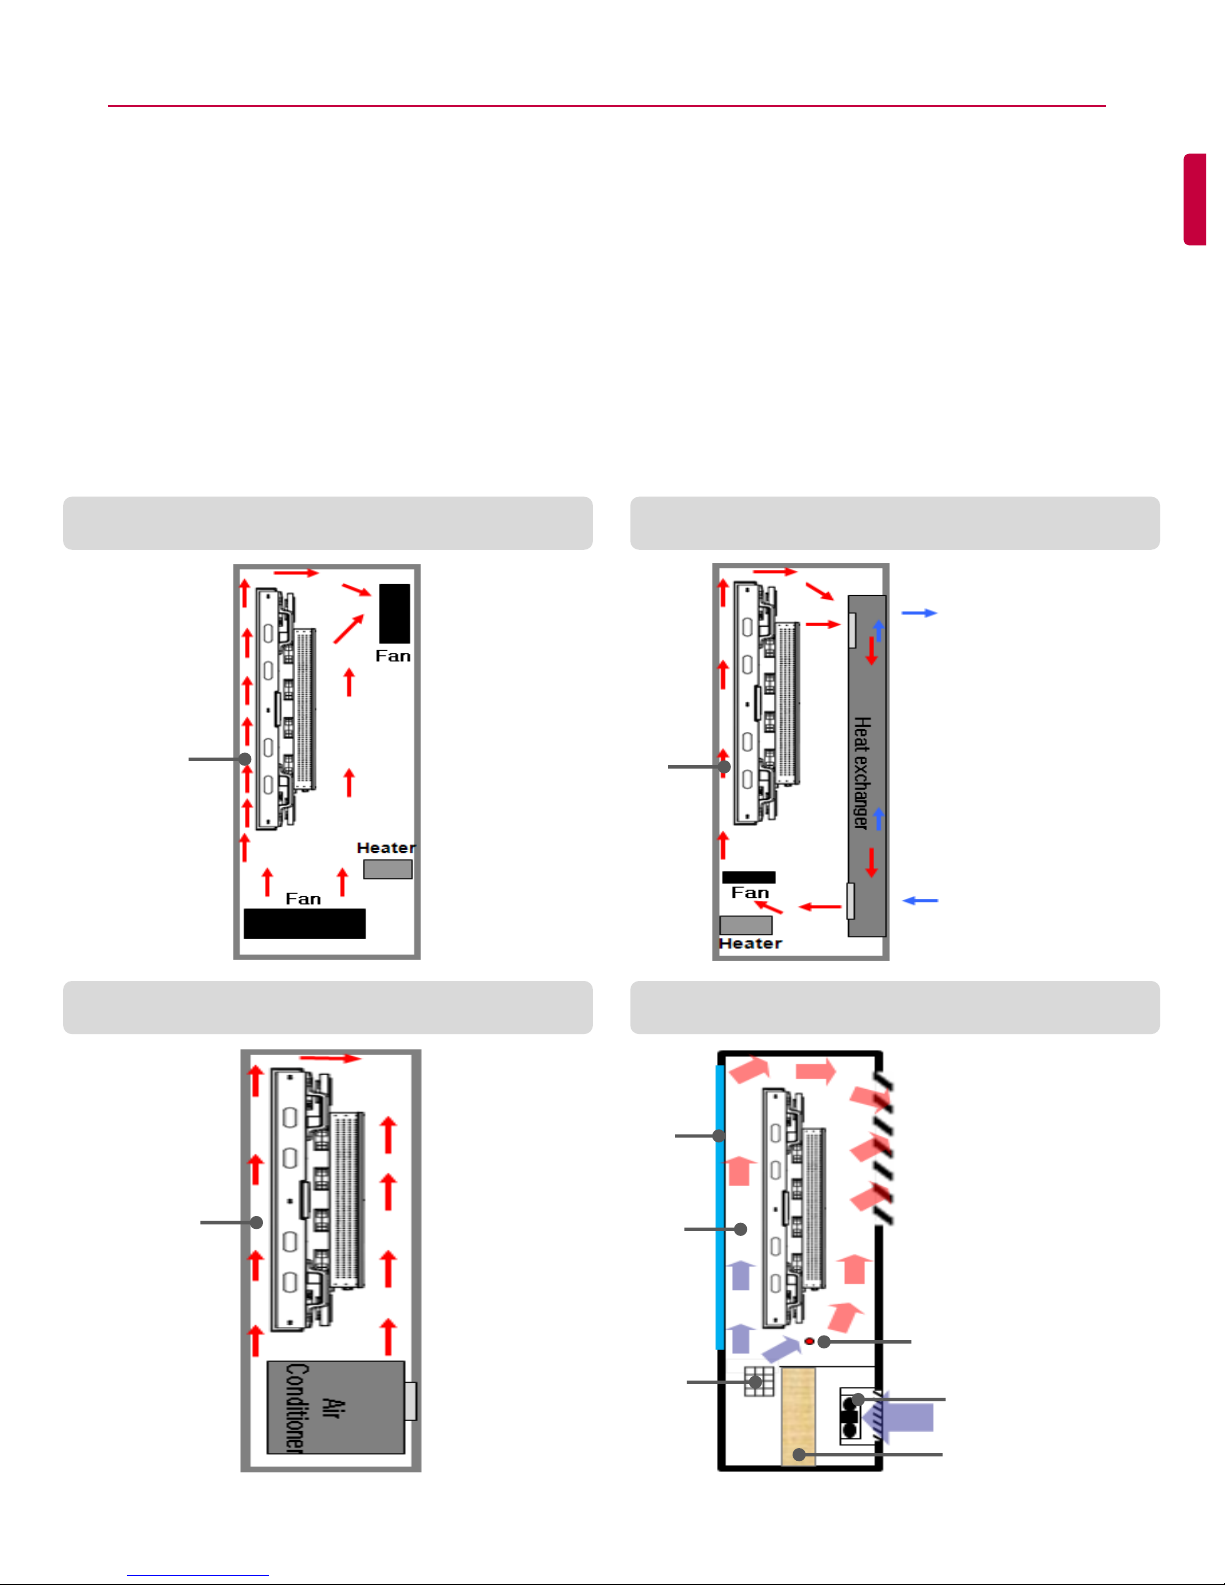
5-1. Keep temperature 0°C ~ 40°C(Mandatory)
5-2. The Handles are removable
5-3. Do not use a screw that is longer than 19.8mm (Mandatory)
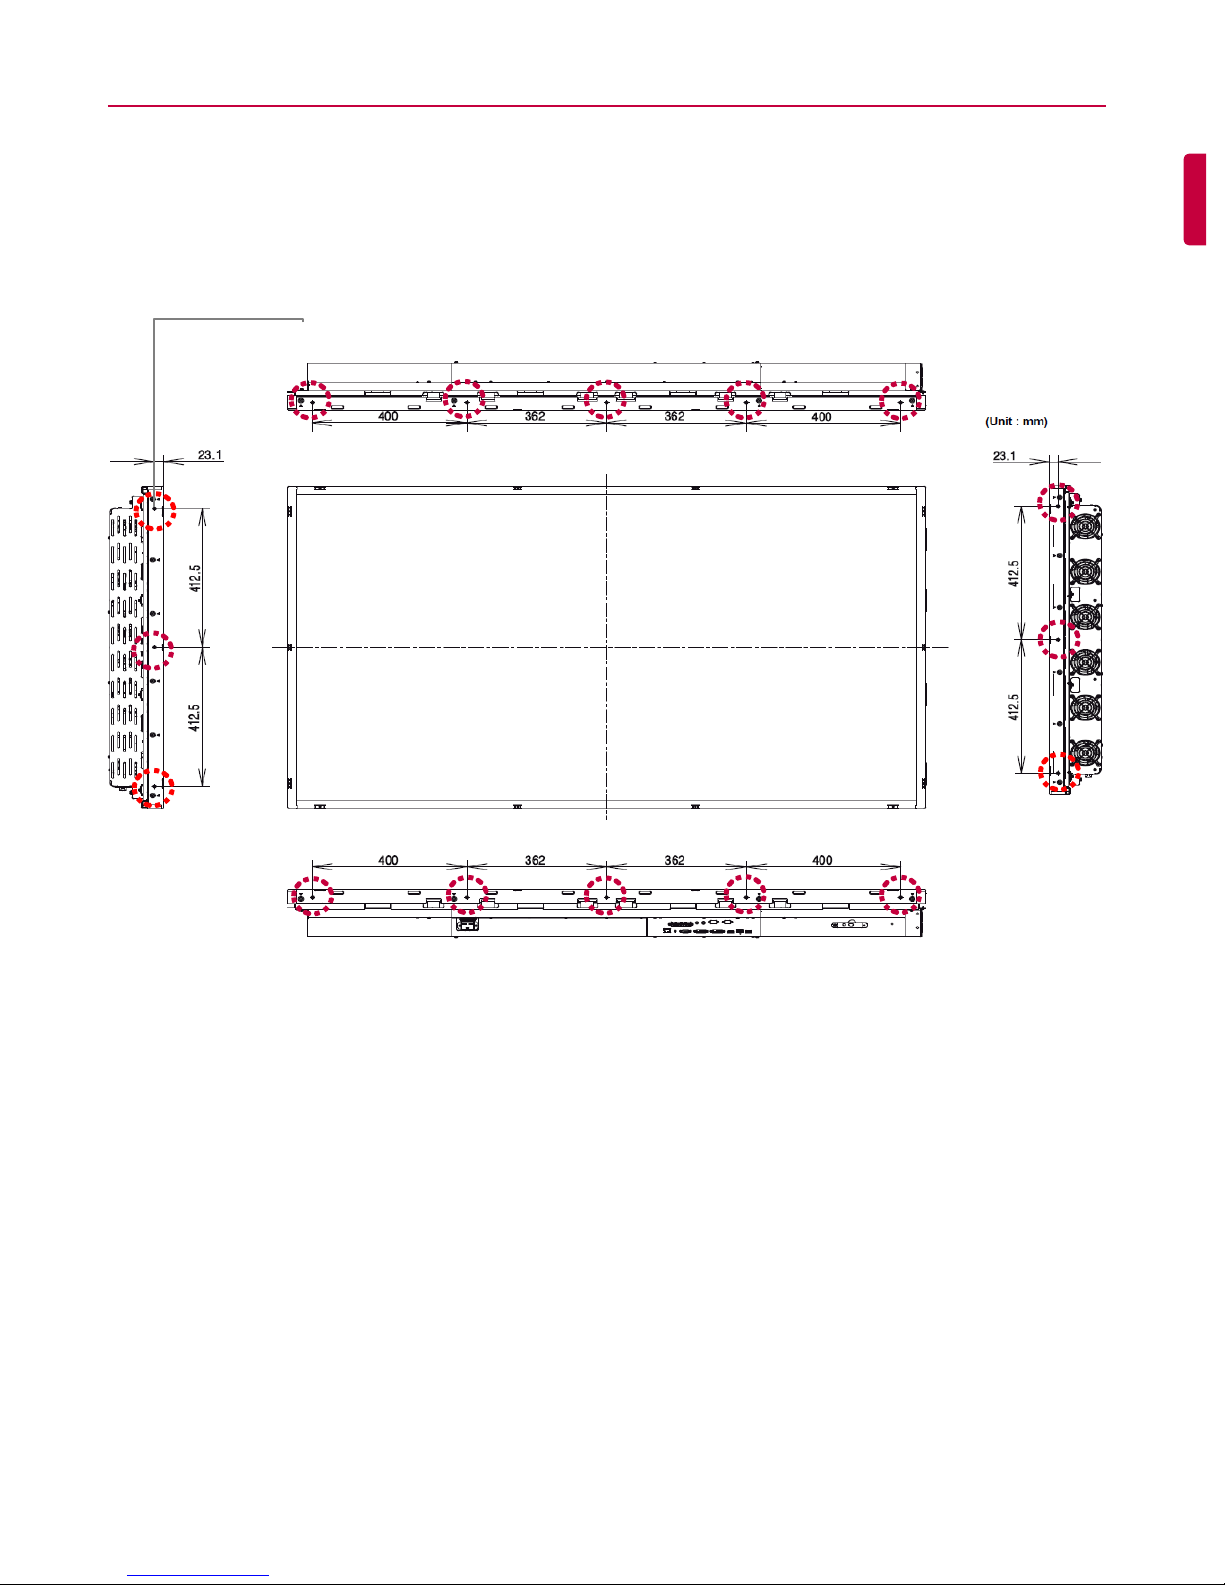
5-4. Dimension of 84WS70MS
5-5. Use the Eye-Bolt Bracket to lift
5-6. Use the vesa screw holes for stand
5-7. Guide for Screw Size (Mandatory)
6 The other check point
6-1. Do not install such as face down or face up direction
6-2. Avoid installing the in-door signage at out-door
6-3. Guide for installing when product is close to the window
6-4. The TV module applied model & Image sticking
6-5. Enclosure design guide to prevent dust (Indoor)
6-6. Check the Baud Rate & RS-232C cable
6-7. Keep the distance for embedded installation
6-8. Firmware update by SuperSignElite-c
6-9. Guide for how to install correctly to the bracket
6-10. How to check Signage power off history
6-11. Digital Signage SW download method
6-12. SuperSign SW download method
6-13. Signage SW version box label mark
6-14. Avoid installing the product at oily environment when mounting
to the wall by using a wall mounting bracket
6-15. Check the Input Label when Signage is set up with a PC/Media Player
6-16. Do not spray directly onto the screen when cleaning the monitor
by using a cleaning liquid
6-17. Check the Guide Spacer when installing wall mount
6-18. Be careful not to fall off the wall metal material
6-19. Check the USB device is bad or not
CONTENTS
3

7 Accessories
7-1. How to connect the Stand
7-2. How to clean Touch Overlay
7-3. How to connect the OPS with KT-OPSA
CONTENTS
4

OPENFRAME SIGNAGE
1-1. Keep temperature (Mandatory)
When designing the enclosure, the temperature inside the enclosure must be maintained
as optimal temperature
The Measurement method for checking the operating temperature inside the enclosure
Enclosure
Openframe Signage (eg. 47WX50MF)
5cm
Thermal sensor
5cm
5cm Example
1. Should install a thermal sensor inside the enclosure.
There are three location for thermal sensor.
(backside of the top , backside of the middle,
backside of the bottom)
2. On this basis of you measuring the temperature,
Ensuring that you keep the temperature
47WX50MF
> 0°C ~ 40°C
72WX70MF
> 0°C ~ 50°C
5

1-2. Consider using a cooling & heater solution (Mandatory)
To maintain the temperature inside the enclosure, you should consider using a cooling
and heater solution such as an air conditioner, heat exchanger, or combined cooler
and heater depending on the external environment. (Please see below examples)
You could also employ an air flow circulation system and air curtain* between the front
panel and the enclosure.
Example 2 : Enclosure (Heat exchanger)Example 1 : Enclosure (Just fans)
Example 4 : Direct Air Cooling SolutionExample 3 : Enclosure (Air conditioner)
Air Curtain Air Curtain
Heater
Membrane Filter
FAN
Humidity Sensor
Protection
glass
Recommend to design the exterior of the enclosure to meet with the IP65 standard.
Use a dust filter to prevent dust .(At air inlet and outlet )
Filter should be used for filtering out bugs, dust and water.
For preventing from rust of lead frame in circuit board,
operates the Heater if relative humidity is high.
*Air curtain :
Air flow circulation system between
the front panel and the enclosure. 6

1-3. Do not disassemble Handle, Fan or Side bracket (Mandatory)
Do not disassemble the parts such as Handle, Fan or Side bracket
for preventing of product safety & function problem
Handle
Side bracket
Fan
*47WX50MF
47WX50MF
72WX70MF (No Handle, Side bracket)
Fan
1
2
[ Rear side ]
7

1-4. Check Screw hole depth to avoid LCD panel damage(Mandatory)
You must use the side screw holes when mounting the panel
The Side screw holes are M4.0 Tap , Torque 4~5Kgf.cm, pitch 0.7mm
The Screw hole depth of the panel is: 9.0mm (Max)
If a screw is longer than 9.0mm, it may cause damage to the LCD panel
It is advisable to only use spring washer-type screws.
Side Hole
47WX50MF
47WX50MF
▪Example : Spring washer type
8

You must use the side screw holes when mounting the panel
The Side screw holes are M6.0 Tap ,Torque 4~5Kgf
(Top and bottom sides: 5 holes for each, left and right sides: 3holes for each)
The Screw hole depth of the panel is:16.0mm(Max)
If a screw is longer than 16.0mm, it may cause damage to the LCD panel
47WX50MF
Side screw hole of panel
72WX70MF
72WX70MF
9

1-5. Please install a cooling system when exposed to direct
sun light (Mandatory)
NOTE
•To prevent sunlight, consider to attach a UV film on the glass
•For Example-Using a canopy may prevent the enclosure temperature increasing
due to direct sunlight.
Example
10

1-6. Use the side bracket to mount into an enclosure
1-7. Refer to brightness of according to ambient luminance
•You should use the side bracket to mount the signage display into an enclosure.
•This is measurement of 47WX50MF’s Auto Brightness Control function
Ambient Luminance
(Lx)
Brightness
(nits)
0
410
10
415
25
419
50
421
100
602
200
784
300
1131
400
1850
500
2024
Brightness (nits)
Side Bracket
47WX50MF
Ambient light (Lx)
Auto Brightness Control Curve(47WX50MF)
11

1-8. How to measure fan noise when it is installed indoors
•Avoid installing the product in indoor environment. It can cause noise issue
•If you are possible to measure the noise level of this product in indoor environment,
please do it using the below picture as guidance
•If measurement value meet the specification, it shows that the product operating
correctly
1m 1m
Canopy
Enclosure
Front Back
72WX70MF
Front
~55dB
Back
~65dB
<Noise measurement spec>
NOTE
•During the measurement, please turn off the Air Cooler in the enclosure
72WX70MF
12

1-9. Be careful not to damage the cable when installing
within an enclosure
13
Expansion PCB (Accessory)
Enclosure
•When designing the enclosure, please ensure that there is enough space in order to
prevent the Expansion PCB cable being damaged and ensure that it is installed carefully
72WX70MF

2-1. Install Dust filter & keep temperature 0°C ~ 40°C (Mandatory)
•Embedded Mount Condition
•Application model : NC1000, NA1000, NA1100, MP500, PC100
•Minimum distance between media player and structure : 100mm distance to X,Y,Z axis direction
•Should install dust filter in ventilation area
•When the unit is operating, you must keep temperature inside being 0°C ~ 40°C
100mm
100mm
100mm
100mm
100mm
Ventilation
Ventilation
Ventilation
Hot air
Cool air
▪Dust filter
Enclosure
Media player
MEDIA PLAYER
14

2-2. Minimum distance between media player and structure (100mm)
•Monitor Back Cover Mount Condition
•Application model : NC1000, NA1000, NA1100, MP500, PC100
•Minimum distance between player & structure : 100mm distance to X,Y,Z axis direction
•0°C< Ambient temperature <40°C
Structure
Structure
Structure
Structure
100mm
100mm 100mm
100mm
Piggy bag type
2-3. The importance of periodic cleaning for ventilation area (Mandatory)
•Clean ventilation area for dust using vacuum cleaner periodically (once in 2~3 months)
* Make sure to turn off the signage, media player and enclosure fan when cleaning
15

3-1. Preparation for Installation
TRANSPARENT SIGNAGE
•Preparation for Installation
•Please refer to the “LVDS Pin Map Guide” in the manual.
Preparation Items
(26TS30MF/47TS30MF)
•Need to purchase separately the below items
16

3-2. Portrait mode: Rotate the set clockwise 90°(Mandatory)
•Portrait Layout(Only supported for 47TS30MF)
•To install in portrait mode, rotate the set clockwise 90 degrees when looking at the front.
(The AD board should support portrait mode)
3-3. Attach the product by using the screw holes (Mandatory)
Landscape
Portrait
CAUTION
•The 26TS30MF model don’t support the portrait mode because of module characteristic
•Transparent Signage enclosure construction.
17

3-4. How to connect the cable assembly
Cable assembly
18

3-5. Reference guide to the ventilation holes if in an enclosure
3-6. Reference guide to lighting set up
•Transparent Signage enclosure construction
Front view Side view Back view
Opening the door view
Working display with enclosure Side type lighting Ceiling type lighting
19

3-7. Reference to the storage place (AD Board, Media Player)
•Example of the storage place which is located under enclosure
▪Storage space for equipment
20
Other manuals for 26TS30MF
1
This manual suits for next models
4
Table of contents
Other LG Monitor manuals